THIS CURBSIDE GARDEN TABLE FRAME GETS A BRAND NEW LOOK USING SCRAP WOOD AND PAINT | YOUTUBE VIDEO

Hi creative friends! Welcome back to another Trashy Treasure Tuesday’s feature! When my sister Andrea heard I wanted a trashy project for TTT, she told me where to drive and find this abandoned piece. She said this metal outdoor table frame was sitting on the side of the road for over a week. It was in a weird location too. Propped up against a do not stop sign very close to one of our busiest intersections in Burlington.
*As an Amazon Associate, I earn from qualifying purchases. There are affiliate links in this post to other companies/products I use and love as well. You will never be charged extra when you purchase through these affiliate links. If you purchase from my links – A BIG thank you for supporting me and the #siblog! To see my full disclaimer, click here.
I’m looking forward to seeing what our TTT crew have created and I hope you join me on today’s tour as well! I’ve included their before’s and links to the after’s down below.

Here’s the metal table frame I started with. Nothing to look at but let’s see if we can’t give this piece of trash some character!

It was leaning against a No Parking – No Stopping sign but hey, this girl stops and parks for JUNK!

THIS POST IS SPONSORED/CONTAINS AFFILIATE LINKS TO PRODUCTS I USE. YOU CAN SEE MY FULL DISCLOSURE HERE.
WHAT YOU’LL NEED
Outdoor Table Frame – SALVAGED
Rustic Scrap Wood Boards
Ryobi Miter Saw
White Lightning Cleaner
Rustoleum Spray Paint
Spray Can Trigger Handle
Paint Brushes
Umber SILK All-In-One Mineral Paint
Gator Hide Topcoat
DIY SCRAP WOOD TABLE MAKEOVER
Here’s how I salvaged and upcycled this curb-shopped table frame in a DIY Scrap Wood Outdoor Table.
CLEAN & PREP
To start prepping this piece, I took my garden hose and hosed off all the grass and grime. The weather is warming up here in the Greater Toronto Area (GTA), so it’s lovely to be working outside again. After it was hosed down, it got another wipe down using an automotive sponge and White Lightning Cleaner and then another rinse. And do you see what I see? The rainbow is the icing on the cake! 🌈

After the piece was clean and all dry, I removed the clear glass table bumpers/spacers with needle-nose pliers. These weren’t needed because I was creating a DIY scrap wood top instead of glass. You’ll see later in the post, how the holes the table bumpers left were super convenient!

SPRAY PAINT TABLE FRAME
Now for the fun part! It was time to change this very generic metal table frame into something rustic and full of character. For the base coat, I used this Rustoleum Black Outdoor Spray Paint that sticks to metal, plastic, wood, and more. I like using this Spray Can Trigger Handle. It clips onto the top of a spray can and turns it into a makeshift spray gun.

Safety first, even though I was spraying outdoors (so nice to hear the birds chirping while working!!) I still wore a mask. This is an oil-based spray paint that sprays super fine so I don’t want to be inhaling any of this. I painted one coat which took less than 10 minutes to do. It wasn’t a perfect full coverage because we are after a rustic look. I left it out in the sun to dry. This Rustoleum Spray Paint takes 20 minutes to dry to the touch, 1 hour to handle, and 24 hours to be fully dry.

SCRAP WOOD FOR THE TOP
I grabbed these VERY rustic scrap wood boards from my inventory. I don’t remember where I got them or from what project they were left over from but they were perfectly imperfect! . I measure the table’s length (34.5″ for this table) and cut each board to size using my Ryobi Miter Saw.

Once I had them cut to size, I played around with the board configuration leaving space/slats in between.

PAINTING IN UMBER
To unify the colors of these rustic wood boards, I applied a 50/50 paint wash. I used 50% water to 50% Umber SILK All-In-One Mineral Paint and painted one coat to all the boards. If you missed last week’s curbside makeover using Umber Paint, you can check it out here.

Using a chip brush, I dry-brushed some Umber paint over the black base to create some faux texture.

OUTDOOR TOPCOAT
To protect the wood from the outdoor elements, I used Gator Hide. Gator Hide is a water-based poly that is super durable. It’s not just water-resistant – it’s water repellent, which I demonstrated on this blue buffet here. The water just beads up but doesn’t penetrate the wood.
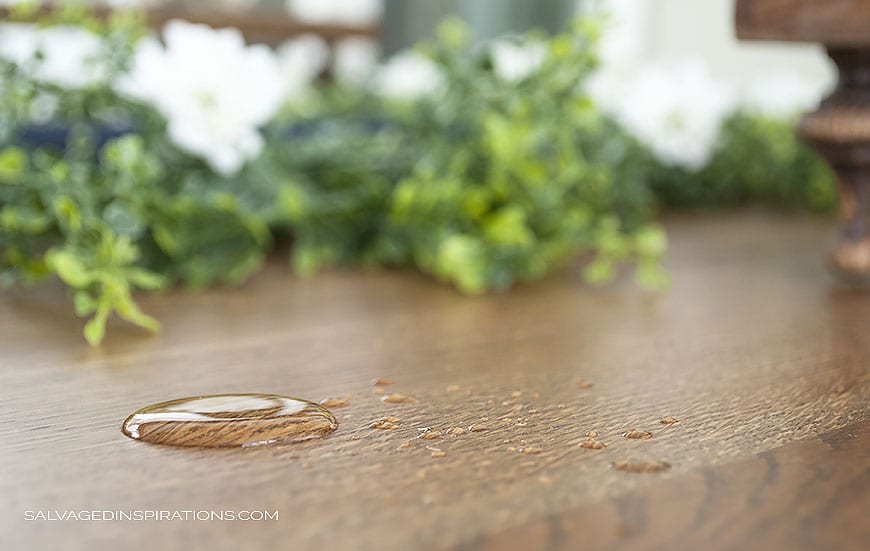
This makes it perfect for high-traffic furniture like dining and kitchen tables, and outdoor furniture. This raw wood with just the paint wash drank up the first layer of topcoat. As you can tell from the pic below, I wasn’t shy about the amount I was using on the first coat. Second and third coats can be put on in lighter layers.

The paint wash and topcoat gave these rustic scrap boards a lot of interest. Here’s a close-up below. Mother nature creates the BEST designs!

The last step was securing the boards to the table frame. This metal table frame already had holes where the glass bumbers/spacers had been so I used these existing holes to screw the wood in place from the underside. Super convenient!

PIN AND SHARE 🤗


You have so much courage, Denise! The table is great for what you want to use it for. It’ll be great sitting outdoors and you won’t have to worry that you spent so much money on it. And a “NO PARKING ANY TIME” sign when there’s a treasure to be had-HA!! Good job my friend and thanks for the inspiration!
LOL, thanks Caye, you can’t beat FREE! I think it will be great as a garden table too… and it was great practice. Next time I know what I’d like to do a little differently. Have a wonderful week! XOXO
I would have wanted to pick up that table. But.. It would not have ended up looking like this.
And you call this a practice piece ?? Your vision was perfect.
Adding the umber details to the frame looks amazing. It adds so much to the black paint finish.
I love the umber on the reclaimed wood as well !
Love the color. (I just put some in my cart) Taupe ish is my neutral of choice.
I did not know gator hide is a water based poly. Does it help with fade resistance too ? I need to refresh my punched metal bistro set. CO sun is tough on outdoor stuff. Think it will help it be more durable / less color fade ?
I’m pinning this, and look forward to you youtube tutorial.
Thanks so much for sharing all your creativity ! You Do inspire.
I’m glad you put some Umber in your cart P, you’re going to LOVE it! I’ve used it full strength, as a paint wash, for faux wood finishes etc. I always have Umber in my paint inventory now. You’ll have to let me know what you think when you use it! And so glad you like the piece. Anything that has to do with cutting or assembling wood is practice for me, hehe. I have so much to learn and am looking forward to learning. YES, Gator Hide will help with fade resistance too. Thanks for the PIN my friend. XOXO
Hi Denise. I love the new look of this table. Beautiful and rustic.
Thanks Monique! So happy you like the new look! Have an awesome week! XOXO
This looks SO good! I love that you stop and park for trash ha ha..I appreciated that chuckle! This would make a great outdoor coffee table too! XOXO
Thanks so much Christy! I agree! It looks amazing as a outdoor coffee table but some of the boards are a slightly warped… Id be afraid my coffee (full transparency, my wine🍷) would topple over and spill through the cracks. We wouldn’t want that to happen!🤣
You’re speaking my language! SCORE! You’re a rebel disregarding the do not stop sign 🛑 😂 You had a great vision for this table and the addition of scrap wood was perfection. Well done, my friend. Thanks for sharing. Pinned! 😘
We’re kindred spirits Do – same same!😉 And I KNOW I’m getting old when the most ‘rebel’thing I do is disregard a road sign for 1 minute!😂😂😂 I should have been EXTRA naughty and left my four ways off!🤣 Thanks for PIN my friend! Hugs
Such a great idea for this trashy find!! Perfect use for it! xoxo
Thanks Nancy! It will be great to hold some gardening supplies/seedlings! XOXO
WOW, I wouldn’t have looked twice at this metal table or those boards! Great save Denise and thanks for sharing. I look forward to your weekly emails! – Nicki
Thanks Nicki!💙 If my sister didn’t encourage me I might not have looked twice at this one either.😆 So glad I picked it up though!
Wow. The original table is unrecognizable now. Looks great!
YAY, because I really didn’t like the original table too much!😆😆😆 Thanks Cyndi and have a super week! XOXO
Great save, Denise. And even better that you used salvaged wood too.
Thanks my friend! XOXO