Are you loving this glam mirrored furniture trend? Well I AM! What I’m NOT loving is the hefty price tag dangling down from a sparkly knob and shocking me twice with it’s reflection.
The Solution: As any DIY’er worth her grain of salt would do, I decided to learn how to cut mirror to style my own mirrored furniture.
I figured learning how to cut glass and mirror has many benefits. You can create any shape or design to fit whatever project your working on. You can save money by re-purposing mirrors for a fraction of the cost of what it would be to buy new. Cutting your own mirror also saves time because you don’t have to drive around for a custom “cut” for each project.
Sounds great but here’s the thing…
I wanted to learn how to cut mirror for future projects but was admittedly a little apprehensive working with sharp mirror or glass.
 To this day, M-M-M cringes when he watches me using our large butcher knives in my “non-chef-way”. Why? Many years ago I nearly lost a finger while prepping a roast. I’ll spare you the gross details.
So there I was having visions of cutting this mirror incorrectly and crippling another finger! Okay, dramatic I know, but to reassure myself, I recruited the help of M-M-M to show me how it’s done.
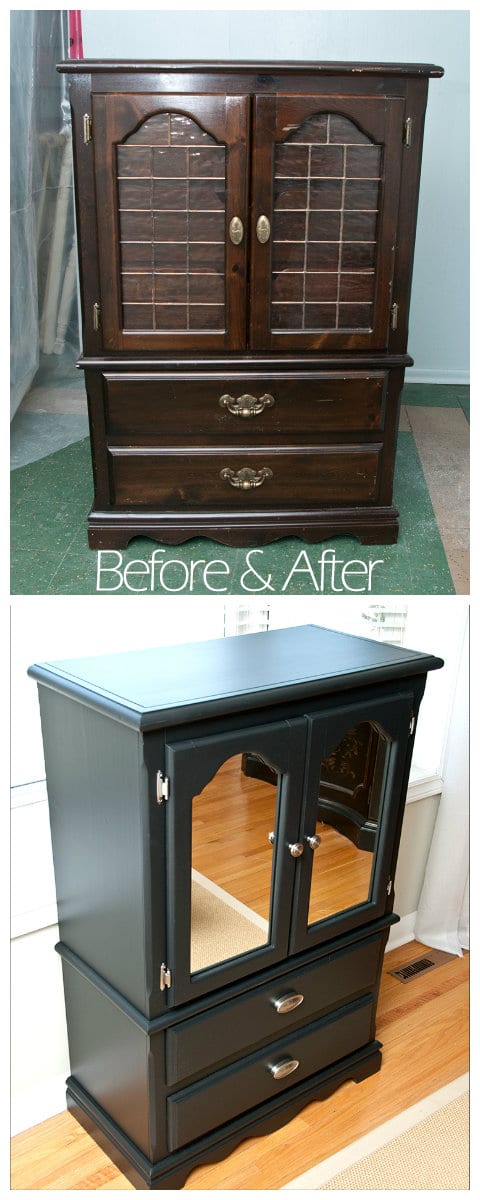
Here’s the before and after of the thrift store lingerie bureau. This turned out to be a wonderful “small-mirrored” project which taught me how to cut glass and mirror… and I’m happy to report, it’s NOT hard or scary!
How To Cut Mirror For DIY Mirrored Furniture
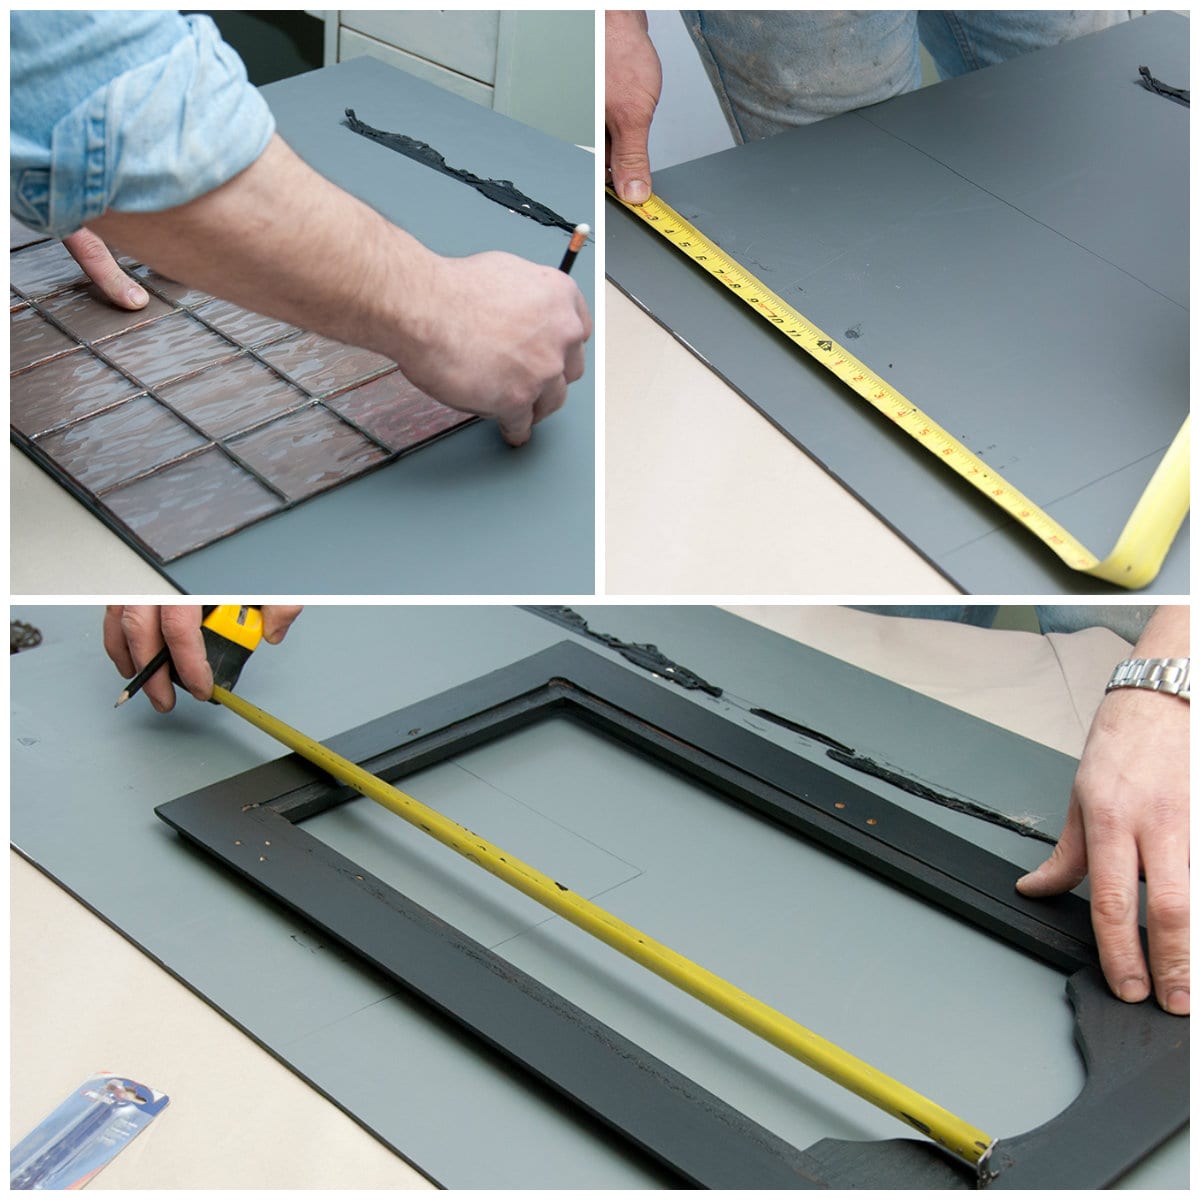
1. Choose a finished piece of furniture and enough mirror to cover the surface(s) you want to sparkle. Gather the glass cutting supplies.
For my first mirror project I painted a $25 thrift store lingerie bureau and replace the leaded glass with salvaged mirror.
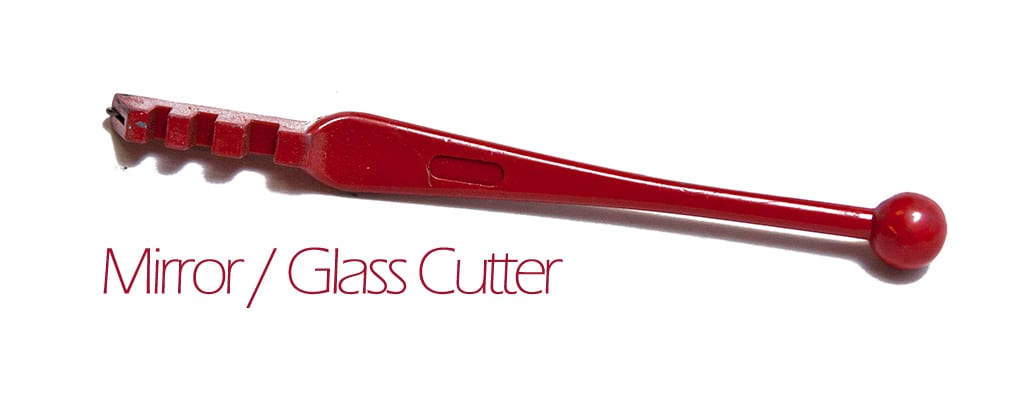
To cut the mirror, the supplies we used were a straight edge, tape to cover the straight edge, a measuring tape to measure, an over-sized mirror, a blanket to cover the table, cleaner to clean the mirror and the magic tool… the glass cutter.Here is the inexpensive glass cutter we used which was purchased from Home Depot for $6.
Getting the mirror perfectly clean on both sides is important because even the tiniest speck of dust or dirt can cause the mirror to chip or break during the scoring process… as you’ll see below!

3. Measure, Measure, Measure.
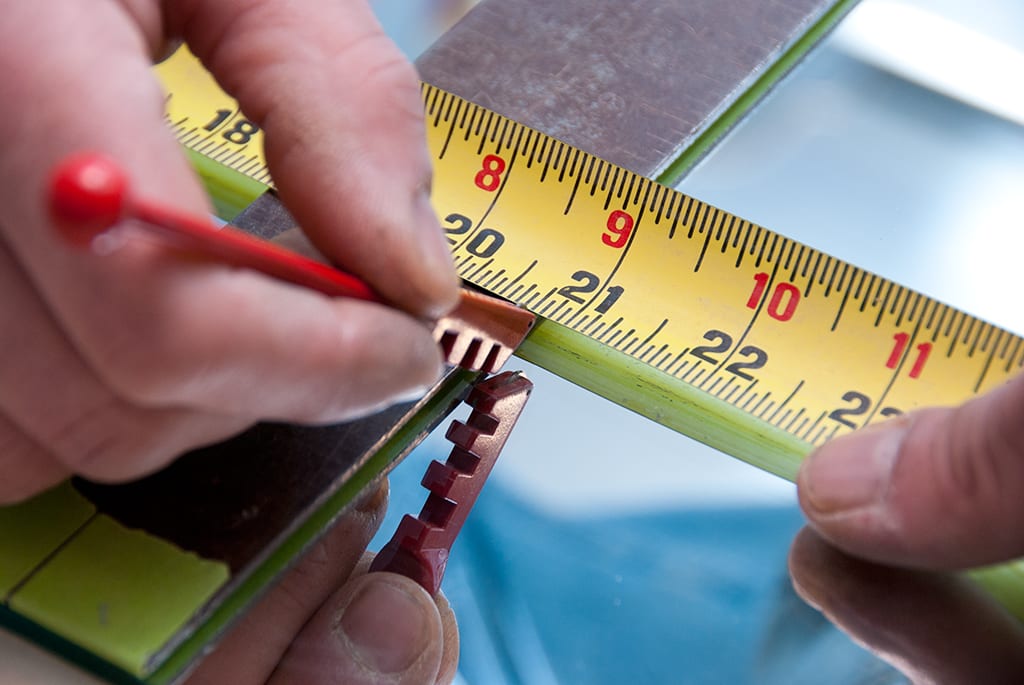
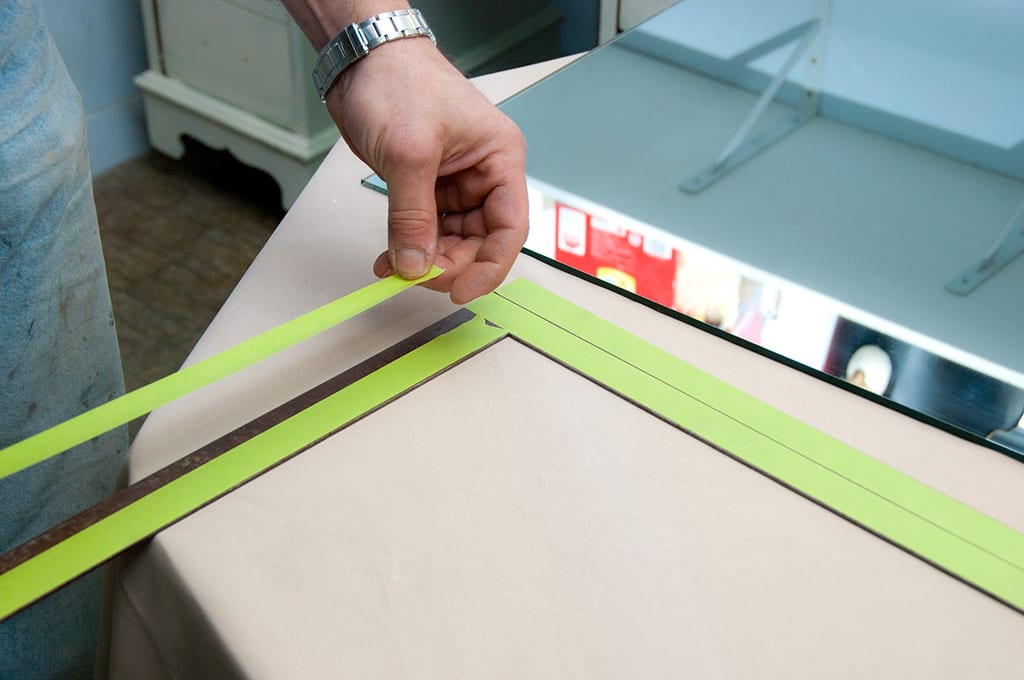
5. Cut the mirror along the measured line using a straight edge and a glass cutter.
While holding the straight edge (we used a long level/square ruler) on the measure line, we held the glass cutter vertically (straight up and down) and apply a slight steady pressure to the glass cutter as we rolled it along the straight edge. I learned this actually doesn’t cut the mirror but scores or scratches the mirrors surface as you go which creates a flaw-line for a controlled break. If your doing it right, you will hear the scoring of the glass. Not a pleasant sound… it reminds me of nails against a chalk board. A tip that M-M-M gave me is to score the entire way down only ONCE while applying even pressure without stopping! When you approach the end of the mirror, don’t stop… just let the glass cutter drop off at the end of your score.

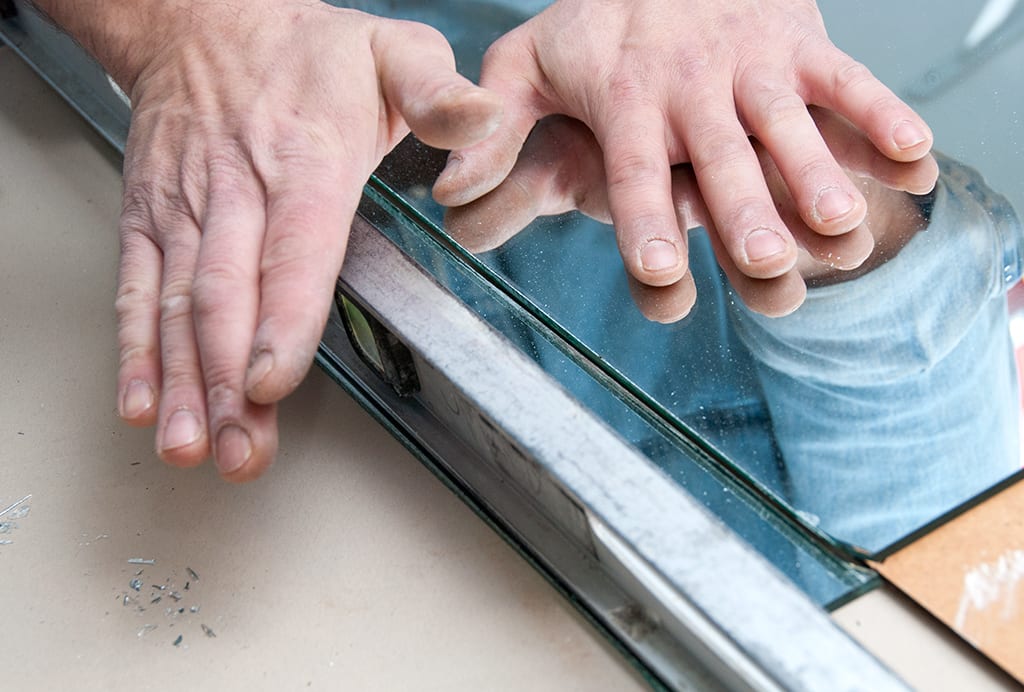
6. Break the scored line by applying pressure on a straight edge.
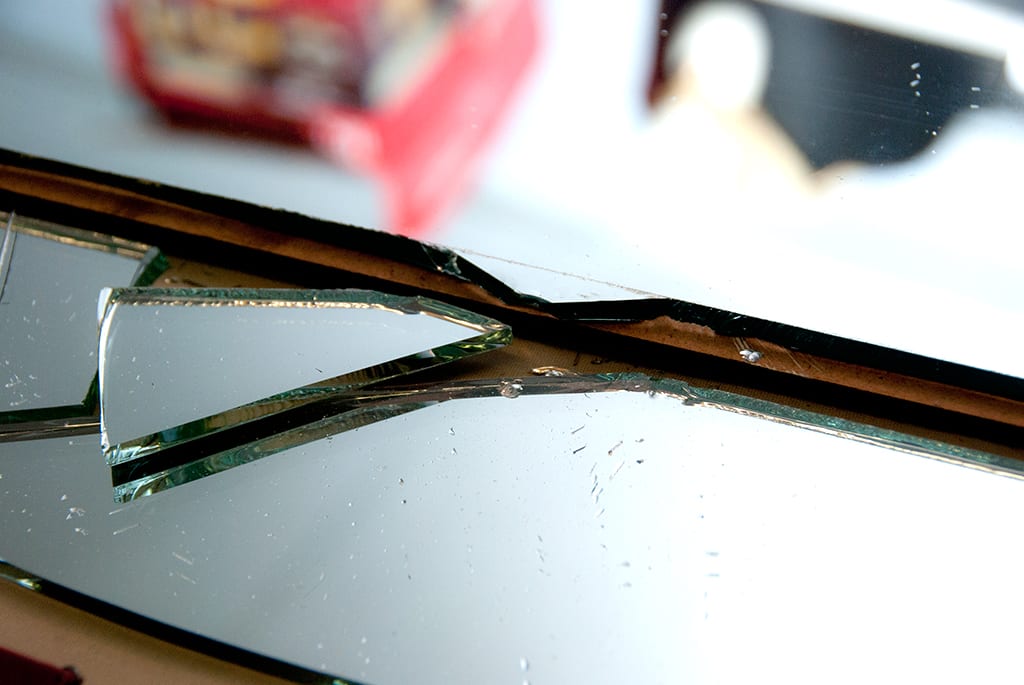
Now this is where I got nervous and whipped on my safety glasses..lol! If we were professional mirror cutters, we would have those running pliers which help widen the score and control the breaking pattern. Instead we used a long level to help break the score. As you can see below, our first try was NOT a success! I think it may have been due to not cleaning the glass thoroughly on both sides!
Second try… worked like a charm. Once I saw how it was done and tried it for myself, I have to admit, the process is quite simple.
This piece sold before I had a chance to “stage” it! 🙂
Now that I know how easy it is to cut mirror, I’ll definitely be styling some more mirrored furniture. Maybe the next one I’ll keep for my own home!

Where do I go to get an hand on experience glass and mirrors cutting
Hi Samar! I’m not sure where you’re located but I would suggest Googling glass companies in your area. Any glass company in your area will cut glass to size for you. You could even try hardware stores. Home Hardware in Waterdown has glass cutting service so worth a try.
Hi Denise, I want to mirror and entire bedroom set, had my mind set on it for a while now. I ran across your blog during my research. My question is did you strip the furniture before painting it? If so what did you use? I’ve stripped furniture a couple of times and found the stripping chemicals expensive and evaporated to quickly (the one I liked anyway) the others weren’t so easy dissolving the old finish. I used a case knife on my last project, which did fine but took FOREVER to strip. Luckily, it was only 2,dinning room chairs.
This piece was sanded (to create some tooth for the paint to adhere to) but not stripped before painting. I rarely strip my furniture before painting because as you mentioned, it’s smelly and not so fun. The only time I do is if there’s multiple layers of paint which can’t be sanded smooth before I repaint OR I plan on staining the wood rather than painting it. Good luck with your bedroom set. Love the mirrored look. 🙂
Denise, I was wondering, I need to replace a mirror in my granddaughters lighted make-up case. The lights protrude thru the mirror. Have you ever made round holes thru mirrors. I have to put six in a mirror. Any suggestions would be appreciated.
This sounds like a great project Dan! I’ve never needed to drill holes into a mirror but I do know a proper bit is required along with water. Also, placing it perfectly flat on some boards is important so it’s fully supported and doesn’t break or crack. Here’s a more detailed article… hopefully helpful to you and I can reference back to it when I need to do this! 🙂 http://www.doityourself.com/stry/how-to-drill-holes-through-a-mirror#b
How do you make the edge look like the other edges? Like if you are putting on top of apiece of furniture? Is there a way to make beveled edges?
This inexpensive tool is amazing for cutting edges that will be concealed under something Pat. But when I need a completely finished or beveled edge, I take it to my professional glass cutters.
Nice write-uo on your lingerie closet. Helped me a bunch adding mirror to a plain old headboard. Thanx a million. Only one picture missing though… one of you in some of that lingerie. LOL. You’re hot!
Thanks Dave but this is not ‘that’ kind of website…lol. I’m glad the tutorial was helpful.
So interesting article! I had no idea that I can make my own mirror furniture! Thanks a lot for sharing!Beddington Carpet Cleaners Ltd.
What glue or adhesive do I use to put the mirror on furniture?thanks.
Cathy
For this particular project, no adhesive what required because there were ‘tabs’ on the back panel to hold the glass in. When adhesive is needed, Liquid Nails Mirror is a great choice. Bonds like crazy to wood, metal and painted surfaces and wont de-silver the mirror.
Hi, I have a piece foe which I want to do just this. It also has a curve like your doors habe at the top. What is your advise for scoring and breaking the mirror to have a positive end resul?
A good solid surface and long straight edge is important. Measure carefully and score the glass with even pressure 1x (don’t go over the score over and over again) and then make sure your straight edge stays in place while applying pressure on the glass to break off. Good luck on your project Erika!
How did you cut the decorative tops? I have a tri-mirror vanity that I need to place mirrors in but the tops are rounded…. do you have instructions for that part? (Since a straight edge wouldn’t be applicable here….)
Christa, the two mirrors were cut straight on all sides and installed behind the wood frame. As seen in the picture, the wood frame (door) has the rounded top. I’ve never tried to cut glass with a rounded edge… but my guess would be a sturdy guide (like the straight edge except rounded) would be helpful.
Hi Denise,
Thanks for the tutorial it is going to come to some great use and can’t wait to get started! 🙂
My question is once your finished and ready to put back into cabinet how is that? Easy? Hard? I never did anything like this before and thought that might be the tough part. Do you have a tutorial showing that process?
Thanks so much in advance.
Lisa 🙂
Lisa, the key to an easy install for the new glass/mirror is to really pay attention when you’re taking it out. It’s not difficult if you keep all the hardware/pieces and trim. If I think I may forget how it was originally installed, I’ve even taken a picture of how everything was pieced together… just so I have a photo reference when I put it back together.
I want to cut our bathroom mirror into two smaller pieces. It is 1/4″ thick; is it easily cut?
The thickest glass i have cut is dbl thick. Will the mirror be much more difficult to cut?
Eric, if you and your glass cutter managed to cut a dbl thick glass, a 1/4″ mirror should not be difficult. There’s no real difference when cutting glass or mirror.
hi I want to do an entire dresser covered in mirror. what would you use to cut the circle for knobs?
I had to ask M-M-M this one because I haven’t tried this yet Trish. He said a Diamond Tipped, Carbide Bit or Tile Drill can all do the job. But slow, steady, light pressure is required. If you give this a try, I’d love to hear how it worked out for you!
Hi Denise,
I purchased a mirrored jewelry box from a store and the cashier cracked the side before I got out of the store… YIKES. Do you think I can repair this or should I just return the jewelry box????
The box is one of a kind and I think I could have it repaired.
Yikes is right Marci! I’m sure the mirror could be replaced (and for a jewelry box the mirror/glass is probably quite thin so it would be easy to measure & cut) however it depends on how much time/work you feel you want to put into it. If I was in LOVE with a one-of-a-kind piece, I may take the time to replace and repair. If I thought I could return and get something similar or another box I like just as much, I would probably return it. Just my two cents. 🙂
Im planning some DIY mirrored furniture projects in the future only problem is I have no clue where to go for the mirror. Where did you get your mirror from?
Hi Breanna! As I mentioned to Christine above, you can purchase mirrors from Lowes, online, Glass & Mirror Stores. Less expensive options are Thrift-Stores, Goodwill, Re-Use and Re-Stores.
I have an old mirror that is already showing signs of antiquing and I am going to antique the entire mirror. Do you know if I should antique before or after I cut the mirror? Thank you in advance!
If it were my mirror, I would cut the mirror and THEN antique it… but it’s whatever you feel more comfortable doing Emily. There’s really no right-or-wrong way. 🙂 Have fun with your project!
I love this tutorial! I’m having a hard time finding a large, inexpensive piece of mirror to work with. Do you have suggestions of where to look?
Christine, I often find large inexpensive mirrors at Thrift-Stores, Goodwill, Re-Use and Re-Stores. You can also purchase mirrors from Lowes, Glass & Mirror Stores and online but the latter is a little more costly.
I am not surprised it sold so quickly, lovely piece and well done on your glass cutting skills.
Thank you Andrew! 🙂
Thanks for the tutorial! You make it look almost so easy. 😉 I’m pinning this for future reference! Have a great night! ~Lisa
Thanks Lisa! … and thanks for the share on Pinterest! 🙂
Thanks Denise! Just found your blog today. I am wondering about cleaning the back of the mirror. Do you have to worry about the cleaner (windex) removing the silver backing? I have a couple very old mirrors that I have never used because I don’t know how to repair the silver on the back and they are not pretty once that has been damaged. So, I have been reluctant to get a mirror wet on the back.
Thanks.
Hi there Merralyn…Welcome! Depending on the age and condition of the mirror, cleaning the backs of mirrors with Windex should not be a problem. For this particular mirror we used Windex and a product called Goo Gone to help remove the adhesive residue and it was perfectly fine. I’ve also turned many mirrors into chalkboards and have cleaned both sides with Windex. I’ve never encountered any problems. If this mirror is old/fragile/antique, I would just test a tiny corner before spraying the entire back.
Very pretty and you are quite brave…well done and thanks for the tutorial.
Judy
Thanks Judy. 🙂 I have a ton of salvaged mirror so this is a great way to start putting it to use.
I don’t like how it’s called DIY, I like calling it ‘DitY’ because it actually sounds like a word instead of saying Dee – Eye – Why