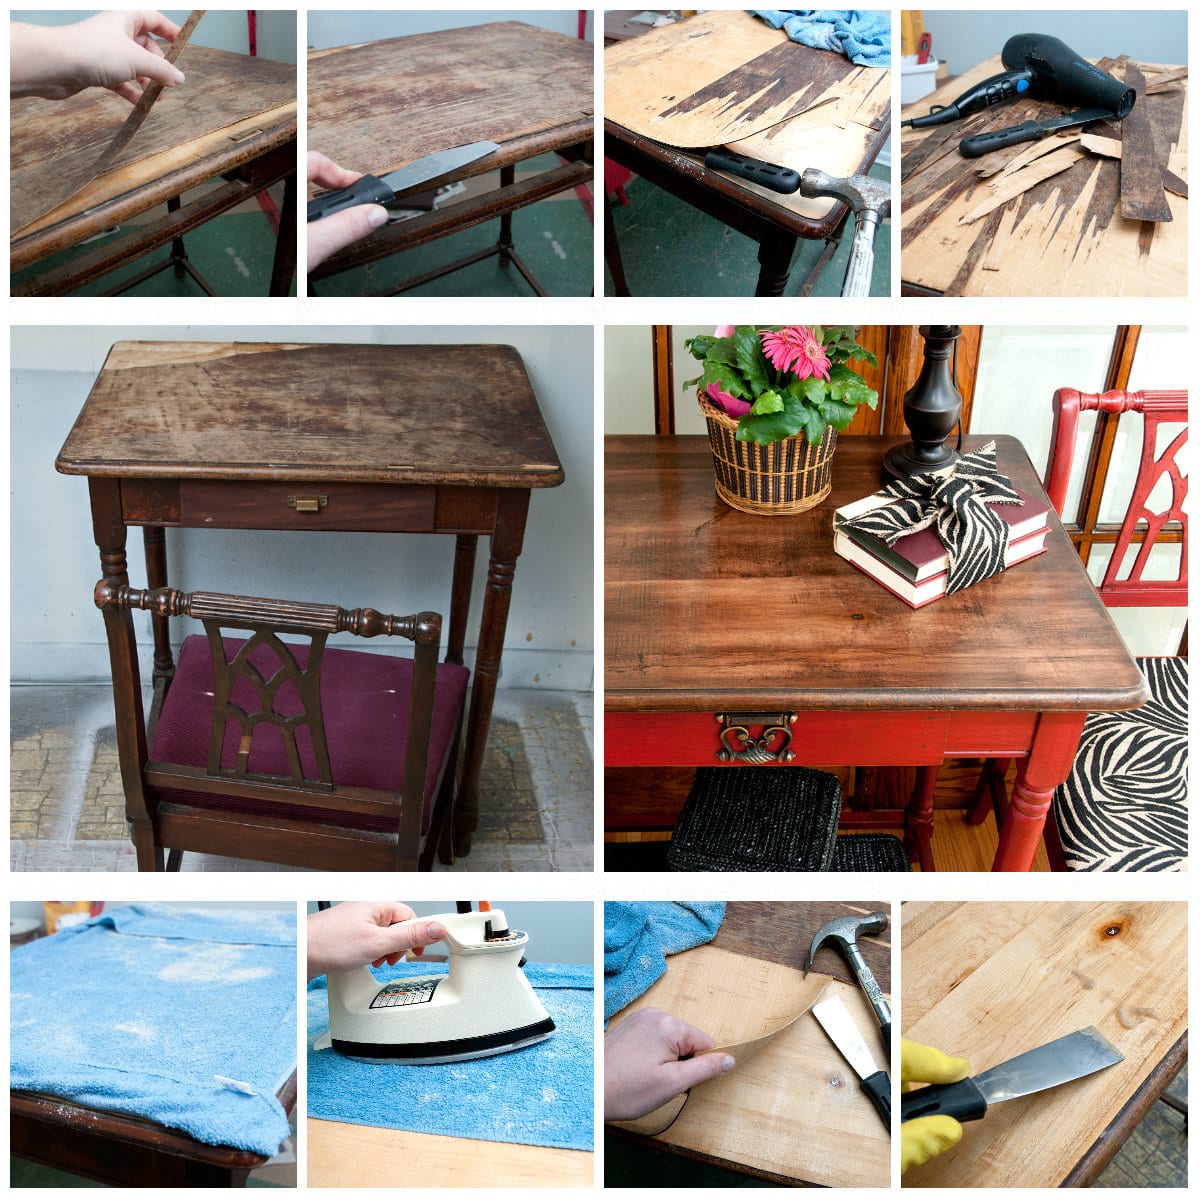
Last week I transformed a horrible looking writing desk in Part 2 of my Road-Rescue Series. Today I’m going to show you exactly how I repaired the top by sharing some easy tips on how to remove veneer.
Although it looks like a big job, with these quick tips, removing veneer is not as hard as you might think.

A little 101 on the topic… a lot of furniture is veneered. And just because the veneer is peeling, scratched or damaged doesn’t mean the furniture can’t be salvaged and re-styled to be beautiful again.
If the veneer is in fairly good shape with just some minor flaws; uplifted areas can be glued back down, gaps and cracks in the veneer can be filled in with wood filler, and scratches can be sanded out… just don’t sand through the veneer like I did on a previous project!
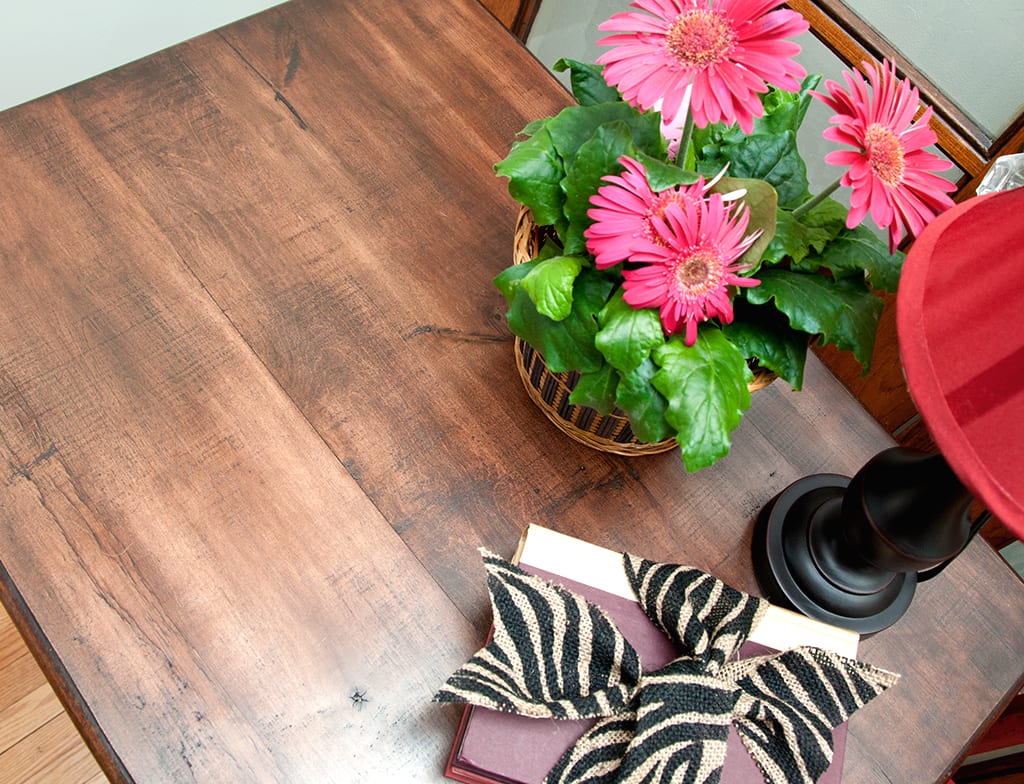
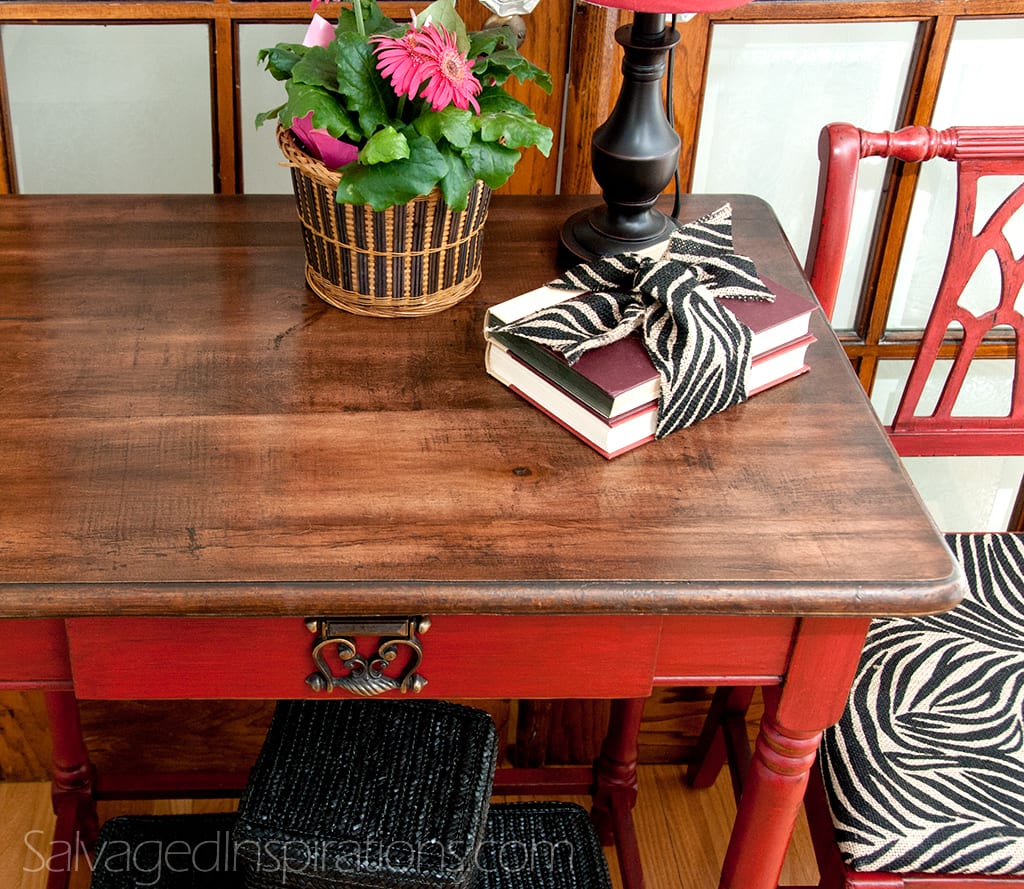
If the veneer is in really rough shape, removing the veneer and painting or staining the wood underneath can turn your piece into a show stopper! Here’s the same writing desk after the veneer was all removed. The wood underneath was stained with a GF Gel Stain and then aged to create this old world look.

1. Remove loose pieces of veneer by hand. As you can see I didn’t wear gloves… and yes… I did get a splinter or two! Do as I say… not as I do…lol!
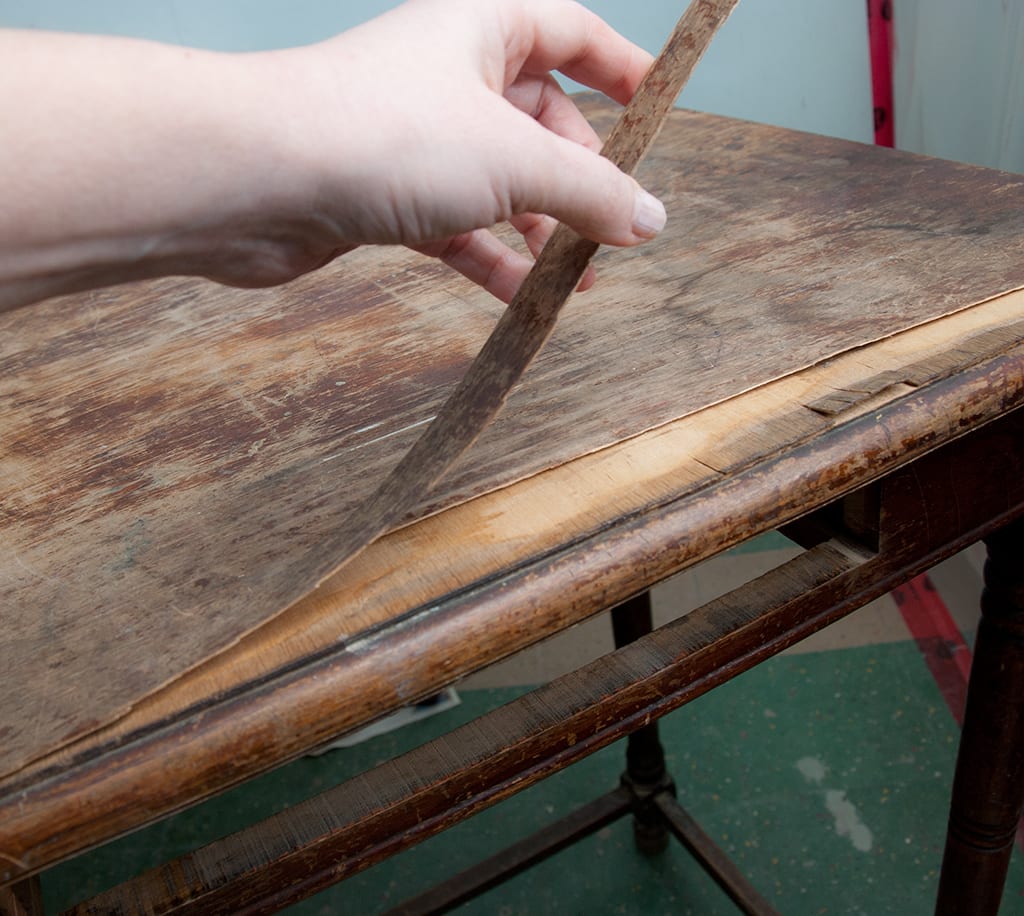
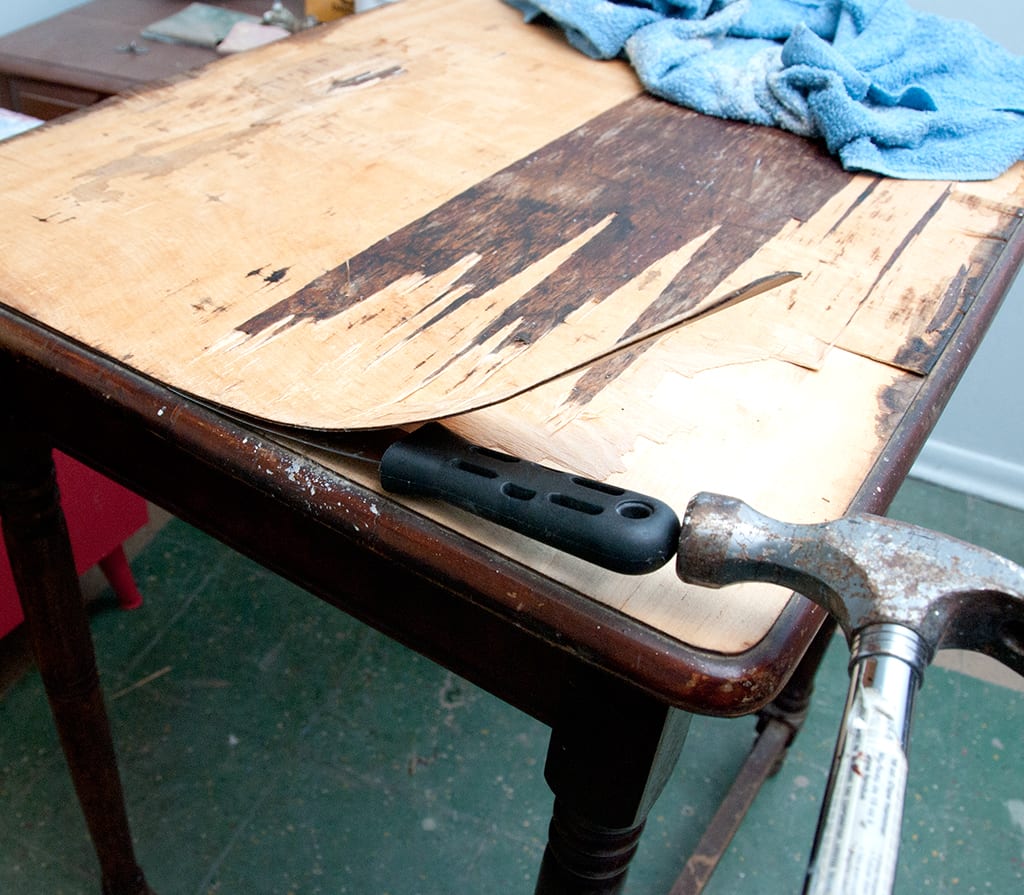
2. Use a metal putty knife/scraper in a HORIZONTAL position to pry off the veneer. It’s important to hold your tools horizontal to the veneer at all times being very careful not to gouge the wood underneath. I used this smaller putty knife I had on hand, but a wider one will help get the job done even faster.
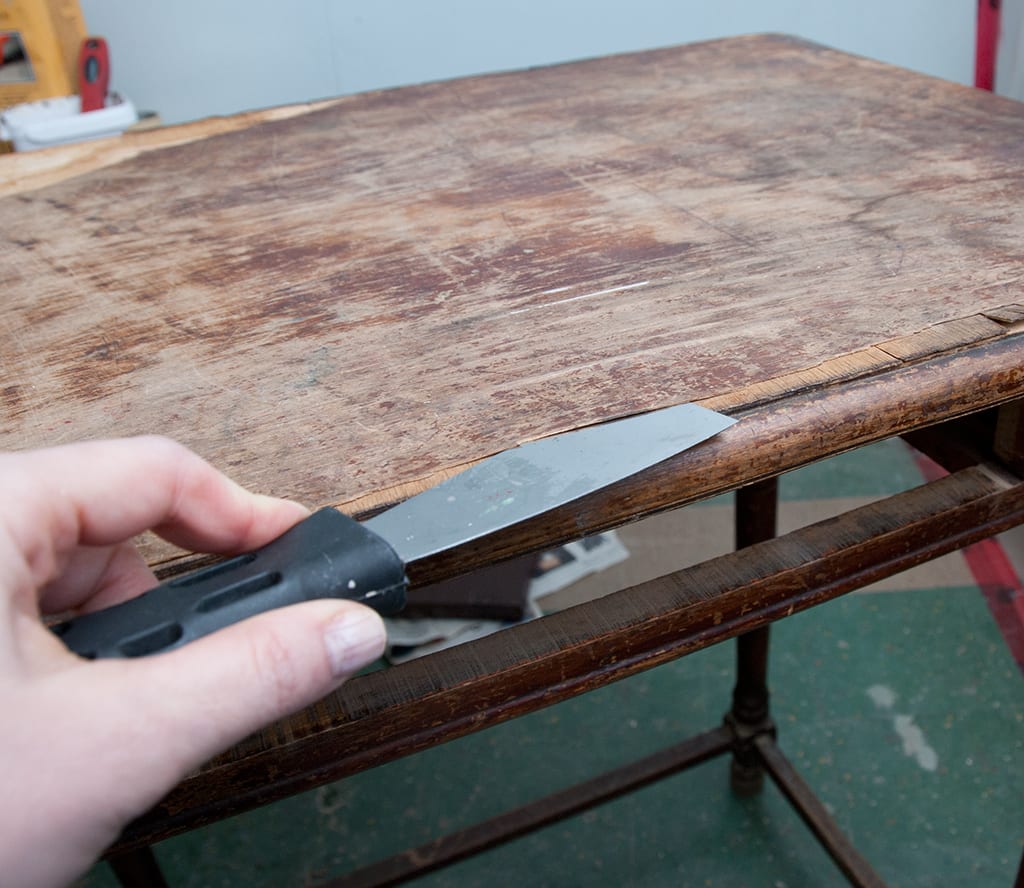
3. If your “people-power” couldn’t get all the veneer off, use a hammer. Use the leverage of a hammer on the end of your putty knife to apply more force on the veneer.
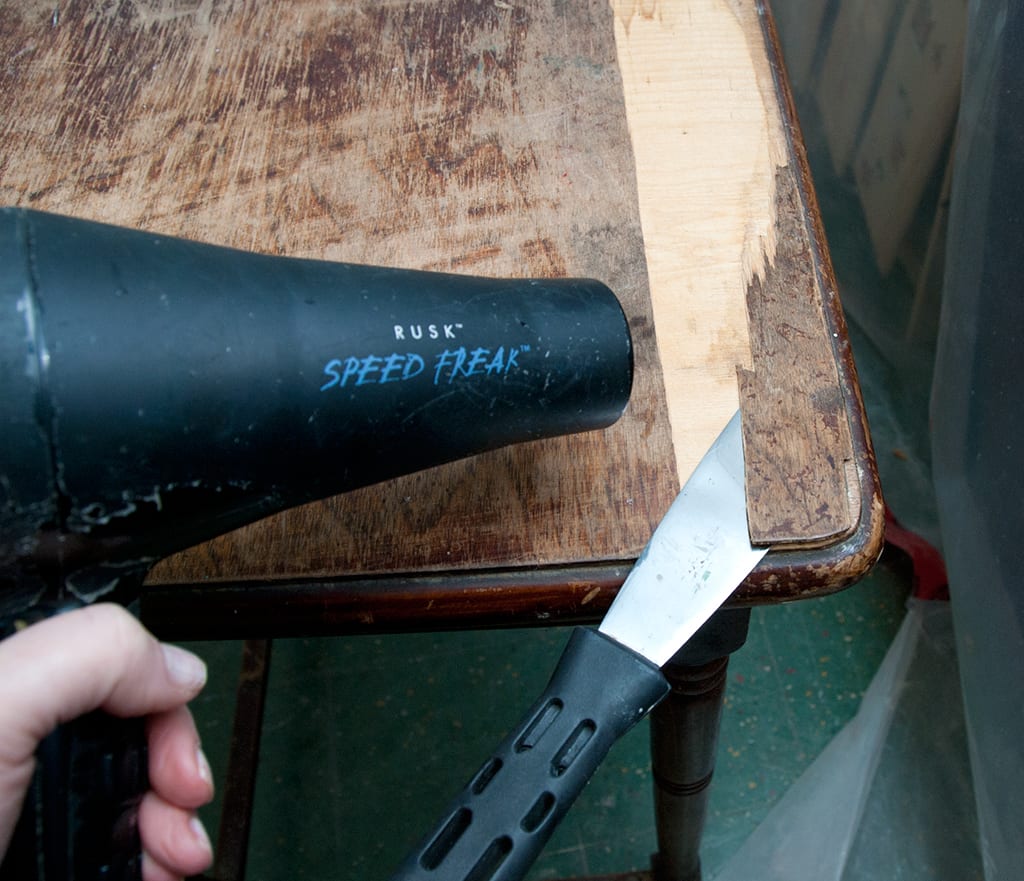
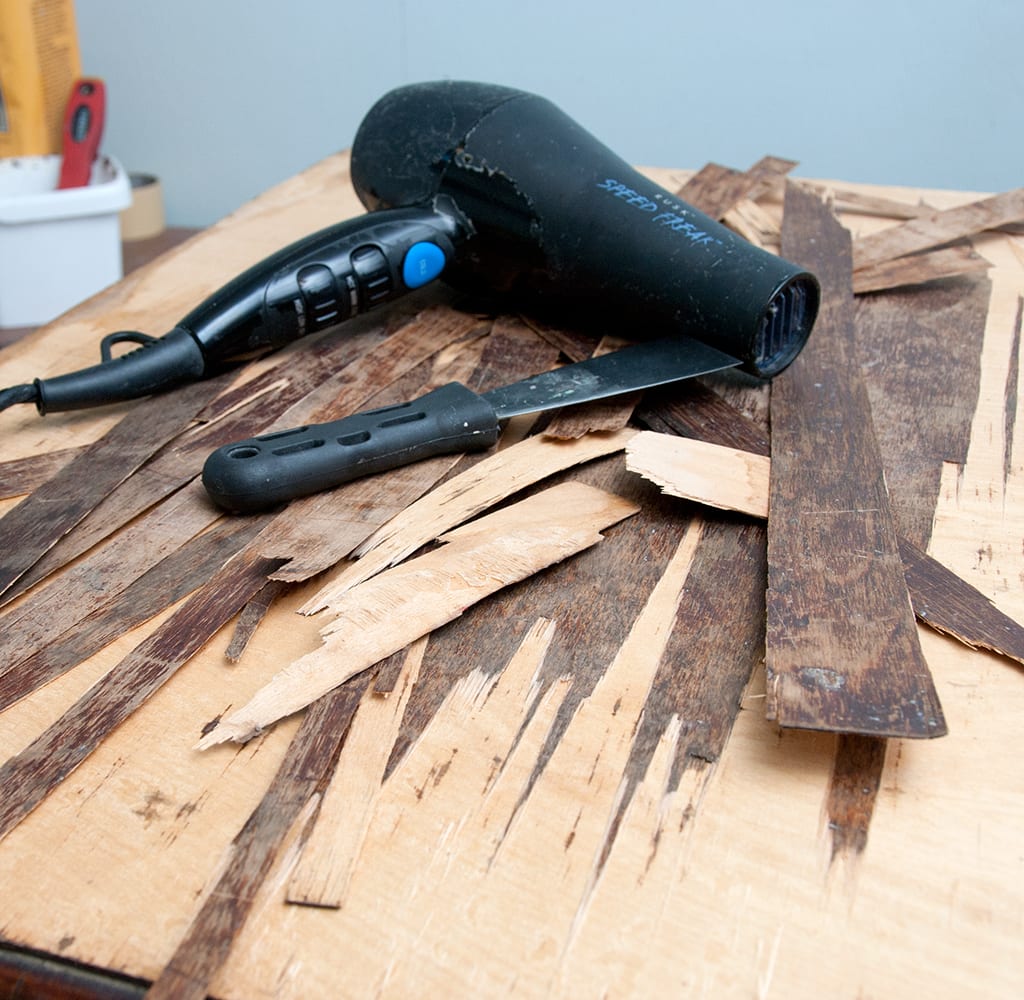
4. Use an old blow-dryer and your putty knife. Turn the blow-dryer on high and hold it a few inches away while using your putty knife to pry off the veneer. The heat from the blow-dryer will heat and loosen the glue so the veneer is released more easily.
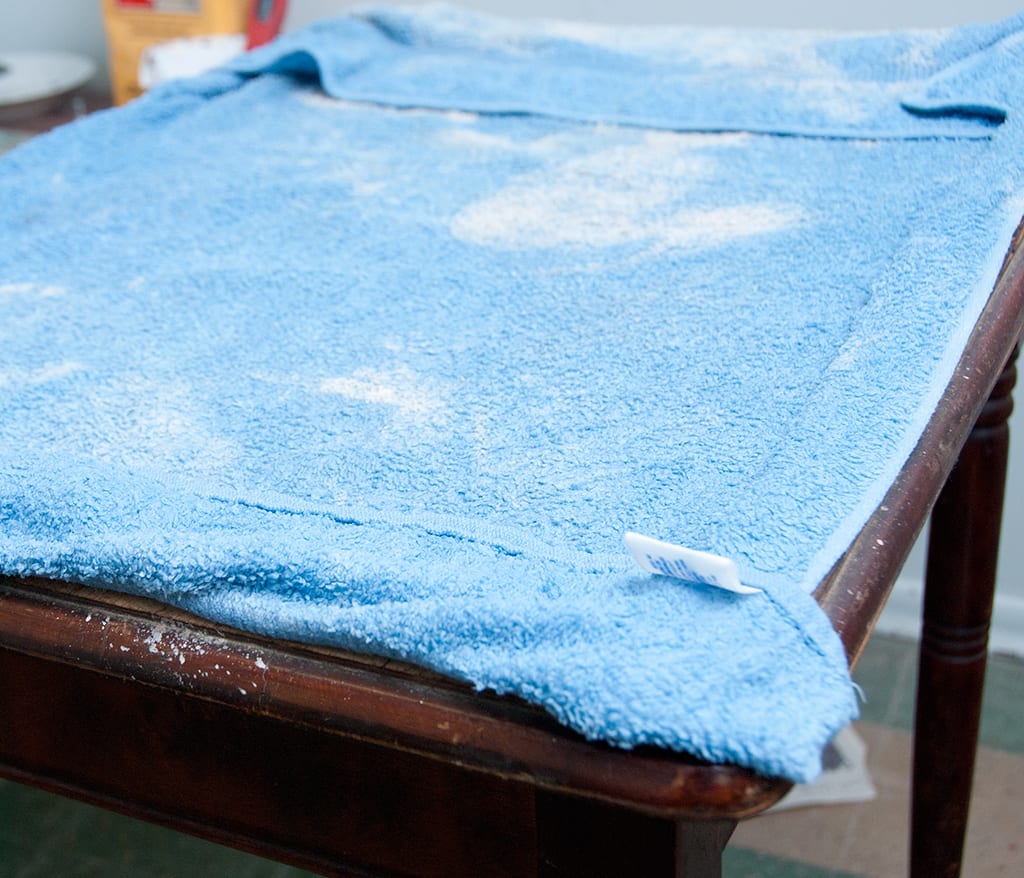
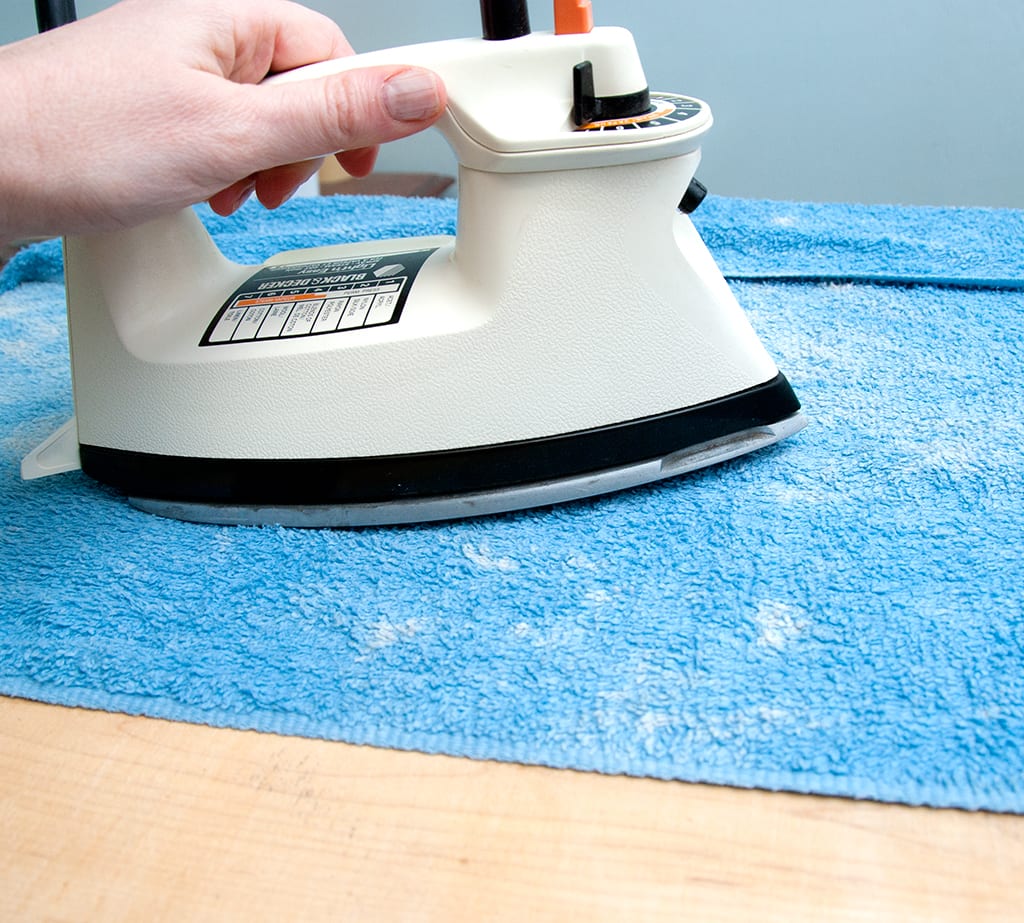
5. Wet an old towel in hot water and ring out the excess. Place a hot ringed out towel on the veneered surface and leave it on for several hours. The moisture will loosen the veneer glue and then you can use a putty knife to pry it off.
6. For any remaining stubborn pieces of veneer, use an old iron on high or steam setting. Place the heated iron on high setting on top of the damp towel and hold in each area for 30 seconds or so. This will soften the glue and help lift the remaining veneer.
7. After all the veneer is removed, you will have some glue remaining. Use a Putty knife/scraper to scrape off the glue residue and clean and dry thoroughly before staining or painting.

So there you have it! Removing veneer may take a little time but it’s not difficult! And to make things even easier for you, here’s a convenient PIN’able reference with all the tips!
Have you removed/refinished any veneered furniture… do you have any additional tips or tricks? Have a question about removing veneer? Leave me a comment because I LOVE hearing from you!
Denise x
_____________________________

I was trying to repai / renovate my late fathers writing slope. All went well until I used a hot iron plus towel to try and remove some ‘bubbles’ that had formed on the top of the box (slope). I managed to burn a section of the veneer which is now black and raised. Have tried injecting wood glue and clamping but this did not work. Is it possible to replace the veneer on a small…ish box?
Manny thanks and thanks for a superb article!
It sure is Nigel! You can buy sheets of veneer (you’d just have to search for best match) and then adhere it to the top after the old veneer has been removed.
I have my mom’s waterfall cedar chest. It is mostly in great shape, but there is a bubble on the front. I see no need to strip the whole piece if I can find a way to glue the bubble. Do you know of a way to get glue in a spot like that? Its in the center.
Hi Kathleen! It could use a little operation…lol. What I’ve done in a few situations like this is sliced the bubble with an exacto knife. A small slit, just enough to get a knitting needle size into. Then I bought a marinade injector from the dollar store. They look like larger needles with a larger hole. Filled it with wood glue and injected into the small slit. Then clamp until it flattens. 🙂
I offered to refinish the reception table at a gallery that hosts my artist’s group shows.. Now I’m a little concerned at what I might find beneath the damaged veneer. It looks like the wood might be a composite, not solid wood.. Any suggestions for making it look like wood rather than simply painting it?
Hi Jan! I’ve used this wood graining tool to create faux wood. Here’s an example on my farmhouse spool table where there was NO good looking grain at all. Hope this helps. 🙂
I love all your tips and advice. I have removed the veneer from top of console table and underneath the next layer is like sawdust. do I remove this or try to cover with wood putty?
Hi Nancy. I’ve noticed really old pieces often have 2 layers before you get to the underwood. That said, check to make sure there is solid wood underneath that before removing. Worst case scenario – a little more patching. 🙂
Denise,
Thank you for posting this! It is so helpful! I am in the process of redoing a piece and under the veneer (which is chipped in a pretty good sized spot on the corner) is a soft board.. no idea what it is. Would you suggest removing the veneer and the soft board underneath it? I have no idea what to do!
Yes, on some vintage pieces there is the veneer, and then another thin layer of wood. Before you remove the second layer tho, make sure there is good wood to work with underneath. You can often tell by looking at the back to see if it’s a solid piece of wood under the veneer. Hope this helps.
I have a cedar chest with a veneer top, but I primed it with a white primer, since I didn’t know anything about removing veneer. I had tried staining it darker than the original, but I could still see a few water marks, and there are a couple small cracks where the veneer got damp.So I thought I would paint it (but not what I really wanted). Otherwise it’s in pretty good shape! So, how should I proceed if I tackle removing the veneer; where & how do you start? I love the dark stained top.
I am working on my fist veneer removal project and it’s a tough one; it’s a dresser and then entire piece needs the veneer removed.. I am able to remove alot of the veneer from using a damp towel over it but I am curious about the the layers of veneer. The dark stained part is coming off and then it looks like there is another thin piece of wood/veneer underneath that. Do you remove that as well or just the dark top part? Hope that makes sense! Thanks!
Hi Kara! Yes, it’s wood on wood veneer and so long as there is a good looking wood underneath (some type of wood you want to expose to stain/paint etc), that part gets removed as well.
Loved your article! The only thing I can add to it would be to wear safety glasses. Those smaller bits of wood can come off with enough velocity to get in your eye.
Yes! Thanks Dave. 🙂
Hi denise, I’ve got a great old desk to refinish. The veneer is peeling on a side and back panel,with plywood underneath. The other two back panels and side panel still have veneer intact though weathered. I plan on putting a whole new top on it. My question is do you think I can sand and stain the plywood under veneer and have it look good or would you recommend sanding and painting?
loved this method! it took a while, but the veneer all came off. unfortunately the wood underneath is not that great so I’m going to have to paint it anyway. now I’m thinking that using wood filler would have been better.faster. this was a Lane cedar chest and maybe I should have known that the wood underneath would not look good stained – oh well! I certainly have a clean slate now!
Hey – glad I found you .. I’m struggling with veneer removal right now – an old vanity … I’ve tried soaking it with a towel … gotta get an iron so I can try that
Gonna take the hair dryer to it too
i wanted to ask if i can put beneer over veneer that has been gouge by the movers?
Hi Kara! You can put veneer over veneer but the original sheet should be perfectly flat and adhered ie no bubbles, lifting etc.
WOW!! Denise! This is an amazing post! I just put a roadfind (a former Bombay table) on the street again because the veneer was peeling and it looked like too much work! I LOVE the style of the table – it will be great for staging! (I’m a stager)
Thanks for your tips!!!
Go grab it back Debi! 😉 You never know what’s under that peeling veneer!
Thank you so much for posting this!! We have a beautiful old cedar chest that belonged to my husband’s grandmother. At some point someone decided to “improve” it by adding a veneer over the amazing cedar. I can’t wait to try your techniques to restore this chest.
Im painting a vanity that has a veneer top, my daughter and granddaughters have carved their names on it. My question is, is there any way to preserve the part where they have their names? Any suggestions would be greatly appreciated!
If the color and finish this the way you like it. Perfectly clear epoxy it’s really what you want it’ll be there for life he’ll be there for your children’s lives it will always be there. Just make sure the surface is extremely clean you want it to be thick but not too thick they’re going to want to run off the top and gently down the sides I would you use a brush or squeegee to spread epoxy and it will self level that’s why it needs to just be left alone you can use a heat gun hair dryer or a torch make sure it spreads evenly and pop the bubbles with the torchmaybe practice on something you don’t care about you can order epoxy on Amazon.
Wow thankyou for this, I am in the process of removing the veneer from a treadle singer sewing machine cabinet, slot of it had lifted and was badly chipped …. but the stubborn areas…. will try the heat and iron suggestions, would a wall paper stripper do the same??? I was given the piece of furniture and am going to chalk paint it in antique gold or bronze so hopefully it will be beautiful especially when I have cleaned up the machine also… thankyou again
Hi Glenda! I’ve never used a wall paper stripper so I’m not sure if it would work on veneer. But the heat/iron does! Good luck. I hope your Singer turns out great. And funny, I just posted a fabulous repurposed Singer on my Facebook Page. 🙂
Wow, just looked at the singer on your page, fab, mine is the full cabinet and I am planning on retaining its current use. Will try the heat gun tomorrow and have decided to paint it in old ivory now with crackle glaze. My first ever project so will hopefully be able to show pictures when done, thanks again
Sounds like fun and if you have the time… I’d LOVE to see! You can even post it on my FB page so we can show off your creative handiwork Glenda! xo
Hi i have been stripping a piece all day. It is challenging!! I was taking just the top layer off the table and tried to go a bit deeper…it is particle board!! What do I do now? Hide that corner, paint the whole thing??
Leanna, I get it! I’ve stripped down to particle board more than once – believe me! Unfortunately, once the particle board shows through, stain won’t take the same (stain sometimes makes the mistake MORE visible!) so the best option is to paint. I try to be positive about it tho… maybe the piece wanted to be painted the entire time. 😉
Just wandering if I used wood filler in a few places where the veneer has chipped, can I stain over that or should I just strip the veneer. Not wanting to paint.
Hi Amanda! It can be a little tricky to get an exact match, but yes, if you use a stainable filler it can then be stained.
This is exactly what I needed to know! I just moved in an old 6′ long desk that has a raised platform on the top. The whole platform area is surrounded by molding trim, so I’m pretty sure the entire platform is a piece of particle board with veneer on top because one corner is buckled and I can see crumbly particle board underneath. I was originally thinking of trying to gouge out the particle board and replace it without removing the molding, but now I’m wondering if it would be easiest to just replace the veneer. I thought if the particle board was damaged, I could smooth it out with wood filler and then put a veneer on top, and then you said the exact same thing! I’ve never tried anything like this before but I think this desk will be worth the work, and your blog has given me the inspiration to try it. Thanks!
Hi Marybeth! Great project and I’m so glad the SI Blog and my reader’s informative comments (you guys are the best!) have inspired you! I’d love to hear how your desk turns out!
Thank you for these easy and detailed instructions! I have what I think is a beautiful vanity that has been passed down from my mother. My husband strongly disagrees, especially since the top layer is buckled and wood is faded in some areas. The rest of it, plus the chair, is in great shape! For yrs it has been an eye sore to my husband, but who is going to throw out a 50+ yr old furniture! Not me! 🙂
Anyway, to make a short story even longer, I used putty knife to easily remove the buckled areas, but the rest of it will not come up and I didn’t want to finely sand it down. Thanks to you I’m excited to finish it today and give my husband the “I told you so” look! LoL
The only challenge that I would have is to match the stain.
Thank you, thank you, thank you!!
Love this Catherine. It’s going to be a treasured piece I’m sure. 🙂
We have used the hair dryer and wet towel methods combined – in addition we have also used a heat gun instead of the hair dryer – just exercise caution with the heat intensity. Above there was a question regarding removing veneer from cupboards and whether or not the wood will continue to hold together or not. Firstly, you need to be sure of what you are exposing when the veneer is removed – is it MDF, Plywood, particle board, or solid wood. Typically, plywood, and/or particle board makes up the sides of most kitchen cupboards – removing veneer from plywood pretty much needs a new veneer applied as the entire thickness of plywood is really a whole bunch of veneers. Removing veneer from particle board, well the entire surface could be wood filler covered and then paint it or again, re-veneer it (honestly, not a big job, just take your time (paper is your friend). Solid wood makes up the front of most cupboards (some older homemade ones used plywood) and as such, can just get sanded and painted or stained. Bottom-line as to whether or not the cupboard material will or will not hold up – well if it is not already starting to deteriorate then chances are in your favor of the material holing out for you. I would only caution as to the use of particle board – susceptibility to moisture is something that always needs to be taken into consideration.
Hey! I’m so glad I found this post! I am getting ready to tackle taking the veneer off of an old buffet. I’ve never done this before. It looks just like your veneer looked. Very thin top layer going horizontally, then it looks like another layer with the grain looking vertical. So technically you took off a couple of layers right? I hope this makes sense 🙂
Yes, I removed both layers Kristin. Have fun with your project. I’d love to hear how it works out for you. 🙂
My question is; If I remove the veneer from my kitchen cabinets, can I paint the wood underneath without it falling apart? If so , whats the best paint to use?
Hi Teresa! I’ve removed veneer off plenty of pieces and so far, have never had any issues with the wood underneath falling apart. Most of the time I’m pleasantly surprised with what’s underneath and with a little sanding, priming and paint, it looks beautiful. I like Sherwin Williams, and B-I-N primer but any quality brand paint and stain blocking primer will work nicely. 🙂
Love your blog. Removed badly damaged veneer on old vanity top. Wood underneath isn’t a solid piece but two inch boards. It’ll be painted. Side veneer is bad too. Why’d I tackle this. Would you replace veneer and paint or maybe 1/4 birch and for top, bevel edges and putty. Sides would be simple. Or maybe burn it. J/k
Aside from the obvious fabulous tips given here, which I can’t applaud enough. I truly love the hardware on the finished piece. Where did you shop?
Hi Linda! The hardware on this piece was taken off a 70’s piece I had in my inventory. I have a soft spot for unique old hardware but unfortunately, I don’t see anything like this being sold anymore.
I love it. I just did my own little refinish job. Still learning and loving it. theurbancrafts.com/home/sewingmachinenew
What a gorgeous vintage restyle Sierra! Beautiful work. x
Thank You just what I was searching for for 2 days 🙂
So glad it’s been helpful Tammy. 🙂
Many veneers can be easily removed by vinegar. Thoroughly wet an absorbent rag with vinegar( any kind). Push the rag under loose veneer with a putty knife and slowly progress it forward as the vinegar dissolves the glue. You may have to let it soak for a few minutes here and there. Feel free to lean the surface into a slant and pour more vinegar under the veneer as you progress. The vinegar doesn’t hurt the wood. It leaves a fairly glue free surface and most remaining glue can be removed with more vinegar and some elbow grease. FYI–some types of old linoleum tiles can also be lifted from wood floors using this method ( think old schoolhouse type tiles). I once removed a long hallway of ugly green speckled tile off a quarter sawn oak floor over a two day period with no damage to the oak.
I have heard of antique restorers using a mixture of 50/50 water and vinegar on old veneer… but I’ve never tried. Brilliant Candice!
You also can spray it with fabric softener an than put the hot towel on top.
Can’t you do the wet towel to start with,to loosen the veneer and skip all the scraping and prying?
You sure can Diana! 🙂 The damp towel will help loosen the glue – in most cases, some scraping and prying will still required though.
Thanks for this. Gonna apply some of these techniques for rebuilding a guitar top that has a veneer top that I’d love to remove and just do a tung oil finish to the wood underneath.
Sounds amazing Vish… I’m sure it will look great!
Thanks for sharing your experiences. I’m doing some research on painting. I have an old coffee table and I want to refinish and paint it. Now I know how to do that.
We are making a bookcase out of an old grand piano and had to remove the veneer on the inside only because it was veneered only half way down because of the sound board. We came up with a great way to remove the veneer. We used a Shark Steamer. It was fast & clean. Because of all the contours, an iron just wasn’t working. Going to sand the finish off the rest of the veneer on the outside and try to stain the inside to match.
Brilliant Jay! And what an amazing project!!!
Hi Denise. I followed your advise on stripping the old veneer off the top of an old dressing table I’m revamping as a bathroom vanity. Worked great. I think the rest of the veneer will be easy to repair. (Fingers crossed) Thank you.
My mom was refinishing some old book shelves. She noticed that some were harder than others to refinish and then we realized, some of then had veneers! It all makes sense now! I will have to show her this tutorial before we do the next one!
I used the towel and the steam iron and it worked very well. Almost a miracle on how easy it came off. We put the towel and did it in sections, leaving the steam iron on the area for about 40 seconds approx (we didn’t actually time it).
I purchased an old dresser I want to repurpose, but it has an UGLY laminate(looks like a kitchen counter top) on the top of the dresser. This laminate is not lifting or anything. Do you think it can be removed with this method?
Difficult to say when I can’t see it but if it looks like a laminate, it most likely is. If you don’t like the looks of the top and have no intention on keeping it ‘as-is’ there isn’t any harm in trying the above methods to remove it. You may be pleasantly surprised to see what’s underneath!
Thanks for your tips…I’m kinda impatient so I went right to the wet towel but didn’t wait just used the iron to steam the veneer off…it took just an hour to remove all the old veneer from the top of my buffet…and it was so fun! I appreciate your site…dthanks for the inspiration!
hi! I was wondering if you could help me. I have a table that I bought from a thrift store and I wanted to refinish it like a stain on top and white on the bottom. I started sanding the top and I’m starting to think it was veneer because there spots where the gran is gone and if I keep sanding it keeps getting bigger. Do you have any advice? It would be greatly appreciated!!!
Hi Megan. Veneer is quite thin and doesn’t stand up to much sanding. Here’s an example of a veneer I sanded through. Unfortunately, once you’ve sanded through the veneer/grain, if you go ahead and stain, it becomes very blotchy looking finish. Options ~ purchase new veneer/install and then stain. Or cut a solid piece of wood to the exact size (or with a small overhang), install and then stain. Or paint over the existing veneer… which is what I ended up doing.
I recently refinished a gorgeous midcentury stereo cabinet that is solid wood, all covered in veneer except for the framing details and speaker slats which were solid wood with no veneer. Anyway, it turned out great, with a lot of patience, a great deal of furniture stripper and sanding.
https://instagram.com/p/7szEd2mezP/?taken-by=pennedbyjenn
At first I was scared to sand too, but I discovered that I had lots of room to work with the wood even though it was “thin”. I’ve always been intimidated by veneer so I’m glad I did this project. I’ve never considered that it might be worth it to remove veneer either, but I think you have to be careful and make sure what kind of wood you have underneath.
This turned out amazing Jenn!
Easiest way to remove old veneer is to cover with mayonnaise and then old news paper on top of that. Cover with a blanket and let it do its work. I learned this trick from an old furniture refinisher when I was in my 20’s. After a few days it peeled off like a dream.
Mayo????! I’ve never heard of this… thank for sharing Jan!
How long do you leave the mayo on
I have a bear claw table that has veneer on the center post support. It is coming off and wondered if these methods you promote can be used on round pieces versus flat.
Thanks. Great info in this article.
They sure can Carl. I would lean towards using a plastic putty knife. Plastic is less likely to scratch/gouge than metal.
Thanks for all the tips. I have a small six drawer dresser and professionals wanted over 600 to paint. I think I will tackle the job myself after reading your post. Veneer is peeling up but front and sides are good. Should I also sand those before painting and what type of paint should I use, oil base or regular?
Yes, I would give the piece a light sanding for good adhesion. Also, if you’re not familiar working with oils, I suggest sticking to a good water based enamel/acrylic. Easy clean up, hard durable finish for furniture, and no smell. 🙂
I just finished a vintage table and I wish I would have seen this because it took me 3 or 4 days to remove the veneer by soaking it with water and sanding and scraping. Thanks for the tips my piece is pictured 9n my fb page The Magic Brush House
Hi there, just found this. My kitchen cabinets are all veneer. Just wondering if you’ve had any experience painting on top of veneer? Our cabinets are in great condition but dark and not our style. Just wondering if we could use chalk paint on them without having to take all the veneer off. Like I said, they are in great condition so taking it ALL off would be a huge undertaking!!
Yes Cait, you can paint over a veneer surface… I do it all the time with furniture! It may be a good idea to test and make sure your chalk paint adheres before tackling the entire kitchen though. If your cabinets have a shiny topcoat, they may require a light sanding before painting.
I just found an old small entry table with peeling veneer and am going to try your suggestions. Would you like before and after pictures?
I LOVE before and after’s Sandy! 🙂
Thank you for this information. I just bought a lovely old vanity with peeling veneer and I wasn’t sure what to do with it – patch it or peel it?
Also as an ex teacher I think goo gone might get the glue off without sanding.
Would a heat gun work faster than any of these other methods to heat it up. I know I can melt a crayon in next to nothing with mine.
A heat gun would also work well Judy. A little more caution would need to be used so the intense heat wouldn’t damage the underneath wood.
What color Java gel stain did you use? There are several different shades, but everyone always just says java gel. Help please!! 🙂
Hi Angela! Unless General Finishes has very recently come out with NEW Shades of Java Gel Stain, I’m only aware of the one labeled General Finishes Java Gel Stain.
do you need to sand top before painting once veneer is removed?
Yes Sherry, I always give it a sanding to remove any glue and uneven areas. And I’m extra particular if I’m going to be staining it.
There is a lot of cheap furniture out there today built with paper veneered particle board (e.g. a $40 computer desk, a $25 book shelf, etc…). Many of these cheap pieces can be taken apart, stripped down with a belt and/or orbital sander (60 – 80 grit aluminium oxide abrasive), Once stripped the individual parts can be re-veneered
Denise,
you mentioned that you aged the table after staining it. What did you do to age it? It’s a beautiful piece!
thanks Julie! Here’s a link with the glazing/aging details for this piece.:) https://salvagedinspirations.com/general-finishes-van-dyke-brown-glaze-effects/
What color red did you use?
Taylor, I used Miss Mustard Seeds Tricycle Red with General Finishes Java Gel Stain for the top.
Thanks for all the tips! I just pulled part of the veneer off a hollow door and am now painting it with a oil based Kilz because it got wet when the hot water tank went out. I am thinking about putting a thin strip of molding where the two meet. It will in the garage in the corner so it will not be to visible;). Love your blog!
Thanks CC 🙂 .. and great choice with the Kilz for the door… I love that primer!
I’ve done this too…what a mess but the good news is that the tables (desks, etc.) tend to look kinda cool without the veneer..and the iron can be cleaned again…a lot of sweat equity..thanx for the share!
Haha…”sweat equity”…I like that! And yes, I agree… sometimes the wood underneath is a lot more interesting than the veneer it was covered in!