 Hi guys, thanks for all your well wishes. The flu has left the building and I’m feeling much better. For those of you who wrote in saying you were sick, I hope you’re taking good care of yourself and feeling better too! x
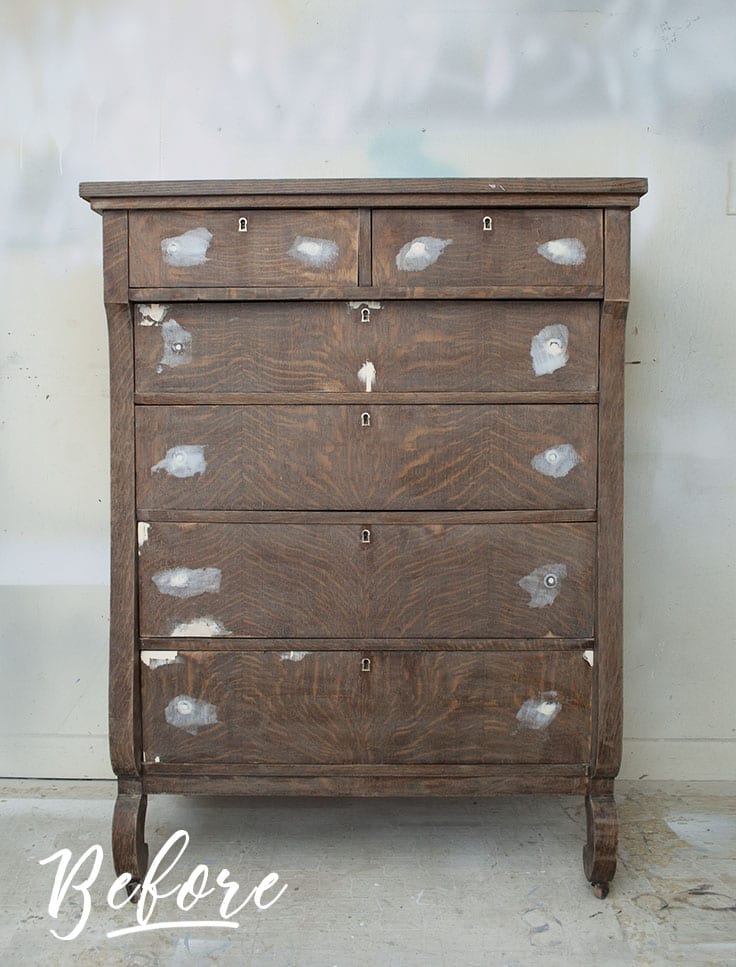
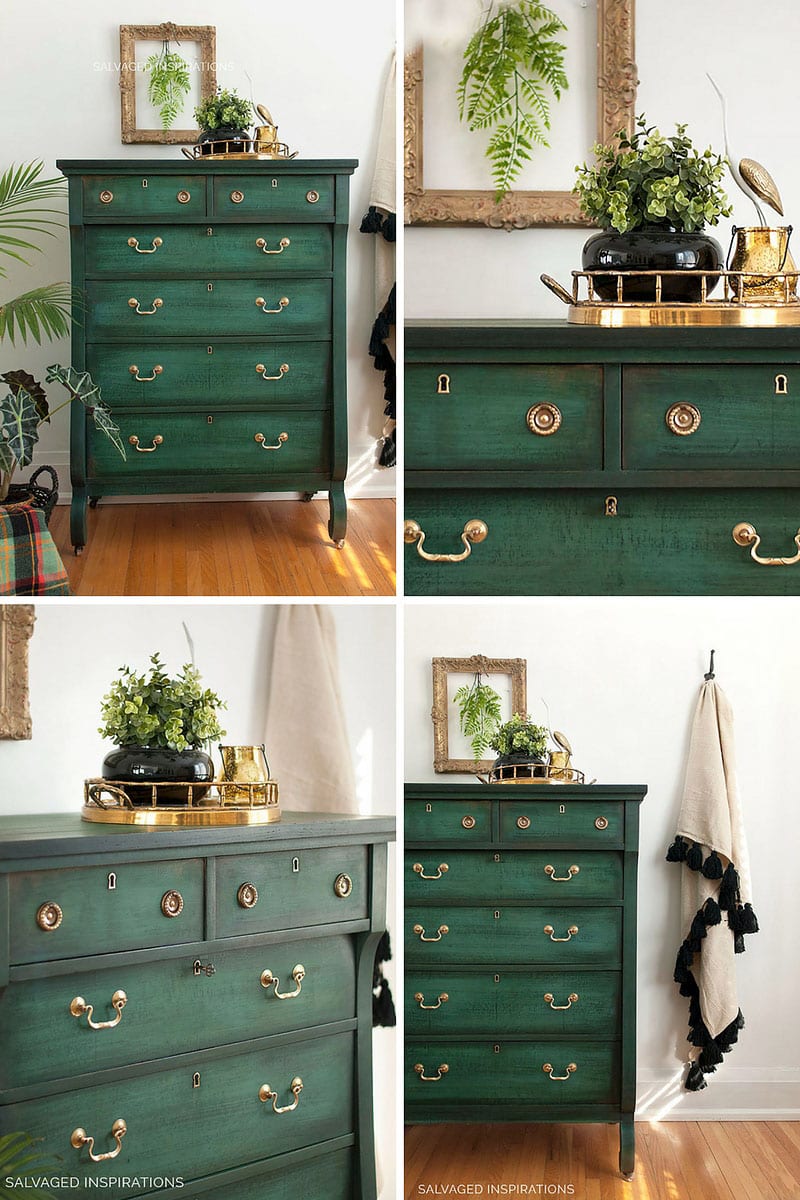
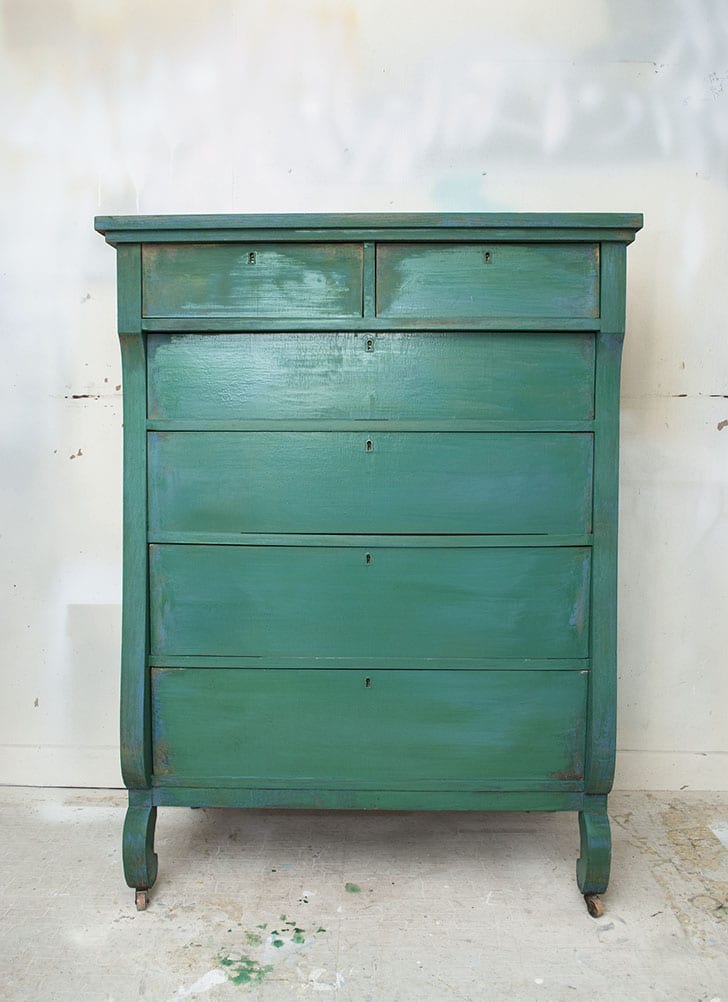
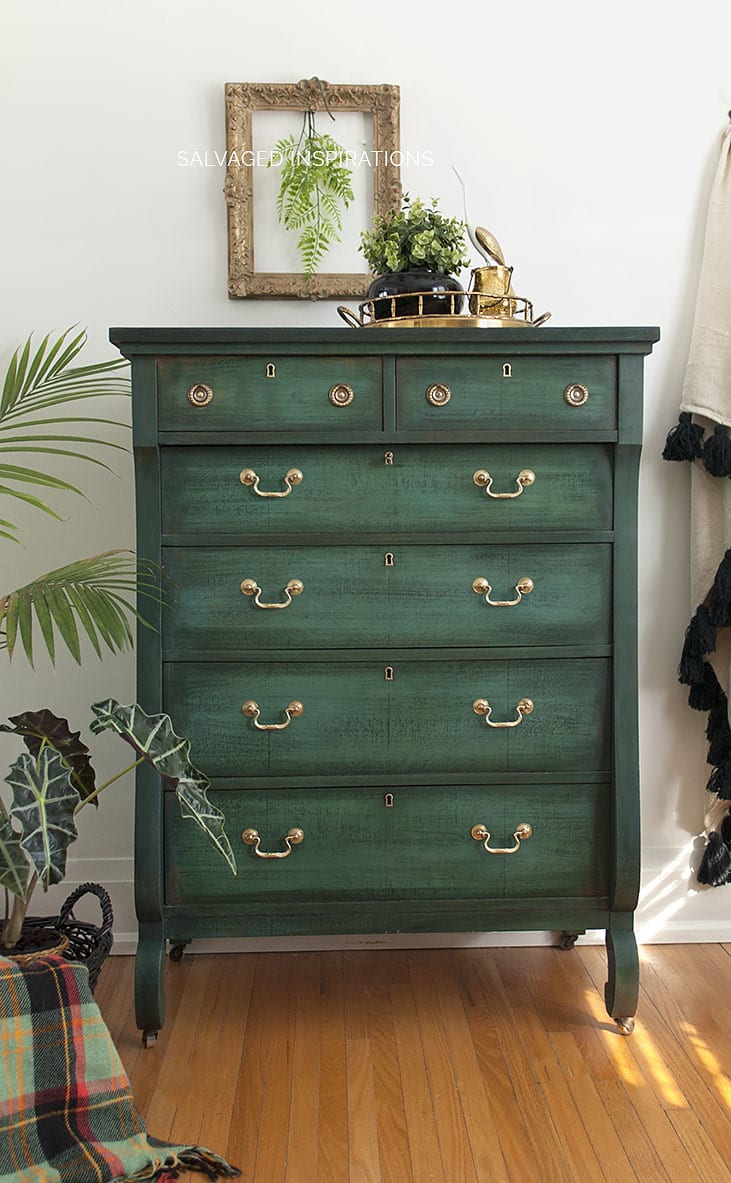
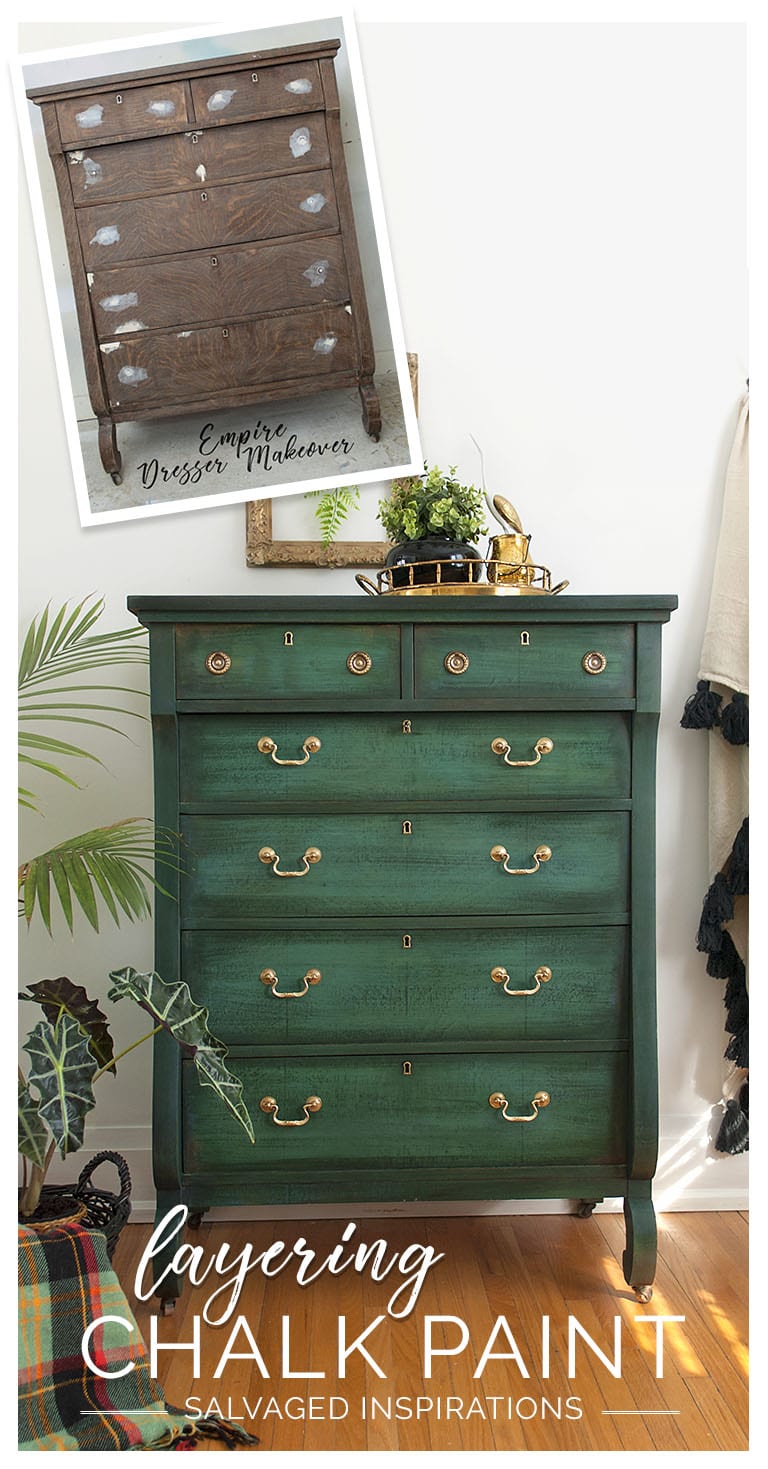
This piece was a real treat to work on because I don’t come across empire dressers too often. I was feeling adventurous and tried a new layering technique that involves painting a trio of colors in Annie Sloan Chalk Paint using a brush, a spray water bottle, and some black wax. I recently saw Debi from Debi’s Design Diary (I’ll include a link below) using a similar technique to create a vibrant piece of furniture. I used the simplified version of her technique on this empire.
 THIS POST CONTAINS AFFILIATE LINKS TO PRODUCTS USED. YOU CAN SEE MY FULL DISCLOSURE HERE.
For all the years I’ve been painting furniture, I still find layering paint to be a little intimidating. The more colors – the more intimidating! What colors should I use? What paint technique will be best? How should I blend the colors? What top coat should I use? There are so many different methods of layering chalk paint so I stuck with the bare basics and here are the steps I took to achieve this look.
SOURCE LIST::
- Empire Dresser ( Salvaged | Estate Sale – kind of… you can read more here)
- Paint Brush
- Water, TSP and Scrub Brush
- Brasso & Brass Hardware ( Salvaged from another old dresser)
- Spray Bottle
- Sand Paper & Tack Cloth
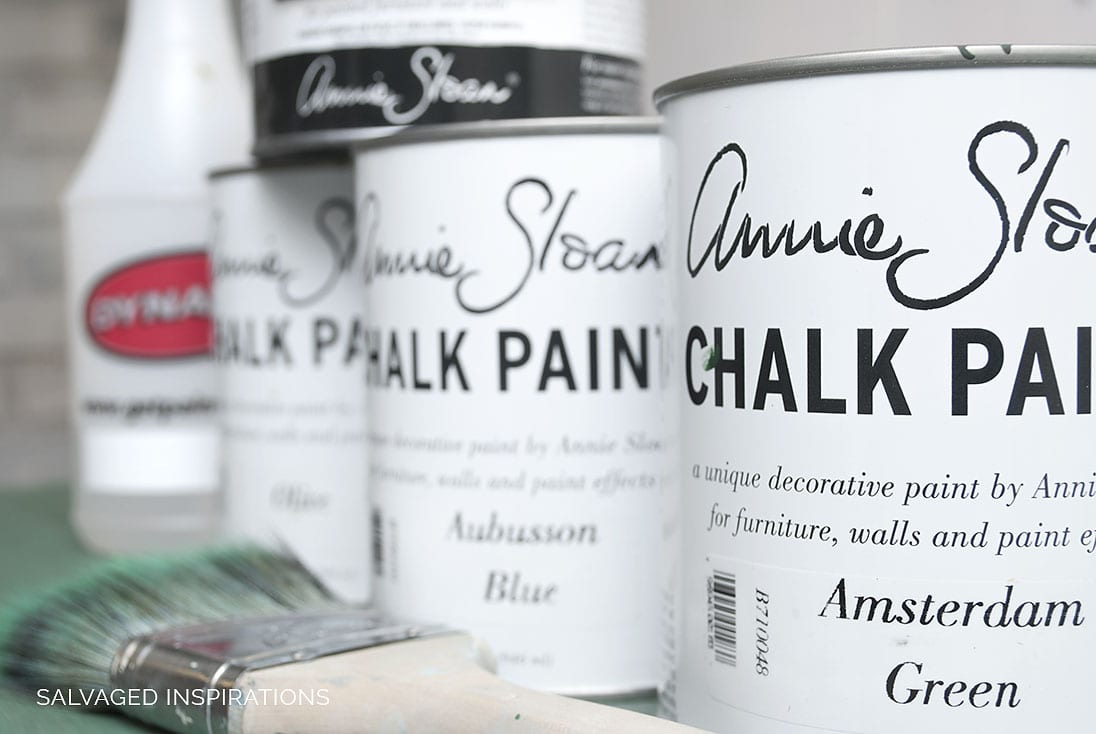
- Annie Sloan’s Olive, Aubusson Blue & Amsterdam Green
- Annie Sloan’s Black Wax
HOW TO – LAYERING CHALK PAINT
I should warn you, it gets a whole lot ugly before it starts looking good.
:: I started by cleaning the entire piece with water, TSP, and a scrub brush.
:: Then I patched and fixed all the missing veneer and old hardware with Bondo and sanded the Bondo smooth.
:: I gave the rest of the dresser a light sanding with 180 grit and then wiped away all the dust with a tack cloth.
Now for the fun… and the ugly…
:: I chose my colors carefully. I wanted this empire dresser to have depth and rich-blended-jewel-tones while looking old-world-distressed.
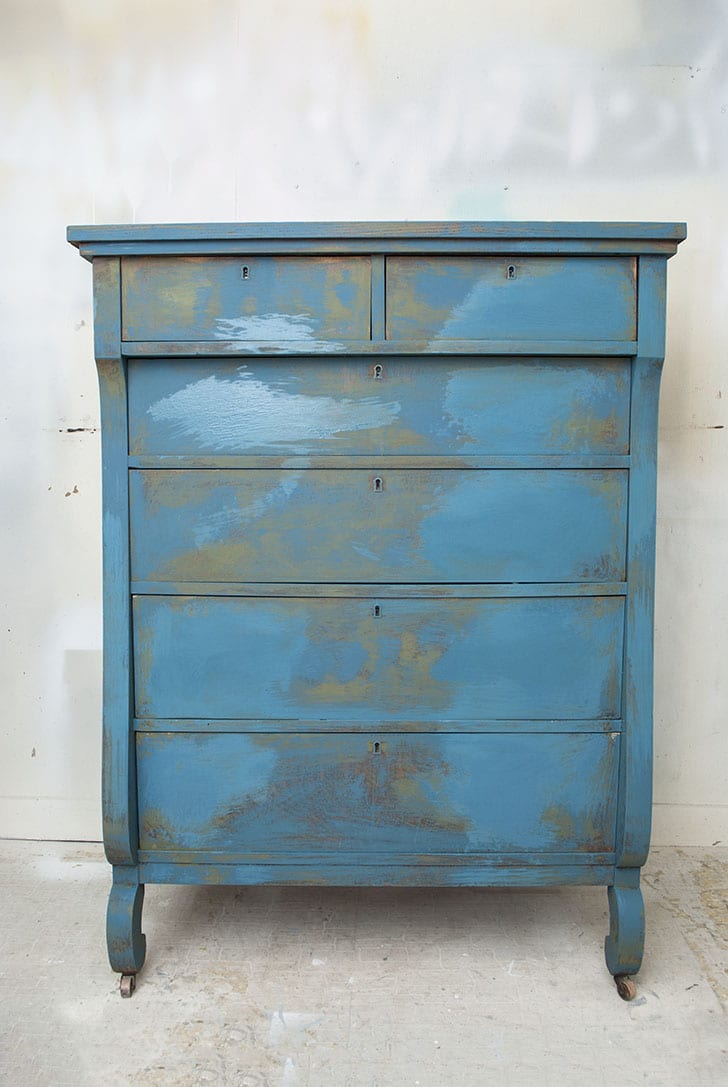
Color #1 Annie Sloan’s Olive
I applied AS Olive in a random dry brush technique. Heavy in some areas, light and feathery in others.

Color #2 Annie Sloan’s Aubusson Blue
I layered on the blue with exactly the same brush technique as the first coat in Olive. With both these colors painted on the dresser, you can see there are some heavy areas, light areas and even a few areas where the natural wood is still peeking through.
Color #3 Annie Sloan Amsterdam Green
The green was brushed on liberally. Then I took my spray bottle filled with room temperature tap water and sprayed the wet paint with the water. I let it sit for about 30-60 seconds before I took my paint brush and blended it into the Olive and Aubusson Blue leaving little areas (like around the corners of the drawers) with the first two colors revealed. There’s even a little wood left revealed too.
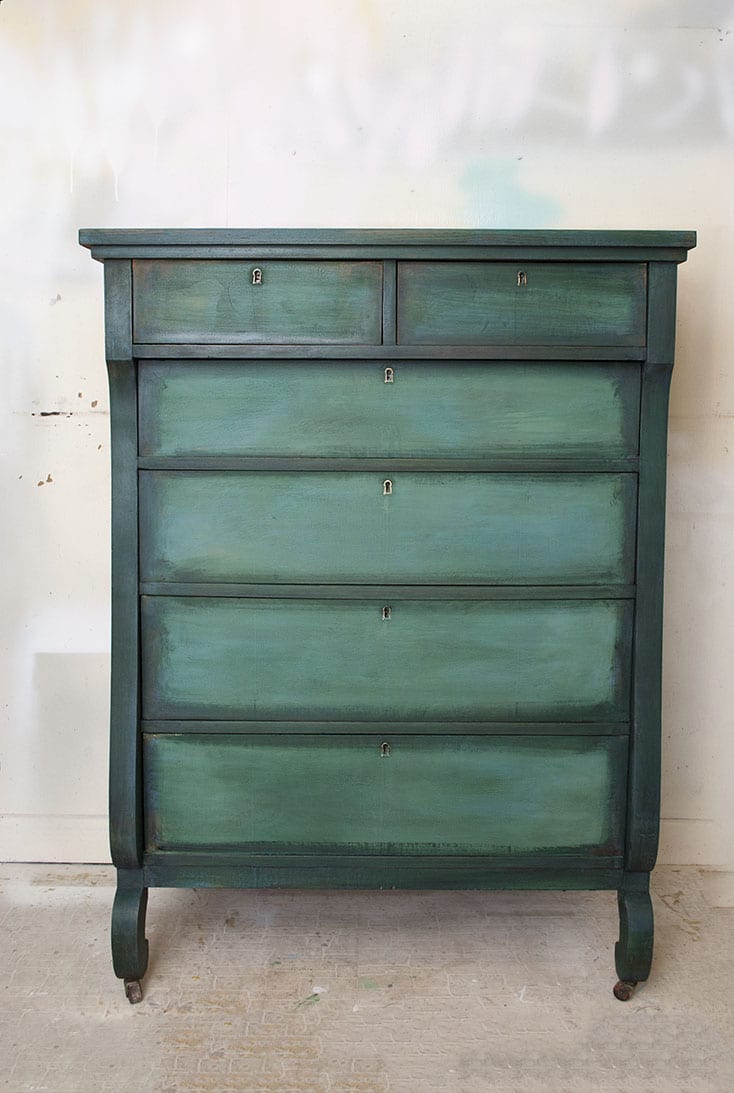
:: Each layer of paint was left to dry for about two hours before applying the next color and I only sanded the very last coat before applying wax.
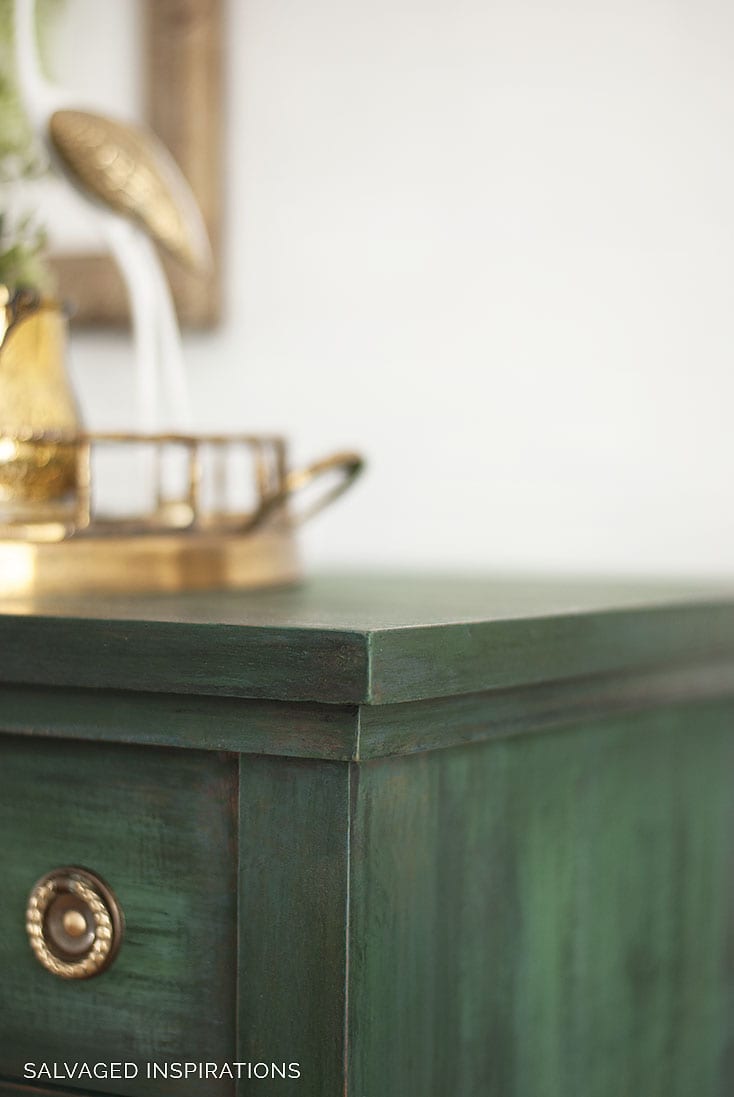
:: The AS Black Wax and applied generously around the edges and then I lightly brushed it into towards the center. The brushed wax is the same technique I used on this Weathered Wood Dresser here.
:: The finishing touch – these brass handles I salvaged from another old dresser. I keep ALL my old hardware. A little Brasso or natural cleaning and they can look brand new.
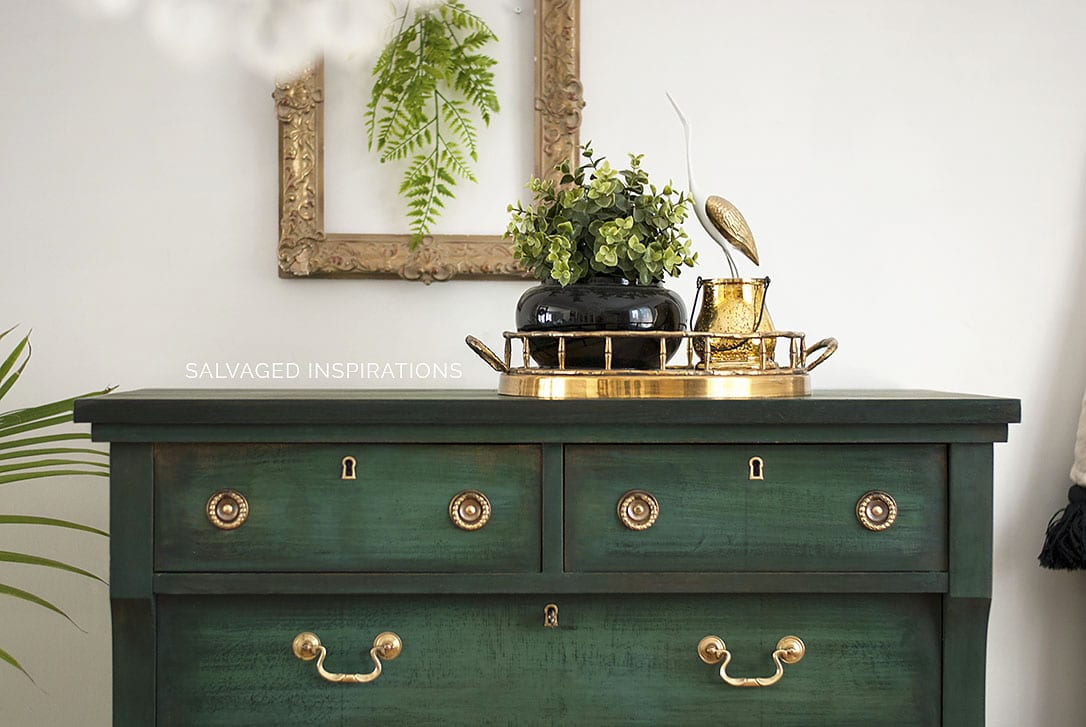
I really like this old world distressed look and will be trying it with different color combos in the future. Actually, I have an old vanity in my inventory that I might try this technique on.

Benefits of Layering Chalk Paint
Some benefits when layering chalk paint is very little paint is needed and your brush strokes don’t need to be precise. Also, if your piece of furniture has imperfections like this empire dresser did, they are easily hidden with this technique.


Oh, and before I sign off, thank you so much to all of you that took the 2018 Reader’s Survey! Your comments are amazing and I’m loving all your feedback. I’m going to keep the survey open for another week before I draw a name for the $100 Amazon Gift Card so if you haven’t taken it yet, it only takes a few minutes and is totally anonymous. I’d really appreciate your input. My goal is to keep creating posts that inspire you to tackle that DIY project and of course posts you enjoy. 🙂
2018 READER’S SURVEY LINK HERE!
Debi’s Design Diary Layering Technique
I’D LOVE TO HEAR IF YOU’VE EVER TRIED THIS BEFORE? IF YOU HAVE ANY COLOR COMBO TIPS YOU’D LIKE SHARE OR HAVE ANY QUESTIONS, FEEL FREE TO CHIME IN… I ALWAYS LOVE HEARING FROM YOU!
Thanks and have an inspiring day my friends!
Denise x

Thank you for sharing with us. I’ve made a piece of my own. It’s just gorgeous 😍 but a whole lot of ugly before the final result! 😂
Thank you Klaar… and so true… a whole lot of ugly😂
What size canisters of paint did you purchase for this piece? The small or large? I’m painting an armoire and want to buy what I need, but not anymore than necessary. That stuff is expensive. 😂
BTW, love this article, and rnd result of this piece of furniture!
Hi Bethany and thank you! I had the 32 oz cans on hand, so the larger ones. But honestly, I did this makeover so many years ago, I can’t remember how much paint I actually used from each color.
Ermagahwrsh, that green flannel blanket??!
It’s a tartan plaid wool blanket.
Hi, I just found your blog and I am very excited to try this project! (Your work is so beautiful, btw). I want to paint my childhood dresser, which is currently white-aged-yellow, to the end product seen here. Would I have to do anything different to achieve the look you did since I am beginning with a white piece? This will be my first attempt at layering and chalk paint. Thanks!
Hi, such beautiful work! You are so talented and appreciate you for sharing your pieces and advice! Where did you get your hardware? Is it the original or did you purchase these new? I’m looking for the exact style and running out of places to look! Do you recommend a place that sells beautiful hardware that is reasonably priced?
Thanks, Ashley! It is the original hardware. Hobby Lobby has 50% off every few weeks and they have a really good selection. I also have a free printable on my favorite places to buy hardware here. Hope this helps. 🙂
Completed All Of the painting steps. I was starting to sand when I do this it looks very faded out now. The grit of the sandpaper is 180. Should it be something different? Thanks Charlotte
A 180 grit for a finished piece is a little rough. I would opt for a 220 or 320 for a finish sanding or even sanding in-between coats for a smooth finish. As for the faded out look, yes, it will look dusty and get lighter. Once you wipe back all the dust with a tack cloth or damp cloth and topcoat, the dusty faded look will disappear.
Hello I am in the middle of this It was such a beauty I had to try. So my question is if I use all the same products which I do have., how do I seal it if I want to sell it? I’ve use Annie Sloan wax before and lived the look. It was a piece I’ve kept. But I know I can’t poly it after I wax. So do you suggest I get better at waxing so there are not scratch marks if something is put in the top? I want to seal with poly but then can’t achieve the same look if I don’t use wax. So how did you get yours to stay nice if you don’t deal with poly, just get better at using clear wax?
Thanks, mary
I”m a little behind but…..thought I’d ask….How did you apply the wax down the front side sections and the feet? I love your work.
Hi, I love this finish and am interested in attempting it on hutch/server combo. It’s currently an espresso stain. In your opinion, would the darker stain have a negative impact on how this turns out? This is my first attempt with painting furniture and I’m hoping I haven’t bitten off more than I can chew 😬.
Hi Amy! The dark espresso stain should have no effect on this finish. Have fun!
What a beautiful piece and a great technique. I’m wonderin what would happen if you applied that paint exactly as described but didn’t wait for each layer to dry? I’d love to see the difference.
The end result is beautiful and you have dumbed down the steps for us very well. Thank you
Paint layer perfection! The green is so rich and has so much depth and love how the shiny brass hardware just pops against it. Great tutorial too. I’ve been out of the loop these days and didn’t realize you’d been battling the flu. Glad to hear you’re feeling better my friend. xo
This is one of the most beautiful green pieces I’ve ever seen. Now I want to paint all the blue things…….GREEN! Congrats Denise. XO
Thanks so much, my friend. XO
I have a question. I love how this dresser turned out and I wanted to translate the colors and techniques you used to a rocking chair I’m refinishing. I stripped all the paint and sanded it evenly because it was in pretty bad shape before. But before I start applying the olive then blue then Amsterdam green, should I paint all those parts of the chair in pieces and then assemble? Or should I assemble the chair and then paint when the chair is in one whole piece? Also I’m a beginner furniture refinished if that makes any difference lol.
Hi Taylor! If it were my chair I would assemble it and then paint. The reason being is then I could see where I wanted to place more or less color as one cohesive piece. 🙂
That is soooo very fabulous!! Should you admit to salivating over a painted dresser? Thank you much for the tutorial and sharing the great results.
Hi Dee! I openly admit to drooling over furniture…lol. Thanks so much and have a super day. 🙂
My Husband and I love this technique and will attempting our own dresser in a few days. We did notice on the pictures between the wax and display, it looked like a step was missing. Was there a clear coat put on after the wax or was it not dried in that photo. We were really wanting to achieve an “end look” like yours.
Hi Catherine! No clear wax was used on this piece however if you feel more comfortable, you can apply a coat of clear wax prior to using the dark wax. This will allow you some ‘play’ and the ability to ‘erase’ the dark wax if you don’t like the look. However, it may also give a more subtle overall look to the piece also. As for the next step, once I applied the dark wax on the perimeters of all the drawers and body, I took a stiff/cheap 3″ dollar store paintbrush and brushed the dark wax from one end of the drawer to the next. This spreads the dark wax in a ‘painterly’ fashion leaving that gorgeous texture you see in the middle of the drawers. Drying time does take longer for this technique (up to 30 days) because the wax is applied and not rubbed back. Hope this helps and have fun with your dresser. 🙂
I was wondering the exact same thing. It looks like there was a step missing between applying the black wax and putting the gold hardware on. How does it look so different? It’s beautiful and would love to try it on an old dresser! 🙂
This is absolutely GORGEOUS!!! You knocked it out of the park! Love love love the Green 💕
Thanks Cindy!
I’ve read all of the comments and still have a few questions:
1) what type of scrub brush do you use? was the TSP for all over or just the nooks and crannies?
2) how long did you wait between the last coat of Amsterdam green paint and sanding? How long after that for the wax?
3) I read the linked article about how to apply the wax, but what type of brush did you use for it? Do you think the brown Annie wax would give a similar effect to the black? Not sure how different they may end up.
II just purchased a home and have inherited a few pieces of furniture from the sale, which I would love to update! I already have the paint colors in my shopping cart, so just a few questions before I pull the trigger on my first DIY of this sort… Go big or go home, right?!
Hi Michelle! 1. TSP was used to clean the entire piece. Dollar store dish brush (plastic bristles) works great for nooks and crannies. 2. Once the paint is 100% dry you can sand. I think I sanded the next day and waxed immediately after. 3. I used a cheap 3″ firm dollar store paint brush to apply the wax. yes brown works/looks great! Congrats on your new home and have fun. 🙂
I want to end up with an antique French look with blue on top layered over some white. What colors would you recommend, maybe gray, white and then the blue? Thanks for this post. This is as close to mind’s eye as I’ve found.
If I was wanting to use graphite Annie Sloan chalk paint on a project to achieve an old world look on some bedroom furniture, what colors would you recommend layering with?
This is beautiful! After it’s done what is safe to clean it with?
Thanks
Thanks Sarah! To clean I just use a damp cloth or a swifter cloth for dusting. 🙂
Hi Denis, After you applied the black wax and before you added the hardware did you apply a clear wax or something? The final piece looks much more blended with a smoother , deeper,, richer color.. I love your work!
Thank you
Hi Stacey! Thanks so much. 🙂 No additional wax or topcoat was added after the dark wax.
Hi, great painting idea! I’m sure someone has already asked but does this technique work with paints that aren’t chalk pain?
Hi Rene! I’ve only tried this technique with chalk/mineral paints so I’m not sure. Great questions. I’m guessing yes, but chalky paints are easier to add texture with so the finish may look slightly different with a regular latex or acrylic paint.
Thank you for your reply. I’m asking because I just painted my bedroom and I have some sample paints that didn’t make the cut but would blend in well. Eh I’ll try it and send you feedback with a picture! Thanks again!
Thanks Rene, I’d love to hear how it works out for you!
Add calcium carbonate and a bit of water to your latex samples too make chalk like paint. That way you’ll have the best of both worlds.
How much should be added?
Hi Denise, I love this jewel toned color combination and hope to reproduce it on a roll top desk. What Dixie Belle colors would be closest to the ones you used? I already have the Dried Sage color and thought I would use that as my base. Any thoughts on how to bring the layered look to the actual roll top part of the desk? I love your work and look forward to your response!
Hi Elle! Annie Sloan’s Olive, Aubusson Blue & Amsterdam Green – You could use the DB Dried Sage as your Olive base (seeing as you already have it 🙂 ) and then go with a blue you really like. A very small amount shows through. Just enough to add depth. As for the Amsterdam Green substitute that’s tough because DB has more vibrant greens. So I would probably go custom and mix some Kudzo with a black or dark grey to tone it down and deepen it some. As for painting the roll top, I would use the same layers but apply gingerly as not to make a mess. It’s tempting to load the brush as you normally would but often that leads to drips etc. Hope this helps and have fun Elle! x
Thank you for your response! Wondering if it is okay to use the Amsterdam Green from Annie Sloan as my top coat along with the Dixie Belle Dried Sage as my base and either the AS or DB blue as a mid color. Is there anything in the formulation of the brands that would not allow them to work together? Inspired by your blog, I’ve only worked with the Dixie Belle paint and waxes. Should I use only the AS black wax or a DB alternative? Appreciate your help!
For sure Elle. These products can mix and match. 🙂
Hi
I have a table that I bought years ago. It was white washed , but thru the years turned yellow.
I want to chalk paint it dark, then white. My dilemma is when I tried a spot, I then tried lightly sanding it to distress it. Then both layers came off. And the yellow came thru.
What should I do. Can I put a top coat over the dark layer to seal it so then when I paint it with the white chalk paint and sand distress it, the brown color won’t come off. I’m just not sure how I should do this. Can you give me some ideas. Thanks.
Sure! A VERY fine sandpaper with a light touch might do it say 320-400grit. If you’re using chalk paints a wet distress can also work nicely. You can paint the bottom (dark) layer with an enamel (or something other than chalk paint) so when you wet distress the dark bottom layer stays put. Or you can try a resist method like this vaseline technique or wax method here.
I’m in love with this color combo and how your piece turned out! Going to try it on a buffet. Question- when you sprayed the water, did you let that third coat of paint dry first? Did you work that step in small areas or whole piece at once. Thank you! I’ve had recent success with Magnolia Chalk Style Paint but maybe I’ll try the AS to get the right colors! Thanks again!
I have the same question.
I worked in sections (drawer for instance) and sprayed the water on the wet Amsterdam Green. 🙂
How do you get the hardware so shiny? Do you send them out to get them refinished? If so, where? I painted over ther hardware on my curio and I am regretting it.
I think for this piece I used BRASSO. It cleans up old hardware beautifully.
Hello, I just discovered something that polished up brass plated hardware BEAUTIFULLY!
Barkeeper s Friend cleanser……wet hardware, shake the bottle well because it s semi liquid, apply some liberally, let sit a little while and lightly scrub.. An old toothbrush or fine steel wool helps with tiny spots. This worked so much better for me than Brasso..
Thanks for this Sharlee!! 🙂
Sorry for the typo Denise!
haha, no worries… thanks for sharing your great tip! 🙂
I’m new to Dinese’s site. and a little behind but, you are right about the barkeeper’s friend. Always have some in my house. You can also cook hardware in old crockpots. Works wonders. You can pick up old crockpots at Thrift stores such as Good Will. I find “church thrift stores will “deal” with you a little better.
Hi Denise. Your work is absolutely beautiful! I’m just getting started at all of this DIY repurposing and decorating and I have very little knowledge. I have several pieces of old furniture that I refuse to get rid of but the colors don’t go with any of my interior colors or décor. My first project is a computer desk that I use daily. It is one of those Sauder desks that you have to put together. I’m not sure of it is laminate or veneer. I’m guessing laminate. Any suggestions on how to go about painting it? I don’t want it out of commission for a long time so I’m looking for something that won’t take more than a few days or a week to complete. I would like to use aqua or teal infused with copper or bronze as the colors
HI Eileen! Yes, I’ve worked (and owned) a few Sauder pieces and as far as I know, they are usually topped with a laminate. Here are some tips on How To Paint Laminate and using these techniques — your desk shouldn’t be out of commission for more than a few days. 🙂
How did you get the crackling effect in the paint? It’s a beautiful piece! You do wonderful work!!
thanks Donna! 🙂 This empire dresser had a little texture on some of the wood/veneer so that may be what you’re seeing but nothing was done to create a crackling effect.
Hi Denise,
I love this layered look! Can you tell me roughly how big this dresser was and how much paint you used? Looking to do multiple pieces to match and trying to figure out much paint I would need.
Thanks
Hi Shannon, and thank you! Dimensions are 55” H x 38” L x 18” D … it’s a large tallboy! Hard to say exactly how much paint I used because I was dipping into different colors but I would say in total – an 8oz container… maybe slightly more. ?? When I work with DB paints I find the paint is thick and really pigmented so 95% of the time I’m watering it down unless I’m trying to create texture. Hope this helps. 🙂
I am not a green person but I love this piece. I am about to attempt a two-tone version myself. How did you manage to keep that key holes Shiny and bright without removing them? I’ve had a few pieces that I can’t remove hardware from and it irritates me. Love your work.
Thanks Cheryl! If you take a peek at the ‘process’ pics, you’ll notice I paint right over those keyholes. Then when I sanded, I sanded them too! Makes them look like new. 🙂
I Love your work I’m doing a ‘wardroom’ piece dying this technique and similar colour scheme . Thanks for sharing such great inspirations and how to tips ! Much reepect! – Cade
‘Doing ‘ not dying. !
Hi Denise,
I am refinishing a piece that has glass door on top and one drawer on bottom. Beside the glass door on either side is a fairly wide wood panel. I am at the waxing step and am not sure which direction I should do my brush strokes. The drawer seems it should be done sideways but the inclination is to do the panels up and down, as they are taller than wider. Will it look weird if the brush strokes are in different directions on different parts of the furniture?
Hi Jane! The direction I paint is in relation to the area I’m painting. For instance, if I’m painting a front drawer I go horizontal, but if I’m painting the side of a tallboy dresser, I’ll paint vertically. So paint direction is adjusted for the area I paint. As for brush strokes – it’s best not to have any unless you want a textured look. Here are a few tips to make brush strokes disappear. 🙂
Thanks for your quick response, Denise. Every step of this project has turned out exactly like yours. Excellent instructions!
I Love your work I’m doing a ‘wardroom’ piece dying this technique and similar colour scheme . Thanks for sharing such great inspirations and how to tips ! Much reepect! – Cade
Hi Denise! I’m going to try this this week on two of my dressers , although both are already painted so we’ll see how it comes out… I was wondering if you used a gloss/varnish at the end or left it as it is? Many thanks 🙂 x
I used Annie Sloan’s Black Wax to seal/protect/and add texture at the end. No gloss or varnish was used. Have fun with your piece Sara!
Thank you so much for your reply! I just bought all the supplies today, very excited! They had no block wax so I’ve got with a dark Jacobean wood one, will that still work?! Sorry for all the questions I’m a complete upcycle novice!
Jacobean is a nice dark brown so I think it will work really nicely. 🙂
Hi Denise,
I am about to try my hand at the layering technique for the first time. I absoulelty LOVE this look. I do have a couple of questions if you don’t mind.
1. Did you scrape with a putty knife like Debbie with Debbie’s Design?
2. How do you pick what color to go with? I think this is my biggest challenge. If it was for me I would match my decor but these are pieces I would like to sell.
3. What colors sell the best? I know it just depends. Some people like Farmhouse and some people like deep colors but, in your opinion, which do you think sells faster?
I just love your blog and reading your tutorials. I just need to do it. I wish my furniture could talk to me. LOL
Hi Cheryl! 1. No I did not use a putty knife. 2. Pick colors you’re drawn to rather than worrying about what will sell or not. For me, there’s nothing worse than working with colors (or a piece of furniture) I’m not into… it just doesn’t feel good. If you paint with passion, you’re piece WILL sell because I believe it shows through on the piece. 🙂 3. White and black. In my experience, white and black sells fast because they are neutral and most safe and versatile. Hope this helps and I’m cheering you on from this end Cheryl. 🙂
Hı Denise l love green ❤❤❤❤❤and incredıble.ı am türk
I don’t know much english.hands health
Hi Nursema, WELCOME. My sister and I visited Istanbul many years ago – absolutely GORGEOUS! Thanks for the love and hope you drop by again. 🙂
I absolutely LOVED this piece!! Just loved it! Such a gorgeous finish. And that colour. Goodness. I happened to come across this post via Pinterest n boy am I glad. 🙂 I’m no pro, or even a novice. But I love woodwork and all things associated with it. And such detailed explanation you added that helped even someone like me to visualise the process. I will certainly follow your work as there’s so much to learn! Keep up the great work!
Thanks Natalia, and WELCOME! So glad you’ve found the #siblog on Pinterest and glad you like the dresser! Look forward to chatting again soon and Happy Holidays to you. 🙂
I’d love to do this technique on a brand new, unfinished pine dresser. Since the wood is still it’s original pale color, would it still work to apply the colors in the same order? Or would I need to build up a deeper color underneath the first color?
Hi, Denise! I think this project is amazing. I am going to attempt it with my dresser… but I have one question. The peice is currently coated with a dark stain and I am afraid of how this will effect the layering. Do you recommend that I sand it all off first? Or add something else before the layer of olive? Thanks so much!! Can’t wait to get started 🙂
Hi Victoria! IMO, I think a dark stain would look really nice as the base. Work with what you have is my motto most of the time. You can choose to reveal as much or as little of the dark stain as you like… and you will get a feel of your preference after your first coat. Good luck and have fun. 🙂 I’d love to hear how it turns out for you.
Your piece is amazing and your instructions are so helpful (as always). I’m about to embark on my largest chalk paint project – a large china cabinate – and this was a real inspiration. Thanks so much for sharing and teaching.
Have fun with your china cabinet Xenia. I’d love to hear how it turns out for you. 🙂
Hello – This is beautiful! Question about the hardware… it looks like the original bureau had single knobs, which you changed to pulls. In the photo of the original piece it looks like you filled in the knob holes with wood putty. How then do you line everything up properly to drill the holes for the new pulls?
Hi Sheila! When I first started repositioning hardware it took me a while and I was scared of mucking up. But with a little practice, it gets easier. I measure with a measuring tape or see-through ruler, drill my pilot hole, and then the actual hole for the screws. Also, you may find this tape trick helpful. 🙂
Gorgeous! You did a beautiful job on this piece. I found the same dresser and painted it white and gray for my daughter`s room. It came out stunning. I love your technic. I so happy I found your blog.
Beautiful and helpful! Is there a *key* to which colors go on 1st, 2nd, 3rd, etc? Project photos of A.S. projects show the colors, but not what order they are layered on. Help!
She used Olive, then Aubusson, then Amsterdam.
How do you figure out which colors to use to achieve the desired effect?
I have the same question. I can’t always see the colors. Maybe a color wheel showing complementary colors? I haven’t tried it yet.. Although I did follow Denise’s instructions, and my piece came out beautifully!
I’m wondering about the colors also. The piece is absolutely beautiful, but I don’t see any trace of the first two colors. I’m wondering if those layers were even necessary.
Hi could you give me some more combos of colours that would work together in a blend? I am looking for a creamy /earthy colour combo for a 3 drawer server. Thanks.
Hi Denise,
After you’re done painting and ready to apply the wax, do you Sand the edges Or the entire piece ? Your work is amazing by the way!
Thank you! I’m in the habit of sanding all my pieces for a super smooth finish before top coating. In some cases, it’s a super light sanding with a high grit paper ie 300-400 grit as in the case with this dresser. And yes, if you want more distressing around the edges you could use a lower grit. 🙂
Hi Denise,
love the finished product! Thank you for sharing. I did wanted to ask more about the brushed wax technique. Did you just use the black wax only or did you also use clear wax to wax the entire piece before using the black wax?
Also when you brush the black wax toward the center are you not wiping off the excess wax?
Thank you.
Hi Denise! I did not use any clear wax. And no, I use the black wax on the hard bristle brush to create this look. So add more wax and more pressure around the edges, less wax and less pressure closer to the center. Then I leave it for a good 24 hours – and then wipe off some excess making sure to go over it lightly… not smudge it all in…hope that’s helpful and makes sense. 🙂
Hi. When you spray the water, do you spray the entire piece and then brush where you want to blend? Or do you only spray where you want to blend? I am asking because I am picturing paint running/dripping. Beautiful piece, by the way.
Hi Allison, great question! It depends on the look your after because I know many people are liking the drippy look. I tend to tone mine down a bit so spray the water in sections… where I’m focused on the blending and then move on to the next drawer or area and repeat. 🙂
Thank you for for showing me your beautiful pieces.
I am inspired .
Thank you Joan! I’m so glad you like it. 🙂
This is so beautiful— thanks for sharing
Thank you, Carol! 🙂
Hi Denise,
I have about two hours ago joined your blog, and am absolutely inspired by this project of yours, i.e. Layering Chalk Paint. I am an absolute newcomer and have firstly done a few small things [trays, wooden boxes, chairs and small side tables. I have lately started on painting an old sideboard” with AS Graphite, and the outcome was not bad at all.
I have not, however, done any other techniques on it yet, not even distressed the piece. So what I now have is a furniture piece, overall painted with Graphite – maybe too neatly done, though, after I have watched this tutorial that you now have shown us, and I would like to add one or two colours in addition to the 1st Graphite layer . I would like to use this layering technique and add two more colours to liven up the piece, if one can call it that!
I can also mention that the dresser is at our beach home and I would like it to somehow fit into the decor of greys, whites and some blues.
Can you please advise me on what additional colours I can use to obtain a layered look, and if I perhaps firstly will have to sand down a bit on the Graphite base colour before continuing, or perhaps firstly “kill” the Graphite a bit with a lighter base colour?
I will really appreciate your advice to me on this big issue for me, and even if some of the other [more experienced than me!] friends here on your blog could give me some ideas, seeing that I now already have a Graphite base colour?
Thank you ever so much …
I
Hi Isobel! Sounds like a great project. Seeing as its painted ‘perfectly’ in AS Graphite, it may be difficult to get a real blended look as that’s usually done wet into wet paint. I’m guessing here (because I’ve never tried the blending technique on an opaque painted graphite piece), it may be helpful to sand some of the graphite off and then start layering colors into each other from there. Black will still be your dominant color, but if you carefully blended in some grey and blues to say highlight around the doors/drawers etc, it could look quite stunning. Also, a black or custom diy wax could add more dimension and color too. Good luck!
i love this! is this technique only possible with chalk paint or do you think I could achieve something similar with Fusion Mineral Paint????
Thank you Lou! And yes, you can definitely achieve this with mineral paints! 🙂
Hi Denise….gorgeous! All of your pieces are gorgeous! I do have a question for you…when you say you lightly brush the black wax on over some areas, is it enough to protect it or have you used any clear wax or poly before hand? Thank you!
Hi Cassie! Thanks, and the black wax is all I used. It seals the piece nicely. 🙂
I was following down the list until I came across my question – already asked by someone else (In case it was a REALLY silly question!!) 🙂
I have had issues in the past with the dark wax blending my colors TOO much. I wondered if you had done the dark wax only on the outside and used clear wax in the middle. You state above you only used the dark wax – Can you guess what I might be doing incorrectly to get the undesired blending?
Thanks so much- Love this site
Hi Ami! For sure. You could use both clear and dark wax and then lightly blend the dark wax into the clear. 🙂
Your work is absolutely beautiful! I’m inspired to pick up a paintbrush and get to work.
Thank you so much, Susan! 🙂
I’m in the middle of doing my first layered piece and it’s sooo intimidating, and boy it sure does get ugly before it looks good (assuming mine will look good when it finished, fingers crossed tightly) thank you for your beautiful inspiration! I adore your work!
Thanks… and I know, it is intimidating. But it will look ugly before it looks good so keep going! I’m cheering you on from this end and I’d love to hear how it all turns out for you. 🙂