
Can I let you in on a little secret without you thinking I’m weird?
Whenever I find a vintage piece of furniture curbside [like this one], I do a little happy dance! It doesn’t matter if a passer-by is walking their dog – if a FedEx dude is making a delivery – or if a landscaper is mowing a lawn, I still indulge in my weird little happy dance!
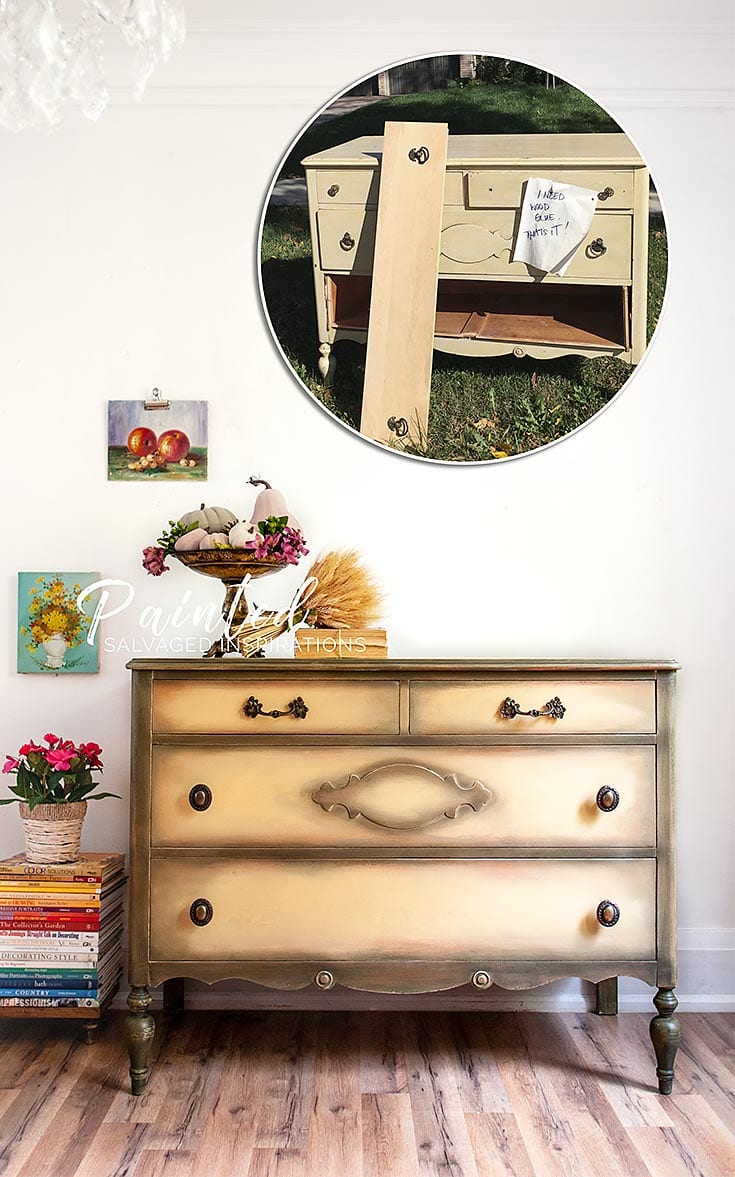
And that’s exactly what I did when I found this curb-shopped vintage dresser. Take a look at this charming piece!

Someone had lovingly tried to repair the wonky bottom drawer. They even went to the trouble to attach a note saying “I need wood glue. That’s it!” If that’s not a shout out for ‘saaaave me’, I don’t know what is.
Unfortunately, the repair wasn’t a quick fix with wood glue. MMM reconfigured the bottom drawer and ended up making an entirely new face because sadly, their new drawer front had warped.
Once everything was all fixed, I read over all your color suggestions on Facebook – which I’m loving btw! – and blended a few of them together.
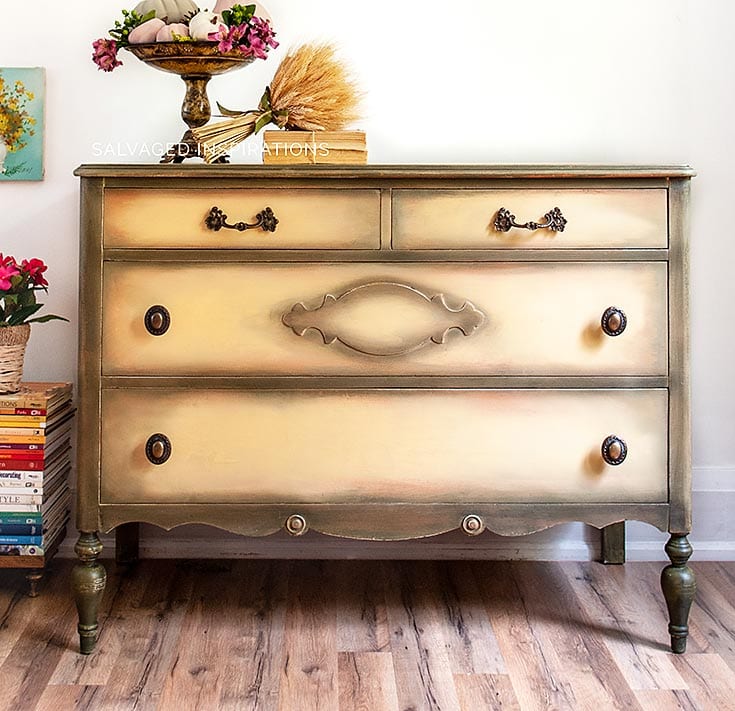
Here’s what we ended up with. Take a look at this Rebel Yellow Vintage Beauty…

THIS POST CONTAINS AFFILIATE LINKS TO PRODUCTS I USE. YOU CAN SEE MY FULL DISCLOSURE HERE.
SOURCE LIST::
-
- Vintage Dresser – SALVAGED
- TSP
- Water Mister Spray Bottle
- Shop Towels
- Paint Brushes (tried the new mini here)
- Olive AS Chalk Paint
- Collard Greens Chalk Mineral Paint (Olive substitute)
- Terracotta Chalk Mineral Paint
- Rebel Yellow Chalk Mineral Paint
- Gator Hide Topcoat
- Black Wax
REBEL YELLOW VINTAGE DRESSER MAKEOVER::
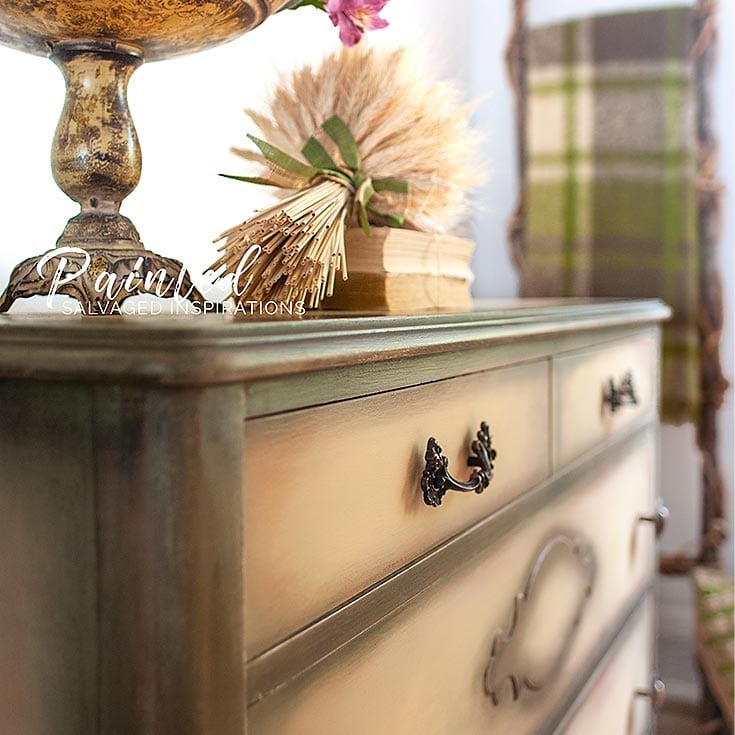
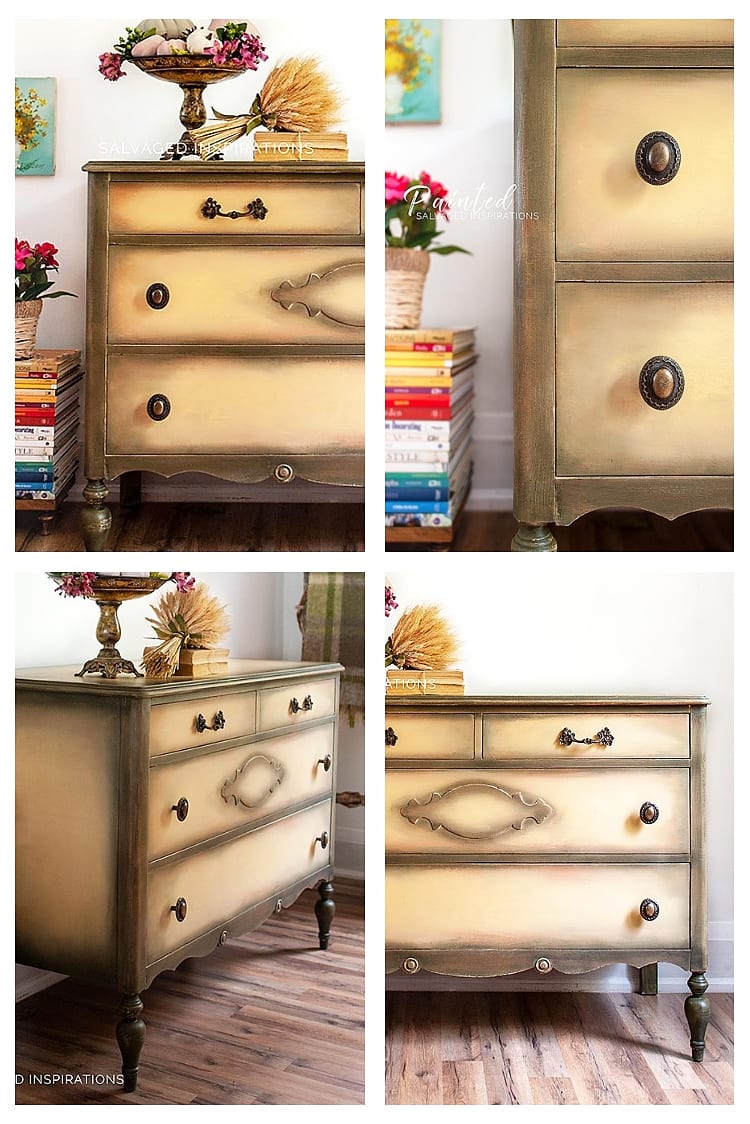
Once this vintage dresser was repaired and cleaned, it was sanded, primed – and then I used a layering and blending technique to get this finish.
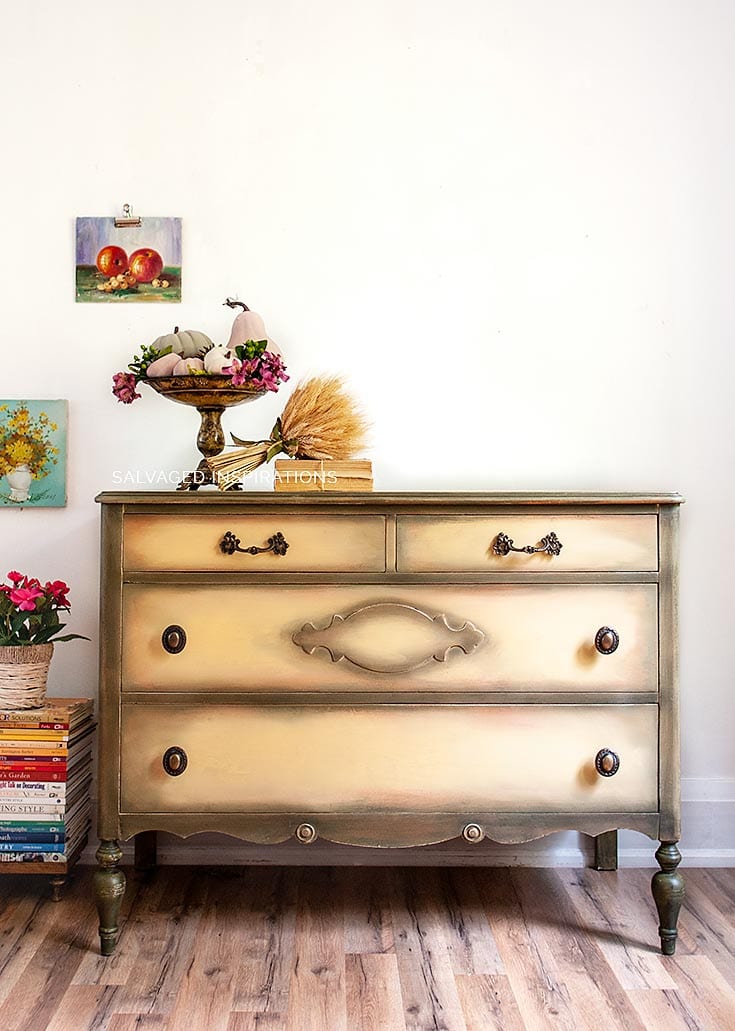
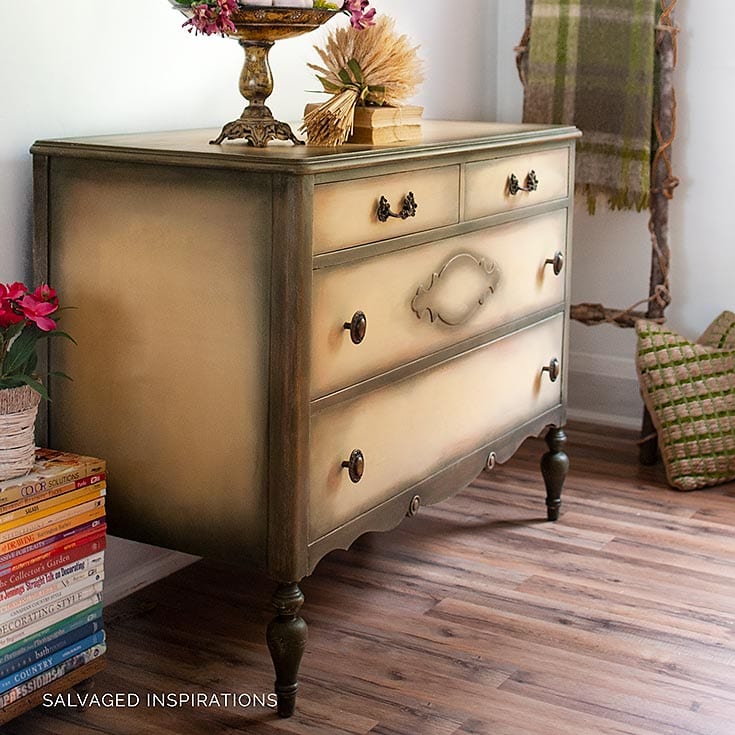
The Rebel Yellow is the star of the show but combined with Annie Sloan’s Olive Chalk Paint and DB Terracotta, it makes for a gorgeous retro-blend! I didn’t have any on hand, but DB Collard Greens is a perfect substitute for AS Olive if you were looking for a less expensive option.
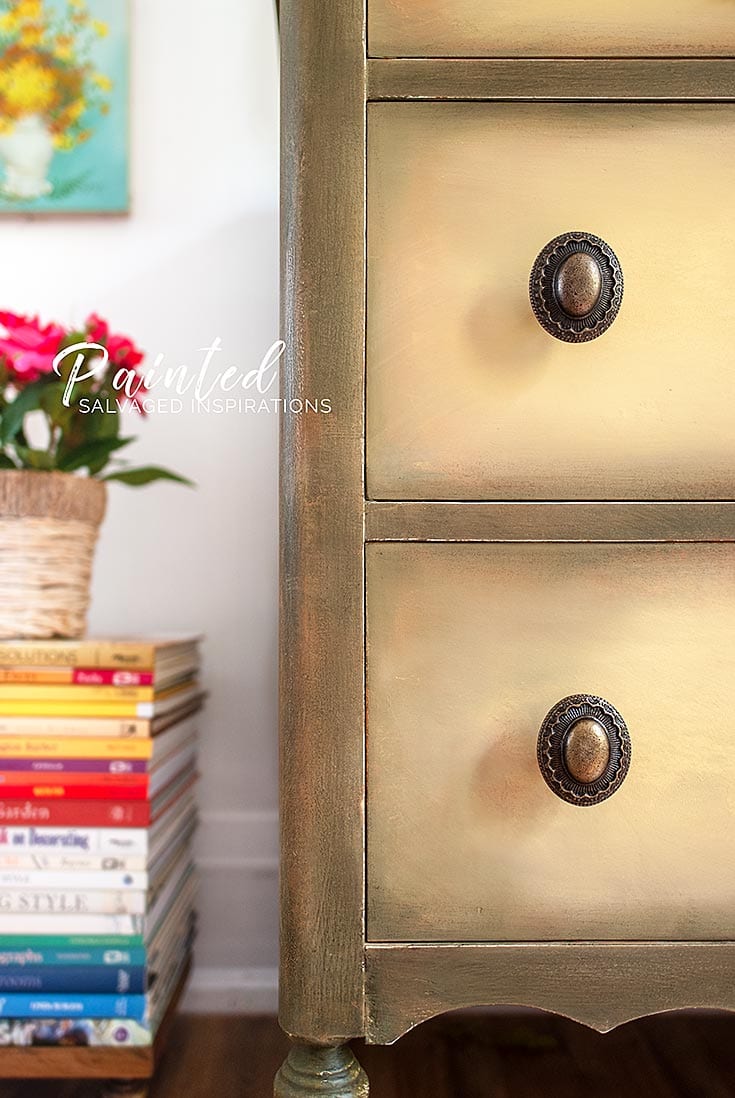
The vintage handles on the top two drawers were taken off this Dark Romance Radio Cabinet that I shared a few weeks ago. The oval knobs on the bottom drawers are a 50% off Hobby Lobby find.
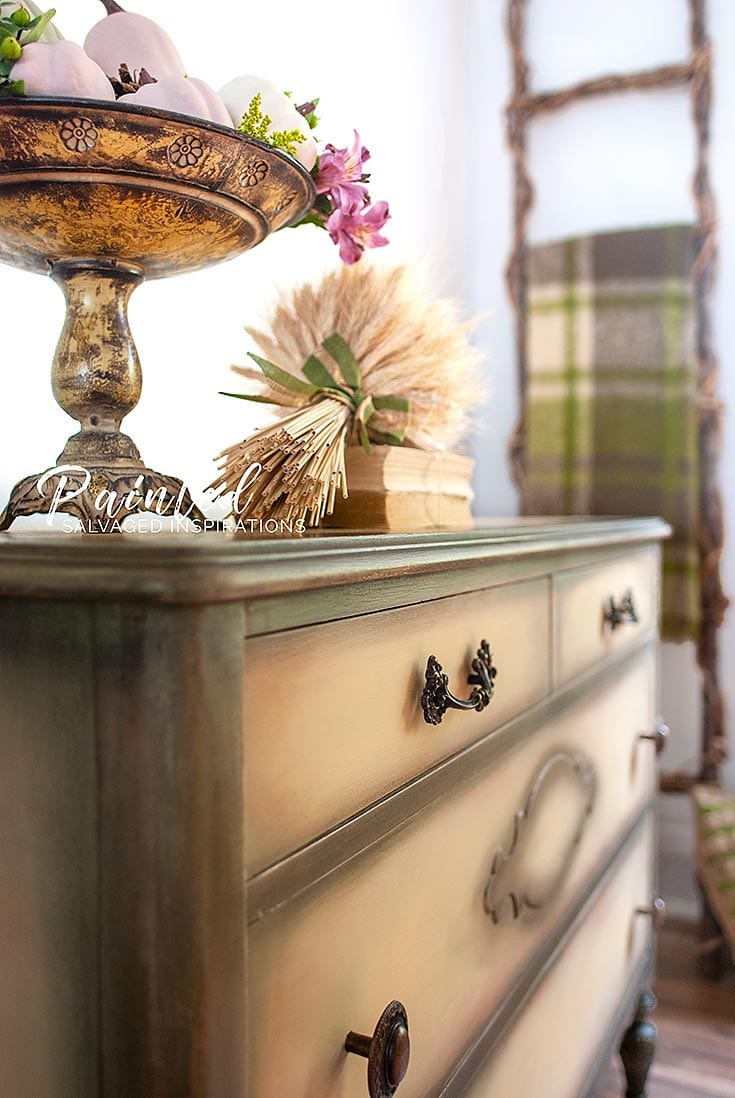
I really like the hints of the Terracotta peeking through. It gives this piece a warm pink-ish hue and makes for a beautiful finish.
The black wax is only applied around the edges where the Olive green was used, and then ever so slightly blended into the Rebel Yellow. This adds some retro-drama. 😉 What do you think?

I hope today’s curb-shopped makeover sparks some ideas for your upcycling projects. You guys are always inspiring me so thank YOU!
I’D LOVE TO HEAR YOUR QUESTIONS AND/OR TIPS AND WHAT YOU THINK OF THIS CURB-SHOPPED DRESSER MAKEOVER. FEEL FREE TO CHIME IN… I ALWAYS LOVE HEARING FROM YOU. 🙂
Happy furniture painting my friends!
Denise x
RELATED POSTS::
Fall Style Furniture Makeover | Before & After
How To Apply Furniture Transfers | Vintage Radio Cabinet
Painted Entryway Table | Fall Makeover
Layering Chalk Paint | Empire Makeover
How To Paint Furniture WITHOUT Brushmarks!
PIN AND SHARE!

Hi! LOVE your website and pieces. You are so talented! Did you let the yellow dry before adding the terra-cotta? Or did you add another layer of yellow and then wet blended in the terra-cotta? There’s so many ways to do it so I was just curious. Thank you so much!
Thanks Leslie! … and they were blended together while still wet.
Amazing! The technique seems so simple In theory but in application that’s a whole other story! Thank you for the response! You continue to inspire my furniture painting obsession. ☺️
Hi there, I’m new to your incredible blog and to chalk painting. This piece is amazing. I wanted to quickly ask how you got the tones peeking through the olive green around the edges? Did you use the blending technique on the green edges as well. Thank you for sharing all this amazing information.
Hi GGG, and WELCOME to the #siblog – so happy you popped in! I have a few tutorials on how to get this layered and blended look which you can read here and here. Hope it’s helpful and I look forward to chatting again.
Denise,
Here is another beautiful piece that is absolutely beautiful!!!!! I’ll have to read thru your instructions again to get the jest of what you did, but it turned out to be amazing. The different coloring or shading you do is wonderful. That’s what makes the piece so alive!!!! You are sooooo GOOD!!!! I love this and thanks for sharing your talent with all of us.
jean
Thanks so much, Jean! XO 🙂
Gorgeous! I Love this piece. You are so talented
Thanks Penny! 🙂
Hi Denise. I would love to try to recreate this look on a tall boy I have sitting around. Do you have a tutorial on your blog where you use the same or similar technique. Thank you for the inspiration 😍.
Hi Tania! Have fun with your tallboy. 🙂 https://salvagedinspirations.com/layering-chalk-paint-empire-dresser-makeover/
I love love love this!
Thanks Pamela! 🙂
Holy Smokes! You have such a gift and I just love that you share it with us all! I had hoped you would paint a piece yellow! My envision didn’t even come close to what you pulled off. My goodness, I just love what you do! Thanks so very much for all your inspiration and teaching.
You just put a huge smile on my face Peggy! I’m so glad you like this vintage makeover. I think I’ve only done two or three yellow pieces (here and here) but I’d like to do more!
Not weirs all for you doing the ‘Happy Dance’.’ If I was still able I would be doing back flips but too old for doing that now..
I like all the details of that dresser and what you have done with it; Absolutely divine. Gorgeous.. Like the new hardware as well. Great Job.
I did want to mention that if the bottom drawer face wasn’t warped too bad; sometimes running it through a wood planer does help. Hubby has done that with some fence boards;; running them through his planer and it really did help A lot.
My back flipping days are loooong gone too Colleen! 😉 Thanks for the kindness AND the plainer tip!!! 🙂
Beautiful job! Love the colors!
thanks Sue. 🌸🌸🌸
The yellow with the darker shading looks amazing! I didn’t think I was a fan of yellow until I saw this. Beautiful!
Thanks Nicki. The Olive and dark wax helps bring out the yellow, for sure. 🌼
Really love the shading around the edges on this one.. Makes the light areas pop.
Ahhh, thanks Tracy…I was just saying that in a previous comment! I’m having fun with blending and shading pieces and I have to say the wax makes it pretty easy!
Beautiful!! The shading of the black wax is so appealing. I hesitate to try this look because every time I use dark wax everything just looks dirty, Maybe it’s just me, but when you shadow your pieces, they look awesome! Keep up the fabulous work, I love following your blog and seeing your talent at work.
Ya, I’ve had my fair share of pieces that have looked muddy or dirty too. But I hope you don’t give up. Dark waxes can create interesting depth and interest on a piece. And if it’s not exactly as you envision, clear wax can be used to ‘erase’. 😉
You inspire with every piece you do.
Thank you
Julie
xo
Ditto Julie! 😊
Lovely, and I agree about the happy dance…. FREE wow so cool. Finished product is beautiful
Right?! I can’t help myself because you can’t beat free AND saving a vintage piece!
Hi Denise. I love this Rebel Yellow dresser soooo much. For some reason, it reminds me of the Holy Guacamole dresser you did a while back (also one of my favorites). The way you blended the colors is perfect! BEAUTIFUL 🙂
Yes! The Holy Guacamole dresser! Maybe because of both the green and yellow looking kind of retro. 🙂
Wow….This is beautiful!! I love the color combination, and the application is perfect. You did an outstanding job on this one, Denise!
Thanks so much Deb! 💛
You always do such a beautiful job layering colors, Denise! If only the previous owners could see their discarded dresser now 😉 The new oval knobs are perfect! Pinned
Thanks Marie! And I hope the previous owner would be pleased that new life was breathed into the piece. There are names and initials engraved into the bottom of this dresser from 70’s… so it was definitely a well-loved piece. Thanks so much for pinning!
I love everything about this!
I’m so glad…thank you Donna! 🙂