HOW TO TURN A DATED DESK INTO TWO UPDATED NIGHTSTANDS! |YOUTUBE VIDEO INCLUDED!
Hi creative friends! Today I’m sharing How To Turn A Dated Desk Into Updated Nightstands. I swear this desk had a mind of its own and gave me a tough time every step of the way but I LOVE how it all came together. The time and effort were well worth it!
It’s also Furniture Fixer Upper Day. I’m sharing my super talented friends’ makeovers as well. I’ve included links to their before and afters at the end of today’s post. And if I haven’t told you lately, I’m so happy you drop-in on FFU Day. Thanks for being here and joining in on the fun!
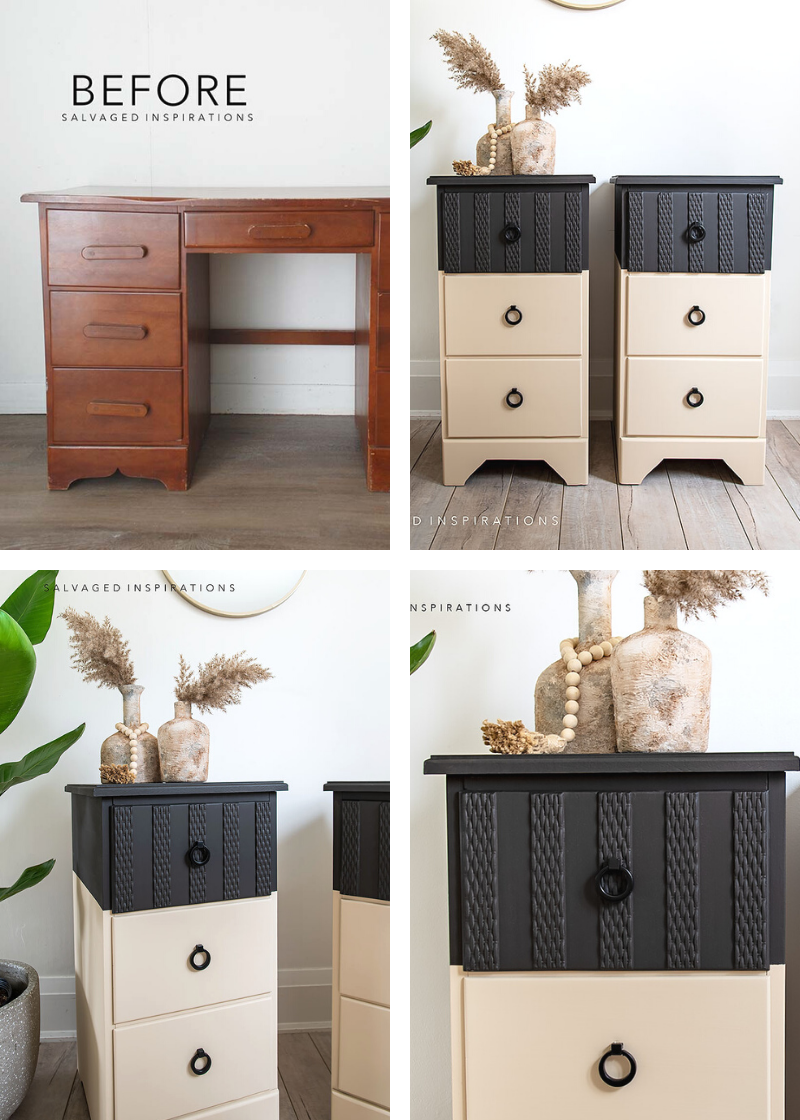
Here’s the salvaged desk I started with. One of Nick’s clients was going to throw it away so he asked me if I’d like it. YES PLEASE! It’s a well-made maple desk. I know it’s heavy-duty because when I was bringing it downstairs to my studio, I dropped it down 5 or 6 stairs. Uggghhhh. The desk was perfectly fine but it bruised my knee. Summer’s coming and it would be nice to wear shorts or skirts but I’m telling you, the amount of time I spend on my knees fixing furniture, painting, photographing …my poor knees are always discolored. 😆 Is it just me or do any other furniture painters have this problem?

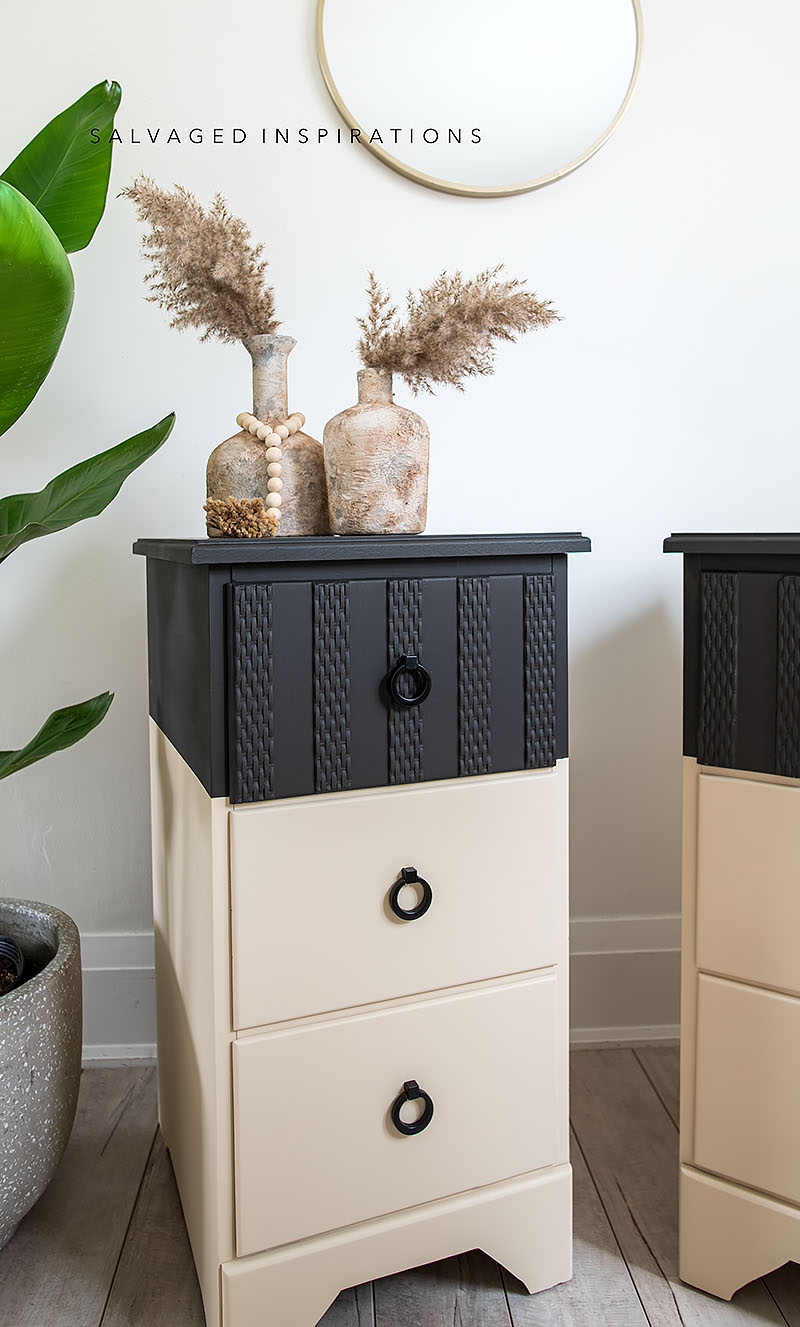
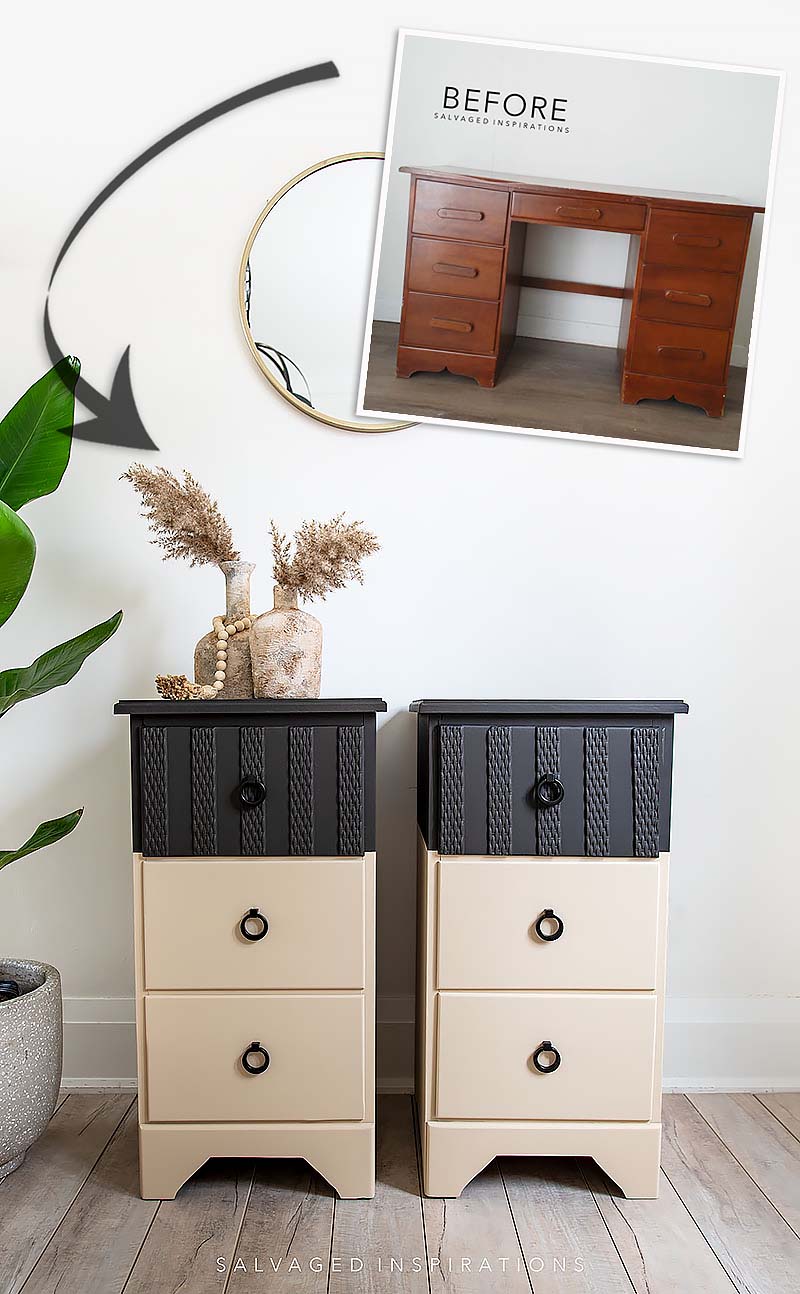
Before I get into the how-to details here’s the NEW look! What do you think?

If it wasn’t me who restyled it, I wouldn’t even know this set was a desk in its previous life. hehe
THIS POST IS SPONSORED/CONTAINS AFFILIATE LINKS TO PRODUCTS I USE. YOU CAN SEE MY FULL DISCLOSURE HERE.
SOURCE LIST
Maple Desk – SALVAGED
White Lightning
Scrubby Soap
Wood Glue
Wood Filler
Paint Brush
Sand Castle Silk Paint
Coffee Bean Paint
WoodUbend Basket Trim
Satin Clear Coat
Black Hardware Rings
TOOL LIST
Router
Jigsaw (similar)
Woodworking Square
Orbital Sander
Furniture Clamps
Skill Saw
Heat Gun (similar)
REPURPOSED DESK INTO PAINTED NIGHTSTANDS
When Nick brought me this FREE desk which was salvaged from one of his job sites, I didn’t know whether I was going to do a modern or vintage look. But I did know it wasn’t going to stay a desk. Nightstands sell WAY faster than desks in my area.
I’ve transformed a few desks into end tables and when I take it step by step, it’s easy. I like to remind myself to focus on one step at a time. Inch by inch makes it a CINCH!
What I will say (and I’d LOVE to hear if you agree down below in the comments) is styling and painting modern-looking furniture is a lot more work than a vintage finish. I find when I’m painting a vintage or artistic finish it’s easy to hide small imperfections with florals, painting techniques, transfers, distressing, paint washes, etc, but with a monochrome sleek look, everything has to be perfect. Every flaw shows!
Here are the steps I took to get this look…
CLEAN + REMOVE HARDWARE
I cleaned the inside and out of this desk with this TSP substitute. If you’re following along on my social stories, you may have seen how many cobwebs there were! Once clean, I removed the hardware. I’ll definitely be keeping these pulls because they will look great on another piece, I’m sure!
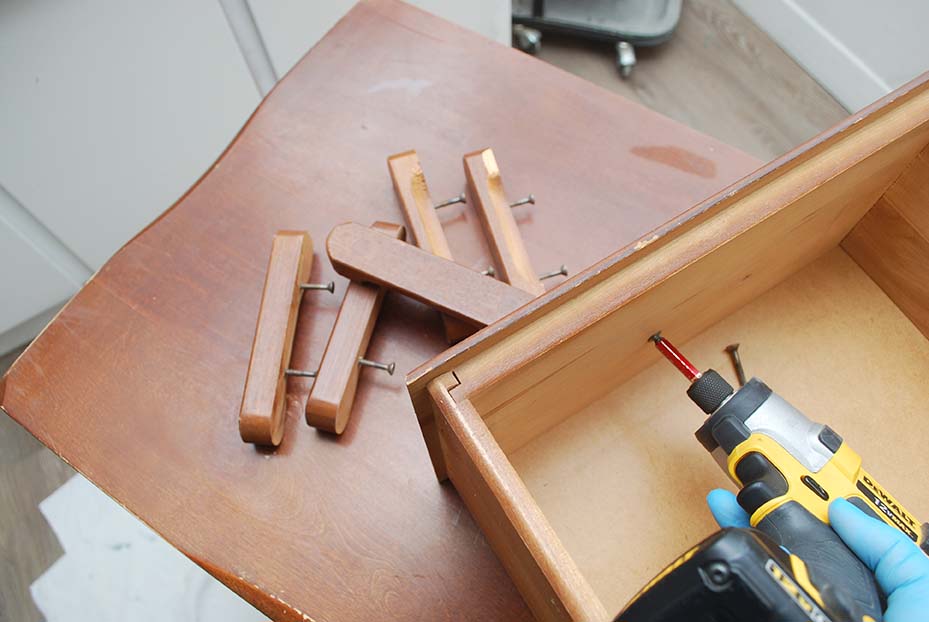
DISASSEMBLE DESK
Every desk is a little different but the basics are the same.
- Removed the desktop by unscrewing the screw from underneath the desk
- Remove the center drawer and unscrew the middle frame of the desk
- Using a mallet or hammer, remove the back support
- Success! Now you have two nightstands!

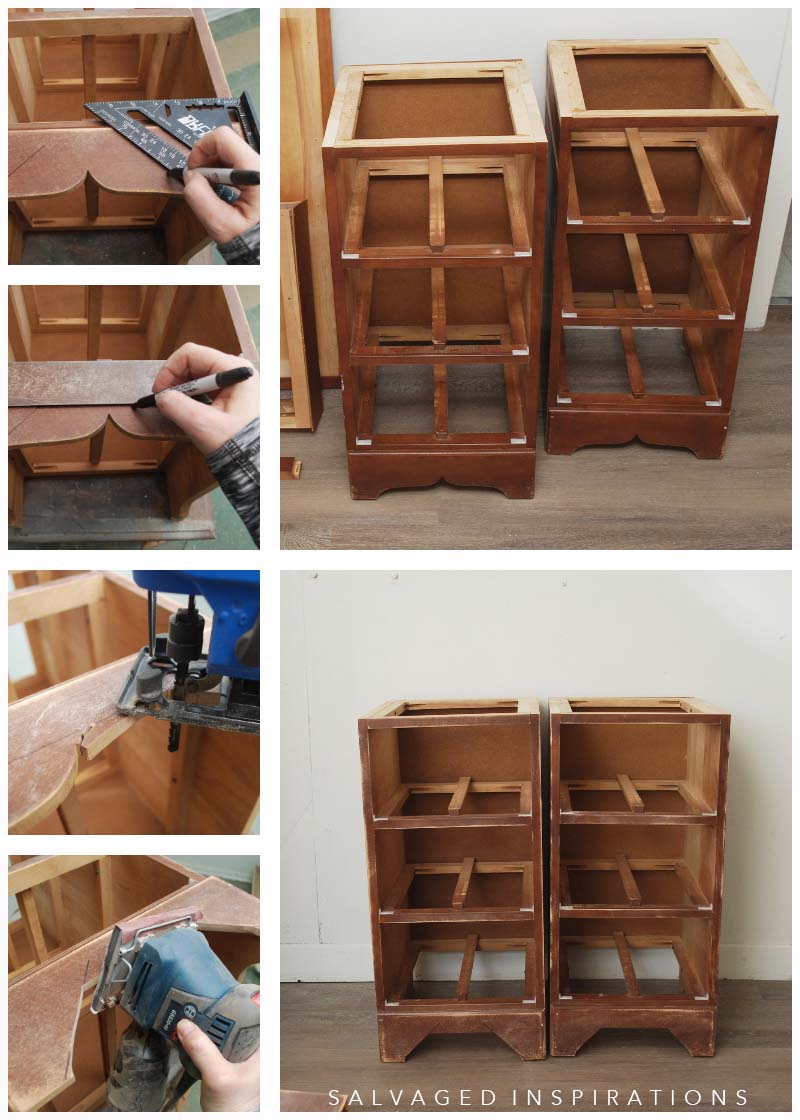
UPDATE THE BASE
To give these nightstands an updated base, I wanted to get rid of the whale-tail-skirt and used my jigsaw to create a straighter profile. My first attempt went a little crazy (which I’ll share in this Saturday’s Youtube tutorial) so I had to adjust my measurements higher than I planned, but it all turned out okay. I used a square and a sharpie to draw out the base. I followed the new profile with my jigsaw. Then sanded the edges smooth.
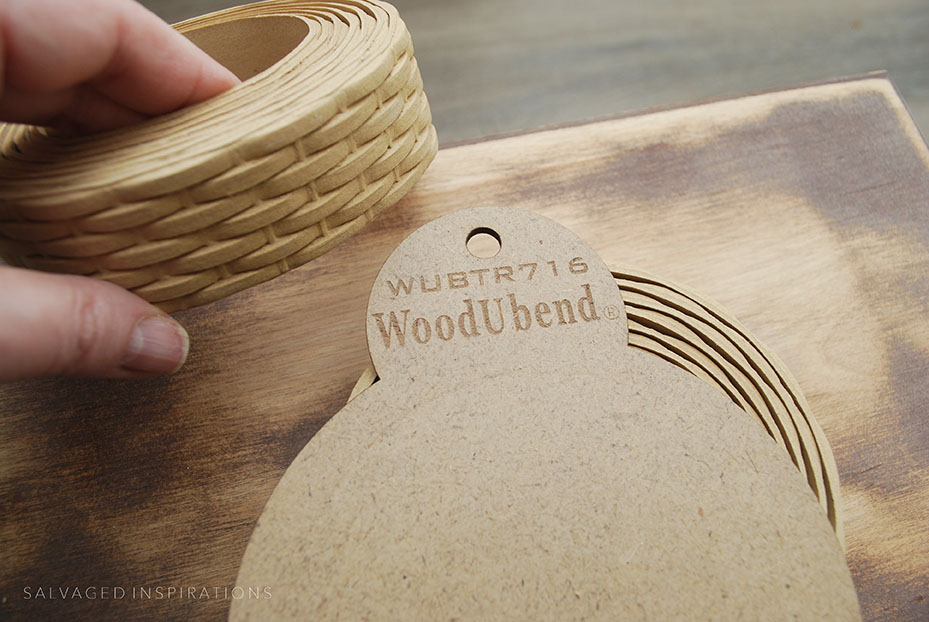
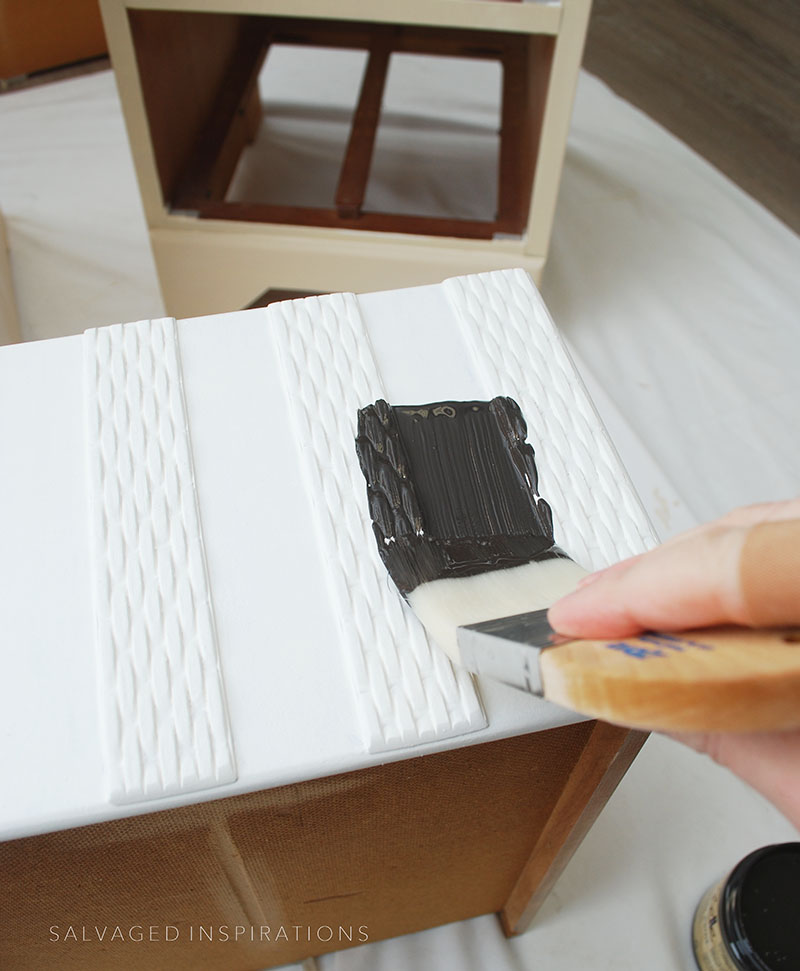
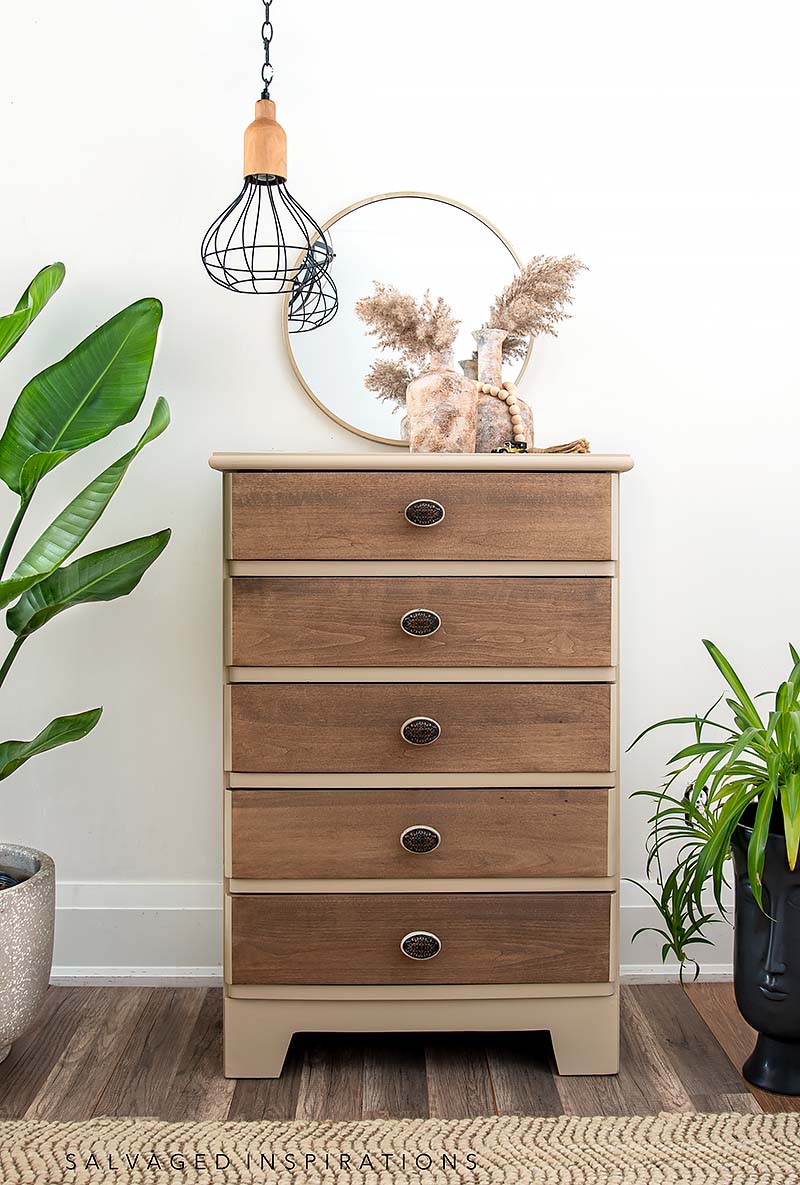
ADDING WOODUBEND
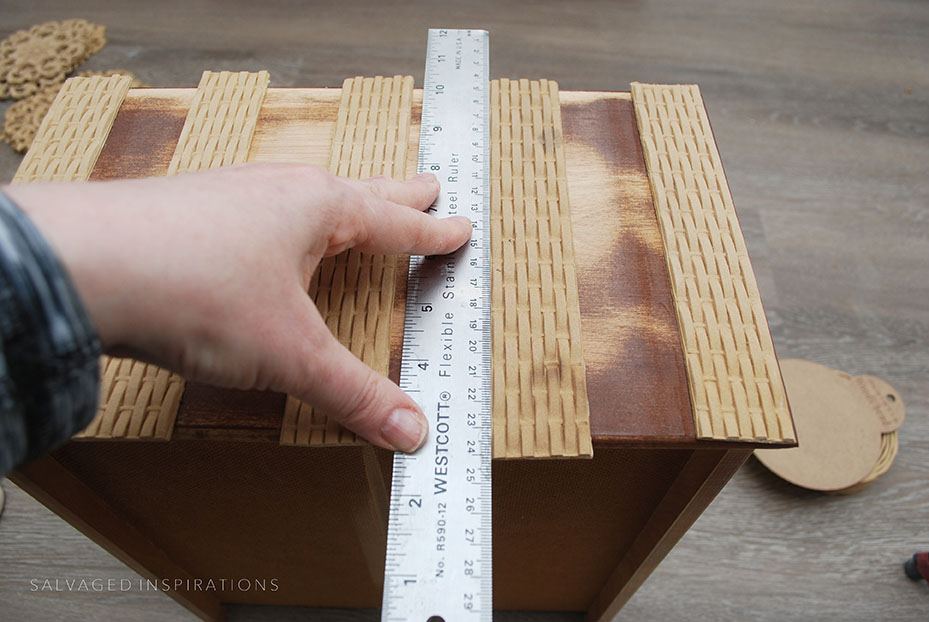
To give some interest and texture to the top drawers I added this Basket Weave Woodubend trim. Woodubend is really fun and easy. You heat it up with a hair blower or heat gun. When it is warm, it bends and cuts very easily.
I cut five strips for each drawer and glued them on with wood glue. Then using a sander, I sanded them flush with the top and bottom of the drawer. I have a full tutorial on How To Use Woodubend here.
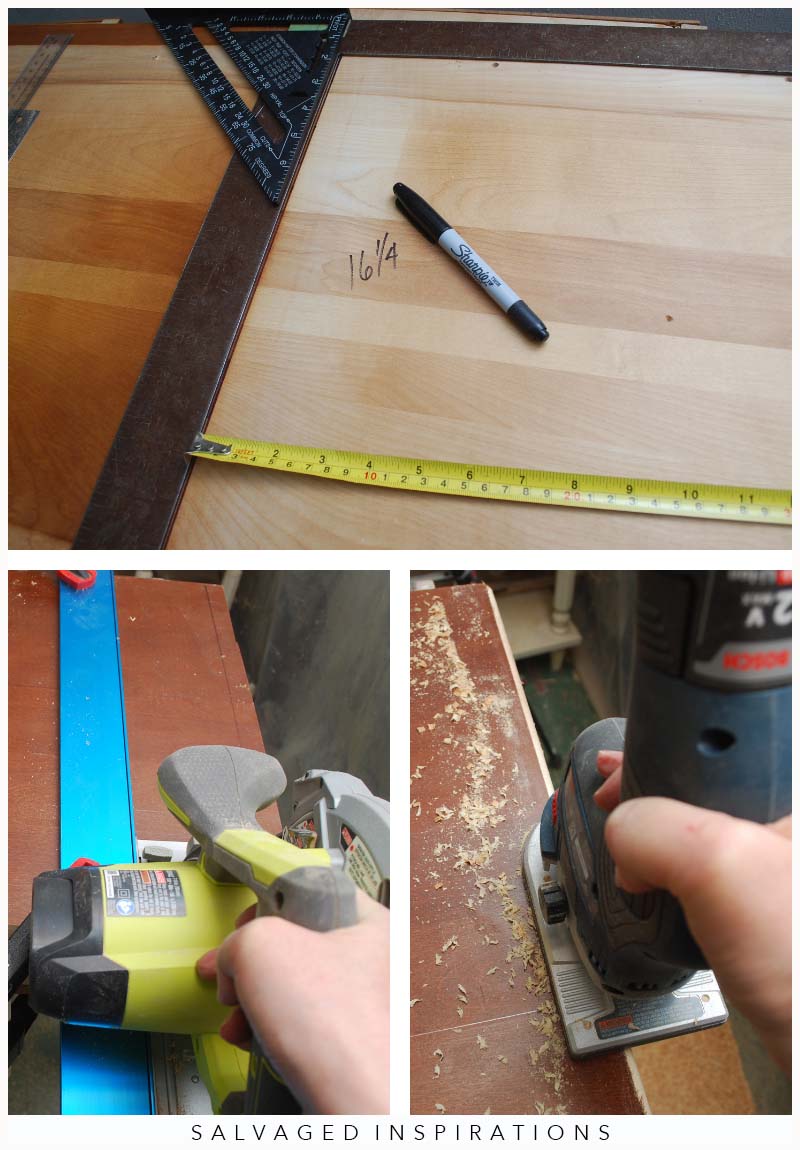
CUT NEW NIGHTSTAND TOP
To cut the desktop into two-night table tops I measure 16 1/4″ for each. Then using a guide and my skillsaw I cut two tops. This took me HOURS. I couldn’t get my cuts perfectly straight and square. As I mentioned, this desk tired me out! The part I was looking forward to was using my router. I LOVE this router! As I mentioned in another post, I’ve tried a good few brands of routers and this is the only one I find super easy to handle and actually look forward to using!
ATTACH NEW TOPS
An easy way for me to position the new tops onto the body was to flip it over so I could see exactly what I was doing. This worked out great. I drilled pilot holes and then added my screws BUUUUT, I didn’t measure my first few screws properly and pierced right through my freshly primed top. I’m not going to lie, I was crushed.
All the work I put into these nightstands and I made a rookie mistake and ruined my perfect top. Ugggh. After I pierced the top of my nightstand, I had to sand, fill with wood fill, and then reprime with BIN Shellac Based Primer. Since I had the wood filler out, I filled in all the little dings and marks I didn’t see before I primed the piece.
DIPPED PAINT FINISH
I’ve been seeing a lot of dipped paint finishes in IG and Pinterest and I absolutely love the contrast so thought I would give it a try.
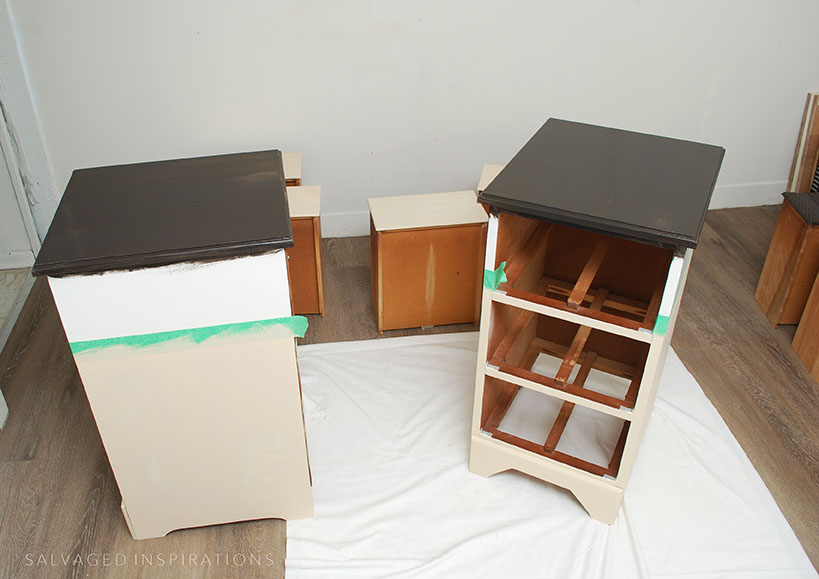
As I mentioned above, a clean modern look often takes more work than an ‘artistic’ finish because every little detail shows up and there is no covering it. Using a soft paintbrush to minimize brush marks, I painted in Coffee Bean and the bottom in this Sand Castle Mineral Paint. I think the contrast in colors gives a clean look.
TOPCOAT | PROTECTION
Nightstands are high traffic because they get a ton of use so I’ll be spraying two coats of this Satin Clear Coat for protection. I just didn’t have time before styling and doing my photoshoot. This topcoat will make these end tables easy to clean and durable.
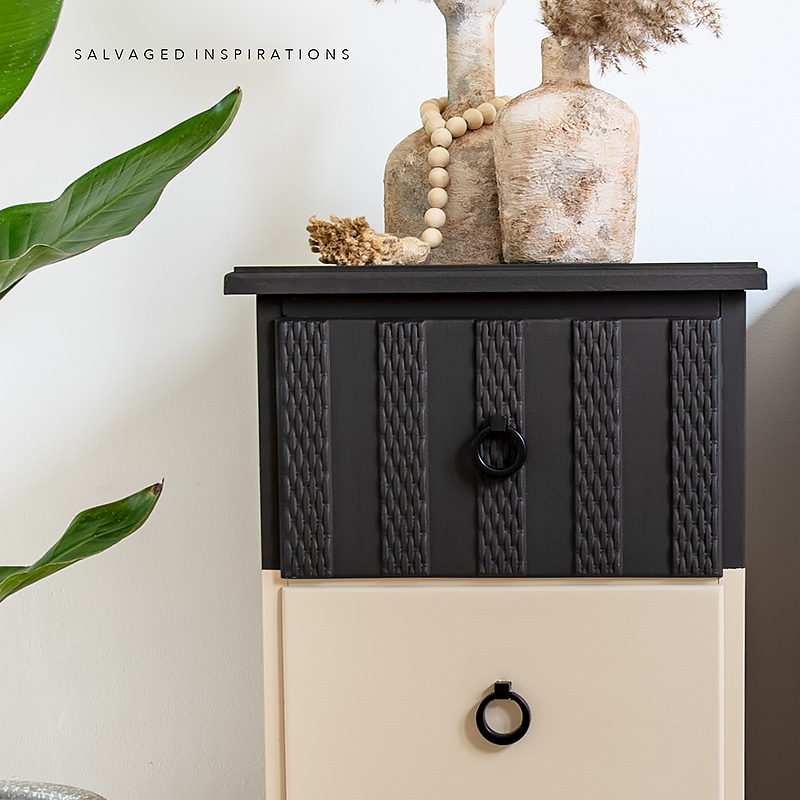
NEW HARDWARE
I kept the original wood handles from this desk because I know they are going to be fabulous on something else. But for these modern nightstands, I replaced the chunky wood with these round ring pulls I ordered from Amazon. So pretty and the black really ties everything all together, don’t you think?
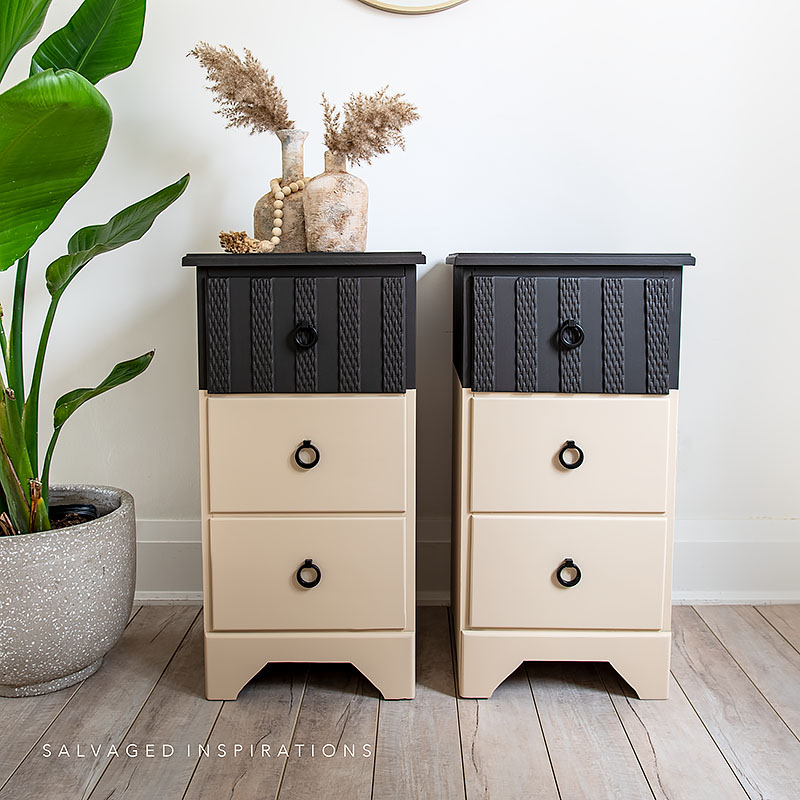
Here’s the finished look!
Check out these drawers!
YOUTUBE TUTORIAL
Here’s a step-by-step tutorial on Youtube. If you have any problems viewing below, feel free to watch it on my Youtube Channel HERE. Our #siyoutube family has hit 13.2K so don’t forget to subscribe if you haven’t done so already! So exciting, thank YOU! 🙂
AND NOW FOR SOME FURNITURE FIXER-UPPER FUN!
You’re going to LOVE what my creative team of Furniture Fixer Upper ladies do! Below are their BEFORE photos. Visit the links below to see the amazing AFTERS and learn how they did it! I’m heading over to take a peek as well! x
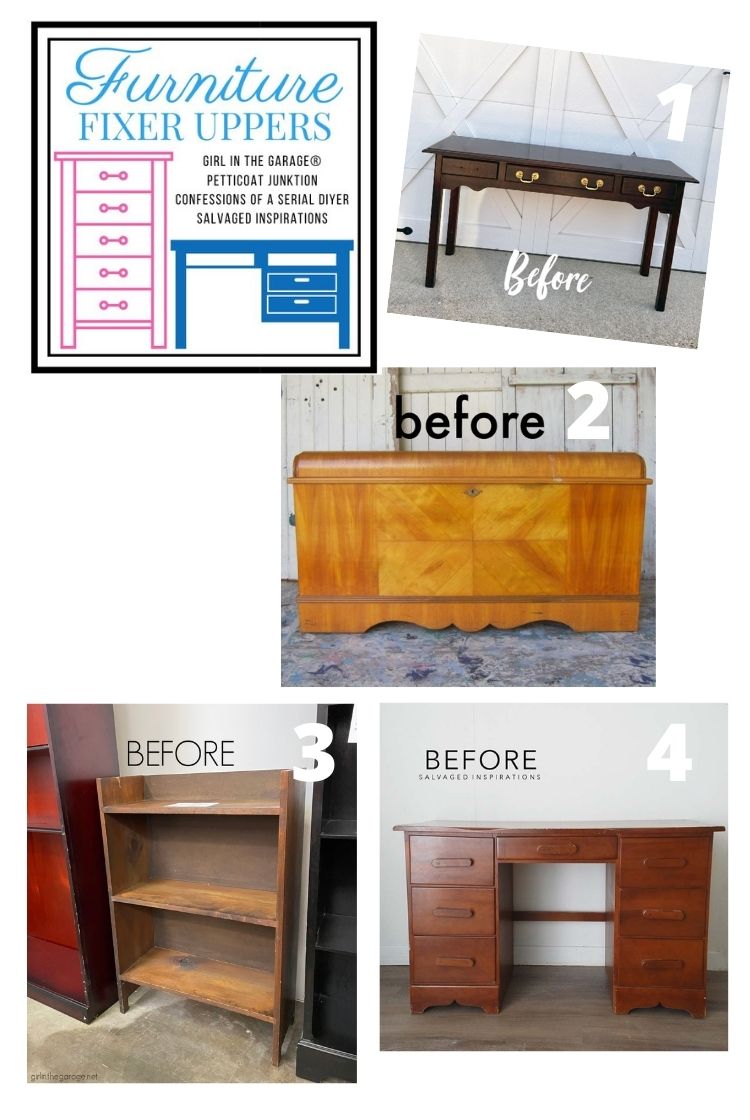
1. CONFESSIONS OF A SERIAL DIYER
2. PETTICOAT JUNKTION
3. GIRL IN THE GARAGE
4. SALVAGED INSPIRATIONS (HAPPY YOU’RE HERE!)
Here’s another look at this desk’s before and after. I hope it’s inspired you and given you some new ideas for your projects!
For all you visual learners, I’ll have a full Youtube Tutorial published for you this Saturday. Be forewarned though, I’m a hot mess and look exhausted working on this one…lol. Also, thanks for all the kindness to me being included in my very first podcast last week! I have the link to the Zibra Podcast here.
LET ME KNOW WHAT YOU THINK OF THIS SALVAGED DESK-TO-PAINTED NIGHTSTAND MAKEOVER. FEEL FREE TO ASK ANY QUESTIONS YOU MAY HAVE… I ALWAYS LOVE HEARING FROM YOU. IT MAKES MY DAY! 🙂
Happy furniture painting friends!
Denise x
RELATED POSTS::
CURB-SHOPPED DESK TO NIGHTSTANDS
PAINTED SECRETARY DESK
FRENCH COUNTRY WRITING DESK
ANNIE SLOAN WHITE WAXED DESK
HOW TO REVAMP YOUR OLD DESK
PIN AND SHARE!

JOIN THE SALVAGED INSPIRATIONS FAMILY!

Can you tell me how you did those 2 bottles that are sitting on the nightstands you made from that desk, please?
For sure! Here’s the full post and step by step tutorial – https://salvagedinspirations.com/how-to-paint-glass-vases/
Denise, I actually adore the original skirt, but it wouldn’t have looked right with the vision you had for this piece. Very chic new look! xo
Thanks so much Jen! XOXO
I’m thrilled to find your before and afters. I can’t seem to find the blanket/hope chest though. Thanks again.
Great work!
Thanks so much Sandy and here is a link to the Blanket Hope Chest with the Woodubend for you!🙂
Amazing restyle, D. Love how you changed the bottoms, added the trim, and chose the perfect hardware. So artistic!
Thanks my friend! 💕 A lot of work (and it really shouldn’t have been but sometimes it goes that way…lol) but I’m really happy how it all came together too! Have a super weekend. XOXO
They look awesome… You must have been born with a paint brush in your hand . Your work is very artistic .I love it all
That’s super sweet Barbara, thank you!🥰 While working on this one, I kinda wish I was born with some tools in my hand!😅
WOW! I LOVE these and you’re such an inspiration. I would have given up once the desk fell down the stairs! Thanks for sharing and for always surprising us with your makeovers. I always look forward to seeing you in my inbox. 👏
Aw, thank you Nicki! You always put a smile on my face and I love having you here! Hugs XOXO
I am seriously going to invest in some construction kneepads…fifty bucks at Lowe’s or Home Depot. I spend too much time on my knees. getting up is the problem.
Yes, such a good idea! Nick is always encouraging me to wear knee pads. I have a cheap pair but I find it hard to stop what I’m doing and put them on!
You are so right…they are totally unrecognizable now! They are like works of art…so well done, my friend. I hope your knee is on the mend…I am always on my knees too, especially for photographing! XOXO
Thanks Christy! Luckily I jumped out of the way and it just bruised… could have been a lot worse so yes, it’s on the mend thanks. And meeee tooo! Always on the hardwood floor taking pics. I never imagined photography would take a physical toll.📸😂
WOW!!! That’s unbelievable!!!!
Thank you Michele!!! XOXO
These are so fantastic! I love the vision you had for these!!
Ah, thank you Kim! XOXO
I was not expecting this but I LOVE it. I especially love the detail you added. Nicely done. xo 😘
I’m glad I can still surprise you my friend! Hugs XOXO
Gorgeous! Fabulous makeover!
Thank you Rebecca! XOXO
i love this!!! i wish i had more time to try some things at home. man!!!
AW, thanks Tiffany! XOXO
Wow ! Just Wow !
I am sooo impressed. (Power tools are my weakness / fear).
I was signed up for a wood shop class – but was cancelled w/ covid. 🙁
You ares so creative – and fearless. Tons of admiration here !!
This makeover is Perfect. You have a great eye for design. Repurposing a desk – brilliant.
Thank You for your hard work – and sharing.
I can’t wait for the video. Suuuuure I will watch it multiple times. 😉
Great color choice. Love the woodubend details.
You never disappoint. I look forward to your posts every week.
Thanks, p
p.s This fixer upper group is amazing. So happy to see such talented women.
Aren’t the FFU Ladies FABULOUS!!! I’m so honored to be part of the ‘crew’! And what a great idea with the woodshop class P. I find some power tools really intimidating as well – my large skill saw is one of them. Taking a woodworking class is brilliant so hopefully, they will offer it again. XOXO
Very interesting idea Denise. I’ve seen the dipped look several times recently as well. Sometimes I think it looks too busy but you did great! Maybe it’s the colors you chose and how well they work together. They have balance and the black pulls just tie it all together.
Thanks so much Niki! XOXO
Denise, these look great! I’m a sucker for vanities and desks to turn into nightstands, just bought a vanity this week! These are so distinctive! and I love the hardware you chose too!
Thank you Gwen! And ya, me too. It’s a really great idea for older desks/vanities that wouldn’t sell otherwise, isn’t it?! Have fun with your vanity… I know you’re going to do something GORGEOUS with it!🤗
Your work gets me so excited! I am going to try reworking some pieces I have in my home. I have been following you for a while. I have a group of friends from church who are very interested also. I see a group effort in our future. What fun that would be. I will keep you posted.
A group of friends encouraging each other to make a difference in our environment by repurposing furniture – SOUNDS AMAZING!!!! 😃 I’m excited for you Donna! I’d love to hear so please keep me posted!🌸
Wow! Nicely done! I love the color contrast as well as the texture contrast! And your eye for the whale skirt…really great. I always love to see what your doing, it inspires me. Your so courageous!! Lol
Xoxo
This one did take some courage! 😂 It tuckered me out but I’m so happy with how it all came together. Thanks so much Lorna! XOXO
VERY CREATIVE.I PARTICULARLY LIKE THE WEAVE TRIM PLACED VERTICAL. 2 COLORS EXCELLENT.
Yay! Thank you Bonnie!💜
FaceTime doubt so nicely! There have been several desks for sale in my area that I have passed on, because I don’t think desks sell all that well right now. If only I had thought of turning them into nightstands! Now I just need to practice my jigsaw skills which are beyond pathetic right now.
Also – – I am completely with you on my knees not looking great. My husband told me the other night that I needed to invest in a pumice stone!
Oh, I’m so glad I’m not the only one with the knees!🤣 YES, I need a pumice stone and some cover-up!!!😂🤣 And as for the jigsaw skills I’m the same – I def need more practice. And I need even MORE practice with the skill saw ugggh, it took me hours because I’m not at all comfortable with it. But I have to say I’m so proud of myself for saving this piece because just as you said, old desks aren’t a big seller around here either. XOXO
These are absolutely beautiful! Love the color choice.
Thanks so much Janice!🤗
Hi Denise! They turned out so pretty. My knees are not the problem, it’s the bruises all over my arms from moving furniture. It’s horrible.
Thanks Cheryl and awwwww, I get those too! Furniture painting is a workout!🏋️♀️💪😂
Hi Denise. This transformation is AMAZING! Those nightstands are absolutely gorgeous. The woodubend basket weave on the top is stunning. I also have to say a big THANK YOU. You are always very honest and hearing that things don’t always go smoothly (even for you as a professional) is very encouraging for all of us newbie DIYers. This makeover may have been trying but the outcome is STUNNING. Great makeover and wonderful lesson.
Hi Monique! I really love the Woodubend too, I think it adds a lot to this makeover! And thank you! 💜 I appreciate you saying this because it’s not comfortable admitting things were challenging or that I suck at using a skill saw.😆 I hope it encourages anyone who is reading to step out of their comfort zone and go for it!