First things first, THANK YOU SO MUCH for all the kind supportive emails and comments on my Quick-Tip-Tuesday Post last week! I find it hard to share personal details – but I’m really glad I did. It’s made me realize so many of you are dealing with similar situations… and we ALL have our challenges or hurdles to overcome. All your support gave me strength and made me feel better! So thank you to all of you!!
And even though it’s not a Tuesday… {big smile}
Does sanding your furniture rank right up there with cleaning a litter box or picking up after your dog? A crappy job but someone has to do it right? Prep and sanding are essential for an amazing finish; so why do we keep looking for a short-cut or an easy way out?
I’m okay with sanding a piece of furniture with my sander prior to painting. I’ve even learned to somewhat enjoy the process. I see the old finish with all those nasty scratches and imperfections disappear right before my eyes. Gratifying. But one of my pet peeves is hand sanding those tricky intricate areas my sander can’t reach.
I just don’t have the time or patience for it.
I’ve just found a foolproof way to avoid tricky sanding ~ Liquid Sandpaper!
I’ve had this bottle of Liquid Sander sitting on my shelf for nearly a year. I put off trying it because I’m not a fan of using harsh chemicals in my work space. Since this was my first time using it, I don’t claim to be an expert on the stuff, but I did learn a few things. And more importantly, I want to share this product with you because I was impressed… IT WORKS!
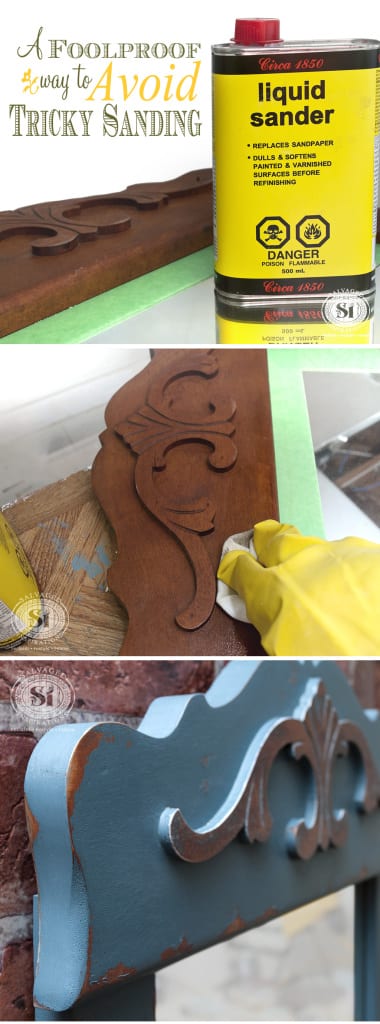
How To Use Liquid Sandpaper:
Super easy. Moisten a cloth with the product and wipe onto your surface until it’s slightly sticky. The Liquid Sander will degloss your surface and create good adhesion for your new finish. I used Fusion (a water based product) and the paint passed my scratch test and adhered to this mirror 100%. No sanding required! Be sure to read the directions specific to the brand your using. Timing varies depending on what type of paint or topcoat you’re applying over top.
When to use Liquid Sandpaper:
:: On Antiques or any Delicate Furniture
:: Crown Molding or Appliques
:: Any Type of Detailed or Curvy Furniture Legs etc.
:: Any Tight Areas where a Sander or Hand Sanding is Time Consuming or Difficult
:: Furniture Painted with Lead or Anything that may Cause Harmful Dust
What Liquid Sandpaper Does NOT do:
:: It won’t remove scratches or flaws in the wood like sanding will.
:: It doesn’t strip old paint off furniture like a stripper will.
:: Liquid Sandpaper doesn’t sand or scratch up the surface or remove paint like a paint stripper does, but it does degloss by prepping the surface for a new coating of paint or topcoat.
Safety First:
Although the chemical smell wasn’t as bad as I was anticipating, Liquid Sander deglosser is smelly and requires proper safety measures. Gloves, eye wear, plus a really well ventilated area are important. It’s also flammable so be sure the rags you use are disposed of properly.
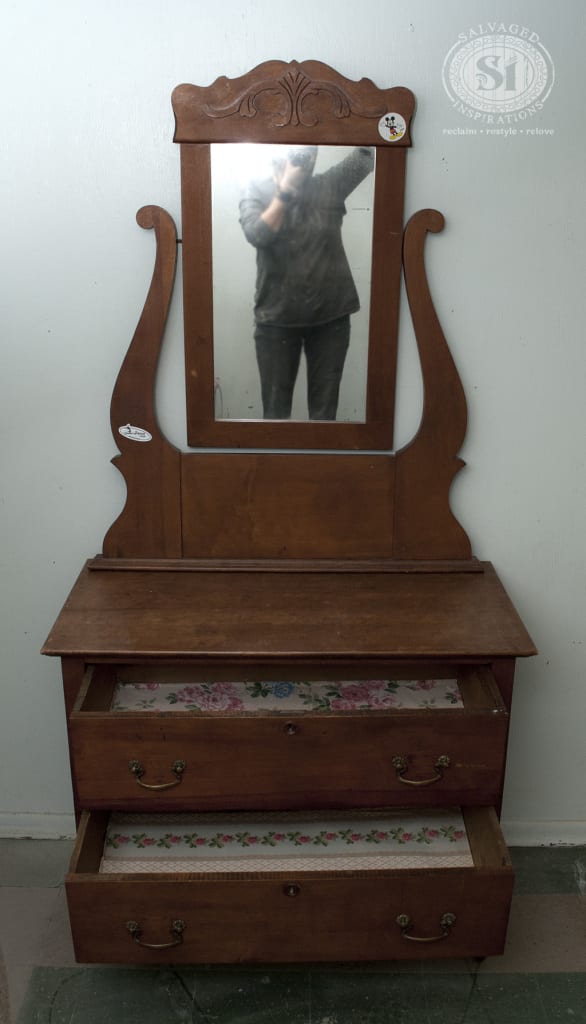
Here’s the before of the antique dresser + mirror I found on Kijiji.
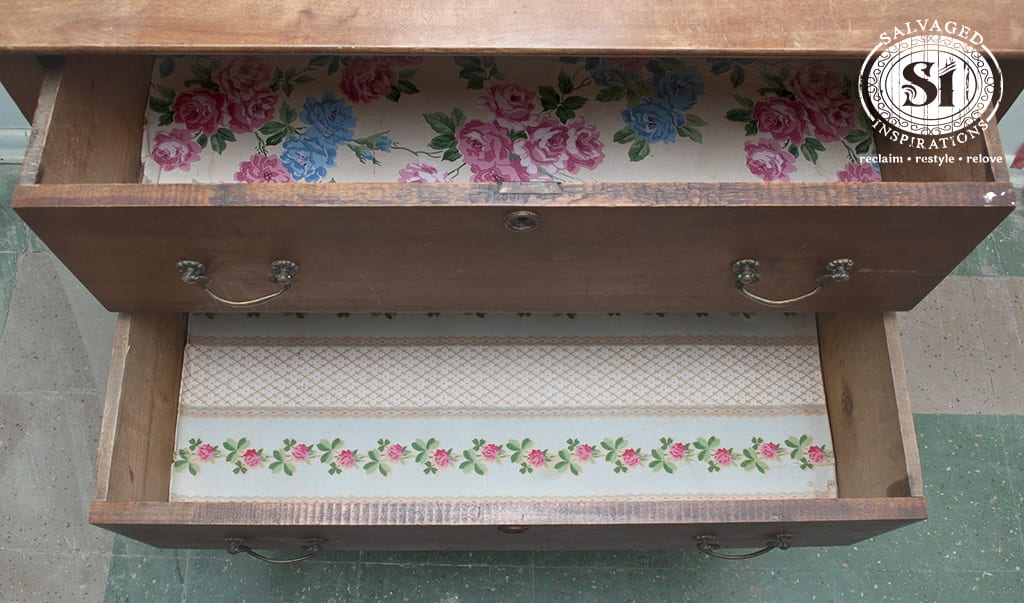
And how sweet is this? I’m always touched when I see furniture like this. Someone took the time to line the drawers, so I know this piece was well-loved. I’d like to start collecting these old pieces of paper and do something crafty with them in the future!
Be sure to pop in tomorrow. I’ll be sharing my new backdrop along with the “AFTER” of this dresser.
Have you ever tried using a Liquid Sandpaper? Do you have any advice you can share with me? I love all your comments, questions and suggestions so chime in!
Related Posts ~
Using A Brown Paper Bag 4 Final Sanding
Reduce Dust While Using A Sander
And now, with doggy bag in hand… I’m off to walk my Gidgy. 🙂
Enjoy your day everyone!
Denise x
_____________________________
Like what you see? Subscribe to Salvaged Inspirations so you’ll never miss a post!
Follow along on Pinterest, Google+, and Facebook for more inspiration!

Hi i enjoy your tips question..i have a beautiful more and the color is outdated it is a natural wood color but it does have gloss on it now I sanded my nightstand and it took me 3 hours and it did not come out good mind you I sanded it it with a sander. I am ready for a change I want 2 make it beautiful with a basic grey color please give me some advice thank you my name is Marlene I’m going to try to take a picture and send it to you so you know what I’m working with
Hi Marlene! Kudos to you for taking on the project and upcycling what you have! From what you’ve described, it sounds like a stain blocking primer would be beneficial to cover up the sanded nightstand before you paint. That will block any bleedthrough/stains and give you a good foundation for the grey to adhere to.
thanks for all the info! I am going to biote the bullet and paint my mantel./ What is the best way to protect the areas I do not want the liquid sandpaper to get on?
Hi Edith! Plastic and/or cardboard for your floors and I would tape plastic drop clothes (or even garbage bags will work) to the areas you don’t want the liquid sander touching. Hope this helps and great project. 🙂
Thank you so much for the info on liquid sanding. I hate sanding; takes up too much time. Thanks a million; quite grateful for the tips and info
Learning alot ~ thanks
Ahh…I found a great use for old wallpaper. I had purchased some smaller pieces of furniture when I was living in my apartment after downsizing. I have a small collection of vintage wallpaper I salvage from old homes I help restore. I use the wallpaper as a backing in cheapie, modern bookcases or shelves I’ve had to give them a vintage touch.
I love this Laura!
You are doing the right thing by following your heart to take care of your dad. My husband was diagnosed with dementia 10 years ago and 3 years ago had a stroke which he survived, but is paralyzed on his entire left side. He has been in a nursing facility since the stroke. I visit him frequently and have learned many lessons through this. Early on a social worker taught me that his reality has to become my reality, accept whatever he says as the truth even if you know it is not. The hardest lesson and the most important one for me to learn is to take care of myself. For me that means feeding my self by doing things that I love, sewing painting, or whatever makes me happy. I am not taking anything away from him, but making me a happier person and that makes it easier to relax and be present when I am with him. God bless you and your family.
I really appreciate you sharing this. My sister and I attended a series of classes at the Alzheimer’s Society and they told us the EXACT same thing you’re saying! The most important thing is keeping Alzheimer’s patients feeling safe, secure and loved (and this includes going along with their ‘different’ perceptions on things). But equally important is finding time for ourselves. A real challenge at times. I thank you for this because it’s a nice reminder that ‘me’ time is important too. 🙂 All the best to you and your family Kay. x
Thanks! Have been wondering about this product but read warnings of its toxicity. Can’t be any worse than actual stripper. Could you tell me if this can be used if wanting to restain. If painting, I can see this working well, as you only need to roughen the surface so paint adheres, but if you want to stain a different color, would it be better to use stripper/sanding?
Exactly, that’s why I put off using it for so long. But I actually found it was MUCH less harsh than using a paint stripper. Not so bad really. I’m guessing for stain, stripper/sanding is the way to go Tracy. 🙂