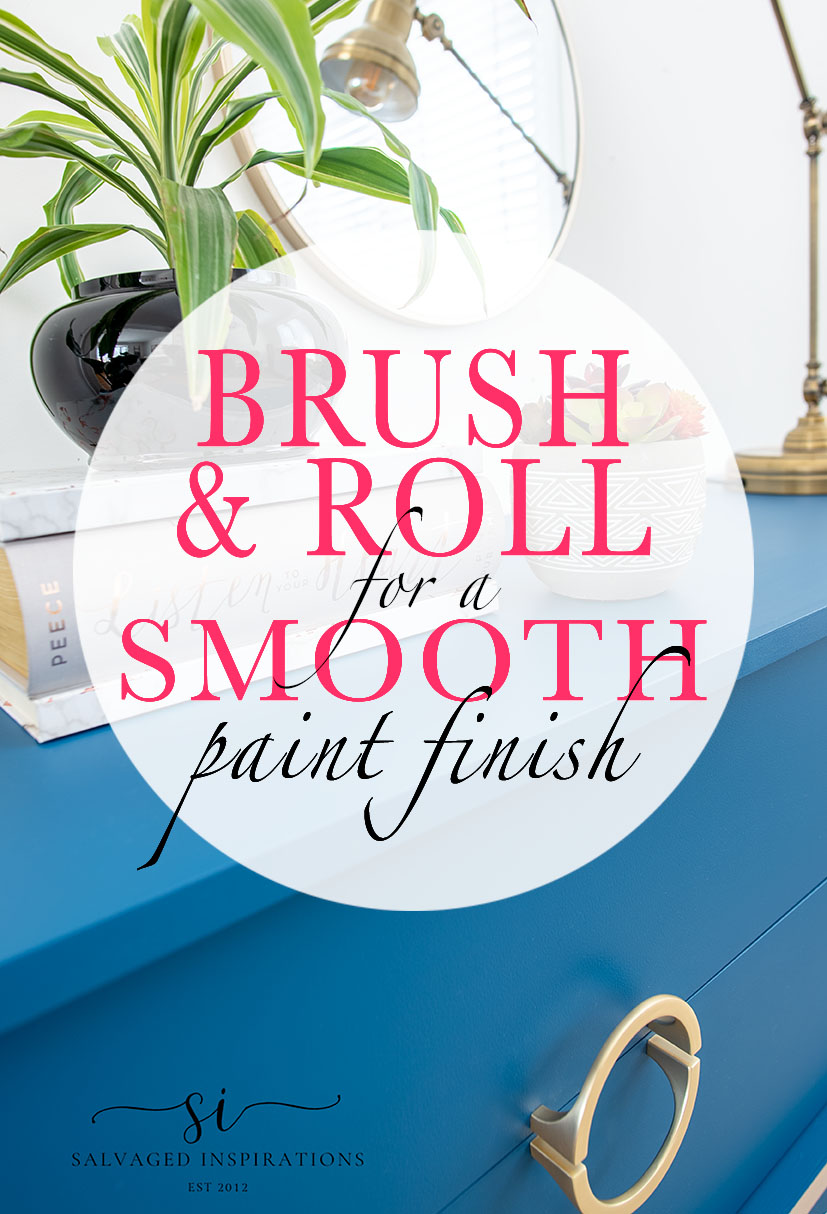
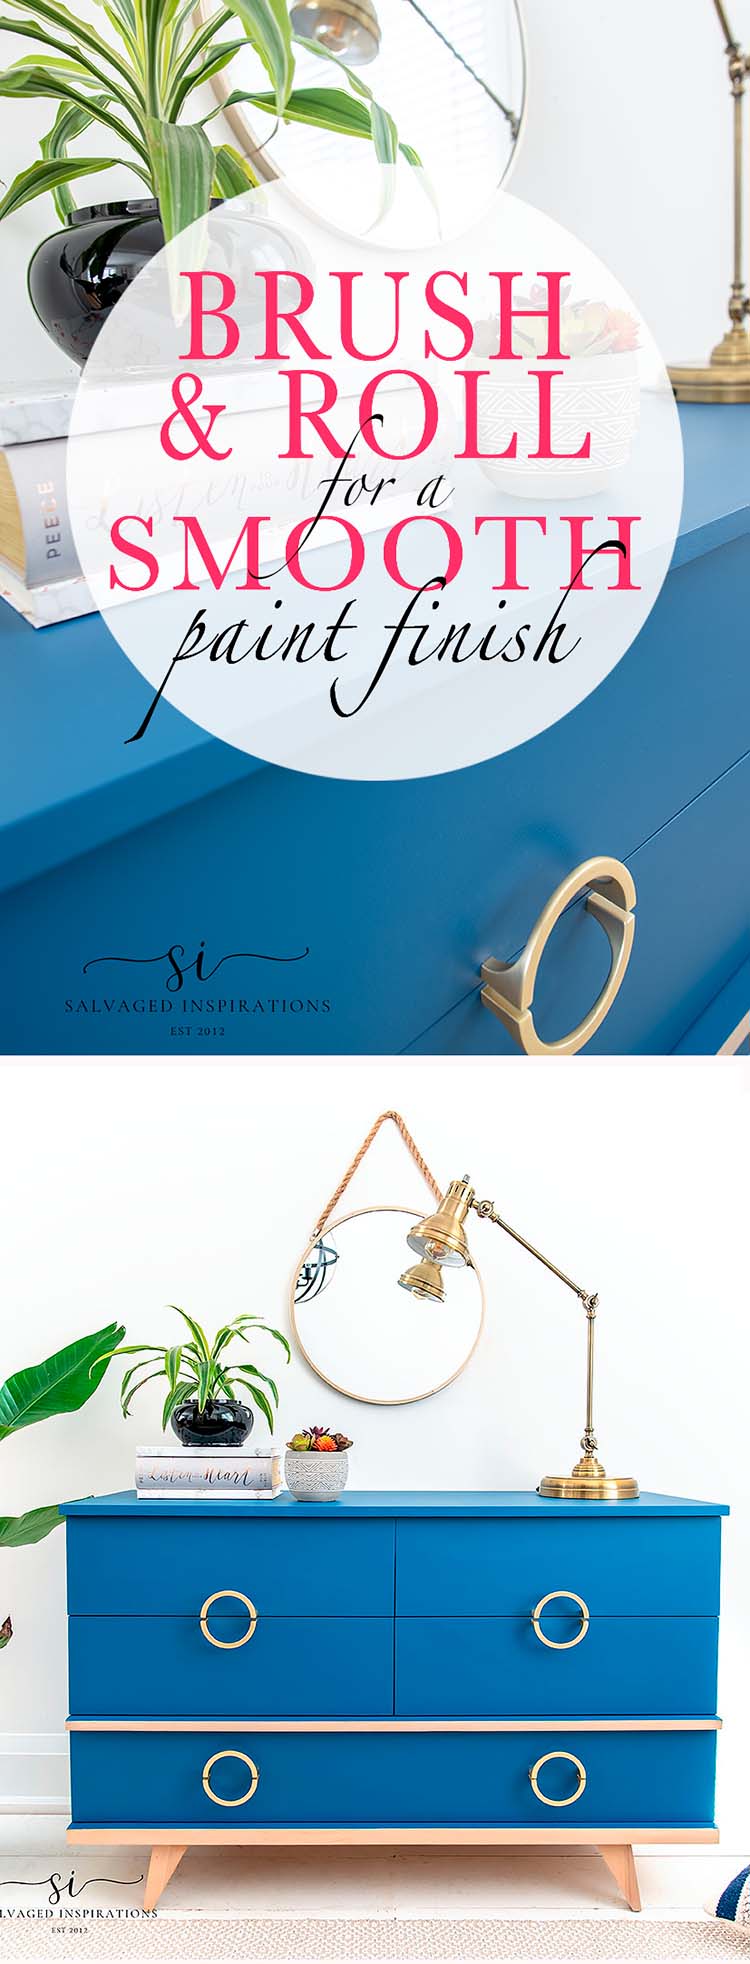
BRUSH AND ROLL PAINTED DRESSER FOR A SMOOTH FINISH WITH NO BRUSHMARKS | YOUTUBE VIDEO
Hello creative friends! Do you hate brushmarks on your paint projects? Today I’m sharing a brush-and-roll paint technique that helps eliminate ugly brush strokes. I’ve been seeing a lot of professional painters using this method. Even one of Nick’s trades “Tommy the Painter” offers this brush-and-roll paint technique when working on high-end doors and cabinets. And this is the exact same way I used to paint my french door black if you missed last week’s post. I’m sharing my thoughts on using the brush-on-roll-off method on furniture… and I’m going to let YOU decide what you think of this finish by sharing close-up pics!
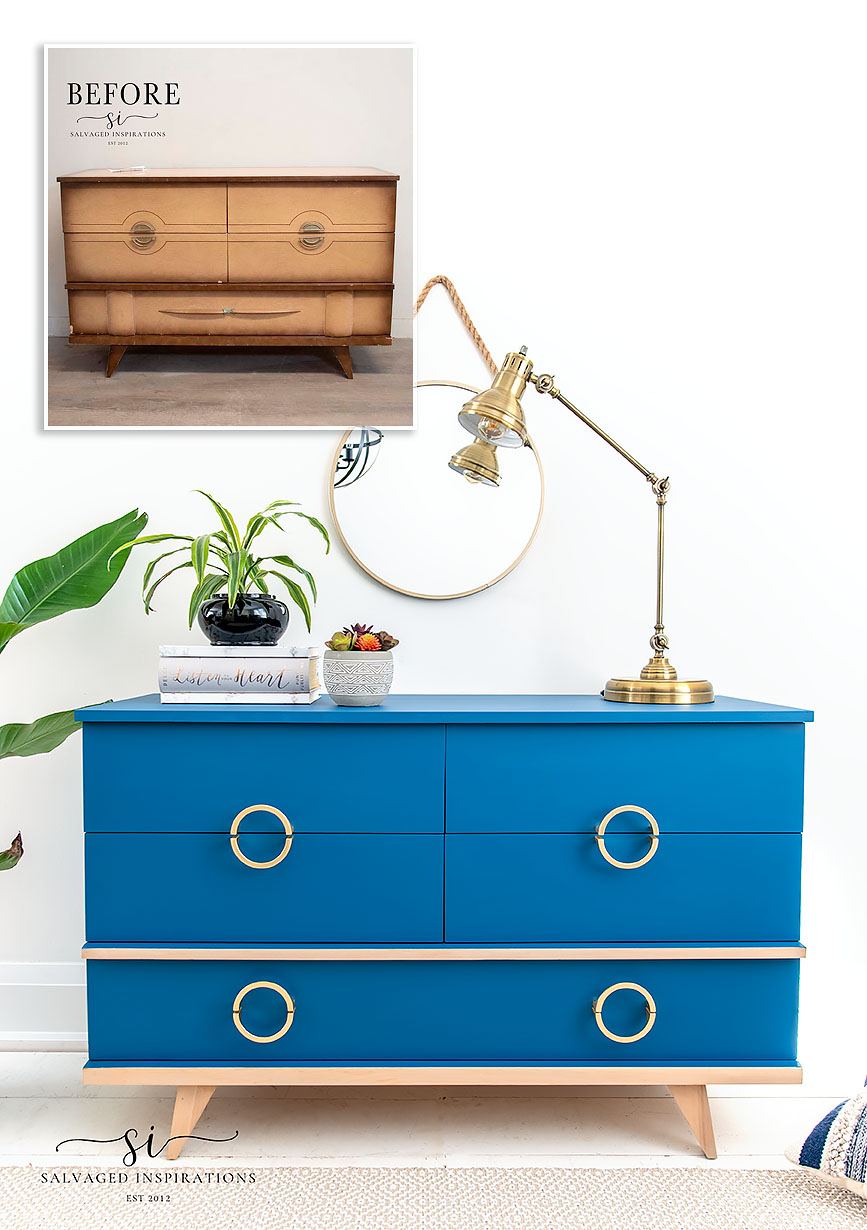
Here’s the MCM Dresser I started with. I picked it up from the Restore for $40. Just look at that face, right?!. hehe
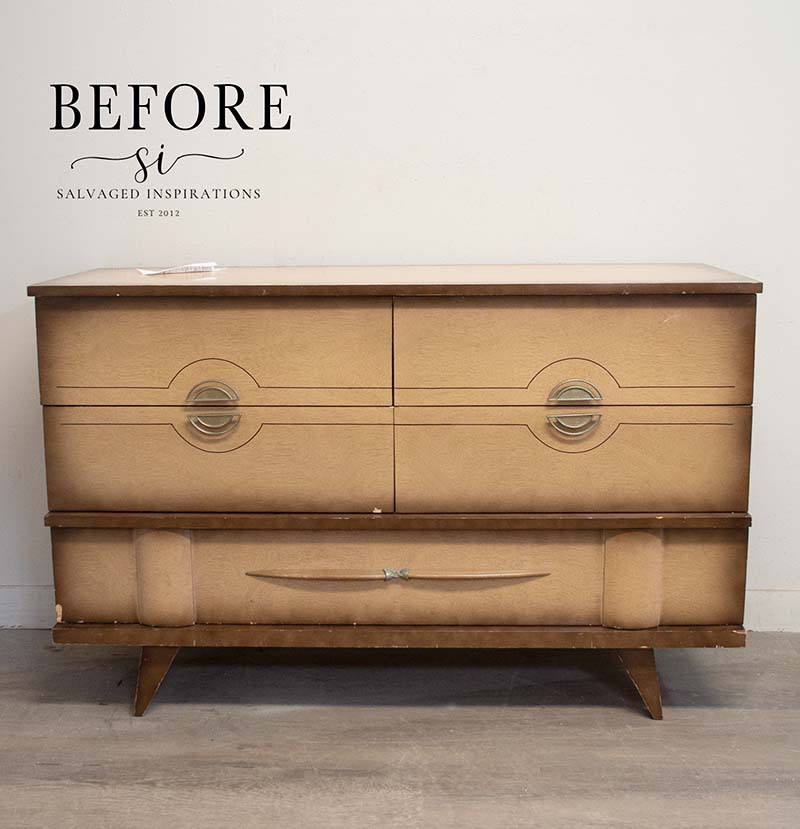
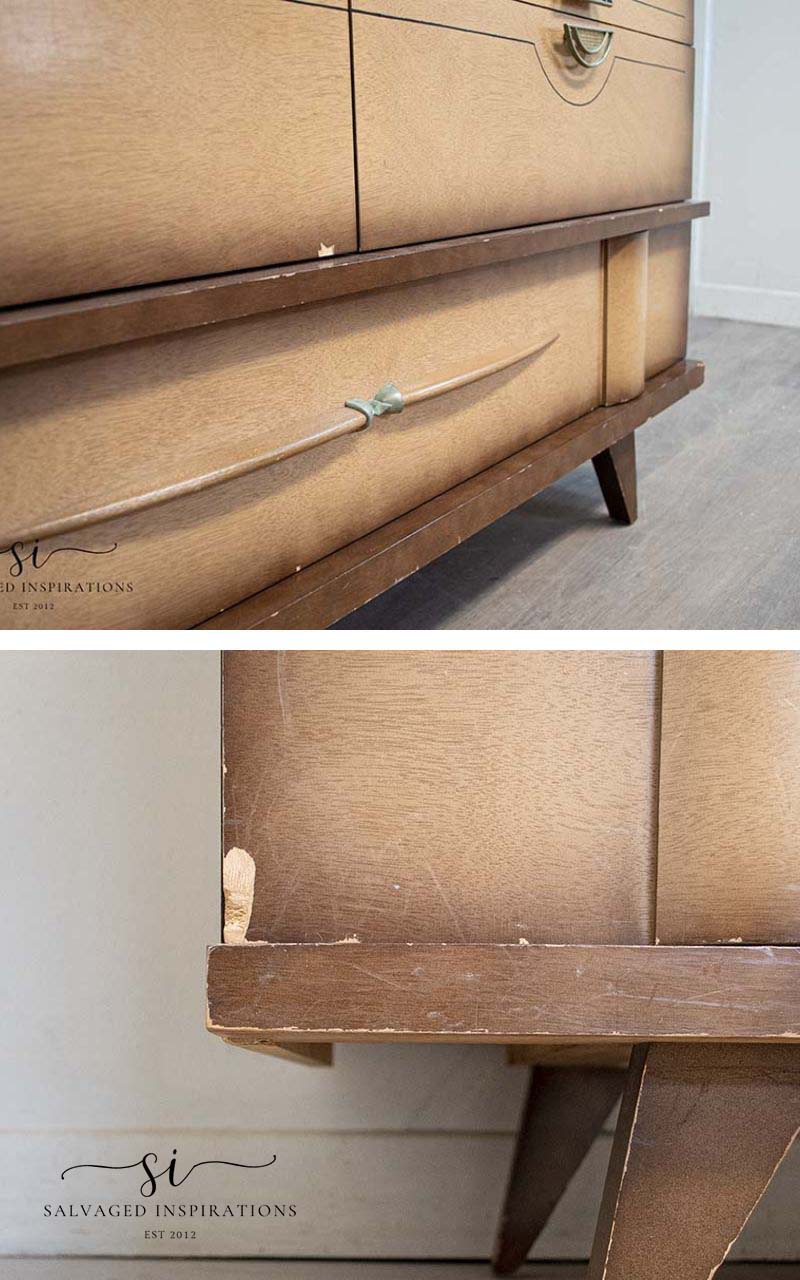
The laminate top had some wear and tear.

And there were some chips and gouges that needed repairing. Otherwise, it was in great shape.
THIS POST IS SPONSORED AND/OR CONTAINS AFFILIATE LINKS TO PRODUCTS I LOVE AND USE. YOU CAN SEE MY FULL DISCLOSURE HERE.
SOURCE LIST
MCM Dresser – SALVAGED
White Lightning Cleaner
Gorilla Epoxy Stick (similar)
Slick Stick Primer for Laminate
BIN Shellac-Based Primer
Flat Large 2″ Paint Brush
4″ Paint Roller
Au Naturel Stain
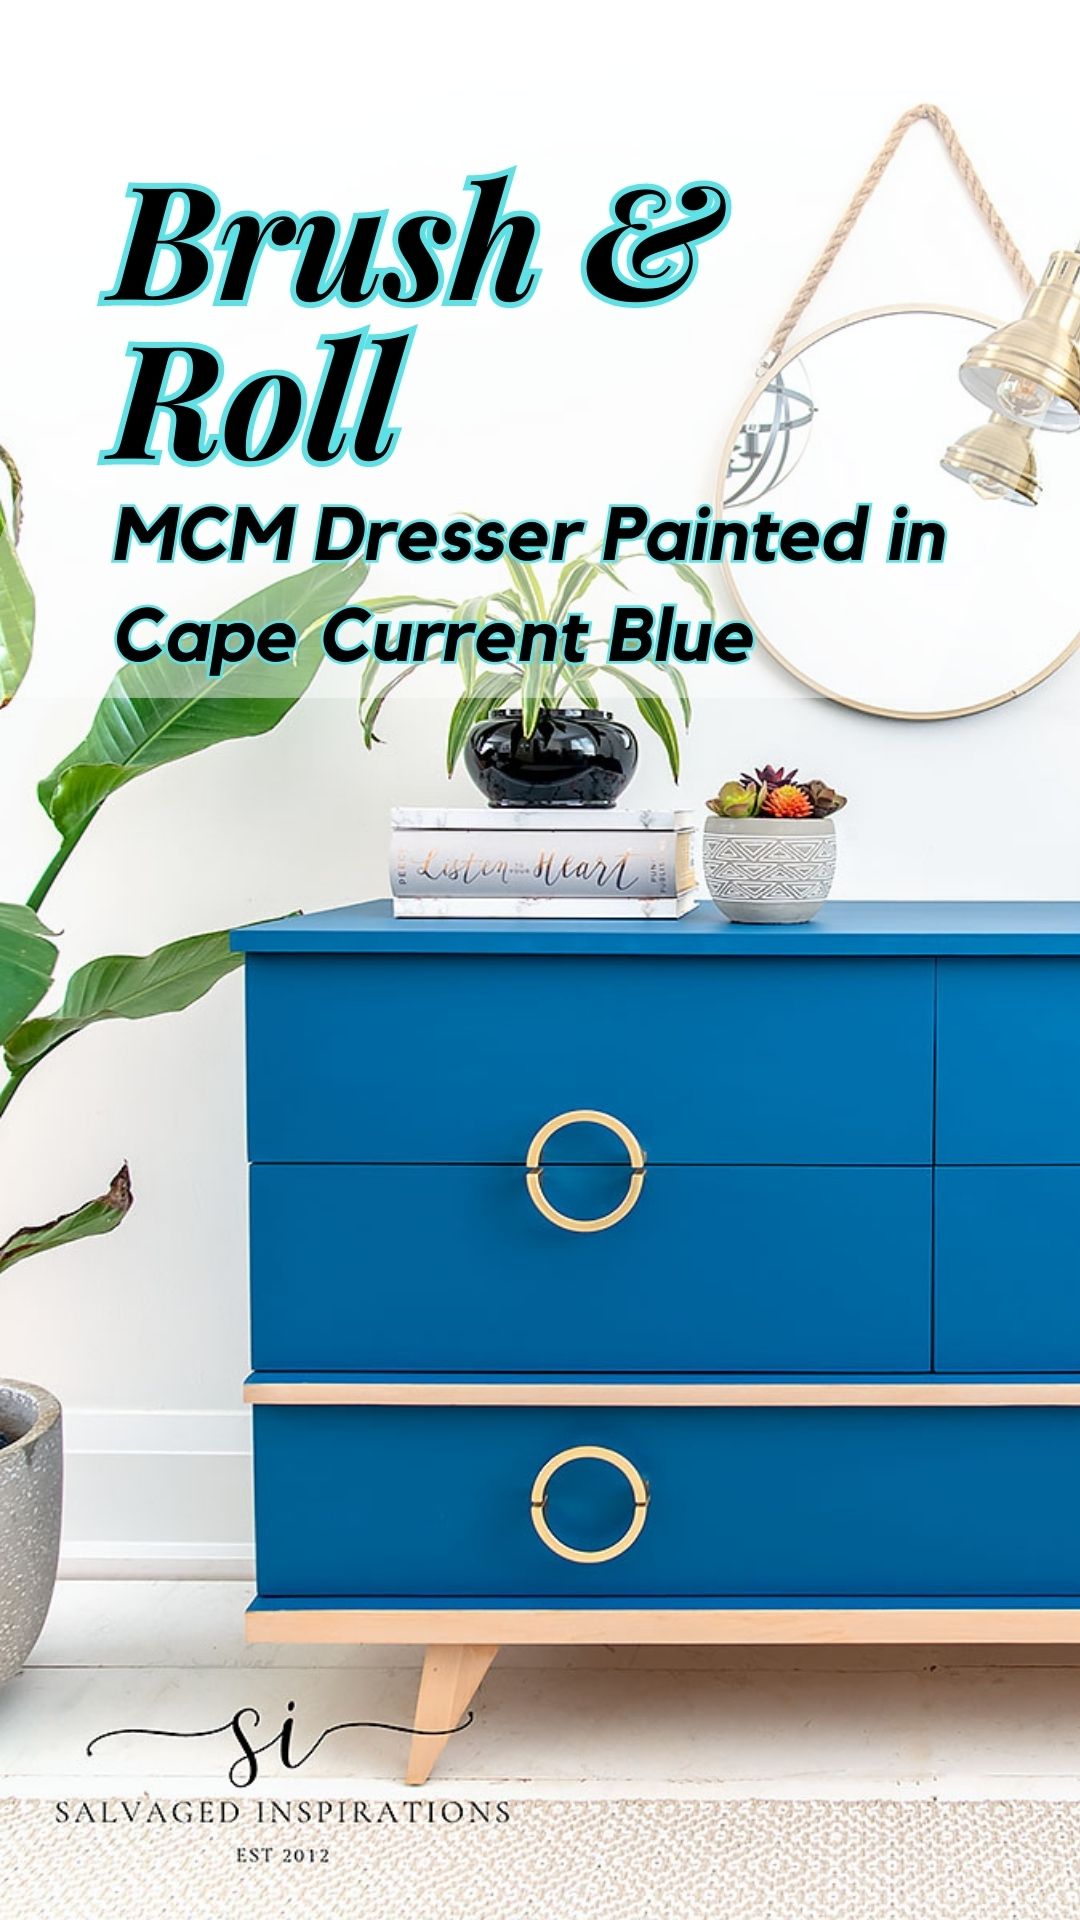
Cape Current Silk Paint
Brushed Brass Hardware
BRUSH AND ROLL PAINTED DRESSER
Here’s how this MCM dresser came together using this brush-on-roll-off paint method. I can’t wait to hear what you think!
CLEANING | PREP
This dresser got a good cleaning on the inside and out using this White Lightening Cleaner mixed with some water in a spray bottle. Then I removed the eyes and mouth hardware and also the wood plates that were held on by screws. If any of you have any ideas on how to salvage these pieces I’d love to hear your ideas!
SLICK STICK
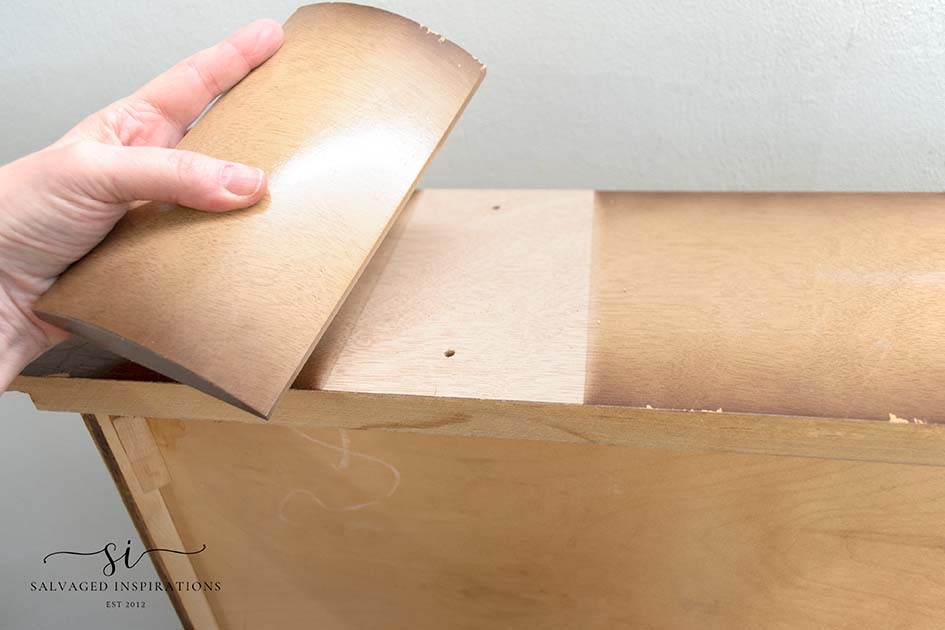
Before filling any hardware holes, dings, and gouges, I went ahead and added one coat of this Slick Stick. If you want to eliminate sanding altogether, this bonding primer is amazing for slick surfaces.
FILL HARDWARE HOLES
Once the dresser was clean and dry, I filled the hardware holes using Gorilla Epoxy Stick. This epoxy stick looks and feels like clay and is very easy to use. I’ve been using it more lately because it doesn’t have a strong odor as Bondo does. This is a great alternative for me in the cold months because I don’t want to open my studio windows. Here’s how to use it…
- Cut off a little piece using a putty or utility knife.
- Knead it in between your fingers until it becomes pliable and all one color.
- Then press it into the old holes or any dings and dents.
What I like to do is fill the majority of the hardware holes using the above method, but leave a little space to top it off with wood fill. The reason is once the epoxy dries, it’s as hard as a rock and very difficult to sand. The wood filler is really easy to sand smooth by hand or with a palm sander as seen below.
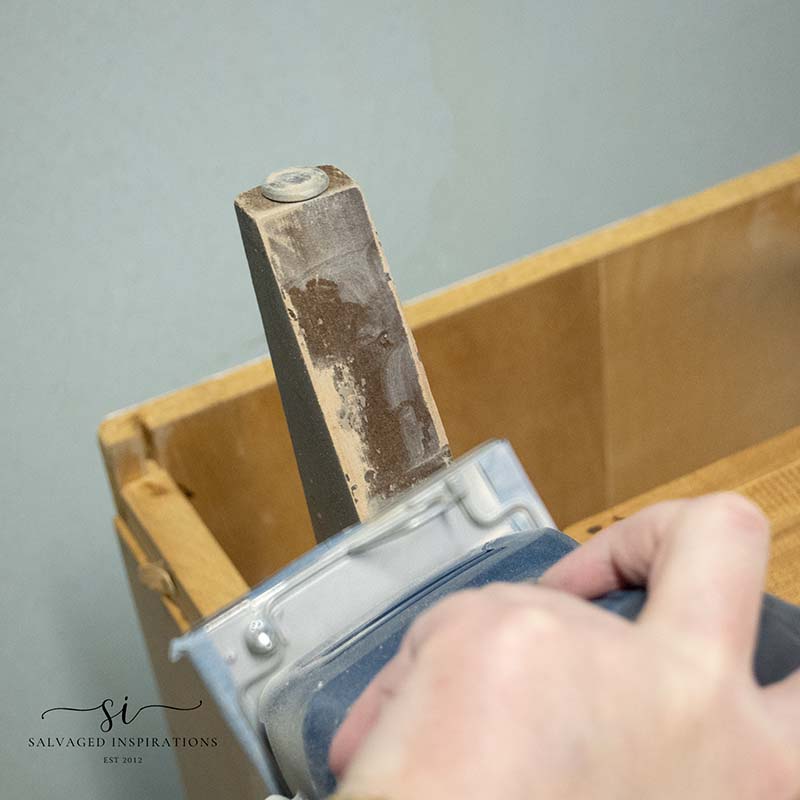
SAND & STAIN
While I had my sander out, I sanded the old finish off the feet and base of the dresser.
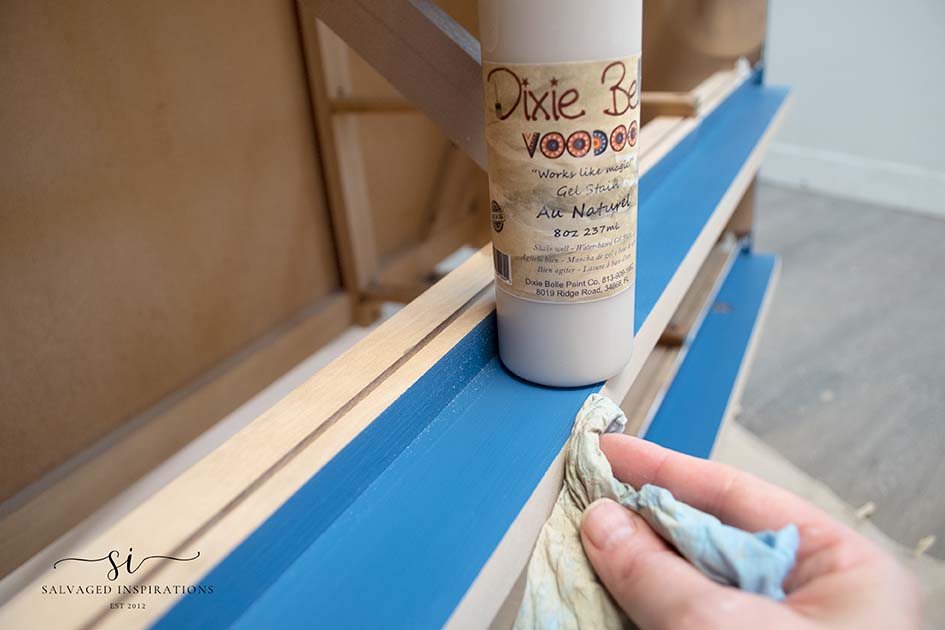
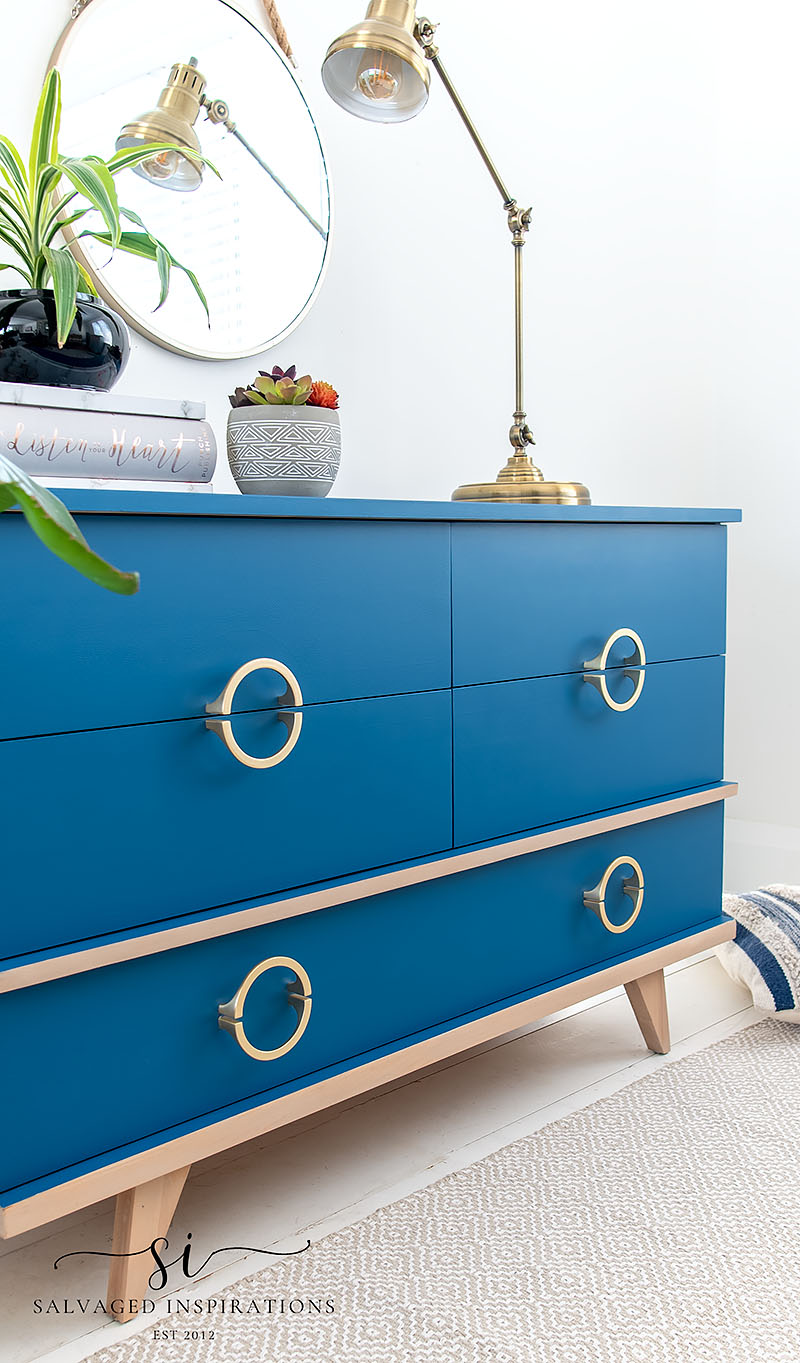
To keep the raw wood look, I stained the feet and the two wood runners using this Water-Based Au Naturel Stain. It kept the wood looking all-natural. There wasn’t much difference at all but just enough to take a little of the yellow/red out of the wood tone.
PAINT
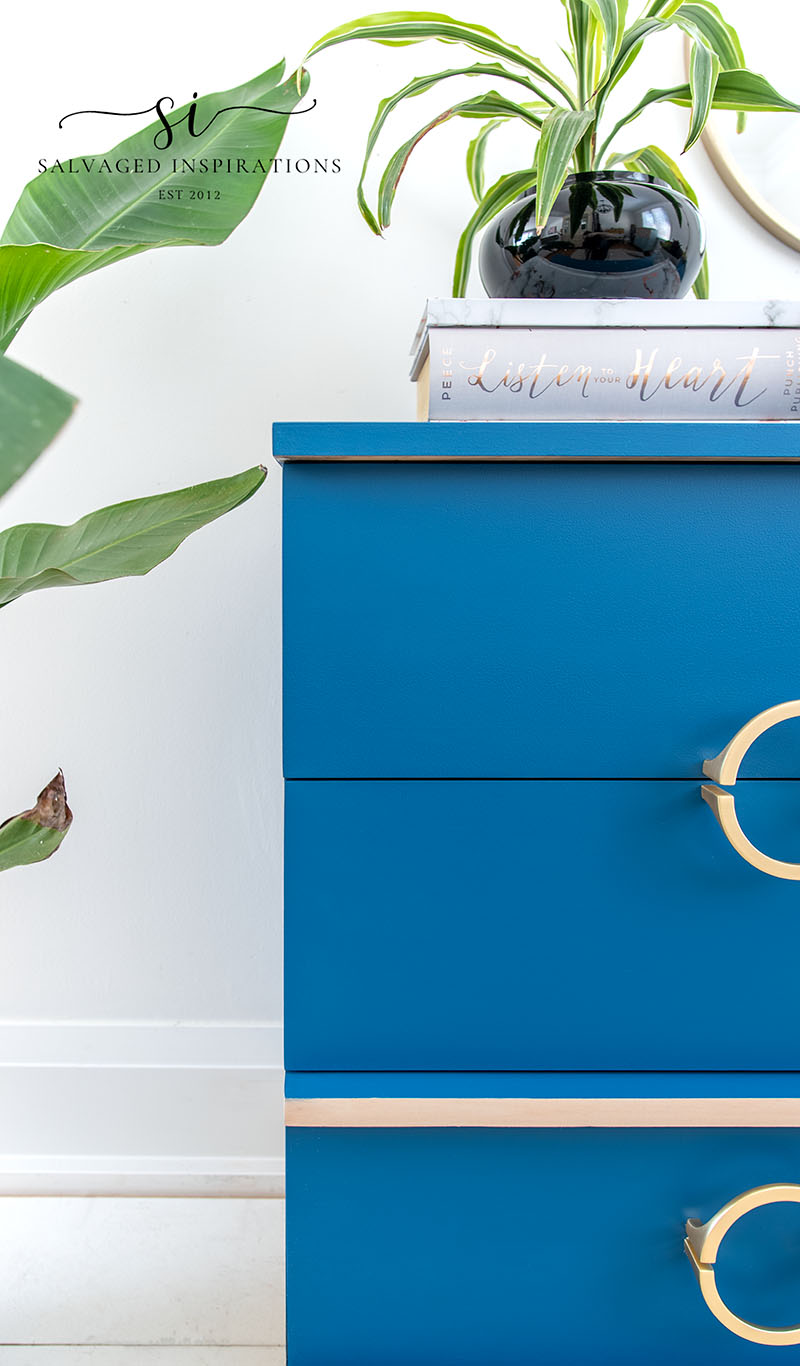
Now for the fun part! I chose to paint this MCM Dresser in this vibrant blue – Cape Current. I’m not going to lie. When I first started brushing it onto the drawers my first reaction what OHHH NOOO because it’s such a strong blue. I wasn’t sure it was ‘retro’ enough for this MCM style but as you’ll see, the finished look is awesome!
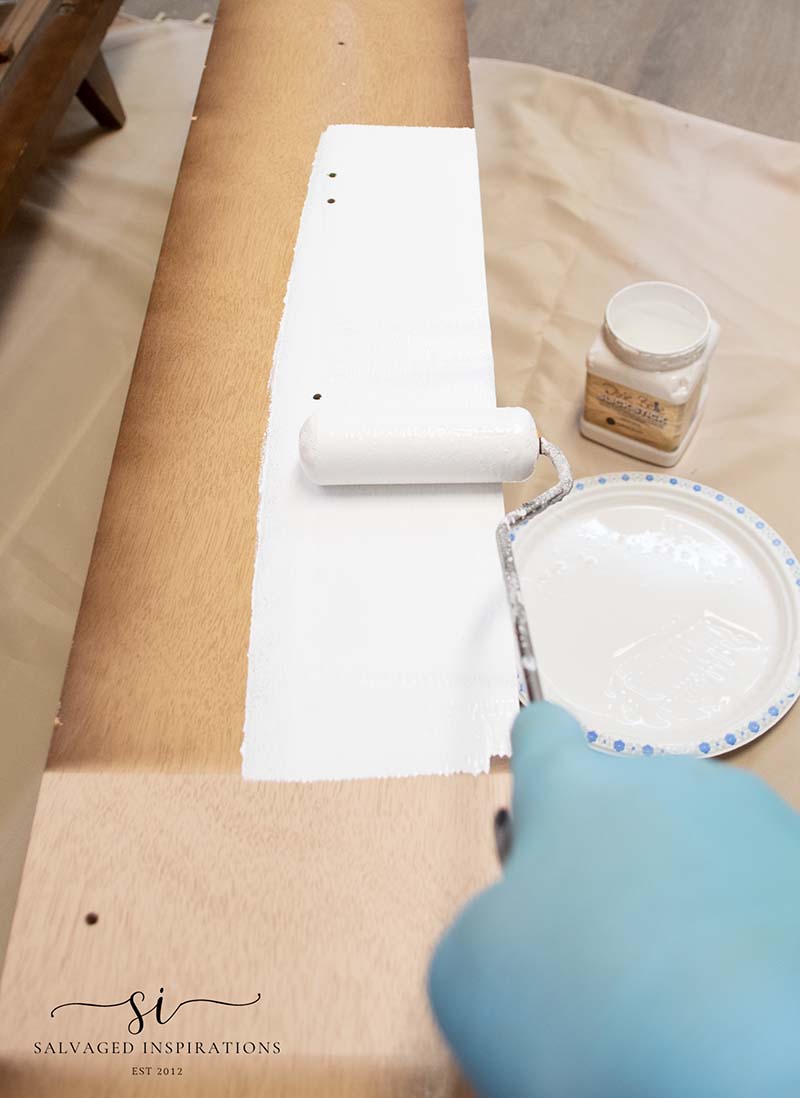
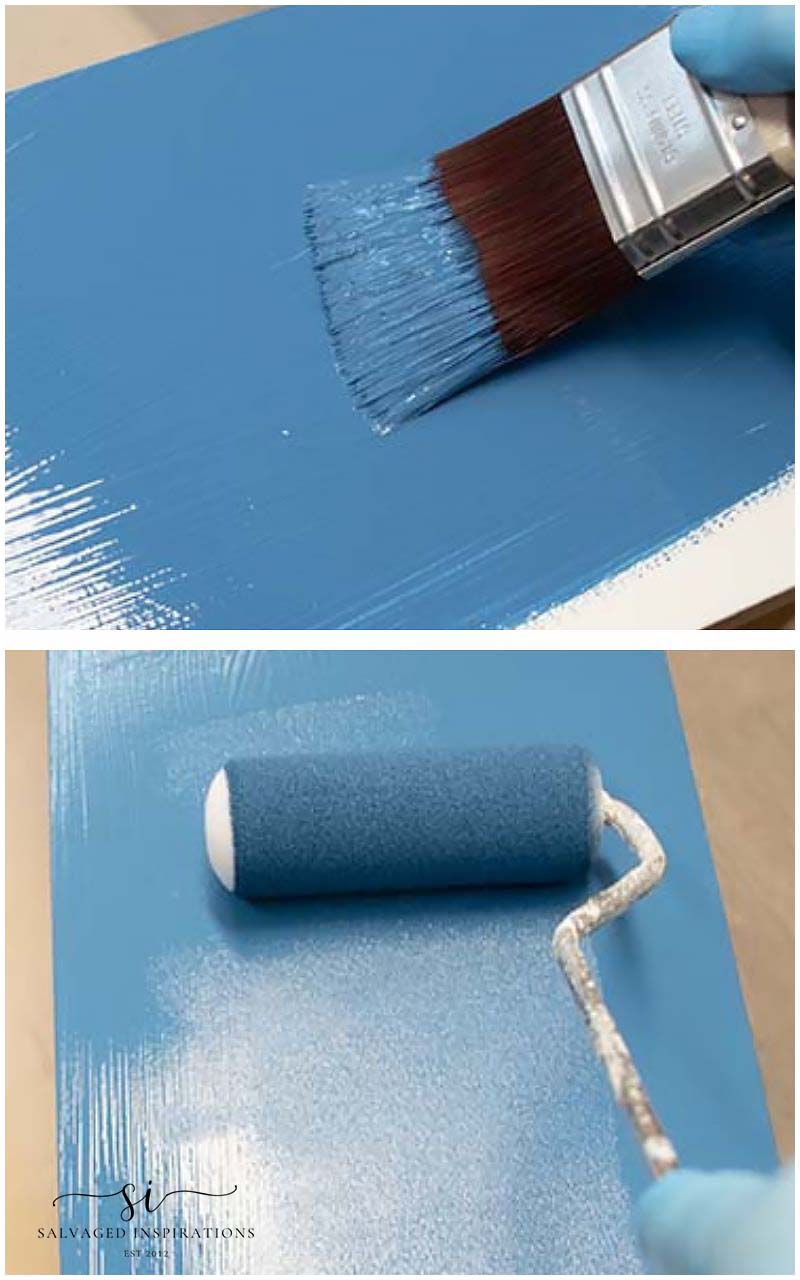
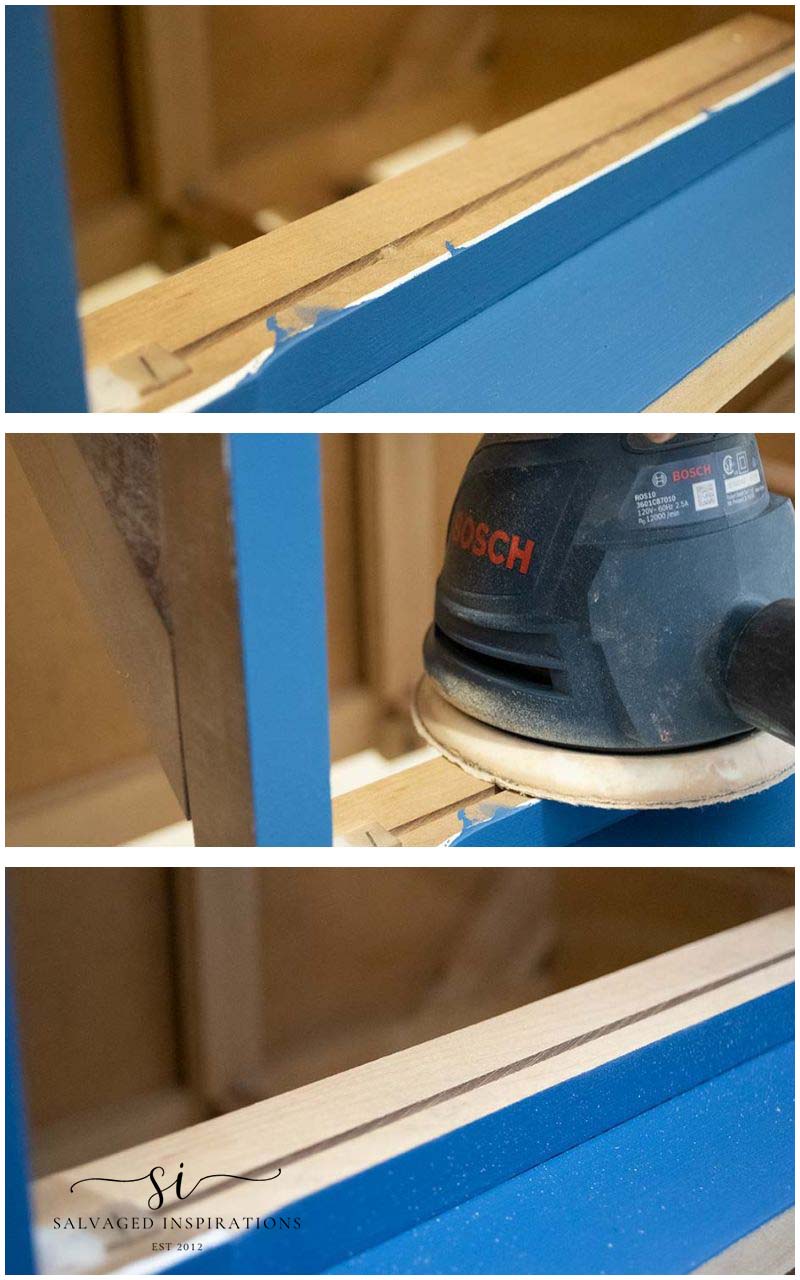
I used my 2.5″ flat synthetic brush to apply a generous amount of paint making sure to get all the areas of the drawer covered.
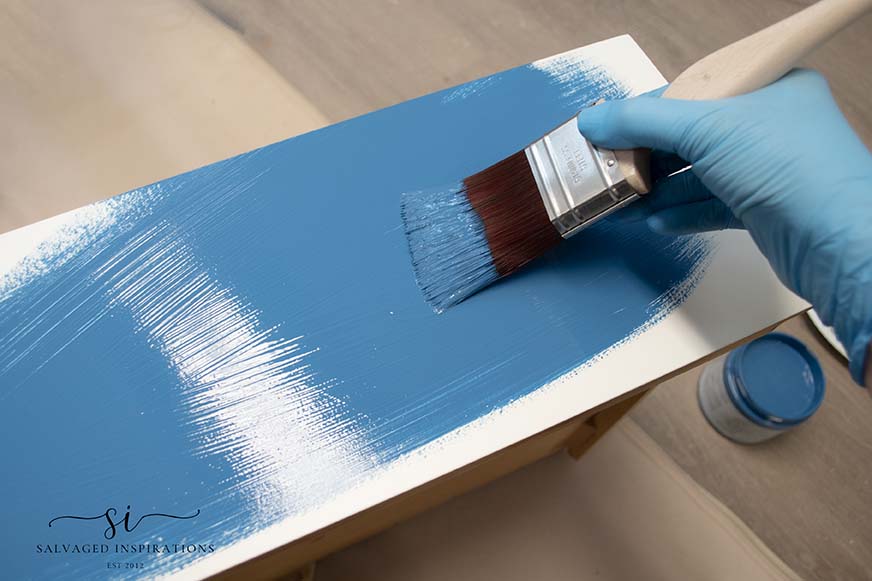
Then using my 4″ high-density foam roller, I rolled OVER the brushed-on paint to eliminate any brush strokes. On the first pass, I applied a normal amount of pressure. The second pass (as you’ll see in this Saturday’s youtube video) I rolled with a very light touch. Just enough to even out the paint.
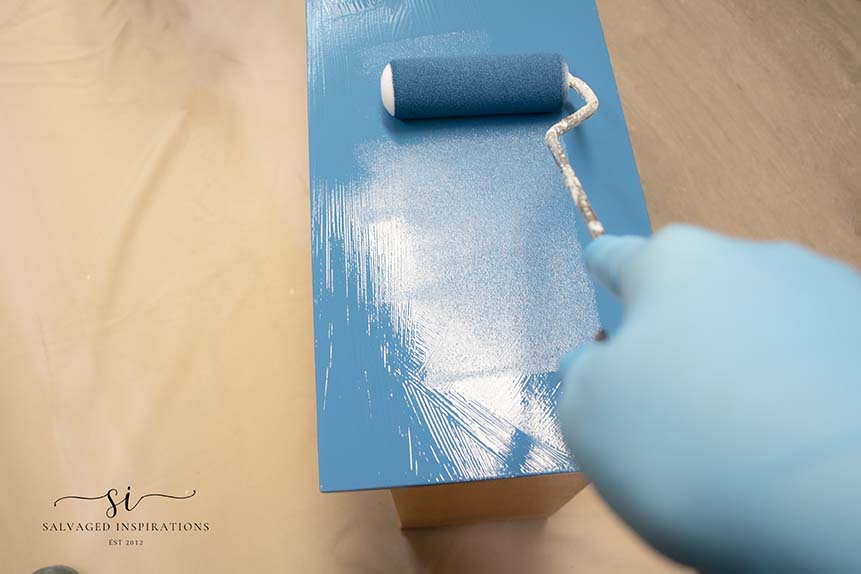
Below is a closer look at the above. On the first passing, I definitely saw wet brush marks because I used a good amount of paint. On the second passing with the roller, I saw a small amount of texture aka an “orange peel effect” caused by the roller. Most of it leveled out after it dried. I also made sure to sand in between each coat as well.
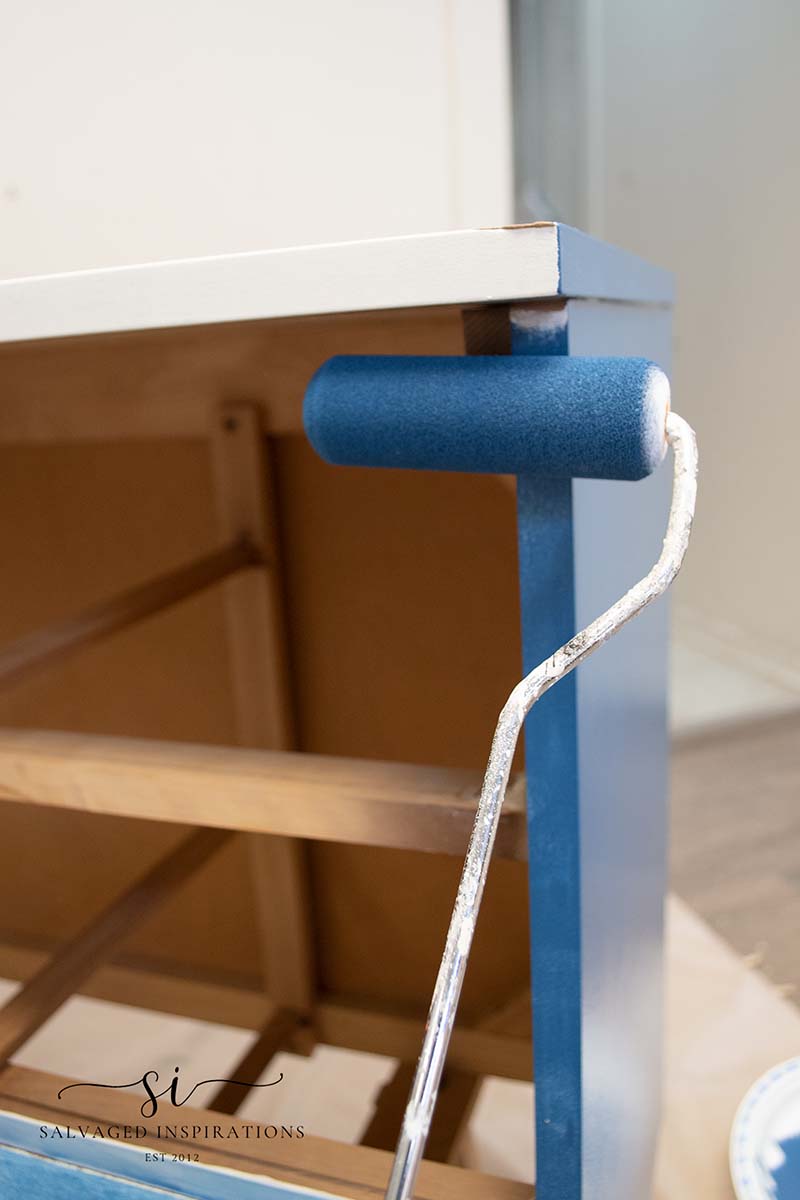
I also used the roller to paint the edges. Two coats were required for full coverage on this dresser.
CLEANING UP PAINT
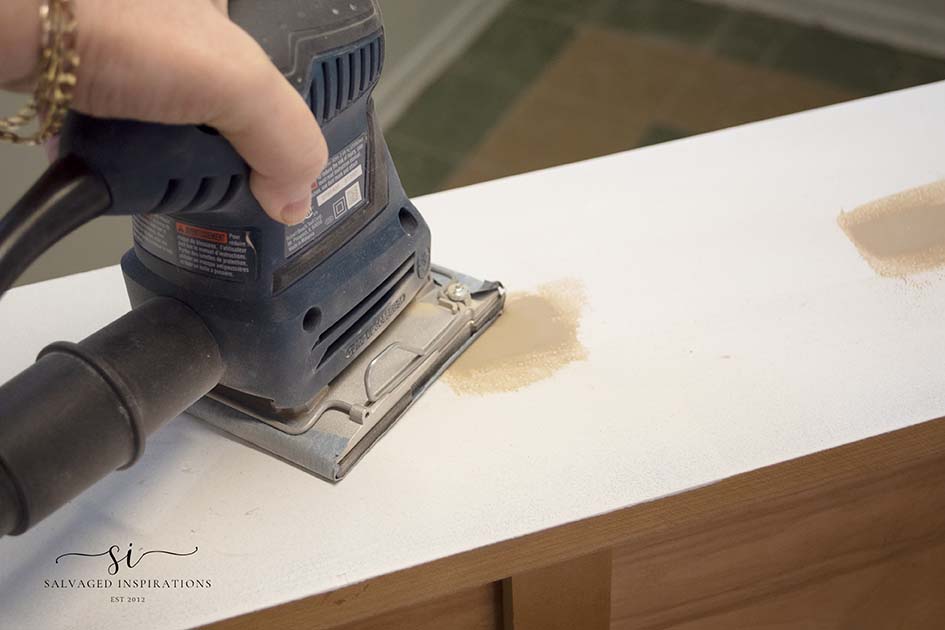
As clean as I try to be when painting, a little paint and/or primer usually will get on the drawer guides or undersides of the dresser.
Pro Tip ~An easy way to fix this is to take your sander and sand the excess paint away. It’s super easy to do and check out the professional-looking results!
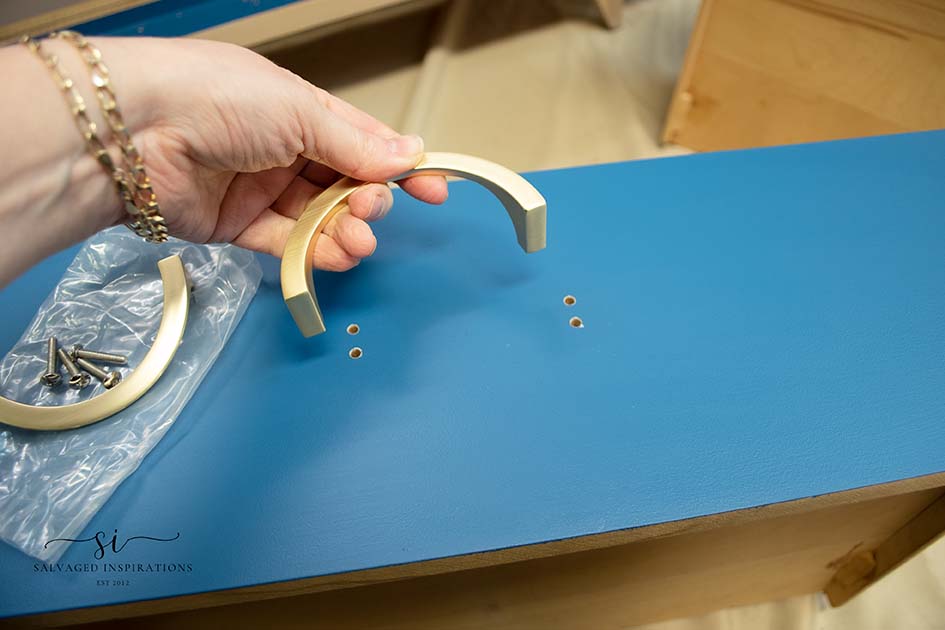
BRUSHED BRASS HARDWARE
To finish the modern look, I installed this new hardware. You may remember I used the same hardware on this Drop Cloth Painted Dresser here.
No topcoat is required because Silk-All-In-One Mineral Paints have a built-in primer and topcoat included.
Here’s how it all came together. What do you think of this NEW look?
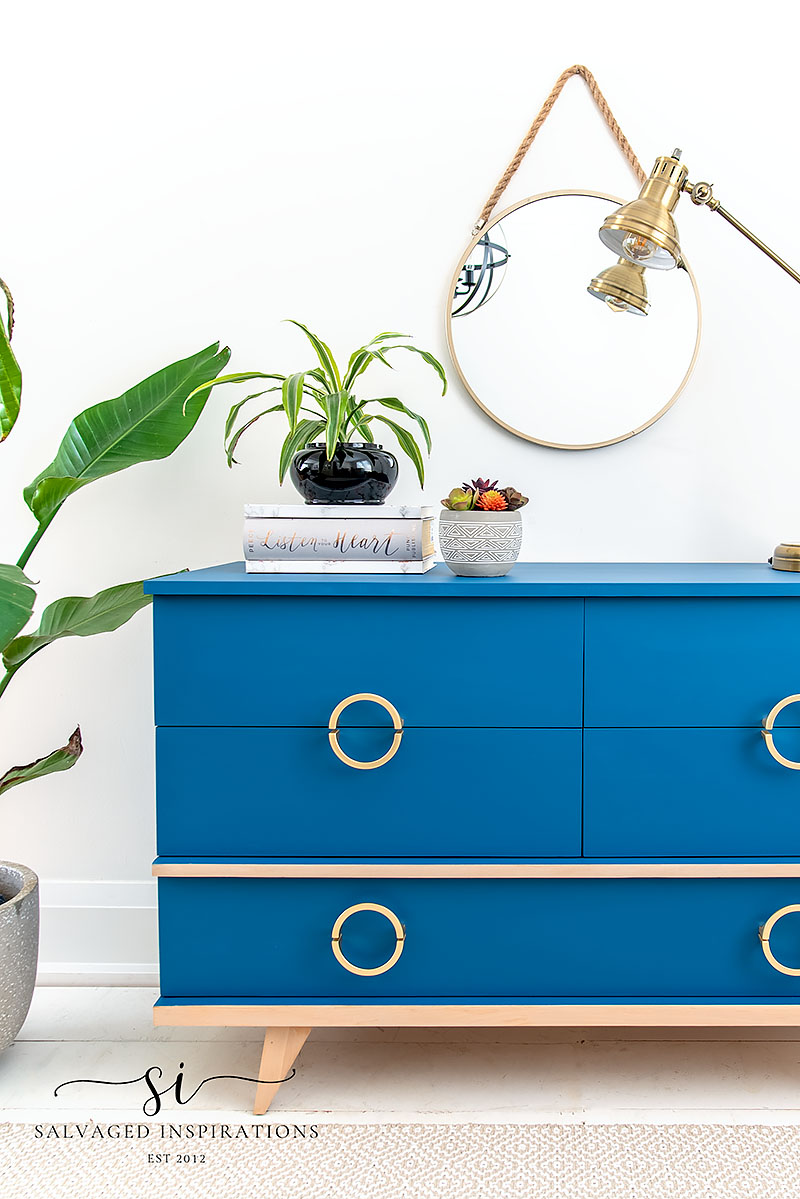
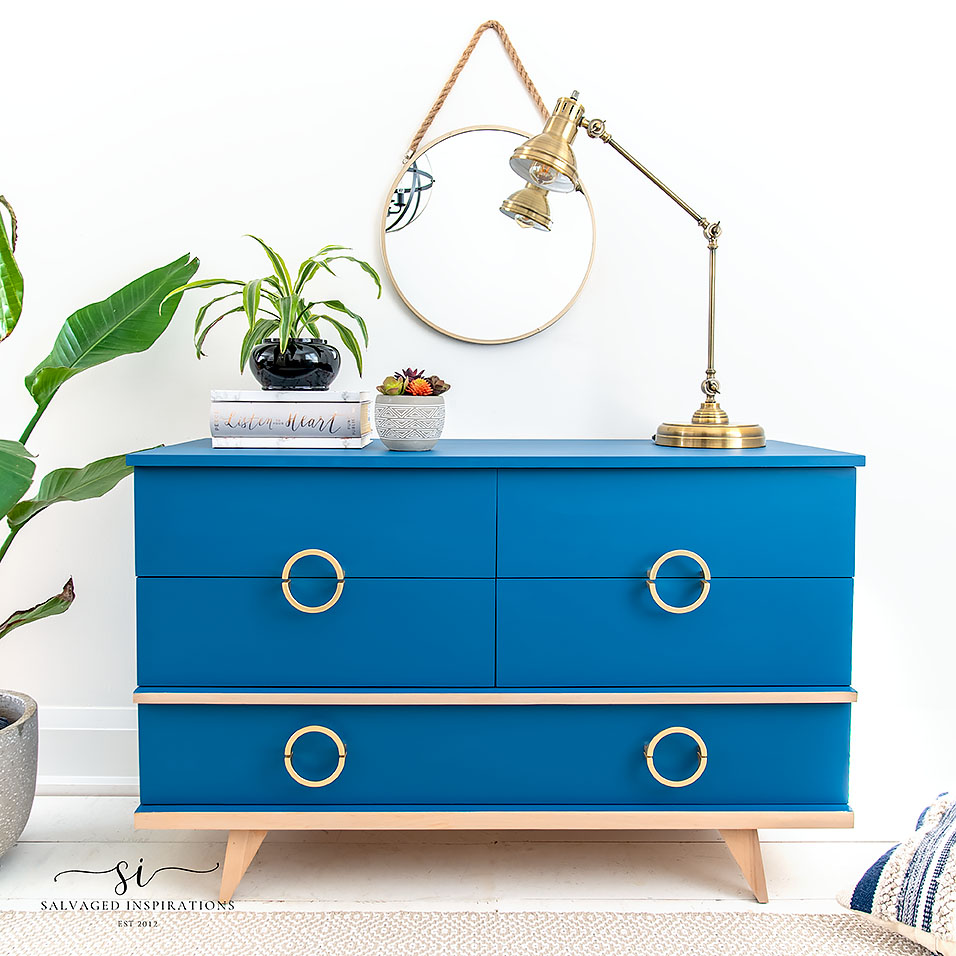
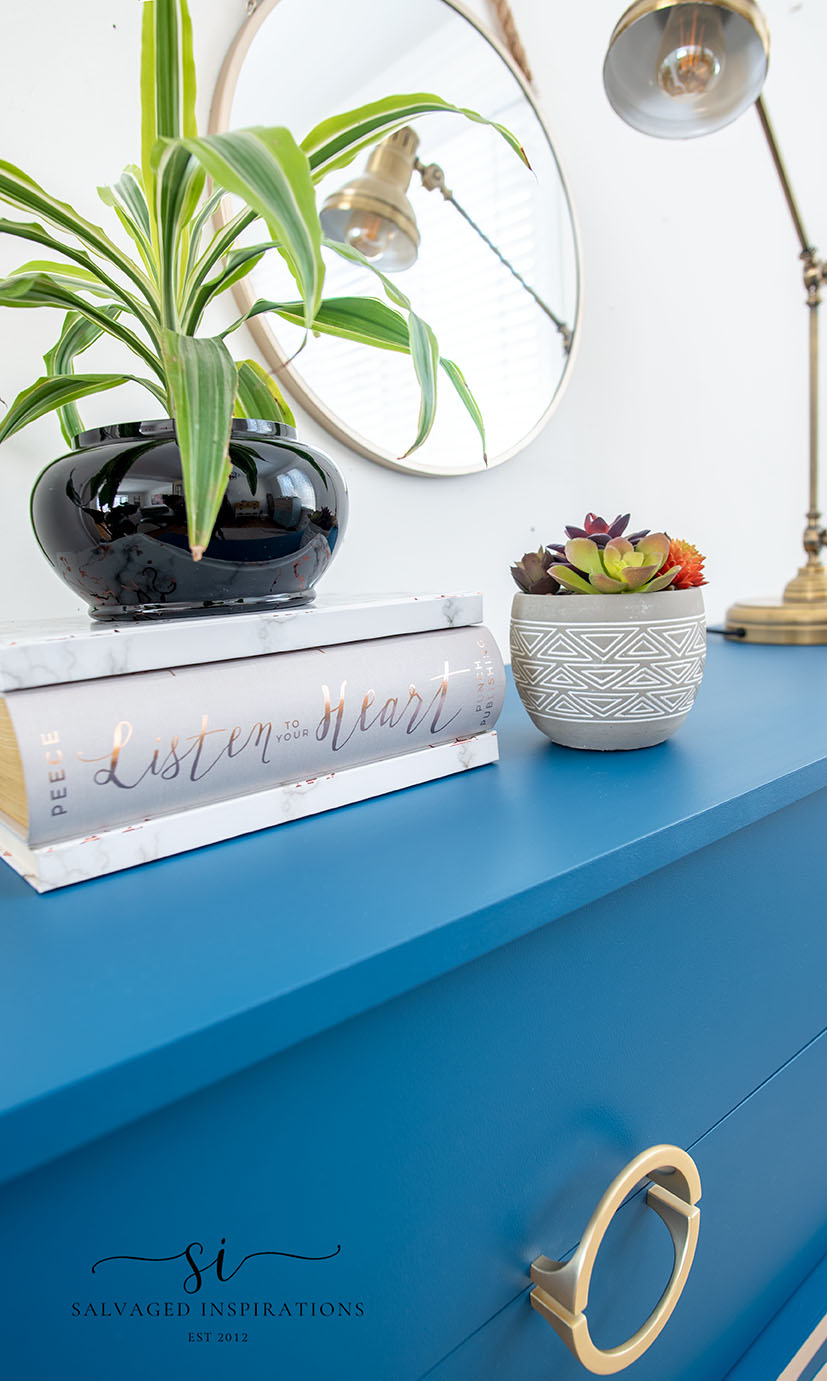
I love the brushed brass hardware against this vibrant blue!
And as promised, here are a few close-ups. I hope you can see the tiny texture left behind by the roller. In some areas, it’s a little more visible than in others.
I’m guessing maybe the paint was a little thicker or thinner in those areas… or maybe it dried a little faster in those areas?? Or maybe I should try another type of roller next time.
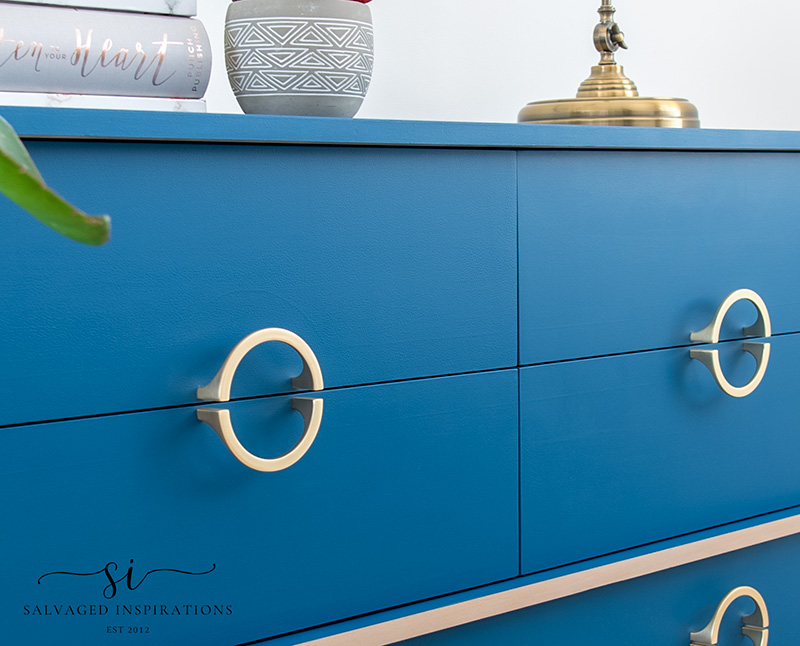
Either way, you really have to look very closely to see this.
MY THOUGHTS ON THIS FINISH
If you’re having trouble with brush marks, this is a GREAT alternative to getting a similar look to a sprayed finish. It’s not as flawless or smooth as a spray finish, but standing back, I don’t think anyone would be able to tell the difference. It’s only upon a really close-up look that you can see there is a tiny bit of texture.
I’ll definitely be trying this technique again. I’d like to try it out with different paint velocities and different rollers to see if I can get to an almost perfect sprayed finish. Challenge on!
YOUTUBE TUTORIAL
Here’s a step-by-step tutorial on Youtube. If you have any problems viewing it below, feel free to watch it on my Youtube Channel HERE. Our #siyoutubefamily is already a community of 37.3K so don’t forget to subscribe if you haven’t done so already! So exciting, thank YOU! 🙂
Here’s another look at this MCM Dresser before and after. I hope this makeover has inspired you and given you some new painting ideas for your projects.
LET ME KNOW WHAT YOU THINK OF THIS BRUSH AND ROLL FINISH AND THE MCM DRESSER. FEEL FREE TO ASK ANY QUESTIONS YOU MAY HAVE… I ALWAYS LOVE HEARING FROM YOU. IT MAKES MY DAY! 🙂
Happy furniture painting friends!
Denise x
RELATED POSTS::
MCM CHOCOLATE-PAINTED DESK
PAINTING FRENCH DOORS IN BLACK
DROP CLOTH PAINTED DRESSER
22 SALVAGED FURNITURE FLIPPING IDEAS
HOW TO PAINT FURNITURE WITHOUT BRUSH MARKS
PIN AND SHARE!


Hey Denise! i know i have already commented above but i came across this on Cottage Market. this is a perfect Statement piece and i very much appreciate your tip about filling the holes. I use the same thing and it is hard to sand off so from now on i will only fill the hole half way and the rest with DB Mud. Thank you again!
Hey thanks Cheryl… I didn’t even know I was included in the Cottage Market roundup!!! And ya, I find using the Mudd waaaaay easier after its been primed. I hope it works well for you too! xoxo
This piece is AMAZING!! I am absolutely in love with it!! I would never be so lucky to find an outdated piece like this and bring it to life again!! Love the color!! Where is the best place or places to look for pieces like this?
I would check your local thrift stores and on Facebook Marketplace Melissa! And thanks so much. So glad you love it! XOXO
jUST WONDER HAVE YOU EVER USED fLOTRON TO GIVE A SMOOTH FINISH. I HAVE KITCHEN CABINET I’M GOING TO PAINT AND HAVE THE PRODUCT BECAUSE I SAW HOW THEY USED IT MAKING POUR ART AND WONDERED IF IT WOULD BE AN ASSET FOR MY CABINETS……WHAT DO YOU THINK…..
I think YES! I always have Flotrol on hand in my supply box. It works great!
Hi Denise! I think it looks 110%better. I tried looking for the textured parts and didn’t see them. Did you use a foam roller? I have found that the silk colors are pretty vibrant. I just tried one of the colors and I wasn’t a fan I would love to try the dark green though. I always learn so much from your tutorials. Thank you!!
They ARE vibrant, aren’t they?! When I first opened this Cape Currant and started painting I was tempted to lighten it up with another color… but I thought, Denise – be BOLD. Glad I kept going with it. 🙂 And yes, I did use a foam roller. I’d like to try this brush and roll with other paints and rollers to see how it goes. XOXO
I love the vibrant color of this gorgeous MCM makeover, Denise. The unique gold hardware makes such a statement. I was about to ask when I noticed Carol beat me to it and your answer makes total sense. I am definitely going to try this technique. I always leave your blog learning something new – thank you! 🙂
Thanks my friend! It’s so vibrant it scared me at first 😂 but I actually really love it on this piece! Enjoy your day! Hugs XOXO
Nicely done, D! Like that stain colour & love the two sets of eyes vs the original emoji face!! LOL
LOl, thanks my friend! XOXO
Hi Denise. Found your site this morning. Wow! I’ve spent so much time viewing all the videos! You are amazing! The color is beautiful complemented by the stain. I need to get some Voodoo. I think I have EVERY OTHER PRODUCT in my stash except that one. I didn’t realize the brush and roll technique was new. I’ve been doing this since day one because I’m lazy and didn’t want the work that went with paint/dry/sand/ repeat. I have found that higher end furniture refinishing rollers work the best. The have very low nap for a truly smooth finish. Thank you for sharing your beautiful pieces. You are an inspiration to all of us!!
Hi Karen and WELCOME! So happy you found the #siblog!🤗 Would you mind sharing the brand name of the refinishing roller you use? I would LOVE to give it a try!
Beautiful as always Denise! And thanks for sharing this paint rolling tip. I’m going to try this on a side table I have!
Thanks Nicki! And I’d love to hear how your side table turns out! XOXO
Sooo beautiful! I love everything about it. Just wondering…why brush first rather than just roll?
Thanks Carol! 🤗 When you fully load a roller with paint and then roll, often you’ll get more texture and air bubbles. With this technique the roller stays drier (if it gets too wet you can roll it on a paper plate to offload some paint) and less air and texture results.
You’re so knowlegable Denise! I have a jewlery armoire that I’m about to refinish and was going to roll the paint on the top and sides. Thanks for the advice!
My pleasure and thank Carol! Have fun with your jewelry armoire!
WOW! I absolutely LOVE the finished item. I didn’t think I would as I’m not a lover of bright colours as a rule, but with the hardware you used it really does look great. I also like the brush and roll finish, and will be giving it a try on the next project I do. Thanks for sharing this technique with us.
So happy you like this finish and color Judi! And ya, I’d LOVE to hear how it turns out for you!
I love the contrast between the bold blue and the gold. As always, you did a great job!
I can’t wait for the results of your painting tests with different roller and paint (I’m using Annie Sloan and a smooth finish isn’t always easy)
I have a question for you: do you think I could use an Annie Sloan wash directly on my vanished pine chairs, without sanding first? (Just a good claning) The goal would be to cover the orange tone of the pine…and on top of that orange, what color would you use to mimic a white wash? Paris Grey maybe?
Thanks for your reply
Thanks, Corinne! I’ve tried applying a wash straight over a varnished finish and it didn’t work for me.😕 I think because the water dilutes the chalk properties that enable chalk paint to adhere. What about a gel stain to reduce the orange? This can be applied over an existing finish but you might want to experiment with the color combos.
I had trouble with brush marks on the dresser I just finished more so than any other time….maybe the paint was old? Wish I had seen this post before 😁 will definitely give the roller trick a try next time! LOVE the hardware!
Older paint thickens up so that could be why, for sure. Sometimes thinning it with a little water or some Flotrol will do the trick. Or yes, try this roller trick. I’d love to hear your thoughts!
Thank you for the great tips! The dresser turned out beautifully.
Thanks my friend! Have a beautiful day! XOXO
I love how this came out!! After you applied the stain, did you put anything over it?? Topcoat?
Thx
Thanks so muc Tiffany! And I didn’t… yet. Before I sell it, I will wipe on poly (prob Gator Hide) with a sponge to protect it. 🙂
Hi Denise
Like always ,you did an awesome job on this old dresser. .Looks like it was smiling and could not wait to be painted and look real pretty again . I`m sure he is very happy now. The color is fresh and clean looking.
Cheers
Right?! That face reminded me of one of those animated ‘Robots’ lol. Thanks so much, Barbara!
Hmm. Now I want to repaint my kitchen cabinets! This seems like a great tip and worth trying – thanks for sharing it. And the brass with that blue is super fresh looking – love it!
Yesssss, me toooo….I really want to do my kitchen cabinets as well! I’m so glad you love the dresser, Marcia!
I think this is your best transformation yet! Love it!
Oh I’m so glad Nancy… thank you!!!
Love this and will definitely try the brush and roller technique. Thanks.
My pleasure and thanks Lori! I’d love to hear how this roller technique works for you. 🙂
Beautiful! The natural stain with the vibrant blue makes a statement. The drawer pulls are also fabulous and the finished piece would be coveted here in Palm Springs. Great painting tips too!
Yay! Thanks so much Elle! I’m not sure how fast this color will sell here in the Toronto area but I can so see it in Palm Springs!!!😃
Denise, it’s absolutely great! On the first picture of the paint, my immediate reaction was, “WHOA” (lol), but it is just perfect. Of course!
I wonder–would a lower density roller make a difference or worse? You’ll have to keep us posted please.
My first reaction when I started painting with this color was WHOA…lol…but once I finished the first drawer I knew this color was going to be bold and beautiful. And I wonder as well. I’ll experiment with a few rollers and keep you posted Caye. XOXO
Hi Denise. Wow, I love how this dresser turned out. The new gold hardware is simply stunning against the vibrant blue and the natural wood accents are the icing on the cake. Well done.
Thanks my friend! XOXO