Happy Tuesday to you!
Today’s QTT is more like a full blown tutorial on How To Use Bondo as Wood Filler… and how I think they compare. Even though this post isn’t really ‘quick’, it’s a follow up on last weeks Quick-Tip-Tuesday and I can’t wait to show you this amazing dresser leg repair!
So let’s get right to it… Have you ever passed up on a gorgeous piece of furniture because it was flawed or damaged? Maybe it was perfect in every way but it was missing veneer. Maybe a drawer corner was knocked off? Or possibly a hunk of wood was missing from a leg? Like this one!

No worries… I’m learning imperfections like these are EASY to fix!
I’ve used Bondo on a good few furniture projects and the truth is, I’m blown away by how well Bondo repairs small AND large missing wood pieces and/or veneer!
For instance, I wasn’t 100% sure Bondo would fill this entire missing leg piece.
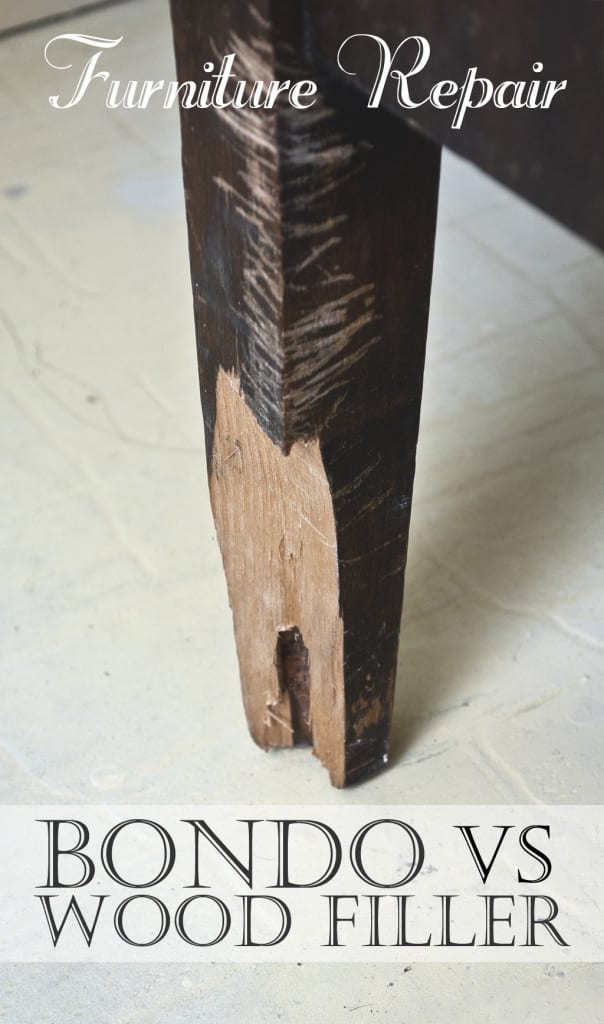
My original thought was to use some wood shims and wood glue to fill the majority of this missing leg, and THEN use a wood filler or Bondo to patch the rest of the repair. Then I thought – screw it. I’ll find a way to re-create the straight lines of the leg… and I’m sure the Bondo will be strong enough. I was right!
Buying Bondo
There are numerous brands of “Bondo-Type” products but what you’re looking for is a putty used for automotive repair and filler. All-Purpose Bondo’s are best. Just as the name suggests, these products can be used on wood, concrete, tile, automotive repair etc.
The price of Bondo is in the $15-$20 range versus a brand-name wood filler which you can buy for between $5-$10. Bondo is a little more costly, but as you’ll discover below, well worth it for the time it saves and the durability it provides!
Mixing Bondo
Mixing Bondo isn’t difficult but I’m not going to lie… it’s a whole lot of smelly! Make sure you work in a properly ventilated area and read the safety instructions.
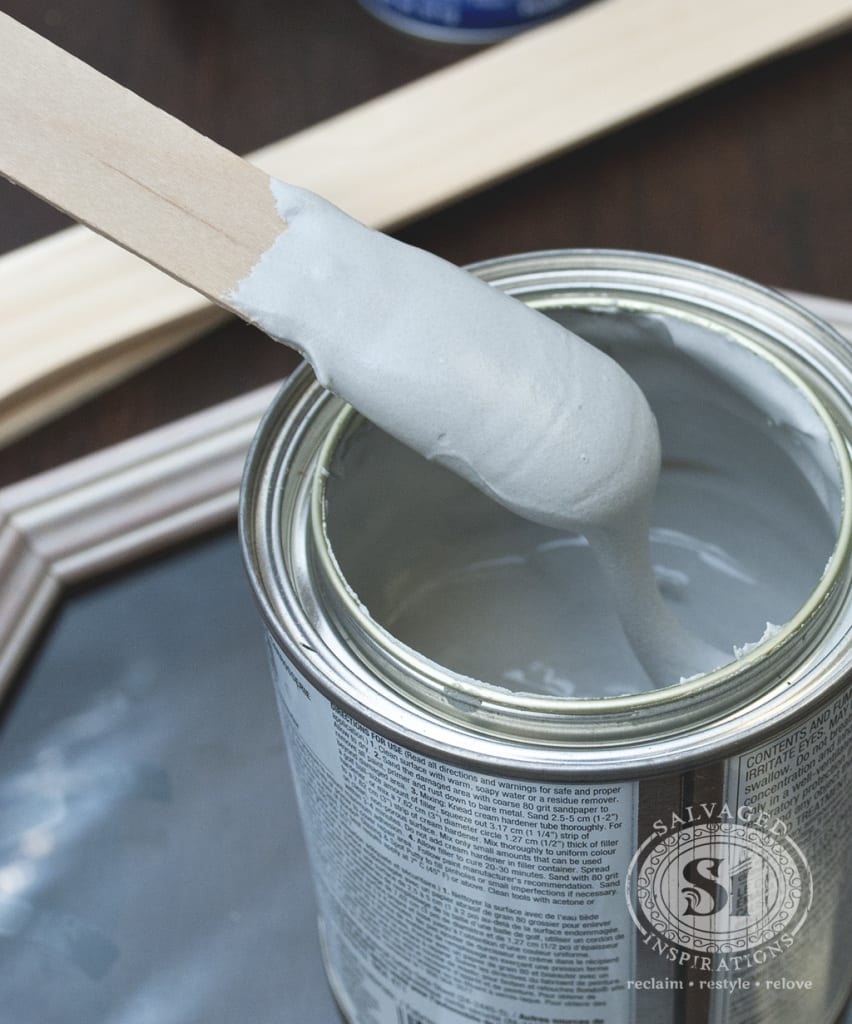
Bondo comes as a putty and includes a separate colored cream hardener. Once they are mixed together, the hardener activates the putty with some sort of chemical reaction. It’s important to mix thoroughly until it’s consistent in color.
Mix both together on a clean non-absorbent surface like plastic or glass. I’ve designated this glass frame for mixing my Bondo. I’m not sure why, but I read mixing on cardboard can absorb and change the chemical balance of the product.
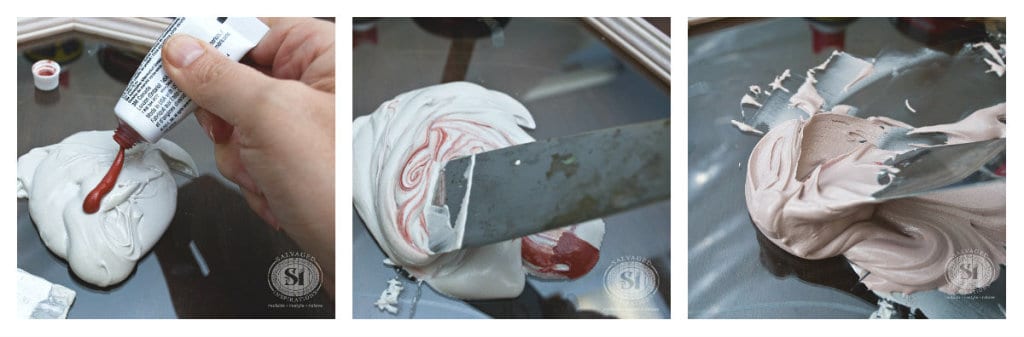
For a golf size blob of putty, I mixed in a one inch line of hardener. If you mix in more hardener, it will dry faster… it may even start drying during your repair. Be sure to follow the mixing instructions! Because it dries so fast, there’s a short amount of time you have to work with this stuff – unlike Wood Filler where you can pretty much take your time.
Applying Bondo
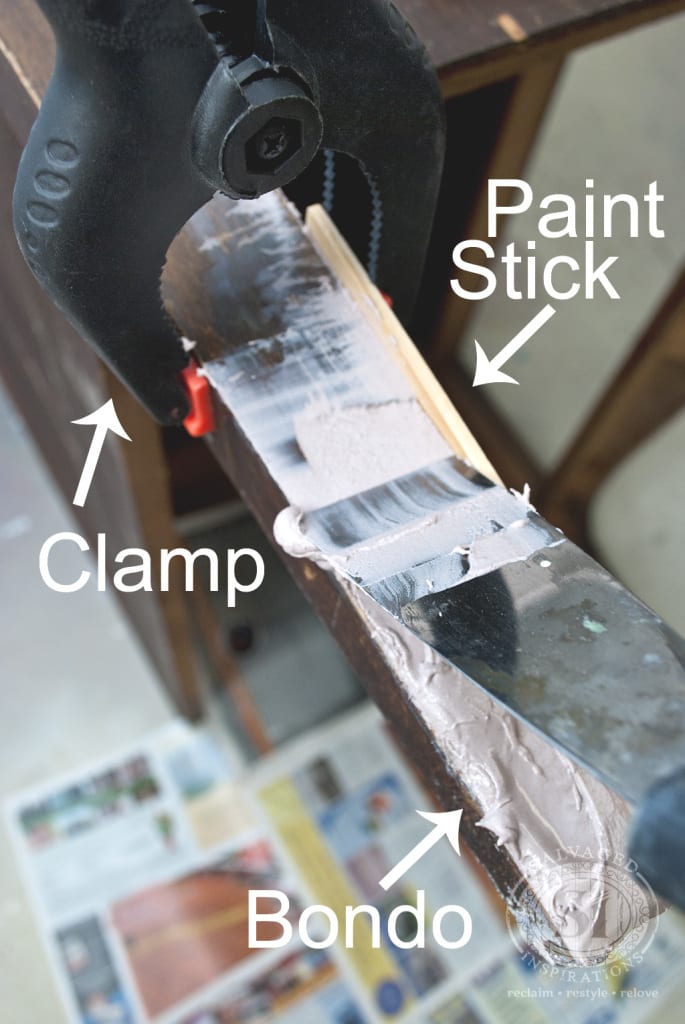
You can apply Bondo with a putty knife or with the same tool you use to apply wood filler but the consistency is different. Bondo is more wet and gloopy….I know, not the most professional terminology there…lol.
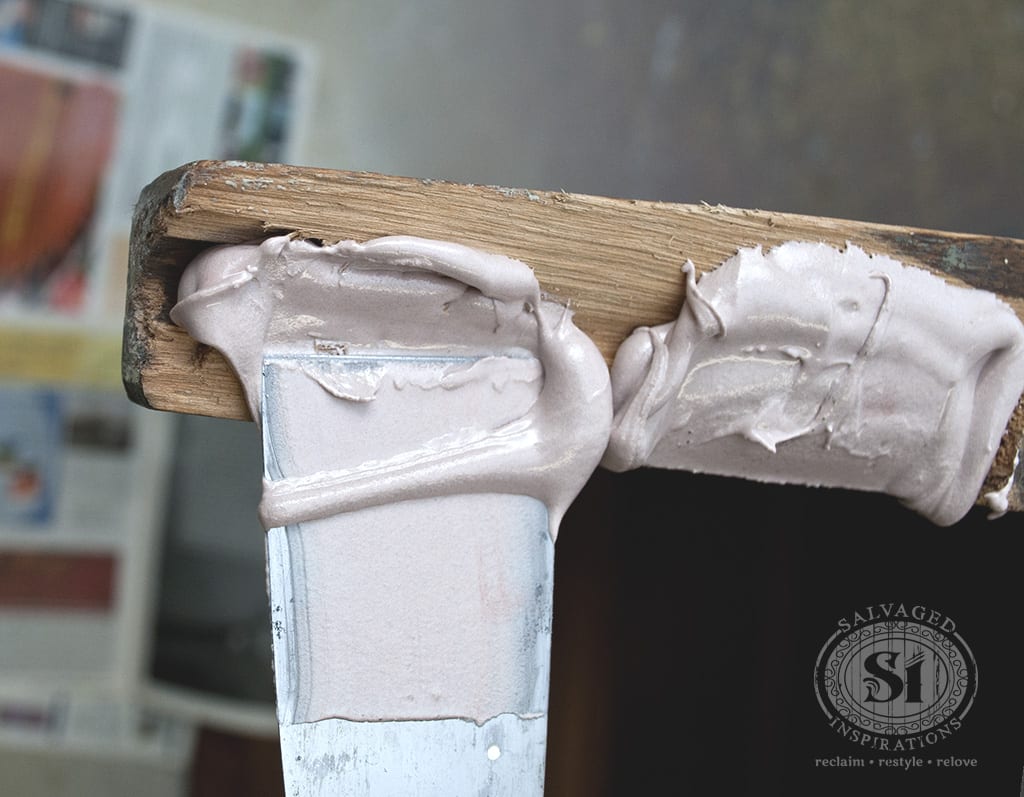
To create a straight edge which may be required for some larger repairs, use any sort of firm flat surface. I used paint sticks and clamps to create a perfect edge by following the natural line of the leg.
Check out last weeks Quick Tip Tuesday to see what I use so the Bondo doesn’t stick to my paint sticks!
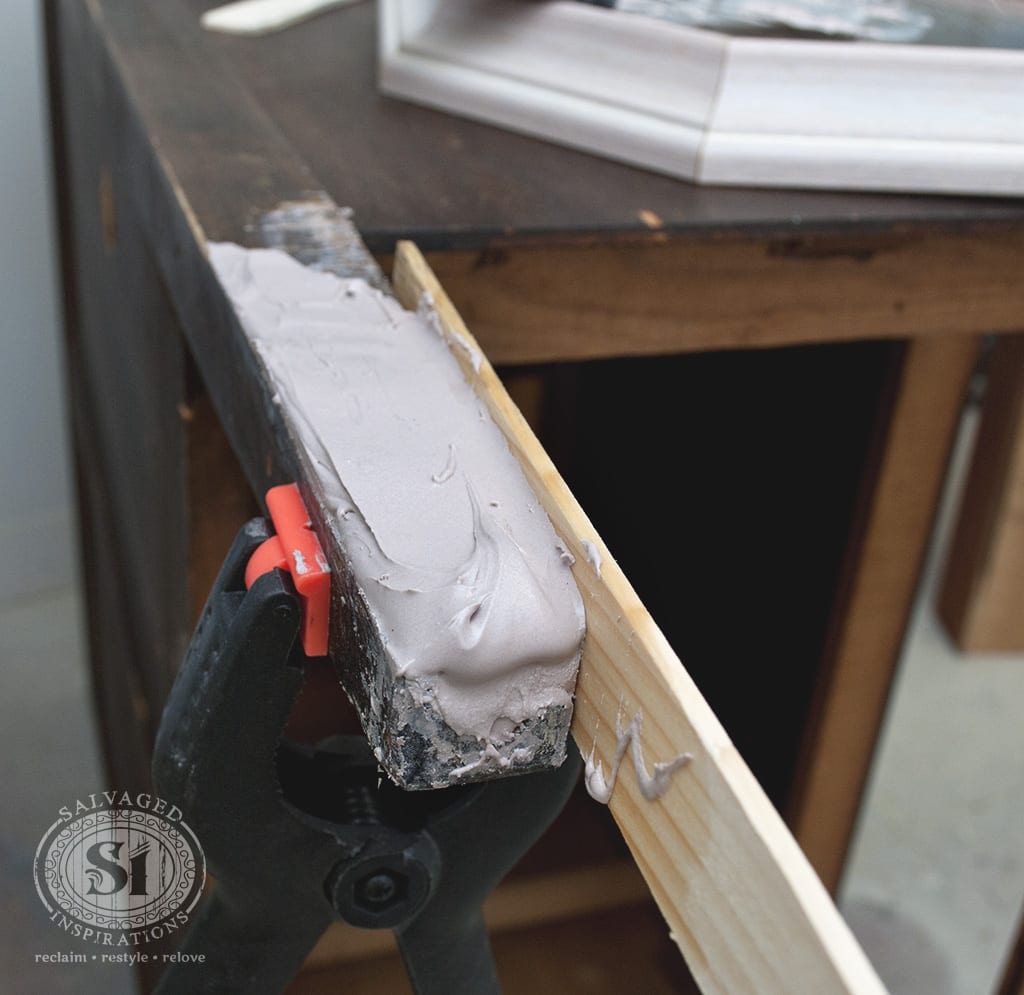
Unlike wood filler that may need to be applied in a few coats, Bondo has NO shrinkage. As long as you fill in your repair generously, only one application of Bondo is needed.
Dry Time
The biggest advantage of using Bondo over a regular wood filler is the short dry time. Wood filler can take hours to dry and require more than one coat. Bondo dries in less than 30 minutes and only requires one coat!
This means more projects in less time.
Shaping and Sanding Bondo
Bondo dries super hard and doesn’t sand quite as easily as wood filler. Removing any excess Bondo BEFORE it’s 100% dry will really cut down on your sanding efforts.
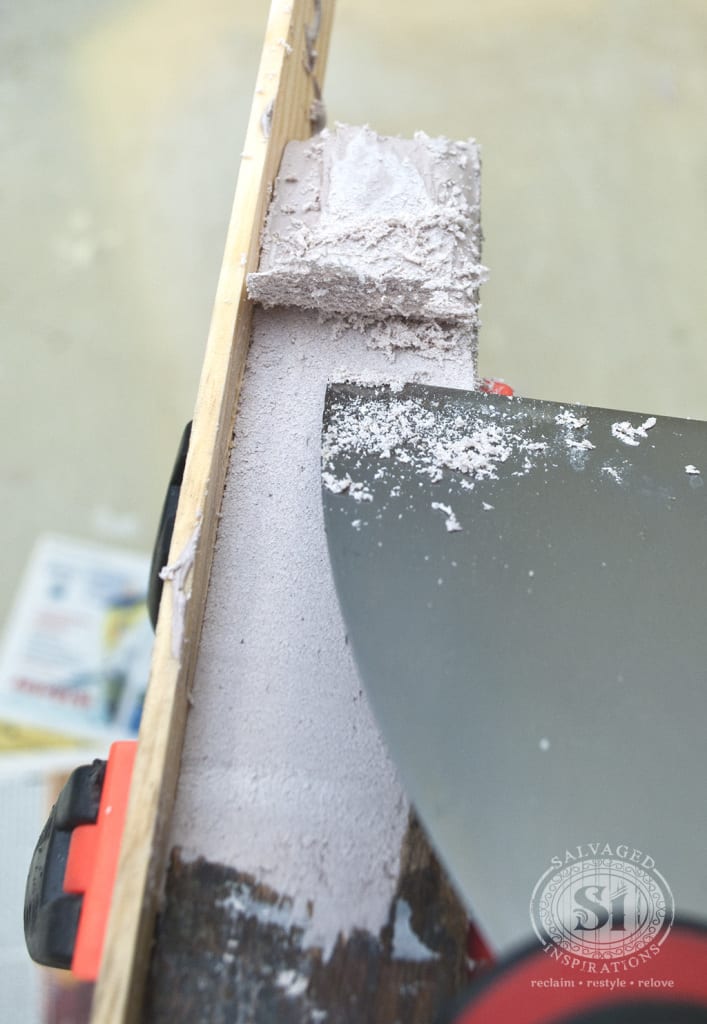
Here I’m skimming and shaping down the excess Bondo with my putty knife. This was about 12 minutes after applying it. It had set but wasn’t fully dry making it pliable and easy to shape.
After I removed the excess following the contour of the original leg, I let it sit for another 10-15 minutes until it was totally dry before I sanded.

Starting with an 80 grit on my orbital sander, I worked my way to 220 grit for a perfectly smooth finish. Voila!
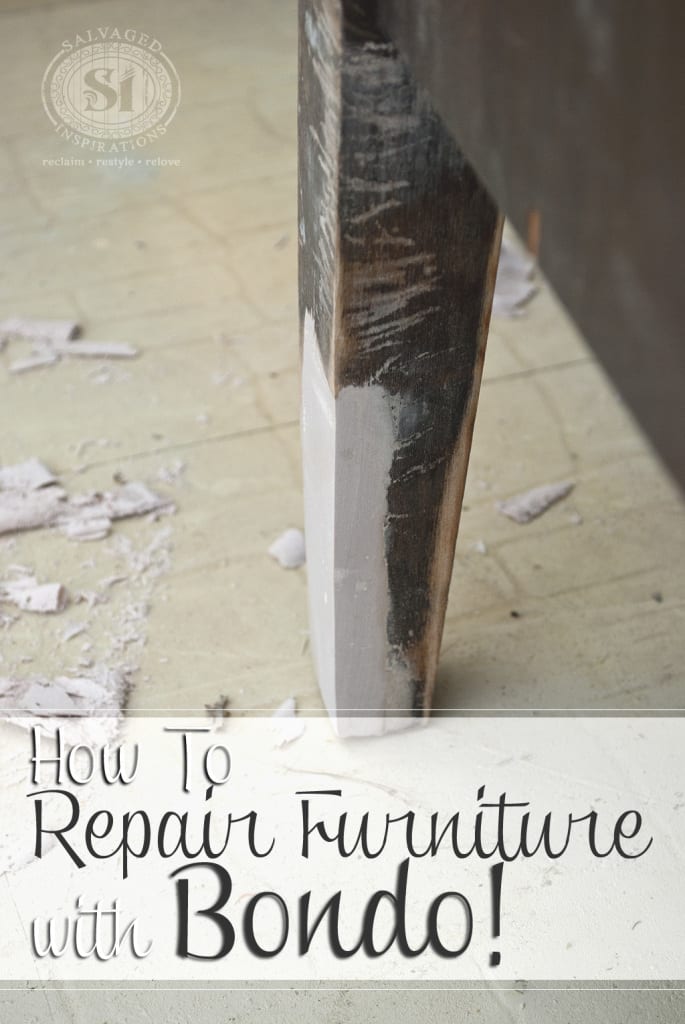
Painting & Staining Bondo
Bondo and other similar type products are made for painting – not staining. However, 3M has come up with Bondo Wood Filler that does accept stain… how exciting! If any of you have tried staining with this Bondo, I’d love to hear your results!
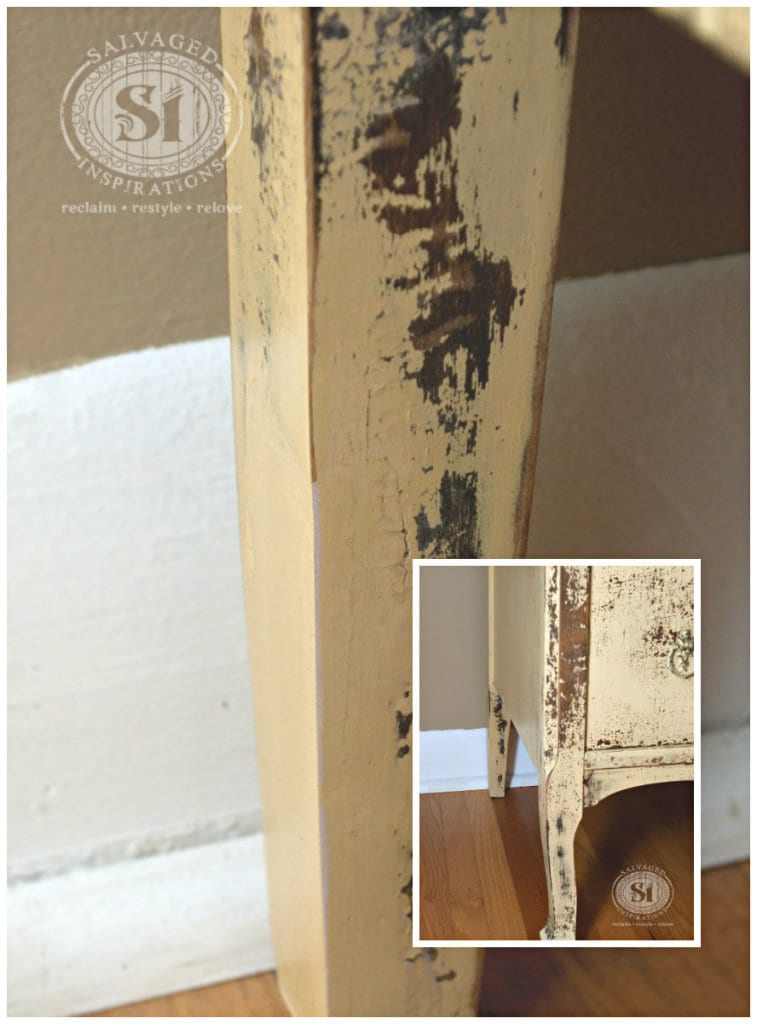
This piece has been painted and you’d never know the leg was broken!
I can’t tell you how many perfectly imperfect pieces I’ve passed up because I had no idea how to fix them. Seriously, Bondo has become a game changer when salvaging furniture. It’s easy to use, saves me time, and provides a heavy-duty durable fix!
I’d love to hear all about your Bondo adventures and repairs so leave me a comment below. Or if you have any questions… ask away!
Catch last week’s Q-T-T here – and if YOU have any tips you’d like featured on the SI Quick-Tip-Tuesday-Series, feel free to send me an email!
Make sure you drop in tomorrow to see the FULL REVEAL of this dresser!
I absolutely LOVE this chippy primitive look and hope you do too! I promise to make tomorrow’s post short and sweet with plenty of gorgeous pics! 🙂
See you tomorrow and have an amazing day!
Denise x
_____________________________

This kind of epoxy filler typically has a natural color a long way from that of any wood you might be repairing. This may not matter if you are planning on painting over the repair, but if you are staining the item to a wood color, some amount of color matching may be needed. If you wish to apply color, you can use the powder oxide of the sort used to color cement. For repairing a mahogany item, for example, a quantity of dark brown oxide powder may be added BEFORE the hardener is mixed in. If it becomes too dark some light brown or even white powder might be added too, till you have approximately the right tone. Having said that it is probably not wise to add too much of these powders as this might weaken the final resulting mix. Some experimentation may be needed. In any event some color touch up will most likely be necessary with paint or stain to get a result very similar to the other wood in the item being repaired. But pre coloring helps. While many hardeners themselves color the final mix of filler, if the filler is pre mixed with oxide coloring this coloring by the hardener will be less obvious. I always add less hardener both because it does change the color tone and because, particularly in warm weather it can otherwise set up too quickly reducing working time. Working in smaller batches also helps. Sometimes you may find it advantageous to add a little solvent like acetone or white spirits to the mix so the result is more runny – e.g. if deep holes must be filled.
This is super helpful. Thanks Peter!!
I tried to read through all the comments to make sure this has not already been asked but how do you keep the paint stick from forming or getting stuck with the bondo, I am trying to do a threshold (exterior) that has rotted and need to make a straight line on the bottom, about 2 inches above the brick walk way and can not keep it from falling off as I form so the paint stick would be PERFECT but I am worried it will stick to the bondo and when I remove the stick the bondo will come with it.
Thank you for the tutourial it will be exactly waht I need
Hi Karen! You can spray the paint stick with WD40 (or something similar) so it won’t stick to the Bondo and/or remove the paint stick before the Bondo has dried 100%. If the Bondo is say ‘half dry’ the paint stick will come off and the Bondo will still hold its shape. Hope that helps and so happy this tutorial was helpful.😊
I live how you showed an actual pic of each step. Great work! Trying this on my grandmother’s old buffet. Thank you!
Thanks and have fun on your grandmother’s buffet!💕
I am new to flipping furniture but I am well versed in the world of bondo because I have been mixing and applying bondo since I was a kid. My dad has been doing auto body repair work since he was 15 and I grew up helping him. The excitement I felt when I came across this tip on Pinterest was a huge nerd moment for me! THANK YOU!
I remember my uncle kept telling me to get bondo several times to fix my door frames and furniture. I could had listened to my uncle. Now I understand how you used bondo on your furniture. I will buy bondo for my foundation floor where carpet tacks used to be. I have to fix my fence first before I do the house repairs. Thank you so much for the information about bondo.
A few years late to the bondo party you have going on but here is a quick tip regarding shaping and forming with Body Filler:
If you put blue painters tape on the connecting material used to make a straight edge or form a shape once the filler is dry, the blue tape does not stick to bondo, it leaves you with a clean surface with the texture of the tape.
Love this! Thanks Zach!
This is very useful. I like the design. Thank you for posting.
Love car body putty. A friend suggested that I use it to fill in a rotted window sill. I dug out all the rotted section and filled it in with body putty. He told me that the body putty would prevent any more rot. I sanded it down, painted it and that was in 1985 and the sill still looks great today.
Hi Roger. Amazing, right!?! Bondo makes Wood Bondo and Auto Bondo and I’ve used both on my furniture. Maybe if I was to use them side by side I’d be able to tell the difference – but honestly I haven’t seen a big difference at all. Just as you said, the body Bondo works great!! Glad it worked on your window sill for all these years!
I was reading this blog and hoping someone could tell me how to remove the Bondo. My contractor used it when he gouged out several huge chunks out of my newly purchased GORGEOUS 1920 antique door. He knew I wanted to stain the door. Now what? I do not want to paint a solid walnut door which was in perfect condition when I purchased it.
This is a handy technique I can use to repair some old furniture. I like the way it can be easily sanded and finished. Great job!
This is a great tutorial. I’m based in the UK so I used Isopon multi purpose body filler available from Halfords instead of Bondo. I’m part way through renovating a decades old chair that my partners Grandpa made. The tip of one of the back chair legs had been broken off & using the Isopon (which behaves in the same way as Bondo & comes with a hardener), I made a mould of the other rear leg with hot glue, peeled it off once it cooled, applied the Isopon, popped the mould over the top, let it set & then sanded it down. Thanks to your tutorial I’ve got a brilliant result.
Amazing you’re restoring your Grandpa’s chair and this is brilliant! Thanks for sharing. I have a lot of readers from different countries including the UK so I know product names and uses is EXTREMELY helpful! 🙂
I love that you made a mold with hot glue. Ingenious! When you used the hot glue to make the mold, did it damage the wood or finish where you applied it? Thanks.
Hi Denise,
What a great idea to use bondo, I am refinishing a walnut Queen Anne dining table that has damaged veneer on one corner, I decided to replace one whole strip which is about 8 inches wide and 40 inches long with new veneer but had trouble getting the veneer off and some of the substrate was removed by accident. I am going to use bondo to build that corner back up before gluing the new veneer on top of it. I like you idea of using paint sticks to create a dam to give a sharp edge. but for the rounded corner I think I will use a fine white cardboard to form the rounded area. I am also sanding down all the curved legs to get the severe dents out, then I will be re-staining most of the table, top and legs and finally I am taking it to an antique restoration company that has a professional lacquer sprayer to give the final finish.
PS… I discovered the best way to get old veneer off is to use a very wet towel and lay it on top overnight then use a heat gun pointed at a metal chisel blade to heat up the chisel which then melts the glue and will pretty easily slide under the old veneer which I discovered watching many youtube videos.
Cheers, Russ
Vancouver Island.
Hi Russ! Great tip on removing veneer and have fun with your Queen Anne Dining table!
I’m going to try taking off the side veneer on my grandmother’s old buffet piece I inherited. If I can’t get the whole thing off then I might try the Bondo. I want to be able to stain the sides with the chipped veneer. The rest of the piece is perfect. Thanks.
Hi Denise~ Would you suggest this for a stained antique bench that my dog chewed the leg on? It is at the bottom of the leg and has bite marks all the way around it. It was very expensive and my husband is going to pass out if he see how bad it is. I will have to use stain over it also. Any tips would be so appreciated. Thanks so much!
Hi Michelle! No, I wouldn’t suggest Bondo or regular Wood Filler because neither stain well. They do sell wood fillers that are stainable however I haven’t found one yet that does a decent job. If anyone reading this q&a has any suggestions, feel free to chime in. 🙂
Sawdust from your hand sander or miter saw. Make layers of wood glue and sawdust. A small layer of glue then sawdust, let it dry slightly and then repeat. Make sure your last layer is saw dust and the piece is completely dry,then sand your piece as desired and stain.
Thank you Robbie! I’m going to try this!!!
After three year your idea for using Bondo as a filler is still current and informative. Your replies to submitted comments are especial helpful. Keep you the good work!
I have been using Bondo for years for filling cracks and voids in furniture and burl bowls I make from Alaskan Birch. I like to add a black pigment (oil based pigment used in paint stores to color their paint works really well) a coupe of drops goes a long ways. The black contrast against the lighter wood looks nice and has a natural look to it. I don’t stain my projects, just use a semi-gloss polyurethane.
As you say, add the pigment to the Bondo and mix thoroughly before adding the harder. To reiterate what you also say, how quick the Bondo sets depends on the local temperature, amount of Bondo used, and amount of hardener added. Too much hardener and the Bond will harden before you can finishing apply it. Too little and it can takes days (if at all) for the Bondo to harden. As you say, best to work with small amounts. Since it dries quickly, better to use several smaller batches rather than on big one.
A final note, good ventilation is essential when using Bondo. Not only is it smelly, but the fumes will make you high and or give you a headache. Even when using Bondo outside, I still use a nose/mouth respirator.
I use bondo on wood repairs and to reduce the drying time on thin applications I use a heat gun and it works grea
It’s good to know more about furniture repair options. Using Bondo or wood filler honestly seems like a good idea, even if it is kind of stinky. We’re probably going to take our chairs into a professional though because they are more broken than some small cracks or chips.
Have you ever used Bondo on construction grade stairs to smooth so a carpet runner can be used.
I asked MMM to double check and he confirmed Bondo and fillers are NOT a structural fix. Something to keep in mind if there is a large gouge/damage etc. That said, wood fill for less than 1/4 inch deep or Bondo or Contact Cement for anything more. Hope this helps.
For structural repairs, there is fibreglass filled bondo. It is bondo with glass hairs in it. This material is a bit harder to work, but is extremely strong.
To use it I recommend putting screws into the wood of the repaired area so that the fiberglass Bondo gets traction. The screws should of course be below the level of the desired surface substrate so when sanding they are not sticking out.
With fiberglass Bondo sometimes called Kitty hair or Tiger hair – depending on the length of the Strand – you apply a thick and lumpy first coat which should have your general shape but be less material than the full surface fill. Sand off any runs or drips that extend beyond your surface substrate. Then apply a second coat of regular Bondo to fill in any gaps bubbles or imperfections. Once sanded this creates a beautiful finish with extremely strong properties.
Kitty hair or Tiger hair eh?… I’ve never heard of this. But I have heard of Bondo Glass which might be the same thing. Thanks for this info Mr.Matt. I’ll have to give it a try. 🙂
Can this be used to smooth wood grain on oak cabinets before painting?
It sure can. 🙂
Regarding “Can this be used to smooth wood grain on oak cabinets before painting?”
and “It sure can. 🙂”
Any tips on doing that. I’m planning to fill in wood grain on sides of futon. Should the standard amount of hardener be used? What happens when the bondo starts to harden and I haven’t finished smoothing it out?
I’m also wondering if I must remove all varnish or poly first. I may try a deglosser instead. Any thoughts?
Hi Connie! Yes, too much hardener and the work time will be cut down significantly. I would suggest sanding the topcoat with a 120 grit to give it a really good tooth… then mix the bondo in small batches and work in small sections. Apply with a putty knife to fill in all the grain and skim the excess. Once it’s all dry, smooth it all out with a sander for a perfect finish and paint. Hope this helps. Great project btw. 🙂
I SAW THIS FIRST TIME N I LIKE THIS………(SORRY FOR BAD ENGLISH..I M A LEARNER)
MY QUESTION IS…
I M MAKING A HELMET OUT OF CARDBOARD AND I DECIDED THAT I WILL APPLY PRIMER TO IT WITH PRIMER HARDNER.SO THAT IT WILL BECOME HARD….SO AFTER PRIMER…IF I APPLY BONDO ALL OVER THE HELMET WILL IT BECOME TOO MUCH HEAVY OR WHAT….I WANT A SMOOTH SURFACE AND NOT TOO MUCH HEAVY HELMET..PLZ HELP
.AND
IF AFTER APPLYING BONDO OR AUTO BODY FILLER..CAN BONDO PROVIDE STRENGTH TO MY CARDBOARD….I DONT WANT TO MAKE IT HARD USING FIBREGLASS AND RESIN… I MEAN WOULD BONDO WILL HELP ME IN MAKING A LONG LASTING PRODUCT…
does bondo stick better than kwik wood putty stick? i just tried that stuff and it did not bond after i sanded wood piece with 80 grit and blew it out with air. i picked it off with my fingernail the next day.
Hi Stanley! I’ve never used Kwik Wood Putty but from what you just told me – my answer is a definite YES! Bondo is smelly, it has a short window when working with it – but it’s amazing. Hard, durable and adheres perfect if the surface is prepped. 🙂
Yep, I read about using bondo for wood repair years ago. I used it to repair the exterior crown molding on an old Victorian house that was to be painted. Looked great!
Hi there, yes I love Bondo for repairs on wood. I have two alabaster lamps and one is missing a piece in the back, any suggestions for repairing that material? Than you
I have a dresser I’m remaking into a book shelf. I removed the wood drawer supports as I needed a higher space between the shelves. I know have holes on the insides of the dresser as the supports were inserted into the sides of the dresser. The holes are approx 1/2 inch by 3/4 inch and about 1 inch deep. How would I get bondo into the hole? Hope this all makes sense
Kim
Hi Kim! I hope I’m understanding your question correctly and can help. 🙂 Home Depot or any hardware store sells dowels in different sizes. You may want to fill these holes by gluing in wood dowels and then filling any remainder gaps with wood fill or bondo. I use a putty knife and squeeze it in and then scrape off the excess.
Hello, Denis!
It was nice to read your article which was very informative to me as a beginner. Today i started to sanded my old varnished dining table as my first project with furniture.. As i wanted to remove the varnish as fast as possible, i used too coarse sandpaper. After usage of 80, and later on 320 paper, scratches still were visible on the veneer sheet. I’m very upset and do not know what to do. Maybe you can give some advices??? Thank you !
Lydia
Hi there Lydia! Oh no!…it’s possible you missed a few steps (or grits) along the way to give you the smoothest finish. For heavy duty surfaces, I start sanding with a 60 or 80 grit and I move up in increments. 80-120-150-220-320 – for example. I gauge how the wood/surface is responding and always sand with the grain. The issue with sanding veneer is sanding through the veneer so it’s best to be moderate with each step. I hope this helps.
Thank you for your advice. I will wash the table to clarify the results of my work… and will decide what to do in my situation. In any case, it was very helpful!
Sincerely yours,
Lydia
any tips for how to form a repair when using on an antique leg with round areas that were partially eaten by termites? I can think of anything, maybe WD40 sprayed heavy plastic or from a rubber raincoat or something cut to size?
Bondo and wood filler work amazing for straight or flat surfaces but a fellow friend and furniture painter swears by this Plastic Wood Product Linda. It’s more like a putty in your hands and can be easily formed on round pieces.
great ideas. Love this site. Thanks, Karen.
Hi Denise. I haven’t used Bondo since high school in 75, working on my 63 Dodge Dart, lol. What a great idea!!! I’m a faux finisher and do many projects for clients with some pretty beat up pieces, especially kitchen cabinets that can be difficult to repair on an edge. Wood filler is difficult on an outside corner, doesn’t really want to behave and lay like Bondo. Also, I’m always buying new cans and tubes because no matter what I do to store it, it dries out before my next application. THANK YOU so much for this idea. I can’t wait for my next project with all its imperfections. ?
Hi Colleen! So happy you’ve found this helpful.. and I’d love to hear how it works on the cabinets for you!
I came across your website just 2 weeks ago when I needed info about how to fix a chair back. Then I immediately went out to buy BONDO.
This stuff is amazing! Thank you so much!
In the past I struggled with all kinds of wood fillers which didn’t do the job.
Your detailed pix and instructions were a great guide for using this really smelly goop.
Thank you for sharing!
After reading about all the good things you said about Bondo I ran out yesterday and bought some All Purpose Bondo to repair a chair. I mixed it as per directions on the can and it turned to concrete before I could use it. So I tried making just a small amount and it did the same thing. Are there any instructions that are more specific? Am I the only one that has had this problem? Help
I’m nodding my head while reading this because I think this has happened to all of us on our first try! If you’re in a dry or hot area – Bondo hardens quickly! That’s part of the beauty of it. Aside from it being SUPER tough, you can patch/repair your furniture and be sanding and painting within 15min. The trick is in adding the right amount of hardener (for your environment) and only mixing the amount you need. I usually work with a golf size ball of Bondo and then add a small squirt (maybe half an inch blob) worth of hardener. Play around and experiment Norma. I’m guessing if you add less hardener you’ll get positive results. 🙂
Spreading the Bondo out pancake style (in small amounts), adding the hardner and then mixing gives me a little bit more working time, I’ve found. The stainable product works very well too. It’s Amazing stuff!
…and I find Salvaged Inspirations is a great source of ideas and how-to’s.
Thank You for sharing!!!
I have been using Bondo to repair wood pieces for some time and found your article well done. I would like to suggest mixing the resin and hardener in the right proportions is difficulty for some to grasp. I suggest using a round rod like a dowel or a chopstick (my favorite) to mix is faster, smoother, and cleaner, and provides more work time.
I have a chair leg just like that. Glad I did my research before trying to repair it with Magic Putty. I have a little electric Plane that I think might work better that sanding. I hope Home Depot or Lowe’s has it. I’m going with the All Purpose Putty.
Thank you! Will trying this product today. Was doing my research and this article was the best I found!
Oh good… I’m so glad you’ve found this useful Jeannette. 🙂
Staining bondo? Well not sure I would try that because Bondo isn’t as porous as wood and wood not allow for staining and wiping. What I do suggest is airbrush painting techniques to mimic the original finish. Try matching colors with acrylic paints while misting the paint over the repaired area. You can use the dry brush technique to simulate the wood grain as well, then varnish as you normally wood. Hope this helps.
This is great! So glad I came across this!! Question: I have some door moulding that has some damage from my dog – pretty deep scratches in the paint and exposed wood. Do I need to sand the paint first in order for the bondo to adhere?
Hi there Tamara! Bondo is a perfect choice for filling in dog scratches on a door. Very durable and won’t shrink. And yes, ideally the surface should be clean and lightly sanded or scuffed for the Bondo to adhere 100%.
That works a lot better than I would have assumed it would. I could use this trick to restore some of my wooden furniture. It would be really nice to be able to have furniture that looks old but isn’t broken up.
Hi Denise,
I am trying to figure out what to use for filling scratches on furniture and was not really happy with using wood filler because of it’s grittiness. Do you think that Bondo works better for filling scratches to crate that very smooth to the touch (even before painting) surface? Thank you.
Hi Oxana! Yes, Bondo works beautifully to fill deep or not so deep scratches. 🙂
I have an antique camper that had some splintery wood panels on the inside. Some of the veneer had pulled away from the baseboard. The veneer was missing parts where the previous owner had just pulled the veneer off, leaving gaps.
I used bondo to fill in the parts that were missing and the bondo made the entire section sturdier and the panel itself stronger.
Bam!
Denise, immediately Pinned this! Great tutorial.
Thanks for the share Rosie! 🙂
Hey Denise! Awesome article! I think this is going to be a game changer in my refinishing projects – I had no idea this was a thing! I’ve got this laminated buffet piece that is going to be my next project. The previous owners drilled two different holes in the back and side so they could run cables through for their TV/gaming systems/etc. Do you think I could use Bondo to fill those hole before I paint? Thanks! Lisa
Lisa, Bondo works perfect for filling holes!
Thanks so much for sharing what is going to be very valuable information for me. Have a table with a big chunk cut out, now I know how I’m going to fix it.
Everytime I click on one of your pins, I learn so much! This was a great lesson, as I, and many others I’m sure, have passed up potential glory because of missing chunks! Thanks so much.
So glad you left me this comment Jeanne… you made my day! 🙂
Loving your work.Rather than using wd40 try using cling film or a plastic bag to stop your baton from sticking to the bondo, its also great to help with moulding bondo around table legs
Brilliant Jeff… thanks! I recently had a reader on Facebook post me the exact same thing!
Hi D…
the best trick is to wrap wax paper around a piece of wood, and tape it on the back, and then clamp the wax-paper side onto your project…
Also, instead of using automotive Bondo, Use Bondos “All purpose putty”. It grey, and sands to an off white, and it sands sooo much easier than the auto stuff…
Regards,
T..
Thank you for this Todd…appreciate it! And yes, since this post, I have purchased All Purpose Bondo and like you said…much better!
Hey guys. Any chance of letting me know where to buy all purpose Bondo in Canada? Thanks, having trouble finding it. Only auto body is sold here as far as I see.
Hi Cookie! I buy my All Purpose Bondo on Amazon.ca or pick it up when I cross border shop because it’s a challenge to find it here. Having said that, I have used Auto Body Bondo (on furniture) that M-M-M had for truck repairs and it does work.
Excellent tutorial! Thanks for sharing the information.
Great job! Love that chippy paint color too. Thanks for the details.
WOW! Denise does it again. You never cease to amaze me with your talent – you clever girl!
Hi Denise, great article! I love bondo! I use it all the time on pieces that you would think would be unrepairable. I also use it to fill holes in drawers instead of wood putty. it dries so quick and is super smooth!