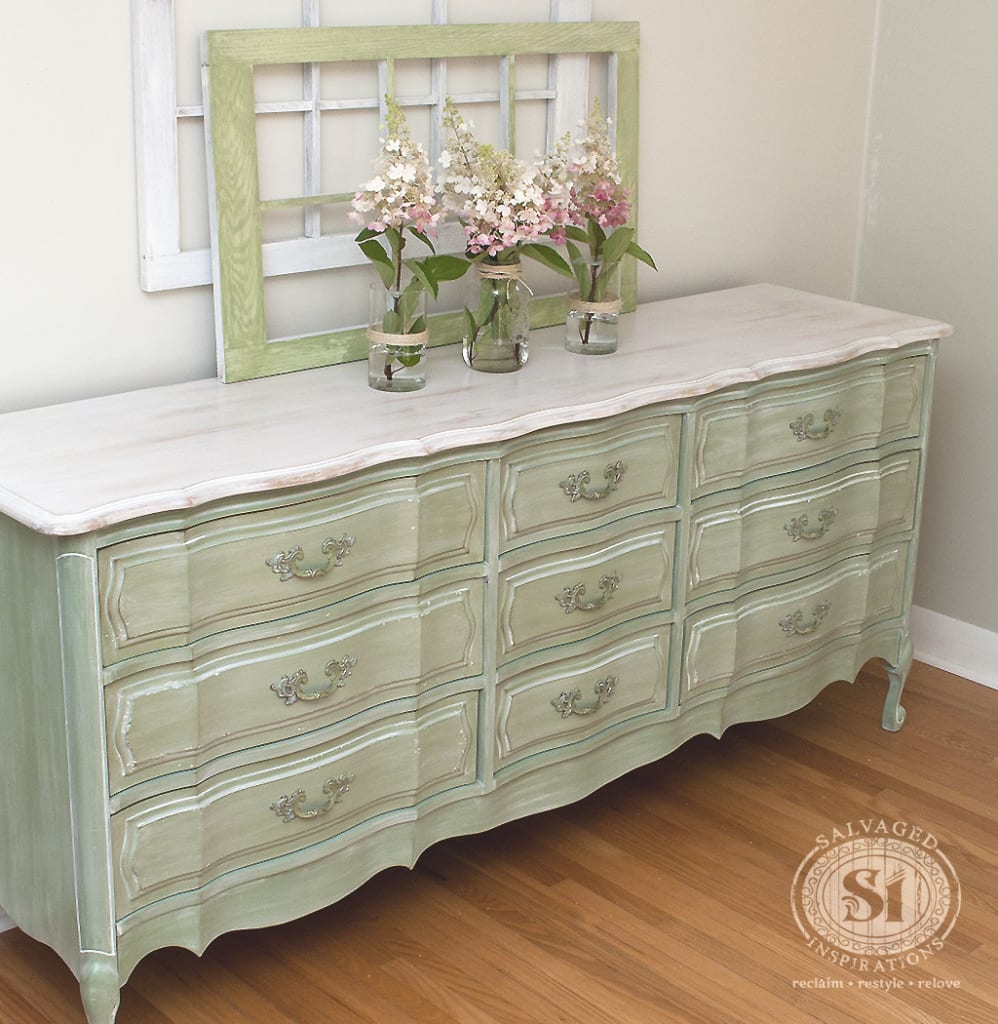
I recently finished this Shabby Chic French Provincial Dresser in a Whitewash Painting Technique. Loving this finish! The top has a bright and airy feel with the natural wood grain showing through. The painted body (which was also washed) shows off this dressers distinct ‘shabby’ details.
Even though this paint technique looks like you have to know what your doing… guess what…you really don’t! If you’re a DIY’er who can water down paint, brush on and wipe off, you can whitewash wood and get amazing results!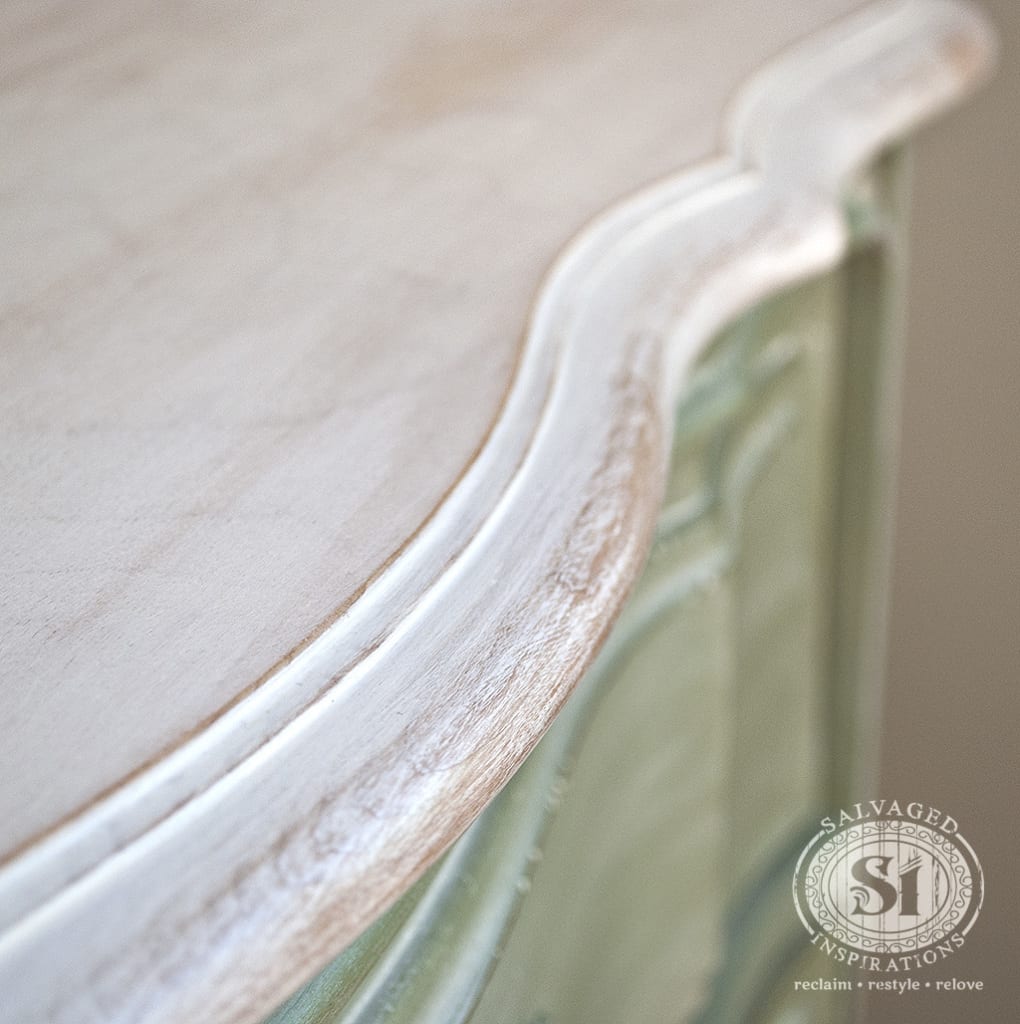
Here’s an easy step by step tutorial::
Step 1 :: Clean and Sand
This was the second salvaged piece M-M-M found curbside. You can see the first one here. Anything curb-shopped requires a really good cleaning! I used TSP and warm water which cuts through dirt, oil and grime beautifully.
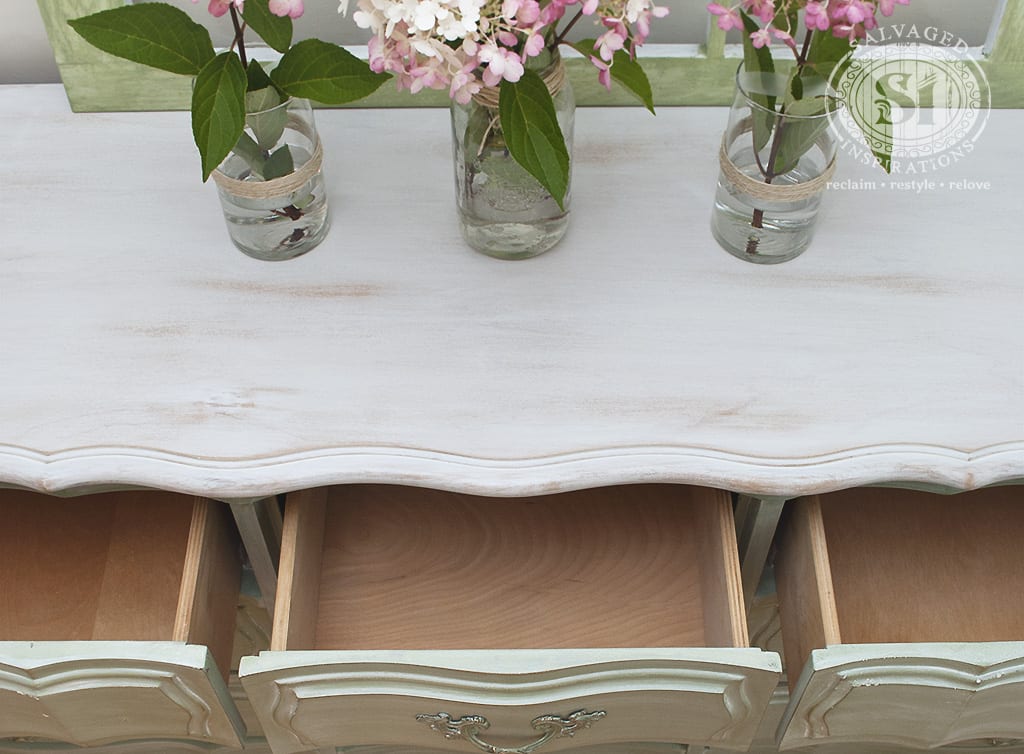
After it was clean and dry, I sanded the entire body with 220 grit to scruff it up and give it some tooth. Because this dresser was large and heavy looking, I lightened it up by sanding down the wood top. Starting with 80 grit on my orbital sander, I worked my up way up to a finishing sand with 400 grit. Super smooth wood surface!
Step 2 :: Paint
I painted the body of this dresser with 2 coats of Miss Mustard Seed’s Luckett’s Green, and then let the milk paint completely dry.

Step 3 :: Watering Down Paint to Make Whitewash
For the whitewash wood effect, I used a DIY Chalk Paint watered down in a 1:1 ratio. {ANY water based paint will work} Approximately 1 part paint to 1 part water… aka 50/50 mix. To create the wash on the painted body of this dresser, I used a 2:1 ratio of latex paint and water… or approximately 2/3 paint to 1/3 water.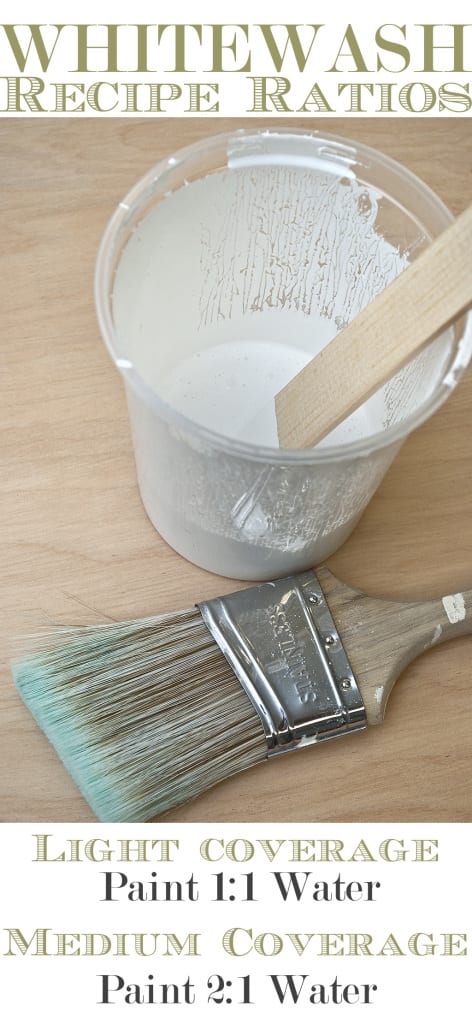 This thicker layer of wash only required one coat to create a nice effect over the Luckett’s Green. You can easily adjust how much water you add in relation to the thickness of your paint and how opaque you want your finish.
Tips ~ Mix a small batch and test it in an inconspicuous area. Then adjust your whitewash recipe with more water or paint as needed. If you’re unsure, try working with a 1:1 ratio because you can always apply a few coats of wash to get your desired effect. Also, you don’t want it too thick because the thicker it is, the more challenging it becomes to wipe off.
Step 4 :: Brush or Roll On The Paint
Once you have your whitewash prepared, apply it to the furniture working in smaller sections. A paint brush or roller will work great. This dresser has a large top so I worked on 1/4 of the top at a time. Painting the full length in strips also works really well. Whichever way you choose, work in manageable areas because you don’t want the wash to dry before you have the chance to wipe off the excess. I forgot to take a pic of applying the wash to the dresser top. But the exact same method is used when applying the wash over a painted surface or a wood surface.

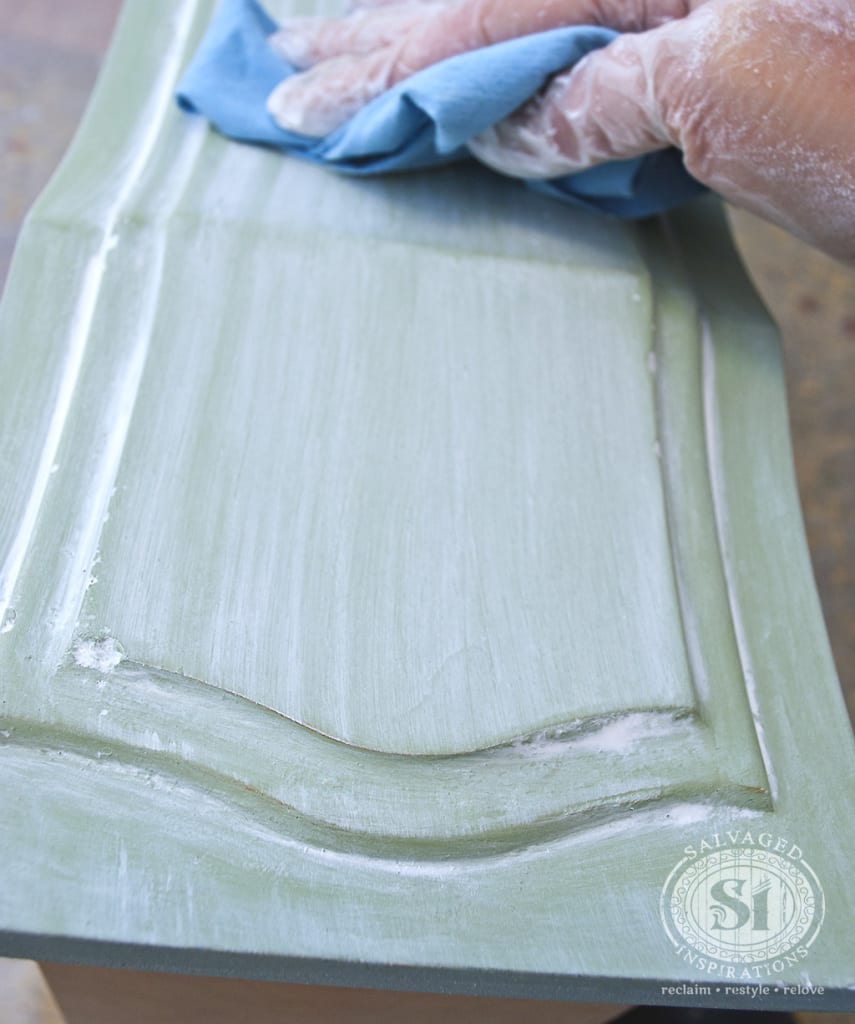
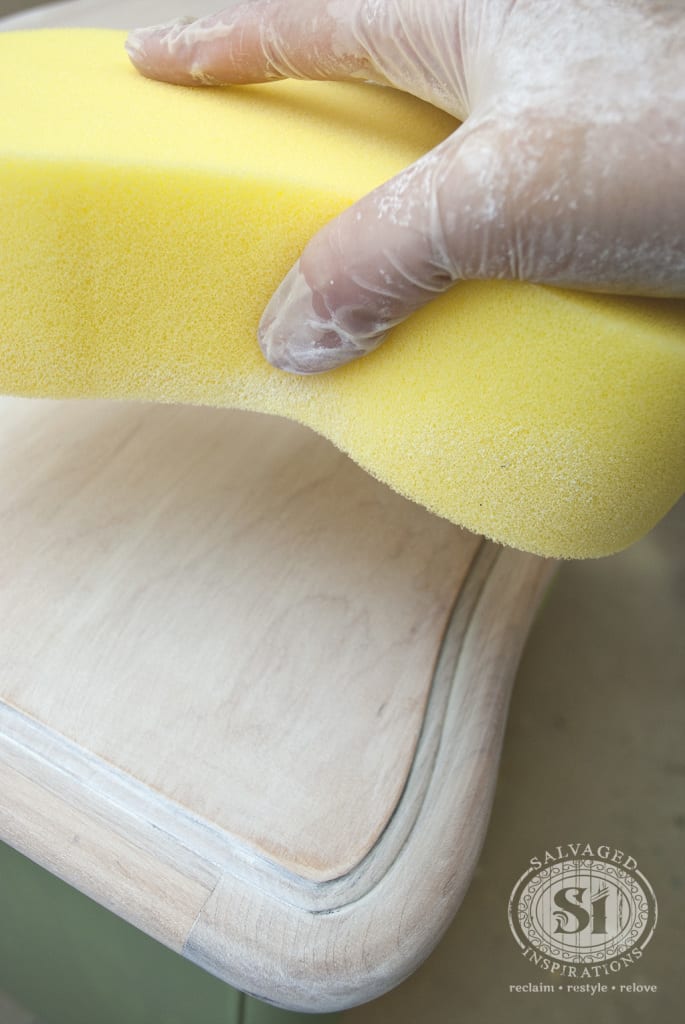
Step 5 :: Wipe the Wash Off
Working quickly, I used a slightly damp shop cloth to wipe the wash off the painted drawers and body. The shop cloth worked okay for the wood top but I switched over to a large dampened sponge which I find works better on a large surface.
Tip~ When you wipe off the wash, always wipe in the direction of the wood grain!
Step 6 :: Let Dry and Repeat
After letting the first coat dry, see if you like your finish. If it’s not quite enough for you, repeat the washing technique and add a second or third coat for more depth. I repeated the above process 3x because my wash was watery and I really liked the added dimension each additional coat gave.
Step 7 :: Lightly Sand (optional)
After the layers of my wash were all dry, for a professional smooth finish, I lightly sanded with a 400 grit then removed any dust before applying my topcoat.
Step 8 :: Apply Your Topcoat
Once your furniture has had time to fully dry (and optional sanding), apply your preferred topcoat. Wax, Polyurethane or Tung Oil can be used depending on how much durability you require and the look you’re after.
I used General Finishes High Performance Flat for this French Provincial as I wanted maximum durability with a barely there sheen. Once your topcoat is dry, add on the hardware and compliment yourself for a job well done!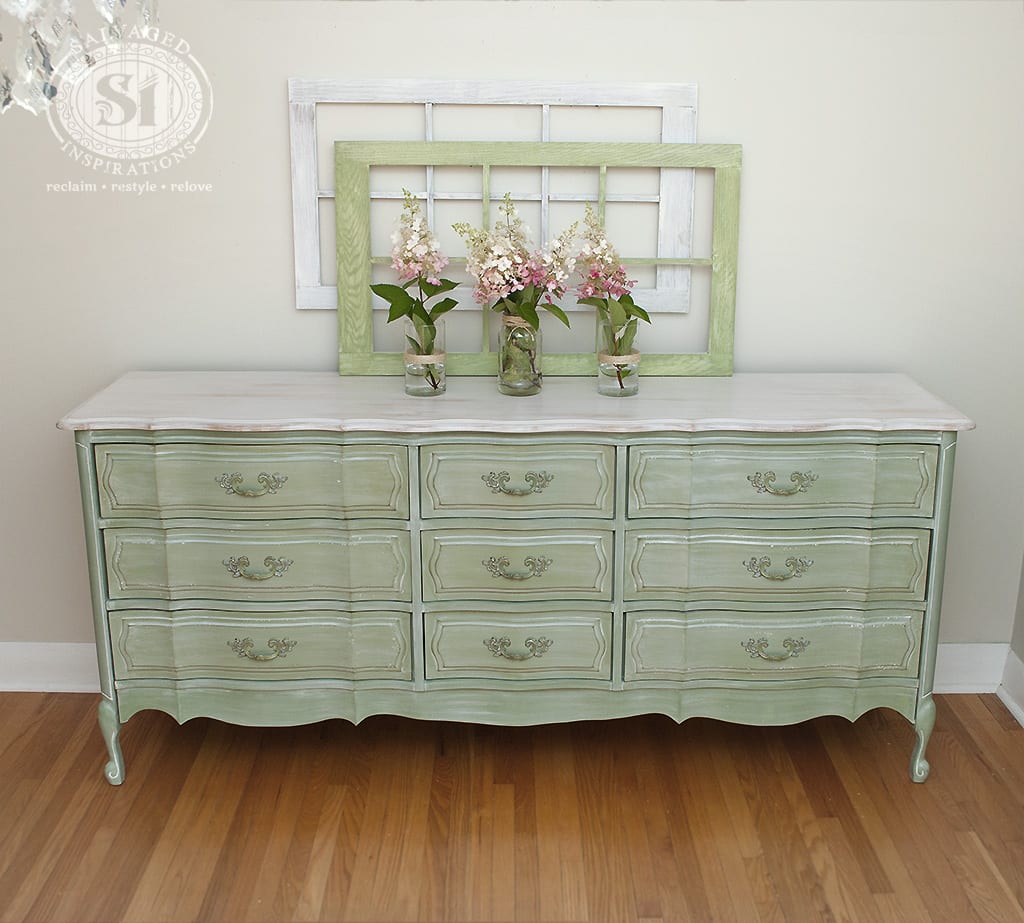
White washing can really brighten up a piece of furniture and add interest and depth whether you use it on raw wood or over paint. And it’s not just for furniture.
This paint technique works on almost ANYTHING – wood, brick, plastic, terracotta, fences, fabric… even hardware!
I may get experimental and try different colors. Grey, blue or yellow might be interesting.
Have you tried white washing your furniture? Have you used any different colors other than white? If you have any questions or tips, leave a comment bellow.
Have a great day!
Denise x
_____________________________
Like what you see? Subscribe to Salvaged Inspirations so you’ll never miss a post!
Follow along on Pinterest, Google+, and Facebook for more inspiration!

Thanks for your post. You’ve done a lovely job and inspired me to whitewash my nightstand. Hopefully will finish it this weekend.. So excited about it!!!)))
Thank Lara! I’d love to hear how your nightstand turns out! Have fun.😊
Hi,
I recently got inspired by painting then whitewashing.
I want to whitewash my kitchen cabinets. They are dark brown right now. But I want them to have blue undertones . Do I follow the same steps as you did for the dresser?
(My back splash will be light (ocean) blue subway tile.)
Thank you for the details on your tutorial. It’s very helpful and informative.
Nancy
Hi Denise! Yes i am still reading all the blogs. You have been doing this a while. I do have a couple of questions. When you say that you might need to clean the sponge after a few swipes, does this mean rinse out the sponge completely? My other question is how would this look on a flat, no detail top of a table? I used Mint Julep and i would like to tone it down some. Would you recommend this technique? Have i mentioned that you and Christy Cox (Confessions of a Serial DIYer) have changed my life? If not then i will now. Before i found you 2 i knew nothing about painting and creating. You have changed my life.
I meant Christy James. I have a friend who is Christy Cox. Oops
Hi Cheryl! Yes exactly. I do rinse out my sponge completely. Squeeze out all the excess water and then wipe down the piece again. I also think if you’re looking for a toned-down look, this technique will definitely work if your piece has less detail. Also, ya, I knew what Christy you meant.:) I just spent a few days with her in Austin TX at a bloggers conference. It was so amazing to finally meet in person! Good luck with your piece Cheryl. I’d love to hear how it’s all turning out for you!
I have brick-look linoleum in my kitchen. If I sand it lightly for the paint to hold, can I white wash it to look like whitewashed brick?? I was thinking chalk paint, then a sealer.
Hi Susan! Linoleum can be tricky so I would test a small inconspicuous area first to make sure the wash is adhering 100%.
Hi Denise, Wow, such great info!!!! I like to use latex paint from the room the piece will be an for white washing. It gives such a great feel of belonging.
This by far is the best tutorial and results I have seen. I would like to do a white wash finish on a raw pine dresser from IKEA. I can’t decide the difference between chalk paint and latex? which do I choose? I want it to be really light (diluted) paint to the wood shows through. Also, I’d like to finish it but leave the option open to repaint if needed in the furniture. What sort of finish do I use? T
I have black painted chairs and would like to lighten them up to look whitewashed. As a neutral or light grey tone. How should I begin? By sanding the black down?
What a beautiful piece. First time to your blog, now I have lots of reading to do as I love your work. I do have a question though about the two window type frames you have on top of this unit. I know they are for photo staging but did you happen to make those and if so, do you have a tutorial on them? Thanks
Hi Laurie and WELCOME! So happy you’ve found the #siblog! The 2 wood frames I staged with were actually salvaged from one of MMM job sites. They were garbage bound so he brought to me and I painted them up – so no tutorial. That said, I also do styling/staging tutorials peppered in here and there with the furniture – so this is one I can keep in mind for a future post. 🙂
Hi there! Your piece turned out beautiful ! Quick question about using the dampened sponge to wipe off the white wash…. does the sponge need to be cleaned off every few wipes as to not accumulate too much paint, or will it be fine to do the whole piece ? Thank you !
Hard to say because it depends on the size of your sponge, the density etc. This large sponge handled the job nicely but if I were to use a smaller sponge I probably would have had to clean it off a few times. It’s good to gauge the results your getting and then clean (or don’t) the sponge as needed. Great point/question btw! 🙂
Hello. Love this effect. I would like to ask you if i can use this technique on melamine that i have already sanded, primed and painted with Pyridine. Also, instead of dark wax can i use dark color?
Hi Christi! Malamine is perfectly smooth and has no grain for the wax to ‘hide’ in for this whitewashed wood effect. You could test it. But it’s my guess it will just look more antiqued when adding a dark wax.
Hello Denise! Beautiful work on that piece really! I would like toy aks you wether this technique would be ok for a veneered top. I have a dining table that i have already sanded and I am thinking of whitewashing it but i’m not sure if it is ok for the veneer.
Hi Nafsika! Yes, this technique will work on wood veneers. Have fun with your dining table. 🙂
Great tutorial! Thank you for sharing!
I have been looking for the dresser handles you have on the Provincial Dresser. Where did you find those?
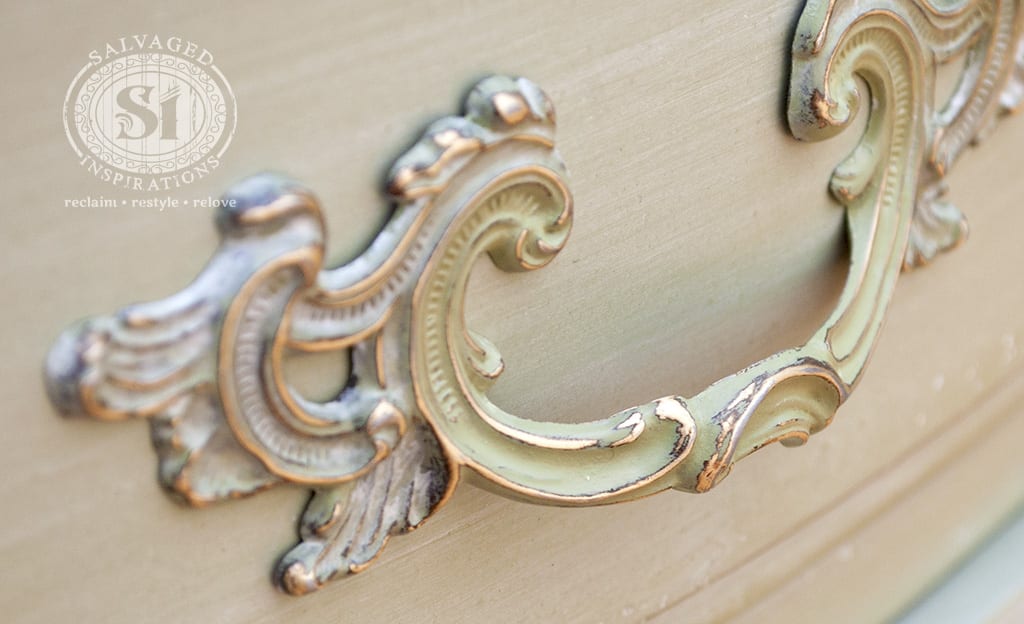
Hi Ti! They were original to the French Provincial Dresser. I added paint and a whitewash over the original finish. 🙂
Love this look! Have wanted to try this but didn’t know how to start. Your tutorial is so clearly explained I now feel like I can do this! Also love the handles. How did you get that look?
Hi Dee! I’m glad you found this tutorial helpful and so happy you’re giving it a try. I’m sure it will turn out gorgeous! The handles were painted with mms luckets green. Then I used the wash technique on the out edges and once all dry, gave the handle a light sanding so the original metal was revealed on the high areas. Hope that helps. 🙂
Hi. That tutorial is great. I just started my first piece of painting ever, an old table. I sanded it and painted with a blueish chalk paint. I experimented with white dry brushing for the legs and it doesn’t look to bad for a first…but I am not sure if this will look good on top of the table. Do you think I could white wash the top. Will it look OK to have both techniques at one piece?
Can I use the white washing technique with a colored paint on a white or lighter surface? Thanks and hello from Germany, Elisabeth
Thanks for the tutorial and beautiful pictures. Just want to throw it out there to everybody else trying, wipe off quickly as she says!! Are use the dry rag to wipe off which may have been my mistake but I was having problems with it sort of layering on top of each other. I had to wipe really quickly in order for it to look right.
I love this, can I do this over a chalk paint? And if so, do I use chalk paint for the white wash or latex??
You sure can Sharon! And for the sake of being consistent, I prefer to use a chalky paint white wash over a my chalk paint but you don’t have to.
Hi, Denise. Thanks for the great tutorial. I have one bit of confusion, though: near the end, you mention you used General Finishes High Performance Flat as a topcoat. I went to their website, but I couldn’t find this product. There is a Flat Out Flat topcoat and High Performance Satin. Did you use one of these, or am I just overlooking something?
Hi Jennifer! Here is a link to General Finishes High Performance Flat topcoat.
Beautiful work! I want to white wash my Dad’s old stained juniper kitchen cabinets there stained now. I have degreased them ,and did a lite sanding. Now my question is “I have got so many answers as in to many cheifs not enough Indian’s”. Lol can I use a oilbase paint to whitewash now. My Heath is not well at all it’s going to take me forever to do this but I have to do it ! Driving me crazy . Some say use Annie’s paint then I have the 3.rd step with the wax I’m not so sure I can handle that . I want to do this right and I have read you can skip a few steps will I get what I’m looking for with what I’m able to put into the job. Yes I do plan on putting a sealer on when finished. So with saying all this getting off track can I skip the primer do a lite sanding and white wash with a oilbase Paint. I’m not looking for perfect but I don’t want it to look like I let a Day Care class come in to help me. In need of help 😅 Thanks for any advice you can give me on this
Hi Christine! If you are looking for a transparent whitewash look – do not prime the kitchen cabinets. If you prime, you will end up with white painted opaque cabinet rather than whitewashed with some wood showing through. I’ve never whitewashed with oil based paint but the technique is the same. Rather than using water to make the wash as you would with water based paint, you use a paint thinner like turpentine to dilute the oil based paint. Once you get the “”washed look you like, let dry and then topcoat. Hope this helps.
Christine, I don’t know if you will see this but I’m curious about how your cabinets turned out. What did you end up doing? Thanks!
Hola, me gustaría decorar una comoda con este blanqueamiento.
Queria preguntarte q pintura blanca de látex utilizas para mezclar con agua.
Me encanta tu blog.
Un saludo. Elvira. España.
Hola Elvira! Para crear esta técnica de blanqueamiento, puede utilizar cualquier pintura a base de agua. Látex, acrílico o incluso pintura de tiza va a funcionar! 🙂
Gracias por tu respuesta. Denise,
Me gustaría probar la de latex, porque lo he visto en muchos blogs, me podrias decir cual utilizas tú, para buscarla en Home Depot.
Muchas gracias y un saludo desde Madrid.
Mi placer Elvira. Home Depot lleva generalmente la pintura del látex de Behr que trabaja agradable. Cualquier marca de pintura a base de agua / látex funcionará sin embargo. 🙂
Muchas gracia Denise,
La buscare.
Un saludo.
Hi, did you put a brown wax on drawers? How did you get the bit of dark on drawers if not? Thanks!
Hi there Linda! No, I did not use a dark wax on the drawers but they were slightly sanded and distressed to show a little of the original wood coming through.
I am buying a couple of end tables for my bedroom. The tables are a navy blue & have glass doors. Also a bargain because of scratches. The finish is shinny. Will I need to sand it first? What about the glass doors?
Hi Lisa! Yes, I like to sand shiny surfaces to create a little tooth for the paint to adhere to.
First, I love your work and tutorials! I am using the POP recipe that you have provided. By base coat is a dark gray. I am then whitewashing over it. Each time I wipe off the white-wash, paint is coming off of it as well. Is it supposed to do this? I am re-doing an old dresser which has a slight sheen to it. I am not sure if the paint is not properly adhered to it, or if I needed more time before white-washing it. On one of the drawers, it was in small areas it came off, on another, it was half of the paint! This is my first time using a DIY chalk paint as well my first time doing a wash. I am trying to create the same look you have with the green dresser, but in a dark gray color. Thank you in advance!
Hi Liz! No it’s not suppose to do that. Anytime paint is coming off, it’s an indication that the paint has not properly adhered to the surface. Since you said the dresser has a sheen, it might have benefited from a light sanding prior to applying your first coat. Unfortunately, this sometimes happens whether using DIY or brand name chalk paints. If this were my piece (as frustrating as it is) I would sand down the two drawers (or anywhere else the paint has not adhered) and start with the dark gray base again. This way you will be 100% sure your all your hard work will stay beautiful for years.
Thank you very much for your easy to follow instructions. I only needed to brighten an already whitewashed coffee table and even though I have done many of my furniture pieces in chalk paint, I had no idea of whitewashing. Love your work.
Thanks so much Robyne! x
This is beautiful!
Thanks Claudia 🙂
I love white was and never new how to do it. Thanks for explaining it well. Looking forward to more of your creations.
Hi! I am so lucky because my husband let me got a dresser as your!!!!
So, is ok if I bother you with some questions??
I will use Berh paint because they have a color. I loved. Then I do not know What to do for I can not sand it because of lead. Also, I have children at home. The paint is hard to sand toó. What would you advice me? I appreciate your time.
Marian, you could try using a product like Klean-Strip Easy Liquid Sandpaper rather than real sandpaper. This allows glossy-smooth finishes to accept prime and paint without having to sand. Tip – you need a very well ventilated space to work in because it does have an odor.
I was inspired by your whitewash technique and have just tried it on a wood nightstand. My question is, when you finish a piece of furniture to sell, do you paint the inside of the drawers, line them, or just leave them (cleaned of course!)? I am hoping to sell the night stand and will show you a picture when it is finished tomorrow. Thanks!
I really depends on the look of the drawer Mary. If the inside(s) are clean and perfect, no need to paint or line. Here’s a post on 5 things to consider before painting your drawers. https://salvagedinspirations.com/paint-the-inside-of-drawers/
What a lovely job you have done! I do enjoy your tutorials and inspirational posts! Is it possible to whitewash over pieces that have been danished oiled? I (very much a beginner) have recently danish oiled a couple of kitchen stools made of pine which turned them rather yellow / orange and needs toned down.
Thank you! I’ve haven’t worked with Danish Oil Tracy but seeing as it’s an oil based treatment, I’m unsure if a water based wash would adhere and stay put for the long haul? If anyone has any experience with this – please chime in!
I have not only white washed, I have used black paint to wash the base of a farm table, green washed on an outdoor planter and red washed on a kitchen shelf. I love the technique because it is fast and dries quickly allow me to finish more projects in a tighter time frame.
Thanks for the encouragement Jeri! I can’t wait to experiment with more color washes!
This is a beautiful piece my friend has the exact piece she’s getting rid of I am going to snag it and copy your design it looks grrrreat thanks for all the great ideas
Yessss, snag it Ellen ;)…lol … and have fun painting and whitewashing! I’d love to hear how it all turns out for you. x
That piece is just beautiful. I love your website, because you always explain how to do. That is so helpful for a DIY’er like me who is just getting into the painting of furniture.
Also for sharing what products you use.
Thank you for taking the time to share the how-to’s.
deb.
So glad you find the tutorials helpful Deb… and thanks for dropping by! 🙂
It’s beautiful!!! I’ve pinned this post because I have a couple of projects coming up and this will be very useful! Thank you! Diane
Pin away Diane! I’m actually trying to be a little more “Pin-Worthy-Conscious” as I’m editing my photo’s… so thanks!
It turned out beautiful Denise! The layered soft green and the white-washed top are a beautiful combination. Great transformation.