A 1970’s THRIFT STORE DRUM TABLE GETS AN UPDATED MAKEOVER | YOUTUBE VIDEO
Hello, my lovely friend! I know how easy it is to overlook old, dated furniture, as I almost did with this one. But sometimes all it needs is a little vision and a fresh start. This thrifted 1970s drum table wasn’t exactly calling my name at first, but with a new-to-me stain and paint color, it found its way back to updated and beautiful. I can’t wait to hear what you think!
I’m also sharing –
- A new-to-me paint color and stain
- The free wood conditioner I used before staining
- How I refresh brass details without removing them
- … and more!
*As an Amazon Associate, I earn from qualifying purchases. There are affiliate links in this post to other companies/products I use and love as well. You will never be charged extra when you purchase through these affiliate links. If you purchase from my links – A BIG thank you for supporting me and the #siblog! To see my full disclaimer, click here.
It’s also the second Tuesday of the month, and this means it’s Trashy Treasures Tuesday! I’m looking forward to seeing what our TTT crew, Christy at Confessions Of A Serial DIY’er, Nancy at Artsy Chicks Rule, and Kathy at Petticoat Junktion, have created. I hope you join me on today’s tour as well! I’ve included their before-and-after links down below.

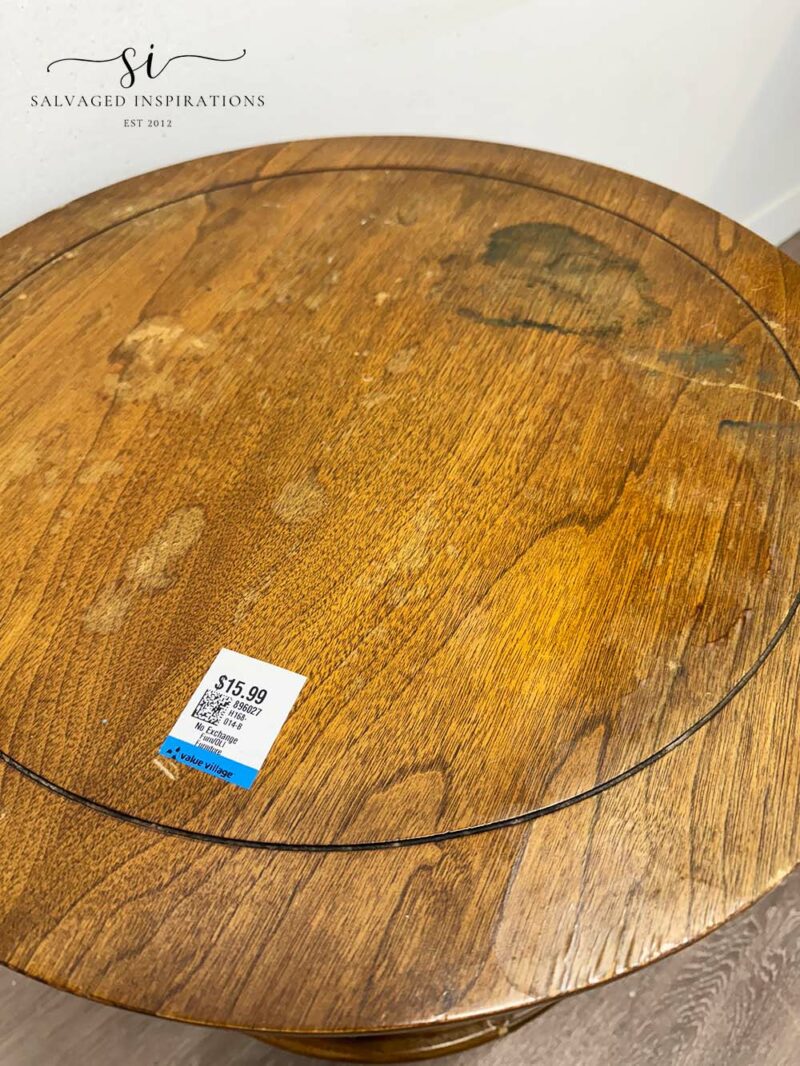
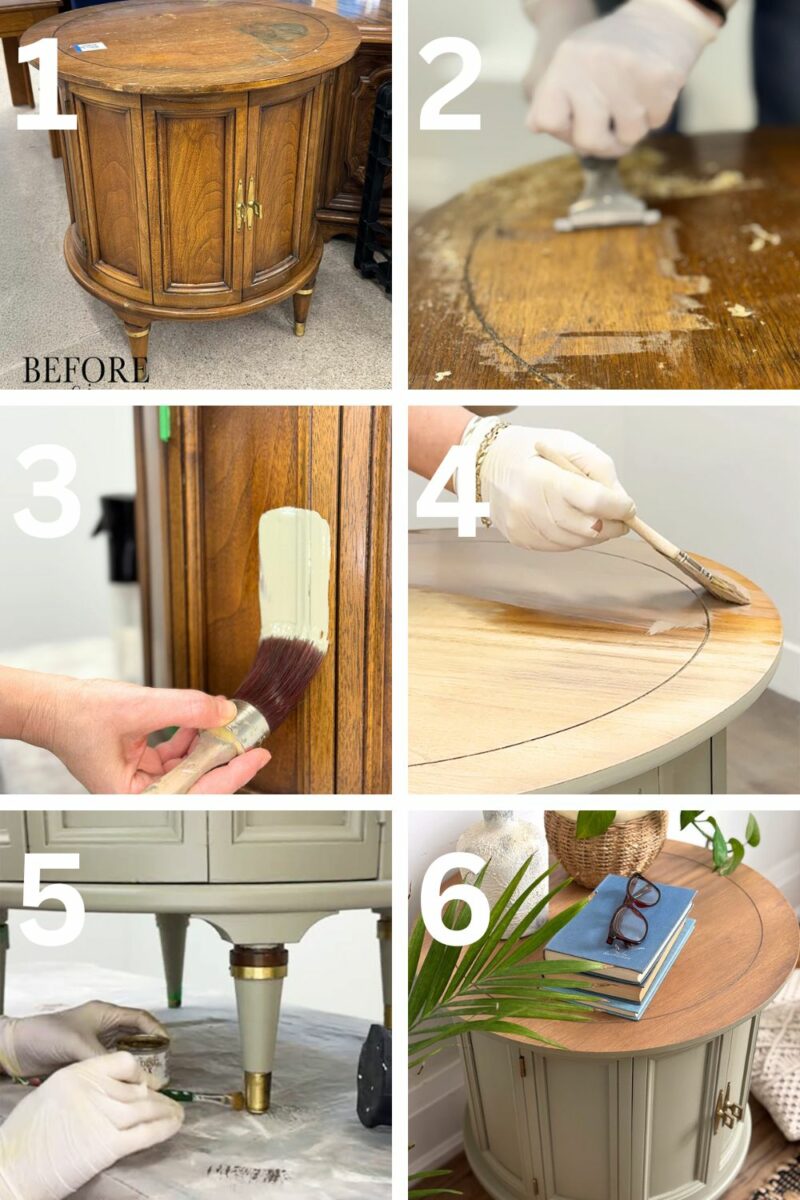
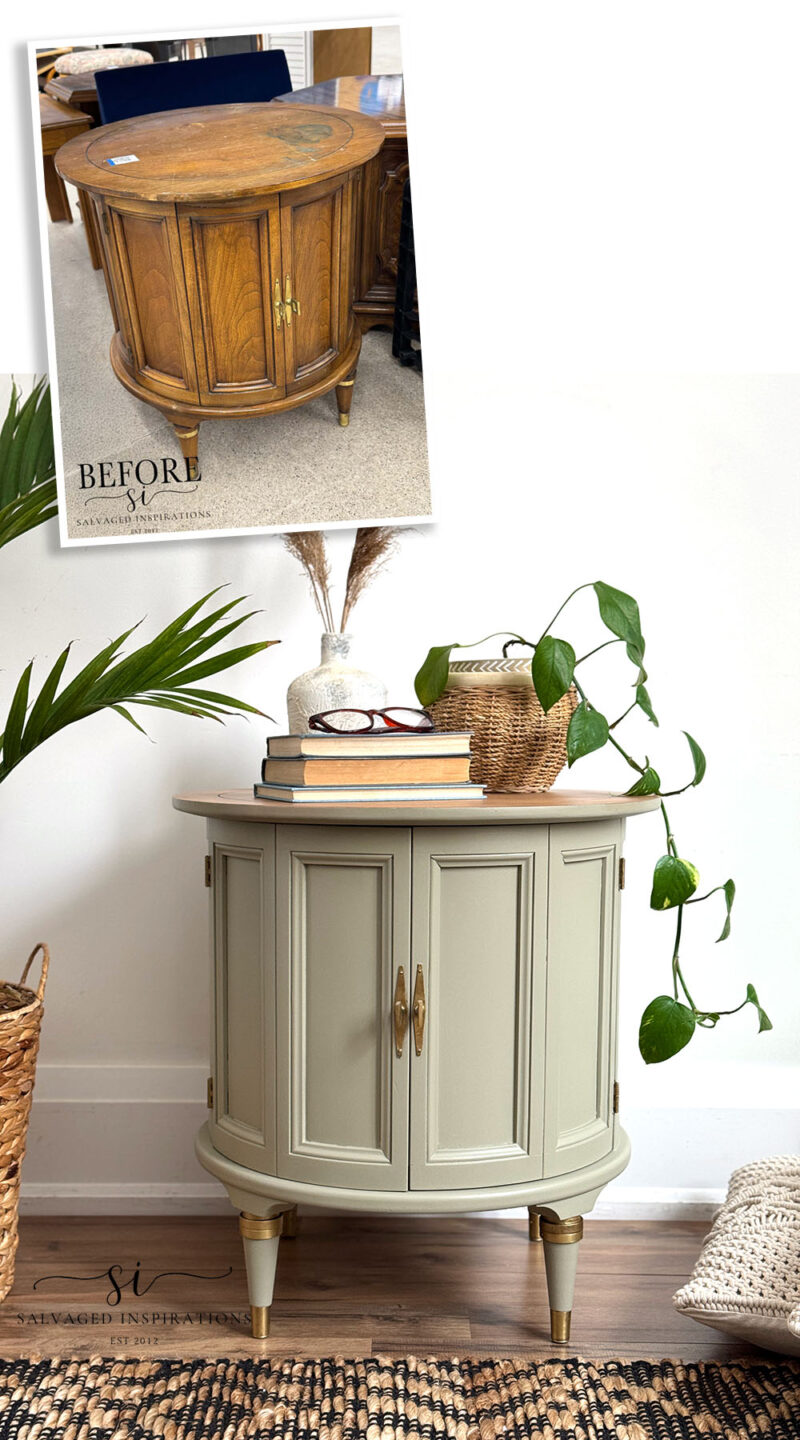
Here’s the drum table I found selling at my local thrift store for $15.99. You could tell that this table was older and well-loved by the worn finish on the top.

I inspected it again once I had it home. I liked the brass details on the legs, and the inside was in perfect shape, other than a little dust.
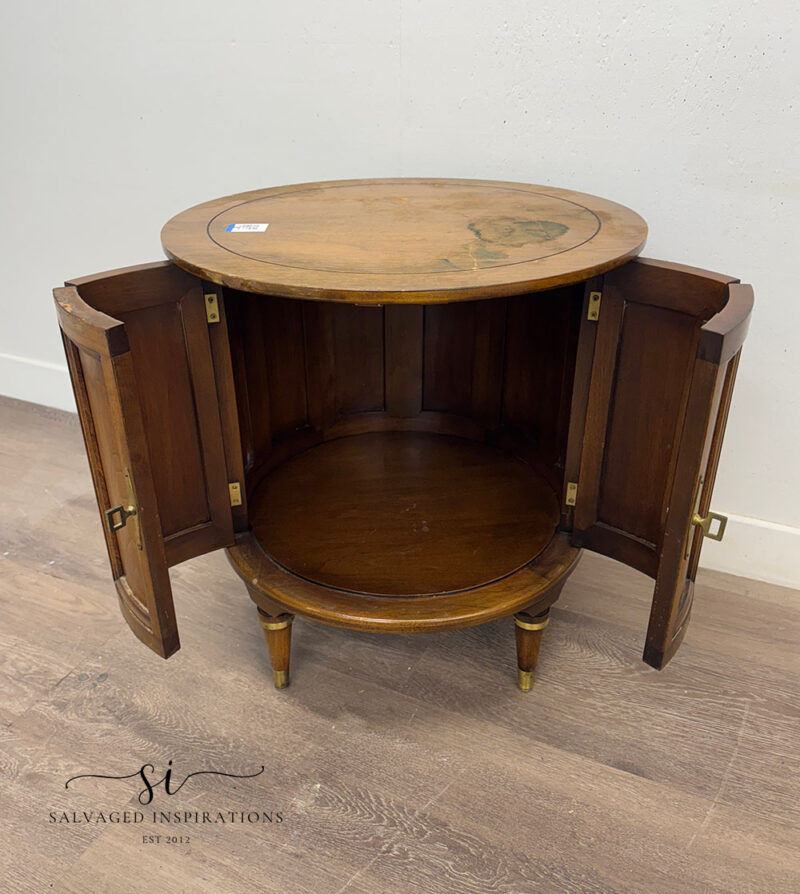
Taking another thorough look at the top, it actually looked like that dark spot was ink. There was also some bubbling of the top coat and worn-down stain, and yes, this top was in desperate need of a makeover.
THIS POST IS SPONSORED/CONTAINS AFFILIATE LINKS TO PRODUCTS I USE. YOU CAN SEE MY FULL DISCLOSURE HERE.
WHAT YOU’LL NEED
Thrift Drum Side Table – SALVAGED
White Lightning Cleaner
carbide scraper (20% OFF as of writing this post!)
Bosch Sander | Sanding Sponge
Painters Tape
Oval Small Paint Brush
Olive Wood Chalk Mineral Paint
Whiskey Barrel Water-based Stain
Gold Gilding Wax
Lint-Free Cloths
Gator Hide Topcoat
Astro Euro 1.7mm Spray Gun
CLEANING
I started by grabbing my drop cloth, flipping it over, and spraying it with my TSP substitute, giving it a good cleaning with my large automotive sponge.
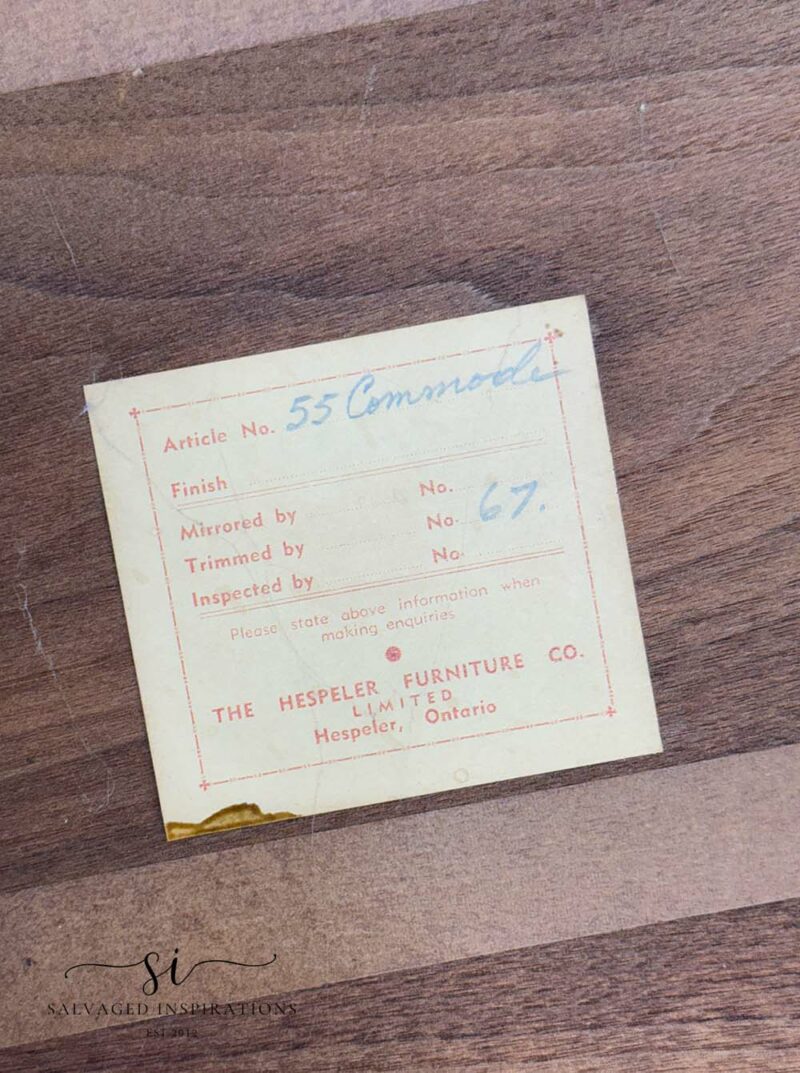
On the bottom, I also found an authentic tag: article number 55, commode, trimmed by number 67, from the Hespeler Furniture Company in Hespeler, Ontario. Maybe you guys can help me out, but I always thought a commode was a toilet. 🤔
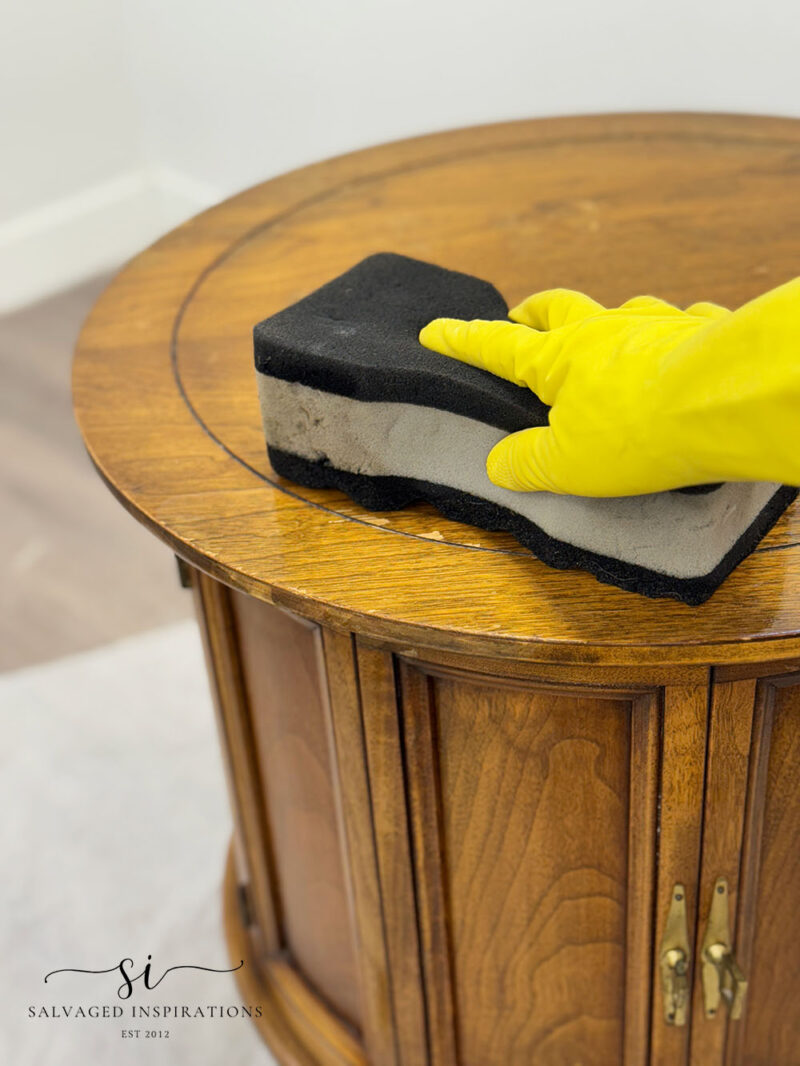
Once I had the underside and all the sides cleaned, I flipped it over and brought out my heat gun to remove the price tag. Then I went ahead, sprayed the top, and gave it a really good cleaning. Luckily, the stain came right off!
White Lightning Cleaner does a really good job at removing stains, grease, dirt, etc. The best part is it’s very inexpensive. Because you’re mixing it yourself, the jar of powder will last you for months and months.
REMOVING & SCUFFING THE FINISH
Now it was time to remove the finish on the top of this drum table. I decided to use my carbide scraper (20% OFF as of writing this post!), as I did not want to use any fumey stripper. I kept working my way around this table until the majority of the original finish was removed. I have a full tutorial on how to use a carbide scraper here.
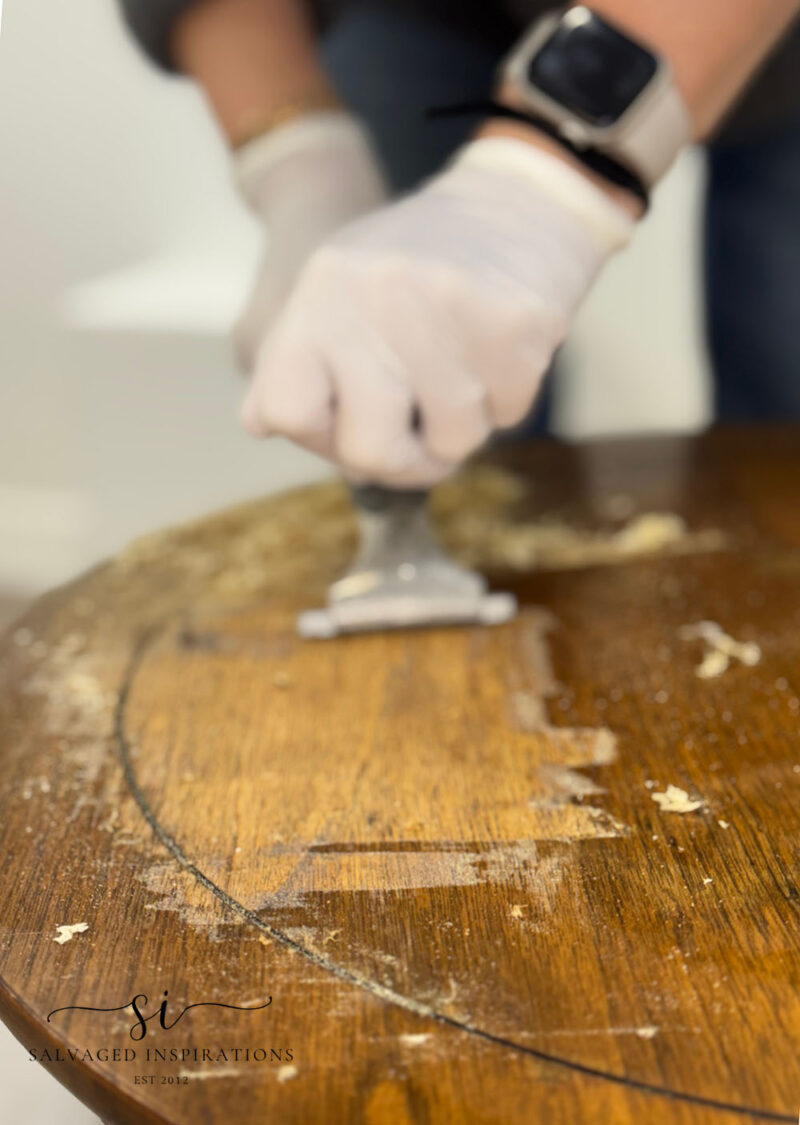
To clean up the rest of the finish, I brought out my Bosch Orbital Sander with a 180 grit sandpaper. Looking at my sander in the pics, I really need to give it a cleaning. I also bought new filters for my shop vac, so that’s on my list of things to do as well. These are the not so glamerous jobs of furniture painting, hehe. The top was sanded to smooth bare wood. The bottom was scuff sanded with a sanding sponge, prepping it for paint.

OLIVE WOOD CHALK MINERAL PAINT
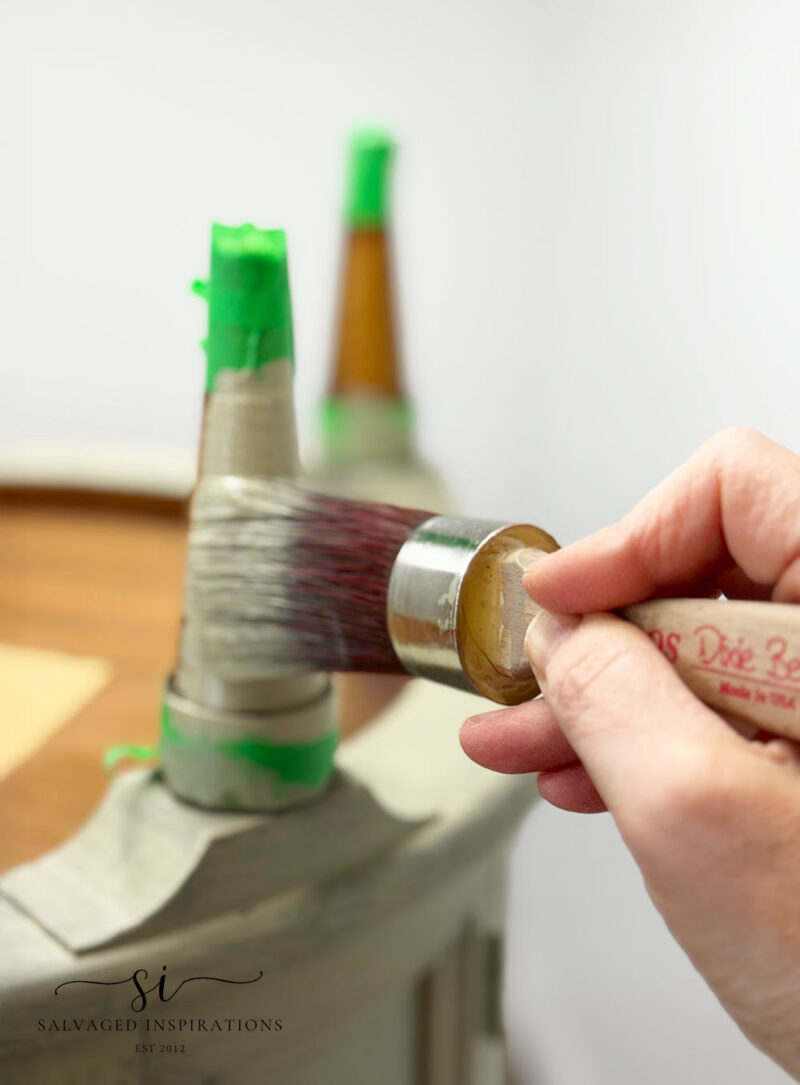
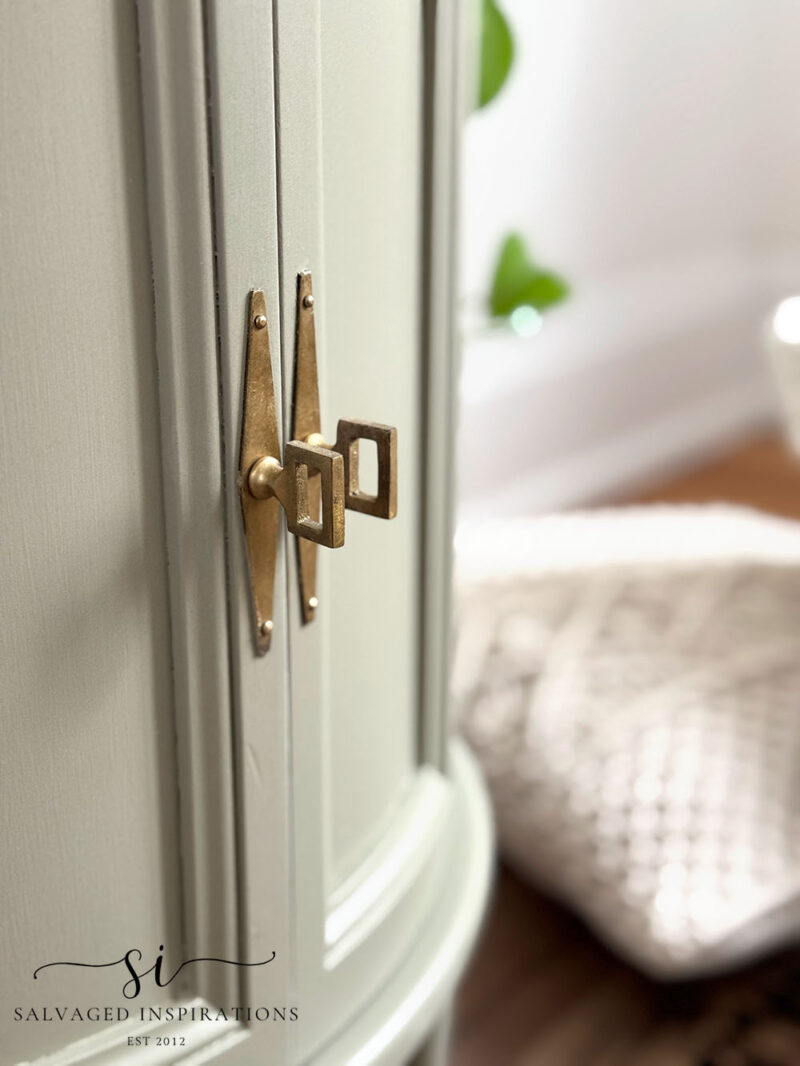
Rather than remove the brass trim, hardware backplate, and hinges, I went ahead and masked them off with green painters tape. Then I picked a new-to-me color called Olive Wood Chalk Mineral Paint. I haven’t used chalk paint in a while, so I debated whether to prime before painting. I wasn’t worried about bleedthrough, and I had scuff-sanded so I thought I’d go with the “How To Use” instructions and just start painting. I’m so used to priming (or using a paint with a built-in primer) that this did feel a little uncomfortable. After all these years of painting furniture, including primer, is second nature to me.
I used my continuous water mister spray my brush and add a little water because the paint is thick. It applies and levels lovely.
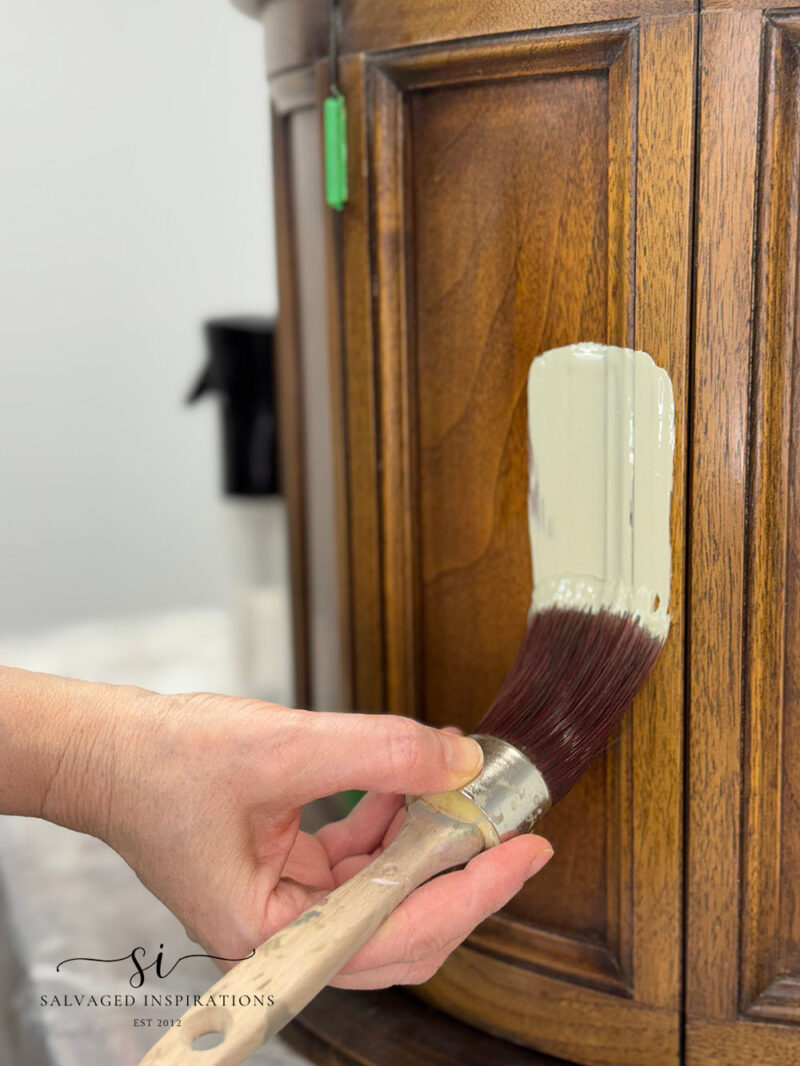
I also flipped the piece so I wouldn’t miss anything. I used my slap-it-on-paint technique to get a smooth finish with NO brush marks on the feet as well.
After I applied the first coat, I let the paint dry overnight. The next morning, I came down and painted another two coats. I’m guessing that if I had used primer, one coat would have given me full coverage.
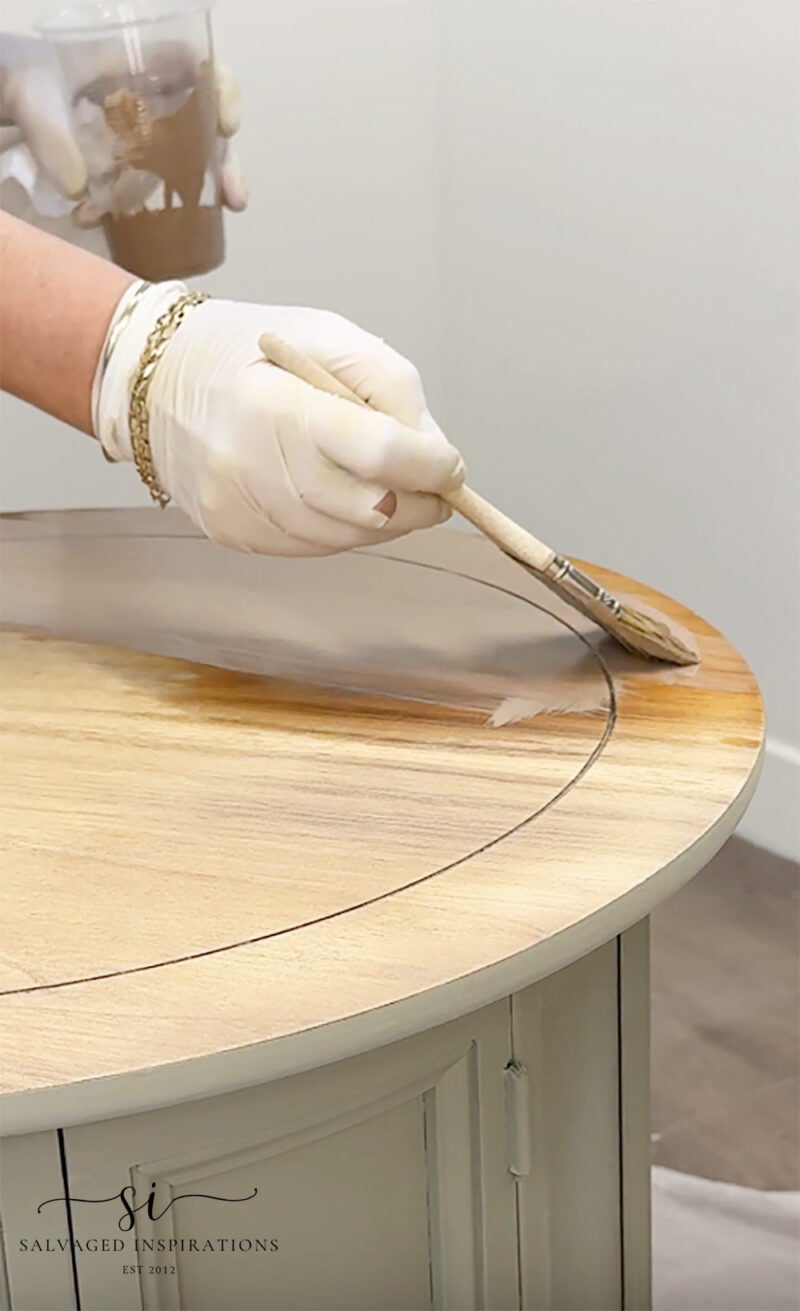
WHISKEY BARREL STAIN
Since I was trying new colors, I pulled out this Whiskey Barrel Water-based Stain for the top of this table. I was tempted to go with my fave Charred Hickory that I used on my bathroom cabinet last week, but I pushed myself to try something new.
When using water-based stains, I find that using a little water on the raw wood prior to applying the stain works like a wood conditioner pre-stain. It allows the stain to absorb evenly for a more uniform look.
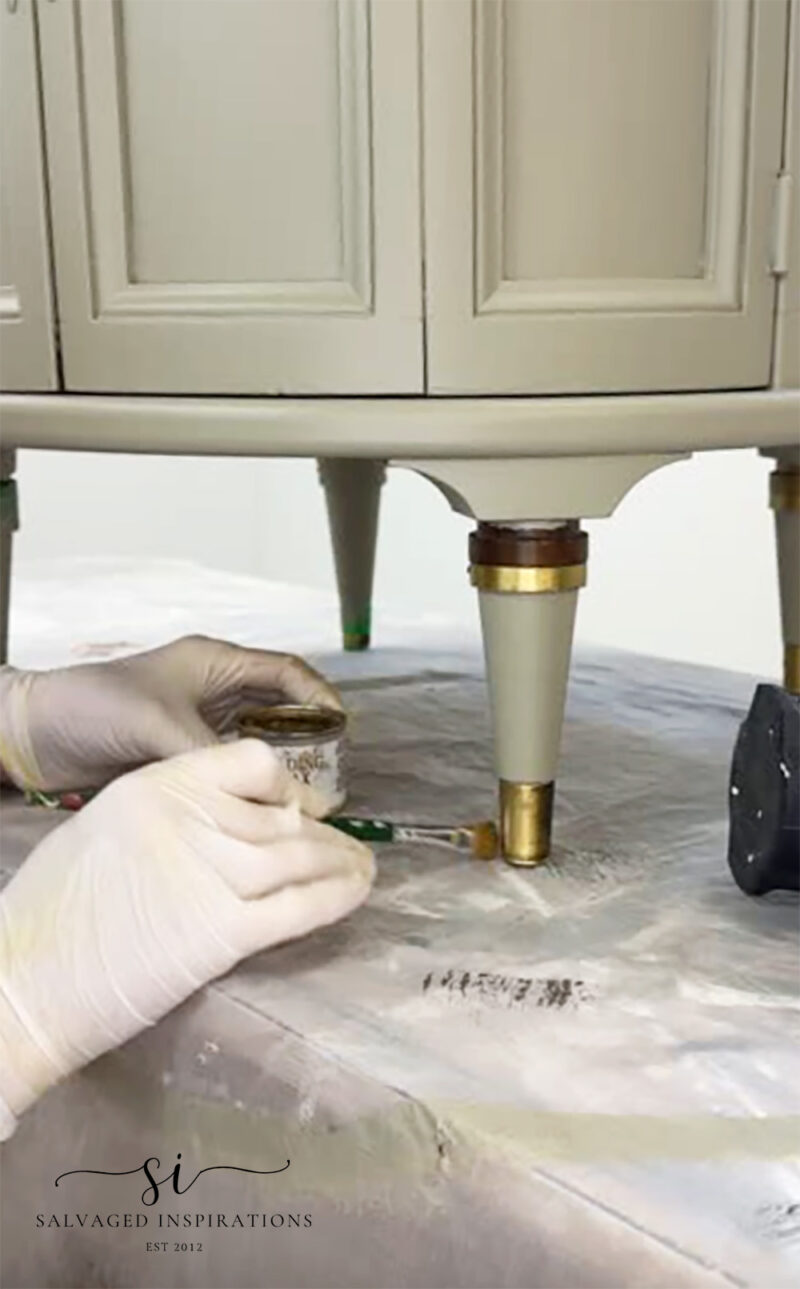
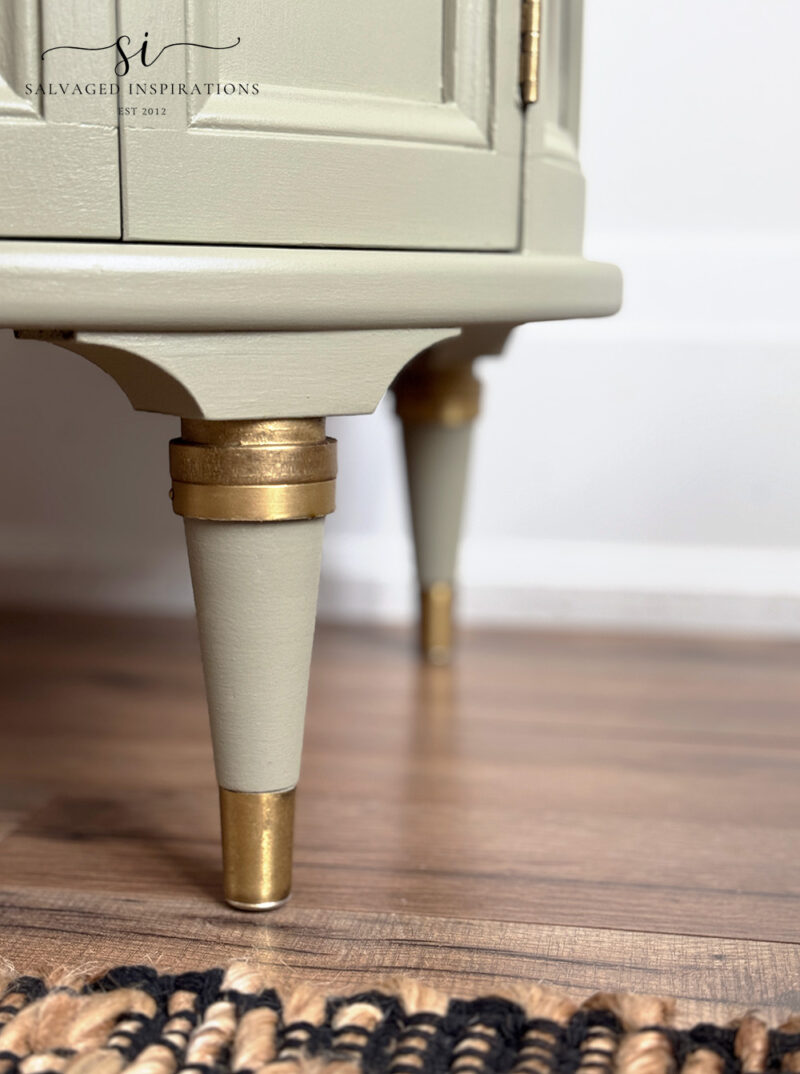
DETAILING WITH GILDING WAX
To give this side table some polished detailing, I grabbed my favorite Gold Gilding Wax. Using a small paint brush, I added it to the feet, including the wood area above the brass! A little extra gold never hurts, right?! This really brought the brass back to life with some extra shine. You can also control how shiny you want your gilding wax to be by buffing it out with a soft lint-free cloth. The more you buff, the shinier it gets.
Also, a little goes a long way. In this weekend’s video I’ll share how much of this small Gold Gilding Wax container I’ve used over the last year and a half. And I’m using it on the regular!
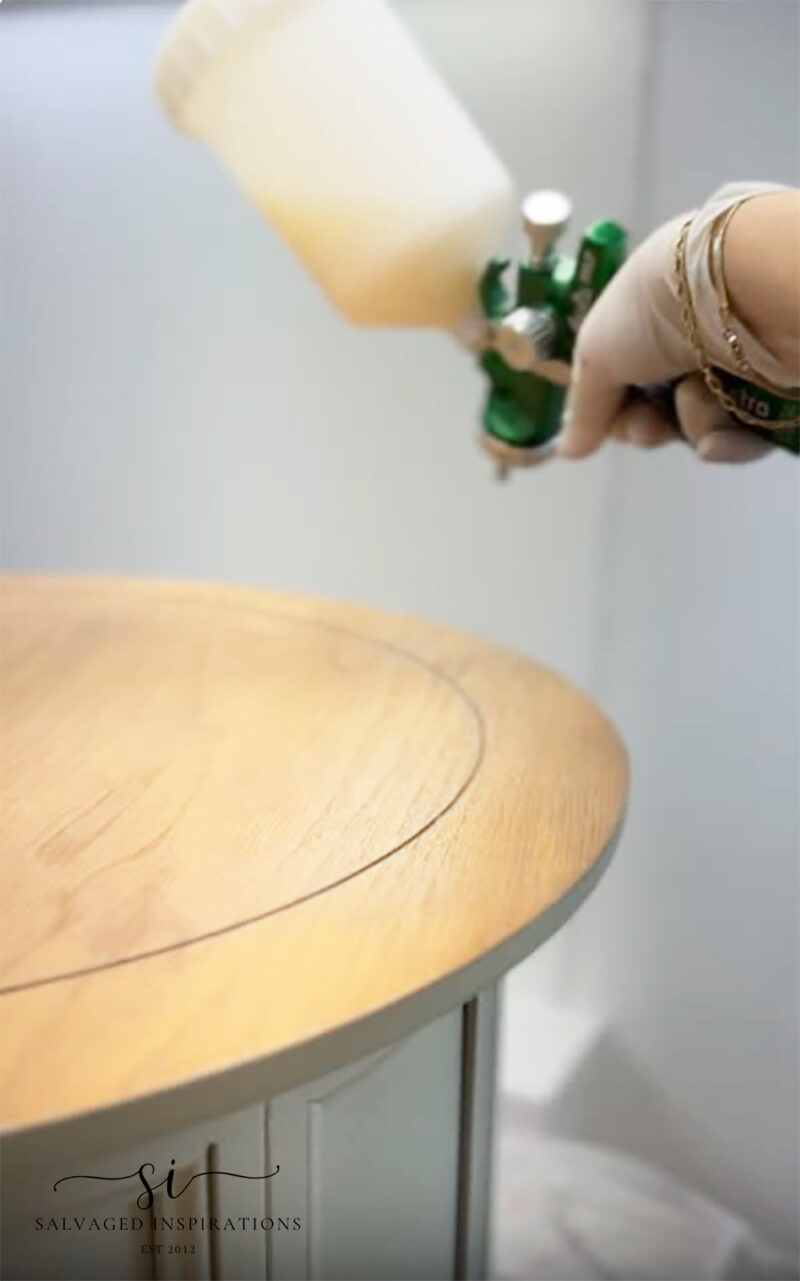
SPRAYING TOPCOAT
To protect the painted body and stained top, I sprayed on three coats of Gator Hide using my Astro Euro HVLP 1.77mm Spray Gun. A light sanding between the first and second coat gives it a smooth finish. Otherwise, you may find that when you run your hand over the water-based stained top, it could feel slightly ‘rough’ because water-based products can raise wood grain.
I let it dry and the table was done! I brought it upstairs to stage and style.
PIN AND SHARE 🤗
THE BIG REVEAL
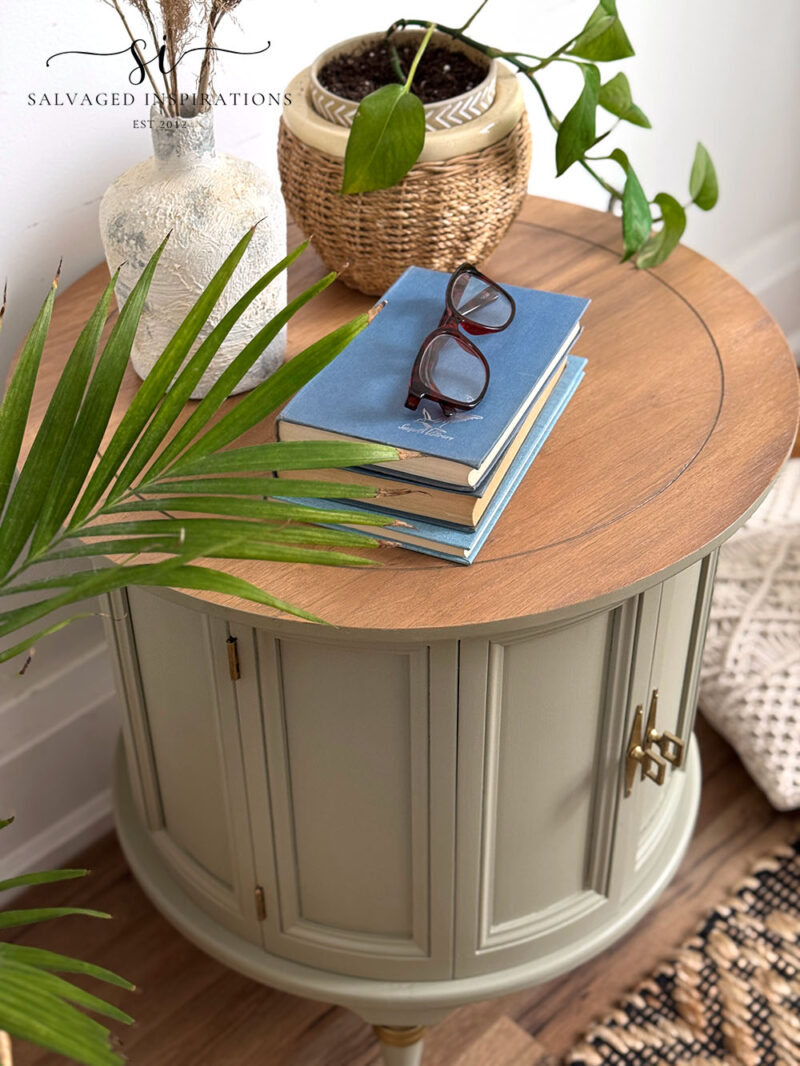
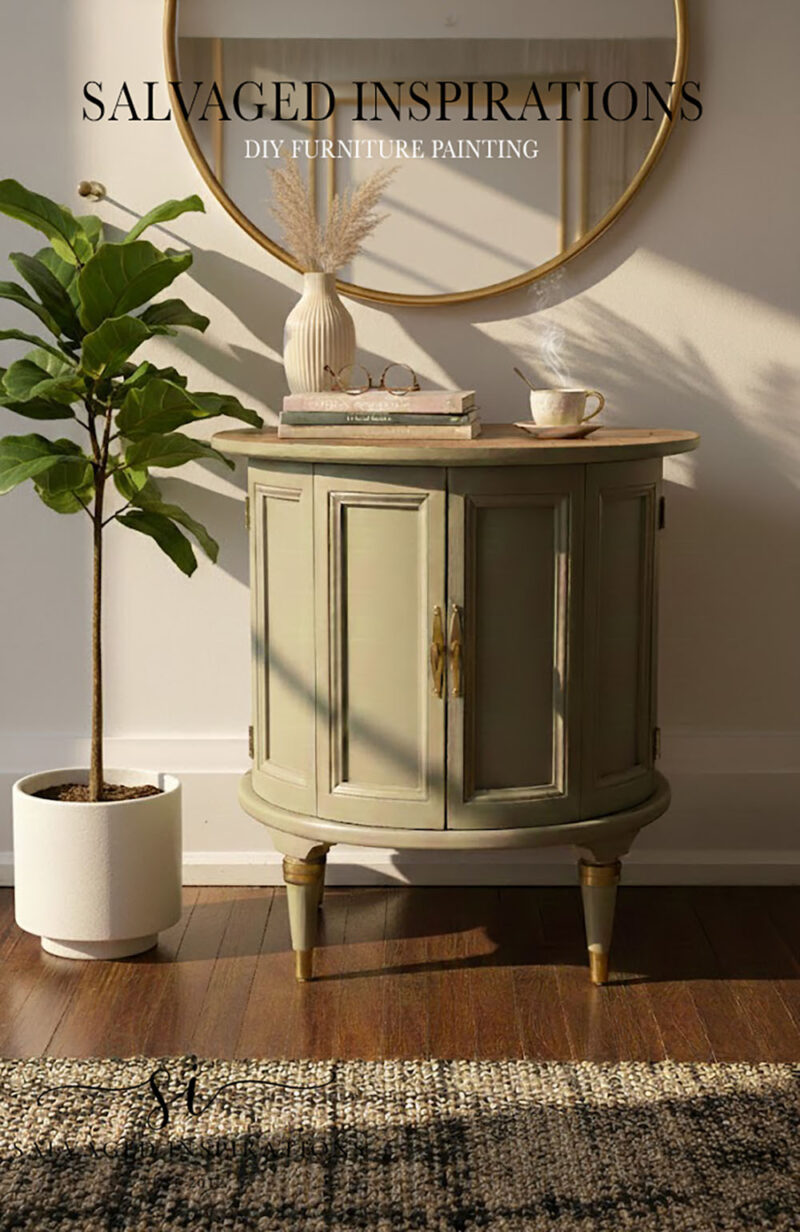
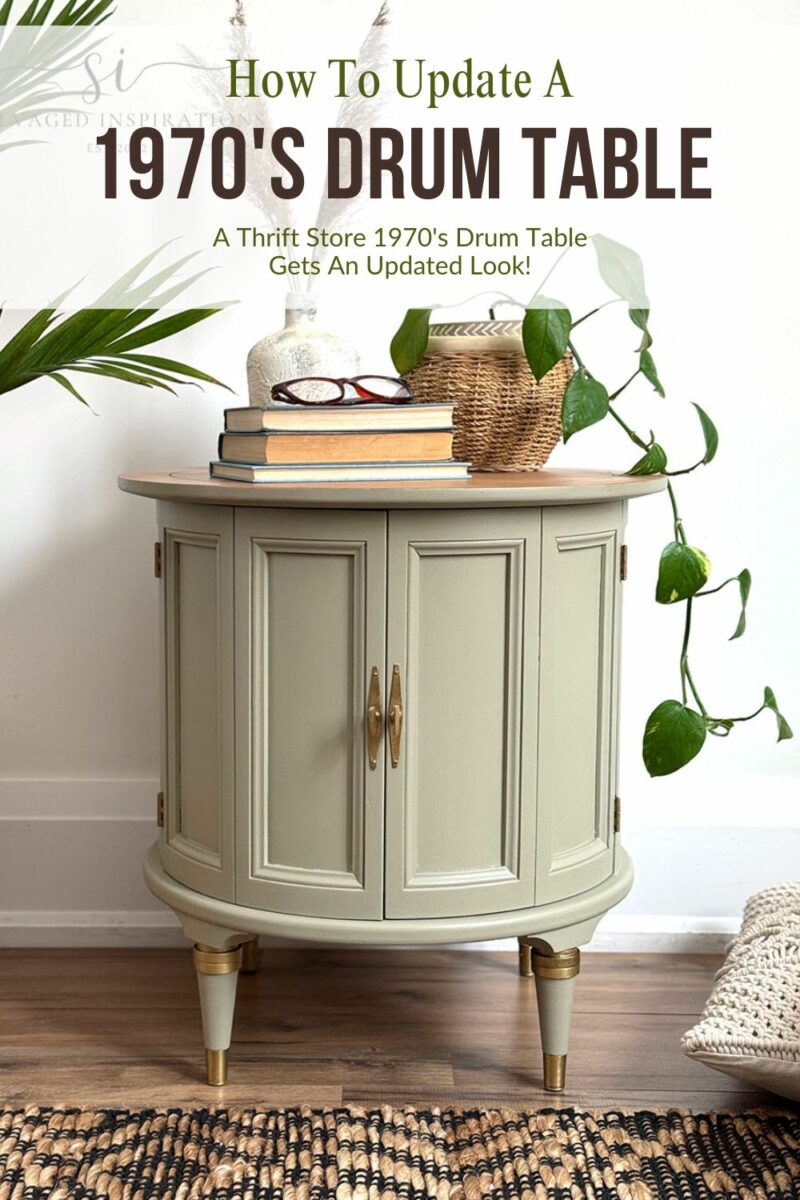
Here’s how this $15.99 1970’s thrifted drum table looks now…
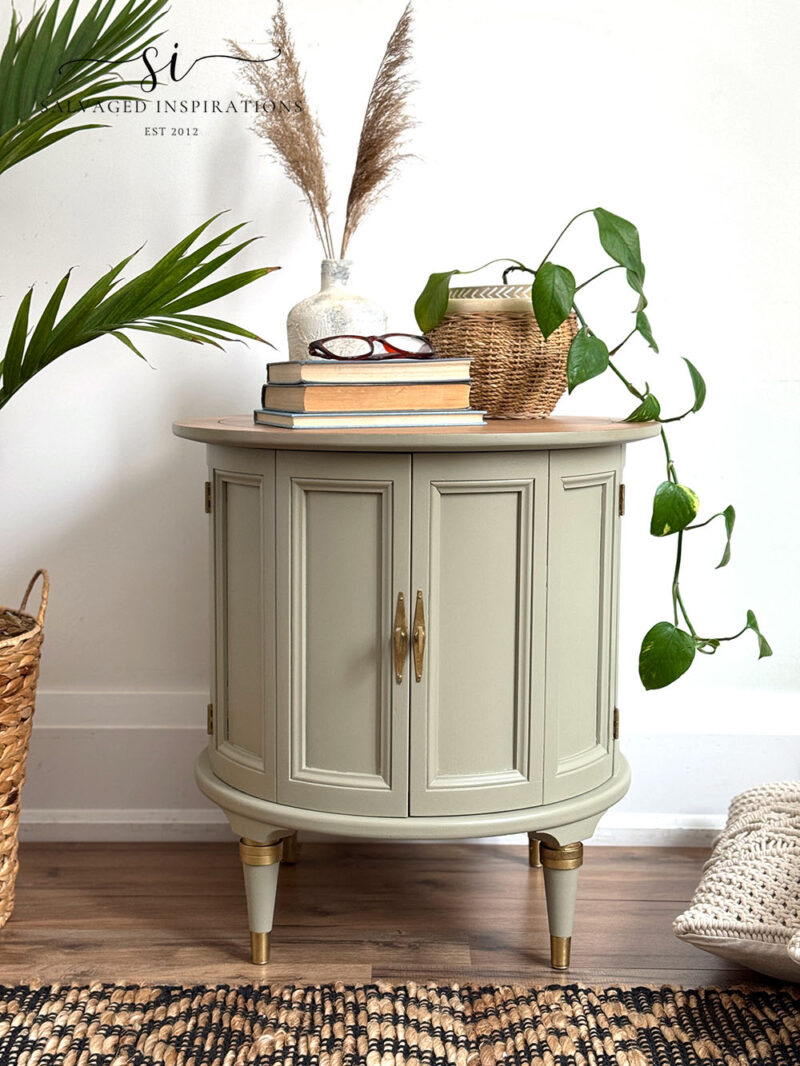
I really like the gold gilded legs and how all the brass hardware came back to life.
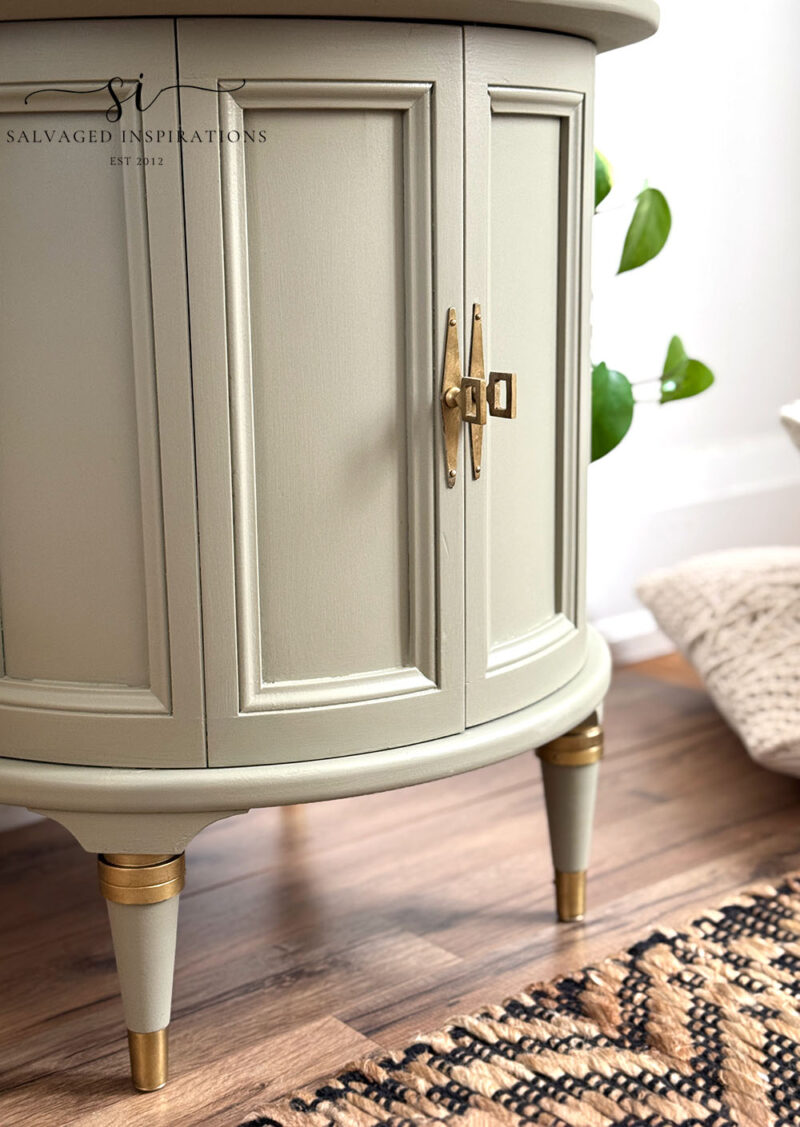
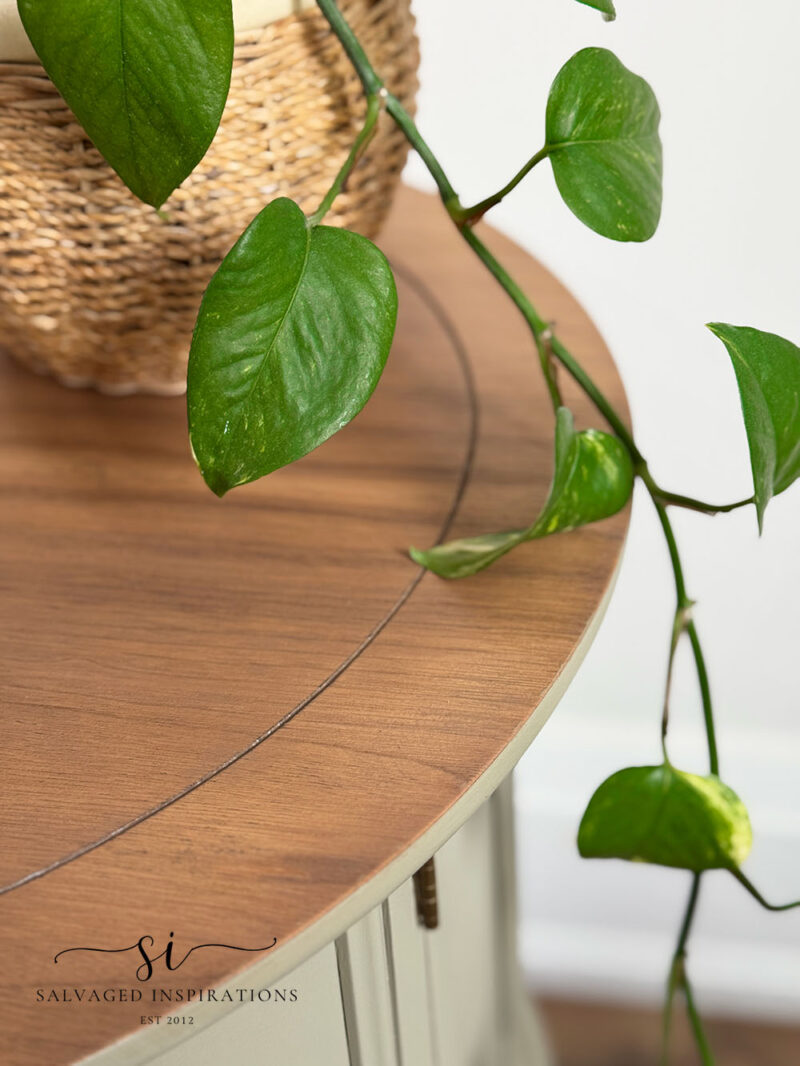
And here’s a close-up of the gilded legs – even on the wood part. With this close-up pic, you can see the different texture of the wood and the actual brass. But to look at the table normally, you’d never know. It looks like a design feature that was always there.
And here’s how the masked off hardware touched up with Gold Gilding Wax looks. It’s not 100% perfect. I’ll be going back in with an exacto-blade to clean up that tiny bit of paint on the side of the backplate. But masking off is a great diy hack when I think I’ll do more damage to the piece by trying to remove it.
Remember what this drum table’s top looked like? Here’s a look at the updated Whiskey Barrel stained top. Gorgeous, right?! I wish my palm plants looked as good. Even the plants are suffering from the cold weather because of the dry heat in the home. If any of you plant lovers have any suggestions, I’d love to hear them!
I wasn’t sure while I was applying this new-to-me stain color — but I love it! And thankfully, the cutting off my Mum’s 40-year-old plant is doing well.
And just for fun, I prompted AI to generate a styling of this drum thrift table. Here’s what it generated. I like the moody shadows and the dark floor. I’m always amused by what it comes up with…
YOUTUBE TUTORIAL
Here’s the full step-by-step YouTube tutorial. Our #siyoutubefamily has almost reached 5.5K, so don’t forget to subscribe if you haven’t already! So exciting, thank YOU!
And now for some Trashy Treasures FUN!
Below are the TTT ladies’ BEFORE photos. Visit the links below to see the amazing AFTERS and learn how they did it! I’m heading over to take a peek as well! x
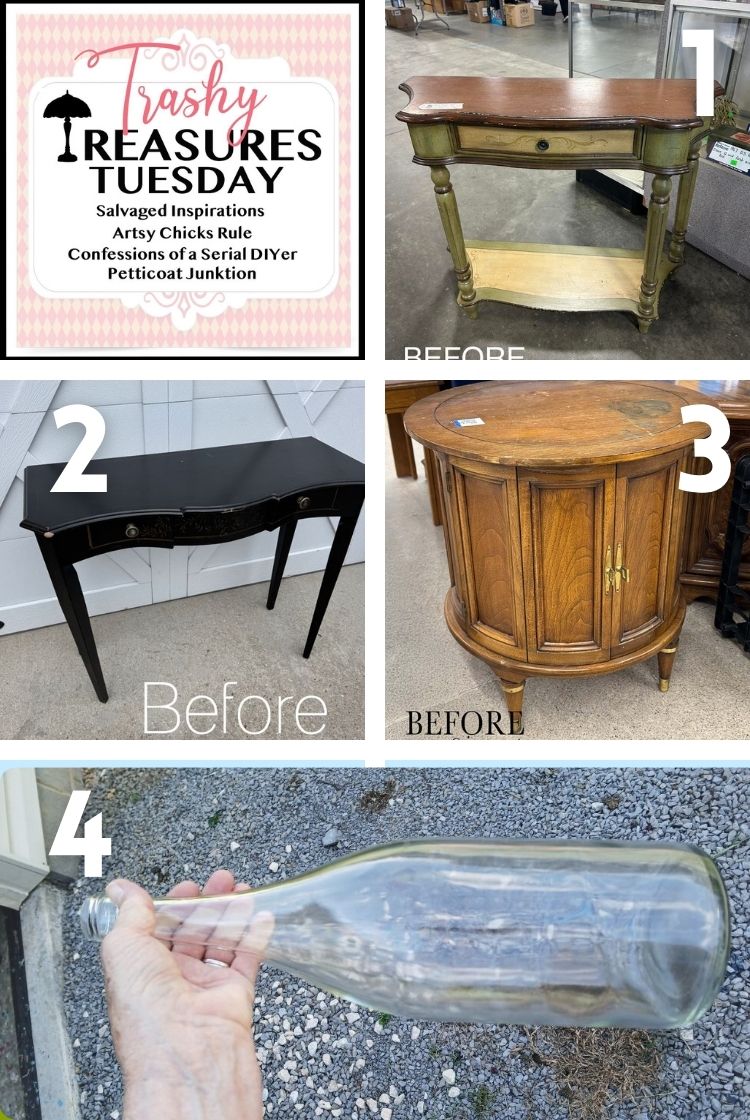
1. ARTSY CHICKS RULE
2. CONFESSIONS OF A SERIAL DIYER
3. SI (HAPPY YOU’RE HERE!)
4. PETTICOAT JUNKTION
Here’s another look at this before-and-after thrifted 1970’s Drum Table Makeover. I hope it inspires and gives you the confidence to update your old pieces of furniture.
Thanks for joining today’s Trashy Treasures Tuesday makeover. If this project inspires you to look twice at a dated piece instead of letting it go, then it’s done its job. 🙂
Feel free to drop me a hello and let me know what you think of this upcycled drum table. I always love hearing from you — and just so you know, I’m always cheering you on from my end!
Happy painting, my friends!
Denise x
RELATED POSTS:
YELLOWSTONE PAINTED SIDE TABLES
$12.49 PAINTED BEDSIDE TABLE
FRENCH PROVINCIAL DRESSER MAKEOVER
EASY BLACKWASH WOOD SIDETABLE
12 EASY DIY PLANTER MAKEOVERS!
PIN AND SHARE! 🤗

Well, I’m a little late but WOW! this turned out fabulous. It’s beautiful and will look lovely with any decor. You know, some of that 70’s look can be updated to look wonderful. ( I know all about that 70’s look, ha ha!)So glad you saved this piece. I love the color with the stain on top. Hopefully Spring is just around the corner for y’all. It’s a good time to work on all those projects right? I’m wondering what you’re up to this week??
Never too late Kathy and I’m with you for knowing all about that 70s look as well ;). We got another snow fall last night so yes, its a great time to stay warm and cozy in my studio and work on furniture. This week I’m finishing up a French Provincial thrift dresser that I picked up for $20.99. i can’t wait to share this Thursday for Furniture Fixer Upper Day.🤗
Wow…I love the colour of this Commode. The stain on the top looks so nice with your paint choice. I like your detailed explanations on how you finish your projects.The AI generated photo is cool…
Hi Lorri! Thanks so much and happy you like the step-by-step tutorial! I think the AI generated after pic is pretty cool as well. 🙂
So pretty! Love the color choice also.
Thank you Debra! 🙂
I’m curious why you didn’t prime this piece? Also, I watched your video and I didn’t see that you lightly sanded between coats of paint, but it showed that you sanded a little bit after the final coat. Is that what you normally do?
And my final question, Do you ever paint the interior of a piece such as this or, a drawer? What about the bottom of a piece?
It’s fun following you. I just wish I had the motivation to finish the pieces that I have right now in my basement. I’m an amateur, I don’t sell them. Just do them for myself and other family members.
Hi Mary Jo!🙂 Chalk Paint (all brands) don’t always need a primer. I’m in the habit of priming but it was a good reminder to myself that if bleedthrough isn’t an issue and there isn’t wood filler or damage where the paint absorbs differently, I can forgo the priming step. Time stamp 10:02 on the video – I’m sanding between my second and third coat. I didn’t show painting the 3rd coat though. So no, I never sand the last coat of paint OR topcoat – only the inbetween coats. I sometime paint the interior or drawers, but only when they are in rough shape. Hope this helps and thanks so much for reading & watching, great questions btw!
Hi Denise. You took this piece from 1970’s funk to 2026 fabulous!!! Love!!!
yessss, 1970s funk😄… thanks so much Monique! Have an awesome week! XOXO
Love what you did with the barrel table! You had mentioned the top was bubbling and I’m curious how to fix that. I have a table where the veneer (I assume) is pulled up a bit. I really want to keep the look of the wood. What is the best way to fix it?
Hi Leslie and thank YOU! For this table – the topcoat finish that was bubbling/lifting up – not the veneer. If your veneer is pulling up and can be fixed by gluing in down. Grab an inexpensive wood adhesive glue syringes, squeeze the clue under the lift and weigh it down with some books or something heavy. Works like a charm! Hope this helps. 🙂
What an amazing transformation!
Thank you Carla!🤗
Wow, who would’ve thought that little piece could look like that! It’s so elegant now, love it! xoxo
Yay, thanks so much Nancy! xoxo
Wow Denise, you are an incredible talent!
You always amaze me😁
Thanks so much Pam, very sweet! Enjoy your week! 🤗
Oh wow! I didn’t see this coming, Denise The color is stunning on this piece. I’ve painted a few of these barrel pieces through the years and just never managed to pull it off, but you did. 💚 As far as the commode, I was thinking maybe a chamber pot was stored inside. 😂 Probably not but that’s where my mind went. It’s gorgeous now and deserves to be shown off. The staging photos, pure perfection! 👌🏻 😍 pinned 📌
…”I was thinking maybe a chamber pot was stored inside.” That crossed my mind too!!! 😂😂😂 Thanks for the PIN my friend and have a wonderful week. Hugs
I always love what you do and this one is so pretty. I’m french Canadian from Montréal and a commode is a fourniture that has storage in it just luke a drawer desk.
Bonjour Caty from Montréal! I love knowing where readers are from, thank YOU! ahhhhhh yessssss I appreciate this, I learned something!!! I just googled it as well… I had no idea.😆
The workmanship is beautiful..this piece is a little modern for me..
But..its absolutely beautiful!
You made happy!!⚘️👏
Aw, thank so much Deborah!
Wow ! I’m not drawn to barrel tables – but your vision is amazing.
Such a gorgeos soft neutral green ( I need to get this ).
I’m really liking the lighter warm stains. This stain color is wonderful.
You chose a perfect touch of gold gilding.
Gorgeous makeover ! 🙂
I’m usually not drawn to them so much either so I’m grateful to Andrea for encouraging me. And ya, I’m loving this Olive Wood too. So glad I tried it. Have a fabulous week P! XOXO
Absolutely stunning. Your work never ceases to amaze me.
Very kind, thanks so much Erica!🤗 Enjoy your week. XOXO
Stunning Denise! I wouldn’t have given this table a second look. You have an artist’s eye and thank you for sharing all your creativity with us!
So happy you like it, thanks Nicki! I may have left it in the thrift store if Andrea hadn’t encouraged me. 🙂
Wow, that turned out beautifully! From dated to gorgeous. Great work!
Thanks Lizzy!💙 I was going to leave it behind and my sister Andrea encouraged me to restyle it. So glad she did!
Stunning! I’m always amazed how you take things I wouldn’t even think of buying and make it into something I absolutely love!
So glad you love it Cheryl, thank you! I’m glad my sister encouraged me because I wasn’t feeling it when I first saw it, lol.
Very pretty! I love the gold touches with that color!
Thanks Cyndi! I’m so glad I tried this color. Its a color I will def reorder. Have a great week! XOXO
This is really lovely – awesome job
So glad you like it Ginger, thank you!
Gorgeous makeover Denise. I love those legs!
Thanks my friend! The gold gilding really brought them back. Enjoy your week and stay warm. Hugs
Absolutely gorgeous, Denise! And the styling is perfection!! This is one of my new favorite colors…a hint of green but it still feels like a neutral! XOXO
Thanks and yes, I LOVE this color too!!! Very soft, calming and I totally agree, reads like a neutral! XOXO
I could not have imagined that this would look so good. Outstanding!
YaY, this is a huge compliment Josee, thank YOU!!!🤗