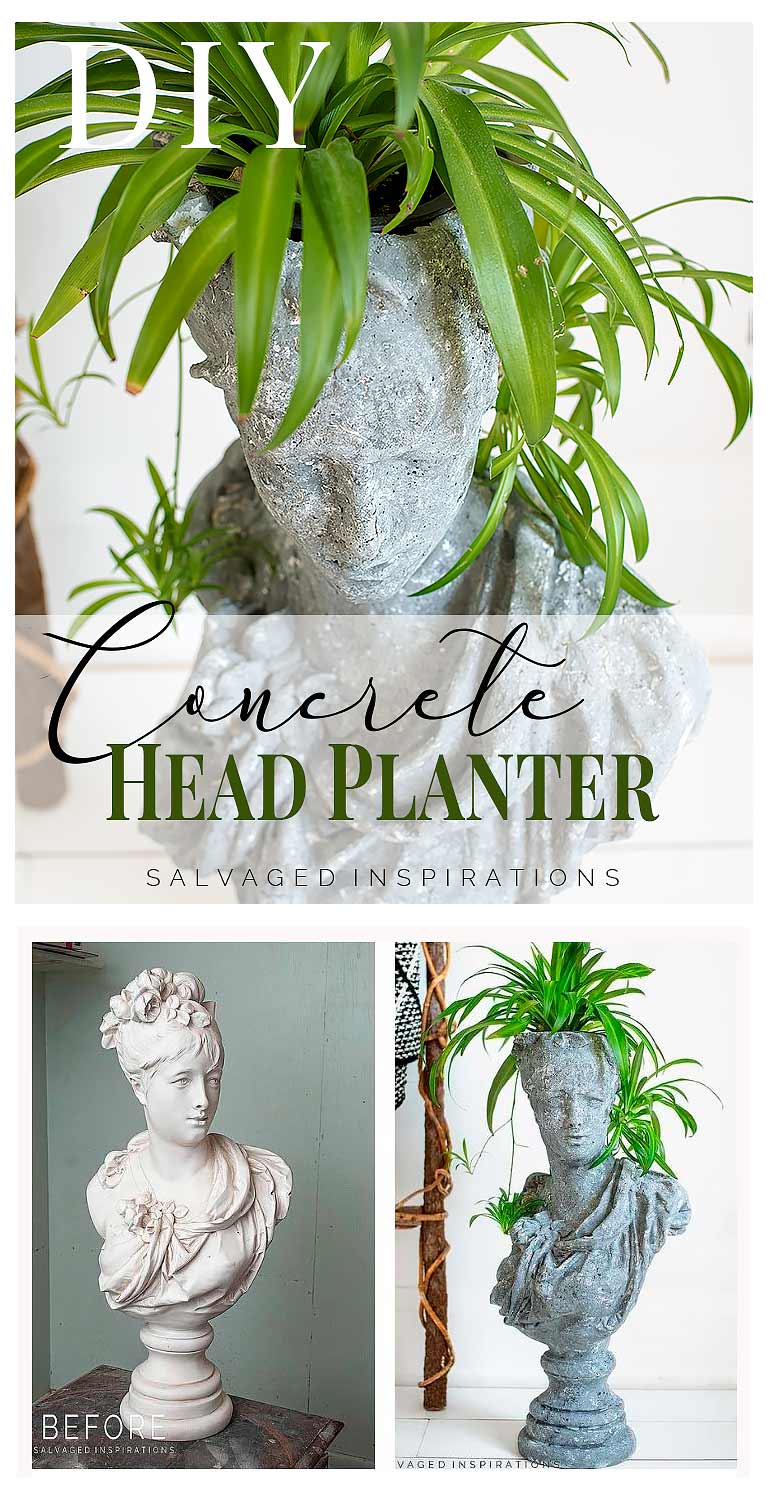
HOW TO MAKE A CONCRETE HEAD PLANTER AND NO MESSY CONCRETE REQUIRED! | VIDEO W STEP BY STEP TUTORIAL
 Hi sweet SI family, it’s great to be back. I have such a fun DIY before and after for you today. I’ll also bet that after this T2T project, you’ll be going through all your knick-knacks to see what YOU can try this on. You won’t believe how authentic this DIY Concrete Head Planter turned out!
My talented T2T blogger friends also have some impressive before and after’s that I’m linking down below… so let’s get this party started!
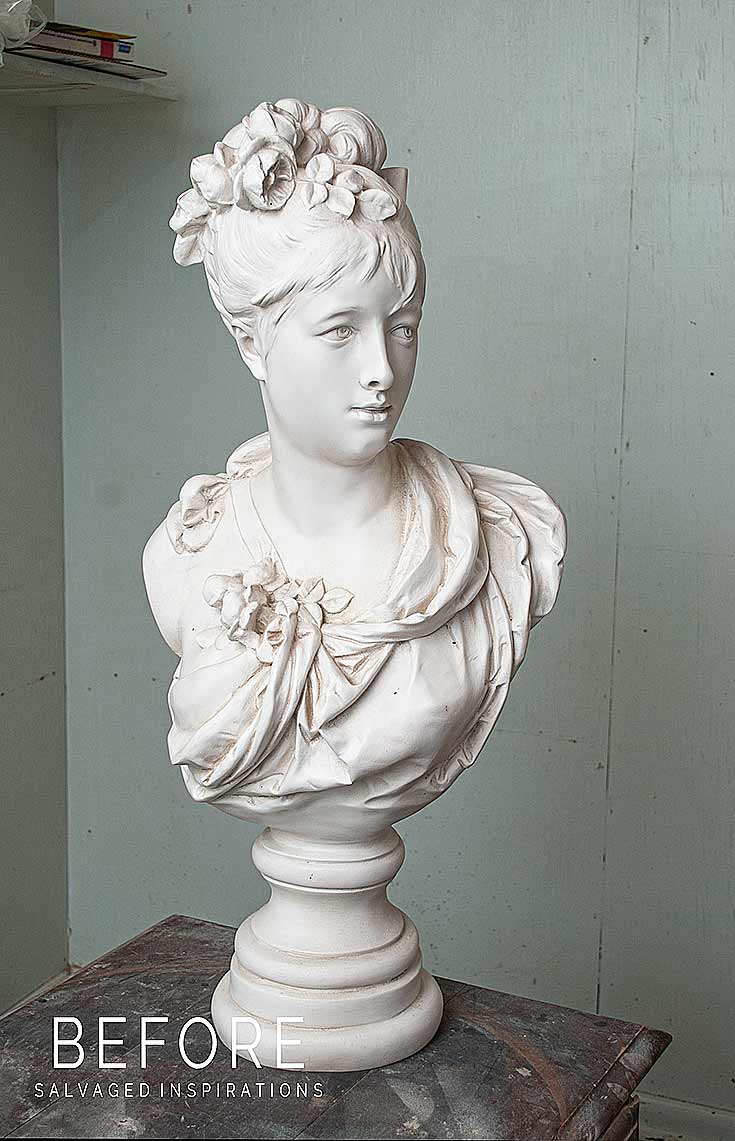
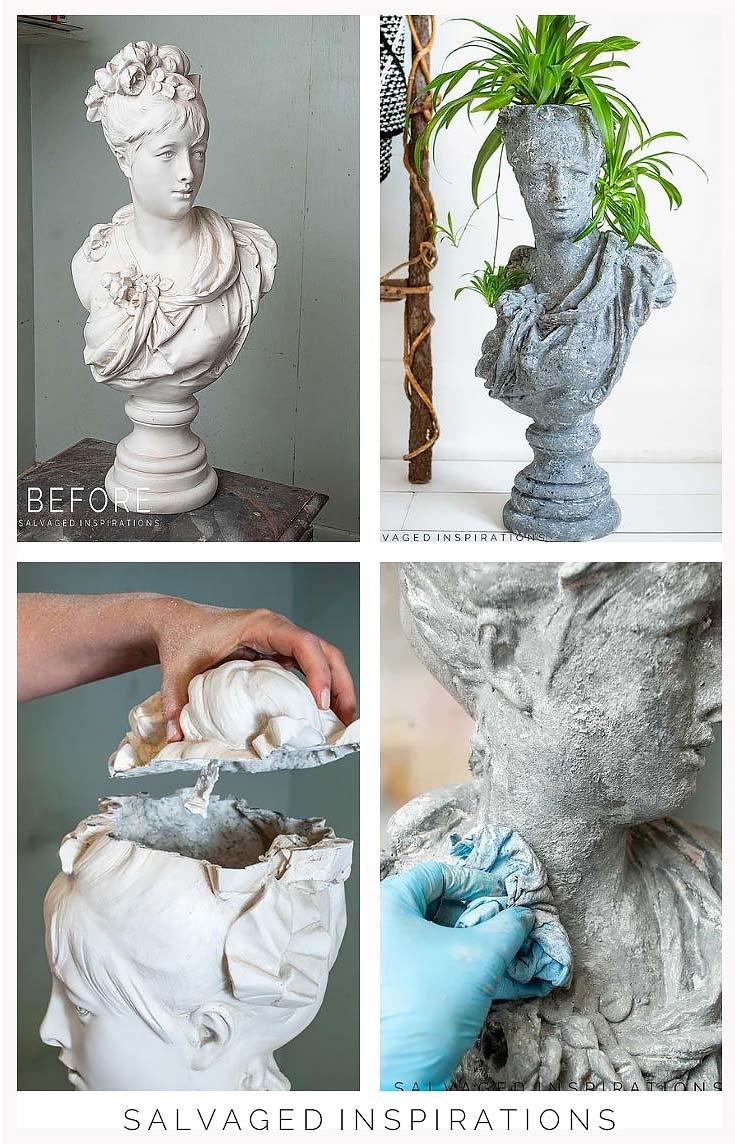
Here’s what I started with. When I posted this before pic for my T2T Crew they all agreed she needs a name. Agreed! So I thought it would be fun to have YOU name her. Be sure to read on because I’ve included the details of the “Name This Lady Contest/Giveaway” below.
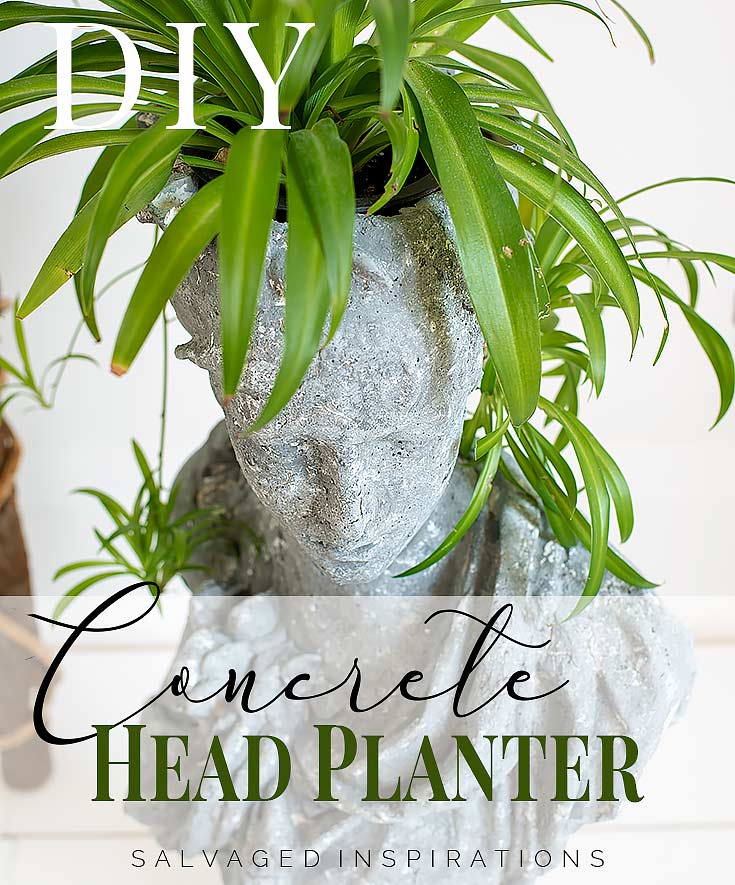
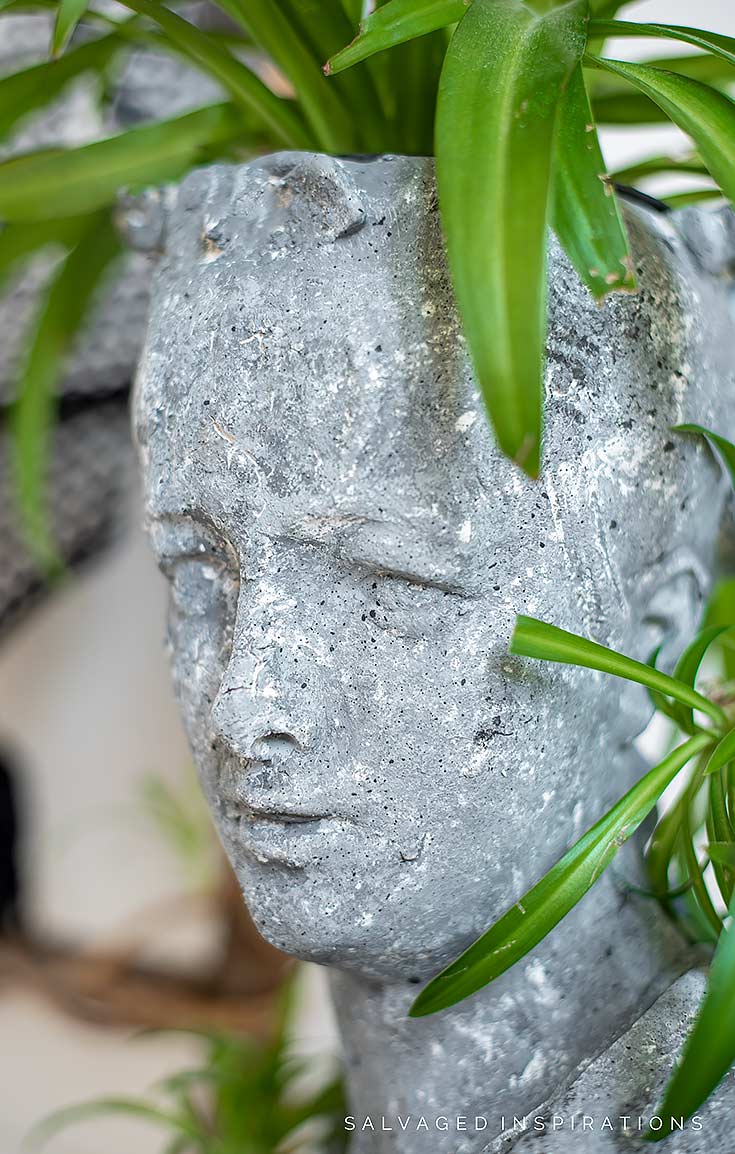
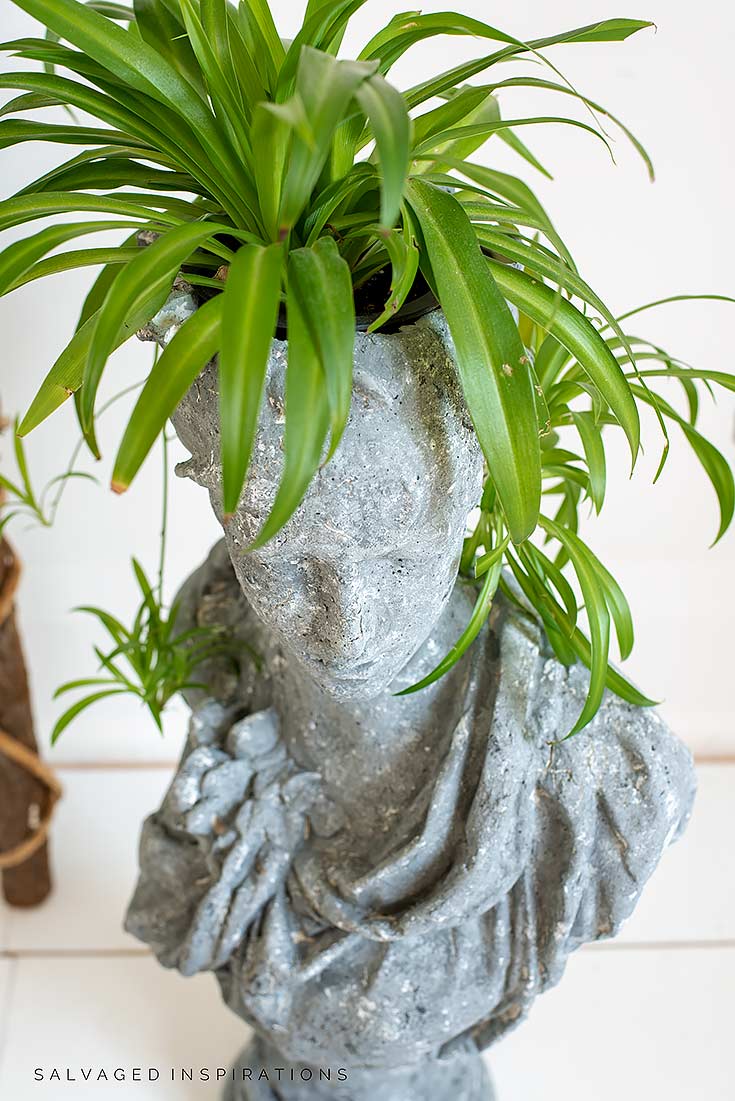
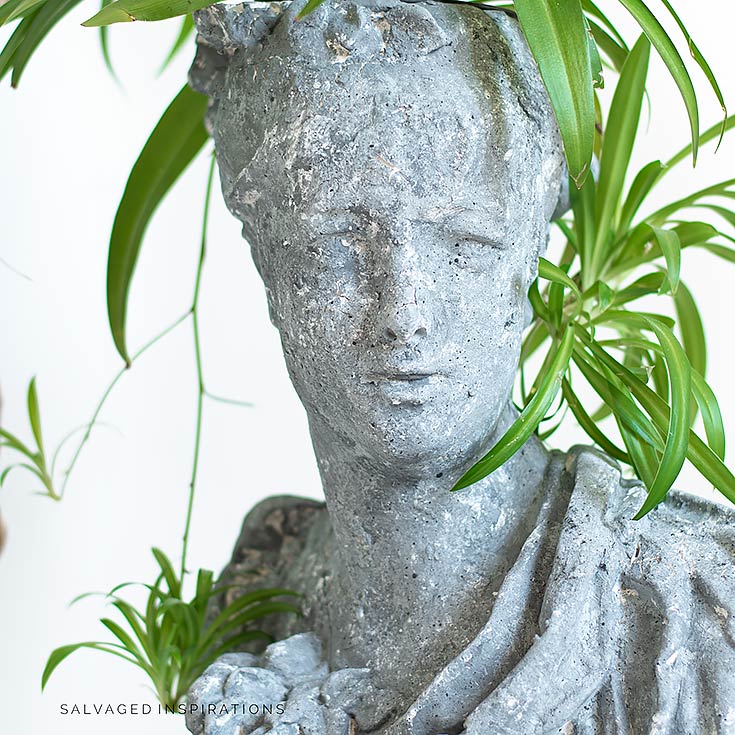
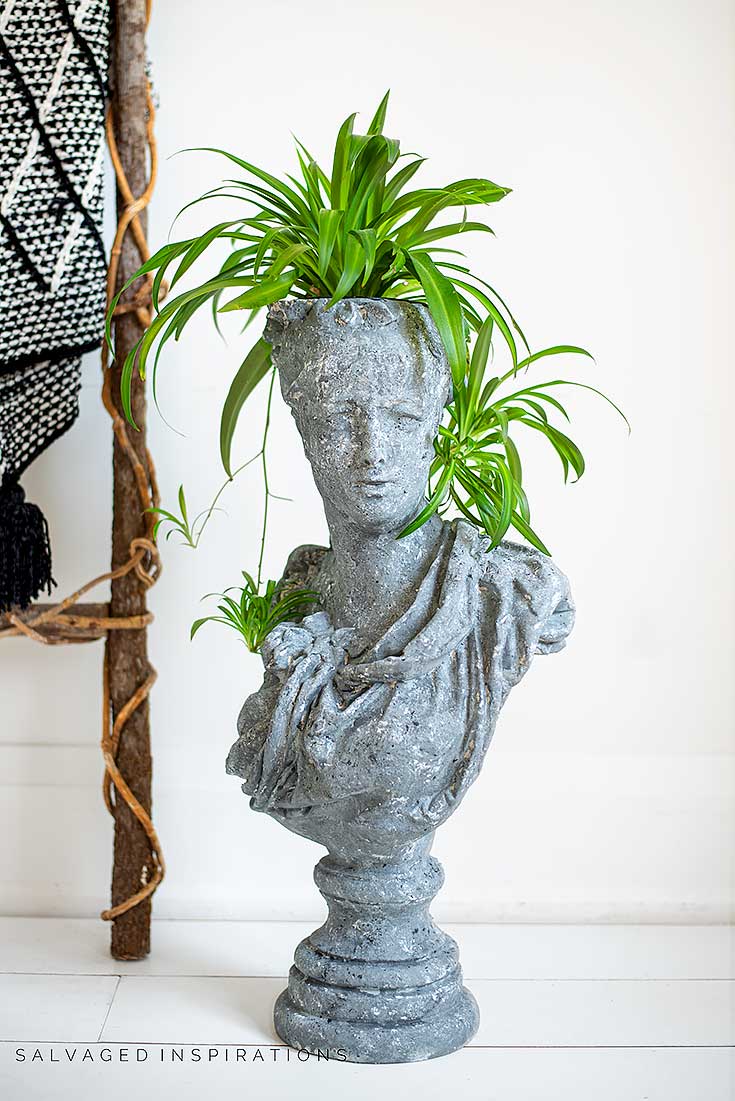
Here’s her new look. She started out as a youthful-looking lady of plaster and has turned into an ancient-greek-goddess using this faux concrete painting technique.
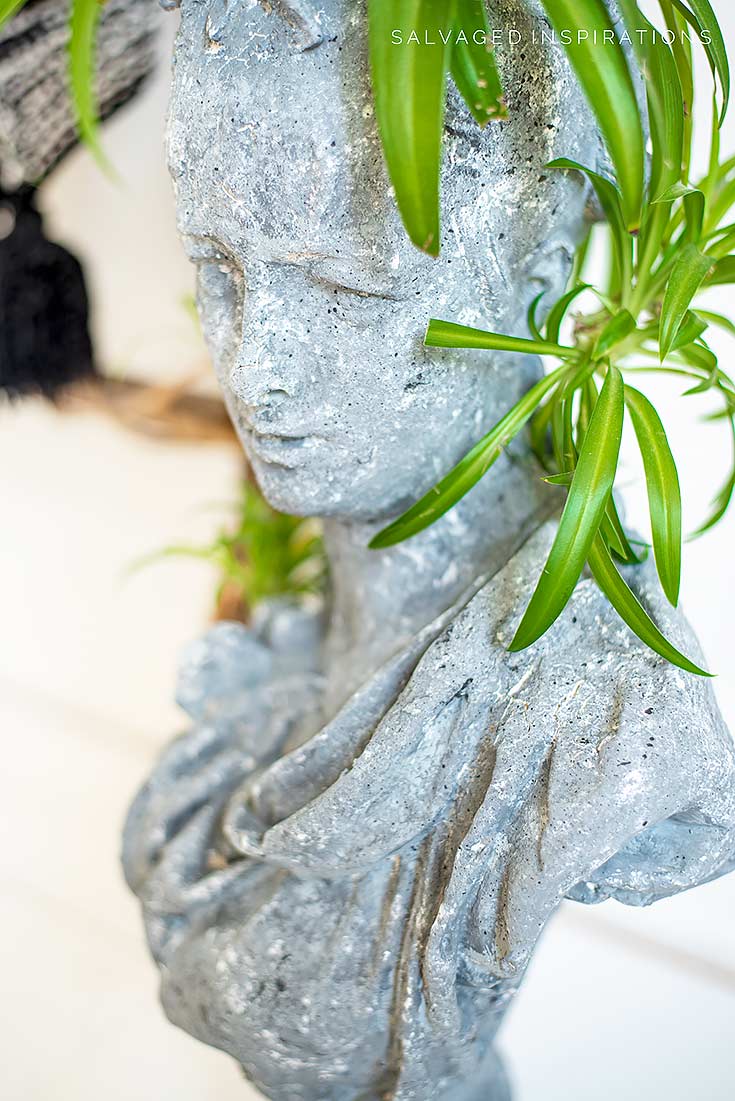
Even I’m impressed with how easy this was to do and how R*E*A*L this concrete finish looks!
Here’s a close-up… what do you think?!
THIS POST IS SPONSORED/CONTAINS AFFILIATE LINKS TO PRODUCTS I USE. YOU CAN SEE MY FULL DISCLOSURE HERE.
SOURCE LIST
-
- Plaster Lady Bust – SALVAGED
- Dollar Store Paint Brush
- 12″ Level
- Sea Spray Texture
- Pencil | Toothbrush| Shop Towels
- Oscillating Cutting Tool (similar)
- Fluff Chalk Mineral Paint
- Manatee Gray Chalk Mineral Paint
- Caviar Chalk Mineral Paint
How To Make A Concrete Head Planter
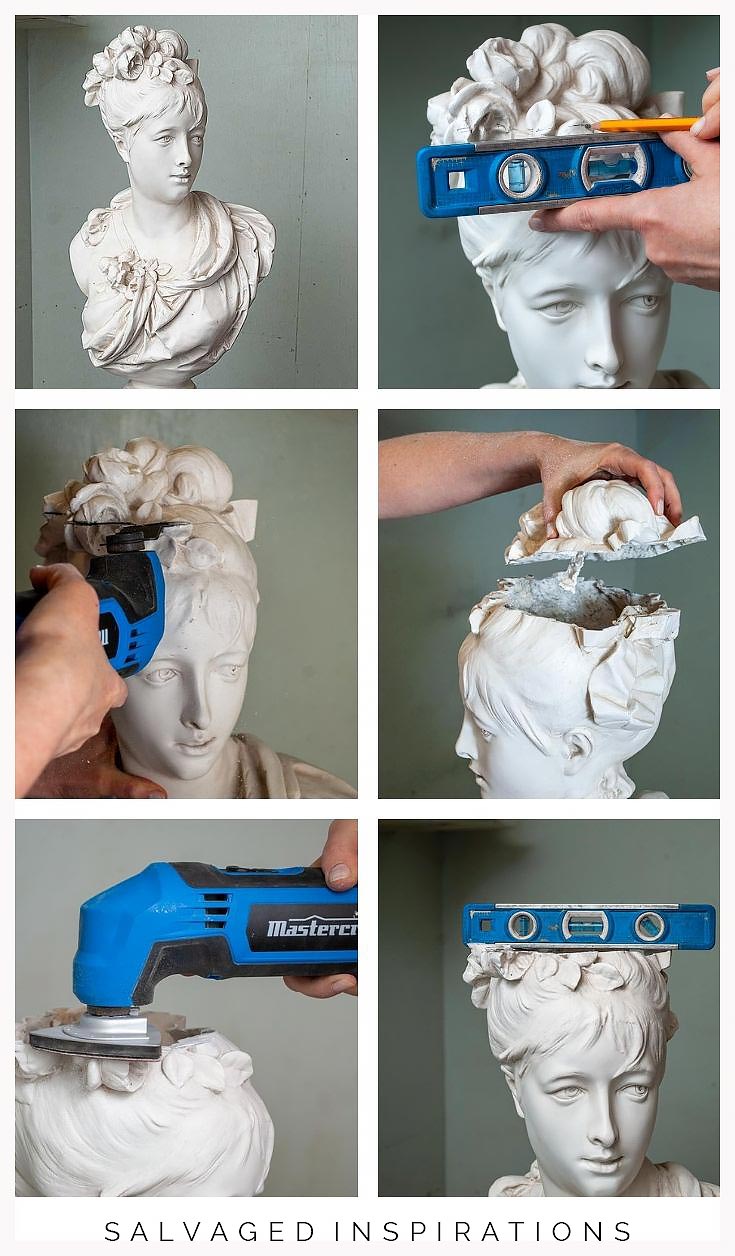
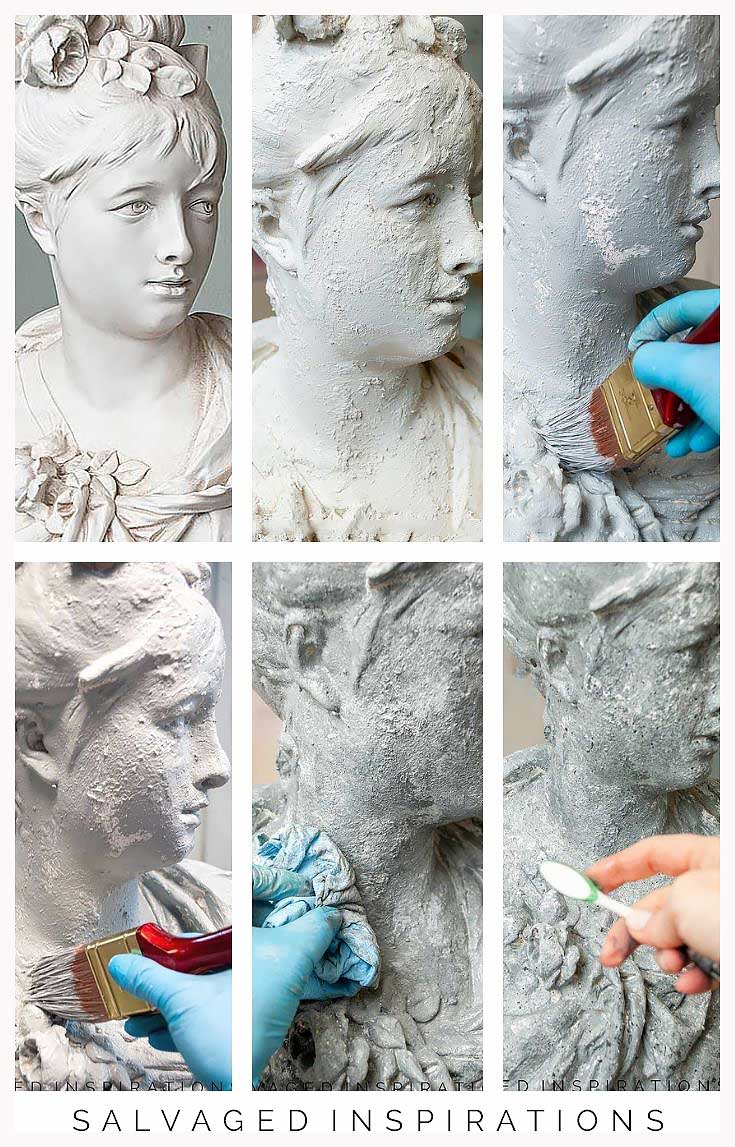
I used this plaster bust I’ve had for years but you could also use an inexpensive styrofoam head or even an old doll head you can pick up from a thrift store. Using a doll head sounds a little creepy but check out some of these cuties.
Remove The Top Of The Head
I placed her on a level table and then using a 12″ Level, I drew a straight pencil line around the top of her head while keeping the bubble in my level centered. To cut this plaster, I used an Oscillating Cutting Tool like this, which made the job quick and easy. You could also use a grinder, Dremel Tool, or even a hand-saw. After I cut through the plaster I removed the top. It wasn’t a 100% straight so I switched the blade to a 60 grit sandpaper and sanded it smooth and level.
Prep Surface
This DIY Head Planter Pot will be in my home so I didn’t bother prepping. But if you were going to use this outdoors, including a drainage hole in the bottom of your planter for water flow and then priming to seal the plaster would be a good idea.
Faux Concrete Paint Finish
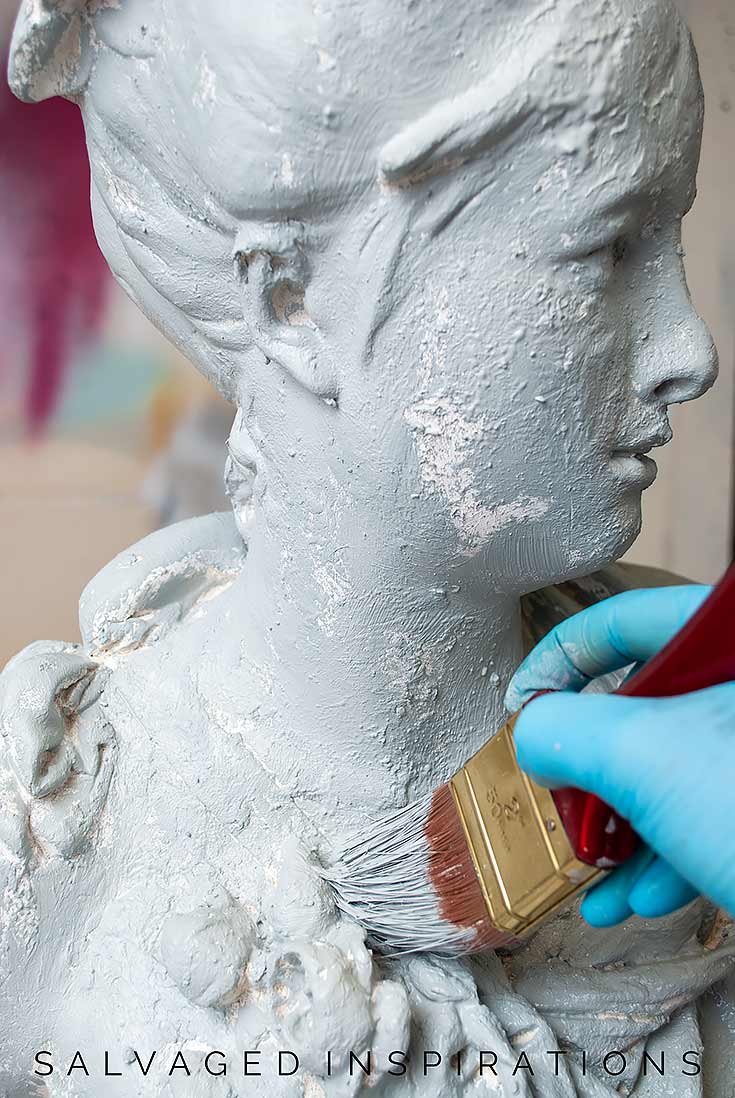
I started by mixing a 50/50 mix of Fluff with this DB Sea Spray Additive. It was a little thick so if I was doing this again I wouldn’t use quite as much additive because as you’ll see in the video (which I’ve included below), it was a little chunky to apply although gave great results.
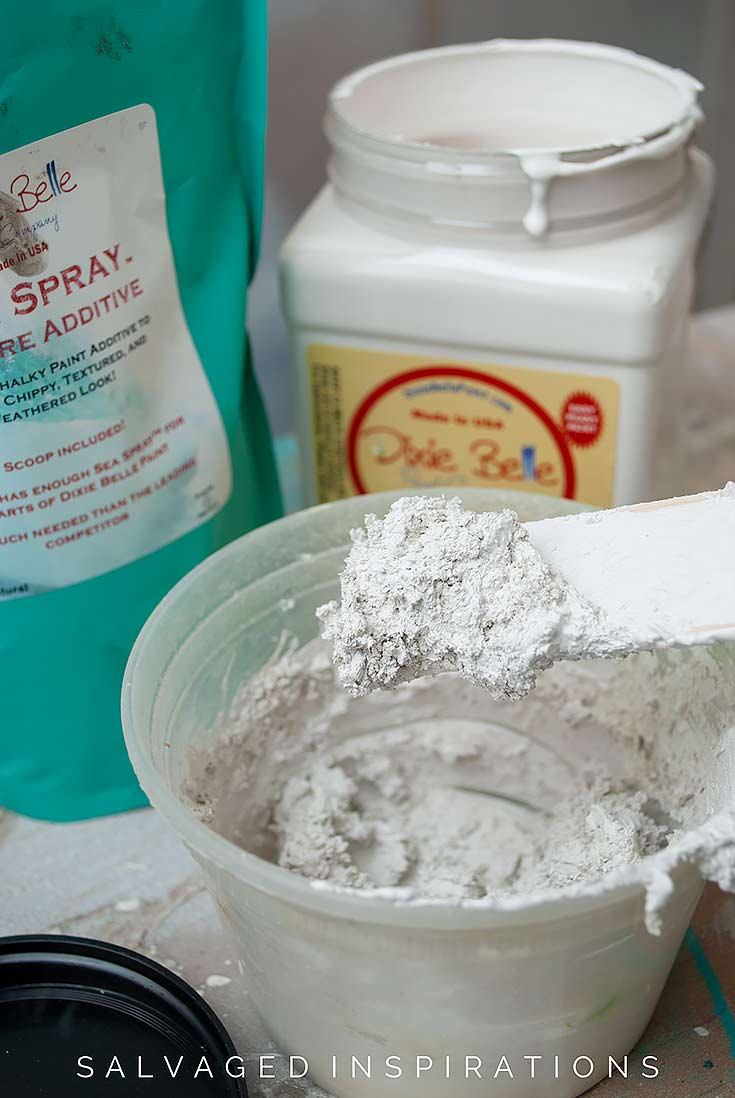
Below is what she looked like with the first coat of textured Fluff. When applying your paint, you don’t have to worry about getting 100% coverage because some smoother areas just add to the concrete look.

Once the first coat was dry, I used this Manatee Gray mixed Sea Spray in about an 80/20 ratio so it wasn’t as thick and much easier to apply. I dabbed it on in some areas and brushed it on in other areas.
I used the same cheap dollar-store brush for all my coats.
To create a third layer of darker gray, I just added some of this black to the Manatee Gray mix and stippled it on. Again I left some of the Fluff and Manatee Gray peeking through in areas.
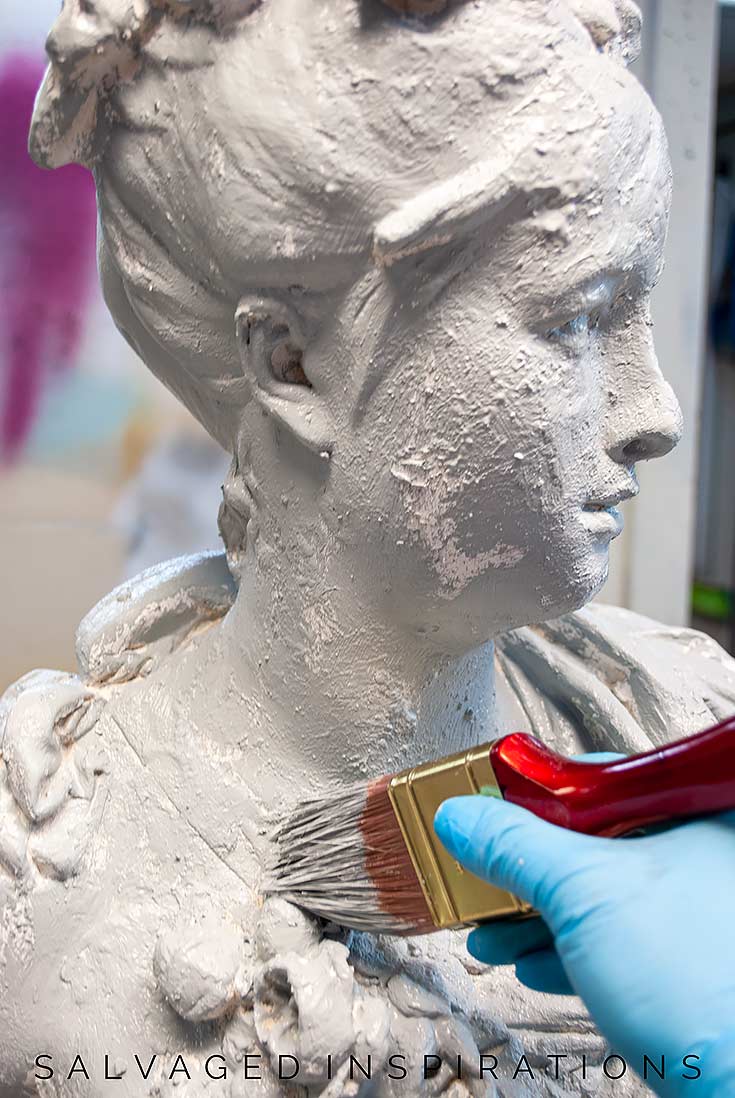
While the paint was still wet, I put a little Fluff and Manatee Gray on a shop towel and dabbed areas to create the illusion of even more concrete texture! Doesn’t she look great?!

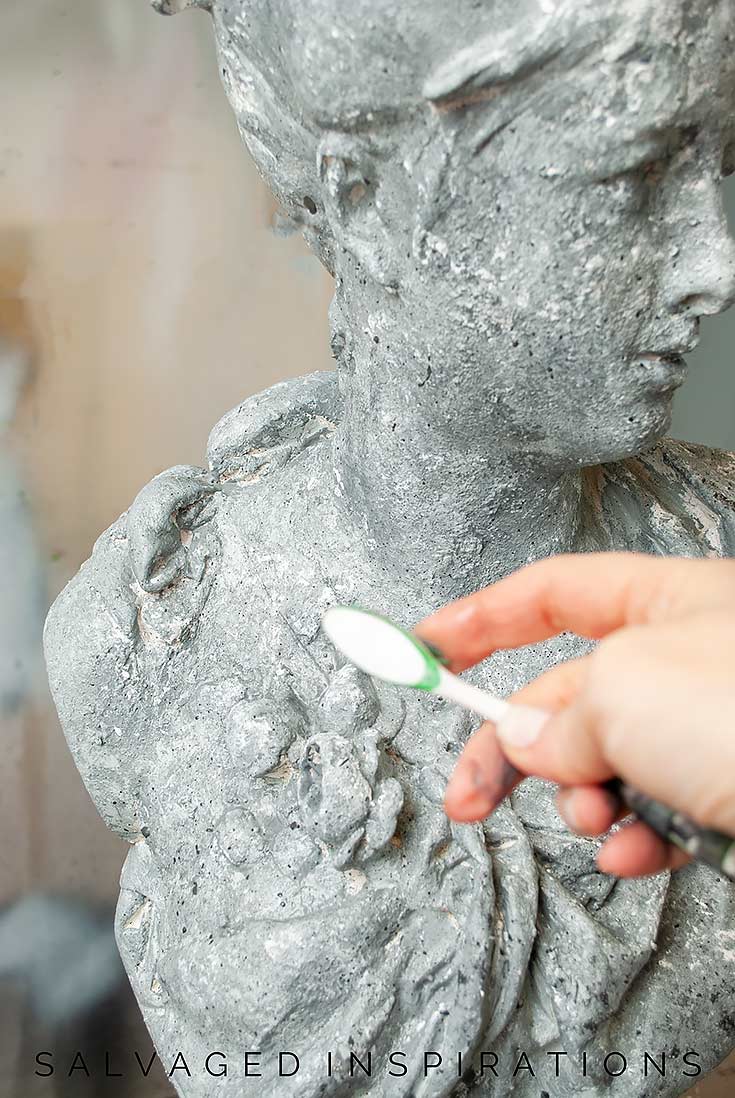
For the final touch, I took a toothbrush, applied a little of this Caviar black paint, and splattered and speckled this faux concrete finish.
Here’s what all the steps looked like side by side so you can see what each step added.
DIY Concrete Head Planter Video
I create a short step-by-step YouTube tutorial so you can see this lady’s transformation in action. If you have any issues viewing the video below, feel free to watch it here… and don’t forget to subscribe! 😉
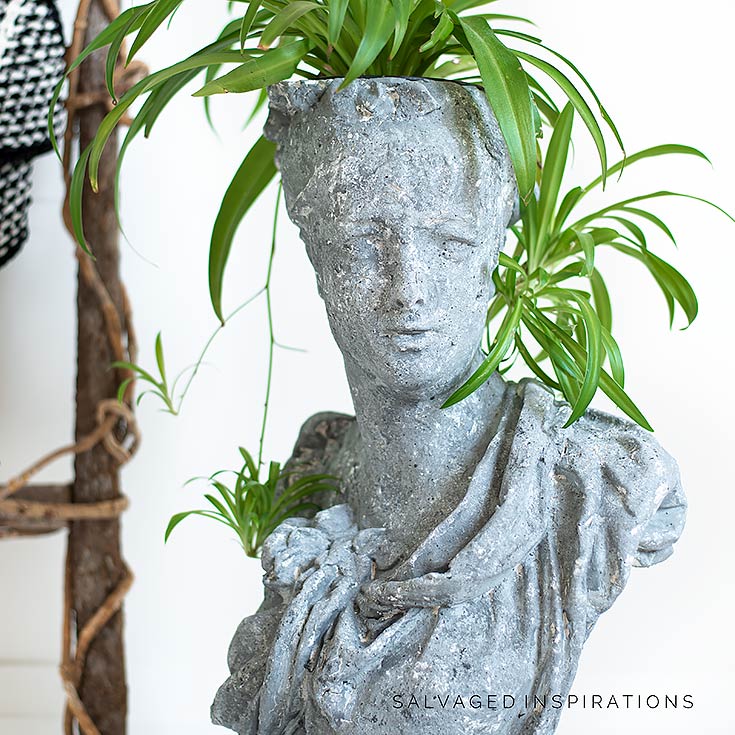
Once she was all dry, all there was left to do was add a gorgeous plant!
If I was to do anything differently with this project, I might have cut a little more off the top of her head to make the opening a little wider. This way I would have more options for the size of the plant I could use. But overall, I’m SUPER happy with her new look!
Now let’s have some fun and play NAME THIS LADY!
Super easy. Leave a comment down below with a name you think suits this concrete planter goddess. I’ll go through them and pick a name (and a lucky winner) next week. The person who provides the winning name gets a $50 Amazon Gift Card emailed to them as a thank you for helping me NAME THIS LADY! This is going to be fun. I can’t wait to hear what you come up with!

And now for some MORE TRASH TO TREASURE FUN!
I know you’re going to LOVE what this talented team of ladies has for you today. They always surprise me with their creativity! Below are their BEFORE photos. Visit the links underneath to see the amazing AFTERS and to learn how they did it. I’m heading over to take a peek right now myself! x

1. Girl In The Garage
2. Prodigal Pieces
3. Artsy Chicks Rule
4. Confessions Of A Serial DIYer
5. Salvaged Inspirations (I’m so happy you’re here!!)
Thanks for joining me today. I’d love to hear what you think of this faux concrete head planter and don’t forget to leave her a name to qualify for the Giveaway! I’ll be back next week with an Ethan Allen Cane Table Makeover and the winner of the Name This Lady Contest. This winner will have 48 hours to claim their prize so be sure to check back. See you then! 🙂
Thanks for reading. 🙂
Wishing you a beautiful day and Happy Painting friends!
Denise XO

She turned out beautiful. Since her plant is a “Spider Plant”, I think she should simply be Spider Woman. Tehee tehee.
yesssss… I love it… hilarious!😂
Hi there! I just stumbled upon you today and I am wondering, what did you end up naming her?
Hi Katrina and WELCOME! Her name is “Alexandra”😊
Originally I thought she looked like a “Marie Claire” like an aristocratic lady.
I would call her “Anenome!”
She looks like an Antoinette to me!
Thanks Ginger!
She looks like a MYRTLE to me…. I have the exact same stature and that is what we call her
Thanks! She’s a twin..lol.
Being a planter i would suggest “Goddess of the Garden”
Lady Phaedra…just a name I heard and thought was beautiful!! And…I love the way she turned out!!!
Thanks Karolyn!
My answer would be Flora the Greek goddess of plants and fertility!
Thanks Candace!
MeDiva. Like Medusa but stylin 🙂
I’m probably too late for the contest, but I would name her Cornelia – the mother of the Gracchi! Reputed to be the most worthy woman in all of Roman history.. Or you could go the other way and name her Clodia – inspirations for the great love poems of Catullus!
Thanks Dixie Lee! x
Chloris, a Greek Godess , or nymph, associated
with plants.. In Roman Mythology it is Flora.
Either one is good.
Thanks Shelley!
I call her Lady Grey
Thanks Tess!!
Lady Antebellum! I just love this project! I have a head planter on my mantel right now and this project couldn’t be more up my alley! Great job!
Thanks Susan!
Lady Eleanor! I love seeing all of your creative ideas!
Thank you, Nathan!
Lady Ophelia, I think is appropriate I am going to try this thanks
Thanks Mary!
She looks fantastic! You are so creative and talented! I think she should be Athena. Goddess of wisdom, poetry, art, and war strategy. Daughter of Zeus and born from his forehead fully grown, wearing battle armour.
Thank you Jeanine! 🙂
Her name should be Jewels
Thanks Renee!
I enjoy your tutorials and explanations. Very easy to follow. May I suggest the name Hestia, the Greek goddess of hearth and home.
Thank you Cher… and thanks for participating! 🙂