 Hi friends! I hope you’re doing well and had a fun and relaxing long weekend. Big thanks to all of you who participated in last weeks Dixie Belle Paint Giveaway. I’ll announce the winners at the end of this post, but first, I’ll share this DIY Weathered Wood Dresser. I know I’ve said it before, but I’m always amazed at how a little paint can transform old furniture!
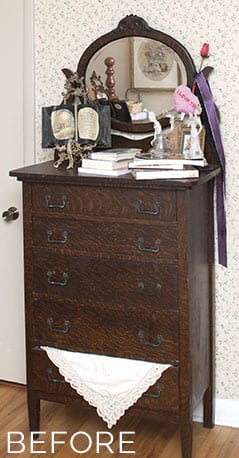
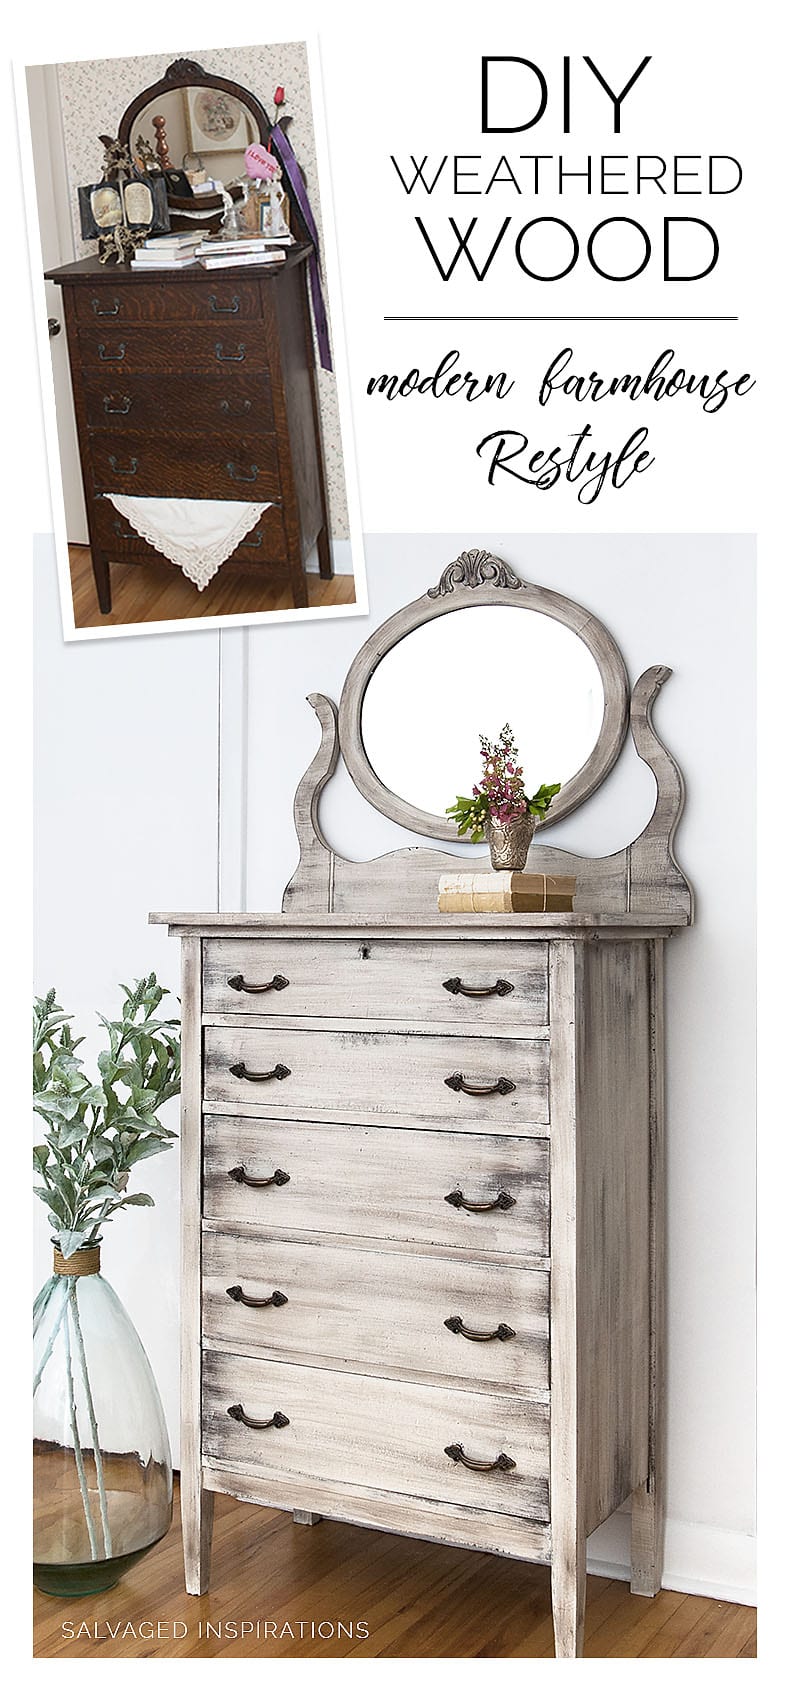
I picked up this old Fumed Oak Dresser at an antique market a good few years ago.
**Update – One of my readers, an antique dealer at Fox and Finch Antiques was kind enough to send me more info on this old dresser. It’s not actually Fumed Oak but an American chiffonier’s finish with quarter-sawn oak. It was made around 1905-1910. The dark color resembles fumed oak but is actually from 100 years of wax and just being in the environment. Thanks, Ginene! 🙂
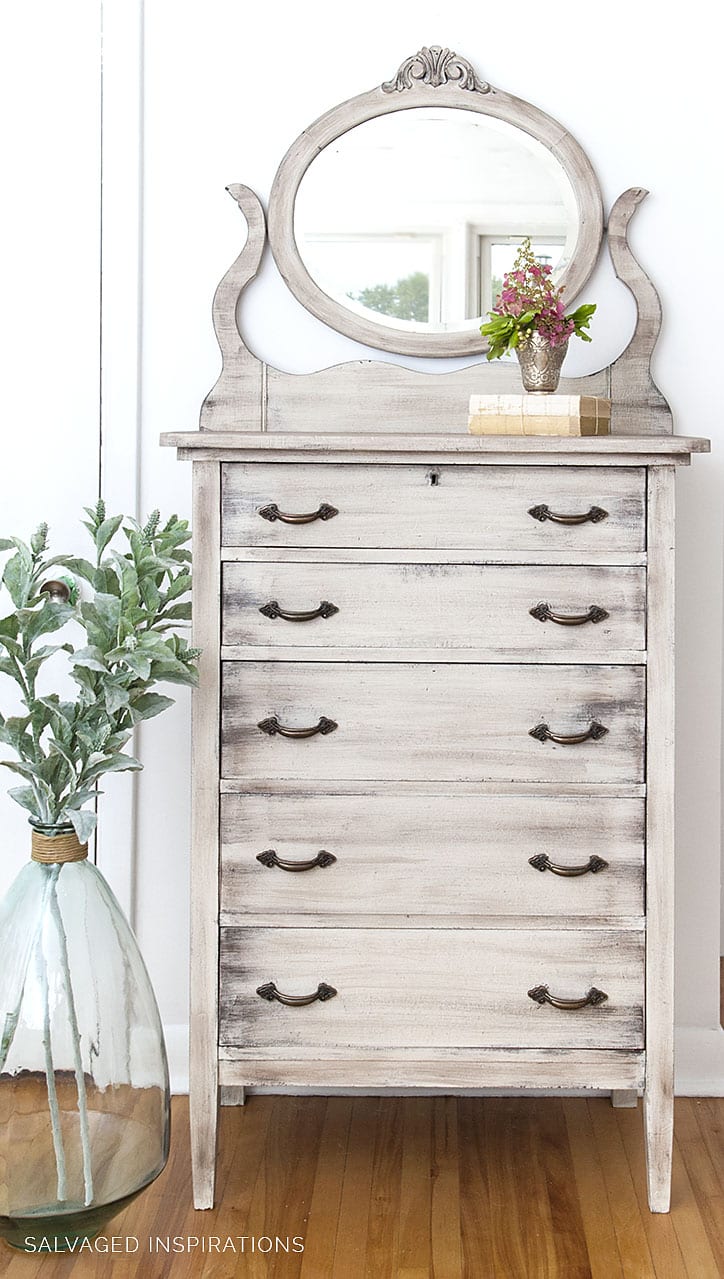
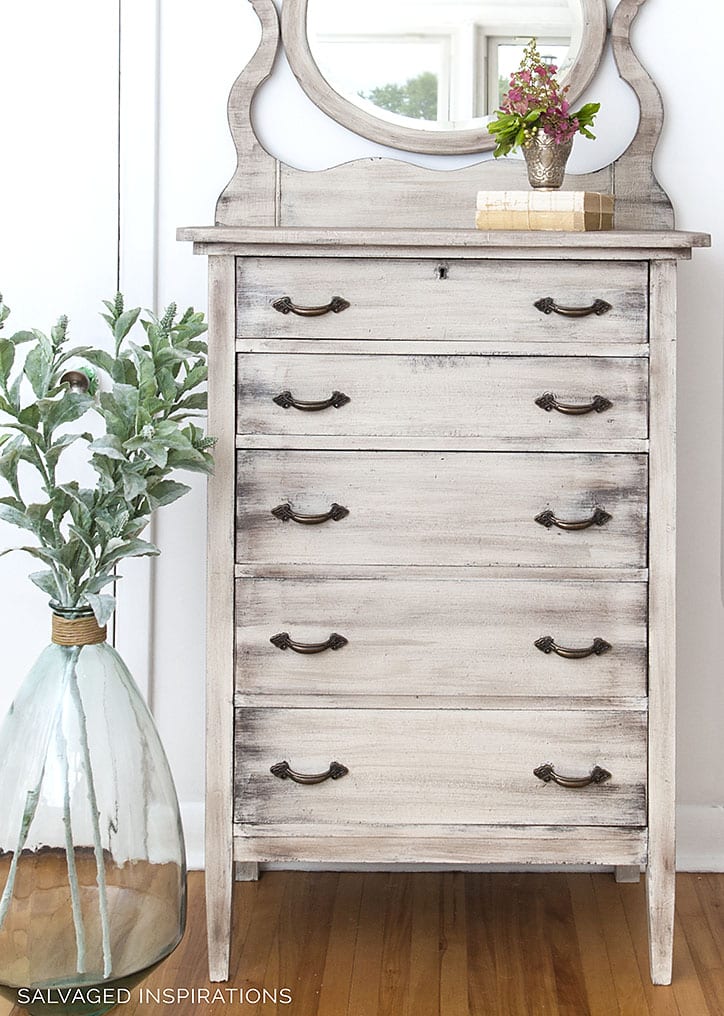
I really like the size and shape because it fits perfectly on this narrow wall in my bedroom. Now, with the walls painted white and the rest of the room getting a makeover, this dresser was looking a little dark and tired – so time for a change.
What do you think? It looks so much better now, doesn’t it? I’m loving this updated weathered look. Andrea and I saw an almost identical finish in Pier 1 and Homesense, so I’m happy I was able to replicate it. 🙂

 THIS POST CONTAINS AFFILIATE LINKS TO PRODUCTS USED. YOU CAN SEE MY FULL DISCLOSURE HERE.

 THIS POST CONTAINS AFFILIATE LINKS TO PRODUCTS USED. YOU CAN SEE MY FULL DISCLOSURE
 SOURCE LIST
- Antique Fumed Oak Dresser – SALVAGED!
- BOSS Clear Stain Block
- Drop Cloth Chalky Mineral Paint
- Sand Bar Chalky Mineral Paint
- Brown Wax
- 2 Paint Brushes (1 hard bristled brush for wax – cheap dollar store brushes work great)
HOW TO CREATE DIY WEATHERED WOOD::
- Clean the furniture
- Prime with a Clear Stain Blocker (I used 2 coats)
- Dry Brush a Base Coat of Drop Cloth adding heavier paint in areas
- Repeat the above paint method with Sandbar
- Lightly Brush on Brown Wax With a Hard Bristle Brush
- Do NOT Rub the wax in OR Sand
I started with cleaning the furniture and then brushed on 2 coats of BOSS Clear Stain Blocker. Clear stain blockers, whether you use straight shellac or any other brand on the market, are perfect when you need to stop staining – yet want a fair amount of distressing or wood showing through.
To get the weathered wood look, it’s all about color and paint technique. The two colors should be within the same family, but one should be a few shades darker than the other. Beiges, browns, creams, and greys are all great for this weathered wood look.
For the first coat, use Drop Cloth. I dry brushed it on (leaving a fair amount of wood showing through) and then built up some areas until the paint was fully covering the wood.
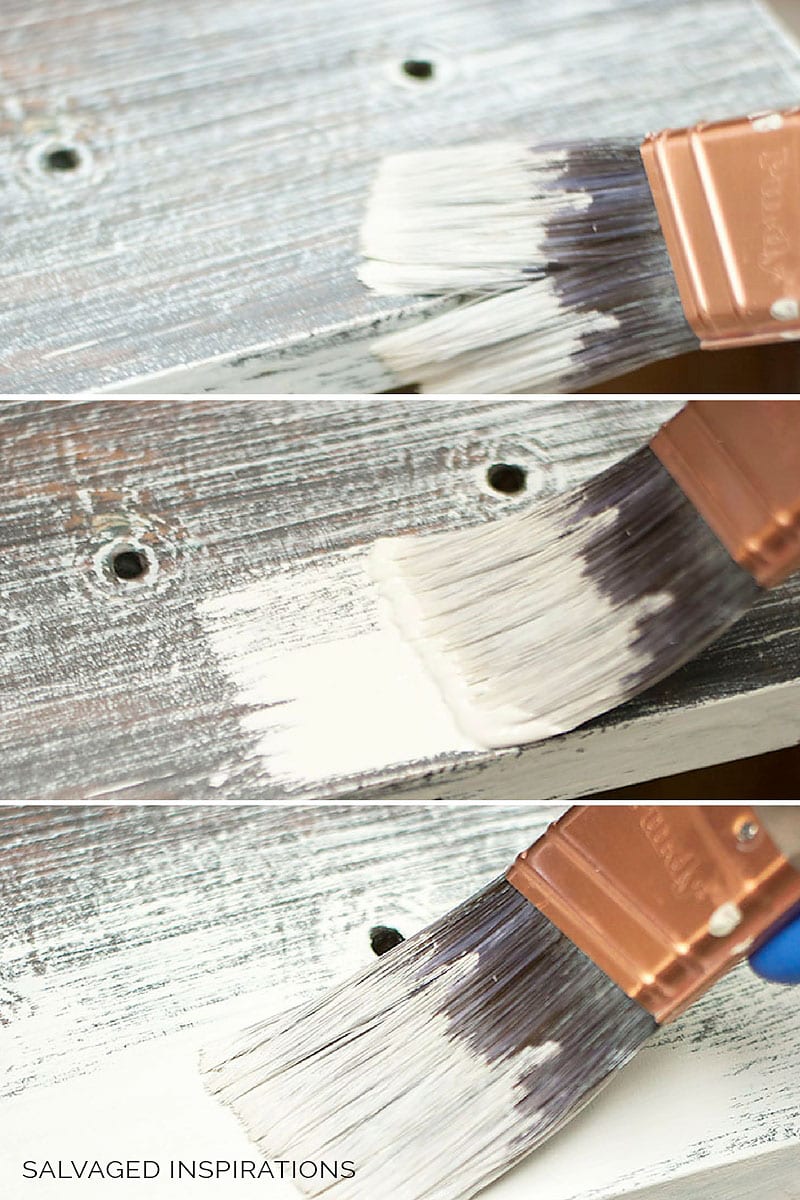
I repeated the above paint technique with Sand Bar. The nice part with this weathered wood paint technique is NO sanding is required. I painted this piece right in my bedroom because there’s no dust. The more texture there is, the more authentic the finish!
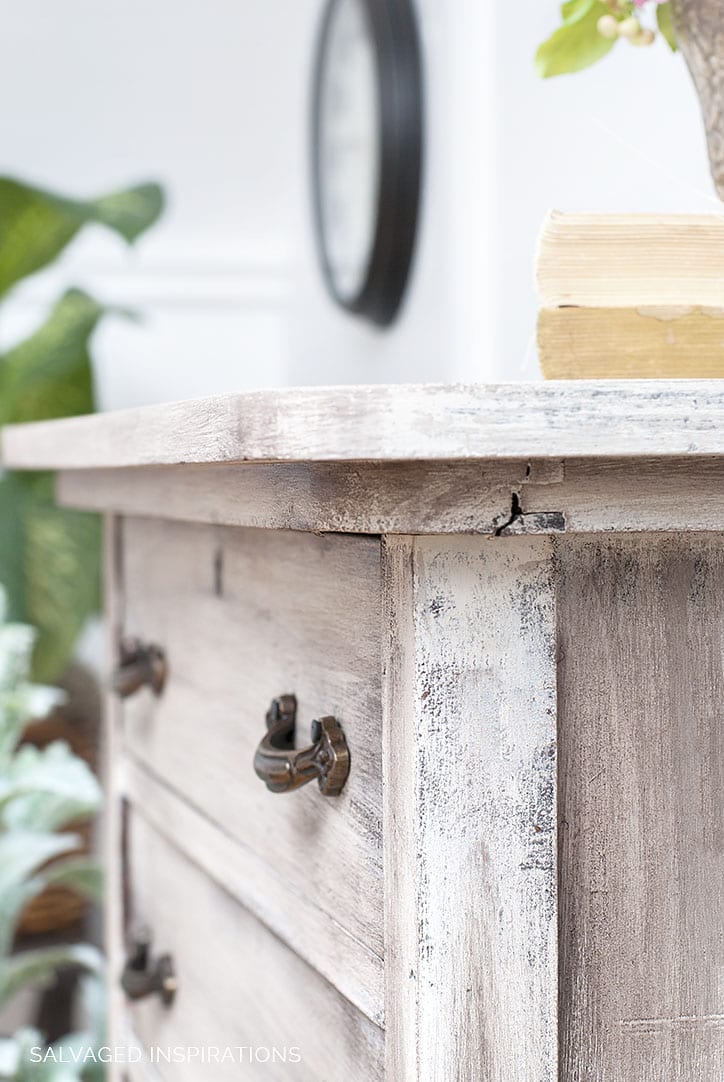
After the paint dried, I brushed on Brown Wax with a stiff bristled brush and a very light hand. I used long steady strokes going from one end of a drawer to the other. Then the same for the top, sides etc.
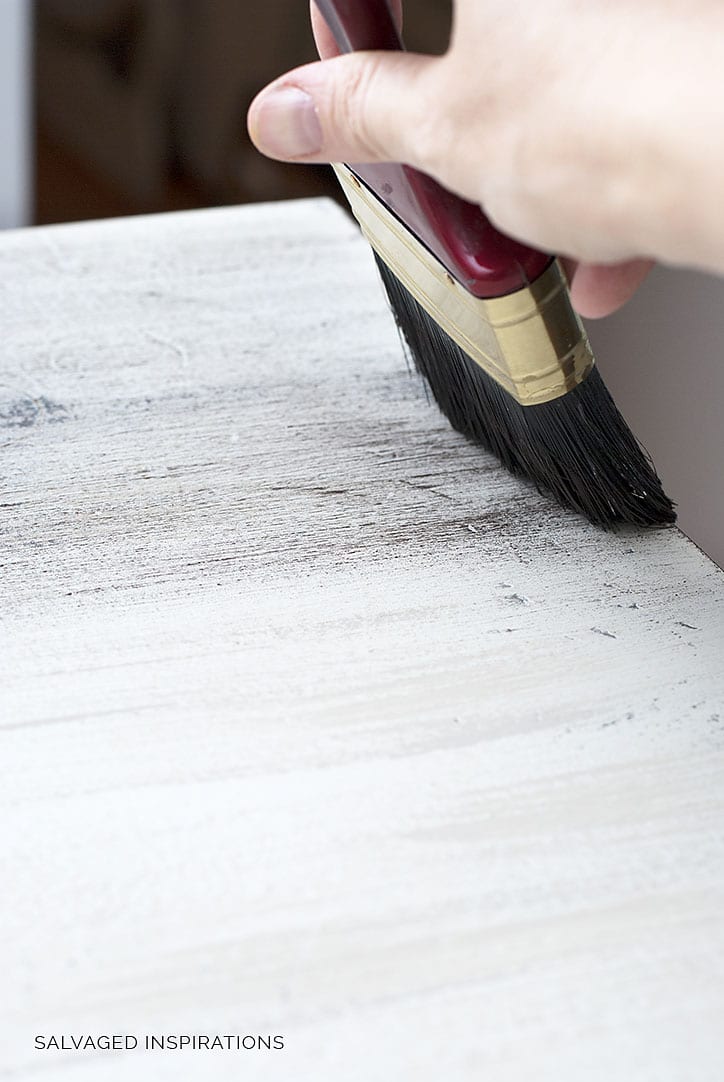
The brushed-on dark wax is the icing on the cake. Once it’s brushed on, it creates wonderful texture and contrast. Just be sure NOT to rub the wax in. It takes a little longer to dry, but well worth it if you want this look.
Here’s a close-up look…


If you missed my past bedroom projects, you can see them here…
Annie Sloan’s French Linen 80’s Headboard
How To: Adding Wallpaper To Furniture
And now for the lucky winners! A BIG thank you to Dixie Belle Paints for sponsoring the giveaway and again, thanks to everyone who participated!
Maureen K.
Mariola I.
Sasha N.
Congratulations!!!
Please contact me within the next 48 hours to claim your Dixie Belle Prize Package. I can’t wait to hear what you think of BOSS and DB’s new chalky mineral colors. 🙂
I hope you like the weathered wood dresser makeover. Feel free to chime in if you have any questions or would just like to say ‘HI’. I always love hearing from you!
Denise x
![]()
LIKE WHAT YOU SEE? SUBSCRIBE TO SALVAGED INSPIRATIONS SO YOU’LL NEVER MISS A POST!
FOLLOW ALONG ON PINTEREST, GOOGLE+, AND FACEBOOK FOR MORE INSPIRATION!
PIN AND SHARE!

Hello, I just found this post and LOVE the dresser. Do you know what color combo you could use if you were using a chalk paint by Rustoleum? I can’t afford the Dixie Bell supplies.
Thank you!
Hi Meg! I just went and looked at the Rustoleum Color Chart and I would guess their Antique White and Cocoa would be the closest to the colors I used. You may have to cut the Cocoa with some of the Antique White… maybe 50/50 depending on how it looks. Then apply and nice dark wax and voila! Hope this helps. 🙂
Hi! It’s my first time painting a dresser and I LOVE the finished look you created. I’d like to paint my dresser in the gray scheme. I was thinking Manatee gray and Mason Dixon gray, but should I go with a gray wax or white to brush finish? I’d like it to be a lighter than a darker overall look. Should I start with the lighter Manatee grey as the base coat or would you suggest a white base and light grey second coat with a gray wax? Thank you!
Beautiful technique. Before you stiff brush the dark wax, do you clear wax the whole thing? If I understand correctly you do not bring the dark wax all the way to the middle of the drawers…so what is protecting the middle face of the drawers?
Thank you
Hi Jeannette! Yes, you can definitely clear wax the entire piece before applying dark wax. For this particular dresser, I didn’t. The paint I used doesn’t require a top coat and I really wanted the matte weathered wood look. 🙂
Hi! Just wondering if you need to let the paint dry in between the drop cloth amd sand bar coats?!?!
Hi Melissa! Ya, but when I dry brush, the paint dries SO fast, you’ll notice by the time you finish the drop cloth the sand bar can be applied. Have fun! 🙂
Hello! Just found you and love your projects!! I’ve been reading up on your painting laminate techniques. Can this technique be used on laminate furniture? Thanks in advance!
Hi Sarah…welcome! You can definitely use this weathered wood finish on laminate! The key would be to prep the surface properly so the paint and finish will adhere 100%. I share how to do that here and here. Have fun Sarah. 🙂
Iwould like to do this on a kitchen table. However I want a stronger protective final coat. Can I put something over top of the paint and wax? Poly finish?
Hi Darcie! I wrote an article about Wax Over Poly or Poly Over Wax here. Hope it helps. 🙂
Hi I just found your weathered wood technique and absolutely love. I have sever pieces that this would be perfect for. Would you give me a couple other color combs that would work for this technique. Thank you so much for all your tips and techniques. Jane
Hi
I’m not familiar with Dixie Paint and was wondering if it needs sealing afterwards? Or if I tried this technique with a chalk based paint would I just seal with clear wax or poly afterwards?
Thanks in advance
Jody
Hi there Jody! Yes, DB Paints should be top coated for ideal protection just like any other brand of chalk or mineral paint. When they are clay/mineral/chalk based, they tend to pick up dirt, oils etc. So yes, sealing with wax or poly is ideal. 🙂
On this piece you said not to rub the wax in. Do you eventually wipe it down when it is dry? How long did the wax take to dry?
THANK YOU!
SG
Hi Sheryl! It took a good 30 days for this wax to dry, and a little longer for the areas that were applied really heavy. I won’t be wiping down or rubbing the wax in because I want the weathered brush strokes as-is. Great question btw! 🙂
So was it 30 days before you could really use the dresser? And was it wet to the touch? We have three small children so wondering how realistic this is for us haha
I hear you. 😉 With this technique, depending on how dark you brush on the wax, some of it will/can rub off until it cures. So yes, light use is perfectly fine within the first 30 days but I wasn’t placing clothes on it, or rubbing up against it until it cured.
This is beautiful! I cannot wait to try this to my bed set and dresser. You said you did this right in your bedroom? Does this brand paint have a smell?
Hi Ann Marie! No smell… and I’m pretty sensitive to odors. 🙂
Hi Denise, Here I am again with a slight problem…I have painted the small cabinet (with the crack…Fixed)I want to glaze the cabinet. But I have put a coat of poly over the paint (what was I thinking?) and now I don’t know if I can glaze over the poly. What do you suggest. Oregon Girl
Hi Kathy! No worries. You can definitely glaze over poly. In fact, many people prefer using a glaze over poly because it allows for more manipulation and glide of the glaze. 🙂
After you glaze over poly, do you need to poly again to keep the glaze? I love your blog, beautiful work!!!
Hi Jessica and thanks for the kindness. 🙂 Yes, most glazes DO recommend applying a top coat to protect the glaze effect.
Did you apply a poly or any kind of top coat after the wax finally dries?
Hi Donna! No, just the wax. 🙂
Which brown wax did you use?
Hi Cathi! I used this brown wax here. It worked really well for this ‘wax painting’ technique.
Hi Denise. I noticed you ALWAYS respond back to the comments left for you. And you even updated your last post after a reader commented on the type of wood your dresser is made from. THANK YOU on behalf of all your SI readers!!!! You are very special and inspiring.
Awww, thanks Monique! 🙂 I know I’ve said this before, but it’s all of YOU that make this blogging thing fun, so THANK YOU!!!
Hi Denise really love your blog, can I please ask a question, I have been looking at your no. 1 choice chalk recipe and wandered ,when you say 2 parts latex paint, what is it please,I’m just a bit confused as to what you use. Hope you understand my question,thank you in advance
Natalie x
Hi Natalie, thanks so much! Glad you’re enjoying the SI Blog. 🙂 2:1 or 2 parts to 1 part = 2 cups paint to 1 cup CC or can be adjusted to whatever you’re using to measure. Eg, 2 pints of paint to 1 pint of CC would also be a 2:1 ratio. Just make sure you use the same measuring tool for both the paint and the chalking ingredient. Hope this helps. 🙂
Hi Denise! I really enjoy your blog! Question, I just ordered the exact DIxie Bell products mentioned in the post, I am wanting the same look for this changing table. My question is do you think this process will work? I was trying to post a picture of the changing table but it would not allow me. Right now it is currently white.
Hi Shannon! The process works! 🙂 The only thing I might suggest is once the wax has totally dried, you might want to put an additional topcoat on like Gator Hide (water-resistant) or their satin or flat clear coat. This will add an extra layer of protection when using it as a changing table. 🙂 oh, and I forgot to mention DB’s topcoats CAN be applied over their wax… they’ve made them interchangeable which is unheard of with other brands!
Thank you so much Denise for responding!!! I’ve already started and so far so good!! Only thing is I think I may have painted and covered with the drop cloth and sand bar too well 😳 I’ve not started the wax yet would it be ok if I lightly sanded with 220 grit before wax?
I’m so happy it’s going well for you and for sure, you can give it a super light once over 220 or even 320 finishing sandpaper before waxing. 🙂
I love the weathered wood finish, especially on antique pieces. Your dresser looks amazing with a whitewash. Denise, I always love how you style your pieces too – so pretty! Pinned
I’m really liking this weathered wood finish too. It adds a lot of interest and really lightens it up, doesn’t it? Makes me want to try it on a few more dark and not-so-perfect pieces I have in my inventory. Thanks for sharing Marie.. and can’t wait to see what you’re going to create next! Love your Rustic Trunk Table. 🙂
Gorgeous work! You transformed a blah chest into a stunning piece! Love that you used Dixie Belle. It’s my favorite
Hi Pam! 🙂 Yeah, DB is really nice to work with and I’m loving their other product too. Glad you like the new ‘weathered look’! 🙂
Love Dixie Belle products and this technique you did on this beautiful old dresser!
Thank you Karen. 🙂
Beautiful job! I love the 2 colors blended together.
Thanks! And yeah, I’m really happy with how the Drop Cloth and Sand Bar worked perfectly together. 🙂
Just love this piece! Turned out so pretty….you are a true artist!
Thanks Teri.x This piece was a lot of fun. 🙂
Hi Denise! This looks gorgeous! I do have one question, I have a veneer desk (circa 1930s) I was wanting to try this on. I do have to use some bond on a couple areas (small areas) but I was wondering, would the rules still apply, since it’s veneer? I did learn how to use bond from your other project (thanks for that, too) I’m new to restoring.
Hi Victoria! This weathered wood technique will work beautifully on veneer for sure. The only thing I would suggest – where you’ve done the small repairs with the Bondo/wood fill, make sure those areas are painted opaque and feather out with a dry brush around them. This way it will look natural and you won’t even know where the repairs were done. It’s a fun paint technique so I hope you have some fun with it. 🙂
Thank you for the info! I’m so so so happy I fell upon your site! I’m forever a fan and follower!
I’m happy you found the SI Blog too Victoria…welcome! And hopefully, we’ll chat again. I’d love to hear how your desk turns out. 🙂
This is awesome Denise!! Just what I need to do with a small bathroom cabinet. I wasn’t familiar with Dixie Belle but their product line looks unbelievable and so incredibly reasonable price wise. Thank you for sharing all the wonderful work that you do. I want to live your life 🙂
Your comment just put a smile on my face Rene. I’m glad it has inspired an idea for your bathroom cabinet! And yes, DB paints are lovely to work with and very reasonably priced. If you decide to give them a try, I’d love to hear what you think. 🙂
Hi Denise, ALWAYS LOVE your special tips. I flag all your projects knowing I will refer to them when copying your projects. I think you are phenomenal!!!
Oregon Girl
Awww, thanks Kathy! I hope the tips come in handy for you. xo
Hi Denise,
I have a mid 1990’s dark wood bedroom set that has some kind of poly finish. Th set isn’t particularly high quality. I was wondering if I can apply the BOSS clear stain block right on the finish or do I need to sand? It looks like your oak dresser had a finish too and was not unfinished? I’d like to attempt your technique! Thank you.
Piper B
Hi Piper! The surface prep instructions on BOSS is “…surface must be clean and free of dust, wax, and substances…. for glossy surfaces, scuffing and sanding for maximum adhesion is recommended.” My dresser did have a finish but it wasn’t glossy. So, I just applied 2 coats and it adhered beautifully. Hope this helps. 🙂
Gorgeous, Denise! Striking look, well worth the effort! Good that you could achieve this without moving it, sanding, etc. Great tip on the heavy wax, always looking to learn!
Hi Marg.. thanks so much! And yeah, it was great not having to move it down two flights of stairs! The only thing about working in my bedroom was my dog was crazy glued to my side the entire time. She found my painting very interesting. I don’t let Gidget down in my studio (dust, dirt, chemicals etc) and now I can add one more reason. 😉
Hi Denise. I love the weathered wood look. I too have seen this technique on furniture at my local HomeSense and LOVE LOVE LOVE it!!! I’ve always wondered how it was done. Thanks for the tips.
Hi Monique! 🙂 Pleasure, it’s a really easy paint technique and great for those ‘not in perfect condition’ pieces. Hope you have a great day my friend. xo