Some of the pieces I salvage have “real-character”. Old furniture with great shape and detail, history and charm. Others pieces, well… not so much. For me, it’s always a fun challenge to transform a ‘nothing-special’ plain looking piece into something noteworthy.
This plain old desk I decoupaged with napkins is a perfect example. This desk has been restyled from seen-better-days to a ‘French Country Charmer’ – and it’s aaaah-dorable! I’ve included more close-up after pics after the how-to’s! {smile}

The story on this piece:
A few weeks ago I tried to decoupage a dresser. I was inspired by Shausha at Sweet Pickin’s Furniture. Sausha created a video of decoupaging furniture with floral napkins. Seriously sweet and you can see the video here!
My first attempt with my napkin decoupage didn’t turn out well. Disastrous really. After numerous tries, I ended up using tissue paper.
You can see my failed attempts here.
So, when I saw these gorgeous floral-bird napkins at The Painted Bench the other day, I was inspired to give this decoupage technique another go.

I started by painting the perimeter of the drawers with Old Fashioned Milk Paint in Snow White, I filled in the hardware holes and completely sanded the drawers down. The Mod Podge was watered down about 15-20%, and then working with one drawer at a time, I applied a good layer to the exposed bare wood.
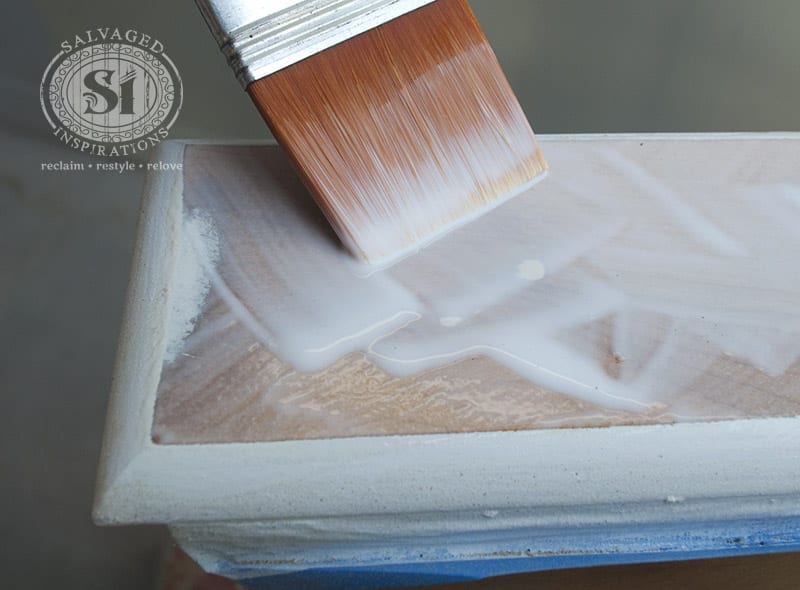
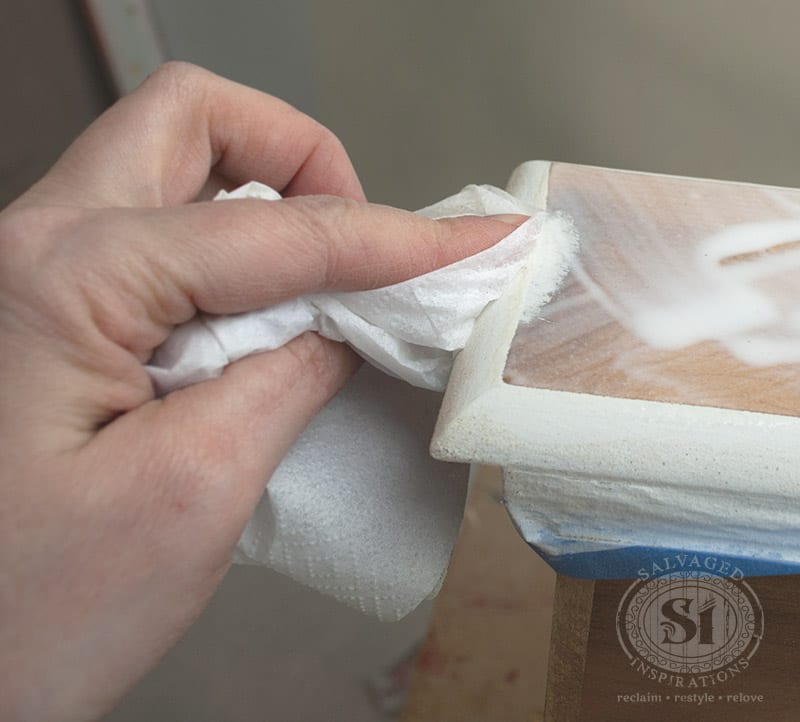
To make sure my napkin design didn’t cover any part of the drawer I had painted, I wiped any excess Mod Podge off the sides.
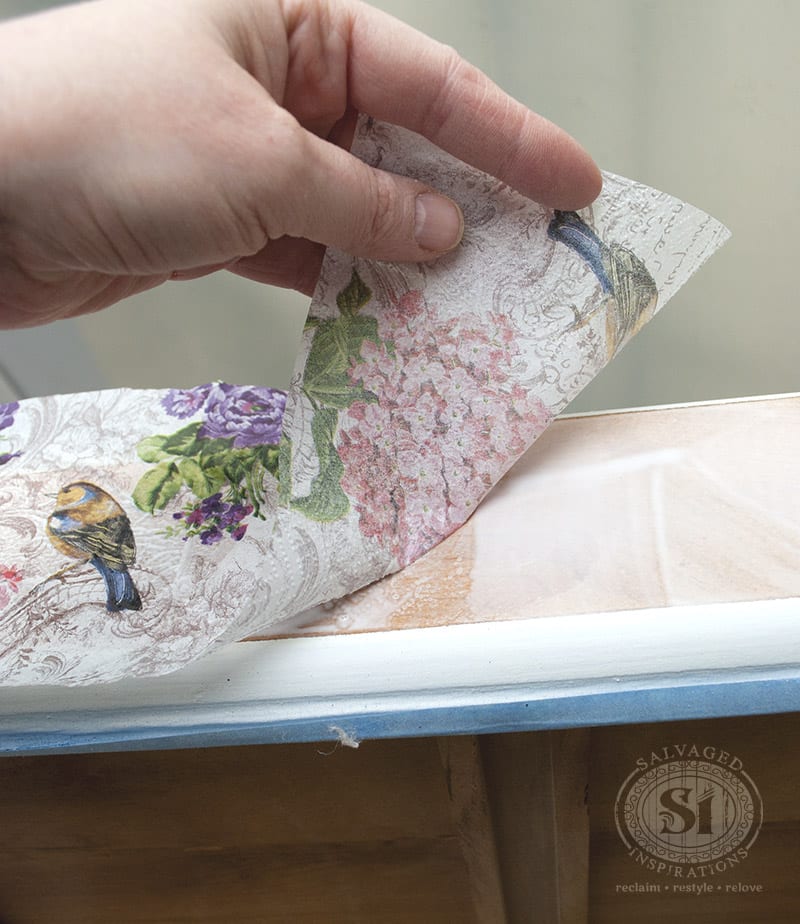
With the glue still wet (the water really helps to extend work time!), I applied 1 ply of the tissue paper on to the front of the drawer.
Here are 3 tips I’d like to share with you from my ‘near’ mistakes:
1. The key to getting this napkin decoupage technique to blend in with the wood or painted surface below is to use ONLY 1 PLY! When I was removing the top-ply of the tissue (the top-ply or sheet is the only one with the design on it) I was under the impression these were 2 ply napkins. Wrong… they were 3 ply. Luckily I noticed before I started decoupaging them on and removed the extra ply of napkin.
2. Apply your napkin motif/design right side up! This probably sounds like a silly I’d-never-make-that-mistake …right? But when I was working with all the drawers facing all different directions… well, you get the picture. Thankfully I noticed I was applying my design upside down and removed the napkin and reapplied before it had a chance to dry.
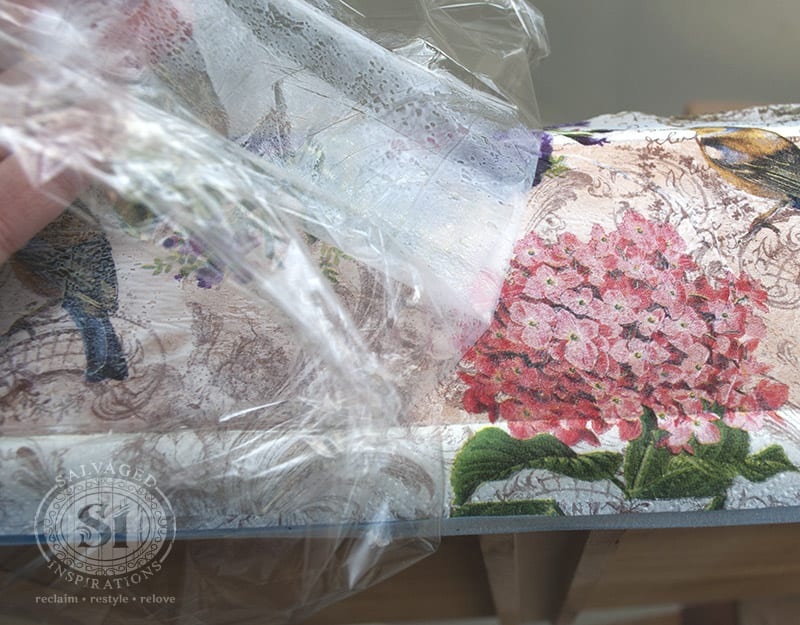
3. Try adhering and smoothing the freshly applied napkin with plastic wrap. Another little snag I ran into was pressing the thin delicate napkin into the Mod Podge to adhere. When I tried pressing the napkin on and smoothing it out with my hand; it kept tearing.
A little bit of tearing isn’t really a big deal if you’re going to sand it down for a distressed look, but it was really tearing. My solution was to put a piece of plastic wrap on the freshly applied napkin and then smooth it out with my hand. This worked GREAT. Easy sliding so it’s effortless to press down and smooth out.
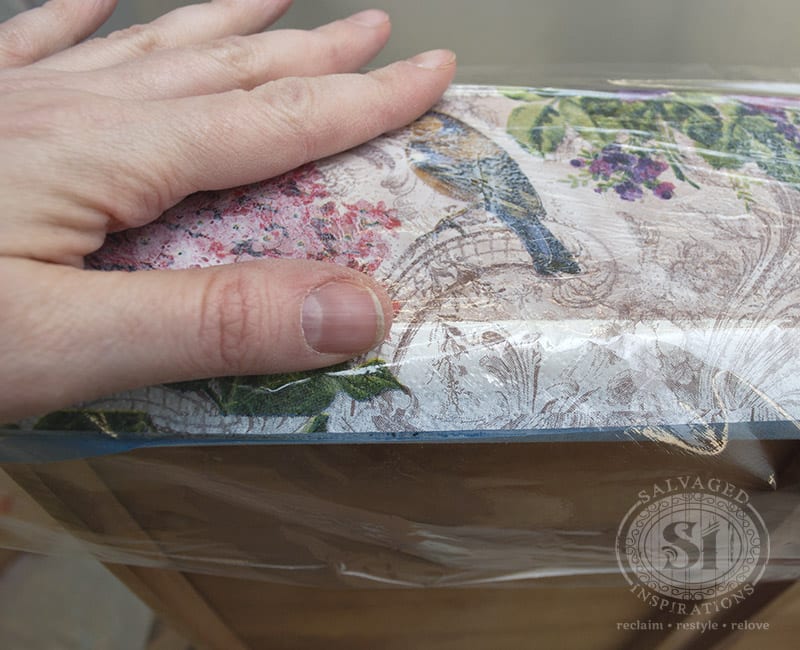
And as an added bonus, I didn’t need to apply any more Mod Podge![]() on the top of the napkin. The adhesive soaked right through as you can see on the plastic wrap below. And …no messy hands!
on the top of the napkin. The adhesive soaked right through as you can see on the plastic wrap below. And …no messy hands!
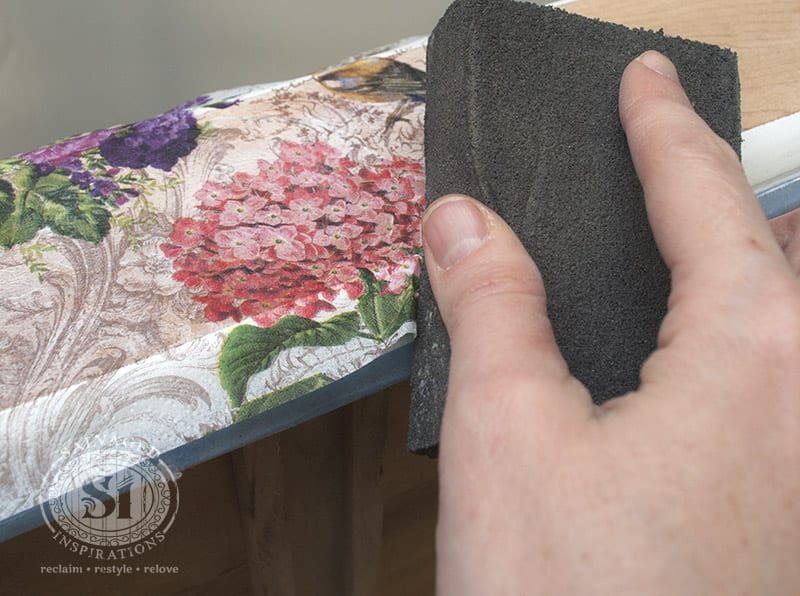
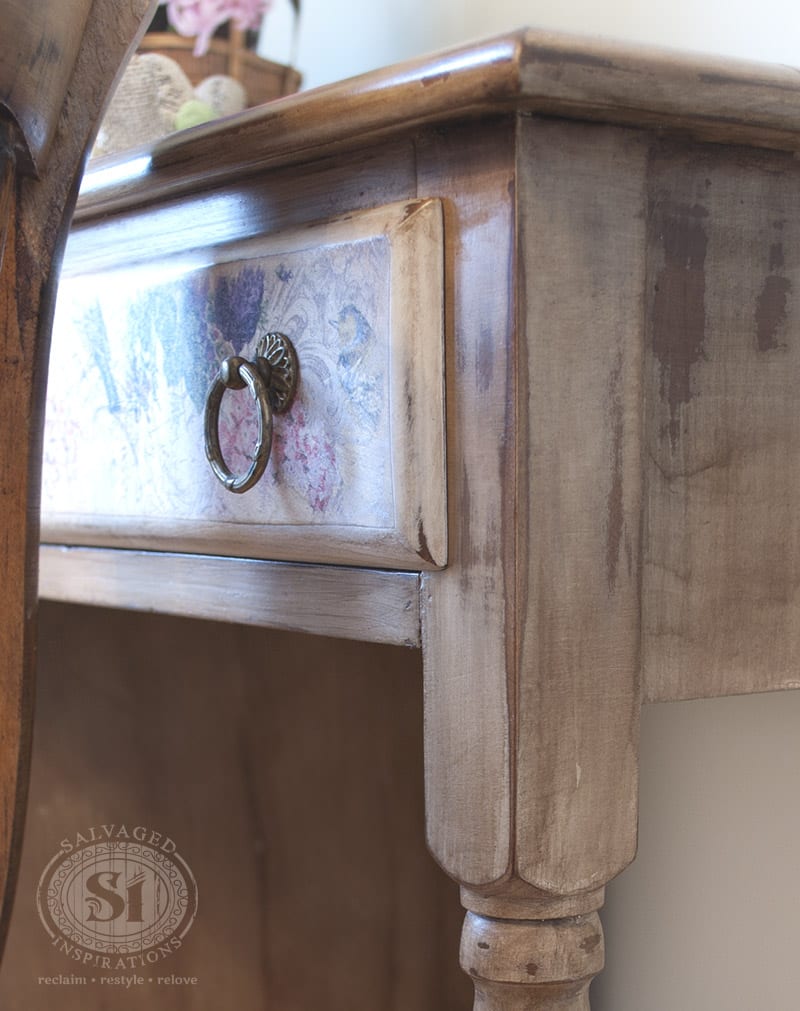
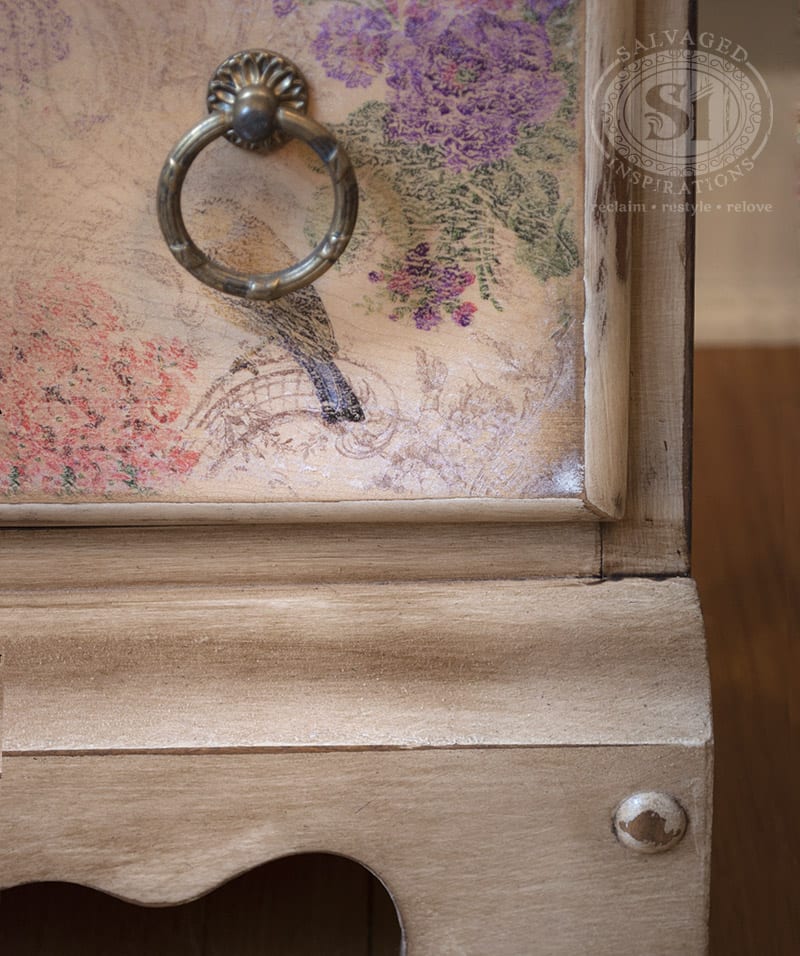
Once the napkin was adhered and fully dry, I used a sand sponge to remove the excess hanging off the drawers. Then to distress and allow the wood to show through in areas, I used my DeWalt sander with a 220 grit sand paper to lightly sand down the entire drawer front.
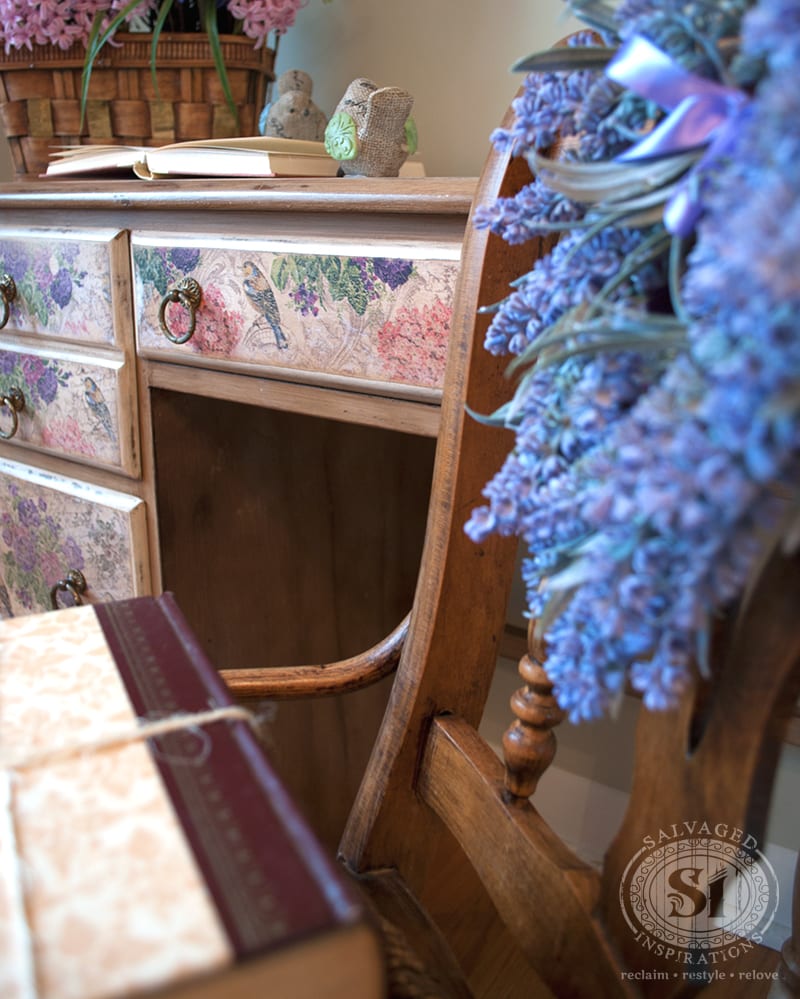
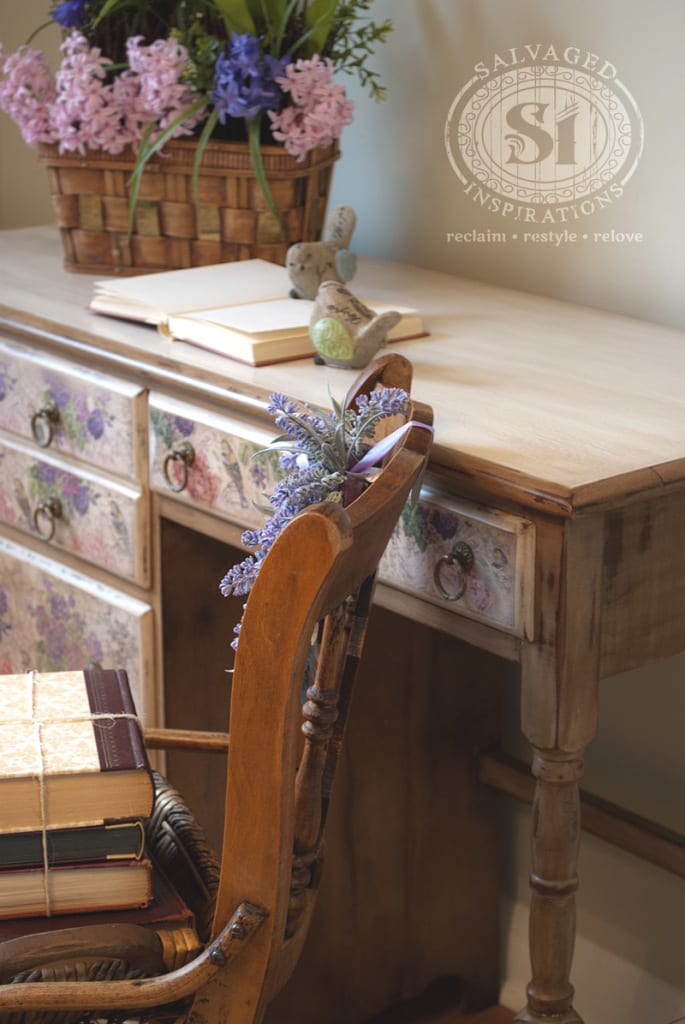
And here’s the finished makeover.
The body of this desk was painted with Old Fashioned Milk Paint in Snow White. To get a warm antique look, I glazed with multiple layers of General Finishes Van Dyke Brown Glaze Effects cut with Behrs Faux Finish Glaze to extend my working time. The entire piece, including the decoupaged drawers, were clear waxed with Minwax Furniture Paste for a beautiful sheen.
I truly love the way this French Country Desk all came together.


I love salvaging furniture. I love taking an old piece that has seen better days and restyling it into something beautiful and useful. And when that revamped furniture finds a new home – seriously gratifying. {huge smile}
If you have any questions about decoupaging, feel free to ask in the comment section below! And please chime in with YOUR decoupage experience! Have you tried using napkins? If not napkins, what have you used? As always, I’d love hear from you!
Enjoy your day and have fun with your next project!
Denise x
_____________________________
Like what you see? Subscribe to Salvaged Inspirations so you’ll never miss a post!
Follow along on Pinterest, Google+, and Facebook for more inspiration!


I can’t believe I’ve never seen this makeover. I have to remind myself you’re an OG blogger. It’s so pretty. The napkins remind me of my grandmother. I don’t know why but they do. She loved florals. Definitely will be adding this technique to my to do list. Great tip using the plastic wrap. Smart! Pinned! 🙂 😘
We are BOTH OG’s my friend!😆😆😆 I’ve been following you for so many years it always surprises me when I come across one of your makeovers I haven’t seen… and it’s always an AWESOME surprise! So happy this one brough back nice memories for you.💙 Thanks for the PIN! XOXO
This one is new to me as well . This piece turned out Beautifully !!
Such a romantic look for a writing corner. Inspiring – for both the end user, and for us process people.
I Love the glaze effect on the desk body !! Such a great warm neutral color.
I was hoping to try some decoupaging on wooden eggs…. but a plumbing leak fiasco derailed my time.
Have you done decoupage on round pieces ? Does the napkin need to be cut in pieces, or can it be folded around the egg ? It’s hard to paint eggs too. Wish I had a technique to hold them.
I’ve followed your posts since after 2015, and look forward to each new post. And apparently the older ones !!
You Always inspire – and educate.
I’ve learned sooo much from you – and Christie too !
Please don’t ever stop. 🙂
ohhhh, plumbing leak fiasco will derail anyone – sorry to hear this P. I’ve done decoupage on eggs with cutouts. Decouapage will crinkle/crease when put on a round surface. It doesn’t make a difference (actually it ADDS to the look!) if you’re going for a distressed look. If you’re going to sand lightly or use a dark wax. If you’re going for the perfect image clean look, it would need to be stratigically cut and pieced together. As a side note, I learn a ton from Christie too. 😉
This one is new to me! It’s absolutely gorgeous! So soft and feminine. XOXO
So glad you like it Christy, thank you! I love going through the archives… it’s been so long, some of them ‘feel’ new to meeee! 😂
Hi Denise,
I would like to decoupage napkins on stainless steek tiffin..can I used 2 ply napkin to safe my time on applying acrylic paints .. .Tq
Where can I get the napkins I wanna order the napkins.pls
Hi Irene! You can find some gorgeous decorative napkins here or I also like to keep my eyes peeled when I visit gift shops or dollar stores. You never know what you can find. 🙂
Hi, when using napkins do they pattern match like wallpaper? my drawers are wider than any napkins
They do but you may have to cut them to pattern match.
When using napkins they have a embossed edge pattern, does this not show up or affect the look?
Hi Ali! It might. It depends on how embossed. Since you only use the top layer, sometimes the Modpodge or adhesive will easily flatten it out.
Love your work ! I am working on a chest that I did with black chalk paint. I have some MK flowermarket napkins that I want to put on the top of chest. What would be a good finish to put on top of napkins .to protect . Also I want to keep the colors bright as they are. I have used the same MK napkins before with luck but they darkened. I put a poly finish on top. Maybe my mistake. Thank You for any help you can give me. Blessings
Do you have to sand down
Hello from Adelaide in South Australia….Thankyou so much for the inspiration , doing many projects during this covid-19 lock down , I Love what you do XX
Hi Janine and WELCOME! Thank YOU and have fun with your projects. Stay safe. 🙂
Can I decoupage on a galvanized tray?
you sure can! 🙂
This is so cute! Thank you for sharing your tips!
Thanks Kim!! 🙂
Lovely work! I have a smallish wooden box I’d like to decoupage and have all on hand but the Modge Podge. Can I use regular white glue instead? Should I dilute it as you did for the MP? Thanks.
Thanks Cynthia! You sure can! Add 1/3 cup water to 1 cup glue and shake and/stir really well. It works like a charm. 🙂
Not just this, but ALL of your work is absolutely amazing! True talent.
Just an FYI for beginners…I started chalk painting my empty Great Value / Walmart coffee cans. They are sort of a heavy duty paperish type of product. Anyway, I followed the painting with decoupaged paper napkins from Tuesday Morning.. I’ve done 3 so far and practice has made (more) perfect. -:)
I’ve got an old half-finished chest in the garage waiting for something. You’ve now become my “isolation” inspiration. Stay safe.
Hi Susan! What a GREAT idea with the empty coffee cans! That’s salvaging at its best… I bet they look amazing. And you put a big smile on my face with “isolation inspiration”… I LOVE that! lol
Hi Susan, I just saw your reply from a year ago on SI and was wondering if you are in the Chicago suburbs. I recognized the GV brand of your coffee cans from Walmart, and the fact that you have a Tuesday Morning, to buy your napkins from, nearby. They have some of the most beautiful napkins to choose from, don’t they? I have used a paper tablecloth for larger projects, as well. At any rate, just wanted to say HELLO and happy DIYing!
can you use this technique on silver trays and such?love the look you got with napkins on desk
If your napkin is’nt long enough do you overlap with the next one or just butt them together.?
Hi Patty! You butt them together. If you overlap, once you decoupage it looks doubled up so the color/transparency won’t match.
Hi Denise
Your desk looks absolutely amazing! I’d love to know where you got the napkins from, they’re beautiful. I’ve been decoupaging in and off for a few years now. My fave project was my daughter’s drawers I did with a really nice french fabric. I’ve got a coffee table and two side tables I’m in the process of revamping now and I’m definitely wanting to try using napkins, just have to find the right ones.
Michelle
Hi Michelle! Great projects you have on the go! I bought these napkins from The Painted Bench but I’ve also seen gorgeous ones at Hobby Lobby, Micheals, Marshalls, Pier 1, HomeSense and even the Dollar Store!
If you have a Tuesday Morning nearby, they have the most beautiful napkins to choose from. Prices are very reasonable and the selection at my local store is amazing! TJ Max is another good source. Happy hunting and DIYing!
Hi Karen! We don’t have Tuesday Morning stores here in Canada but I HAVE been to them when I cross border shop in the States so thanks!👍