Have you ever worked on a project that seemed to fight you every step of the way?
This 80’s dresser was one of ‘those’ pieces. Nothing about this restyle went smoothly, so I had to take a break every few days to get some perspective.
It took me what-felt-like FOREVER to finish it up!

Here are just a few of the things that went wrong. But don’t worry. This isn’t a gripe session or a negative-nelly post. There IS a happy ending, some good advice, and gorgeous after pics for you down below… so read on! I LOVE how this dresser all came together. But as you’ll see, it took a while to get there.
![]()
Take 1 ~ I posted the pic below on my Facebook Page because I wasn’t sure I liked Miss Mustard Seed’s (MMS) Boxwood Green. Then I realized it wasn’t the green I disliked, it was the painted top. The black was way too dark for such a large piece.
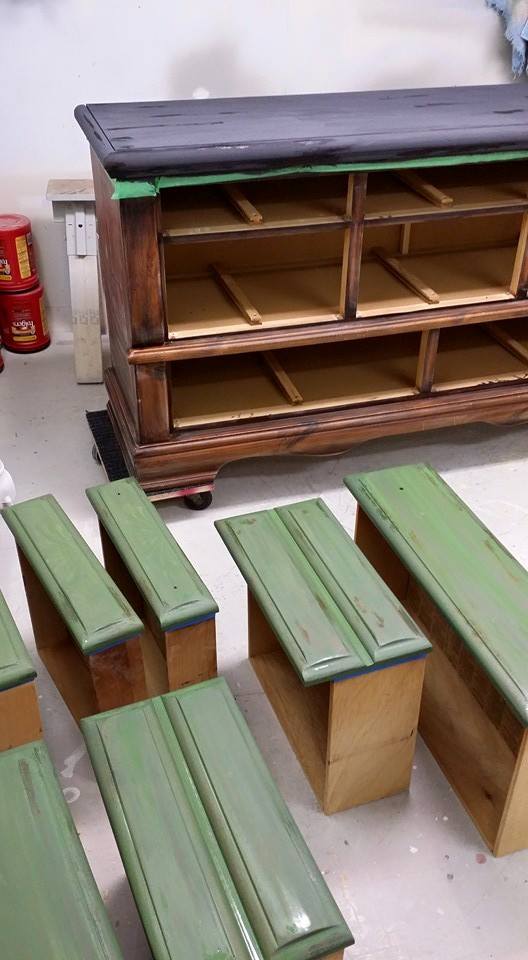
Take 2 ~ I repainted the frame of the top the same color as the dresser. Better. But not great. Still not doing it for me.

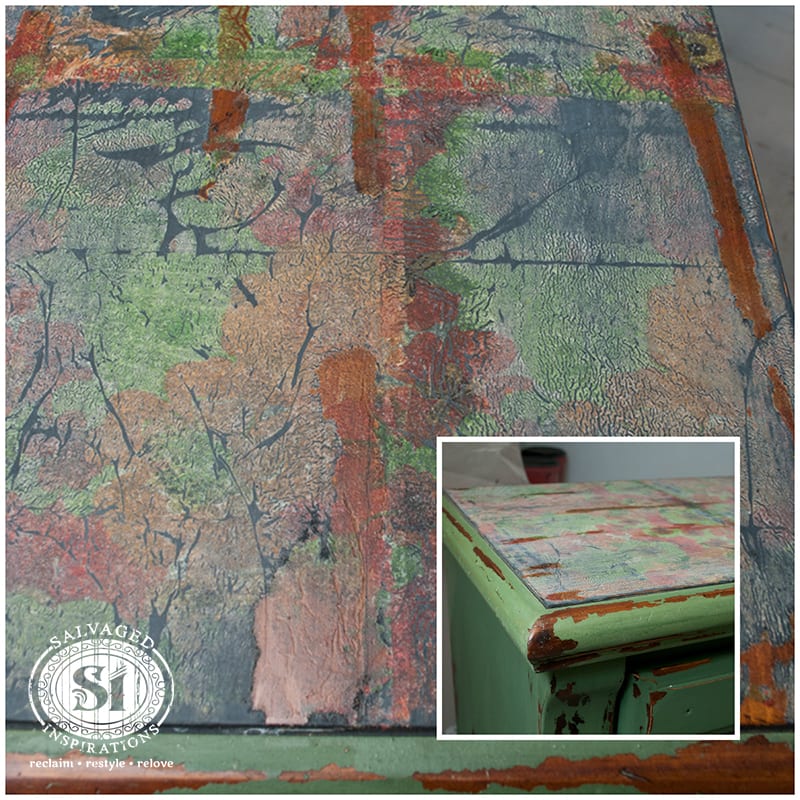
Take 3~ I thought the perfect solution would be to cover the black top by decoupaging it with a pretty floral. This idea and technique is amazing, but as you can see, it looked nasty! This floral was horrid over the black. I bet you can’t even tell it’s a floral…lol.
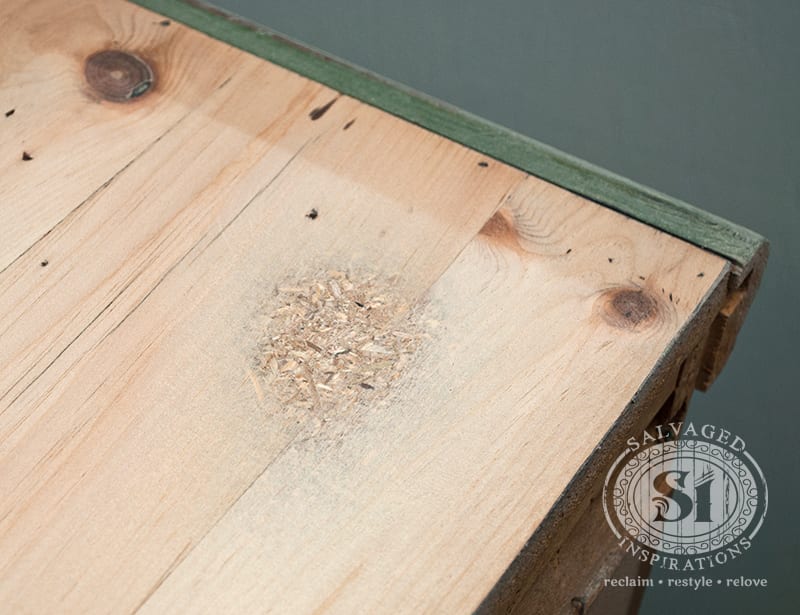
Take 4 ~ So I decided to sand everything off and stain the top. Brilliant right? Nope. Sanded right through the veneer… so that wasn’t going to happen.
My list of frustrations goes on but you get the point.
Finally… PERSISTENCE = SUCCESS!
Here’s how it all came together:
– Carved 80’s design on the top drawers and old hardware holes were filled in with Bondo.
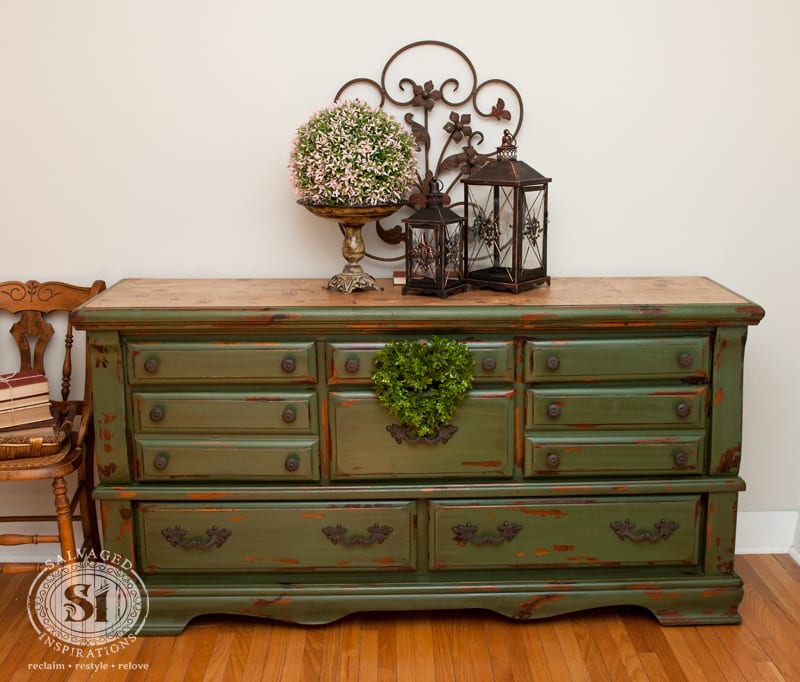
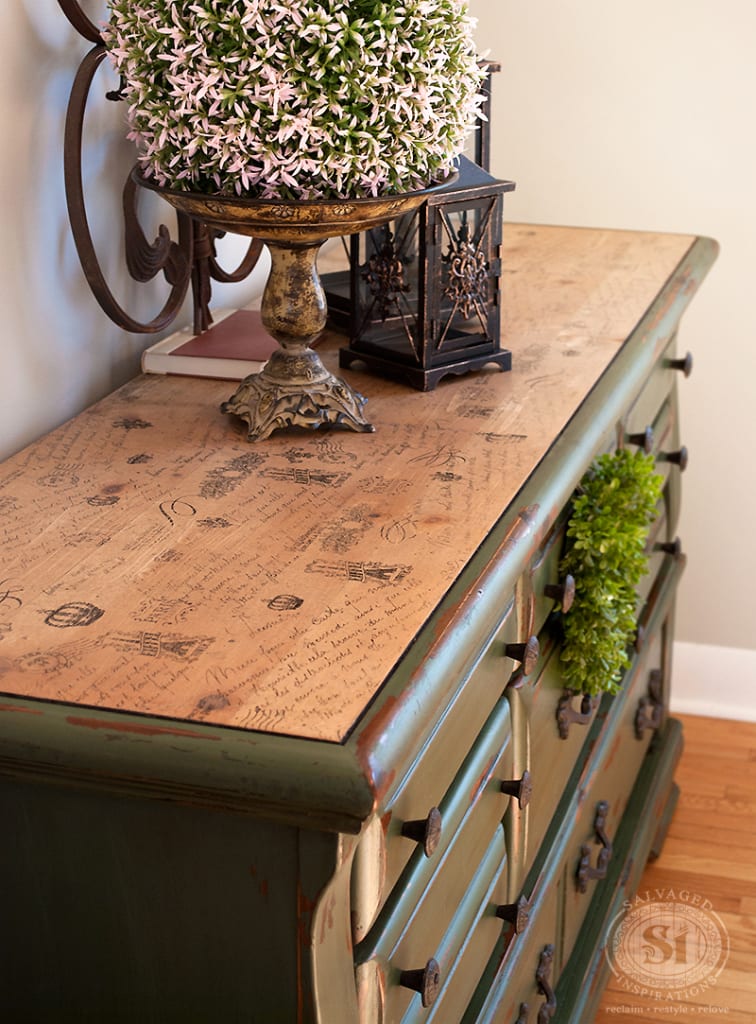
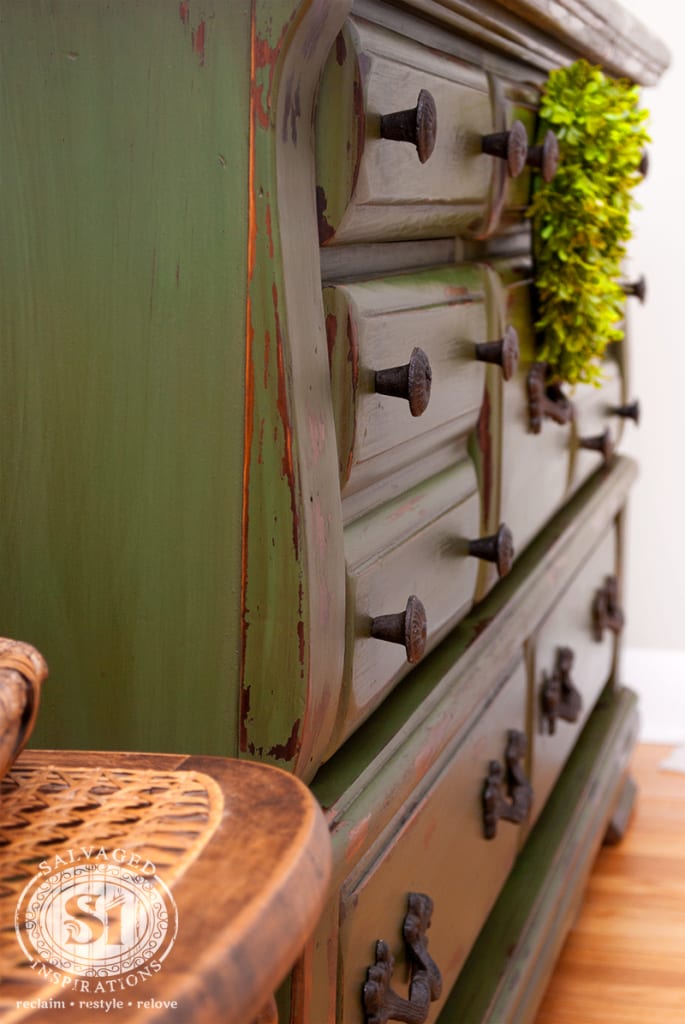
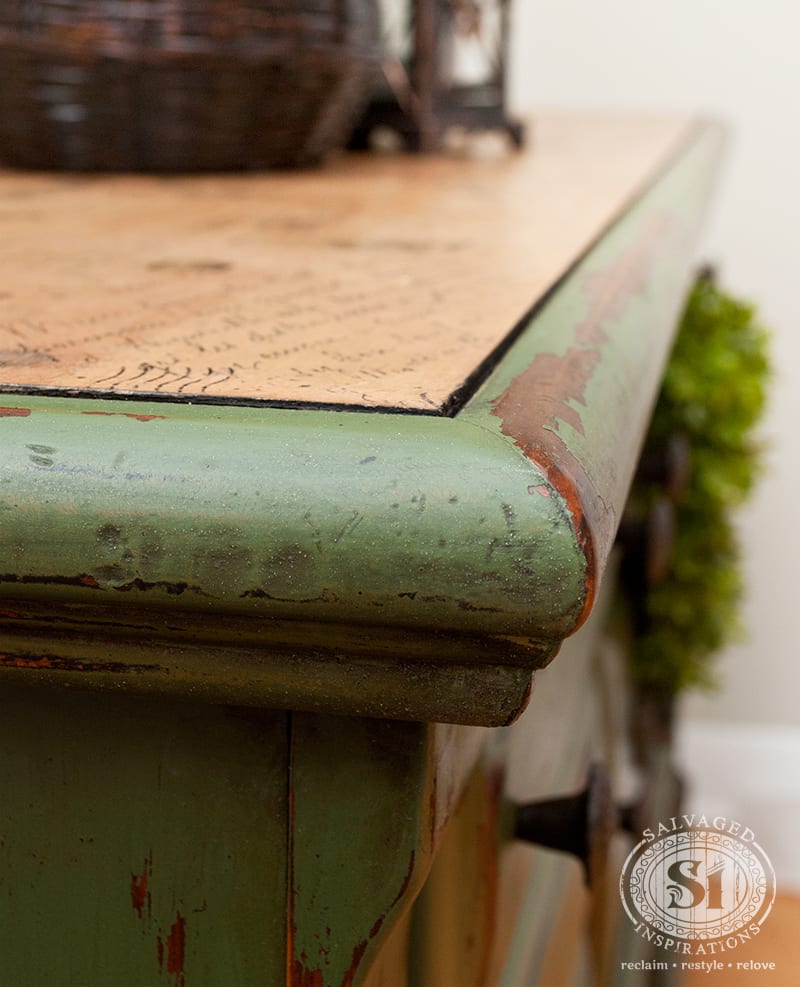
– Painted in MMS Boxwood using the Vaseline Distressing Technique. This shows the warm wood and created a ‘controlled’ chippy look.
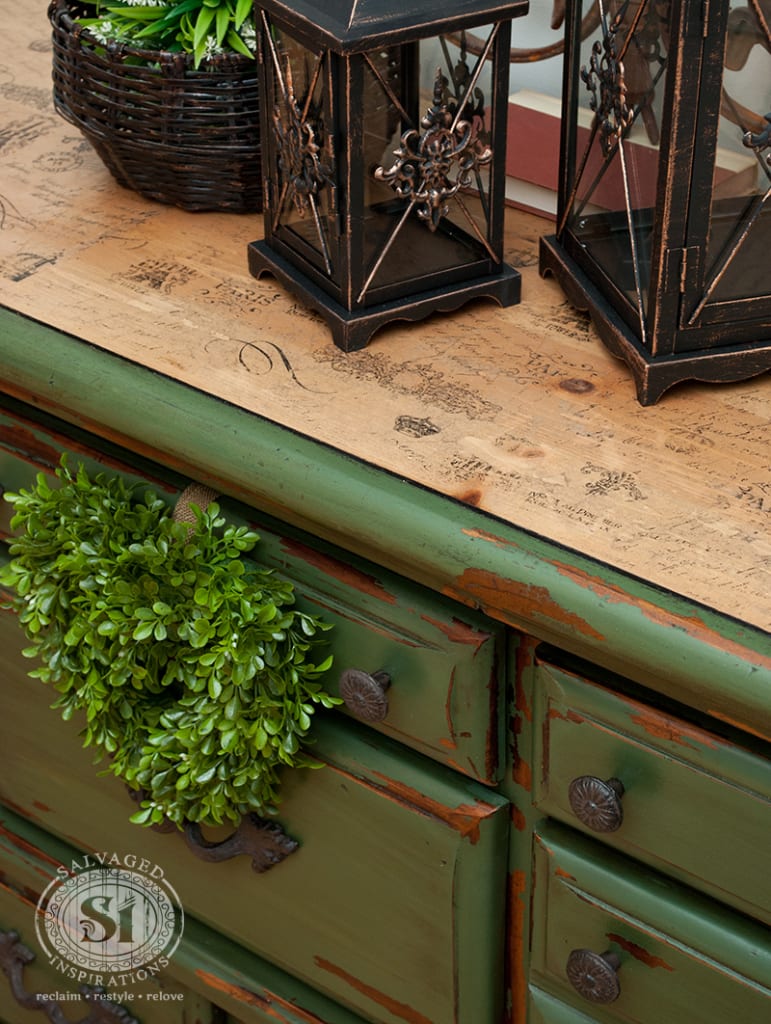
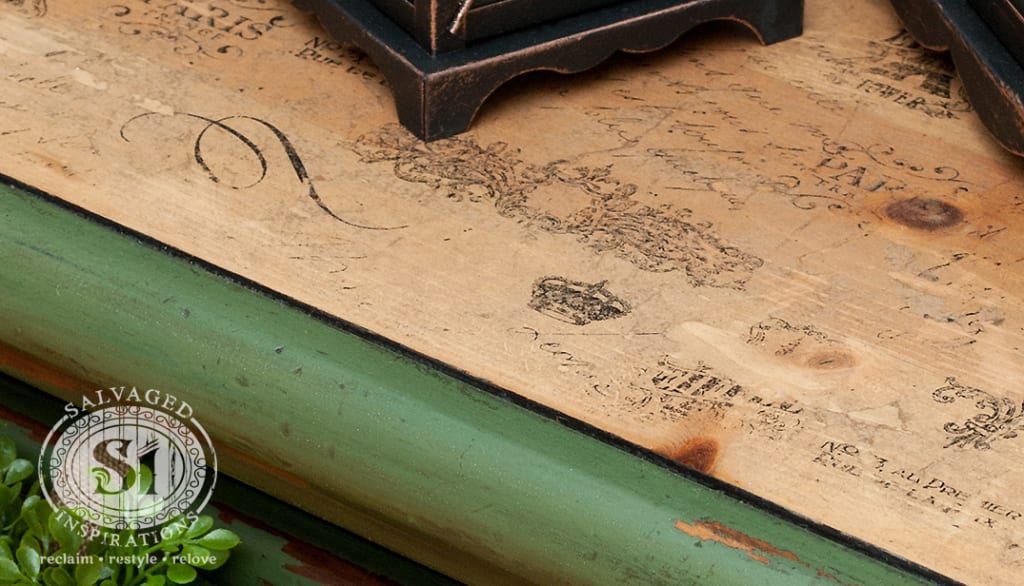
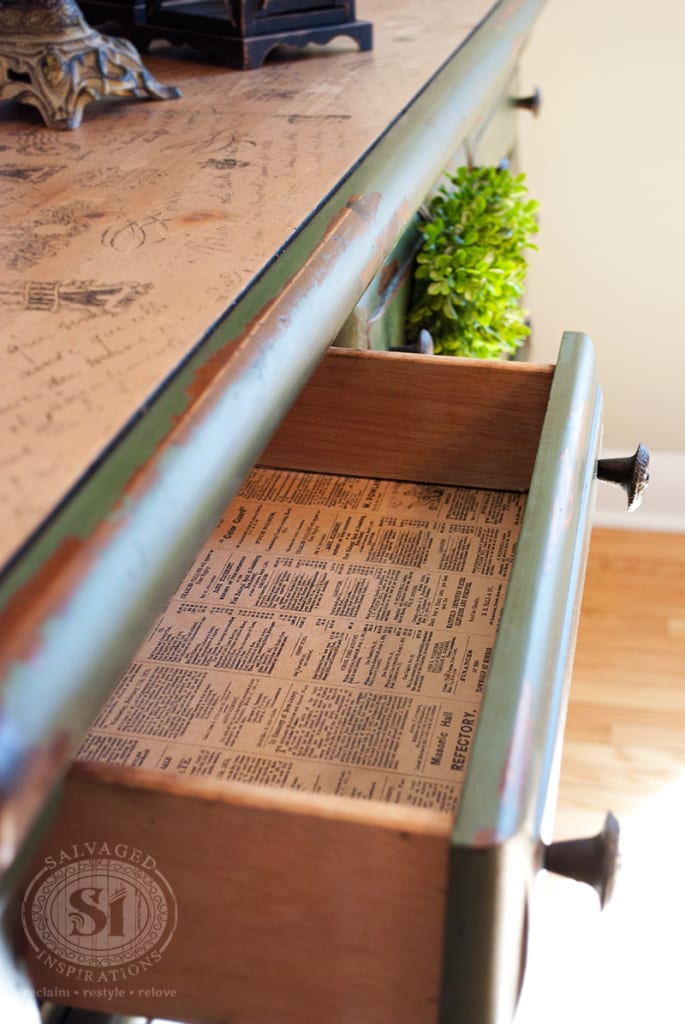
– Top sanded down and decoupaged with a French Design tissue paper from Michael’s. Then sanded and dark waxed. The top looks amazing with the real wood grain showing through!
– Entire dresser antiqued/aged with Minwax Dark Walnut Stain and a DIY Custom Dark Wax.
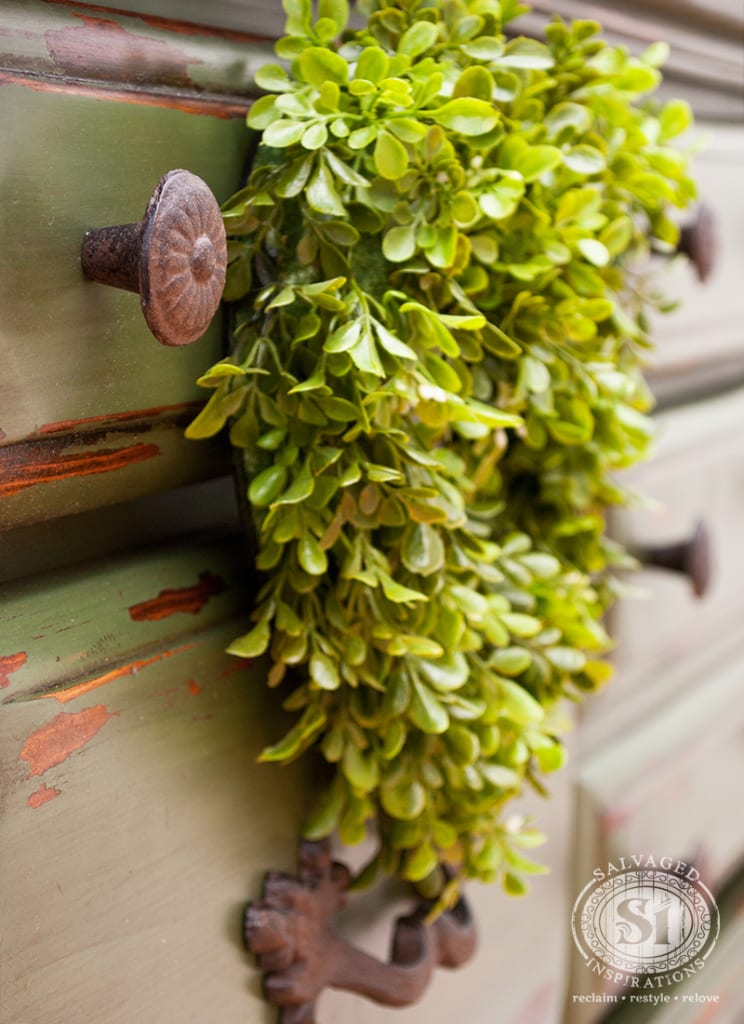
– New hardware.
All the work and challenges were well worth it. I LOVE this French Country Dresser!
So why am I sharing my ‘failed’ attempts with you?
Because judging from some of the emails I’ve received, many of you are under the impression that we ‘experienced’ furniture painters knock off a perfectly good looking piece the first time around.
Yes, it’s true that with experience, it gets easier to visualize what you want and work with different products and tools…BUT…a great looking piece doesn’t always happen on the first take!
I hope knowing this encourages you to to be creative. Follow your inspiration.
Don’t be afraid to start that piece you’ve been wanting to update. Try different techniques and products. And if you don’t get it right on the first try… THAT’S OK!
It’s not a failure…it’s a learning experience!
Feel free to chime in with your thoughts and let me know what you think of the dresser. And ohhh.. how’s my staging? I followed some of the good advice you all gave me so thanks for leaving your comments. You guys are the best! 🙂
Have an amazing day!
Denise x

OMG +!! That top is absolutely stunning!!!!!!!
Thanks Julie!
Hi Denise: The dresser is lovely.
It is so refreshing to hear and see someone admit their mistakes along the way. I’ve watched so many you-tube videos and the people make it sound so easy.
So thank you for your honesty.
Heather
Toronto, Ontario
Hey neighbour! (I’m in Burlington) 😃 Thanks so much. Enjoy your weekend.
For sharing
Love this… BTW what is the difference between chalk and milk paint? Seems like there ought to be a way to “DIY” and make these variations with regular indoor paint (to $ave)..
I’ve never tried diy milk paint but it’s easy enough to make your own DIY Chalky Paint with great results!
I just did a headboard in a milk paint very similar to the Boxwood Green you used. I love it! However, I topcoated it with Howard’s wax and the yellow tint turned my beautiful green to John Deere green. How would you recommend taking that back to the tone I preferred?
I thrifted a similar dresser from Broyhill. Do you remember if this dresser had stops? I took the drawers out and now that I put them back they just fall out? Same wood to metal single slide.
, Hi Denise, I love this dresser. . Would it work to do this on a laminate desk since it will get a lot of use on it’s top?
It sure would Sue. But if it’s a desk that gets a ton of use, I would personally use a dark glaze rather than the wax… and then a few coats of poly for protection.
Denise, this is a spectacular piece. I am trying the tissue paper decoupage for the first time, but I’m not getting the same results. I’ve stained the top in a lighter shade of walnut. When you said you sanded after the tissue decoupage, did you sand the entire top?
Hi Melanie, so glad you like it! Yes, I sanded the entire top down to raw wood, and once the decoupaged tissue adhered and was 100% dry, I took my palm sander with a high grit 220 and gave the finished decoupaged top a light sanding too – and then dark wax. This gave the top a vintage look.
Thanks Denise. I’m just going to confirm that the sanding with the 220 was after the tissue paper has the decoupage medium painted on top, correct? Did you paint one or two coats on top of the tissue?
That’s correct Melanie, I sanded with a palm sander using 220 grit after the tissue paper was decoupaged onto the top and 100% dry and hard. Two coats were used. 🙂
Sure wish I hadn’t given my 80’s dresser away now! Yours turned out so good!
Thanks Bette! 🙂
This was a great post! I enjoyed looking at the end results and reading up about your vaseline technique! My question is about using wax..I don’t want to purchase Annie Sloan so is there any other brands you recommend? MiniWax? if so, when you apply the wax, you slather it all over the piece and wipe away immediately? I am brand new to this so any insight is SUPER helpful!
Hi Natalie! I’ve used Minwax Furniture Paste many times! It works great! It does have a slight amber tint to it when used over white. Trewax is perfectly clear over whites. Here is how to turn wax buttery soft like Annie Sloan’s. Work in small areas. I prefer to wax on and wax off and then move onto the next area. Makes waxing much easier.
I was just curious. I am attempting to decoupage the drawer fronts of an old laminate dresser for my nursery. I chose some fabric to use and while the actual processs worked fine, the look of it, not so much. I’m guessing the dark wood was too much for the too thin fabric I picked out. My question is, would a second coat of the favric change anything and maybe allow the fabric to be less translucent (it’s white with a yellow pattern) or should I start over and choose a different heavier fabric?
Hmmm, I’ve never tried ‘double decoupaging’ anything so I’m not sure if it would work or not. My guess – starting over with a heavier fabric may give the cleaner/neater result though. If anyone reading this has ‘doubled up’, feel free to chime in.
This dresser is gorgeous! I love how you’ve done the top. I’m about to start my chalk paint project, you’ve given me the courage and recipe! I’m using the plaster of paris recipe on a 4-leg small round table that I hope to use as our breakfast table. At the moment it is turquoise blue! Will I be able to decoupage the top of my table after using chalk paint? I think you are just brilliant!!
Hi Sharon! Thanks for the kind words and yes, you can decoupage over chalk paint! Have fun with your breakfast table project. 🙂
Hi!
I have had a few of these “vexing” pieces that I have to walk away from for fear I’ll take a hammer to it out of frustration, lol! but I love that you do as well and are willing to share that here. Gives me hope:). This piece is so very pretty…
Odd question– did you make or purchase the small wheeled dollies under the ends of the dresser? I’ve never seen anything like them and would LOVE something like it. Wrestling big pieces is always a challenge for me. thanks so much!!
…lol…I leave my hammer in the other room Melissa ;). We made me these 18″x10″ dollies out of scrap wood, castor wheels and left over carpet specifically for the larger pieces of furniture I work on. They work great!
I love your final piece! Your persistence definitely paid off. I appreciate your willingness to share mistakes – I am currently in the process of refinishing an old coffee table and it has definitely been trying at times.
haha…sometimes the projects that give us the hardest are the ones that turn out the very best! Good luck x
I am so impressed with your work and even more impressed with the fact that you show your mess ups on here and share them! You are the first blog i have EVER been to (and Ive been to quite a few) that has done this. And I just want to thank you! And I also notice how you always write everyone back on here that comments! I will be following your blog from now on and will be sure to tell everyone i know to follow also! I havent gotten a chance to go through all your posts so i apologize if you have covered this… But do you have any experience using furniture appliques or onlays? I am very curious about using them and even more so that it would seem that they can be made from silicone molds and plaster of paris! If you have, I would love to see a tutorial! Thank you for being human and sharing all your information as well as mistakes!
Thanks Leigh-Anne… and welcome! 🙂 I’ve never made my own appliques (but I have seen some online diy recipes/tuts and it doesn’t look that difficult) but I do buy them and use them on occasion. They’re super easy to put on and it can really add to a piece. Here’s one I did on a French Provincial Dresser.
This is the most amazing makeover I have ever seen! Kudos! I follow a lot of boards and sites for furniture makeovers and have completed a few of my own that I am extremely proud of, but this one is hands down my absolute favorite. Genius!
That’s a HUGE compliment Melinda… thanks so much! x
I totally agree with you, failures are learning experiences, thanks for sharing yours! I love love love your final makeover on this piece. Its stunning!
Thank you Audra!
I love it .. its gorgeous … and the staging is perfect!
Thanks Christine! 🙂
I have almost the exact same 80’s dresser that I have been trying to figure out what to do with! This is perfect. I’m not that creative so this may take a while : )
I’ve shied away from using milk paint because it starts in a powder. It obviously worked for you–the whole dresser design was well thought out and just fabulous! I saw you mentioned sanding the whole piece. (I find sanding very tedious and distasteful). Did you sand to remove grit from the paint finish, for more distressing or to make the paint adhere better?
I hear this all the time so you’re not the only one who dislikes sanding Christine…lol. But to get a professional finish, I always sand…regardless of whether I’m working with milk paint, chalk paint, enamels etc my pieces get a light sanding in between each coat and a final sanding at the end. When I’m working with Chalk Paints, often the surface will NOT require prep sanding for the paint to adhere, however if it’s a glossy/shiny surface, I give it a light sanding to be sure. 🙂
I am confused on the tissue paper top. Is it wrapping tissue you would use for a gift and do you me mod pouge the wood lay tissue cut to size and mod pouge over top? I just love your piece and would like to try it
Yes Jan, I also use this tissue paper in gift bags to give it a festive look! 🙂 For this technique, you use 1 ply. You can add the Mod Podge to the surface before you lay it down (and then brush on top) or lay it down and then brush on top. Either way will work but just make sure the tissue paper is fully covered with the Mod Podge and secure.
First of all, this piece is stunning! Secondly, I was a wondering how you were able to get the paper to be that see through when I did a little patch the other day the tissue paper returned to its same white once it dried and I couldn’t see the wood underneath. Any pointers are welcomed.thank you!
Forgot to ask, when you sanded the after applying the tissue paper on top, what sanding technique did you use? Thanks again!
I used a palm sander with a high grit (320) sand paper Eileen. You can also sand it by hand though.
Thank you Eileen! I used one ply of tissue paper and made sure the pattern and natural color matched the wood. The paper and pattern will make a big difference in the final look. If you’re using a white tissue paper over bare wood, you won’t get the full ‘transparent wood’ effect because the white in the paper will show even after some sanding takes place. I prefer the look of using a white pattern paper over a white painted top… then it blends in seamlessly.:)
It’s beautiful!
My question is what happened to the engraving on top three drawers in before pic? Your end result has smooth drawers.
Thanks.
Krista
Krista, in most cases those details really date a piece so I fill with Bondo and then sanded smooth before painting.
Hi Denise
Love your work. I was just wondering, did you apply the dark stain and the wax at the same time? or did you stained the dresser first then applied the wax. Most blogs I read ask for clear wax before applying dark. I am in the process of working on my first piece of furniture and have been doing a bit of research. Thank you
Yes Louisa. I made my own DIY Dark Wax using Annie Sloan’s Clear Wax and Minwax Dark Walnut Stain. If you apply the clear wax first, it makes it much easier to control your second coat of dark wax. If you’re finding it too dark, just take a little clear wax on a soft cloth and wipe it off. 🙂
Thank you so much…I will definitely give it a try 🙂
I was curious about the etching on the old drawers, what did you do to get rid of those?
I filled them in with Bondo and then sanded them flush Kathy. Bondo is super durable and works great but I have to say it’s pretty smelly to work with!
Where do you buy bondo?
Hi Paula! You can buy Bondo online, or if you prefer to shop at box stores, Home Depot, Lowes and auto shops sell it.
Excellent re-design on this piece!! I love the way you used different knobs to change the look and fill in the design on the original piece!! You have a great eye.
I have been thinking about using the green paint and now I know I will!! Also thanks for the tips about the tissue paper/napkins!
amazingly beautiful! love the French look, inside and out! you are truly an artist…but I knew that already 🙂
I just bought a very similar piece over the weekend. Mine has scalloped edges on top and on the legs and decoupage with French tissue paper is exactly what going to happen! thanks for the inspiration!
Denise- First of all, I ALWAYS like your work! Secondly, I’m glad you didn’t give up!!! Question about the vaseline, doesn’t it just smear around when you paint over it? How do you “control” where it is and isn’t? Beautiful job all around!
Hi Tess! I only apply the Vaseline where I want the paint to repel and chip off. When I milk paint over it, it’s kind of like the oil and water theory. The milk paint beads up over the Vaseline and doesn’t adhere to the wood below. And no, if you paint with a light hand, it doesn’t smear all over the piece. Here’s a more detailed post on this distressing technique. 🙂
What a lovely transformation! The lessons learned are a valuable part. There’s no such thing as failure…some lessons just take longer…ask me how I know! 🙂
This is truly a beautiful piece, and you did a beautiful job describing your journey to get it to this point. I save your posts because they are always so helpful. Thank you !
Great end result, Denise! I think we have all experienced a vexing piece that dogs us from beginning to end! So often we are only privy to the shiny end product in blog posts. Nice to see the creative process isn’t always a nice straight line. Way to persevere…you were rewarded!
Denise,
I have had pieces that have gone through several UPS and DOWNS!
So glad you kept going! Fabulous!
Smiles, alice
Those several ups and downs makes the piece extra special/rewarding in the end doesn’t it! Thanks for chiming in Alice. 🙂
Denise,
This piece is beeyootiful!! I love what you did with it. I really love the top, it looks so authentic, I am looking forward to the tutorial. Can you use any kind of tissue paper? I am impressed!
Thanks Sally! And yes, any type of tissue paper or napkins will work. I only use 1 ply and then sand/distress to my liking.
Are those knobs actually rusted, or did you buy them that way?
I don’t usually like green but this is a gorgeous piece. Now i won’t feel so bad about my trials and tribulations of figuring out just what color and finish to use…… Some pieces “speak” to me about what will look best and others just sit there and let me figure it out myself….Your guidance is much appreciated.
Pleasure MJ, I’m glad you’ve found the post helpful. And I agree, sometimes a piece screams for a particular color/style and sometimes… well…;). This dresser has brand new knobs and handles (that looks old) purchased this way.
Challenges aside, you persevered over all obstacles to come out the winner! The end product is amazing!!! Love the dresser! Would you mind adding a close up picture of the top? And, maybe one of just the top looking down onto to? I love the tissue paper and would like to be able to see it better. I am working on a set of night stands that I decoupaged scrapbook paper onto the front of the drawers as well as to inside of them, because I couldn’t find any tissue paper. It sounds like the tissue paper might be a bit ornery to deal with though. Either way, I would never have thought to sand it after applying it.
Thanks Kim! The tissue paper is a little delicate to work with but even if it slightly tears or adhere’s with a few bumps, with this distressed look it all gets sanded down anyway. When I get the chance, I’ll try to upload a few more pics for you. 🙂
What an amazing job. Look what persistence gets you. Love the tissue paper too!
Looks awesome, so tell us how you did it.
Thank you Pat. 🙂 I’ve included the steps I took to restyle this dresser in the post above.
Whatever challenges you may have had for this project you met head on because this is a stunning and very unique piece of furniture!Beautiful work ..you truly have impeccable taste and a creative spirit !
Oh, it took some ‘creative-spirit’ to finish this one I tell ya….lol. 😉 Thanks for the huge compliment Dena!
I wanna be you when I grow up! Your perseverance & imagination are a marvel! Just gorgeous! I’ve looked for printed tissue paper & can’t find. Was it Michael’s in Canada or USA you found this great paper? Please keep posting your original ideas. Thanks.
Thanks for the big smile Tracy! 😀 I found this tissue paper in the Michael’s in Canada. I was looking for something similar in Hobby Lobby but no luck. Then I get a chance I’m also going to try finding printed tissue paper and napkins on Amazon. I heard they have some stunning patterns online!
What a beautiful shade of green…lovely finished piece!
Thank you Marigene. <3
Thank you for sharing this post because I just finished a piece that I thought maybe just maybe I might throw it over a cliff instead…lol… but no, I would never do that. It took forever and I mean forever because of all of the mistakes or different decisions I continued to change up with the two matching pieces. But it finally came together and looked beautiful at the end and I was in love with them. All of my effort paid off. Thank you for this post, it’s very encouraging. And your piece is beautiful!! I love how you staged it too!! PERFECT!!
LOL… I’m glad you didn’t take the cliff route Jaana! And I’d like to believe questioning creative decisions is the true spirit of an artist! 😉 Thanks for you kind words and vote of confidence on the staging.:)
Hello, this dresser is beautiful. Just wondering when you use stain, do you just wipe it on and wipe off immediately? Also did you mix the MMS with the bonding agent, it doesnt look like the dresser was sanded down. I used MMS on a varnished piece and the entire thing chipped off LOL! I knew it would be chippy but wasnt expecting that. Beautiful work!
Jeannine, my first coat of milk paint was mixed with bonding agent and I controlled the ‘chippyness’ by using the Vaseline distressing technique. As you said, milk paint can be very unpredictable if you just paint it on! The entire dresser was sanded down to create a silky smooth finish. And then the stain was wiped on/off and I repeated this a few times to get the look I wanted.
Denise, I just love this dresser you have transformed!! Did you purchase the French tissue paper at Michael’s in Canada? I seem to have a hard time finding french inspired tissue paper? I love the drawer liner as well. Is that tissue paper or scrap book paper? Great job, great staging!!
Yes Judy, the French Inspired tissue paper was purchased at Michael’s in Canada. The drawers were already lined by the manufacturer so I didn’t have to do a thing. They match up really well don’t they!?
Beautiful! How did you put the tissue paper on the top without it tearing? Does this come in one long sheet or is it like scrap book paper size? Thanks!
It actually did slightly tear in a few places but it didn’t really matter because I knew I was going to sand it down so the wood grain showed through anyway. The tissue paper came in 20″ x 26″ pieces so I used 2 1/2 squares for this dresser. If you water down the decoupage glue, you can carefully (kind of) maneuver the paper even if placed in the wrong spot. Once I do a few more of these decoupaged pieces Kim, I’ll write a tutorial because I’ve had a few emails asking the same thing. 🙂