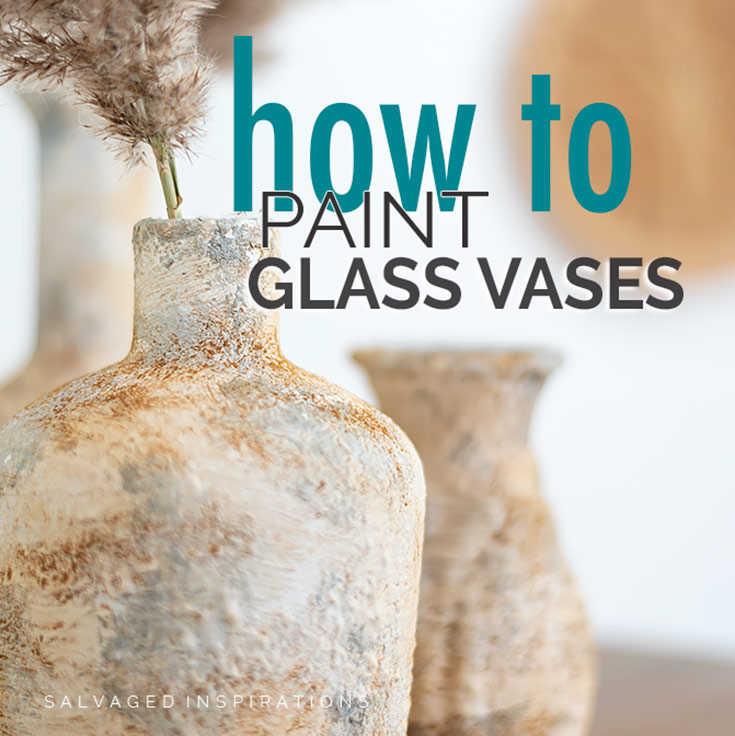
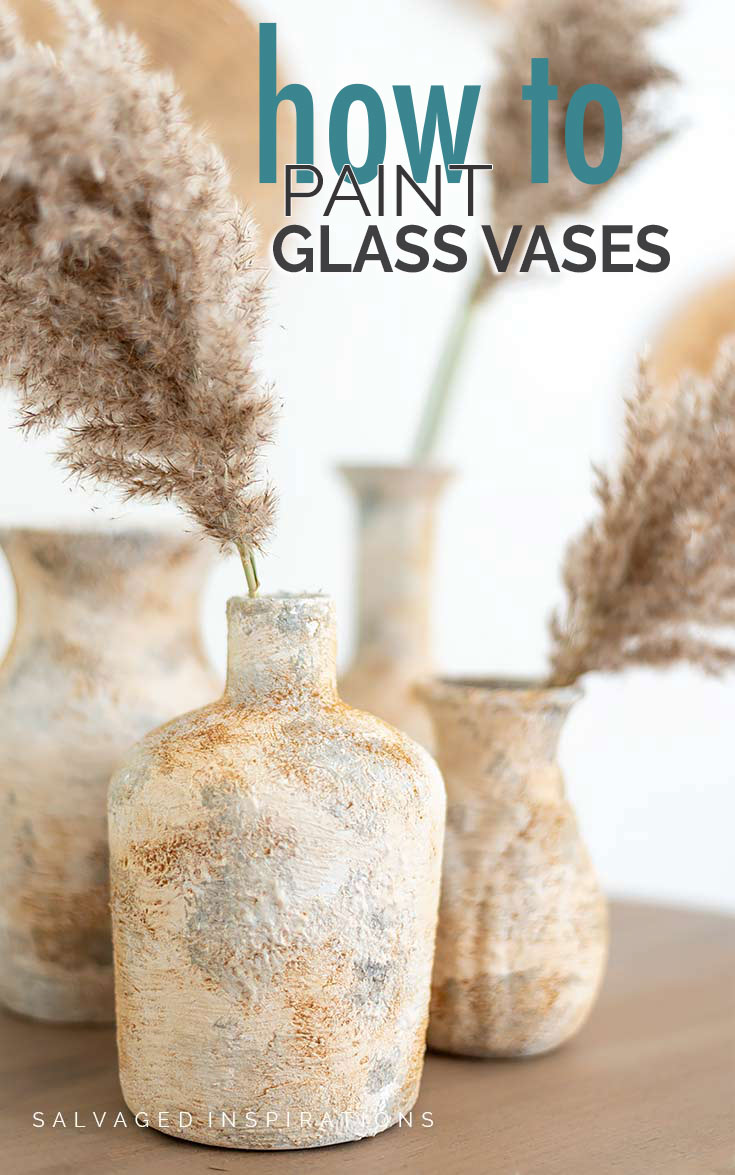
HOW TO TURN CHEAP GLASS VASES INTO TRENDY HOME DECOR USING PAINT AND WHAT YOU ALREADY HAVE IN YOUR KITCHEN! | HOW TO PAINT GLASS VASES
Hi, sweet #sifamily! Today, I’m sharing how to upstyle your cheap glass vases into trendy home decor. All you need for this DIY project is some glass, paint, and some inexpensive ingredients you already have in your kitchen! Here’s a step-by-step on How To Paint Glass Vases so your gorgeous new finish STICKS and STAYS PUT while you showcase these beauties.
**This post was originally published on July 13, 2021. As an Amazon Associate, I earn from qualifying purchases. There are affiliate links in this post to other companies/products I use and love as well. You will never be charged extra when you purchase through these affiliate links. If you buy from my links – A BIG thank you for supporting me and the #siblog! To see my full disclaimer, click here.
It’s also Trash To Treasure Day! I’ve included links to my T2T crew’s makeovers below and I can’t wait to see what they’ve done this month. The before pics look interesting!
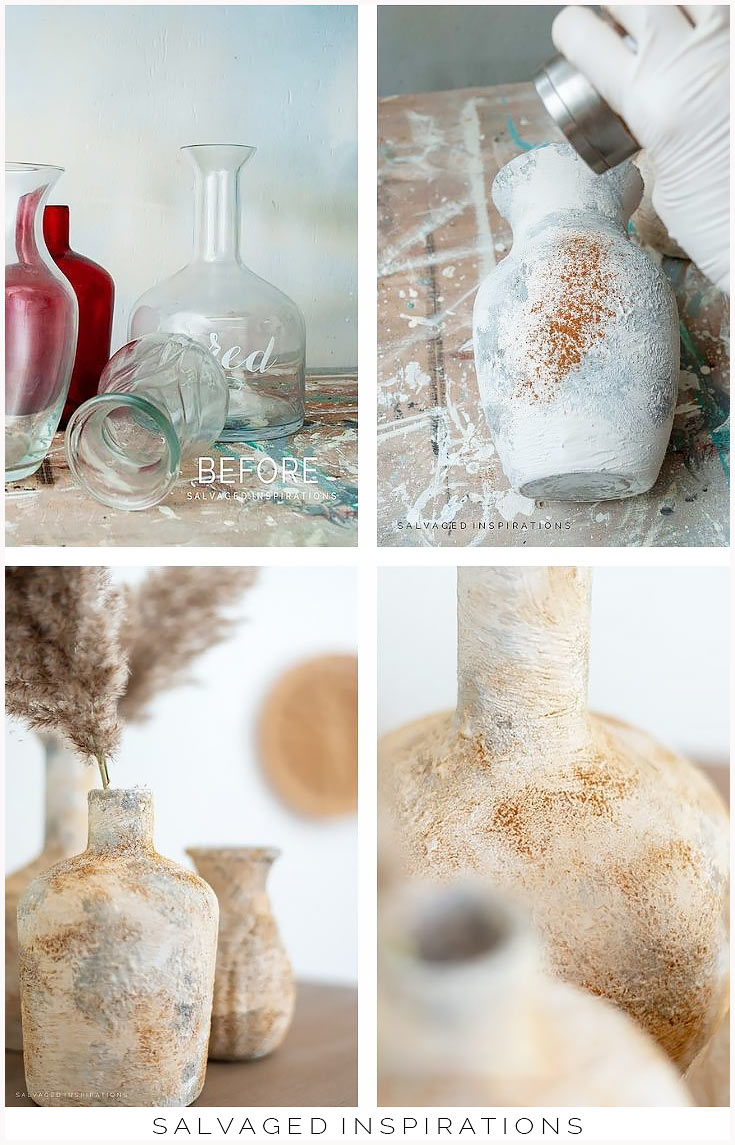
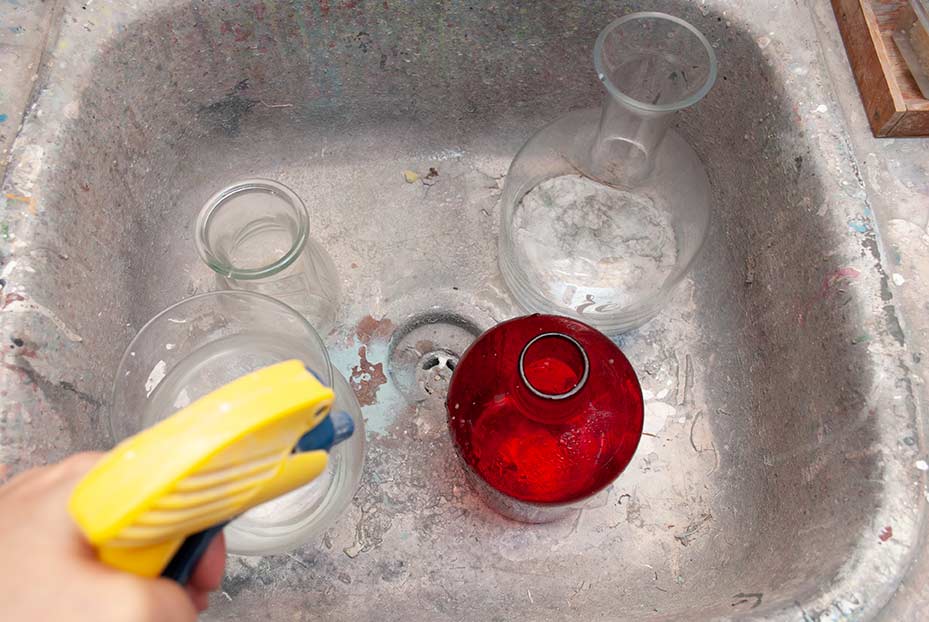
Here are the inexpensive thrift glass vases I started with.

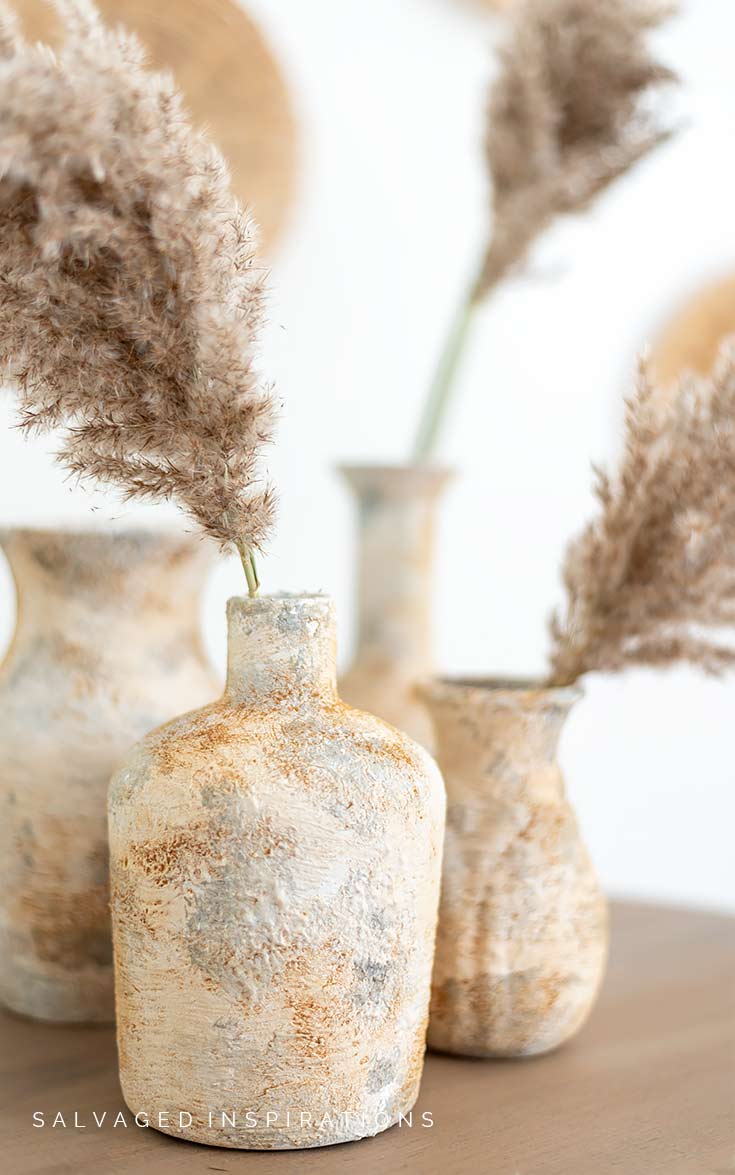
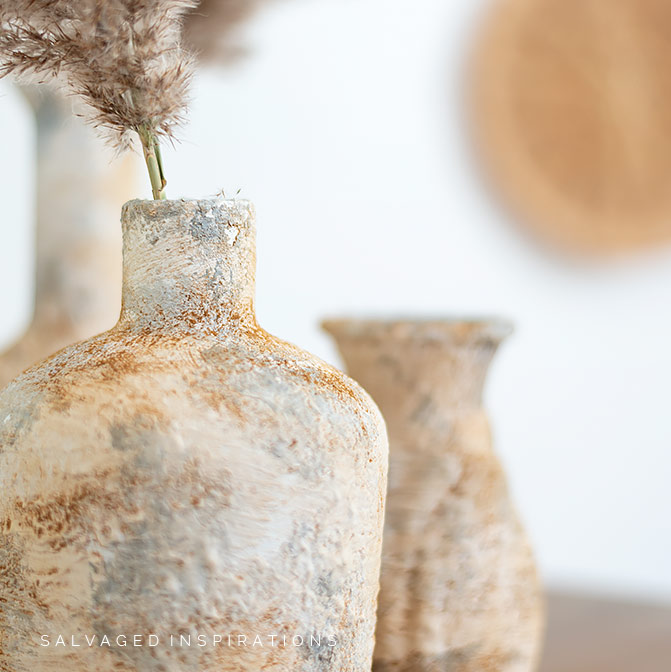
Here’s my new faux Pottery Barn terracotta paint finish! What do you think?
I used kitchen items we ALL have on hand to create this look!
THIS POST IS SPONSORED/CONTAINS AFFILIATE LINKS TO PRODUCTS I USE. YOU CAN SEE MY FULL DISCLOSURE HERE.
SOURCE LIST
Glass Vases – SALVAGED
Chip Brush
Shop Towel
Slick Stick Bonding Boss (Adhering Glass Primer)
Baking Soda | Cinnamon
Fluff Chalk Mineral Paint
Manatee Gray | Gravel Road
WHY UPCYCLE GLASS
Do you have old glass vases hanging around? I have a fair share I’ve collected from thrift stores, garage sales, and glass vases I’ve kept from romantic bouquets Nick has bought me over the years. And even though I’m a fan of glass, mine rarely gets used. Ucycling the glass we already have is eco-friendly and makes for stylish home decor. It can also make for a heartwarming one-of-a-kind gift. I love salvaging and reducing waste by giving new life to old items.
CAN YOU SPRAY PAINT GLASS?
Yes, you can spray paint glass vases! In fact, it’s a quick and easy way to give your vases a new look. Just make sure to clean the vases thoroughly and use a spray paint that is designed for glass or multi-surface. It’s a great alternative to give clear cheap glass some color, stain, or create faux milk glass like I did here – Best Spray Paint for Glass.
HOW TO GET PAINT TO STICK TO GLASS
The key to painting glass is getting the paint finish to STICK. Some spray paints are specifically made for glass. I created a full article here – Best Spray Paint for Glass. It works well and gives you a smooth flawless finish. If you’re after a textured clay or pottery look, spray paint isn’t the way to achieve it. Instead, investing in a Bonding Primer like this one will ensure ANY paint you have on hand will adhere to your glass.
WHAT KIND OF PAINT STICKS TO GLASS
ANY PAINT can and will stick to the glass if you first prime the glass with a bonding primer. Once you’ve followed the directions and waited the required time for the primer to dry, you can go ahead and paint glass with latex, acrylic, mineral paint, chalk paint, or any water-based craft paint you may have on hand.
Here’s the step-by-step I took to achieve this textured look.
STEP 1 – CLEAN
I cleaned these glass vases with vinegar and water to get all the grease, dirt, and dust off them. A warm water wash with Dawn dish soap (or any soap) would have done the trick as well.
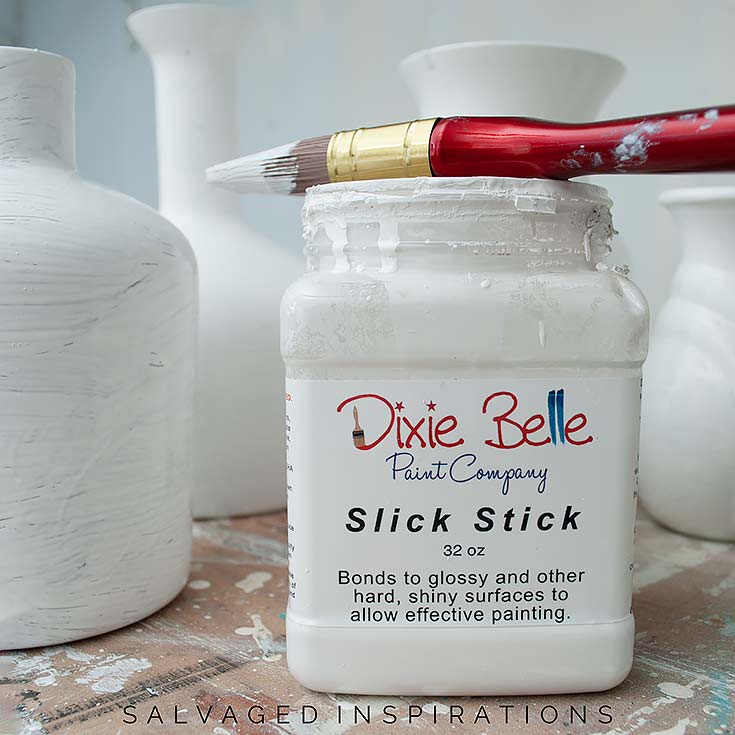
STEP 2 – PRIME
The key to painting on glass is this Slick Stick BONDING PRIMER. This is a bonding primer for glass, plastic, laminate, metal, tiles, and pretty much anything with a super slick surface. And you can’t get slicker that glass, right?! Once it’s primed, you can paint any faux finish you like. Update – Slick Stick is now renamed and updated to Bonding Boss.
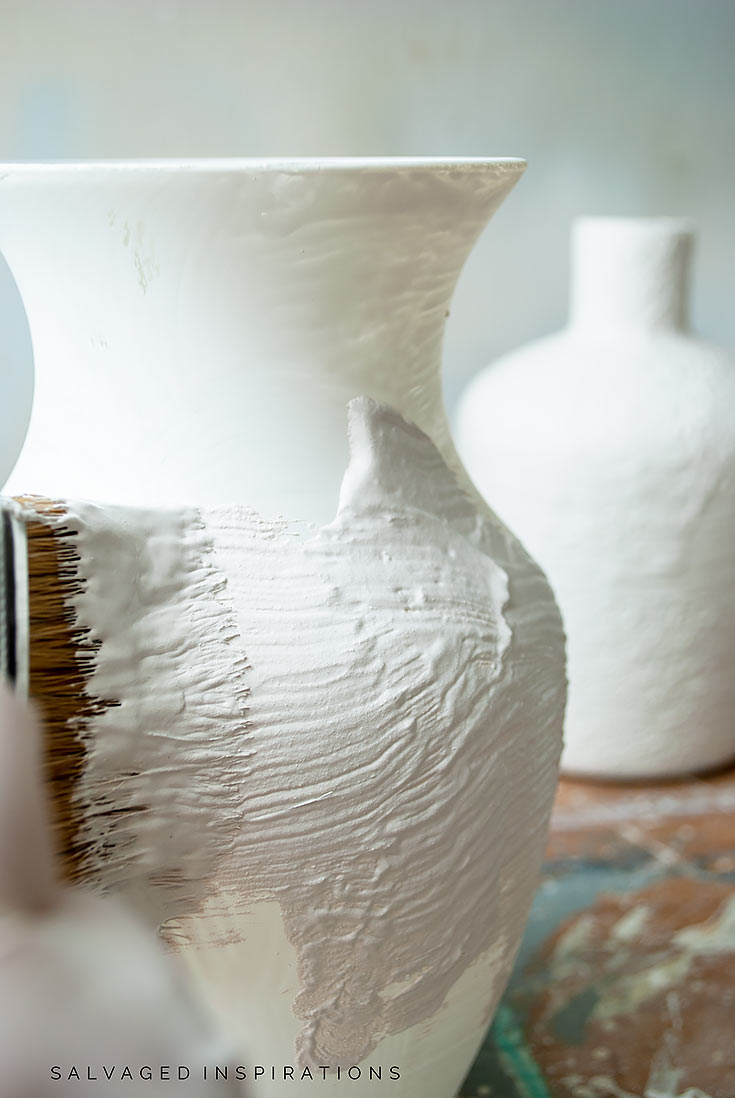
STEP 3 – MIX PAINT FOR TEXTURE FINISH
To get a faux Pottery Barn-inspired look on these upcycled glass vases, I used what we ALL have on hand in our kitchen — Baking Soda. Back in 2013 when I was mixing my own Homemade Chalk paint, I compared four ingredients to make my own inexpensive chalk paints. Baking soda was my least favorite because it gave me the roughest finish… perfect for this faux clay Pottery Barn finish!
I used approximately 1 cup of this Fluff paint and 1/2 cup baking soda and mixed it thoroughly. It was thick with the consistency of heavy buttercream icing.

STEP 4 – BASECOAT
I applied a basecoat of this Fluff mixed with Baking Soda using this chip brush. I wouldn’t recommend using your good paintbrushes for this because it can harden quickly and may ruin them. Check out all this gorgeous texture!
STEP 5 – LAYER PAINT
To create patina on this faux clay vase, I dabbed some of this Manatee Gray in random spots. You can stop there because it looks great! But I wanted a little more depth so I took an artist’s brush and dabbed on a little bit of Gravel Road to darken it up. Small acrylic-size craft paints would work perfectly for this as well because so little is needed!

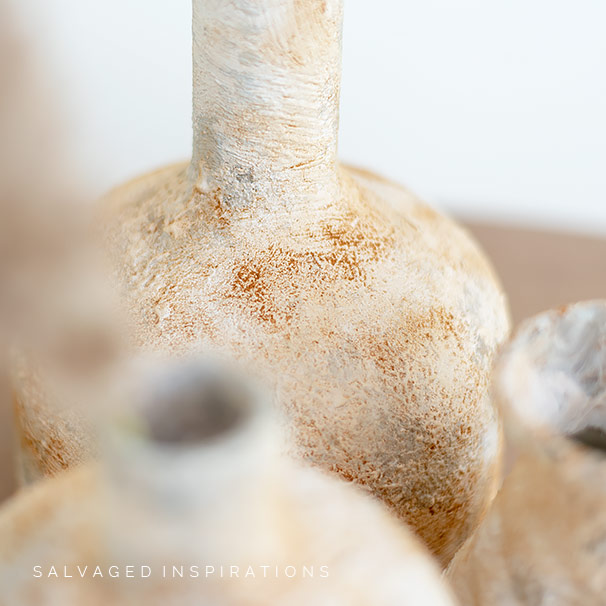
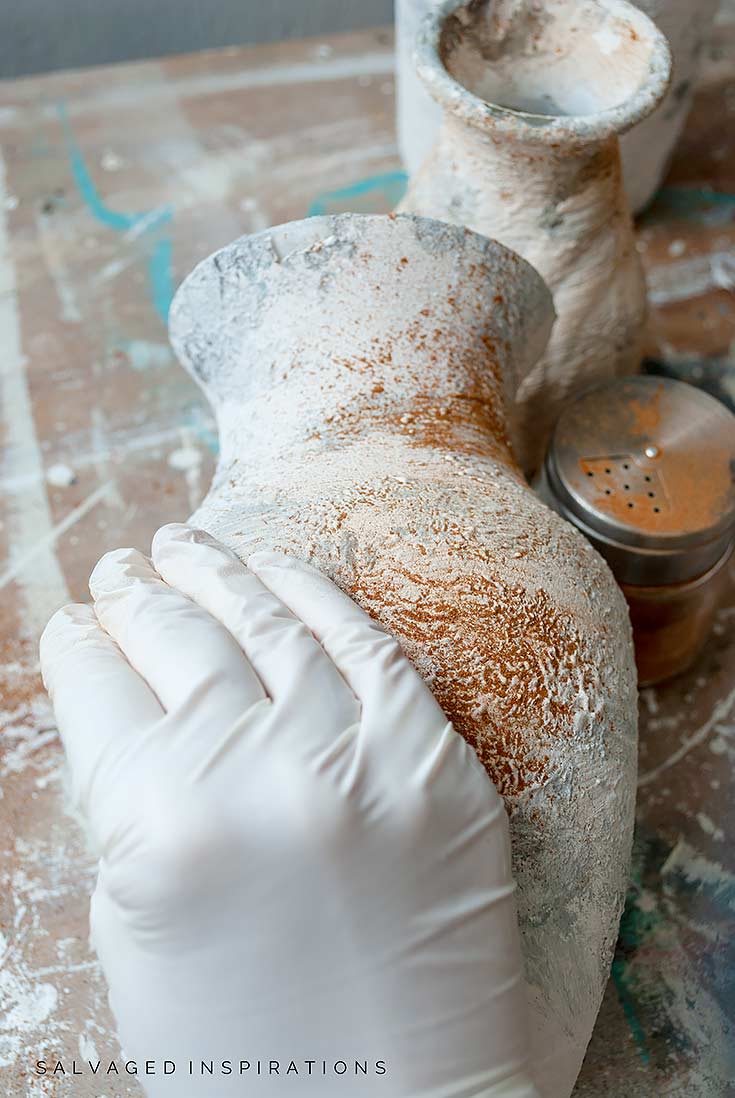
STEP 6 – TERRA COTTA PATINA
To create a terra cotta finish, I used another ingredient we all have in our kitchen — CINNAMON! I got this idea from Christina at The Reclaimed Heirloom when she transformed a vessel lamp into a DIY Restoration Hardware lamp. Her projects and furniture are gorgeous. You can check out her Youtube Channel here.
I’m amazed at how well this works! And it’s the easiest thing. I sprinkled cinnamon onto my dry paint finish and rubbed it in. There were a few areas where I overdid it. If this happens and it’s too dark for you, the excess is easily brushed off with a dry paintbrush.

It smells great too!
I have no idea how the cinnamon will wear over time, but I have to admit I LOVE how this all came together!
Update – It’s been three years and these vases don’t smell like cinnamon anymore, BUT they still look amazing. I have them displayed on my corner bathroom shelf.
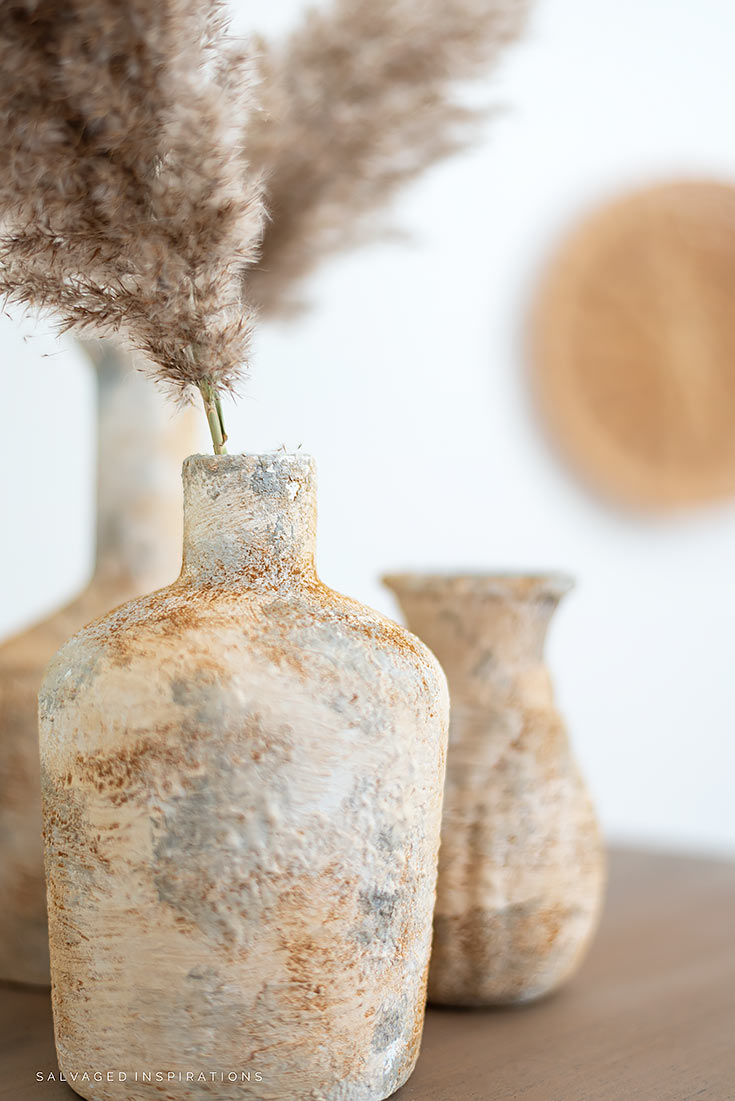
It has so much texture and looks authentic and time-worn.
AND NOW FOR SOME TRASH TO TREASURE FUN!
You’re going to LOVE what my creative team of T2T ladies do! Below are their BEFORE photos. Visit the links underneath to see the amazing AFTERS and learn how they did it! I’m heading over to take a peek as well! x
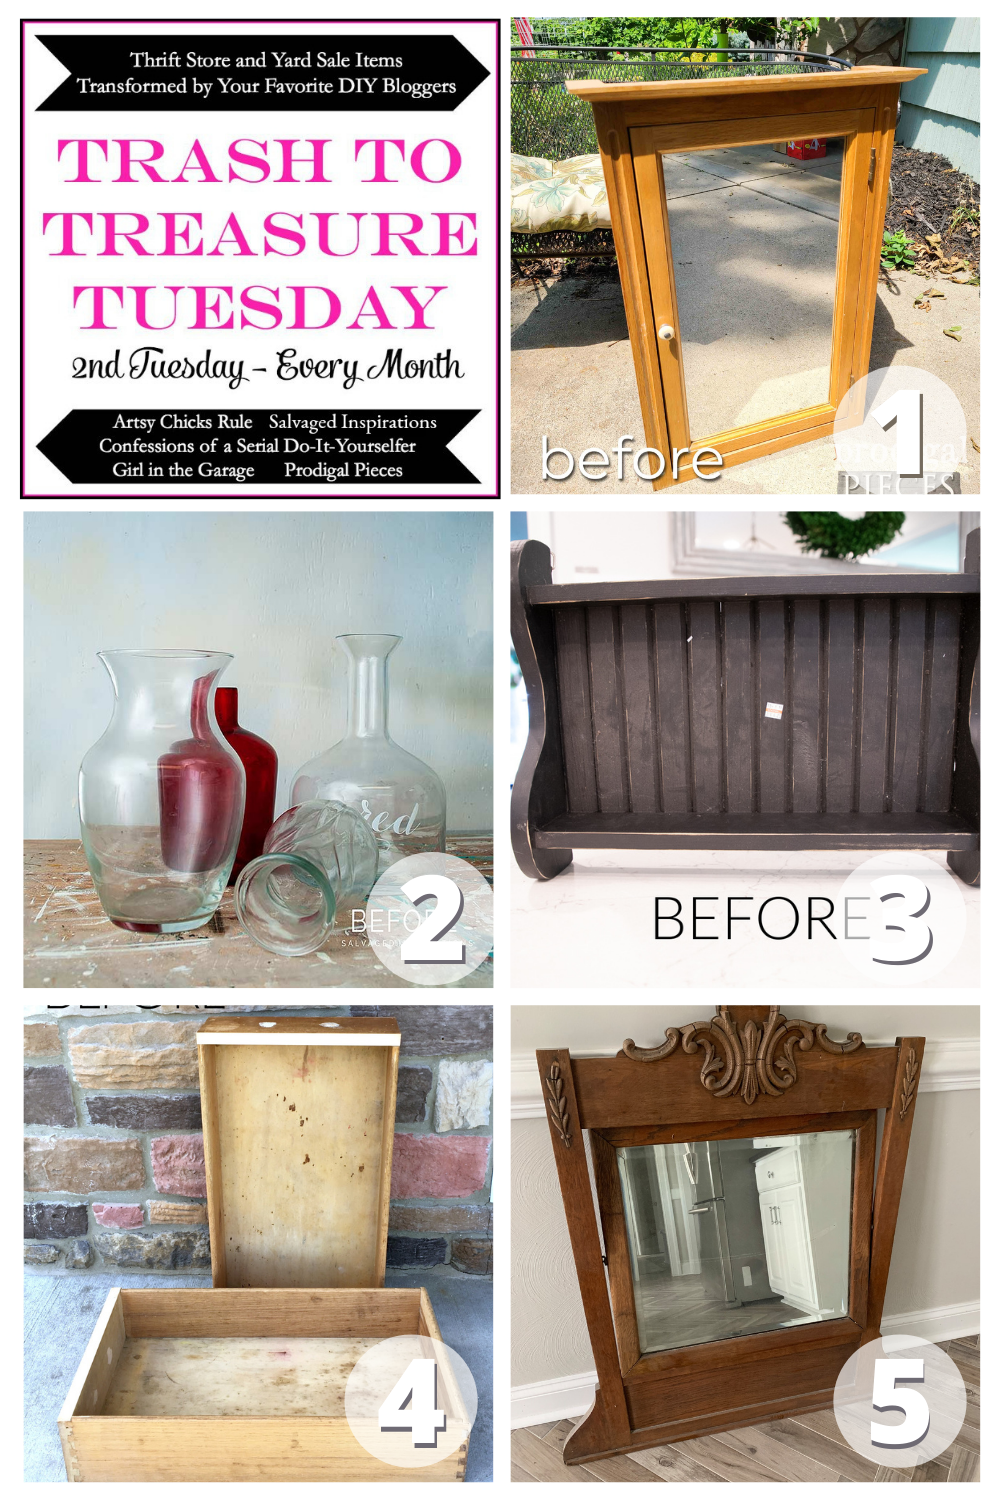
1. PRODIGAL PIECES
2. SALVAGED INSPIRATIONS (HAPPY YOU’RE HERE!)
3. ARTSY CHICKS RULE
4. GIRL IN THE GARAGE
5. CONFESSIONS OF A SERIAL DIYer
I hope this thrift makeover has inspired you to bust out your old glass vases and give them a new look for your home decor. This is such an EASY and INEXPENSIVE project using what you already have on hand. These DIY textured vases also make great props for staging painted furniture. I hope you give it a try and if you do, I’d love to hear how it turns out for you!
LET ME KNOW WHAT YOU THINK OF THESE POTTERY BARN-PAINTED VASES. FEEL FREE TO ASK ANY QUESTIONS YOU MAY HAVE… I ALWAYS LOVE HEARING FROM YOU. IT MAKES MY DAY! 🙂
Have a great day and I’ll be back this Thursday with my Furniture Fixer Upper crew and this sweet secretary desk makeover. See you then! xo

Happy furniture painting friends!
Denise x
RELATED POSTS::
SALVAGED WINDOW GARDEN DECOR
PAINTED GLASS AND MIRRORS | 12 GORGEOUS DIY’S
BEST SPRAY PAINT FOR GLASS
REMOVE GLASS FROM CABINETS
HOW TO REMOVE PAINT FROM GLASS
PIN AND SHARE!

This is timely, I had forgotten about this one. Cinnamon!!! I’m going to try this. Thanks Denise!
So glad! Let me know how it all turns out!🤗
This is beautiful and so simple to do. My question is,you painted with the slick stick first. Did it take just one coat of the paint mixture?,and can I use acrylic paint as long as I use the slick stick first? Thanks
Thanks Patty! For the Slick Stick to work, you apply one coat. Let it dry for 2-3 hours. Then apply a second coat and let it dry overnight. Then paint. And yes. Acrylic paint will work. 🙂 Hope this helps. 🙂
Wow! Wow! Wow!
That looks beyond amazing.
Do you think it would work if I mix the cinnamon with the paint as a topcoat or even with the paint and baking soda combo to create the terra cotta color
Thanks Sharleen! Hmmm, I don’t think so. I’m guessing the cinnamon would just blend into and tint the paint rather than create a terracotta patina. But you could try a little as a test. If you do, I’d love to hear if it works! 🙂
These are great! They look like something dug up in Pompeii! Great job and thank you for sharing this project!
Thanks Anne! XOXO
Do you paint the insides also?
No i did not.
Love it!
Thanks Ky! x
I LOVE this creative idea! They are beautiful! Do you think this technique would also work on a metal piece?
Thanks Jeannie and yes I do! 🙂
Denise,
What a simple idea to make such a BIG impact!!!! Plain glass vases turned into new decor. I love this and will try my hand at making these. Thanks for all your wonderful paint ideas. I love your blog site and look forward to receiving your post.
Thanks,
jean
Thanks for the kind words Jean and I hope you have fun trying this out! x
Hi! LOVE doing an aging treatment on vases. I thought I might add a tip for you. I have done this and I was quite happy with the results. Use a matte clear spray after using cinnamon!! Yep! Holds your cinnamon on for who-knows-how long!
Brilliant tip Linda…thank you! I wasn’t sure if I should topcoat or not. I took the lazy girl’s way out and left them…lol. If I see my cinnamon patina fading, I’m busting out the clear spray. 🙂
They look fabulous, Denise! One would never know underneath is inexpensive glass vases. I must try the cinnamon technique sometime, very cool.
And it smells nice too! 😉 Thanks Marie! XOXO
These look super cool and creative, Denise! xo
Thanks my friend! XOXO
These turned out so pretty, Denise!! xo
Thanks my friend! XOXO
These look incredible. I am definitely going to try. I have some boring vases around,. THANKS for sharing!!!
Thanks and have fun with them Patricia! 🙂
These look awesome and as always, thanks for sharing! ~ Nicki
Thanks so much Nicki! 🙂
Such a simple technique but sooo effective! Could also use to age picture frames that are just too plain & boring. Thanks for sharing.
Super simple, right?.. and I like the picture frame idea! 🙂
Thanks Denise! What a great class idea! Definitely doing this. I sae Christina ‘s earlier too.. Love you both!
If you give it a try I’d LOVE to hear how it works for you. I didn’t seal mine so I’m not sure how the cinnamon will hold up. But I’m moving them around from room to room (trying to find a spot in my home for them) and they’re holding up great. 🙂
They don’t even look like the same glass jars that are overflowing at thrift stores! Fantastic! And I bet they do smell amazing! XOXO
Right?!… I have a ton of these. Now I’m wondering what other faux finishes I can do! XOXO
You did a fantastic job.
Thanks Vincenza! x
Can’t wait to try this amazing DIY..
Thanks Kendy…have fun! x
Hi Denise. Cinnamon:). That’s super creative and smart. I’ll have to check out Christina’s YouTube channel. I just love how these vases turned out. They look very high-end now. Beautiful work. Now, I’m going to check out your friends projects. Trash to Treasure Tuesday is always so fun!
Thanks my friend. And fun, right!?! I get to see the T2T Crews before pics prior to all of us publishing. But I don’t get to see their afters until day of. It’s always exciting (for me as well) to see what they come up with. 🙂
Love this awesome creative.. since I’m a glass lover ( hoarder) it will be a creative I will attempt… especially will use the cinnamon 🥰
Love it! I’m going to give it a try! Thanks for sharing!!
Thanks and have fun Susan. I’d love to hear how yours turn out!💙
Very nice! Have you thought of using dry sand instead of cinnamon? It won’t rub off over time and gets a very similar look as the cinnamon.of course it doesn’t smell as nice…
Thanks Renee and YES I almost did! I’ve seen some Youtube videos where they use dirt and it looks great.
Beautiful! do you have any pointers for just painting glass; or does the Slick Stick always leave a rougher finish?
The Slick Stick can leave a beautiful smooth finish… it all depends on what brush you use and how you apply it. I’ve used it for smooth furniture finishes and it’s fabulous. That said, I’ve also spray-painted glass for a clean finish and it works nicely as well. 🙂
These jars are AMAZING!! very impressing considering you winged it! LOVE THEM!!!
Aw, thanks Zoya! I’m often “winging-it”….🤣
Oh Denise! Love how these turned out and so quick & easy! What could be better? Free! I have fallen in love with mixing baking soda in my paint; will try using cinnamon now! That will be the closest I come to cooking:;) Have a great week my friend!
yeeeeesssssss….”That will be the closest I come to cooking”… I knew there was a reason I get along with you so well!🤣
It always amazes me how something so simple can make such a statement. These are fabulous! Great upcycle, my friend. 🙂 xo
Me too! I have more of these than I know what to do with…lol. XOXO
What a funtastic update! They look so different now and gorgeous!
Thanks my friend! LOVE yours as well! XOXO