HERE’S AN EASY WAY TO FANCY UP YOUR BORING FURNITURE! THIS PRODUCT IS A GAME CHANGER MY FRIENDS! [VIDEO]

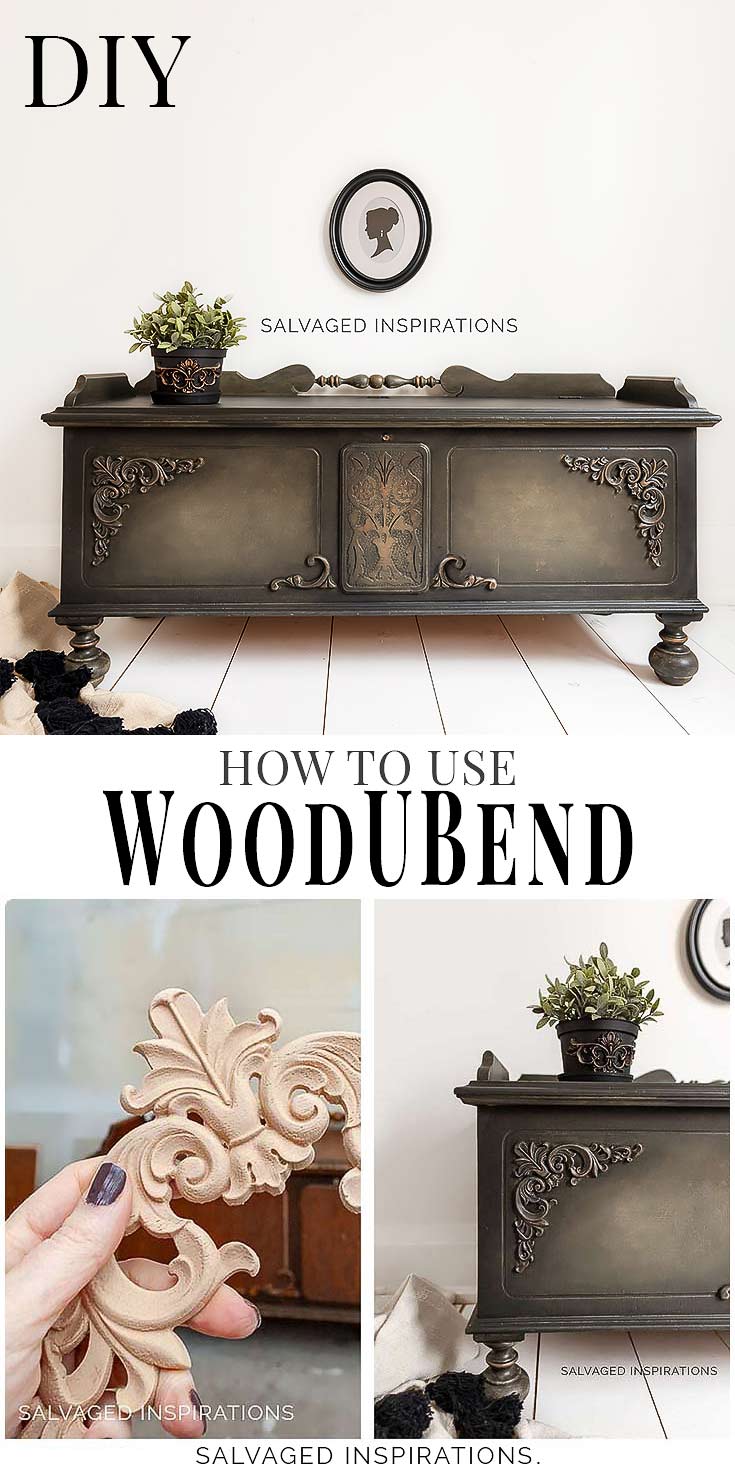
If you’re looking for an easy way to fancy up plain or boring furniture, this product is a game-changer! BENDABLE wood appliques, molds, and trim by WoodUBend! There are over 3000 designs to choose from for every sort of furniture style or DIY project you can possibly imagine.
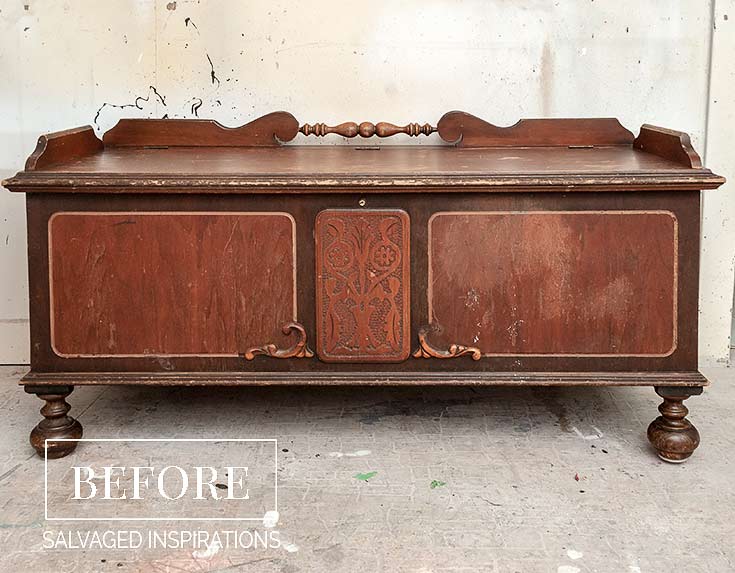
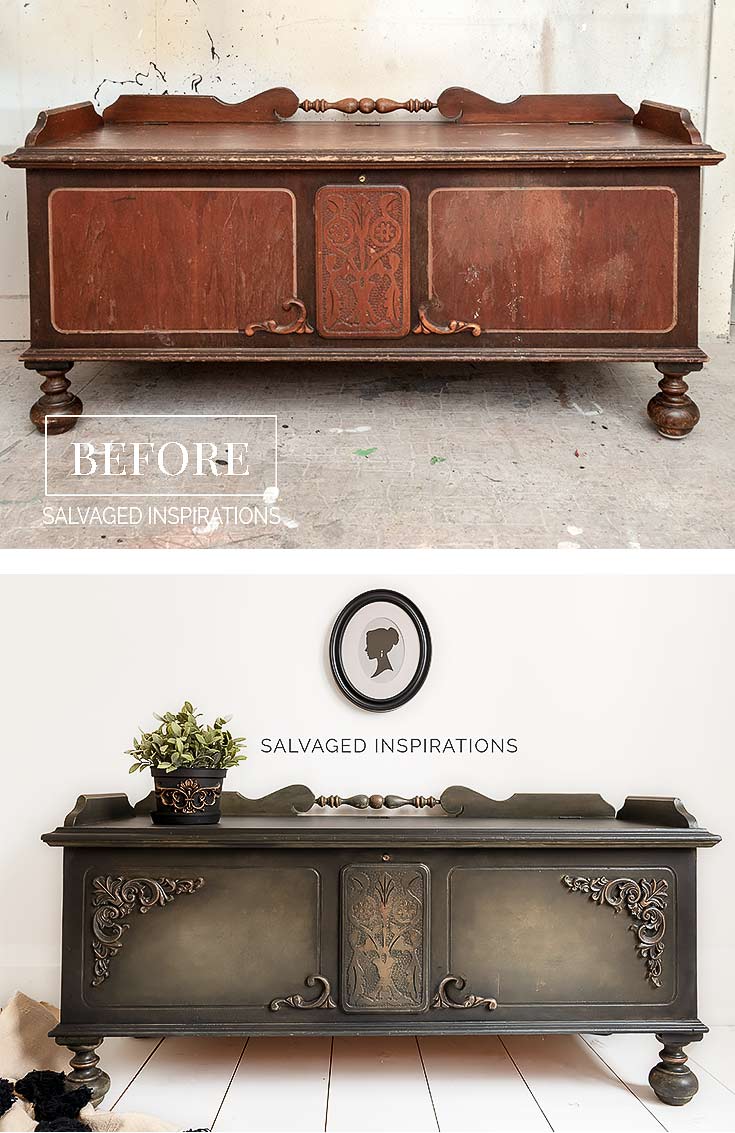
Here’s what I used mine on. A vintage cedar chest. I don’t often find wooden chests to work on so this was a real treat. It’s a charmer even in its’ “before” state…
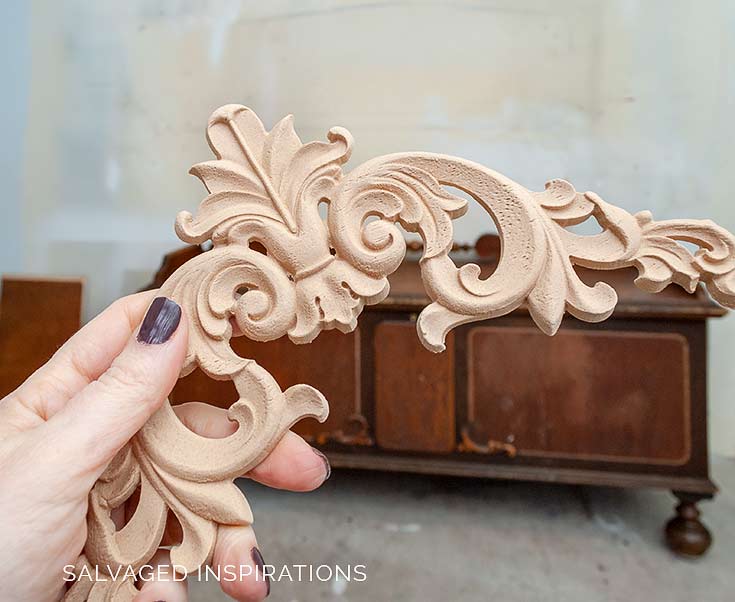
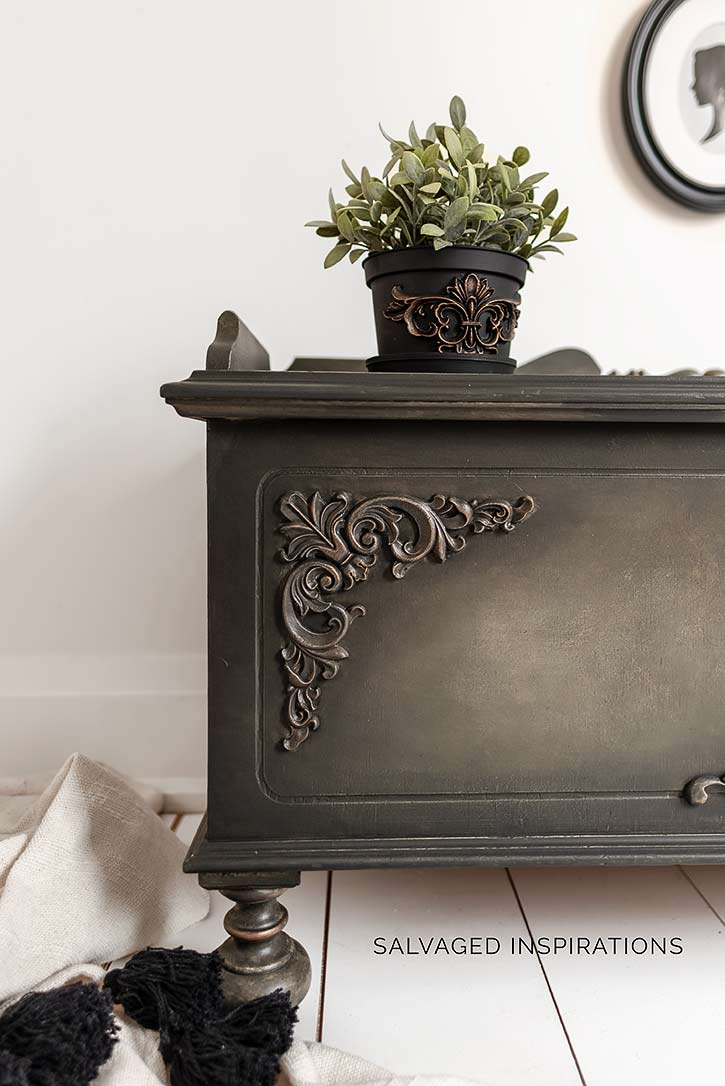
To fancy it up, I added two of these WoodUBend corner appliques.
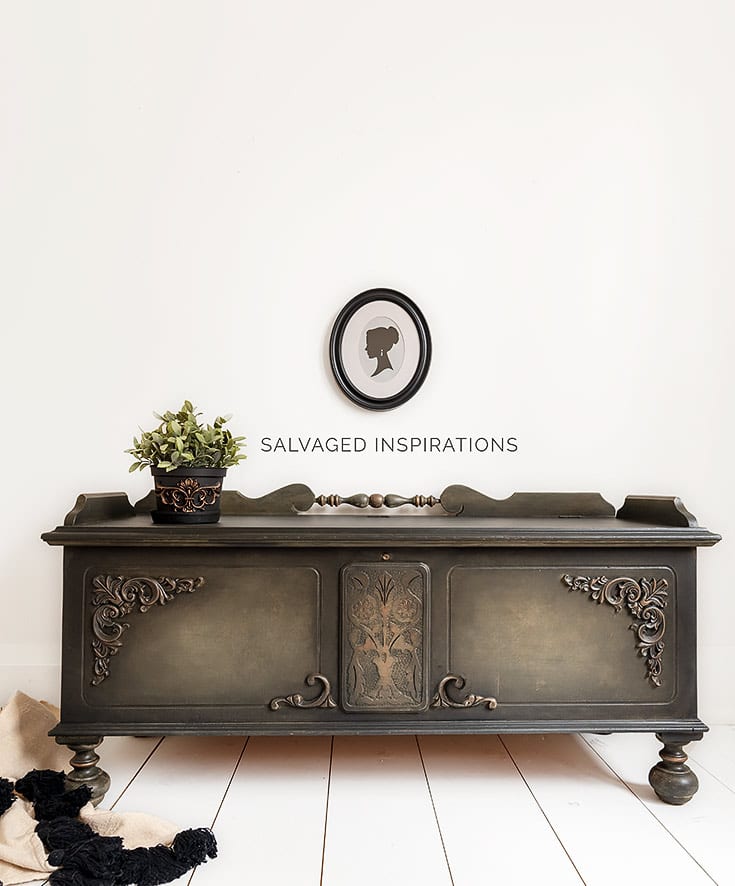
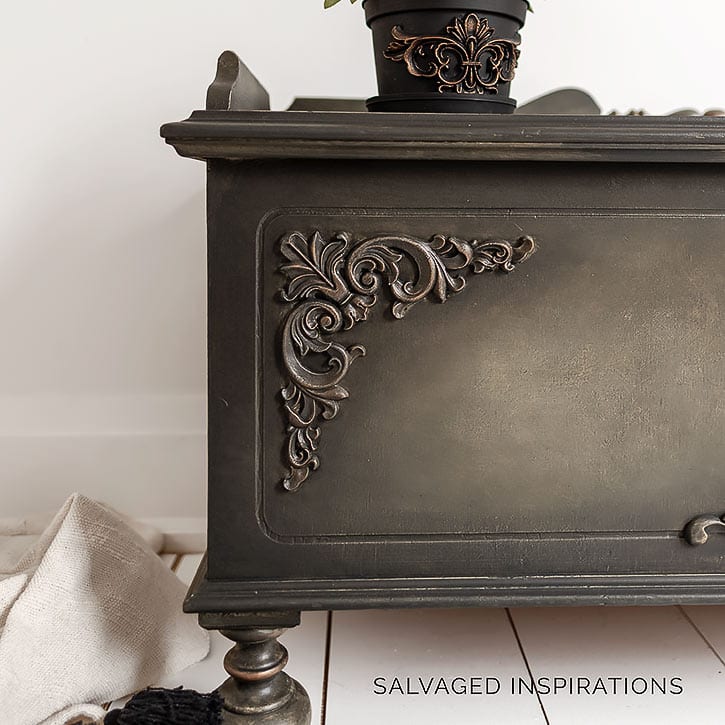
Look at the difference they made!

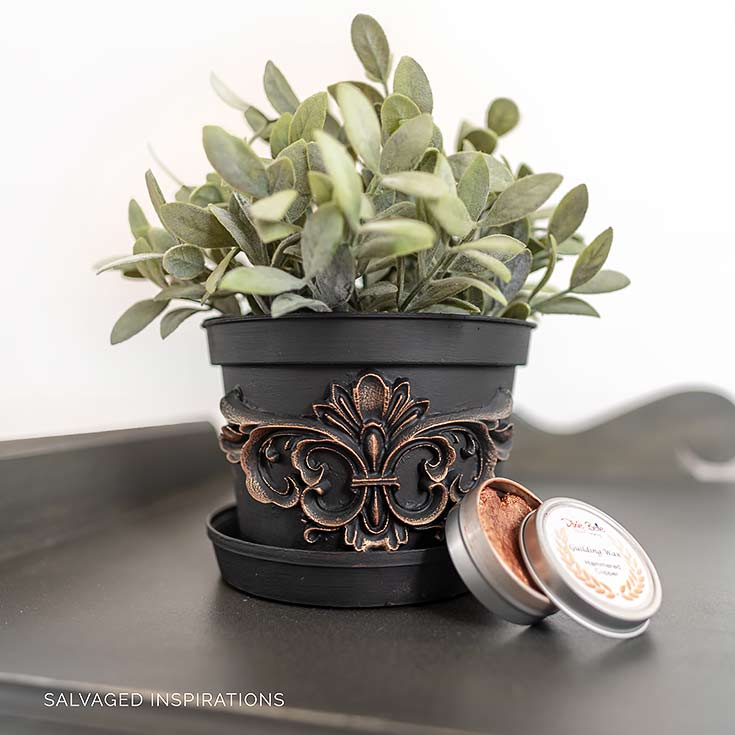
And because I also wanted to test the “bendability” of these, here’s a cute little plant holder made from a plastic pot. I created a video sharing how easy it is to do this!
THIS POST IS SPONSORED/CONTAINS AFFILIATE LINKS TO PRODUCTS I USE. YOU CAN SEE MY FULL DISCLOSURE HERE.
SOURCE LIST
HOW TO USE WOODUBEND MOLDINGS
This was my very first time using this product, so I don’t claim to be an expert. I’m sure the more times I use these decorative molding, the more tips and tricks I’ll discover. But what I can say is it’s an easy process and all you need is some wood glue and heat.
HERE’S A SHORT VIDEO OF THE ENTIRE MAKEOVER:
If you have any issues viewing – you can check it out here on my Youtube Channel
STEP 1 – Clean and Prep
Just like with every makeover, the first step is to make sure the surface is clean so these appliques and trim have a dirt and oil free surface to stick to.
STEP 2 – Heat & Bend
I used an inexpensive $13.99 heat gun from Walmart but a hairdryer will work just as well. Applying heat, the WoodUBend becomes flexible. You can bend it around any form you like… so amazing!!
STEP 3 – Glue & Add Heat
I used this wood glue and added a generous amount on the flat side of the applique. I position it on the front of my cedar chest and holding it in place, applied a little more heat. This activates the WoodUBend so it adheres beautifully whether on a flat or curved surface.
STEP 4 – Paint / Finish
Once the glue dries and its adhered, you can treat it as you would any wood applique. These moldings can be painted, stained, drilled, glazed, waxed or sanded!
STEP 5 – Enjoy the NEW look!!!
Here are a few more pics of my painted cedar chest…
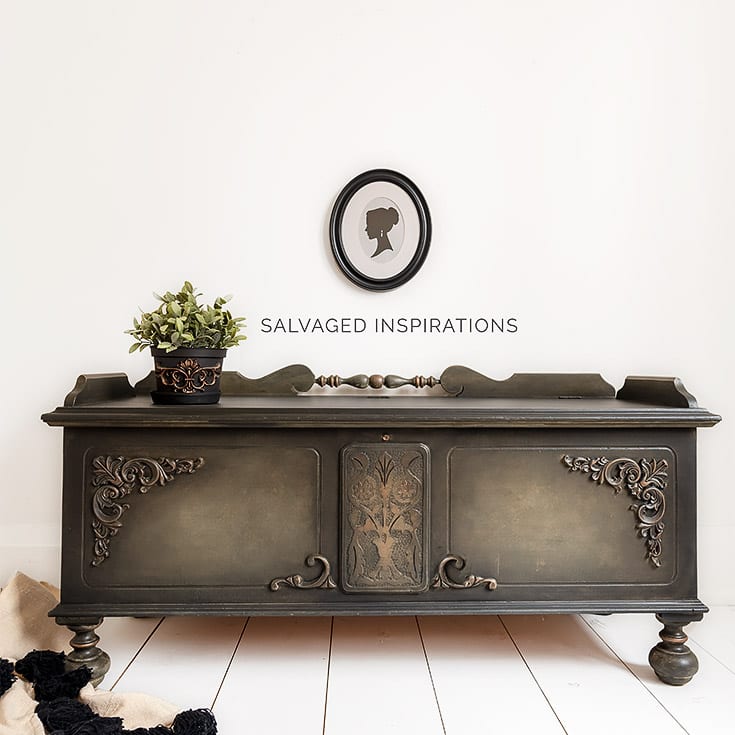

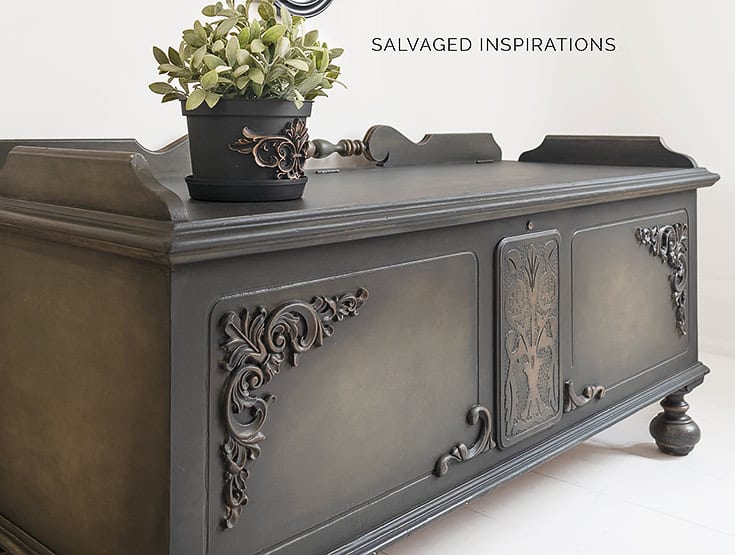
Heres a last look at the before and after…
Before I go, I have some exciting news! I’ve been invited to join the talented “Trash to Treasure” crew. Wooohoo! Starting next Tuesday (and then every second Tuesday of each month) I’ll be sharing a trash to treasure makeover along with four other talented bloggers. If you’re not already familiar with them, I’m going to leave you in suspense ’till next week when I’ll introduce you. 🙂
LET ME KNOW WHAT YOU THINK OF THESE WOODUBEND APPLIQUES AND THIS MAKEOVER … OR FEEL FREE TO ASK ANY QUESTIONS YOU MAY HAVE… I ALWAYS LOVE HEARING FROM YOU.
Thanks for reading. 🙂
Wishing you a beautiful day filled with inspiration and Happy Painting friends!
Denise XO
RELATED POSTS::
How To Apply Furniture Transfers
Adding Graphics | Vintage TeaCart Makeover
Pottery Barn Knock-Off Buffet Makeover
Stop Bleed Through When Painting
5 Ideas To Update An Old Desk
PIN AND SHARE!

Hi Denise, I am a paraplegic doing antiquing of many projects, and I love the piece that you did on the board green canbnet video where you did the demo on the WoodUbend technique… Although, ,what I love the most,; that I’m trying to do, is the painting technique with the actual painting of the cabinet. I’m in in love with this green look with the shadow effect. Do you have a demonstration video on how you did it? Any guidance will be appreciated.
Could you have used it on a corner, say like at the bottom, so that it would be on both sides of the chest?
you sure can Mary! 🙂
Can WoodUBend be glued to mirrors?
Thanks!
It sure can! Just be sure whatever glue you use states wood and mirrors and/or shiny slick surfaces.
What colors and how did you achieve the look on the hope cedar chest do you have a video on how you painted this piece thank you Carol King
Beautiful job! I’m so happy you didn’t cover it with chippy, white chalk paint. Your chest make over looks elegant and classy.
Thanks so much, Kathy!
Love it, Denise! One specific question ~
In one of the photos it looks like the original wooden appliqué on the R side of the chest (looking at it from the front) is broken off; but in a couple of the other photos it appears to have been mended or replaced. Did you do some of your resin magic and make the missing piece so both sides are alike, or ??? If you did fix the broken piece, how did you do it? Maybe you answered this Q in your video (I haven’t had a chance to watch it yet) but I’d appreciate the 4-1-1. Thanks, Denise. You’re the queen 👸
Thanks, Suzy and you’re goooood…I was wondering if anyone would notice! 🙂 The original applique was MIA and I didn’t fix it prior to posting. On the front-facing pic, it’s been Photoshopped in and on the side pics, you’ll notice it hasn’t. That said, to fix it I would use my hot glue gun to make a mold of the original and then pour resin. They also sell this molding kit I really want to try.
The trunk is lovely!
Thank you, Stephanie! x
Sooo beautiful!!!!
Thank you, Dan! 🙂
Mama needs some WoodUBend! I love the idea that they are flexible for curved and round objects too. Gorgeous cedar chest makeover, Denise! Pinned 🙂 Congrats on the Trash to Treasure gig, looking forward to following your adventures.
You DO need some WoodUBend…lol… I KNOW you’d do something super creative with it! And thanks so much. I’m thrilled to have been asked to join. I’m all over plucking “trash” off the curb so it’s right up my alley…lol. 😉
I look forward to your posts every week. Your tips and introduction to new products are so helpful because you demonstrate so well in your videos. Thanks so much. The pieces you transform are amazing. This chest is gorgeous. Will be watching for your contributions with Trash To Treasure. Congratulations.!.
Thanks so much, Joanne! It makes me happy you’re finding the videos and tips helpful!!!
This is such a beautiful piece! I really like the color you chose for it as well. The accent WoodUBend pieces really made it pop!
So happy you like it, Carla. I’m loving this color combo too! 🙂
What is the color combo? I am wanting to achieve this color on my coffee table!
Caviar, Collard Greens, Sandbar and Spanish Moss. I’ve included links to all the colors in this post under “Source List”. Hope this helps and have fun with your coffee table. 🙂
I’ve never heard of WoodUBend but what an interesting product. I was getting excited watching you use it, Denise. I love your enthusiasm and thanks for the great ideas you share! ~ Nicki
I was enthused…lol. thanks so much, Nicki! XOXO
This came out beautiful! I still have my hope chest to paint! Love the bendable appliques.
Hi Maryann!! Thanks so much and if you decide to paint yours, have fun. I really enjoyed working on this chest!
You absolutely nailed this piece… I just love how tasteful and elegant your pieces are. You are my favorite salvage painter…. love those bendable too.. thanks for sharing all this great info on this piece.
Just stunning!!!! I 💖 you!!
Aw, thank YOU, Shelley! You just put the biggest smile on my face! XOXO
I absotulely love the coloring and the applique on this piece. Gorgeous!!
Thanks Liz! XOXO
I love everything about it!!!
Thank you Ranell!
i just redid a cedar chest that i painted and glazed. i added an applique to the front, although it wasn’t bendable! i was most interested in how to keep the cushion to stay on top and one of your photos shows how i could add some pieces to the sides and back. thankfully, i have not quite finished the cushion, so i still have time to shorten it – yikes! so, even though i don’t foresee a use for these bendable appliques, i certainly got a great idea from your makeover! thanks so much! I’ll keep the bendable ones in mind! i do love appliques, they add so much interest to a plain surface!
Hi Gwen! They really do, don’t they! I’m so happy this cedar chest restyle gave you some idea for the cushion problem. I get it. Annoying…lol!
Wow! The chest looks amazing. I must try this product! Thanks for the heads up.
Thanks, Lizzy and ya, it’s pretty amazing! 🙂
Hi Denise! This is amazing. Those appliques are something else. Thank you for sharing and can’t wait to see your trash to treasures!
Hi Carole!!! These appliques ARE something else. I was so amused seeing them bend…lol.
This is absolutely BEAUTIFUL!!! You’re going to love the Trash to Treasure group! They all seem like they’re besties.. Or at least cut from the same cloth. Just like you, they always have some of the best ideas.
Thanks Mikki! And yes, I feel so blessed to have been asked to join their group, they are all so talented! I’m on the hunt for my first Trash to Treasure piece… can’t wait! 🙂
WOW! That’s really lovely! Good job!
Thank you, Cate! xo
My goodness, what a gorgeous chest! And your treatment of it is just beautiful. It looks much more balanced with the appliqués. What an interesting product. Thanks Denise!
Hi Marcia!!! Thank YOUUU! Enjoy your day my friend!
Beautiful makeover. I’m one of those wood loving people and find it very hard to paint something but your items look so good it makes me want to try. I have my grandparents walnut veneer bedroom set that I’ve held onto and think it might be a candidate for paint.
You may be shocked to hear I’m a wood lover too.:) When a piece is in good shape (or the wood can be refinished back to a gorgeous state) it’s well worth doing it. Often these old pieces have lived such a full life there’s extensive damage, the veneer is so dry and cracked along with so many other problems… sometimes it’s the ‘kinder’ way to give the piece a new lease on life… at least in my opinion. 🙂 Whatever you decide to do with your grandparents set will be the right decision for YOU. 🙂
Beautiful! Aren’t the appliqués fun??? I squealed a little the first time I used them. 🙂 Gorgeous makeover. 😘🙌
They ARE! I was squealed through the entire video I was SO amused! Game changer for sure! thanks and have a super day Do. x
Hi Denise. I’ve never heard ofWoodubend before. Is it available in craft stores or only online? Your cedar chest makeover is absolutely exquisite and very elegant. Beautifully done. Can’t wait until next week to learn more about the new group of bloggers you’ve joined:)
Hi Monique! 🙂 I believe only selected retailers carry WoodUBend at this time and you can find them here. They also sell online here. I can’t wait to introduce you and share my “Trash to Treasure” girls makeovers with YOU next week. They are all super talented ladies and so creative and inspiring. I’m so happy to be joining in on the fun! 🙂
Amazing as usual, my favourite so far. Plz could.u tell me the order and.method for the colour/ finish for this stunner, would love to try this on a dresser i have. thanks
Thanks, Steve and for sure. 1. Basecoat (full coverage) of Sandbar. 2. Sandbar mixed w a little Caviar to create a sort of greyish tone. 3. Dip half a chip brush in the ‘greyish’ and the other half in Spanish Moss and create texture by dabbing the colors together on your piece. (you can see how I do this while I’m painting the WoodUBend in the video) 4. Lastly, layer and blend Collard Greens (mixed with Caviar) where you would like it a little darker. I know it sounds like a lot of steps but it goes quite quickly. Hope this helps 🙂
So kind of you cant wait to give this a try thankyou Denise
Pleasure and have fun with your project. I’d love to hear how it turns out. 🙂