 Hi guys, thanks for all your well wishes. The flu has left the building and I’m feeling much better. For those of you who wrote in saying you were sick, I hope you’re taking good care of yourself and feeling better too! x
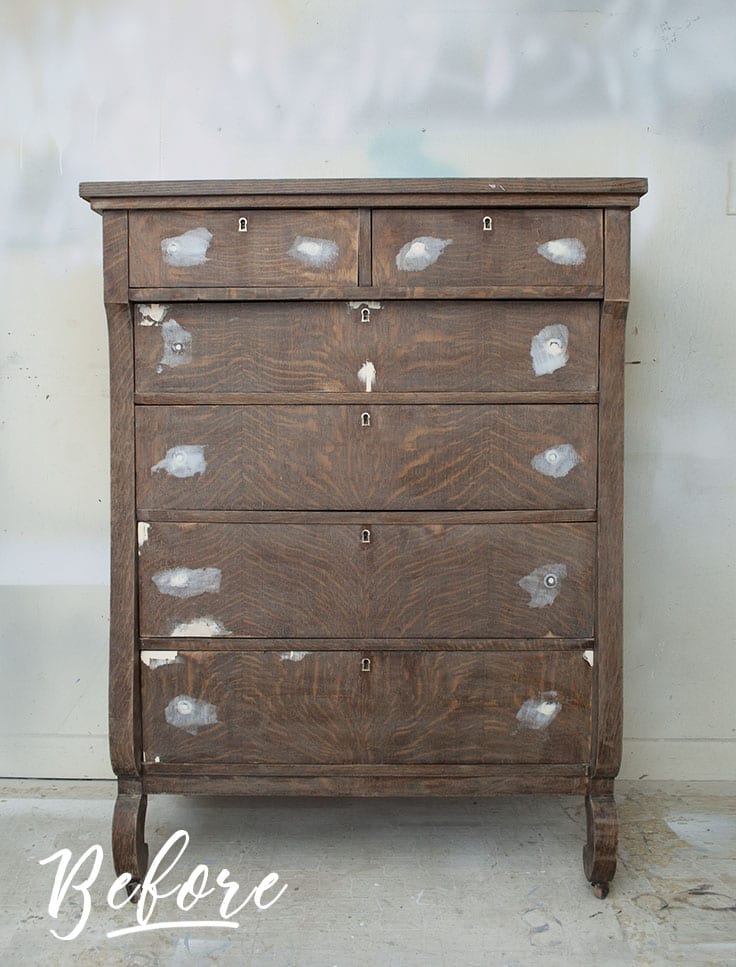
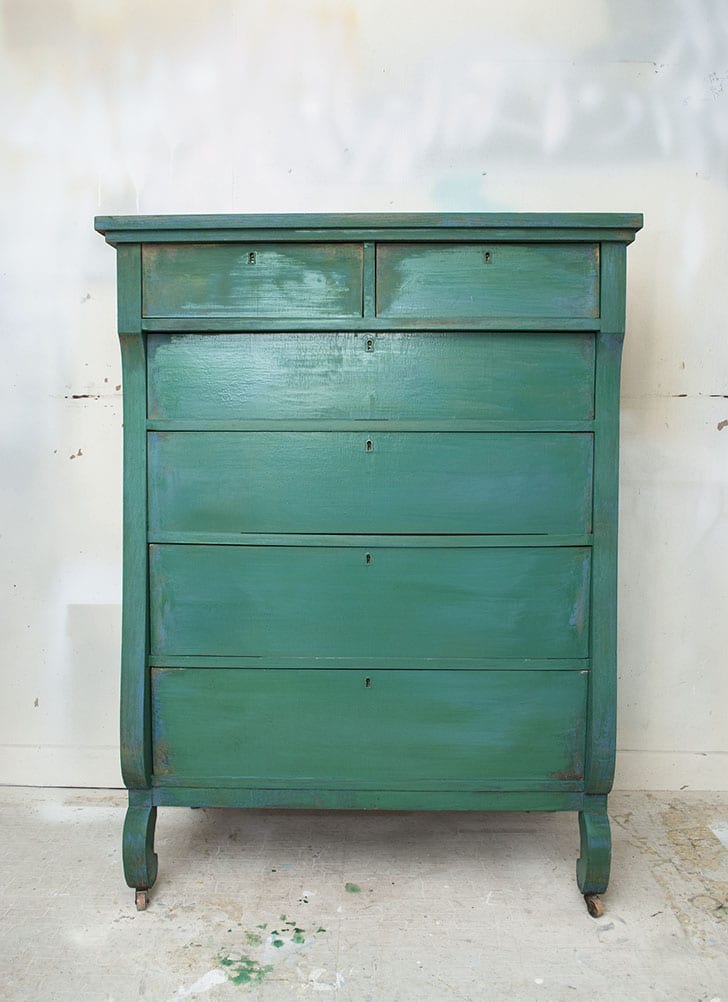
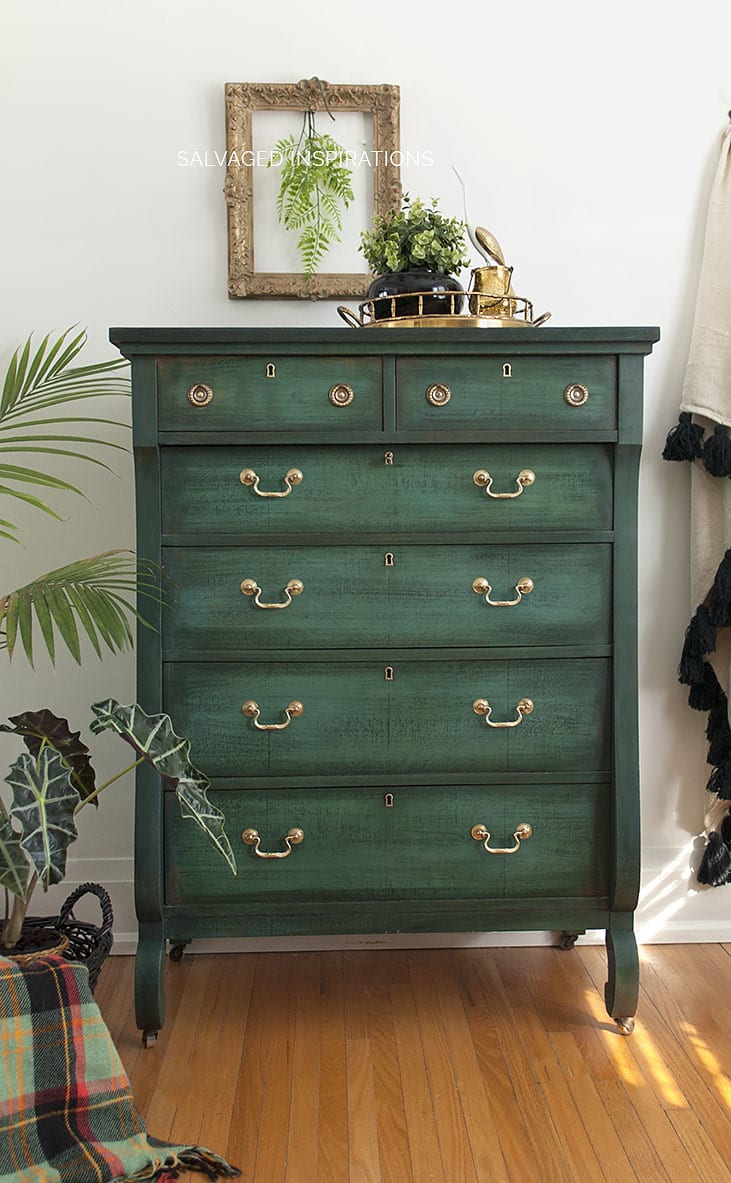
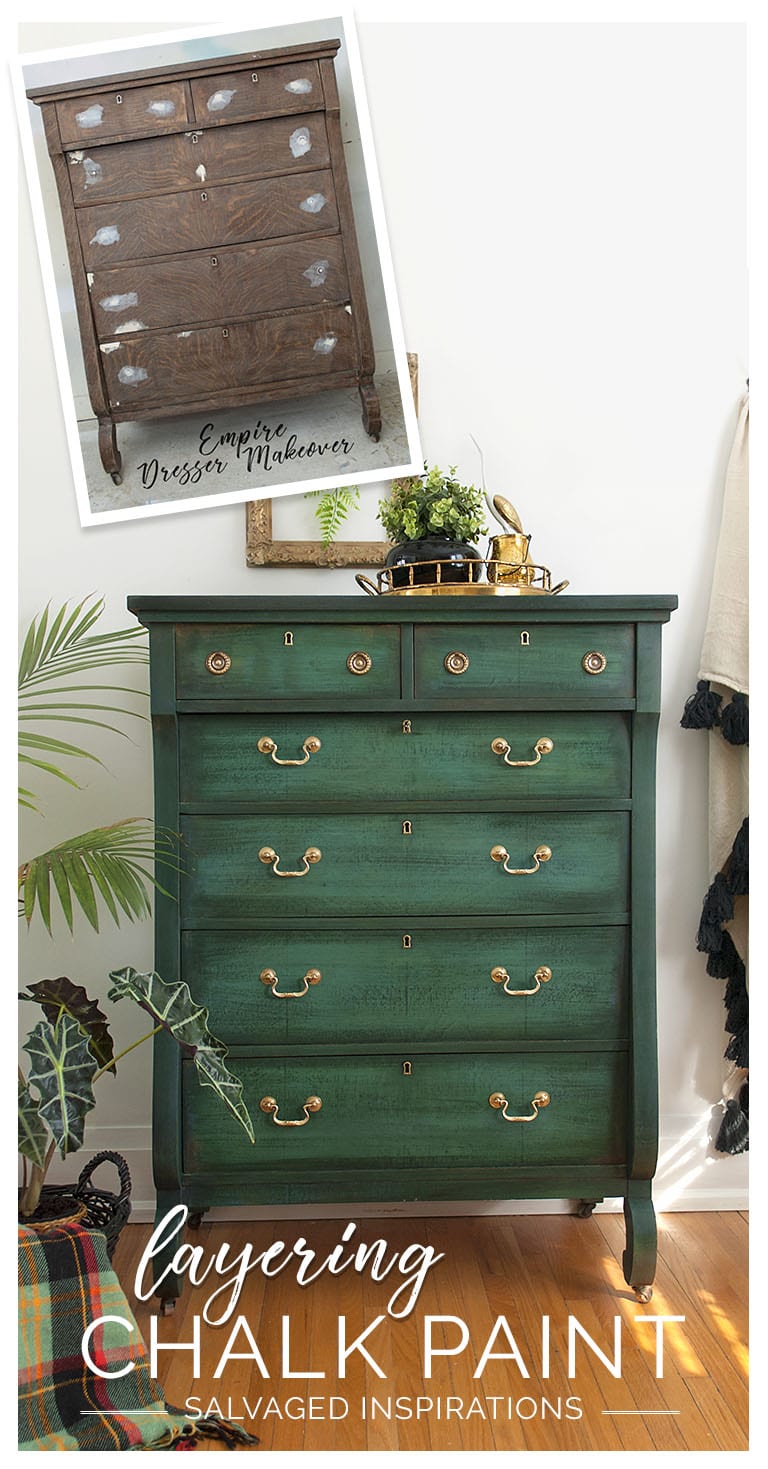
This piece was a real treat to work on because I don’t come across empire dressers too often. I was feeling adventurous and tried a new layering technique that involves painting a trio of colors in Annie Sloan Chalk Paint using a brush, a spray water bottle, and some black wax. I recently saw Debi from Debi’s Design Diary (I’ll include a link below) using a similar technique to create a vibrant piece of furniture. I used the simplified version of her technique on this empire.

 THIS POST CONTAINS AFFILIATE LINKS TO PRODUCTS USED. YOU CAN SEE MY FULL DISCLOSURE HERE.
 THIS POST CONTAINS AFFILIATE LINKS TO PRODUCTS USED. YOU CAN SEE MY FULL DISCLOSURE
 For all the years I’ve been painting furniture, I still find layering paint to be a little intimidating. The more colors – the more intimidating! What colors should I use? What paint technique will be best? How should I blend the colors? What top coat should I use? There are so many different methods of layering chalk paint so I stuck with the bare basics and here are the steps I took to achieve this look.
SOURCE LIST::
- Empire Dresser ( Salvaged | Estate Sale – kind of… you can read more here)
- Paint Brush
- Water, TSP and Scrub Brush
- Brasso & Brass Hardware ( Salvaged from another old dresser)
- Spray Bottle
- Sand Paper & Tack Cloth
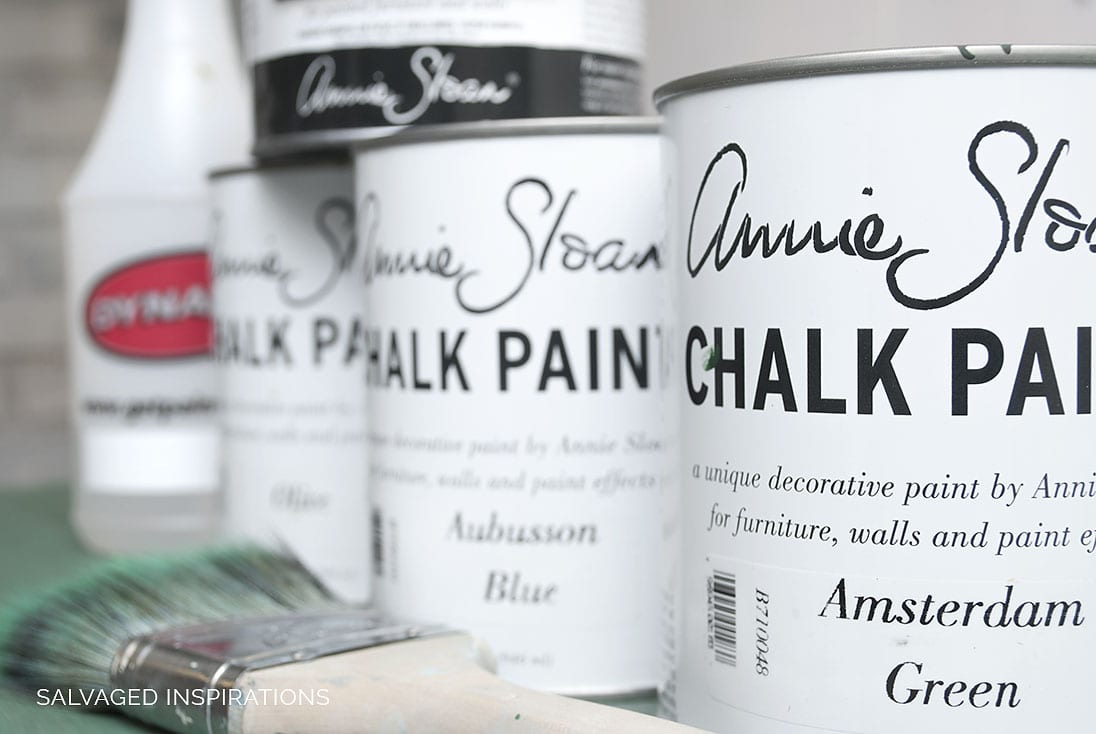
- Annie Sloan’s Olive, Aubusson Blue & Amsterdam Green
- Annie Sloan’s Black Wax
HOW TO – LAYERING CHALK PAINT
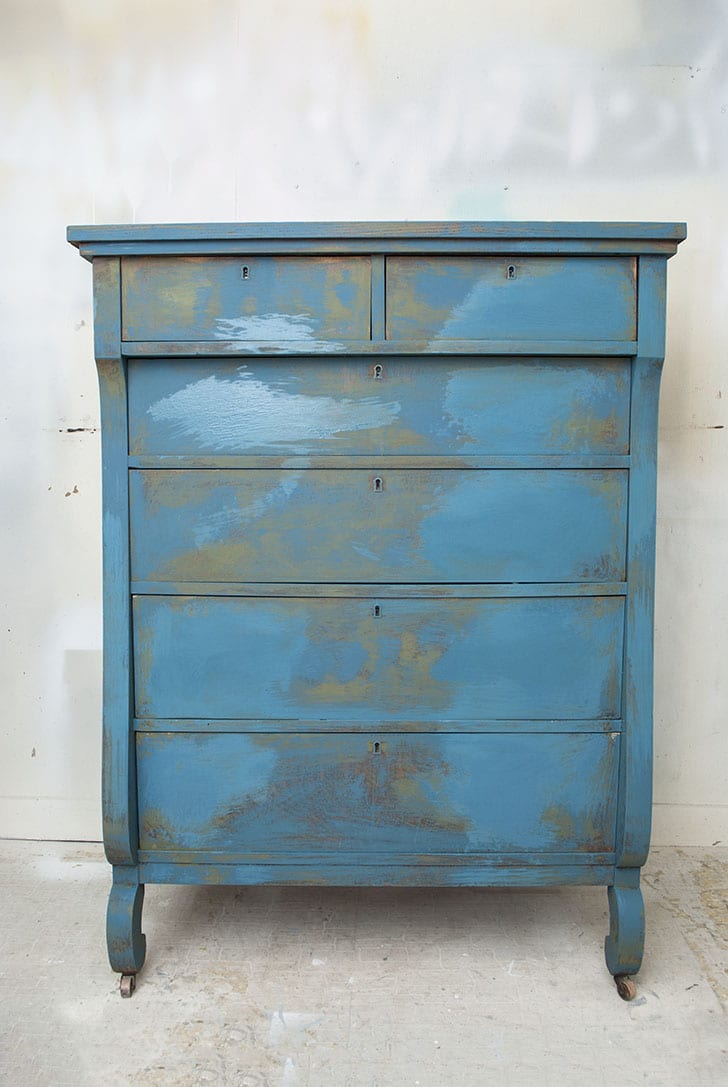
I should warn you, it gets a whole lot ugly before it starts looking good.
:: I started by cleaning the entire piece with water, TSP, and a scrub brush.
:: Then I patched and fixed all the missing veneer and old hardware with Bondo and sanded the Bondo smooth.
:: I gave the rest of the dresser a light sanding with 180 grit and then wiped away all the dust with a tack cloth.
Now for the fun… and the ugly…
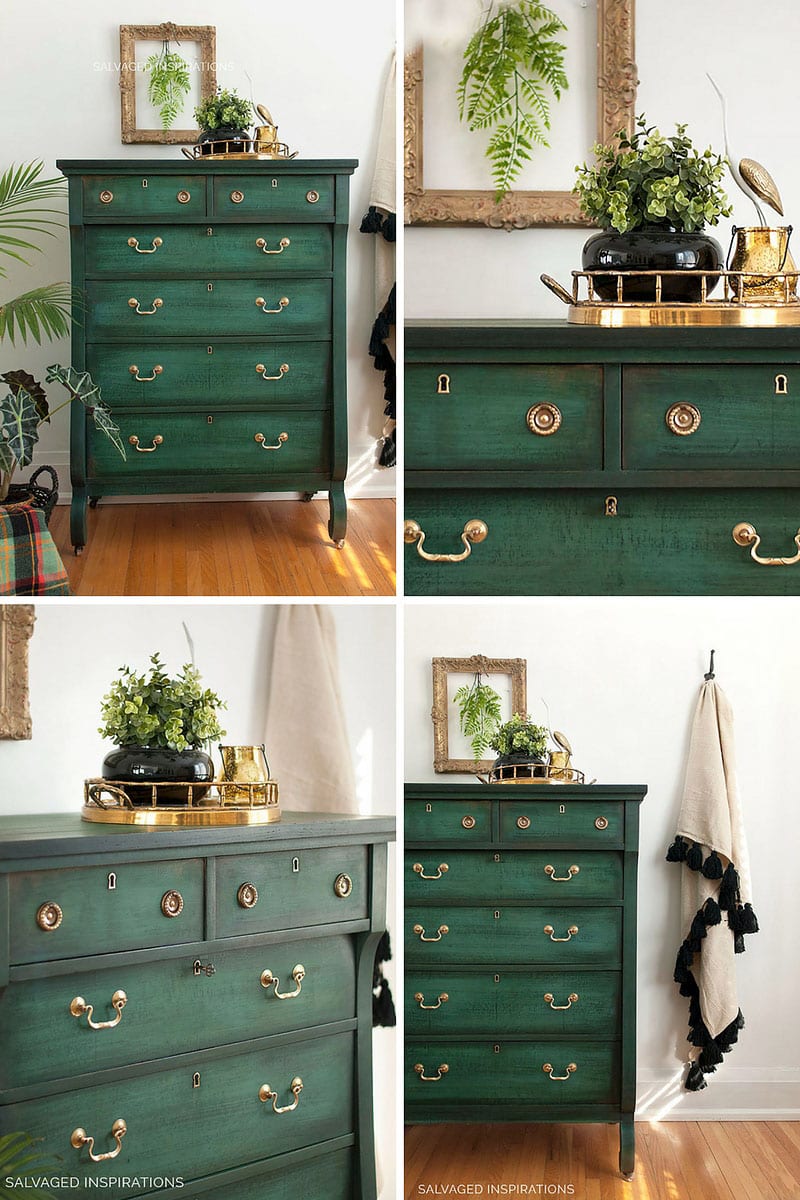
:: I chose my colors carefully. I wanted this empire dresser to have depth and rich-blended-jewel-tones while looking old-world-distressed.
Color #1 Annie Sloan’s Olive
I applied AS Olive in a random dry brush technique. Heavy in some areas, light and feathery in others.

Color #2 Annie Sloan’s Aubusson Blue
I layered on the blue with exactly the same brush technique as the first coat in Olive. With both these colors painted on the dresser, you can see there are some heavy areas, light areas and even a few areas where the natural wood is still peeking through.
Color #3 Annie Sloan Amsterdam Green
The green was brushed on liberally. Then I took my spray bottle filled with room temperature tap water and sprayed the wet paint with the water. I let it sit for about 30-60 seconds before I took my paint brush and blended it into the Olive and Aubusson Blue leaving little areas (like around the corners of the drawers) with the first two colors revealed. There’s even a little wood left revealed too.
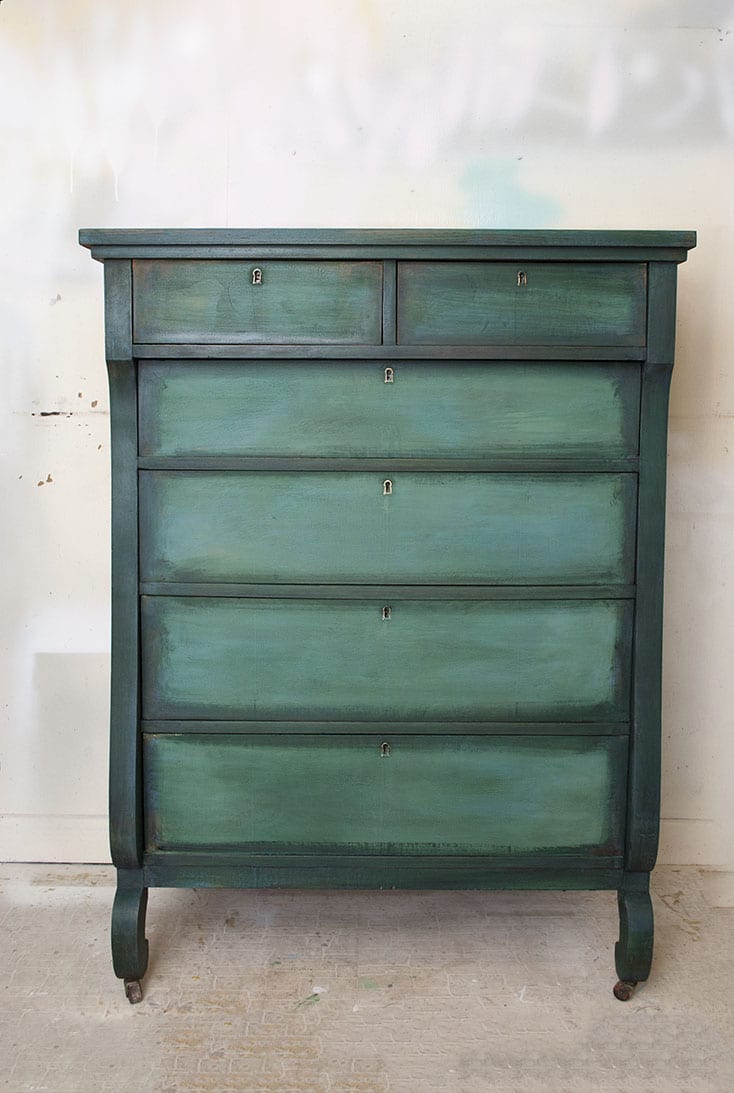
:: Each layer of paint was left to dry for about two hours before applying the next color and I only sanded the very last coat before applying wax.
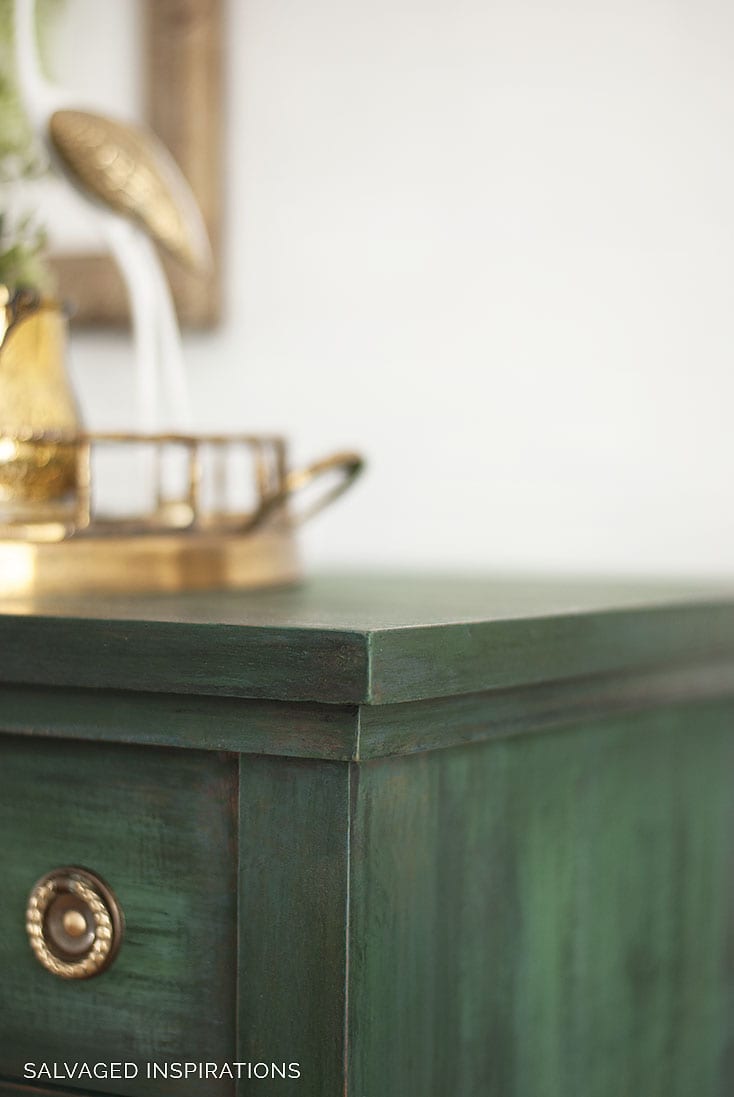
:: The AS Black Wax and applied generously around the edges and then I lightly brushed it into towards the center. The brushed wax is the same technique I used on this Weathered Wood Dresser here.
:: The finishing touch – these brass handles I salvaged from another old dresser. I keep ALL my old hardware. A little Brasso or natural cleaning and they can look brand new.
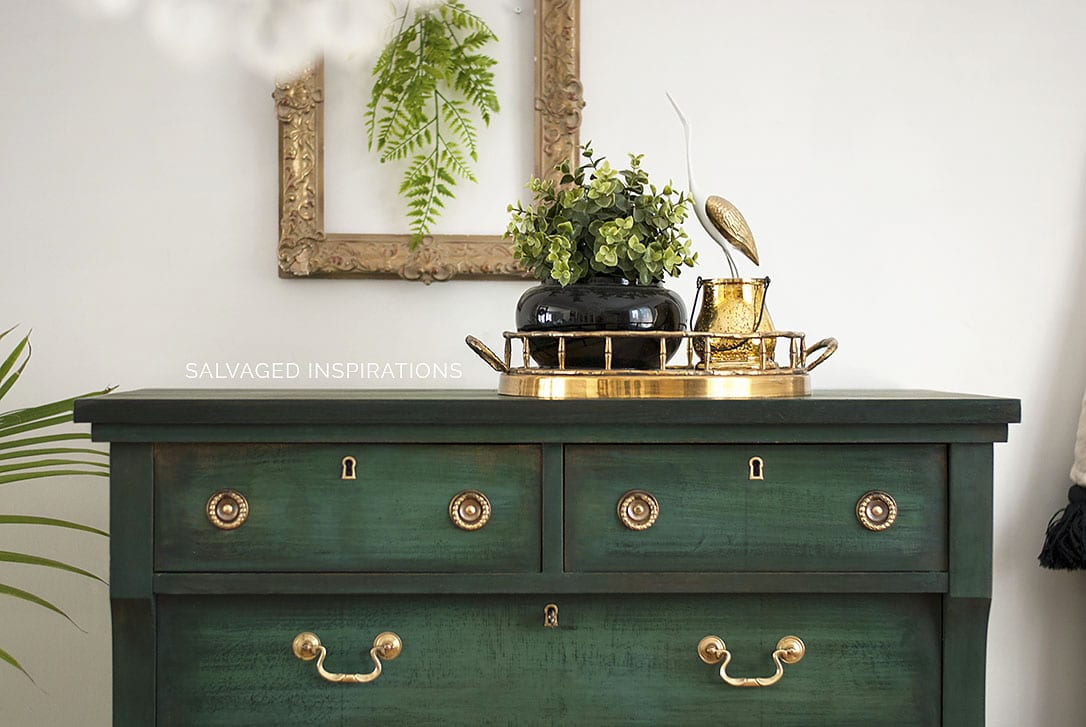
I really like this old world distressed look and will be trying it with different color combos in the future. Actually, I have an old vanity in my inventory that I might try this technique on.

Benefits of Layering Chalk Paint
Some benefits when layering chalk paint is very little paint is needed and your brush strokes don’t need to be precise. Also, if your piece of furniture has imperfections like this empire dresser did, they are easily hidden with this technique.


Oh, and before I sign off, thank you so much to all of you that took the 2018 Reader’s Survey! Your comments are amazing and I’m loving all your feedback. I’m going to keep the survey open for another week before I draw a name for the $100 Amazon Gift Card so if you haven’t taken it yet, it only takes a few minutes and is totally anonymous. I’d really appreciate your input. My goal is to keep creating posts that inspire you to tackle that DIY project and of course posts you enjoy. 🙂
2018 READER’S SURVEY LINK HERE!
Debi’s Design Diary Layering Technique
I’D LOVE TO HEAR IF YOU’VE EVER TRIED THIS BEFORE? IF YOU HAVE ANY COLOR COMBO TIPS YOU’D LIKE SHARE OR HAVE ANY QUESTIONS, FEEL FREE TO CHIME IN… I ALWAYS LOVE HEARING FROM YOU!
Thanks and have an inspiring day my friends!
Denise x

Thank you so much for this tutorial! I used it on an old dresser (with different colours) and it turned out perfectly.
Hi Jordan! My pleasure and so happy your dresser turned out perfect! 🙂
I have a dresser that is painted Sherwin Williams Rosemary, a nice green shade that I love. I’m trying to “age” the piece. Can I use the wax over this paint? Would I need to use something over the paint first?
Hi Jackie and yes! You can use a dark wax over paint to age a piece and if it’s ‘not taking’ (which could happen depending on the type of SW paint was used All Surface Enamel for example) you might want to try using a glaze to create some age/patina. Hope this helps.
Can I use it on a ceiling?
Stunning job! Love the color scheme, and your directions are so easy to follow.
What type of brush did you use?
Thank you Robin! For this makeover I used this Purdy Brush.
By chance do you remember the dimensions of the drop bail handles? I can’t seem to find ones that fit. The dresser turned out beautifully, but I’m spending lots of money on trying to get the right fit handle.
Hi Dee! It’s been a few good years so unfortunately I don’t remember the dimensions of the handles. I hope you find the right fit!!!
Hi Denise!
I’ve just found this layering tutorial. The green dresser turned out beautifully! I’m always so impressed and envious of your talents.
The dresser I’m currently working on has similar little brass key holes. How did you clean them up and make them sparkle without harming the paint when you finished the dresser? I wasn’t able to tape them before painting since they as so tiny but I’d love to have them shiny like yours.
Thank you very much!
Val
Hi Val! While painting you can take a soft cloth and carefully wipe off the excess paint. I also used a high-grit sandpaper 320-400 grit (once the paint was dry) and sanded them shiny at the end. hope this helps 🙂
I love the way this looks! What if I was starting with a piece that was unfinished (bare wood). Should I stain/paint the piece first?
How did you remove the brass locks before painting?
Hi Bobby! I didn’t. They were painted over and then given a sanding and clean up.
What a beautiful piece, yes it definitely was a ugly duckling for a minute, but it’s amazing how how all the colors blended well together. I just came across your blog looking at painted furniture and thank you for sharing your techniques and how to get this rich jewel look, it’s very elegant.
Thank you Pamela and a BIG WARM WELCOME to the #siblog!🤗
Hi Denise, You have a fan in The Netherlands, love the endresult, I,m going to give it a try too. By the way, I,m loving the work of Leslie Stocker(colorways) as well, you can find her on you tube. She uses Annie,s chalkpaintb for blending very well. There are some nicevpictures on pinterest of her work too plus great colourcombinations. Love your channel, bye!
Hello Lulu from The Netherlands and a BIG WARM WELCOME! If you give this a try I’d love to hear how it all turns out for you!
Hi! Gorgeous! When u apply the black wax its over the entire surface right? Just lighter in the middle and heavier around edges?
Thanks Charlene! Ånd yes, exactly.
Hi! I love this tutorial. I’ve had it for years and now I’m finally doing it.
I need to know if the blending with the brush part (after spraying with water) is done with the same brush you applied the green paint, or if it is done with an extra clean dry brush.
Thanks!
Thanks Raysa! I used the same brush but if you’re finding its not producing the results you want, grab a new ‘clean’ brush. Have fun!
Thanks so much for the info!
My pleaure Raysa!
Oh Lord knows I tried… I had to paint it green because I could not make those other colors underneath show through. I don’t know if it was the paint was too thick, or if I applied too much green before I tried to blend. Anyways, green is always a good color too.