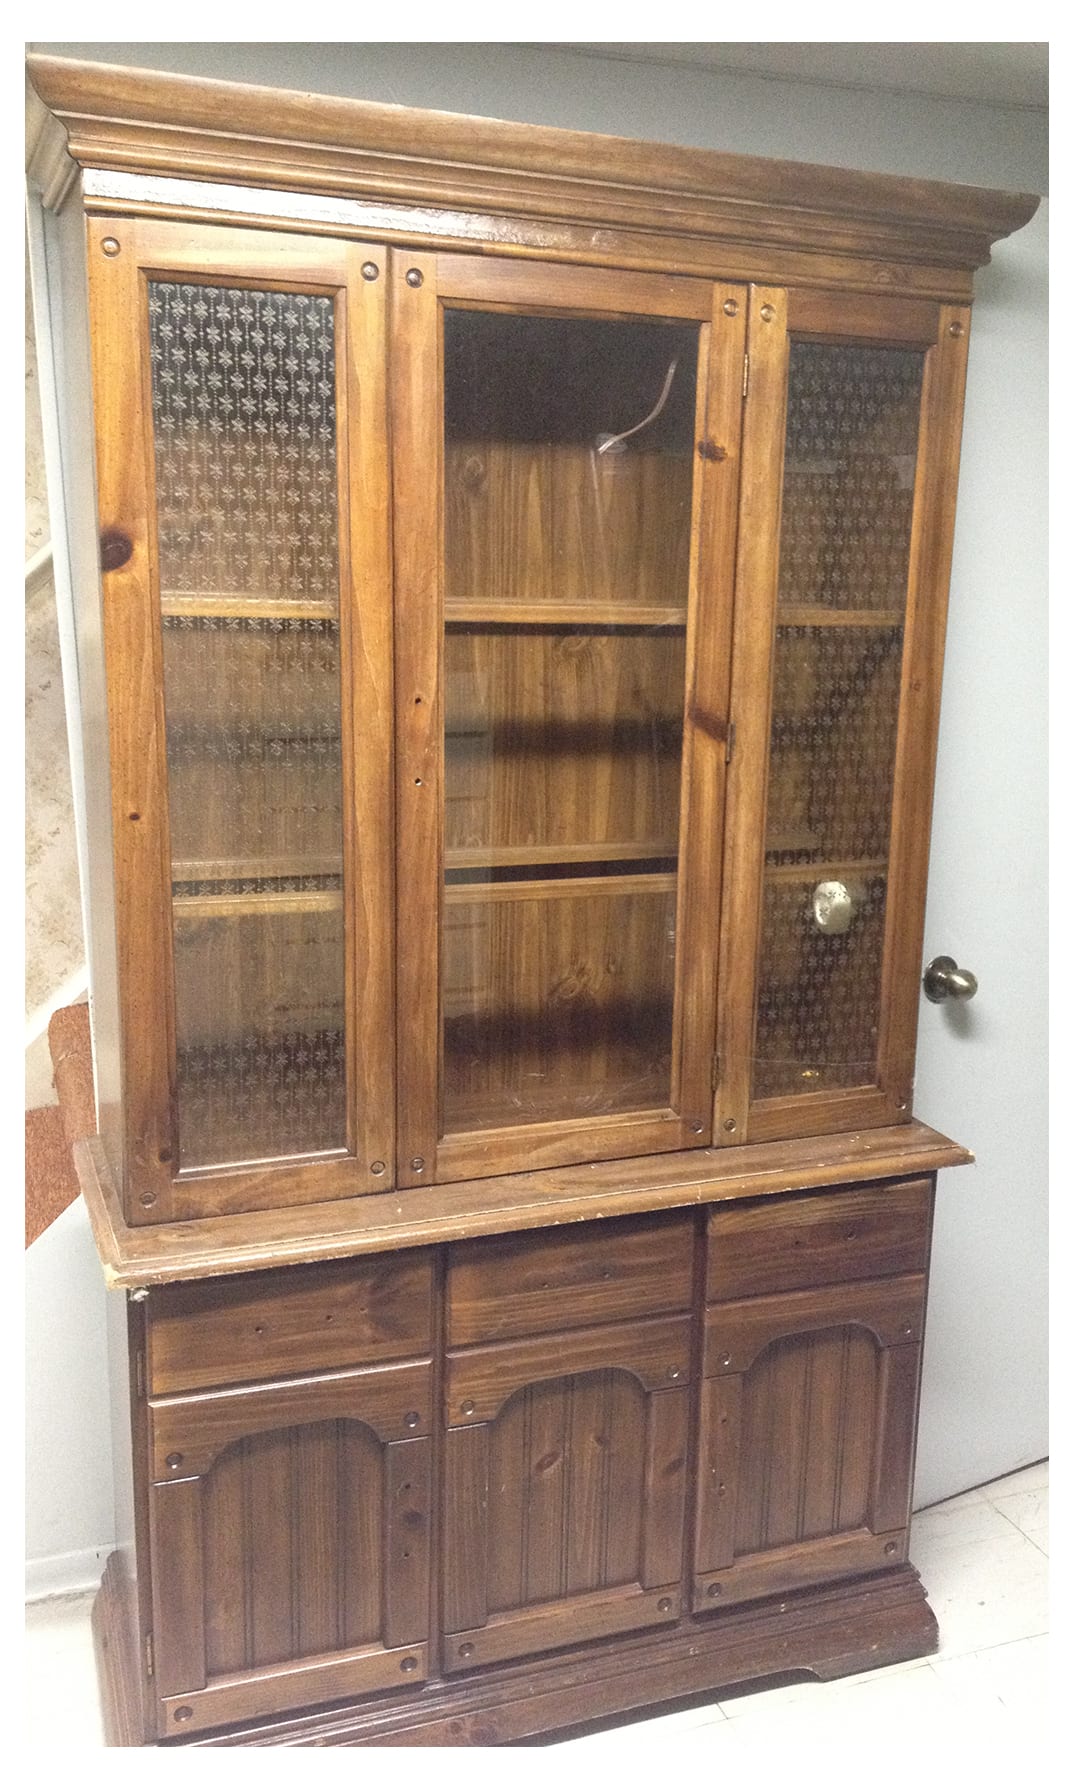
I’ve been having a lot of fun working with milk paint lately. I’ve used a variety of brands on real wood and wood veneer, but until now, I hadn’t tried painting a laminate piece of furniture with milk-paints.
When I hauled this 80’s china-cabinet from my inventory, I thought this would be a fun piece to experiment on.
The buffet and hutch screamed Farmhouse-Chic to me!
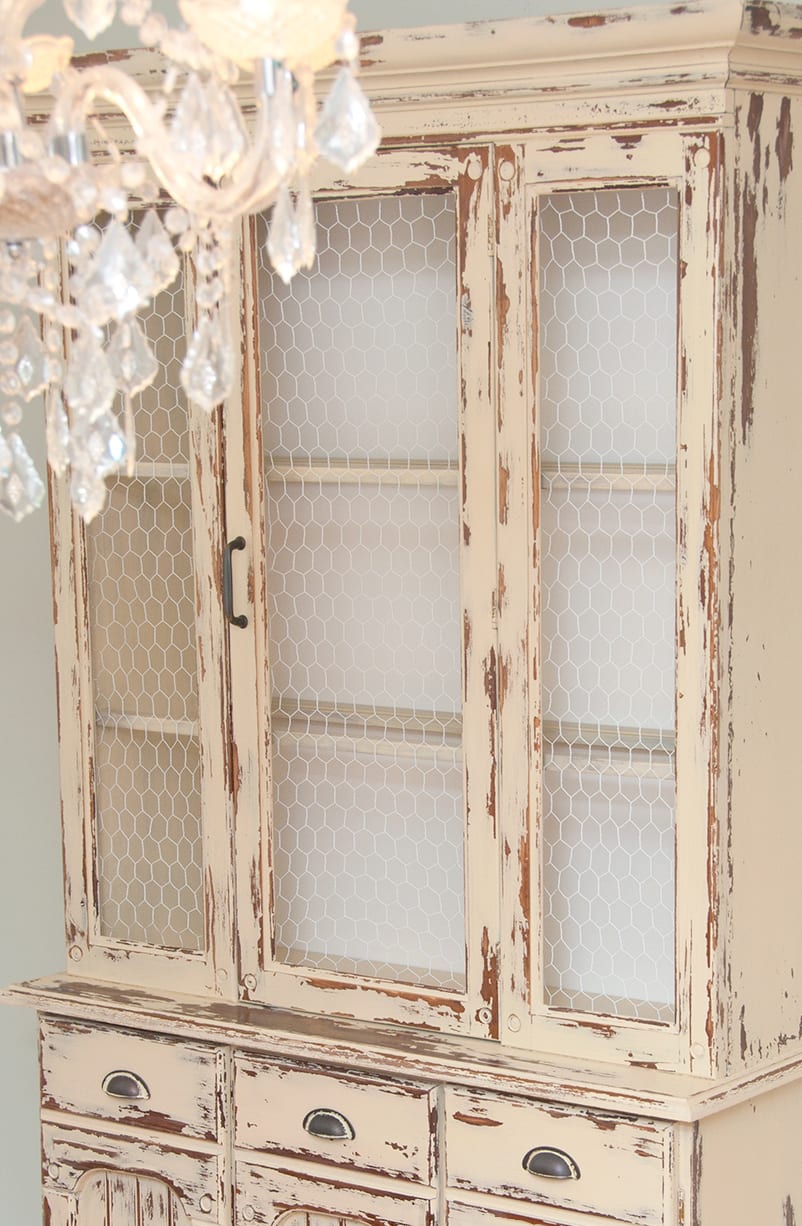
My vision was a chippy, worn and distressed Country Farmhouse Hutch in a soft muted yellow with chicken wire replacing the glass.
I guess in hindsight, it might have been easier to experiment on a smaller project. This piece took me 3x longer to finish than expected and gave me some nerve-racking moments along the way.
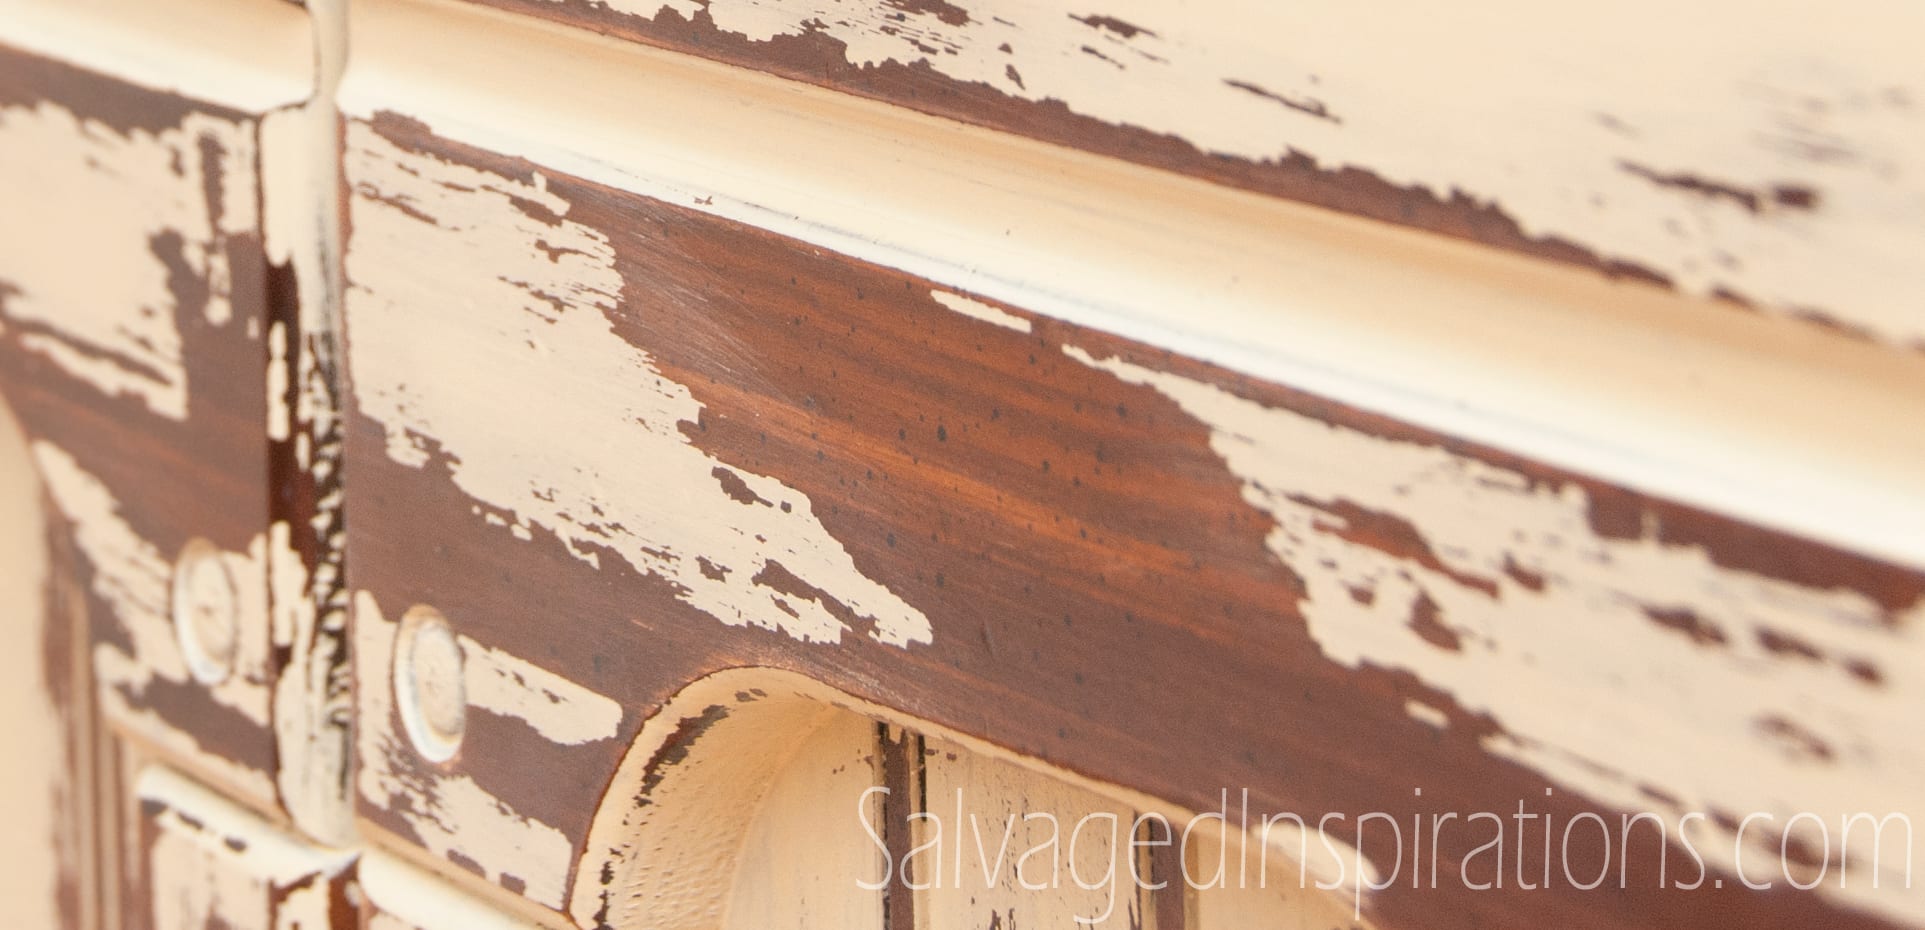
I added bonding agent to help the milk paint adhere to the laminate but NOT ENOUGH…. only about 1/2 of what I could have added. (I thought I was being smart because I wanted it chippy!) The milk paint chipped like I hoped it would… but it chipped like CRAZZZZZZY!
In some places the paint came off in large strips rather than just chipping.
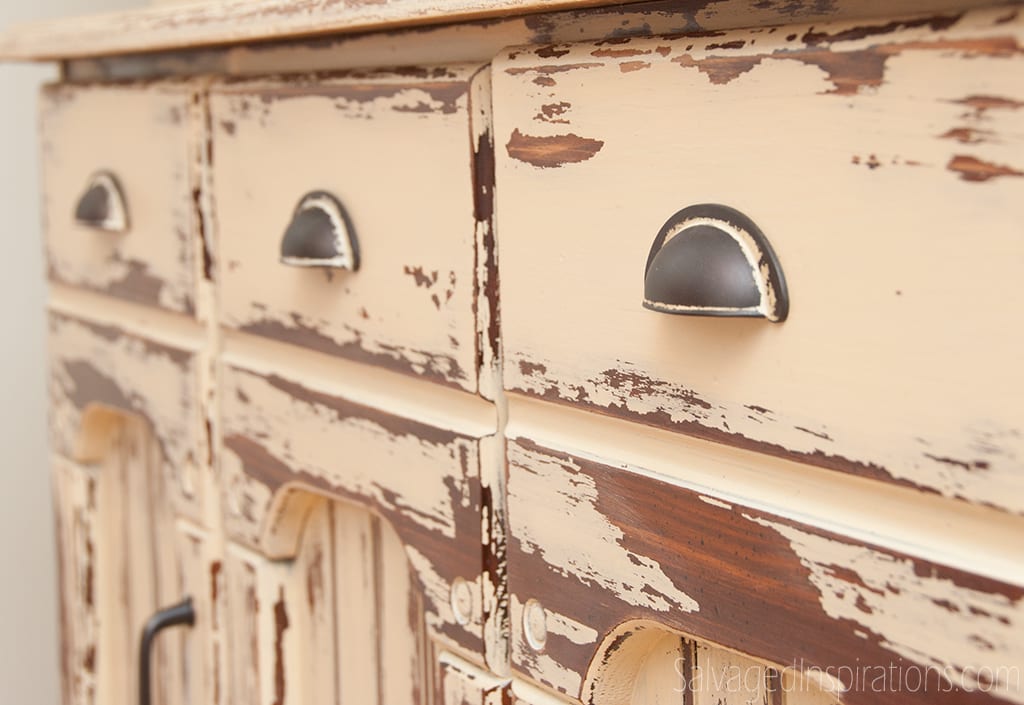
I’ll be honest… as the paint was coming off in sheets, I was hating this piece. I thought OMG, this piece is going to end up with very little paint left on it and look just horrible.
I kept plugging away though… I lightly re-sanded and re-painted in a few areas that were “too” exposed. I painted the inside of the buffet, back of the hutch, and chicken wire a clean white. Then I bought simple cup handles that are a perfect match to the Buttermilk Yellow Old Fashion Milk Paint I used.
This hutch is still VERY distressed and chippy, but once the entire piece was finished and I stood back to take a look, I loved it!
What do you think…. does this piece have country charm!?

Here are the steps I took to Milk Paint this Laminate Hutch… and a few things I learned along the way:
1. I gave the inside and outside of this piece a good cleaning with a damp sponge. It wasn’t stained or greasy so this was enough to get the dirt off.
2. I lightly sanded with a medium fine sandpaper (150-220 grit) being VERY careful not to sand through the laminate. I sanded with a very light hand just to get enough ‘tooth’ to ensure the milk-paint has something to adhere to. There are different opinions on sanding laminate. Some websites caution against sanding laminate surfaces because you can easily sand through to the wood composite. Other websites say because laminate surfaces are shiny and slippery, sanding is a must. I’d love to hear your opinion.
3. I add Bonding-Agent to my mixed Milk-Paint to help the paint adhere. Like I mentioned above, I only added about 1/2 of what the bottle recommended. Next time I use milk-paint on laminate, I’ll be adding the maximum amount of bonding agent to be sure I get the best adhesion possible.
I have a new appreciation for all you furniture artists who use milk-paint to create gorgeous chippy pieces. Contrary to what some people say, these pieces take a lot of work! Arm me with a spray gun and I would have finished 3 pieces in the same time it took me to finish this one….lol.
If you’ve ever painted laminate furniture with milk-paints, please let me know how it all turned out for you. And if you have any tips or suggestions, I’d love to hear them… including whether or not you sand laminate before painting.
Enjoy your day!
Denise x

Does anyone know how to *remove* milk paint other than that one product on the market? There seems to be some DIY recipes for it but none of them seem to definitely work, they’re kind of hit or miss. If anyone has any advice, it’d be much appreciated!
Hi Michelle! Aside from sanding if down and/or off, I’m only aware of one product that eats through this protein based paint. Here’s a milk paint removal vid here. If anyone else is aware of any products they can recommend to Michelle, feel free to chime in. 🙂
Would you do this on a small kitchen cabinets? I don’t want to take down and sand the doors. Would this work ?
Love what you did with the hutch !!!
Hi Deana! This will work on kitchen cabinets. However, milk paint is unpredictable and kind of does it’s own thing. You may end up with more (or less) chipping than you envisioned. I would suggest giving the doors a light sanding to create a little tooth/scuffing (they can remain hanging while doing this) and then mix in Bonding Agent with your Milk Paint. 🙂
I did a very light sanding and applied 1/2 the amount of bonding agent to my laminate hutch but it did not chip off hardly at all!!! You never can tell what milk paint will do–no I have to have another approach because Im using 80 grit and its still not hardly coming off!! Emily in Santa Barbara,CA.
Milk paint is unpredictable, isn’t it!? I hope your laminate hutch turns out as you envisioned Emily!
OH AND BY THE WAY…I LOVE IT.
Thank you! 🙂
WHAT DID YOU USE TO SEAL IT? I USE WAX WHEN I USE CHALK PAINT..
I believe I waxed this piece Tammy.
If I only had half the talent you do, I would be thrilled! Could you tell me which paint is more durable, milk or chalk paint? Which is least expensive (including primers, bonding agents, etc.)?
Aw thanks Cassie! 🙂 From my experience, chalk paint and milk paint are equally durable if applied properly and sealed properly. Cost wise, unless using a DIY Chalky Paint, milk paint is the more cost effective between the two…even when factoring in the bonding agent. Having said that, I think they each lend themselves to such different looks, it’s nice to choose one or the other depending on the look you’re trying to achieve. Just my 2¢ 🙂
Great job on the hutch! I was wondering what brand milk paint you used? I love the color and would like to try it on a piece I have! Thank you for sharing
Thanks Kat! I used Old Fashion Milk Paint in “Buttermilk Yellow”.
Was looking for ideas and found your china cabinet which looks great! Love the color and the distressed look of the milk paint and plan to try it. Beautiful farmhouse look.
Love this. I was looking through images to get paint ideas and saw this cabinet, which is the same exact cabinet I picked up today. Mine is painted black, may have stain over that, so I might just have to go with a solid look. Love the chicken wire but I might stick with the glass, if I can get the design off.
Hi Denise!
I must say, that cabinet is looovely! Not to much, not to little, and very fashouse 🙂
I have a big cabinet/sideboard with lots of carvings and crinkles that I am painting with MMS grainsack. I have never tried milkpaint before, but I am formiliar with chalkpaint. Hopefully I`ll manage:) Have a look at the sideboard on my blog that is awaiting to be overhauled, frugalfurbishing.blogspot.no/2014/10/the-mysterious-antique-sideboard.html Have a nice day!
Thank you Tone! And your cabinet is gorgeous. I’m sure it’s going to look amazing painted in MMS Grainsack!
It’s just beautiful! I don’t usually like the really chippy look, but this is just gorgeous. I love those cup pulls, too. Did they come with the paint on then already? Can you tall me where I can find them?
I was hoping someone would comment on the pulls! I purchased them from Lee Valley and the paint detail WAS on them… it couldn’t have been a more PERFECT for this hutch!
I have painted with milk and caulk paints..still don’t see the name of adhesive u used..covered with your photo..like both paints however HATE those thin/watery colors..have also made plaster or grout paint with ok results..always use rubbing alcohol or vinegar for cleaning-everything..suppose your cleaning agent is sudless ammonia?
Hi Rena! I used Miss Mustard Seeds Milk Paint Bonding Agent. As for cleaning agents, I try keeping it as natural as possible. Warm water, soft cloth, vinegar. For the heavy duty hard to remove stuff, TSP. If you still have a problem viewing the comments, feel free to email me. 🙂
No wonder I don’t care for brown anymore! You took this piece from heavy and boring to featherweight and interesting. Thanks for sharing.
I LOVE, LOVE this!! The chicken wire sets it off beautifully! 🙂
Thanks Wendy!
Loved the chicken wire in it. That brought the piece to a whole different level! Great job!!
Thank you Netti! 🙂
Love it! One question…why was your choice milk paint vs chalk paint? What is the difference?
Hi Kelley! There are many differences between milk-paint and chalk paint (you just gave me a great idea for another blog post!) but the reason I chose milk-paint for this piece is I wanted the “chippy” look. Milk paint is known for it’s chippy distressed look where as chalk paint lends itself to a more subtle worn/sanded distressed look.
If you had used the chalk paint, would you use the same bonding agent or something else?
Your question couldn’t be more timely Teri! I’m just finishing up a tutorial on a few different ways to paint laminate furniture. With chalk/mineral paints, bonding agent or primer is not needed. But if its a shiny laminate surface, what I do recommend is a light sanding. I’ll also provide the link in this response once the full tut is posted! 🙂
I love the hutch! If I were to redo mine, that is the look I want.
Visiting from MMS
Thank you Daena… nice meeting you!
Gorgeous! I love everything about it! Did you add the door wire yourself or was it already there?
Thanks Olivia! Yes, I removed the original glass and added the chicken wire myself. I’ve had some people ask about the chicken wire so an upcoming post will be in the works shortly. 🙂
When I’m painting anything shiny I wash it down with TSP first. Tends to take the shine off, without the fear of sanding too much. I sometimes lightly sand as well. And milk paint is always finicky guessing when and how much bonding agent to use to get the look you want. You just have to go with it. I love this look!
Thanks for the tip Jane! And I agree, with milk-paint it’s good if you can just go with the flow. 😉
Newbie and email lurker here. I love all your posts!
What did you use for “bonding agent” … I searched your site but didn’t find any reference to a specific product?
I can’t wait to finally try one of these!
Hi DDJ! I used Miss Mustard Seeds Boding Agent. This is the only brand of bonding agent I’ve tried so far but there are others to choose from. Have fun!
Oh my God!!!!! This is amazing!!!!!!! Which milk paint did you use? I can’t believe the difference!! You did an amazing job!!! I LOVE it!!!
Thank you Tess! I used Old Fashion Milk-Paint in “Buttermilk Yellow”. 🙂
Beautiful job & really looks like it belongs in a farm house. Thanks for sharing your technique.
Pleasure and thank you Tracy! <3
I have never used milk-paints before but really want to! I love painting and restoring old furniture. You do a lovely job!
If you’re use to using conventional paints, milk-paint takes a little getting use but I’d encourage anyone interested to give it a try! You can get very unique results and it’s fun to work with!