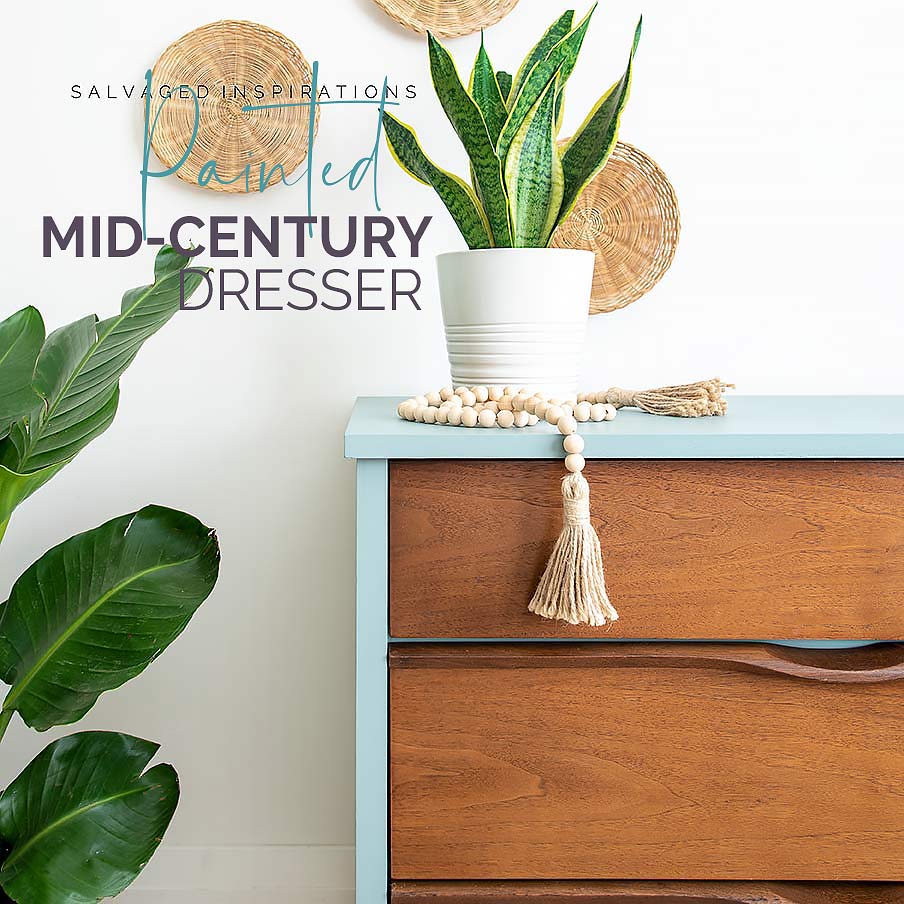
This mid-century modern dresser makeover turned out so chic! I’m sharing all the steps, tools, and paint techniques so you can try this easy furniture flip too. | Video Tutorial Included!
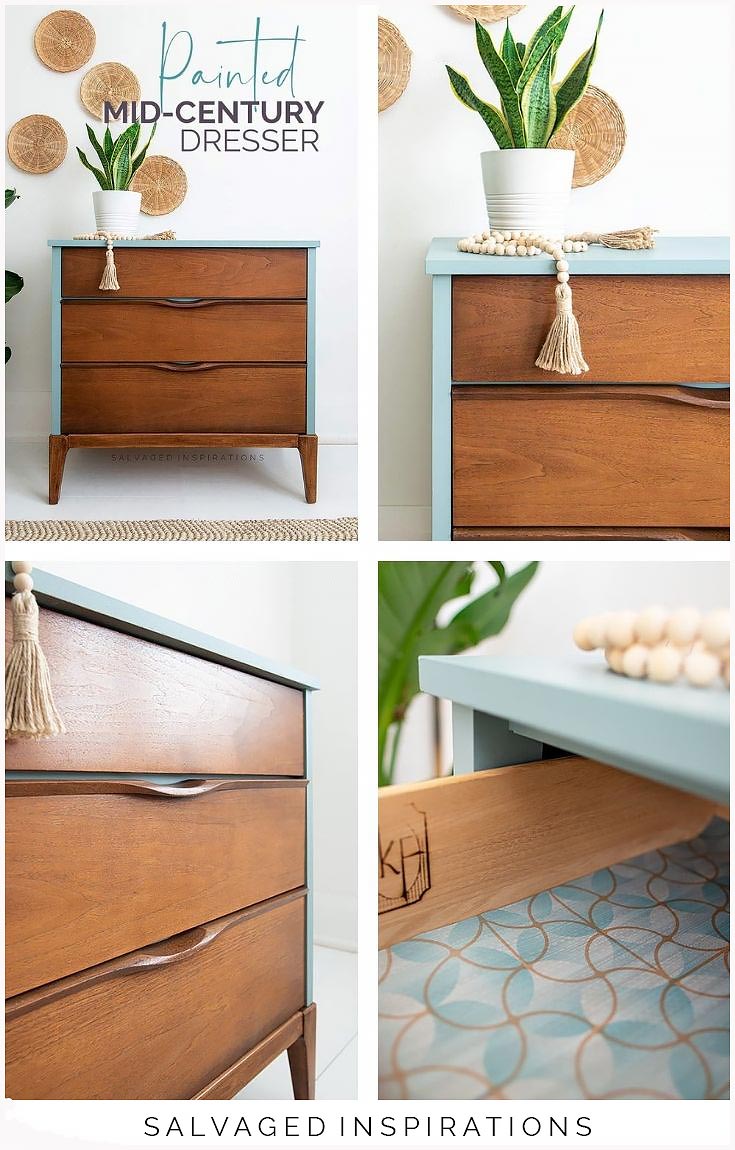
Hi, amazing creative friends! Today I’m sharing this gorgeous Painted Mid-Century Dresser Before and After! Mid-Century Modern (MCM) furniture isn’t what I usually gravitate to. But over the last few years, I’ve come to appreciate this style of furniture. MCM pieces have clean lines and gorgeous wood grain finishes that can be brought back to life in fresh new ways. So when I saw this adorable 3-drawer Kaufman dresser in my local Restore, I couldn’t resist. I have a step-by-step tutorial including…
- Easy stain matching tips
- A SUPER FAST way to fix small imperfections on an existing stain
- An inexpensive tool to sand rounded corners
- My thoughts on color theory for MCM (I’m no expert so this is just my 2¢)
**This post was originally published on July 6, 2021. As an Amazon Associate, I earn from qualifying purchases. There are affiliate links in this post to other companies/products I use and love as well. You will never be charged extra when you purchase through these affiliate links. If you buy from my links – A BIG thank you for supporting me and the #siblog! To see my full disclaimer, click here.
Let’s get started! I found this 3-drawer mid-century dresser at my local Restore selling for $80. I like to cap my finds at around the $50-60 mark but with thrift prices on the rise, it’s sometimes a challenge to find quality wood pieces at those prices. I’ll admit, that’s half the fun of salvage-hunting for furniture, though. It’s always fun searching out interesting pieces to flip!
Here’s how it looked at the ReStore. Isn’t she cute?

When I brought this piece home and gave it a good once-over, I noticed the top and body weren’t in the best condition but check out the drawers. The stained drawers were near perfect!

The inside drawer rails needed replacing, and there was wear and tear, but this was a solid piece of furniture overall.
THIS POST IS SPONSORED/CONTAINS AFFILIATE LINKS TO PRODUCTS I USE. YOU CAN SEE MY FULL DISCLOSURE HERE.
SOURCE LIST
Mid-Century Modern Dresser – SALVAGED
Shop Towel
White Lightning (Cleaner)
Dewalt Orbital Sander
Oscillating Tool (Similar)
Sandpaper | Tack Cloth
B-I-N Shellac Base Primer
Paint Sprayer
Trade Secrets Furniture Repair
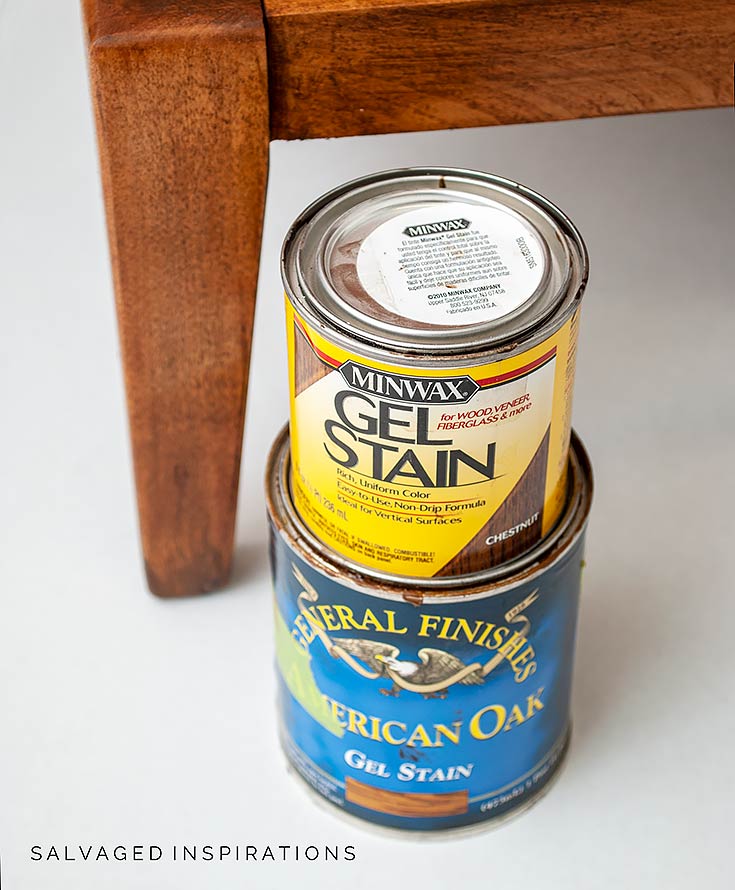
GF American Oak Stain
Minwax Chestnut Stain
Serenity Silk Paint
Satin Clear Coat
PAINTED MID-CENTURY DRESSER
Here’s how it all came together…
CLEAN AND PREP
I cleaned this dresser with White Lightning. I know I’ve mentioned this before but when cleaning my furniture, I always think – if it’s not clean enough to put my underwear in, it’s not clean! When I started selling my furniture, I was so focused on the exterior paint finish that I forgot to clean the bottom of the piece. I remember there were a few times we were loading a piece into the purchaser’s car and I saw cobwebs on the bottom. I have to admit, I was a little embarrassed and since then make sure everything is spotless.

PRO TIP – If you’re selling your furniture, clean EVERY nook and cranny on the inside, outside, back, and bottom!… until it’s clean enough to hold your underwear. 😉
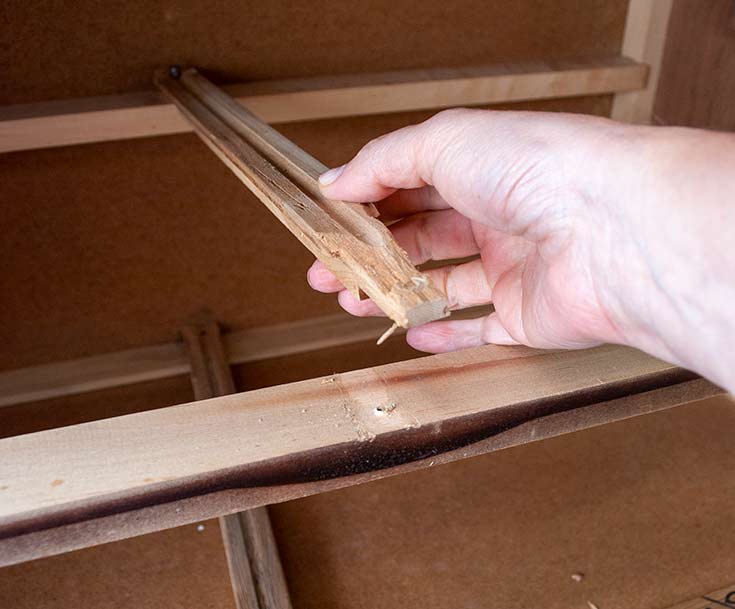
DRAWER REPAIR
Two glides for the drawers were in rough shape so I replaced them with new glides. Well, not really ‘new’. These were glides I’ve repurposed from a few curb-shopped pieces. I had to make a few adjustments with my oscillating tool (which is awesome for sanding, cutting, etc!) for them to fit like the original by cutting a piece from the front and back to fit perfectly and be the right height.

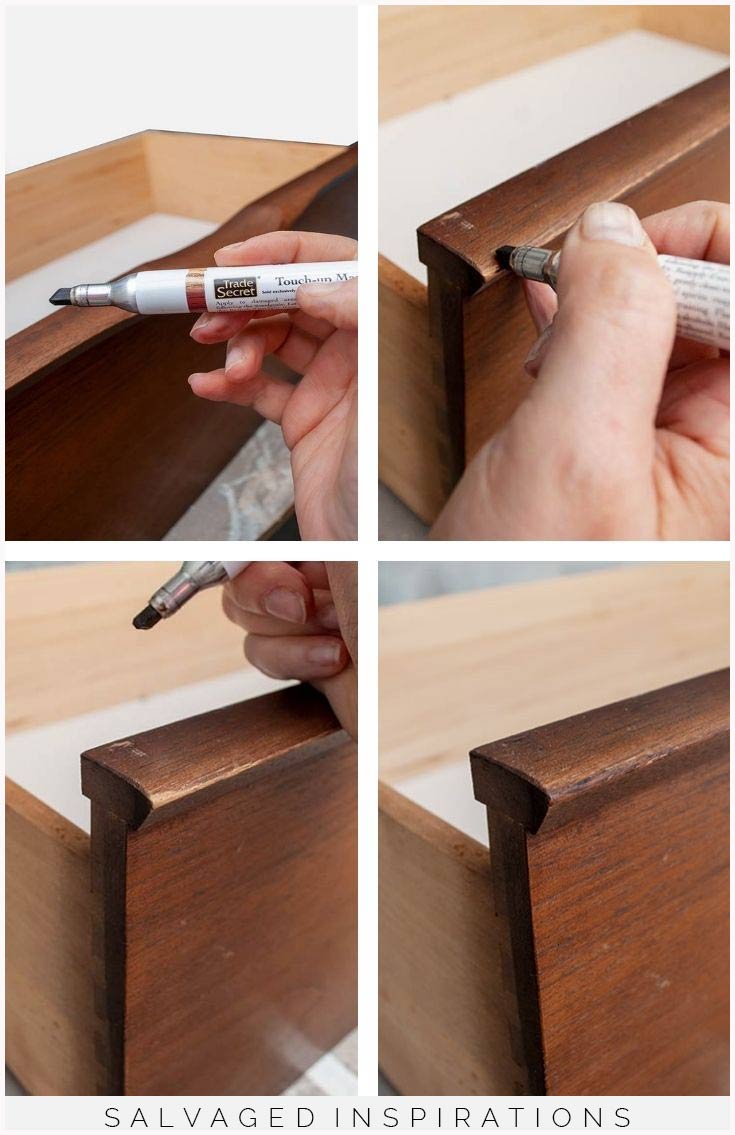
DRAWER TOUCH-UP
The drawer fronts were in great shape except for tiny imperfections in the stain. I used this Trade Secret Touch-Up Marker to hide the imperfections and it worked AMAZING! I have a few of these Trade Secret markers in my inventory. They come in different colors (light, medium, dark) to match a variety of wood stains. It’s been so long since I’ve used them, I forgot how great they work. I wouldn’t suggest this for large imperfections because it might be noticeable, but for small imperfections, it’s PERFECT… and SO EASY. If you can hold a pen or pencil, you can do this! It’s literally coloring in stain imperfections with this marker!
SANDING SKIRT & LEGS
I’ve found a few furniture YouTube channels that I’m addicted to. Made by Raphael and Modern Makeovers. These guys are transforming pieces from top to bottom, and it’s SALVAGING at the next level. I want to be just like them… only me…lol. So moving forward, I would like to get more comfortable using my tools, disassembling and reassembling furniture makeovers so that eventually I can mix and match pieces up and create an entirely new piece! So — inch by inch I told myself. I’ll start by disassembling pieces so I get a better feel of how they are put together, and eventually, I can start recreating pieces.
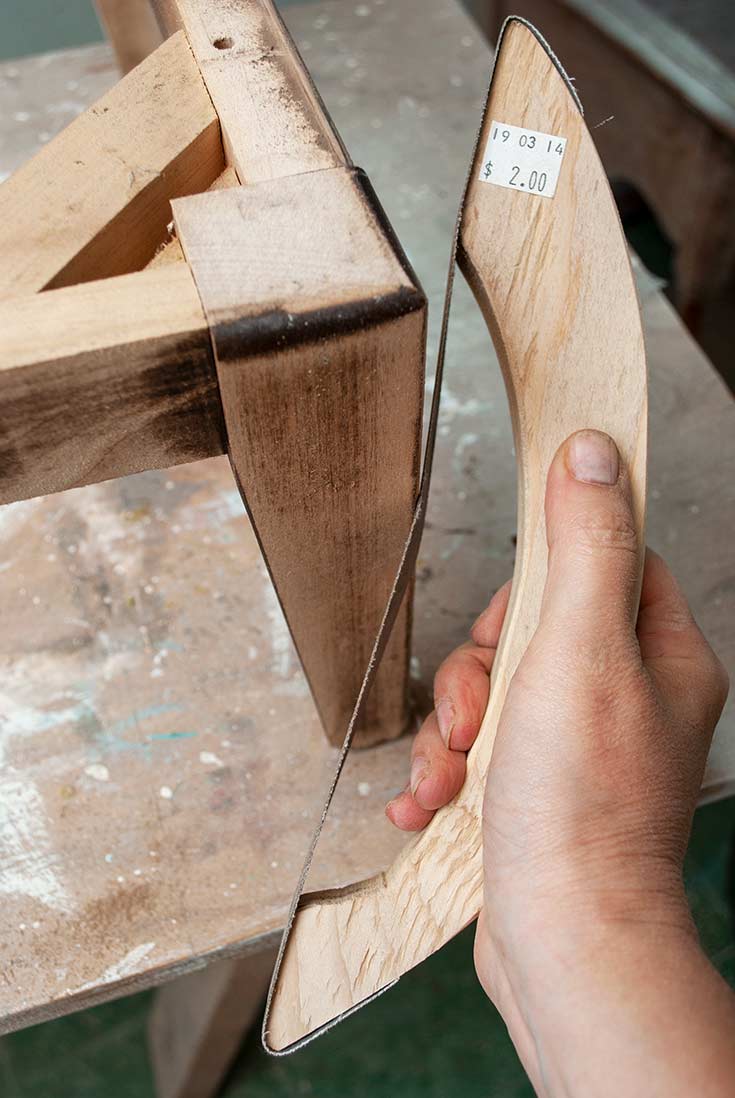
That’s a long explanation for why I removed the bottom skirt and legs. I wanted the skirt and legs to match the existing wood on the drawers and thought it would be so much easier if I removed them. I used my trusty Dewalt Sander (here’s a post on how to transform ANY sander into a NO DUST Sander) to remove the existing finish. I started with 80 grit, moved on to 120 grit and finished with 220. I bought this primitive-looking sanding tool at a flea market for $2… and WOW, it’s amazing for sanding rounded edges. I’m SO impressed! It has some give so it sands rounded areas beautifully. I wish I had bought a few of these but it would be pretty easy to make. A wood handle with a strip of sandpaper stapled to it and voila! If your unable to find a tool like this, a great hack is to add some sandpaper to duct tape and sand corners like I did HERE!
MATCHING STAIN
Once I had the bottom finish sanded off, I pulled out a few colors of stain to match the bottom skirt and legs to the existing stain on the drawers. Matching stain is trial and error, so testing is key. Luckily, I have a variety of stains on hand to play with. It would be a lot more frustrating if I had to go buy a few colors from HomeDepot not knowing if they would work or not.
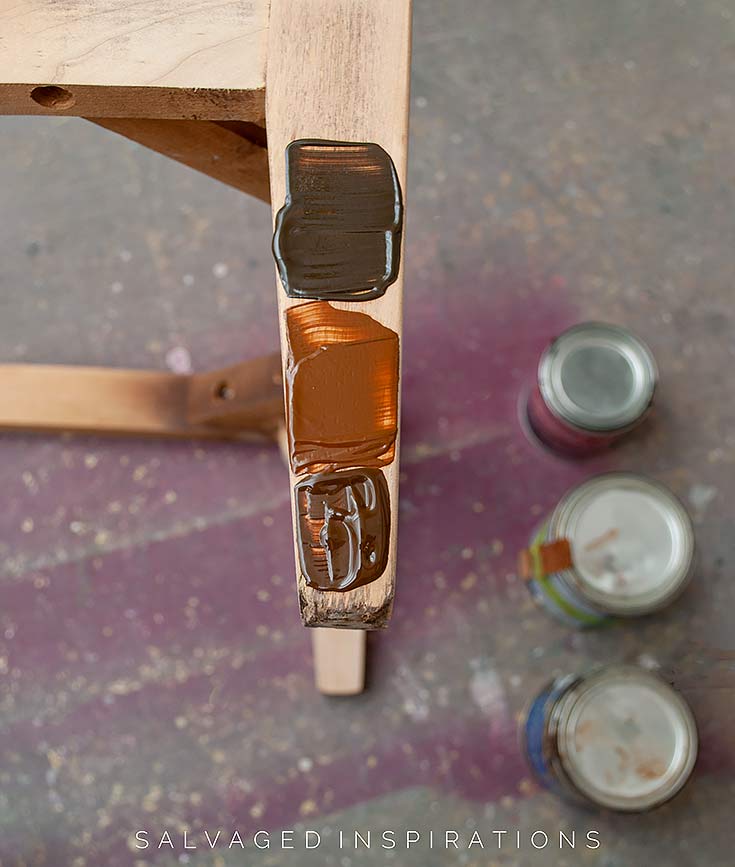
But I will say for the $10 for a small can, even if you bought 3 for $30 for a PERFECT match it’s still well worth it and still way less expensive than investing in a new quality piece of furniture. I ended up using this American Oak by General Finishes and Minwax Chestnut for a perfect match. It’s pretty darn close, don’t you think? To match the stain, I like to look at the prominent base color, which in this case was a reddish base, and then take it from there. I work on the BACK of the leg (inconspicuous area) to do my test matching. If I botch it up, it’s easy to sand down the leg and give it another try. I also waited until the stain was perfectly dry before putting it up to the drawers I was matching it to so I’d get the “true” color.
PRIMING AND PAINTING
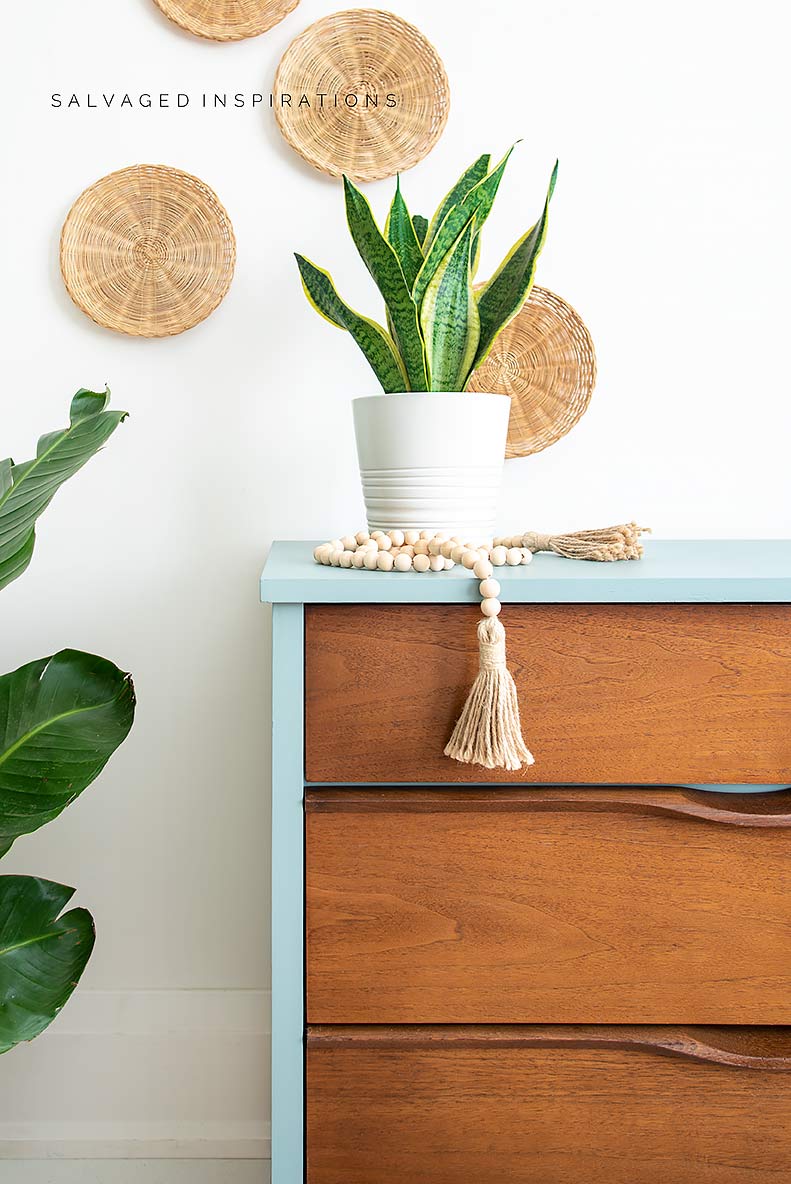
I primed this piece with two coats of BIN Shellac Based Primer by rolling it on with a foam roller to ensure NO bleed-through would show through the paint finish. Then I spray two coats of this Serenity Silk Paint which is a subtle and relaxing blue-green.

My color theory on Mid-Century-Modern furniture is to keep it simple or as close to the time period 1945-65ish as possible. Highly pigmented, saturated colors go beautifully when painting MCM furniture. Terracotta oranges, mustard yellows, avocado greens, blues, and browns… think 70’s! If you’re pairing it with some of the original wood, anything goes imo. There are plenty of Mid-Century-Modern color on Pinterest you can check out for inspiration.
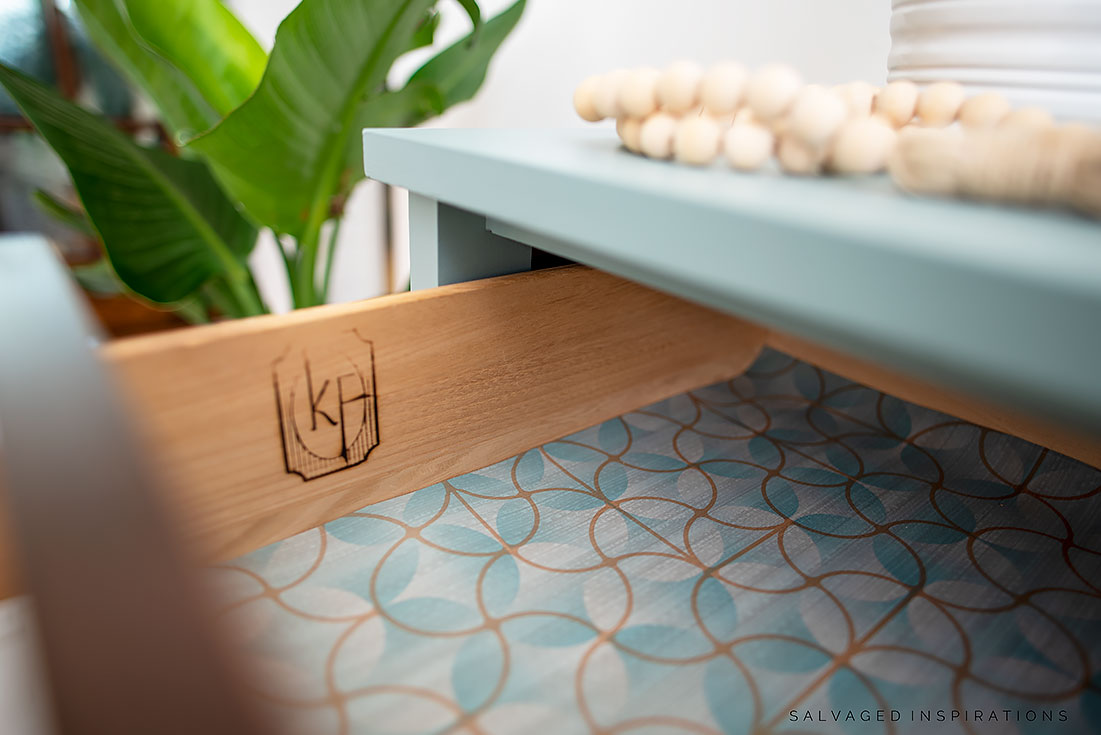
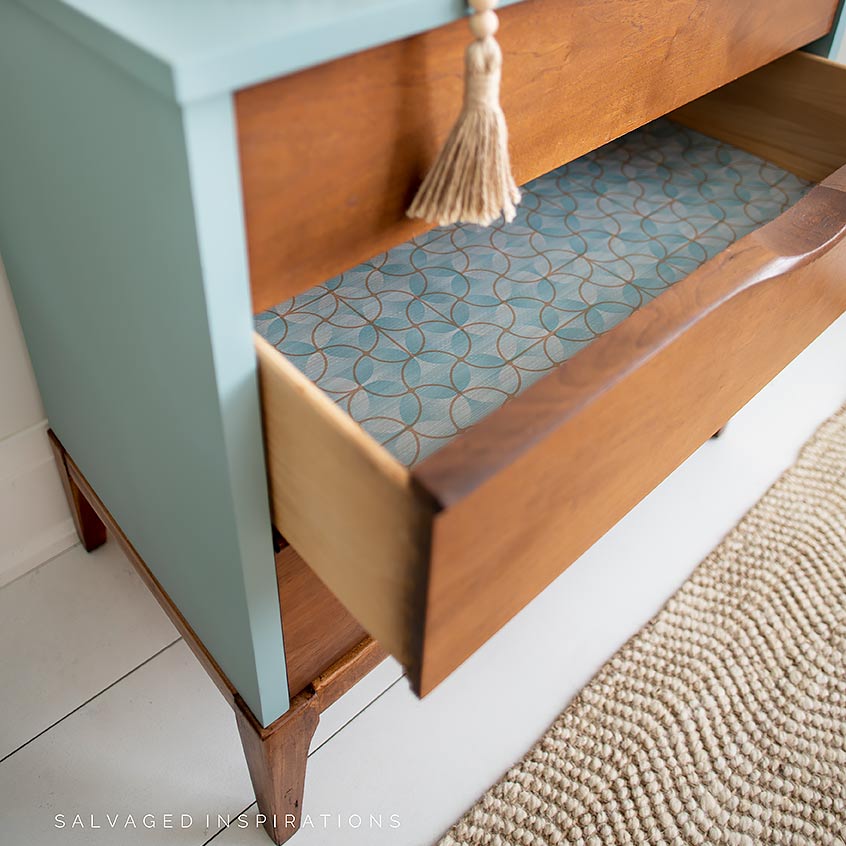
LINING DRAWERS
As the finishing touch, I lined the drawers with a heavy-duty vinyl I had on hand. I picked the more subtle design on the right to tie in perfectly with the Serenity Silk Paint.

I measured the inside of each drawer and then, using a straight-edge ruler and rotary cutter, I cut the vinyl to size. I don’t like adhering drawer liners to my pieces just in case whoever buys them doesn’t like the design. I’d prefer to cut them exactly so they lay perfectly in the drawers and can easily be removed to clean.

THE BIG REVEAL
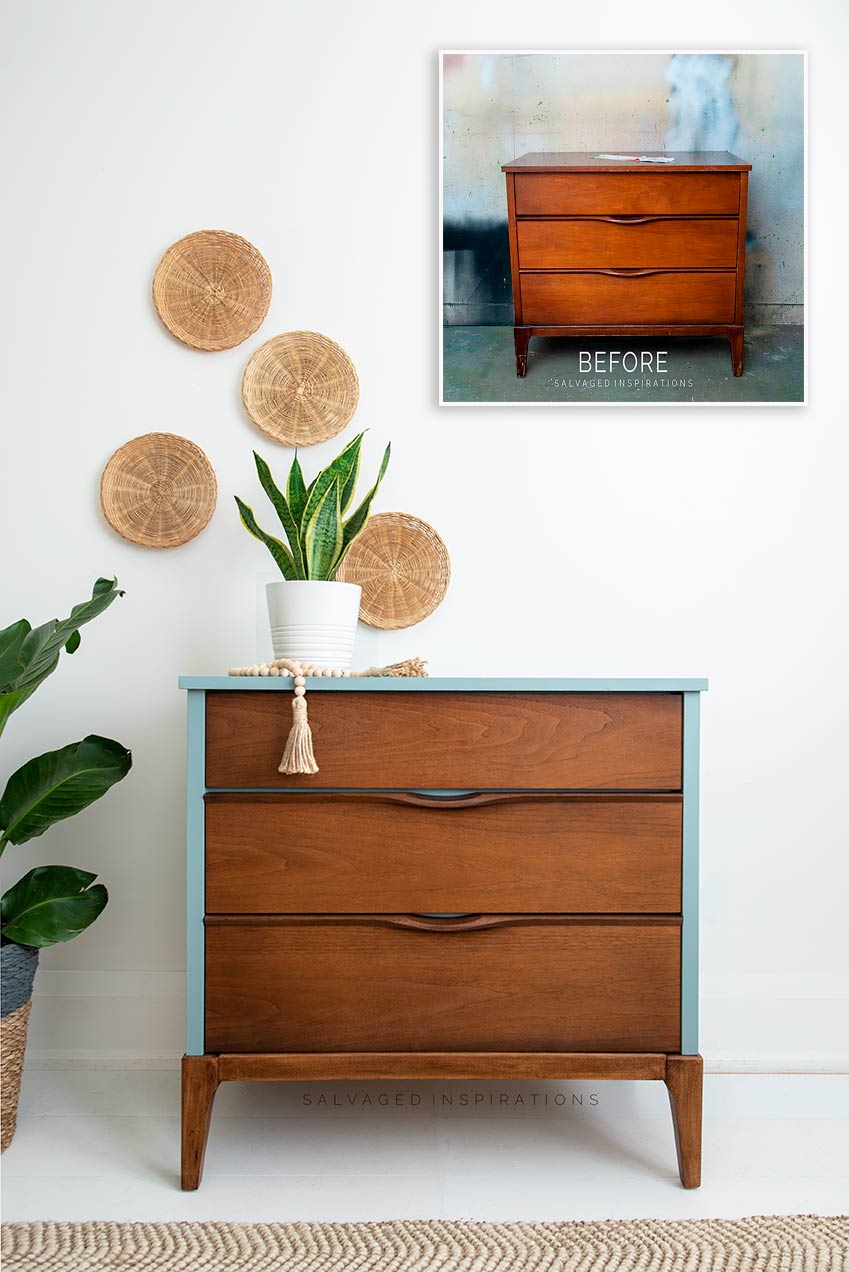
Here’s how it all came together. This painted and stained MCM dresser is updated and looking fresh and new again.

Can you believe these are the original stained drawers? All they needed was a few touches with the stain pen to make them look this perfect!
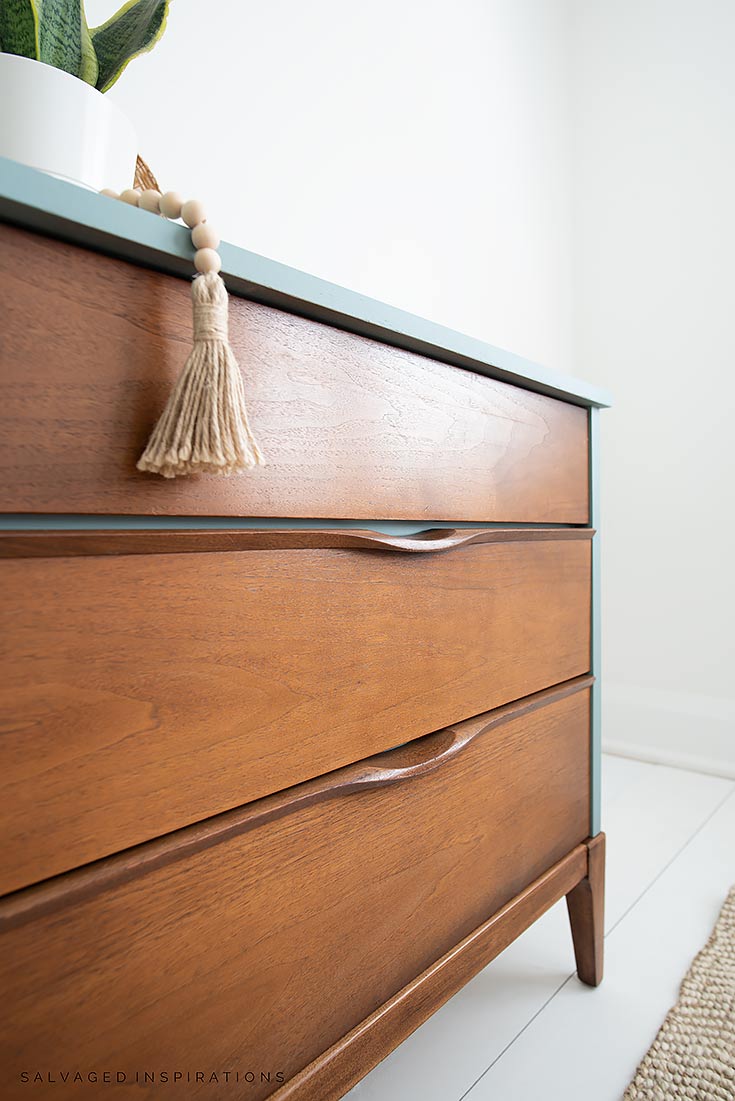
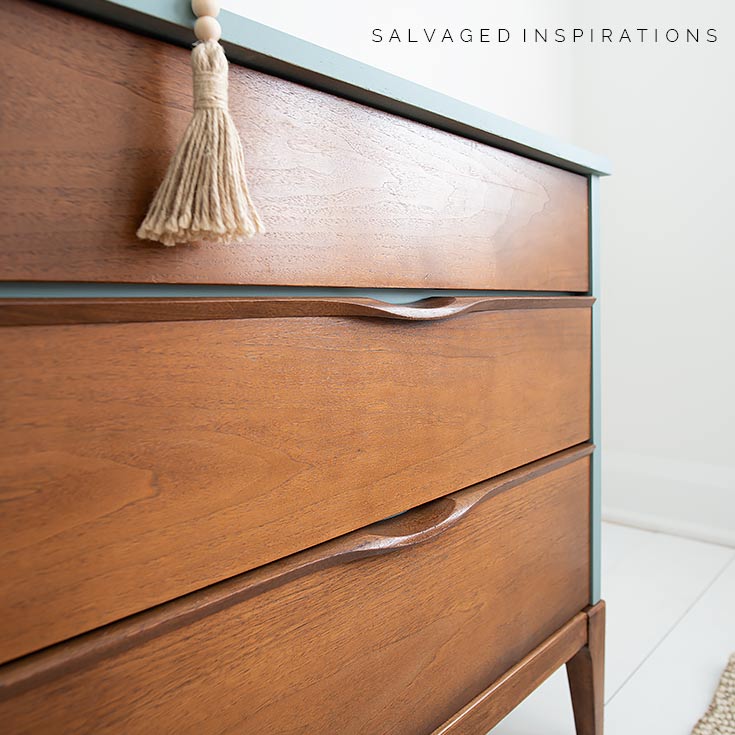
And the peek-a-boo Serenity through those wood drawers… LOVE IT!

The drawer liners complement the piece beautifully as well!
STEP-BY-STEP VIDEO
Here’s the step-by-step on Youtube. If you have any problems viewing below, feel free to watch it on my Youtube Channel here… and don’t forget to subscribe! 🙂
Her bottom skirt has been stain matched to the original stained drawers as well.
I like the cooler contrast against the warm stain on the drawers.
Here’s another look at the before and after. I hope it’s inspired you and given you some new ideas for your upcoming projects.
Thanks for joining and sharing this salvaged MCM thrift dresser with me today. I’ve included other Mid-Century Makeovers in the Related Posts below. Let me know what you think of this painted and stained restyle, or feel free to ask any questions you may have. I always love hearing from you. It makes my day!! 🙂
Happy furniture painting, friends!
Denise x
RELATED POSTS:
MID-CENTURY MODERN BUFFET
HOW TO FILL IN DATED DRAWER DETAILS
TO PAINT OR NOT TO PAINT?
HOW TO CREATE ONE COLOR STENCILS
HOW TO PAINT MCM FURNITURE
PIN AND SHARE!


Cute MCM dresser. You always find the great pieces. I especially love the paper you used in the drawers. I love seeing these extra details. It’s just so FANCY. Thanks for sharing another one of your masterpieces. Have a beautiful rest of your week. Pinned! xo, Do
Aw, thanks Do! The drawer drawer liner is heavy duty vinyl lining I found at the Restore in bolts!… and it was super cheap! So glad I picked it up!
Such a great MCM piece and beautifully finished. Thanks for all the tips too.
Thanks my friend! Hugs 🤗
This was done 4 years ago so don’t expect an answer. You certainly breathe new life into these deserving pieces, wee done. I wonder what your second choice of paint colour would have been? (To my very untutored eye this isn’t a perfect match).
Hi Audrey! For this piece I didn’t have a second choice. I love the warm/cool contrast. That said, I ALWAYS encourage you all to find YOUR perfect match. Color is personal and evokes feelings. Picking what makes you feel good and what is pleasing to your eye is key to a beautiful and successful makeover! 😊
Oh Denise we are like peas in a pod. I’m not a huge MCM gal. I’m all about the pretty, details and carvings….A French girl at heart. I always know I can come here SIB for my inspo, product info and of cause you! Thank You for being in my world.
So I to was searching IG for MCM color/finishes so excited to have SI pop on my screen. I will go check the video but, why the two different stains? Is the MW for drawers and GF for base/stand? Thanks much my friend.
We ARE like 2 peas in a pod 😉 although I have to admit, I’ve seen some GORGEOUS MCM’s on IG and Pinterest lately and it’s kind of changing my mind! As for the stains, I had sanded the bottom to bare wood and then had to match it to the drawers. I tried a combination of stains to get a perfect match and the Minwax and General Finishes worked like a charm! Thanks for all your kind words Roseann… I so appreciate it! XOXO
Hi I am late to the party. I was going through your instagram, and was pulled in by this one as well as the PINK baby.
I love every part of the make over. Thanks for sharing all the little things that make it easier for us.
So glad you like it Julie and thanks for taking the trek over from IG!🤗 Have a super day. XOXO
Denise, this is amazing!! You did just a great job. I can’t wait to see you start tearing pieces apart and creating something fabulous. I have never in my life seen a contraption like that sanding object. That was pretty cool. You go sister!!!
And it was ONLY $2!!! I really wish I had bought a few more. I found it at New Again Construction Essentials in Beamsville. I’ll have to make another trip out there soon. 🙂
REALLY NICE JOB! AND A LUCKY FIND! THANKS FOR ALL THE TIPS!
Aw, thanks so much Kimmy…much appreciated! 🙂
Another beautiful makeover, Denise. The wood and paint color is perfection in my opinion. You’re always inspiring and I look forward to seeing all your creations. xo, 🙂
A big hug to you my friend… I feel exactly the same way about YOUR creations! XOXO
Like you, I thoroughly clean every piece that I renew for resale. I want to know a piece inside and out. Sometimes you make amazing discoveries. Your choice of color for the dresser has inspired me to try this on the next MCM piece that I redo. Thanks for the tips.
I’ve found some pretty funky things inside my pieces…lol… and some very sentimental ones as well! Thanks so much Jeri and have fun trying out this color! 🙂
Love this one too! Where can you buy vinyl like you have in rolls?
Thanks, Patricia! 🙂 I picked up remanent rolls (about 7 different designs) of this vinyl from a Restore. I believe it’s used for upholstery…like restaurant seating etc. Very wipeable and heavy-duty. I’m not sure where you could buy them new though. ??
Do my eyes deceive me, or is the top Formica? I probably would have passed it up if that’s the case. How will the paint stand up to wear (if it is Formica)?
The finished piece is lovely!
I can see exactly why you think it’s Formica… because it looks like Formica! But no its not. I’ve worked on a few of these Mid Century pieces that have tops like this. Superslick and shiny but it’s wood underneath this finish. I have no idea what they used as a topcoat to get it like this but it’s pretty heavy duty. 🙂
Hi Denise. I agree with Jane’s comment. This is much better than new. Wow. I love the soft green/blue paired with the stained wood. You definitely have an eye for color. Those drawer liners are the icing on the cake. Beautiful.
Thanks so much Monique! XOXO
I do like the paint color with the wood tone. I’m not mainly a lover of mcm, but their simplicity does make them attractive – and fit nicely with so many other styles.
Love the peek a boo color !! I am a bit color phobic with my own selections, but sooo happy to see options !!
I also would love to get a bit more proficient with wood tools and techniques 🙂 I can’t wit to see your tutorials !!
Thanks for sharing.
Thanks my friend! I would love to get better with my tools as well! My upcoming video is showing me with the oscillating tool burning through the wood…lol… I guess I used the wrong blade for the type of wood but hey, hands-on learning is the fastest way to learn, right?! 😉
Just beautiful! I love the color with that particular wood finish. I agree, this would be darling in a nursery. Always enjoy your projects and the way you explain all of the steps and the products you use. Keep making a smile!
So glad you like it Mary Jo… and right?!… I think it would be drop-dead gorgeous in a nursery as well! An upscale designer nursery! 😉
What a great post. Super informative and the result is stunning, as usual. Love it!
Aw, thanks Marcia… much appreciated! XOXO
This is beautiful! Great job!
Thanks so much! x
I LOVE this!! I’ve been waiting for you to do a mid-century piece since that is what i’m into right now. Did you put anything on the drawers or the base after you stained it? to protect??
Thank you!!!
Ahhhh, I think I forgot to mention so thanks for asking! The drawers were touched up with the Trade Secret Markers and nothing else. They are all original including the original topcoat. They were just cleaned, touched up with the marker, and buffed. The body and skirt and legs were sprayed with 2 coats of Satin Clear Coat. 🙂
Wow, not a fan of MCM but you could convert me! Love the “clean enough to hold your underwear” good advice to follow.
I used to have mixed feelings about MCM furniture myself. I think it’s really growing on me though! Thanks Laura! 🙂
That’s AWESOME! I love all your choices on this piece. Well done!!!!
Aw, thank you Michele! 🙂
You have a great eye for color. I wouldn’t have given that blue a second look with the wood tones but it looks amazing. Thanks for sharing! ~ Nicki
Aw, thanks Nicki! Much appreciated my friend! XOXO
Yay!! Another non-white piece! LOL Anyway, I just love the pop of blue showing through the handles and the cute liner material!!
Thanks Beckie!!!… and ya, isn’t the peek-a-boo-blue adorable! 😉
You have such a good eye when you’re choosing a piece to restore. This makeover is great! I especially like the blue peeking thru. Nice job 😎
Thanks Desire! I’m not usually one to scope out Mid Century pieces but for whatever reason, this one called my name. 🙂
Very groovy!!! As others have said, it looks brand new.. I think it would be a stand out piece in any showroom. Great job Denise!
Yes, groooovy…love it! Thanks Niki! 🙂
This piece looks amazing, Denise!! Love the Serenity peeking through the drawers. And ha ha…great tip…clean it until it is clean enough to hold your underwear lol! Have a fantastic day, my friend! XOXO
I like the little peek-a-boo tooooooo! Thanks my friend and you have a fantastic day as well! XOXO
I love the color choice! It is beautiful for this style and design. Thanks for sharing all of your tips.
Thanks so much Dana! x
This is better than new! I love your attention to detail. Thanks for sharing your project and all of the steps.
My pleasure and thanks so much Jane! XO