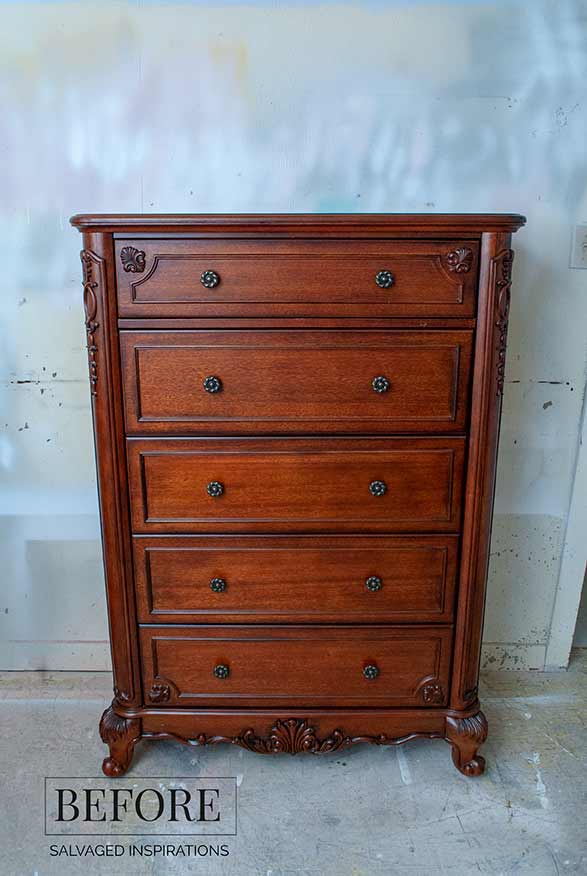
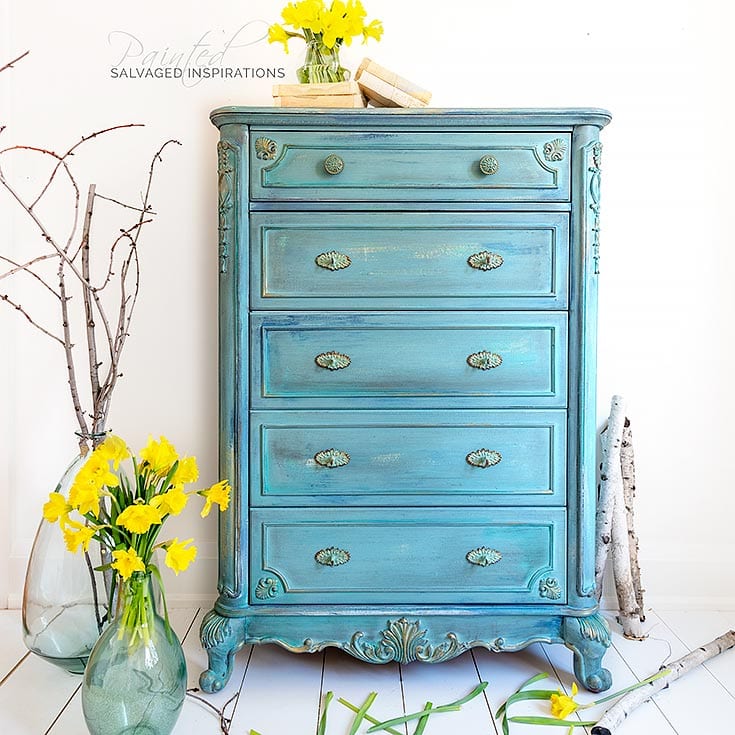
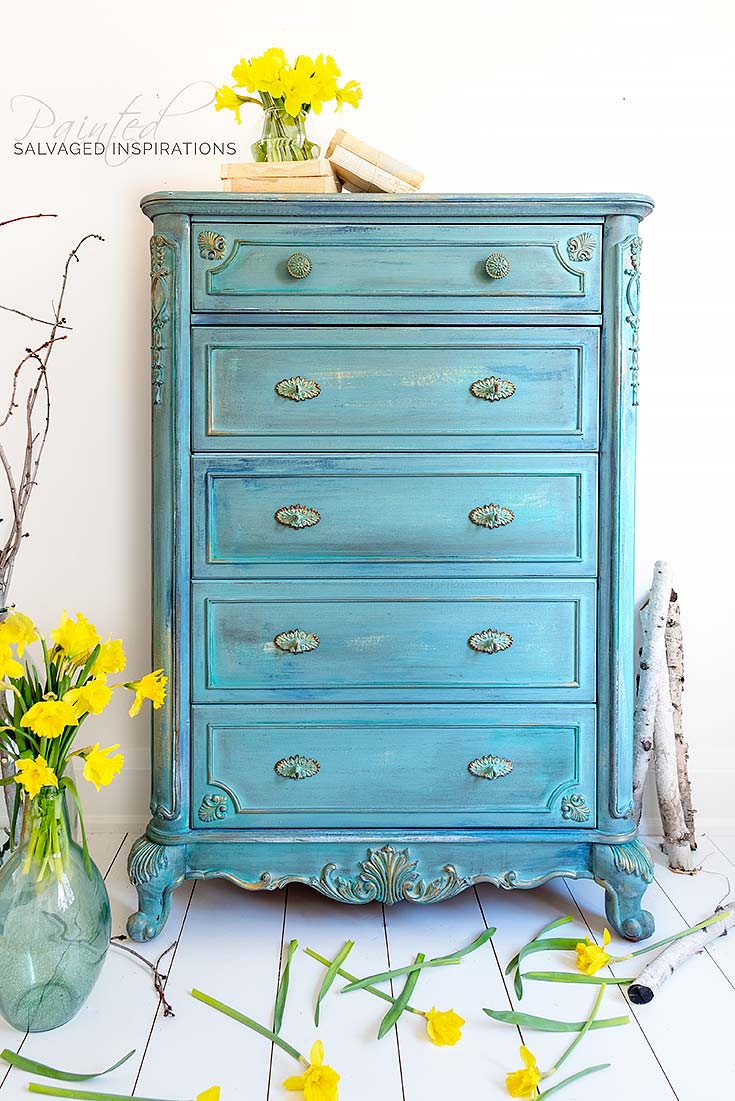
A HANDSOME SLICK TALLBOY DRESSER GETS A LAZY-GIRL-NO-SAND SPRING INSPIRED MAKEOVER.

Spring is here and I couldn’t be happier! Here in the GTA, our gardening season is short so I’ve been treating myself to planting outdoors. I also treated myself to some fresh spring inventory – a handsome bedroom set. It includes a head/footboard, two nightstands, a long dresser, and this tall boy.
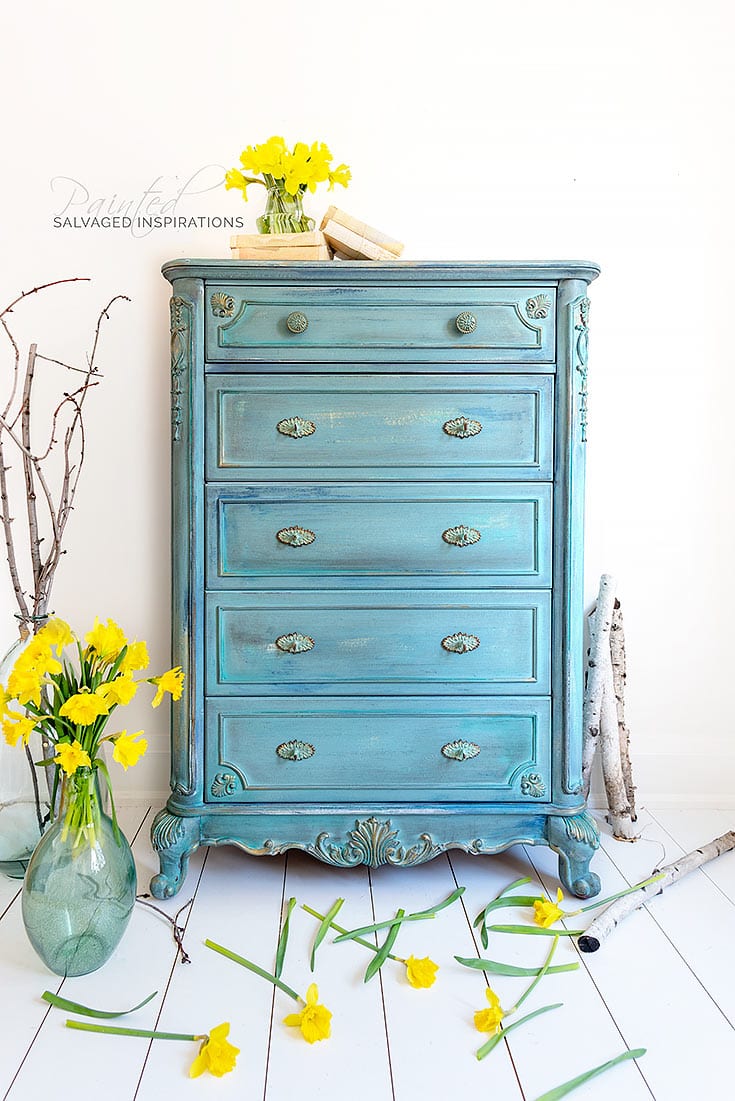
Isn’t it fabulous!
I posted this before on social asking for color suggestions. A big thank you to everyone who chimed on Facebook. You all have some amazingly creative ideas!
I ‘mashed’ a few of them together (green, blue, yellow, grey, mermaid dresser) and came up with this layered spring-inspired beauty. What do you think?

THIS POST IS SPONSORED/CONTAINS AFFILIATE LINKS TO PRODUCTS I USE. YOU CAN SEE MY FULL DISCLOSURE HERE.
SOURCE LIST::
-
- Tallboy Dresser – SALVAGED
- Paint Brush
- Bonding Boss NO SAND Primer
- Hi-Density Foam Roller
- Rebel Yellow Chalk Mineral Paint
- The Gulf Chalk Mineral Paint
- Driftwood Chalk Mineral Paint
- Custom Paint Mix to Create Blue
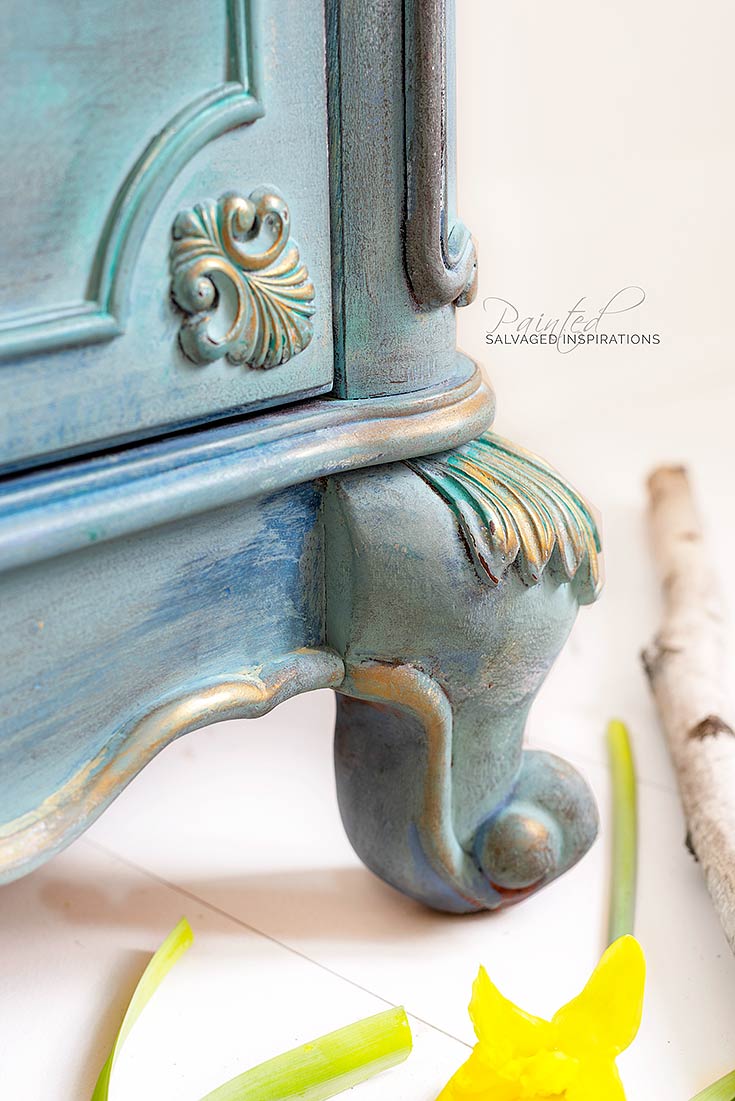
- Warm Gold Gilding Wax
- Brown Wax
- Gator Hide
- Hobby Lobby Hardware
LAZY GIRL “NO-SAND” PRIMER::
I’ve created a few posts on how to avoid sanding your furniture which I’ll link to at the bottom — but today, I’m getting product specific. Slick Stick [this] no-sand primer was designed for super slick and shiny surfaces like glass, laminate, tiles, Formica etc, but works equally well for painting furniture.
Update – They have reformulated the Slick Stick and Stain Blocking Primer to create an all-new BONDING BOSS! It is a bonding primer that also eliminates odors, tannins, bleedthrough and stains yet bonds to glass, plastic, laminate, tiles or any slick surface. It comes in white, grey, or clear formula.

This tallboy dresser had a slick surface and I knew if I were to give it a light sanding, I would have had really bad bleedthrough.
The lazy girl solution was to give it a coat of Slick Stick, wait 3 hours and re-coat. I apply it with a 4″ high-density foam roller to make the process super quick. The next day, it’s ready to paint – no sanding required.
Here’s what it looks like with the two coats of this no-sand primer rolled on it.
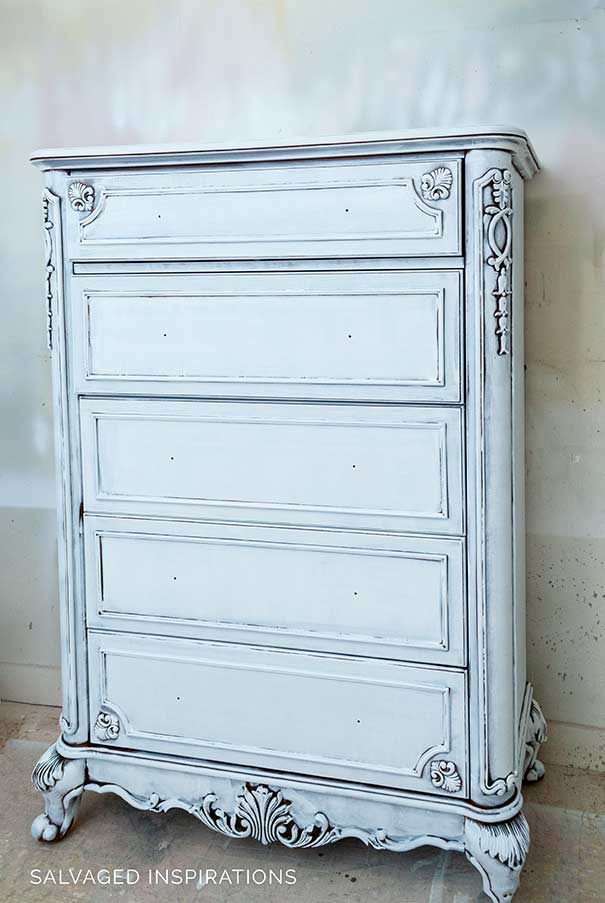
Then you paint as you normally would and the paint adheres 100%.

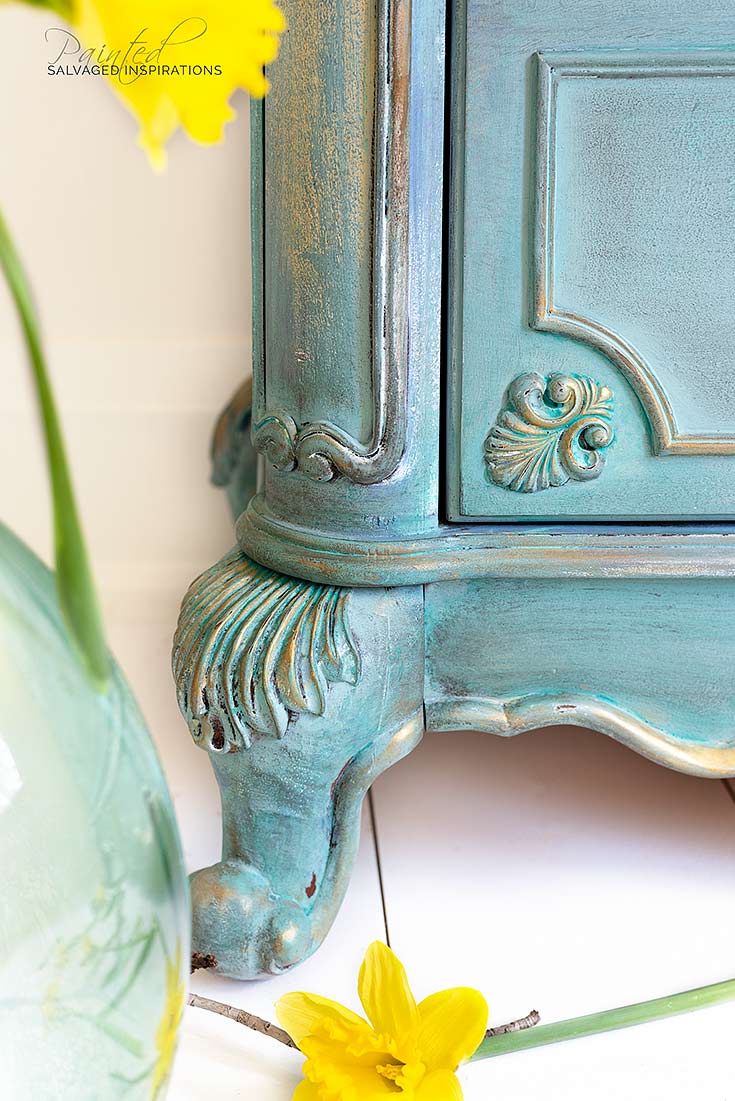
This dresser was painted with a layered technique which I share here.
Layering doesn’t start out looking good but the end result has a rich vibrant depth with a variety of colors peeking through.


LET ME KNOW WHAT YOU THINK OF THIS SPRING DRESSER MAKEOVER… OR FEEL FREE TO ASK ANY QUESTIONS YOU MAY HAVE… I ALWAYS LOVE HEARING FROM YOU.
Happy furniture painting my friends!
Denise x
RELATED POSTS::
How to Paint Laminate Without Sanding
5 Ways To Paint Furniture NO SANDING
Layering Chalk Paint
Stop Bleed Through When Painting
5 Ideas To Update An Old Desk
PIN AND SHARE!


Lovely, lovely, Lovely!
Thank you Caye!!🤗
Dear Denise, Your work is outstanding! When I saw this chest I swooned the way young women do over a handsome guy! I have always loved provincial furniture and you certainly do it justice! Gorgeous piece and an outstanding finish!
I’m a huge fan of French Provincial furniture as well! I’m so happy you love it Lana! XOXO
Hi Denise! I have been using your layering technique and I love it. I’m just now starting to get out of my comfort zone. I just did the denim dresser look. Mine is a.little darker but I’m ok with it. On this dresser I don’t see where the yellow came in and why you used rebel yellow. I love the final color.
I love all this. I’d like to see something in a blue purple pink combination. I’ve seen some pieces on Pinterest that blew my mind but there was no instructions on it.
Hi Debbie! I’ll keep the blue, purple, and pink combo in mind and glad you find the instructions helpful! 🙂
Hi Denise-
Another gorgeous piece! I definitely want to try your layering technique. I noticed in your list of supplies that you did not include a water spray bottle. Did you not use a spray bottle on this piece? Also, was wondering does it matter if you use chalk paint from different manufacturers on a piece or is it best to use just all Dixie Belle products or Anne Sloan Products?
Thank you so much,
Denise
Hi Denise! I don’t recall if I used the spray bottle but if I didn’t list it, I’m leaning towards no. 🙂 As for the paint brand – ANY paint brand would work beautifully. I’ve been using Dixie Belle Chalk Mineral Paints for some time now so that’s my preference, but whatever brand you feel comfortable with or enjoying working is great! 🙂
Absolutely love this! You have such talent. This is a dresser to fall in love with.
I’m so happy you love it Cynthia!
Denise,
Would it be possible to send you pictures of my work and you can tell me how to get your layering look? You make everything so beautiful.
What color did you use over your mosaic of other colors? Thanks. It’s gorgeous. I’ve used your technique before on a green dresser. It turned our fabulous.
It was a mix of the custom blue and Driftwood. And that makes me so happy Kathie, glad it turned out fabulous for you!!!
How come there’s no way to pin on Pinterest?
OH NO!.. so sorry Kim! When I hover I’m seeing a PIN button but let me check into this for you.. and thanks for the heads up. I’m on desktop right now but I’ll check my phone.
I was able to pin it.
Thanks so much for the PIN!!🤗
Omgoodness this piece is so beautiful!! Thanks for sharing about the no sand primer – I need to have thatbin my arsenal ☺️
Thanks Cindy.. and ya, the Slick Stick is great to have around for those ‘tough’ pieces. 🙂
Breathtaking makeover! I attempted to layer an end table last fall and it looked like your photo above where you stated layering doesn’t start out looking good. Mine didn’t improve much. I’m going to watch your video tutorial again when it gets warm enough to be outside painting and give layering another go. Thanks for sharing!
The layering is fun. It starts out really general – almost applying the paint willy-nilly – and then gets more and more detailed as the layers progress. I hope you give it another go Debra! 🙂
There is a video of the layering technique? Please send the link.
The instructions for layering the chalk paint also included sanding between the coats of paint. On the dressor you said there was no sanding required so can you clarify which is correct? I am in awe of the layering of colors and really want to know how to proceed with this application. Thank you.
Hi Margery! The No-Sand is for 100% adhering to a slick surface – but it’s up to you whether you choose to sand between coats or not. I’m in the habit of sanding between each coat (unless I’m doing a specific textured finish) because it really does give a flawless smooth professional finish. Hope this helps clarify. 🙂
Simply brilliant , your energy and enthusiasm is so obvious in the attention to detail you put into your work .
Fab
Aw, thanks Caroline!!! xo
Yowza! It’s so gorgeous! Thanks for sharing your process. A true work of art.
Thanks so much Amy! 🙂
You do a great job on all the furniture!! You are so talented.
Thank you, Charlotte! XO
You are a master blender extraordinaire! Awesome job!
Aw, thanks my friend. 🙂 Hope you’re having a beautiful day. xo
Hi Denise. I just LOVE what you did with this gorgeous dresser. Blue is such a refreshing spring color. Absolutely stunning makeover. LOVE IT:)
Thanks Monique! It was fun using these fresh spring colors… so glad you like it. 🙂
Denise, your style is like a breath of fresh air! Just beautiful!
Thanks Do! Heading out to get some fresh air with the dog shortly… it’s actually a lovely sunny day here!!! 😉
I love all of your work. But I really really love the way you finished this piece. I’m going to go to my Dixie Belle paint supplier and buy a couple more colors to go with my Yankee Blue and Drop Cloth for my dresser.
Once you have a few colors on hand, it’s super easy to mix them to create NEW stunning colors. thanks for the kindness and have fun with your dresser Cheryl. I’d love to hear how it turns out for you. 🙂
I wish I had half your talent, Denise! The hints of yellow and gold really make this dresser pop!
Thanks Nicki, you’re too sweet! And I really like the hints of gold too… love that gilding wax!
Absolutely Stunning!
Thank you Donna! 🙂
That’s a work of art!
Aw, thanks so much Jane! xo