I FOUND THIS TRASHED LIBRARY TABLE AND TURNED IT INTO A SEQUOIA TREASURE | YOUTUBE VIDEO
Hello creative friends and thanks for joining me for Trash To Treasure Tuesday! I found this trashed library table walking my Gidgy last week. I wasn’t sure if I should take it because it was in pretty rough shape. But you all convinced me – a big thanks to every one of you who chimed in on Facebook when I posted this video curbside!
*As an Amazon Associate, I earn from qualifying purchases. There are affiliate links in this post to other companies/products I use and love as well. You will never be charged extra when you purchase through these affiliate links. If you purchase from my links – A BIG thank you for supporting me and the #siblog! To see my full disclaimer, click here.
I’m also joining my T2T crew and sharing links to their projects below. I’m looking forward to seeing what they’ve created and I hope you join me on today’s tour as well!
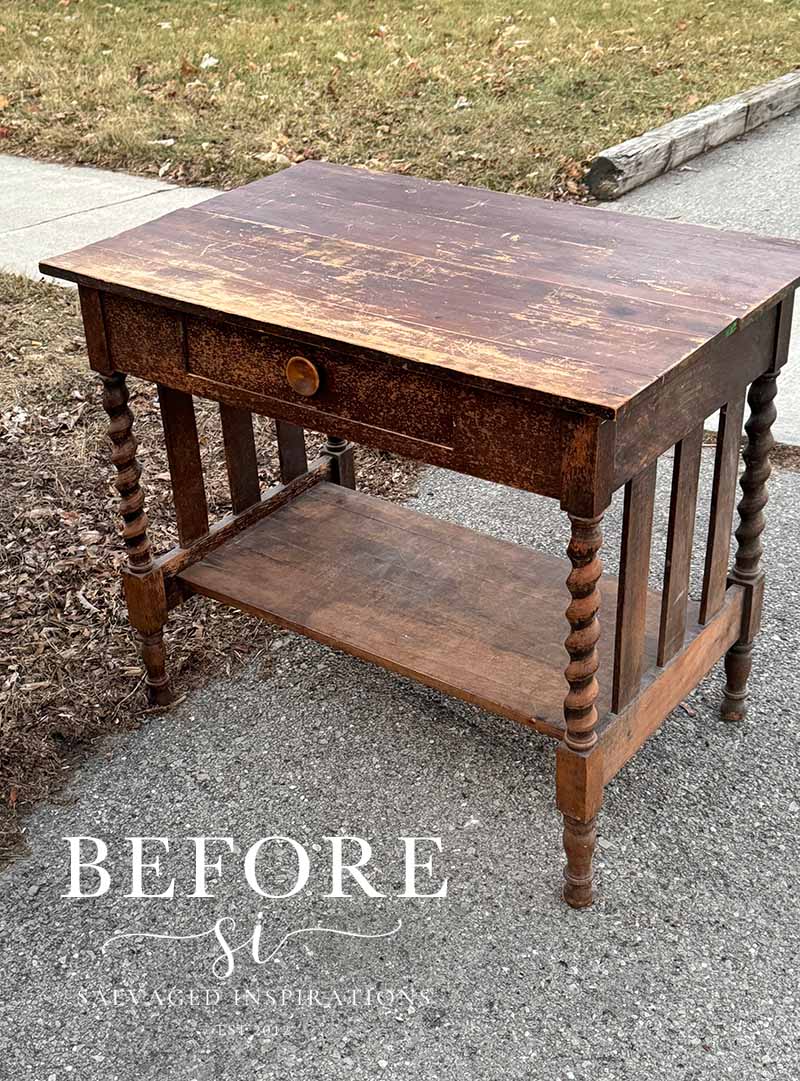
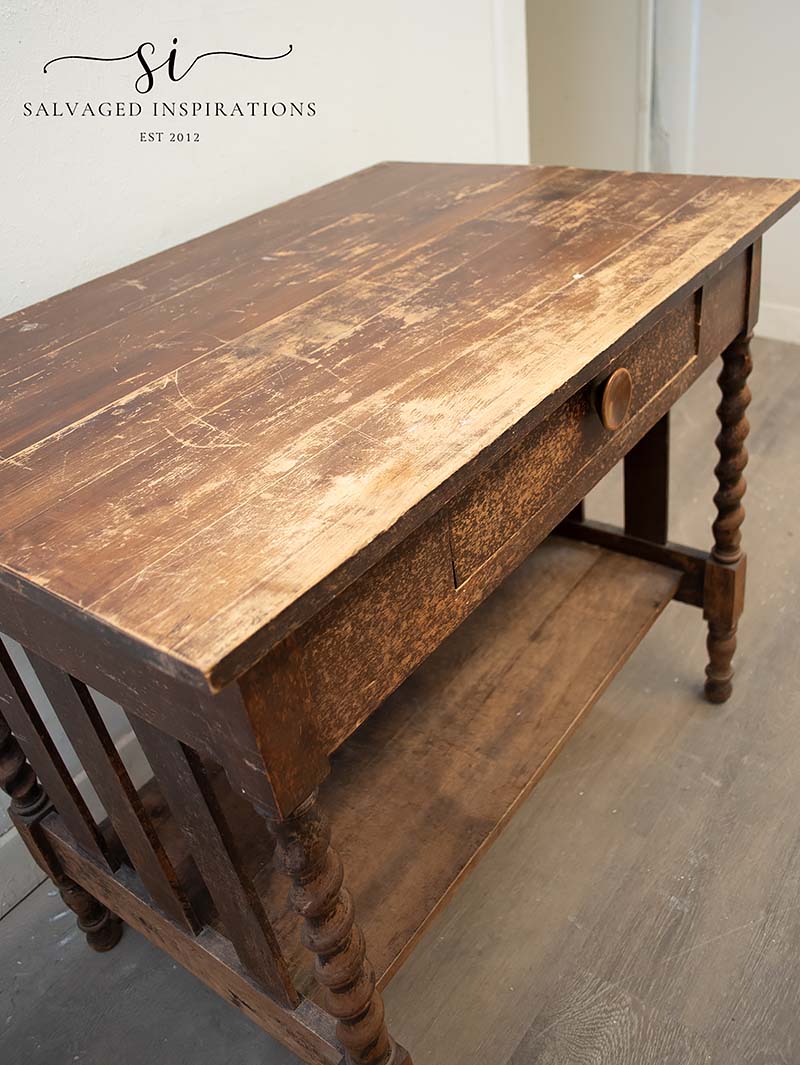
Here’s the library table I started with. The gentleman who owned it saw me loading it into my FUV (Furniture Utility Vehicle ;)) and came out to give me a hand – super sweet man. He said it had been sitting in his basement for the last 25 years and he was so pleased someone was taking it.
I’m always excited to rescue these awesome pieces.
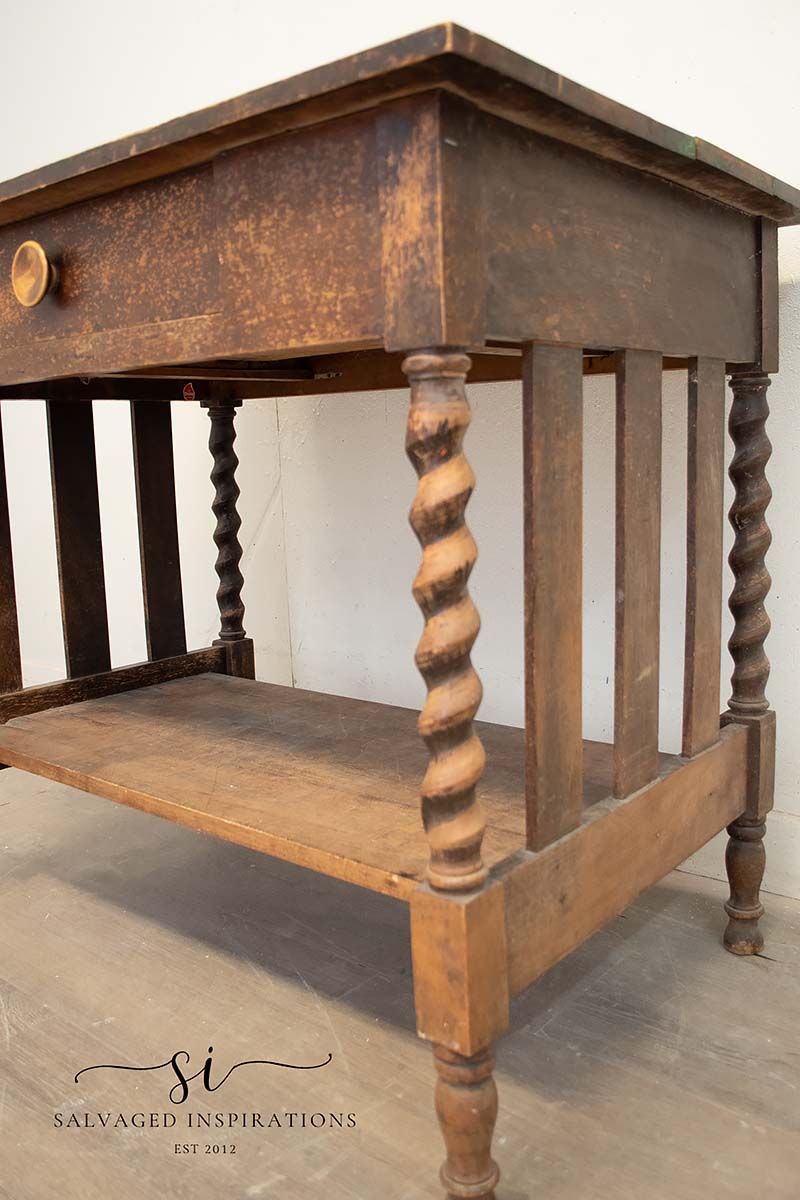
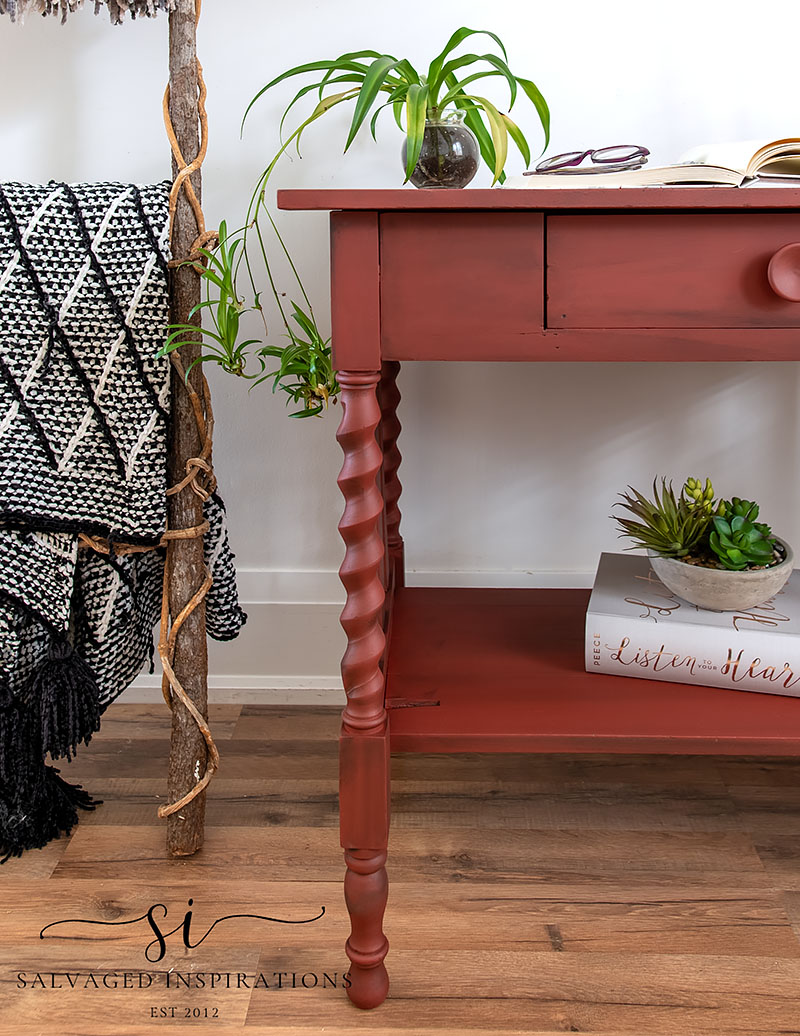
These classic barley-twist legs. Aren’t they gorgeous!?
THIS POST IS SPONSORED/CONTAINS AFFILIATE LINKS TO PRODUCTS I USE. YOU CAN SEE MY FULL DISCLOSURE HERE.
WHAT YOU’LL NEED
Library Table – SALVAGED
White Lightning Cleaner
Shop Towels
Bosch Sander
Wood Glue
Water Misting Bottle
Woodworking Clamps
Paint Brushes
Sequoia Silk All-In-One Mineral Paint
Coffee Bean Chalk Mineral Paint
PAINTING A LIBRARY TABLE
Here’s how this old library table all came together…
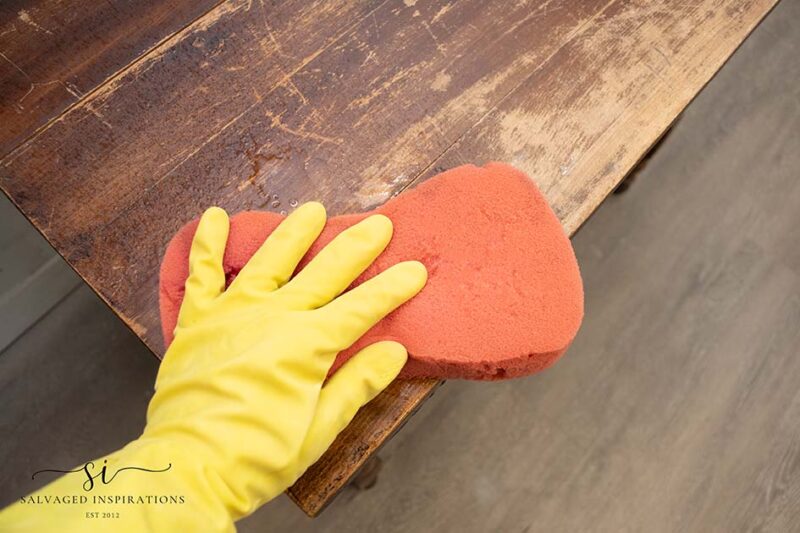
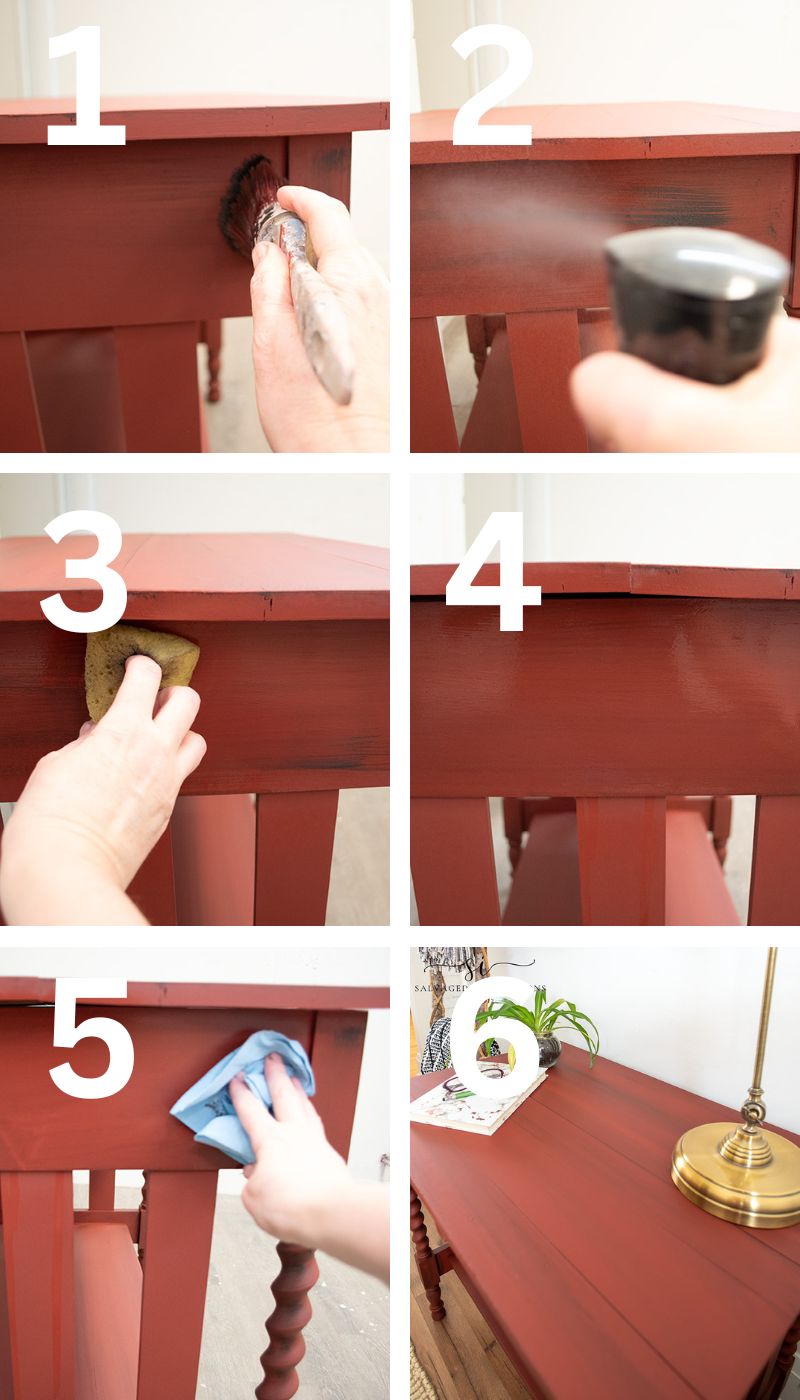
CLEANING
I started by giving this wooden library table a super thorough cleaning. I sprayed it with White Lightning Cleaner and used a Dollar Store brush and sponge to get into all the crevices. I made sure to use another sponge rinsed in clean water to wipe off all the residue.
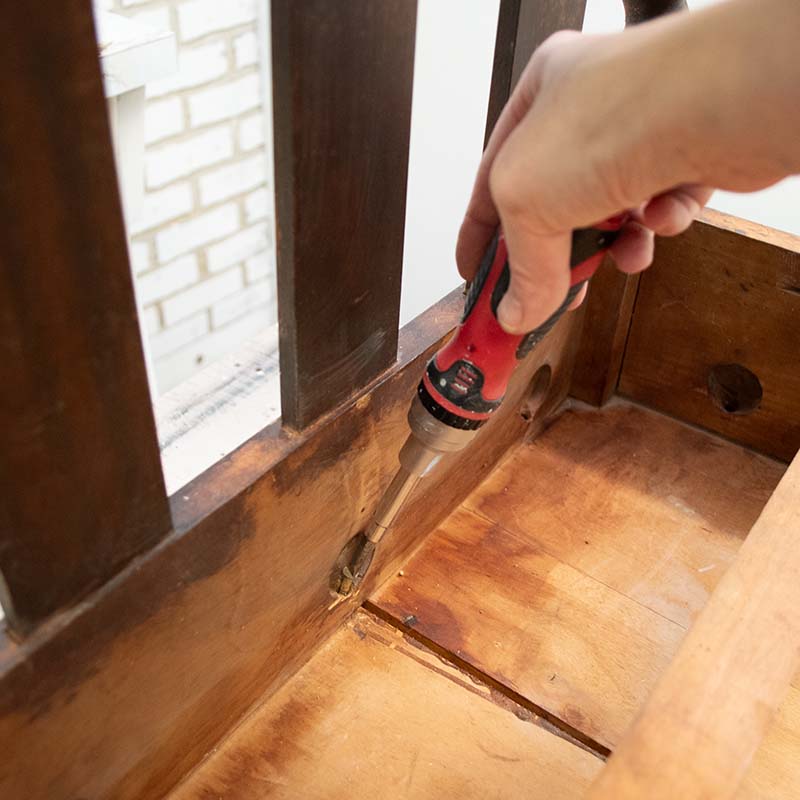
REMOVE TOP
Once it was clean and dry, I used a screwdriver to unscrew the top boards from the bottom. An easy way to get access to all the screws is to place the table upside down on its top. I used my workbench so it was a comfortable height to work on.
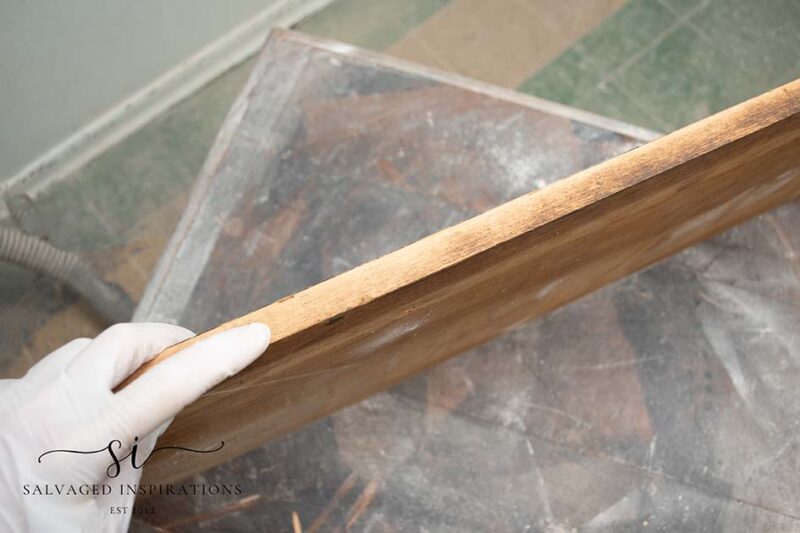
SANDING
Once I had the top boards removed from the base, it was easy to sand. Using my Bosch Orbital Sander and 150 grit sandpaper, I sanded the body. The spindles were scuff-sanded by hand. The top was in two pieces so I decided to glue them up and piece them back together. I started by sanding both sides and smoothing out all the scratches as best as possible. Sanding with the 150 also smoothed out the old finish. Then I made sure to sand the glue and residue off the sides of the boards where they were originally attached. This creates a fresh clean start for a glue-up.
GLUE-UP
This is why I LOVE rescuing these curb-shopped pieces. It provides me the opportunity to learn and try new things that I may otherwise not try.
I thought it would be nice to keep everything original. I brought out my large furniture clamps and set them up on my work table. Then I applied wood glue to both edges and ran my finger across the bead of glue to ensure the entire surface was covered. I pressed the two boards together and clamped. Can you see what went wrong in the image below? It’s kinda funny but kinda not…lol.
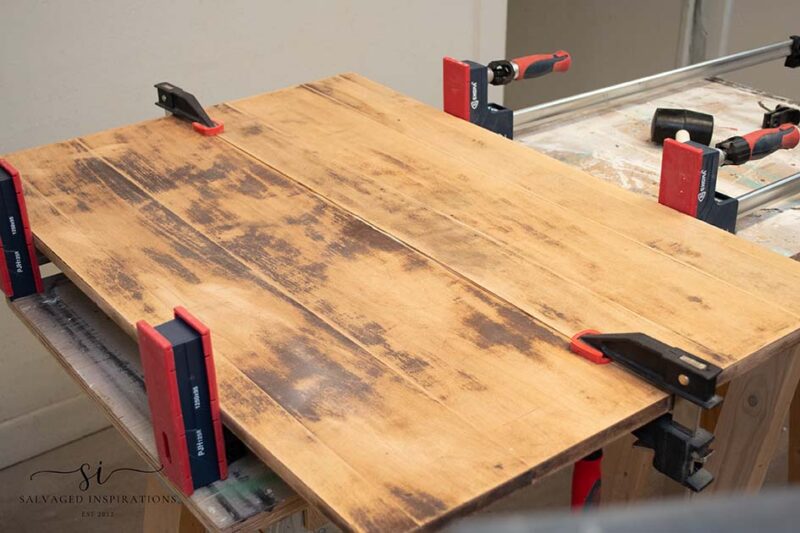
I knew these boards were a little off but I didn’t think it would be this noticeable of a gap! What I learned – If you’re gluing up boards, make sure they are 100% perfectly straight!
PAINTING WITH SEQUOIA
Okay, a lesson learned, and NOW onto the FUN PART! I decided to paint this library table in this brand-new Sequoia SILK paint. This is a color request from an email I received last week from a member of our #sifamily – Angee! Thanks Angeeeee! This color is one of seven from the brand-new National Parks Collection. If you missed last week’s makeover using one of these NEW collection colors, you can see it here!
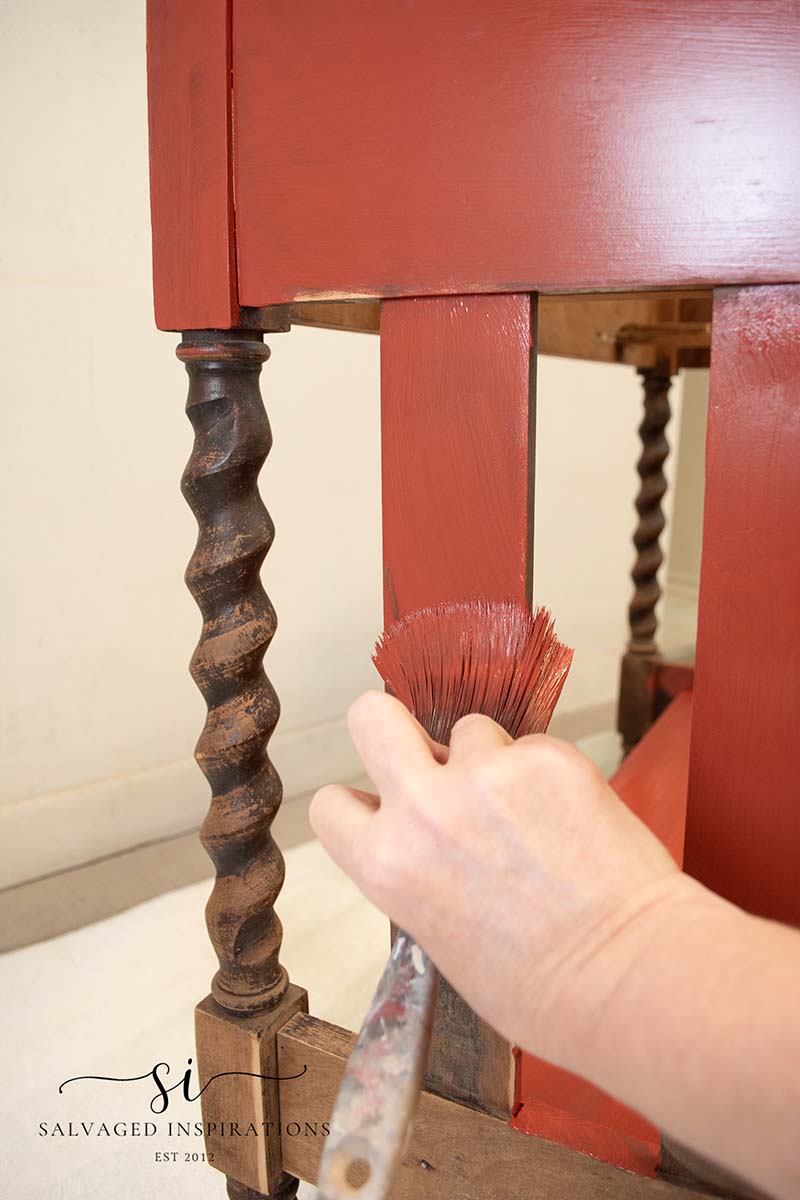
ANTIQUING WITH PAINT
Once I applied two coats of Sequoia and let it dry, it looked too one-dimensional to me – a little perfect for an old vintage piece. Plus there were so many imperfections on this piece, that I decided to HIGHLIGHT them.
Here’s how I created an antique finish using some Coffee Bean ‘distressing’…
- I randomly dry-brushed on some Coffee Bean Paint.
- Using a spray mister bottle, I wet the paint to keep it workable.
- With a damp sponge, I spread the dark paint in the direction of the grain working in sections.
- I made sure I liked the look. If not I sponged off a little more.
- Using a shop cloth, I wiped back the antiquing until I was happy with the look.
- The antiqued end result!
SHARE TO PINTEREST FOR LATER 🥰
RESTYLED LIBRARY TABLE
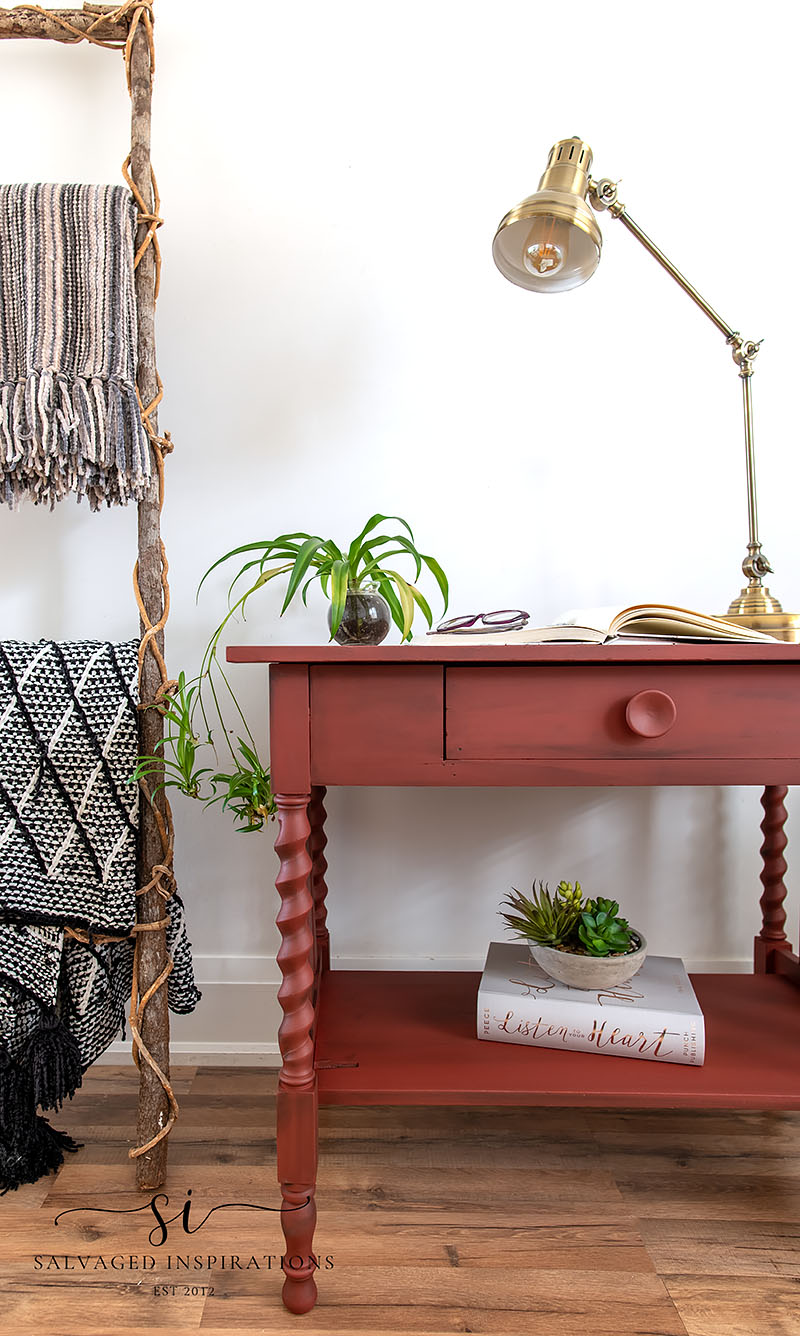
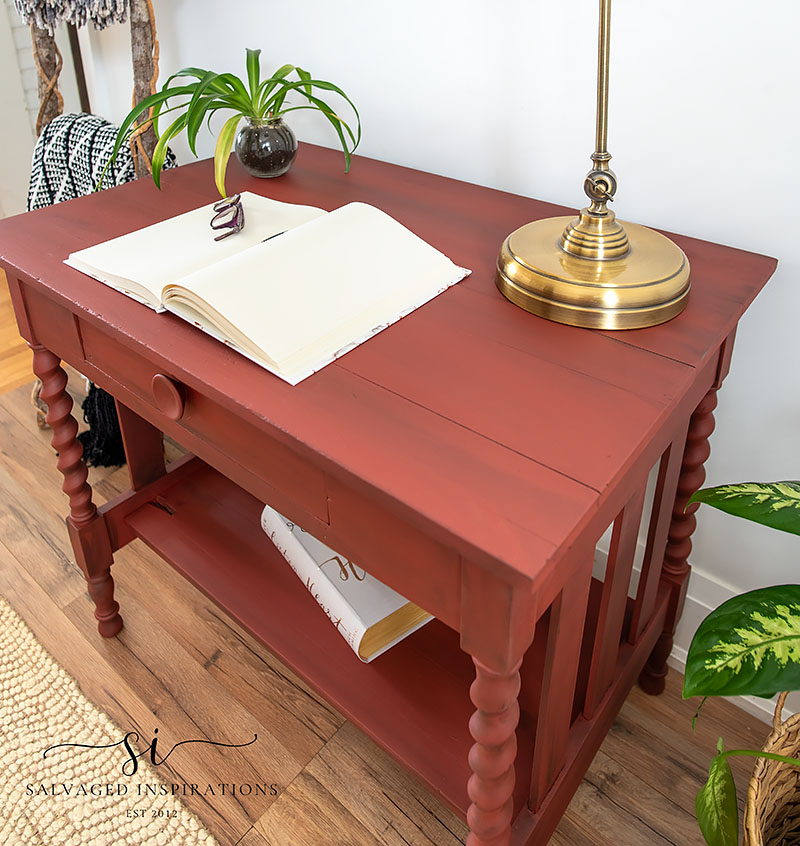
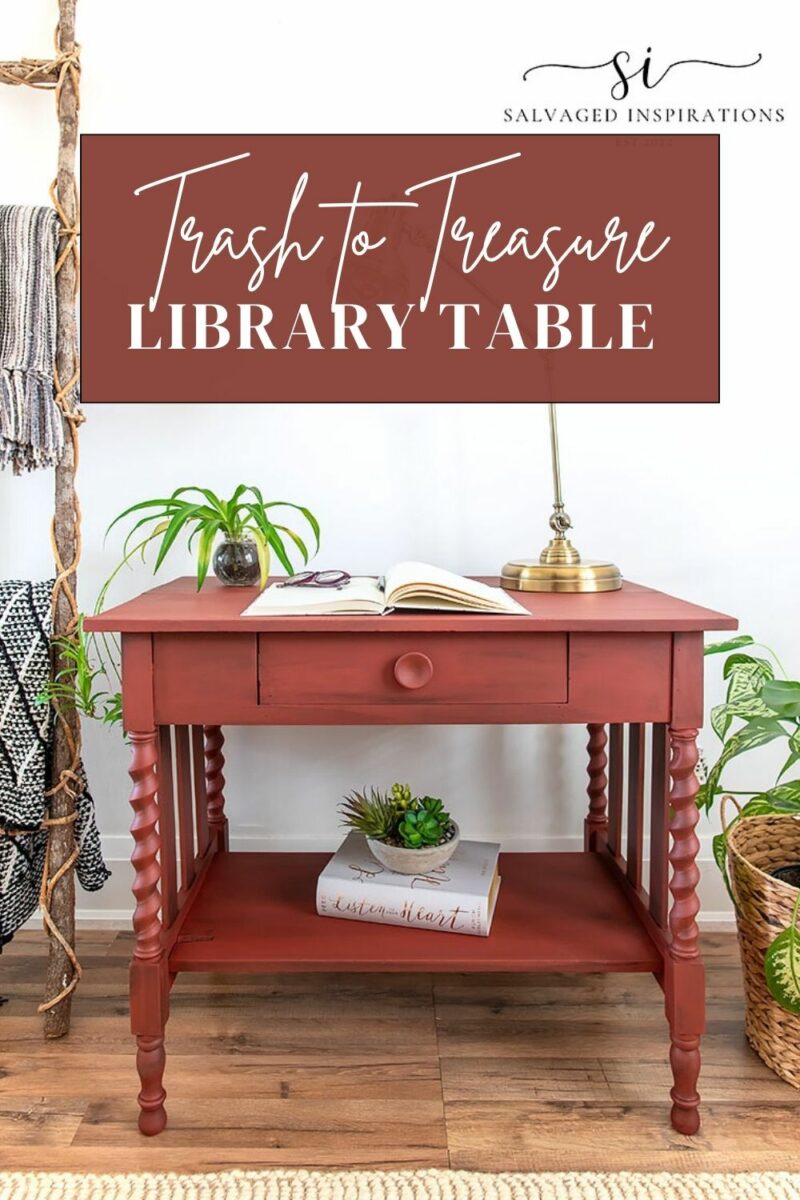
Here’s the finished look.
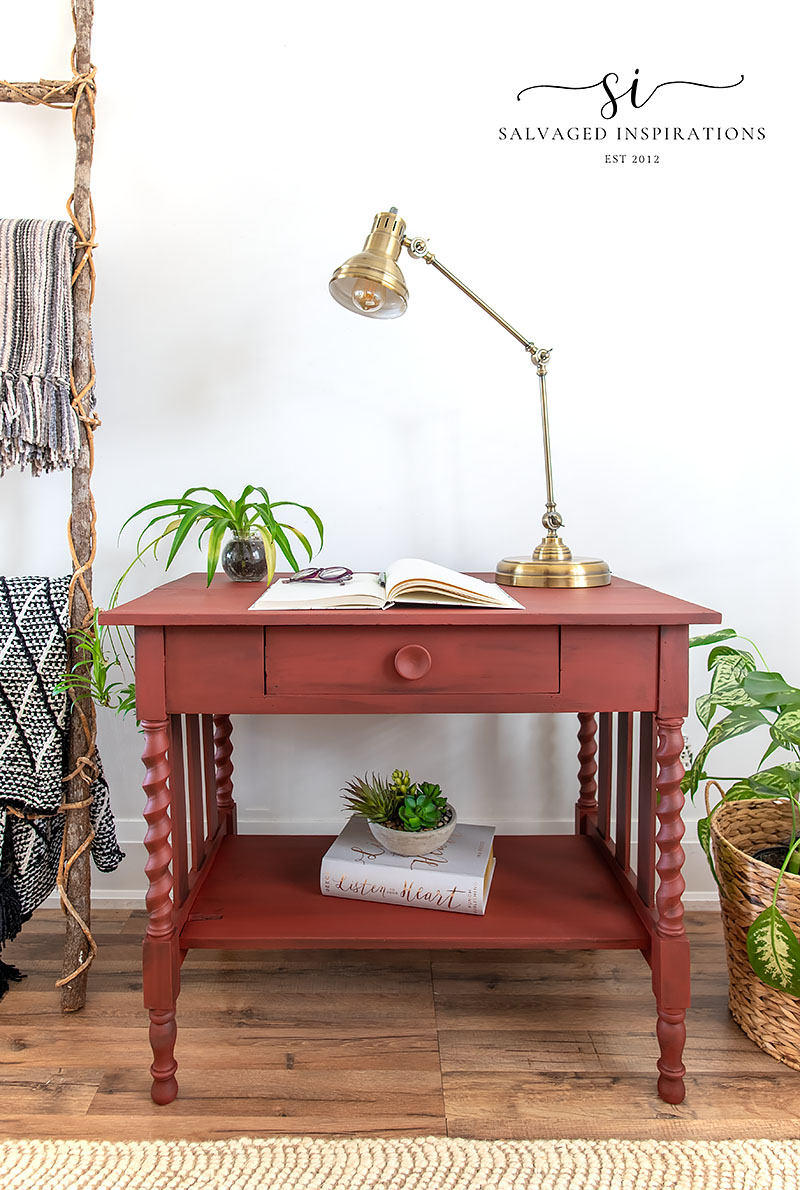
What do you think?! I love this Sequoia Red for the table.
It’s been a while since I’ve created a distressed/vintage-painted piece. I love doing these fun finishes. It’s freeing just being able to get into the ‘paint groove’ and enjoy. Painting can be so therapeutic and relaxing.

And what do you think of these legs?!
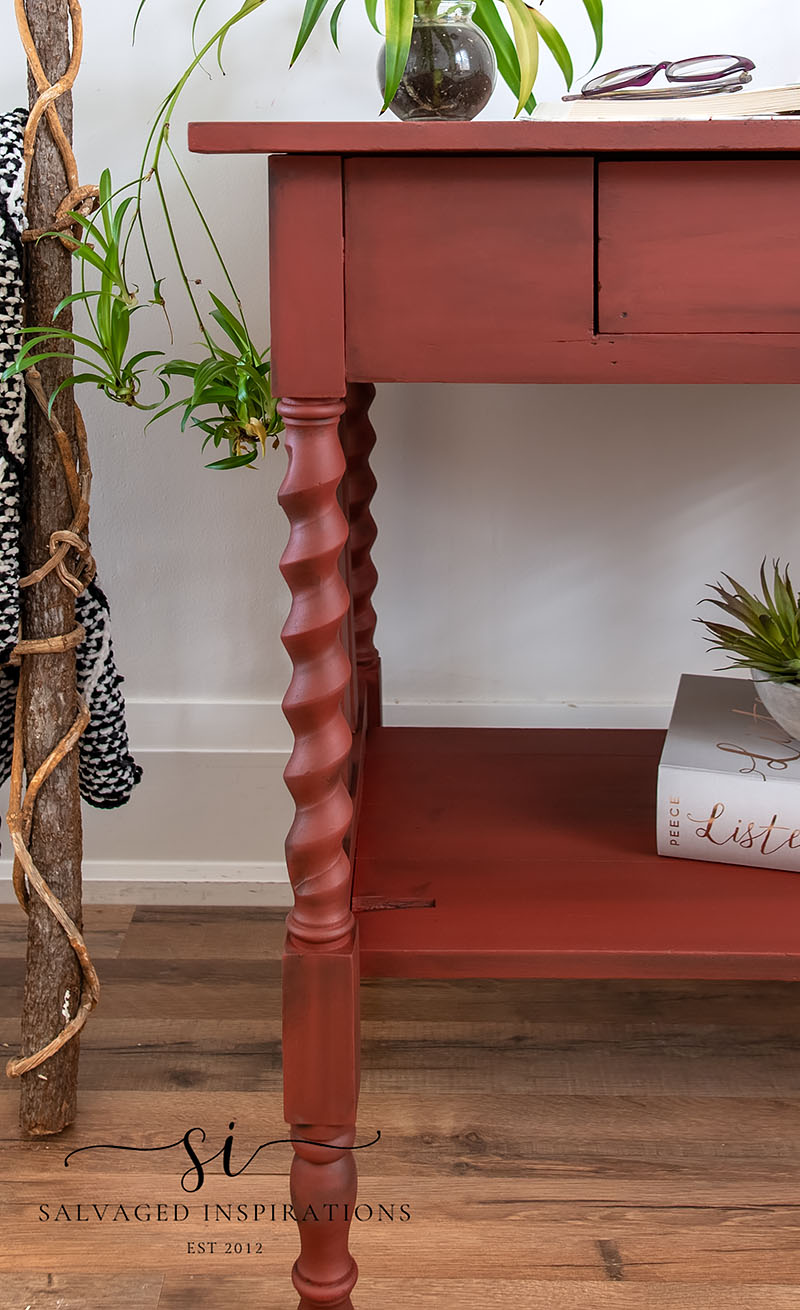
The dark antiquing highlights all the imperfections in this piece beautifully. She’s rustic, vibrant, and has a TON of character.
And here’s a look at the original boards glued together and refinished.
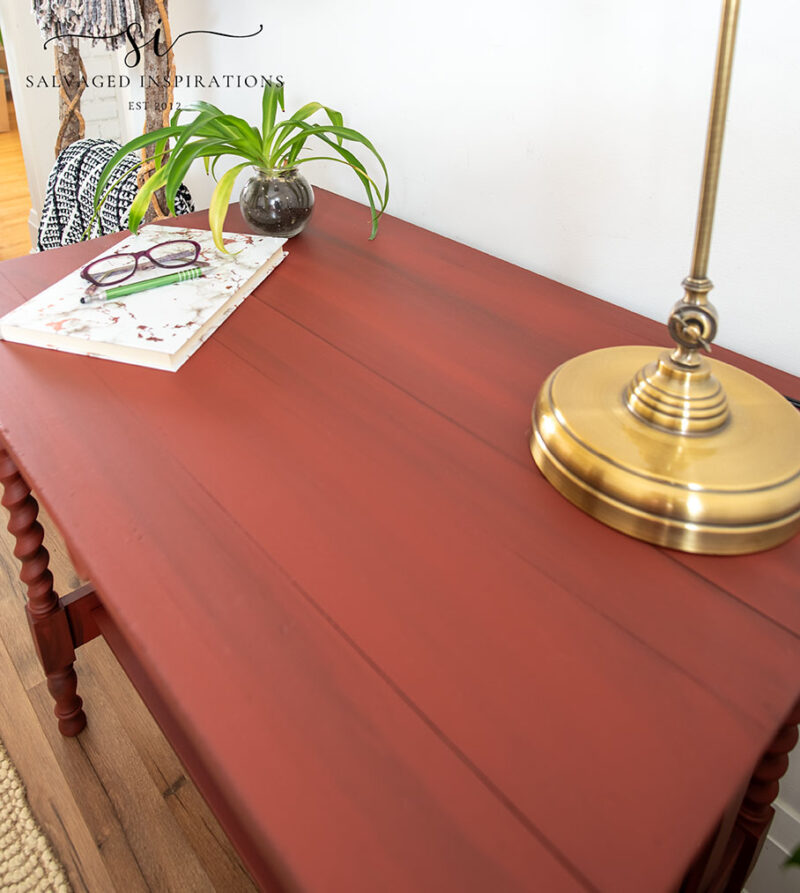
The Coffee Bean highlights all the imperfections including the glue-up. I think it blends it nicely.
I can’t wait to hear what you think of this NEW LOOK!
YOUTUBE TUTORIAL
Here’s the full step-by-step YouTube tutorial. Our #siyoutubefamily is already a community of 43.4K so don’t forget to subscribe if you haven’t done so already! So exciting, thank YOU! 🙂
And now for some Trash To Treasure FUN!
You’re going to LOVE what my creative Trash To Treasure ladies do! 🙂 Below are the BEFORE photos. Visit the links underneath to see the amazing AFTERS and learn how they did it! I’m heading over to take a peek as well! x
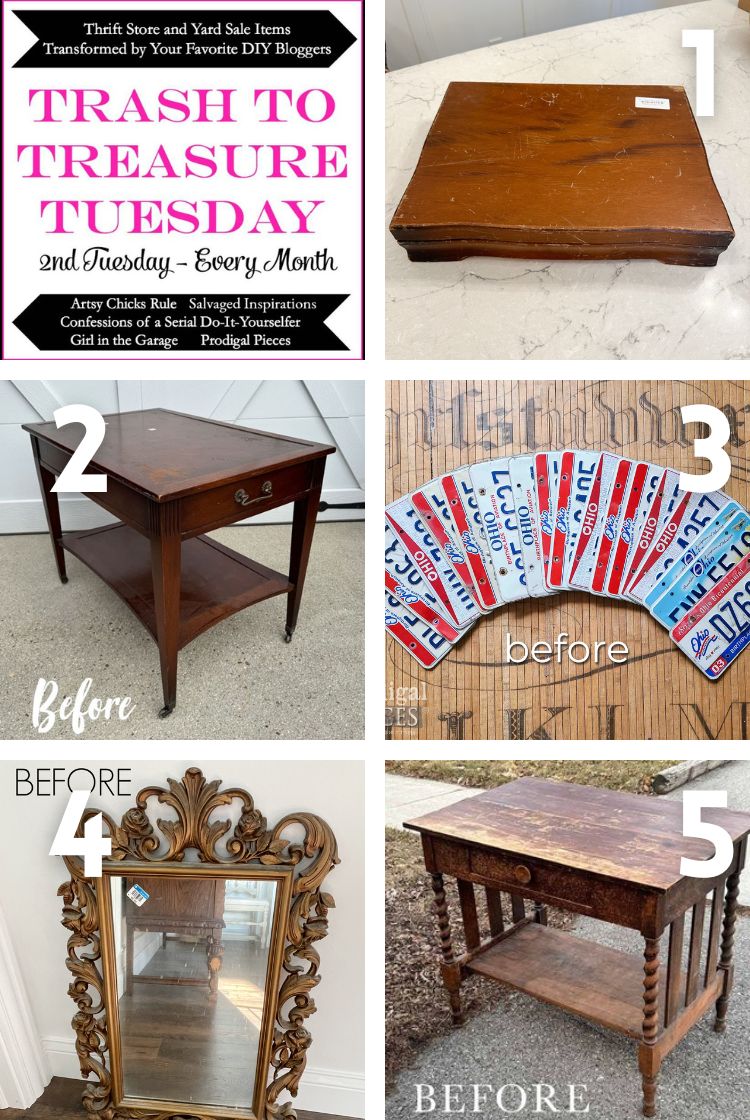
1. ARTSY CHICKS RULE
2. CONFESSIONS OF A SERIAL DIYER
3. PRODIGAL PIECES
4. GIRL IN THE GARAGE
5. SALVAGED INSPIRATIONS (HAPPY YOU’RE HERE!)
Here’s another look at this trash-to-treasure library table before and after. I won’t be selling this one but I hope it’s inspired you and given you some ideas for your painted furniture projects!

LET ME KNOW WHAT YOU THINK OF THIS TRASHED LIBRARY TABLE MAKEOVER OR FEEL FREE TO ASK ANY QUESTIONS YOU MAY HAVE… I ALWAYS LOVE HEARING FROM YOU. IT MAKES MY DAY! 🙂
Happy painting my friends!
Denise x
RELATED POSTS::
THRIFT STORE ACADIA TALLBOY
10 WAYS TO CREATE DISTRESSED FINISH
GORGEOUS RUSTIC RED DRESSER MAKEOVER
RED PAINTED FURNITURE
PIN AND SHARE!

This is such an inspiring transformation! The Sequoia color and distressed finish give the table a charming vintage look while highlighting its character. I especially love how the barley twist legs stand out. It’s incredible how creativity and effort can turn a curbside find into a stunning piece with a story. Amazing work!
Thanks so much Elizabeth! This was a great find and I had such fun working on it!
Love the results! I have a smaller table but with same legs, drop leaves on both sides, and drawer. It is in a bit better shape than what you started with, and has just been sitting there waiting for inspiration for months. And here you come with this! I can’t wait to tackle it now. Thank you for this. 😁
Your table sounds amazing. Thanks for being here to check out mine and have fun with yours Marie!🤗
Gorgeous table. I love how it turned out!
Thank you Diane!💕
The table is Beautiful
Thank you Gladys!🤗
Beautiful legs, happy you picked it up
I’m so happy I picked it up too! Thanks you!!
thanks alot of informationn goodjob
Thank you!
Once again, you made me like something I was initially prepared to turn my nose up at. I don’t care for orangey reds but your addition of Coffee Bean made the color lovely. And I don’t generally like barley-twist legs, but these look beautiful and perfect with the rest of the piece. Thanks for consistently overcoming my objections.
Aw, thank you Cyndel! I’m going to give the credit right back to you and say thanks for having an open mind when you come view these makeovers!
What a beauty, and lovely work! I love that you’re keeping this one, Denise! xo
Thanks so much Jen! XOXO
Wow the table is really lovely. Love it.
So happy you love it, thanks Donnita!
Absolutely love it! Awesome transformation. Never pass up a roadside treasure!
Thanks B… and ya, I love these roadside treasures too! 😉
Ohhhh, I’m not a ‘red’ person either…. But I’m not sure I’d call this red – especially not after the coffee bean paint wash. It’s sooo warm and earthy. Kind of clay ish ? ( I do like me some orange 🙂 )
I’m not surprised you’ll be keeping this table. The spindles are amazing !!
You really did capture it’s mood.
I really want to try a paint wash. It creates such character.
I’ll be watching your video for sure. Several times I’m sure !
Thanks for doing what you do so well. 🙂
You’d have fun with a paint wash. They are super easy to do and very forgiving – even though it looks pretty scary when you first start brushing it on!…lol.
I feel like it needs a chunky gold drawer pull. But I LOVE what you’ve done.
Thanks Susan!💜
You made it whole again! Super job on the distressing because it really “makes” the piece. I don’t normally like red, but this shade is super. Those legs are a killer! Kudos!
These legs are killer…lol. And ya, it didn’t look right to me being a solid color even though this red is like a antique/rustic red I would say. Thanks Caye!! Enjoy your day!
Love this table! You are lucky to have found it. Meant to be, I think. The color is stunning! If appropriate, why not take a photo of the table for gentleman you got it from, and let him know you are keeping it for yourself. Carry on!
Thanks Melanie!! I’ve thought about doing that many times!!! I would LOVE to show all the home owners what their trashed furniture looks like after it’s restyled but I’ve only ever done that with the neighbours I’m close to. Too shy otherwise…lol
What a great job! I love that you left the imperfections. Barley twist legs are so beautiful. I I hope you take a picture and show the kind gentleman that you got it from!
Thank you Cathi! He was super kind but I’m not sure how comfortable I am going up to his door. Although you’re the second person who suggested I do. Maybe this should be a ‘thing’…lol
Hi Denise. Beautifully done makeover. I’m so glad you kept the rustic charm.
Thanks Monique! It really does have some rustic charm going on. I wonder how old it is?!
I’m so glad you decided to take it in and give it a new life…it is gorgeous!! And it looks like its a good size! XOXO
I’m happy I took it in as well. I had a lot of fun restyling it. I haven’t done a distressed piece in a while. XOXO
Such a pretty little table! The Coffee Bean paint was the perfect finishing touch! xo
Thanks so much Nancy! XOXO
You did a really good job. I can’t get behind that color, though.
Thank you Lizzy… and for sure, its not for everyone. My sister Andrea hates red. It scares her.😂
I agree with Lizzy. It’s a real character piece and definitely needed the antique finishing touches to counteract the ‘solid’ colour effect. A new lease of life indeed.
I agree with you and Lizzy too! Thanks so much Audrey! XOXO
Thumbs 👍 Hun, the makeover is lovely. Gorgeous table once again!
Thank you K!🤗
Great transformation. The distressing made all the difference.
Thanks Char! I think the distressing suits it really well too. 🙂
Gorgeous library table! I remember these tables from long ago and the barley twists. ❤️ Beautiful makeover as always. xo 😘
Ya, you don’t see much barley twisting anymore…lol. 😉
This library table is so beautiful. Really like the antiqued red color. Hope I can find one similar this year. Everyone did such a spectacular job on the Trash to Treasure this week. All of you ladies are so talented and amazing, and so kind to share your talents and tips with the rest of us.
If you need me I will either be painting or searching for a library table.
t
Thank you Sue… and I love this group of ladies as well! I’m so honored to take part in this T2T every month and I love clicking through to see the after right along with YOU. All I get to see is the BEFORE until we all publish.🤗
Awesome!!!
Thank you Ruth! Enjoy your day! XOXO
That was a fantastic find! A really nice piece, and when you finished with it, an adorable piece! I like the cor scheme and also the fact that you did not try to hide the cracks in the top. Well Done!
A fantastic find, right!?!😃 I love finding these old pieces trash bound and thank you so much!
That turned out so nice. An easy technique that dries quickly instead of using glaze. Love those legs!
Right! Dries so much faster than glaze and ya, you don’t see these legs much anymore! Have a super day my friend. XOXO
You did a great job, Denise! The spindles alone are stunning – and I don’t normally like spindles! Thanks for sharing this!
So glad you like it even tho spindles aren’t normally your thing… that’s a huge compliment. Thanks Robin!😃
This was a STEAL! Beautiful table, and I just love those legs!!! You did a great job to bring her back to life.
It was a great find and thank you Jeanne! 🙂
What a sweet find and even sweeter makeover! Beautiful job, Denise.
Thank my friend! And I LOVE your makeover this month. So darn creative!!! XOXO