A VINTAGE DRESSER GETS A MAKEOVER USING RUSTIC RED PAINT, WOODUBEND, AND AN EASY TECHNIQUE FOR AGING AND DISTRESSING.

Hi beautiful #sifamily, thanks for joining me! Today I’m transforming this vintage dresser into a rustic red beauty using the perfect Rustic Red Paint, an easy paint distressing technique, and WoodUbend appliques.
As you know, painting is a creative outlet for me. But another reason I love furniture painting is that I learn something new with each makeover… and then I get to share it with you!
I learned a lot about fumed oak a.k.a tigerwood on this one. 😲
I’m also sharing ~
- How to get a perfectly painted lip under your stained dresser top
- How to Distress with Paint
- The BEST Sandpaper Grits for a gorgeous stained top
- How To Sand WITHOUT dust
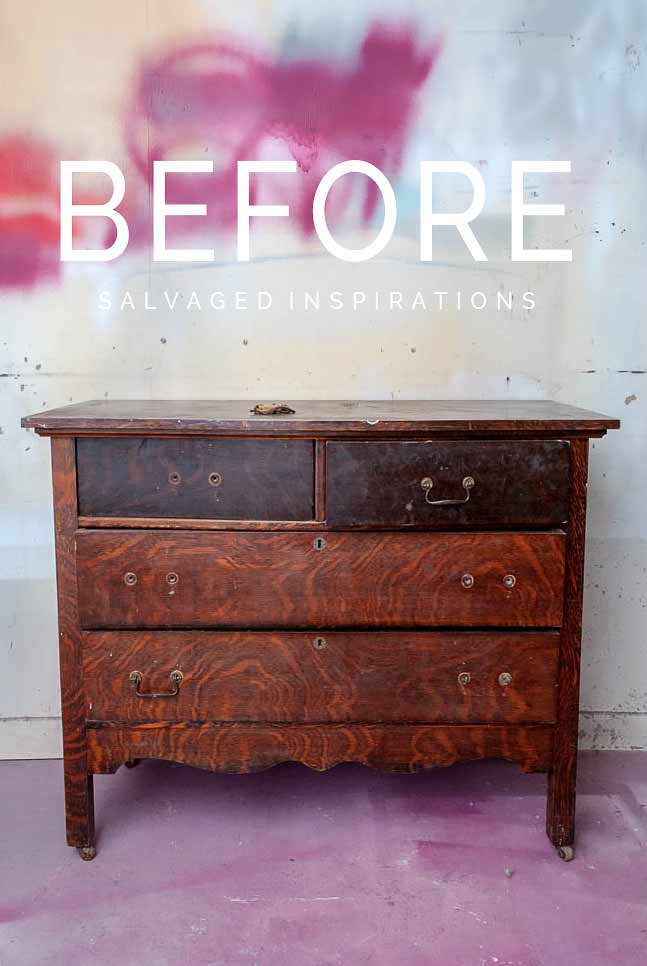
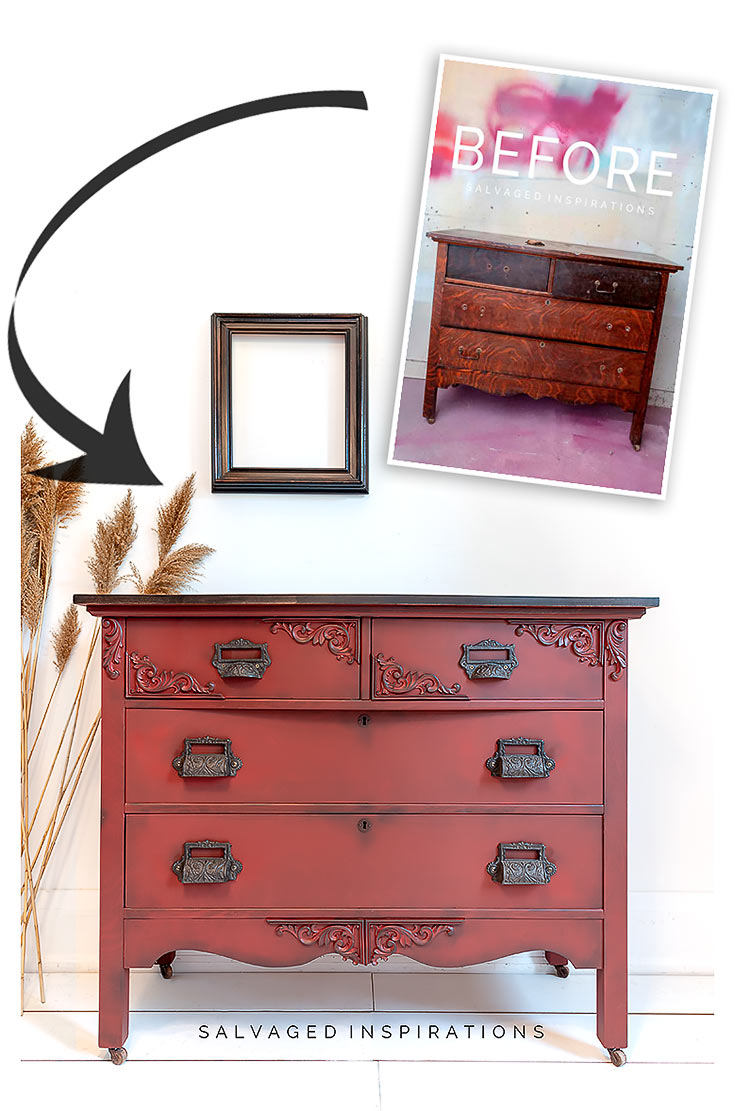
Here’s what I started with. This vintage tigerwood/fumed oak dresser. I shared a before video on my Facebook page which you can see here.
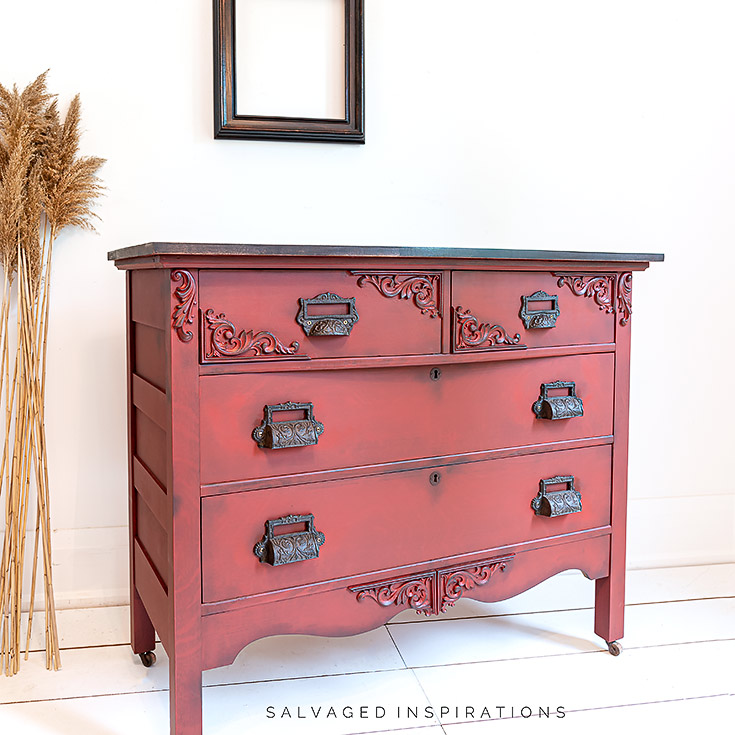
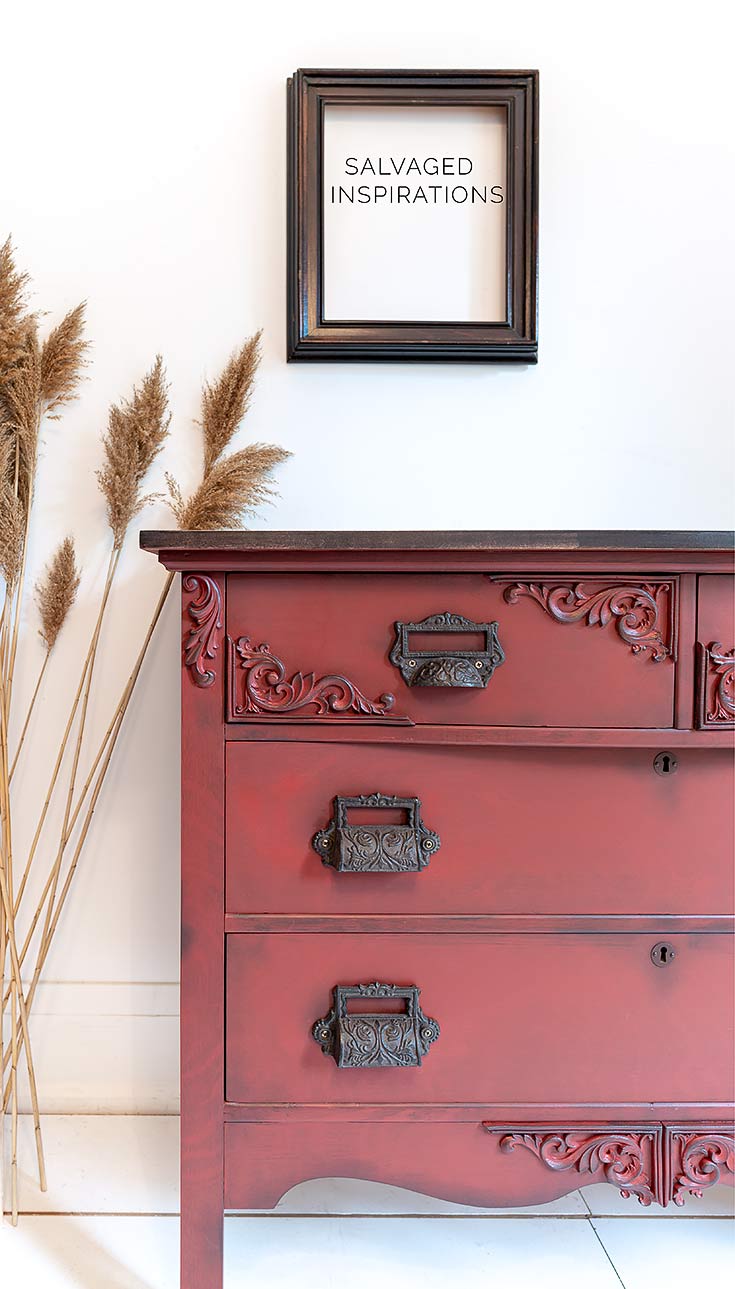
Here’s the after. What do you think?

Can you see the tigerwood showing through the paint? I tried to capture it on camera but it’s pretty subtle unless the light hits it just right.
THIS POST IS SPONSORED AND/OR CONTAINS AFFILIATE LINKS TO PRODUCTS I LOVE TO USE! YOU CAN SEE MY FULL DISCLOSURE HERE.
SOURCE LIST::
-
- Vintage Dresser – SALVAGED
- White Lightning (cleaner)
- Paint Brushes
- Stencil Brush (for distressing)
- Sandpaper | Shop Towels
- DeWalt Orbital Sander
- Coffee Bean (for aging & distressing)
- Rustic Red (basecoat)
- WoodUbend Corner Molds
- Posh Chalk Patina (for Keyholes)
- Expresso Gel Stain
- Satin Clear Coat
RUSTIC RED PAINTED DRESSER
I bought this dresser off Facebook Market Place. It had been in storage for some time so I gave it a really thorough cleaning with this heavy-duty cleaner.
Of the entire makeover, the sanding was the most time-consuming because I was hoping to salvage the wood top. Unfortunately, the gouges and scratches were too deep. Once I started sanding, the fumed oak/tigerwood disappeared and I was left with ‘average-looking’ wood.

A few of my FB friends sent me some articles on how to get the fumed oak look. It’s an interesting process. I also found this youtube video explaining how ammonia fumes bring out the tannins and darken the wood. If you’re interested in how wood reacts, they’re an interesting read.
To get a super smooth stained finish on dresser tops…
- I start with either a 60 or 80 grit sandpaper depending on the hardness of the wood and what I’m stipping off or leveling out.
- When this orbital sander has done the heavy sanding, I switch to a 120 grit and go over it all again.
- A 220 comes next to smooth everything out even more.
- Then I hand sand with a 220-320 fine sanding pad.
- Now it’s ready for stain!
Also, if you don’t want to make a mess when you sand, here’s a really inexpensive way to sand WITHOUT dust. If you have a vacuum, all you need is an inexpensive attachment!

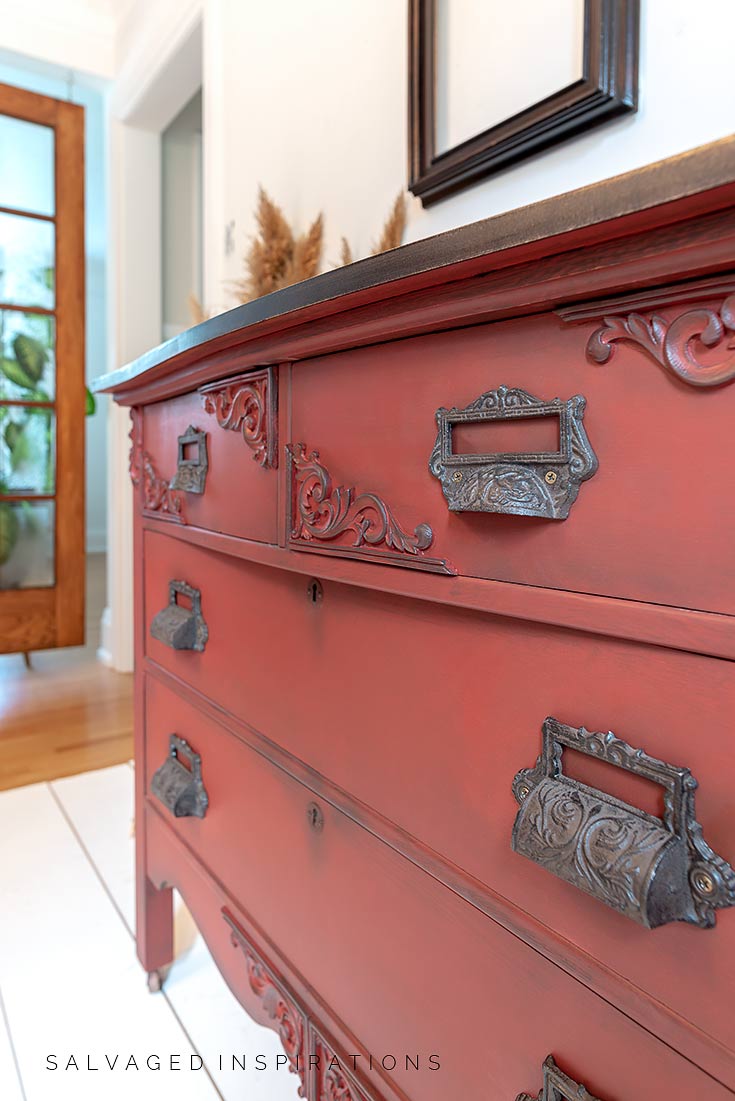
But even before I stain, here’s what I do to get a PERFECTLY painted underlip on the dresser top.
While I’m painting the dresser, I paint the underlip. If a little paint gets onto the edge (as in pic below) I don’t worry about it. After the paint has all dried and I’m ready to stain, I sand the edges of the dresser top. Then stain. This leaves me with a perfectly clean line of paint where the stain meets up.

To give this dresser more character, I added these WoodUbend Corner Molds. These appliques are really easy to work with because once they are heated, they actually bend and mold perfectly to the surface. I have a full tutorial including a video here.
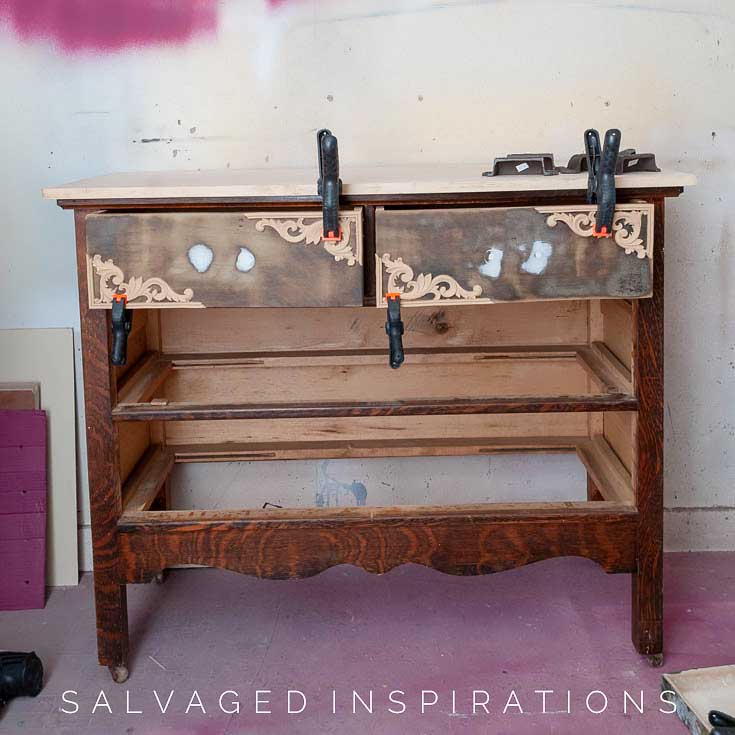
To give them a distressed and aged look, I dry brushed a tiny bit of this Coffee Bean just hitting the high spots of the applique. This is the simplest technique and takes barely any paint at all. I find a good stiff stenciling brush gives me the best result for this method.
I created a video tutorial using this paint aging here. (starting at 5:55 in the video)

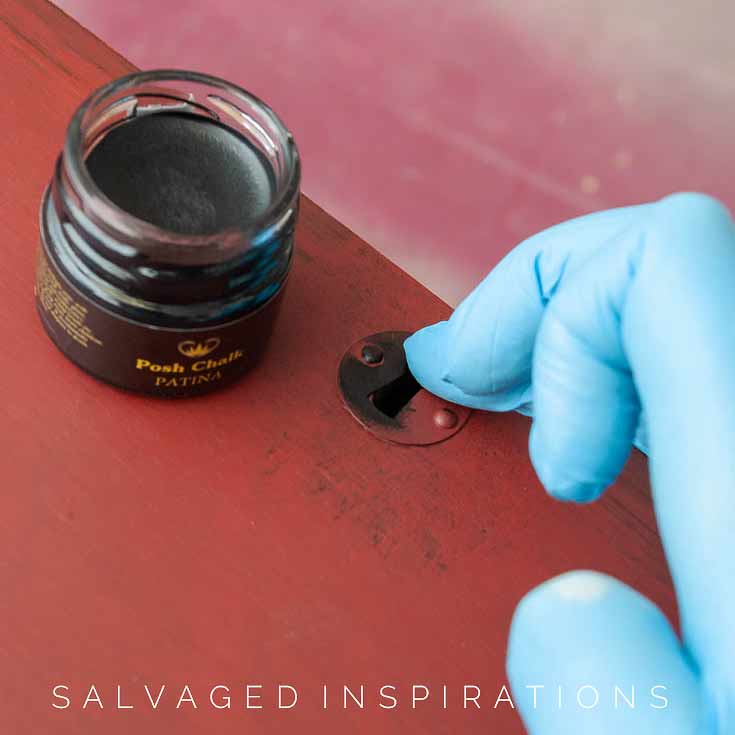
For the small metal keyholes, I used this Posh Chalk Patina from WoodUbend.
I love the end result and I’m smitten with this chunky hardware as well.

Here’s another look at the before and after…
LET ME KNOW WHAT YOU THINK OF THIS SALVAGED RUSTY RED DRESSER OR FEEL FREE TO ASK ANY QUESTIONS YOU MAY HAVE. I ALWAYS LOVE HEARING FROM YOU. IT MAKES MY DAY! 🙂
UPDATE:: It’s almost one year later and I just found out this Rustic Red Dresser made the FULL back cover on the Country Sampler Farmhouse Style Autumn 2021 Issue. I couldn’t be more thrilled!

Happy furniture painting my friends!
Denise x
RELATED POSTS::
RED Painted Furniture
RED Stencil Embossed Cabinet
How To Fix Furniture Painting Mistakes
DIY Weathered Wood
Fuchsia Sunset Painted Dresser
PIN AND SHARE!


Hi there! This is beautiful! Did you wax the entire piece or use a topcoat or both?