HERE’S THE STEP-BY-STEP ON HOW TO CREATE A VINTAGE ROSE FINISH FOR A BEAUTIFUL ANTIQUE LOOK | YOUTUBE VIDEO COMING THIS SATURDAY!
Hi, creative friends, and welcome back to another Furniture Fixer Upper tour. So happy you’re here! While I was away on vacation, I saw a TON of distressed tiles, furniture, walls, and the most gorgeous patinas, which inspired me to try a distressed finish. I don’t do vintage finishes as much as I used to, but I still LOVE an antique look. This is a take two on a dresser I refinished almost 10 years ago, so I can’t wait to hear which paint finish you prefer!
In today’s post, I’m also sharing –
- How to stencil using an airbrush
- A quick and easy way to distress… super fast
- How to antique a paint finish with a water-based product
- And more!
*As an Amazon Associate, I earn from qualifying purchases. There are affiliate links in this post to other companies/products I use and love as well. You will never be charged extra when you purchase through these affiliate links. If you purchase from my links – A BIG thank you for supporting me and the #siblog! To see my full disclaimer, click here.
Bonus, it’s Furniture Fixer Upper Day! If you’re new here, on the fourth Thursday of every month, I join four super-talented friends (Christy – Confessions of a Serial DIYer, Kathy – Petticoat Junktion, Natalie – A Ray of Sunlight, and Gail – My Repurposed Life) to share our before-and-after furniture restyles. I’ve included the links at the bottom of today’s post and I hope you join me in seeing what they’ve created this month! I always learn something new from these talented ladies.

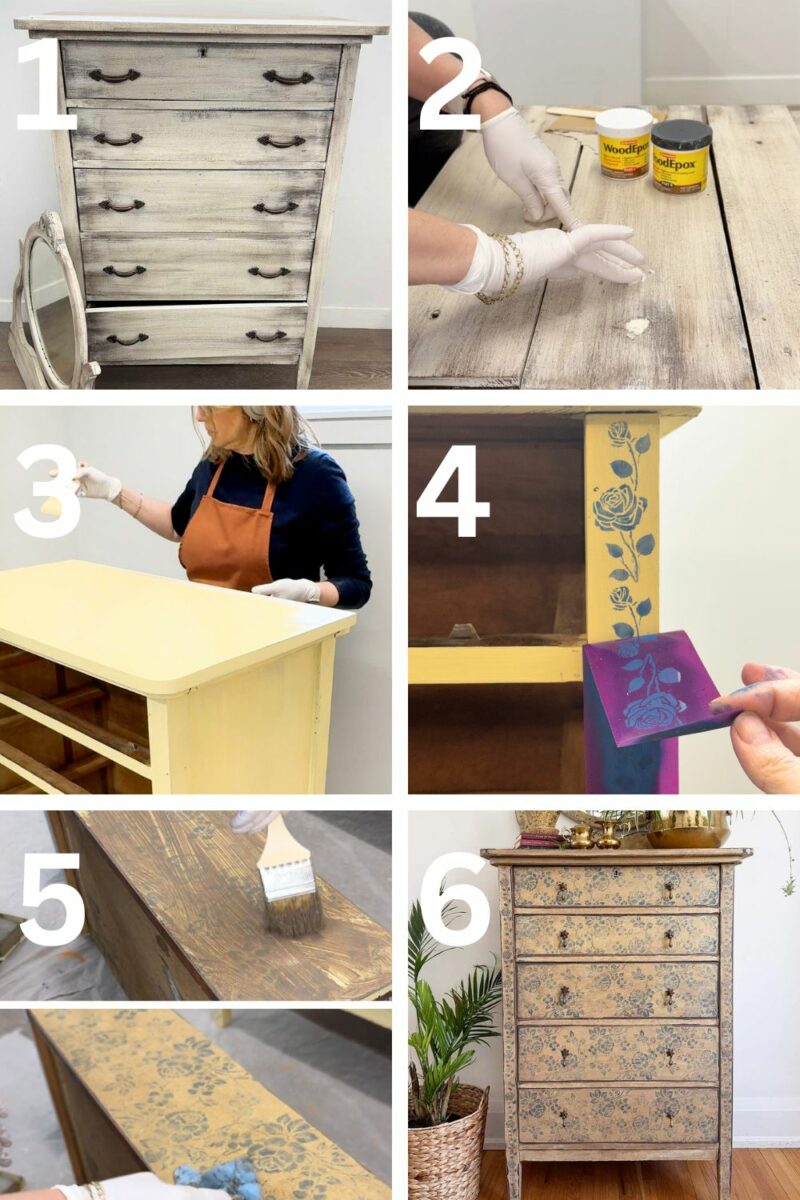
Below is the vintage tallboy dresser I started with. I created this weathered paint finish back in 2017 and used this dresser/mirror in my bedroom for many years. I pulled it out of storage to create another look.
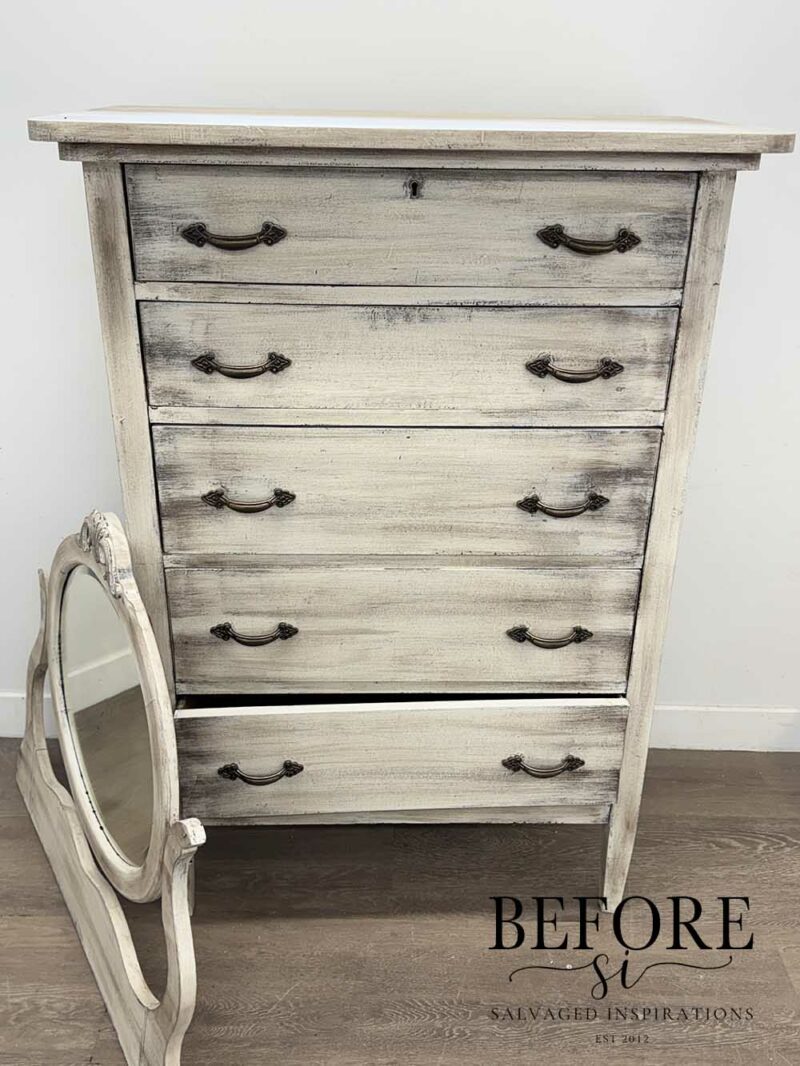
This is an old solid wood piece with great bones. The bottom drawer was a little wonky from years of use. It also looked a little beat up from years of love…and then being in storage. But overall in great shape and nothing we can’t fix up. That’s the beauty of old wood furniture. It can be recreated, restyled, and reinvented over and over again!
THIS POST IS SPONSORED/CONTAINS AFFILIATE LINKS TO PRODUCTS I USE. YOU CAN SEE MY FULL DISCLOSURE HERE.
SUPPLIES
Vintage Tallboy w Mirror – SALVAGED
White Lightning Cleaner
Auto Sponge
Sanding Sponge
Bonding BOSS Clear Primer
2″ Angled Paint Brush
Rebel Yellow Chalk Mineral Paint
Cape Current SILK Mineral Paint
Roses Silkscreen Stencil
Charred Hickory Water-based Stain
Easy Peasy Spray Wax
TOOLS
Timbertech Air Brush Compressor Kit
Plastic Putty Knife
Bosch Orbital Sander
Antique Bronze Teardrop Pulls
CLEAN
To start the prep process, I cleaned this dresser with a heavy-duty furniture cleaner, and a large automotive sponge.
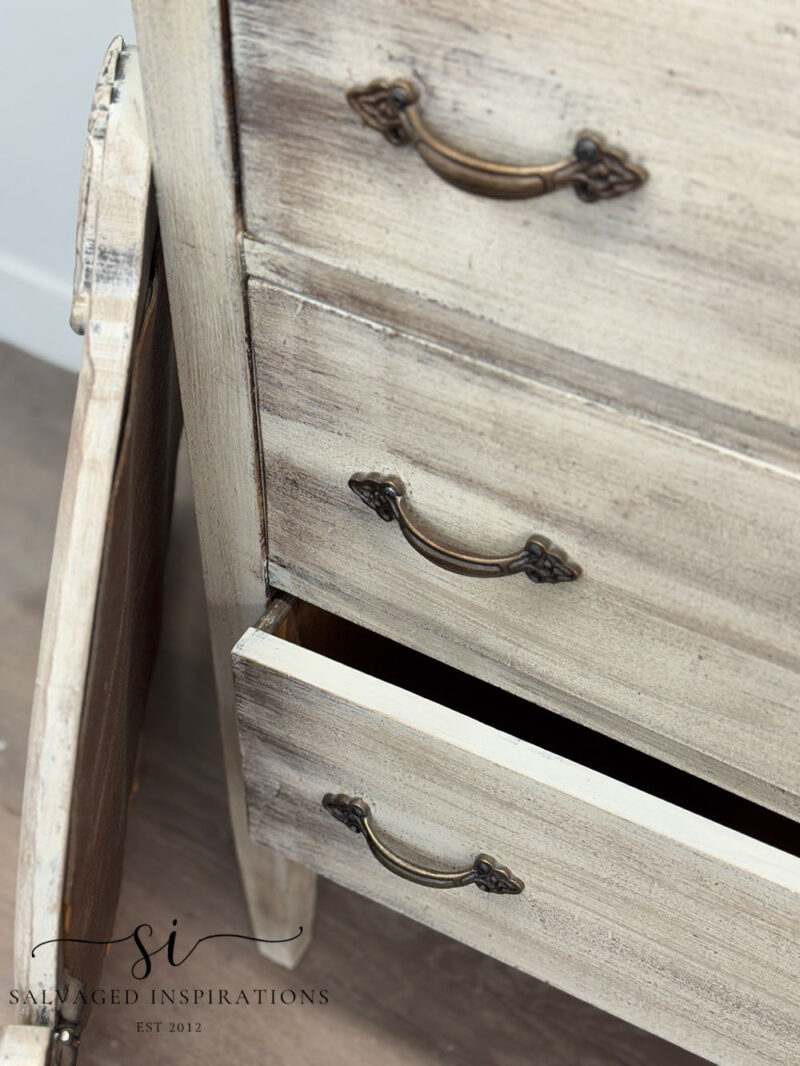
DRAWER REPAIR
To fix the wonky drawer that wouldn’t close, I used a salvaged drawer track from my stash. You can also buy drawer guides/slides/tracks online, but I like salvaging them from old drawers. Then I keep them in my inventory for situations like this. I just made sure that this drawer slide was the proper height and length. Then I used some wood glue, clamps, and finishing nails to adhere it in place.

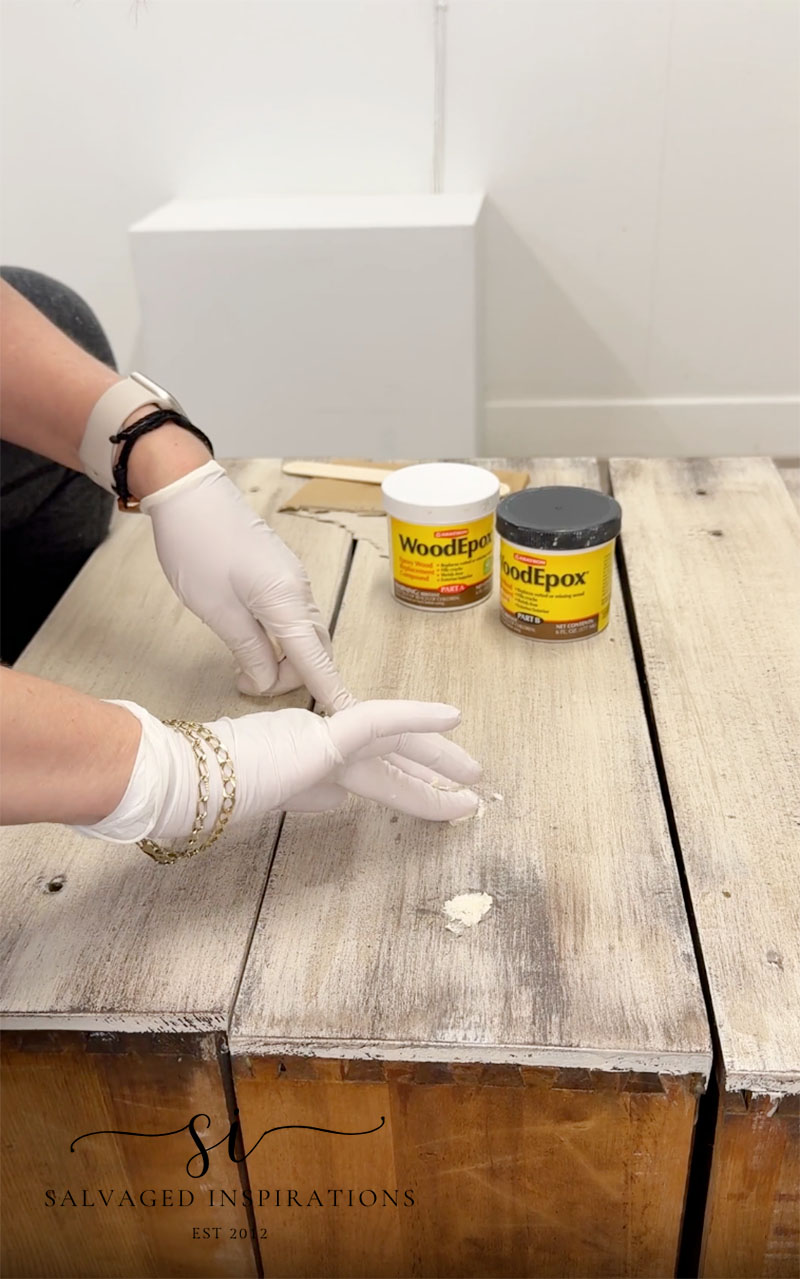
After the bottom drawer was fixed, I went ahead and filled all the old hardware holes with this Wood Epoxy Filler. I really like this product. There is no smell. It’s really easy to mix the two-part system in my hands. And I can mix very small amounts, so there’s no waste. It does require more time to dry than Bondo, so if/when I’m on a time crunch, Bondo will still be my go-to. It’s always good to have a few options on hand, though.
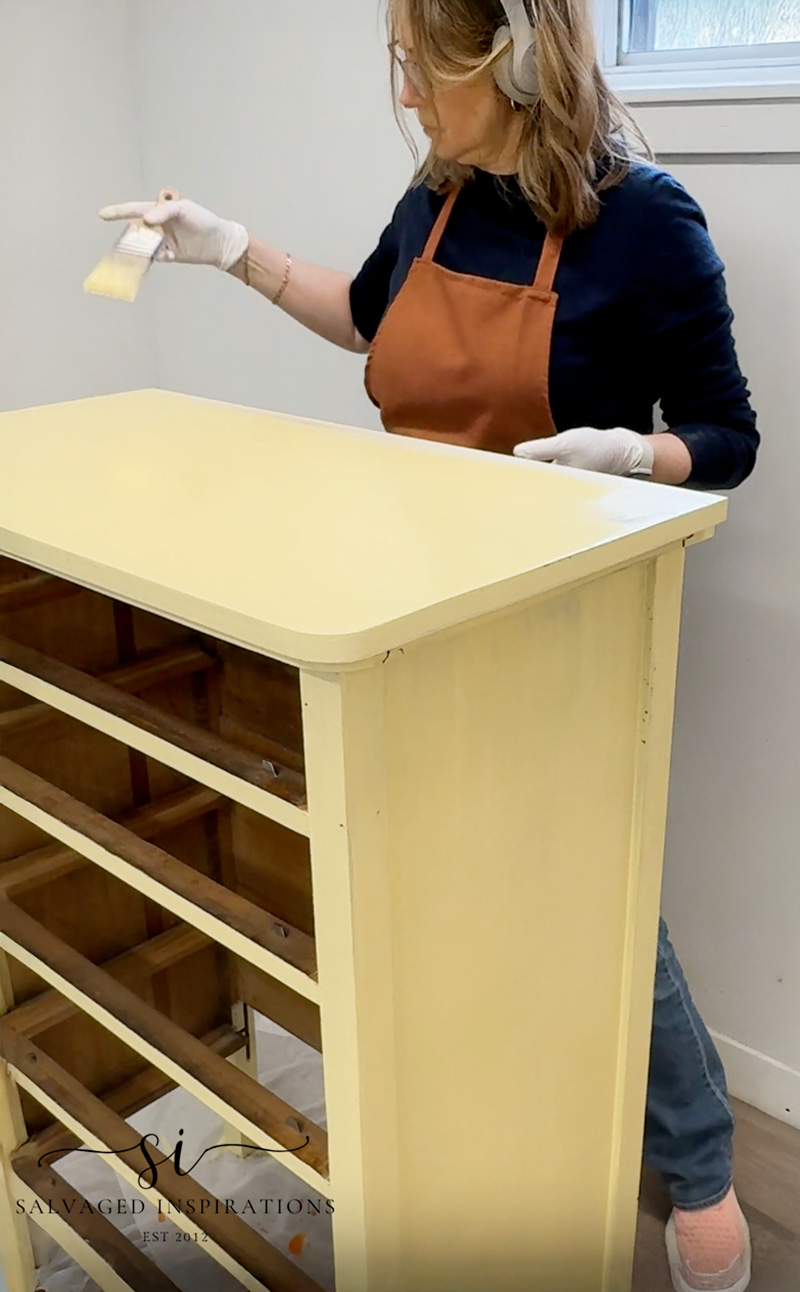
PRIMING & PAINTING
I went ahead and scuff-sanded the entire dresser – including sanding smooth the filled hardware holes. I used a clear primer and then the next day, I came downstairs and picked my base color. The color I chose to paint is this Rebel Yellow Chalk Mineral Paint. I wasn’t too particular about getting a perfectly even coat because I knew I was going to distress this one. I used my 2″ angled paint brush to get into all the details. This paintbrush also gives a nice, smooth finish and is super comfy to use.
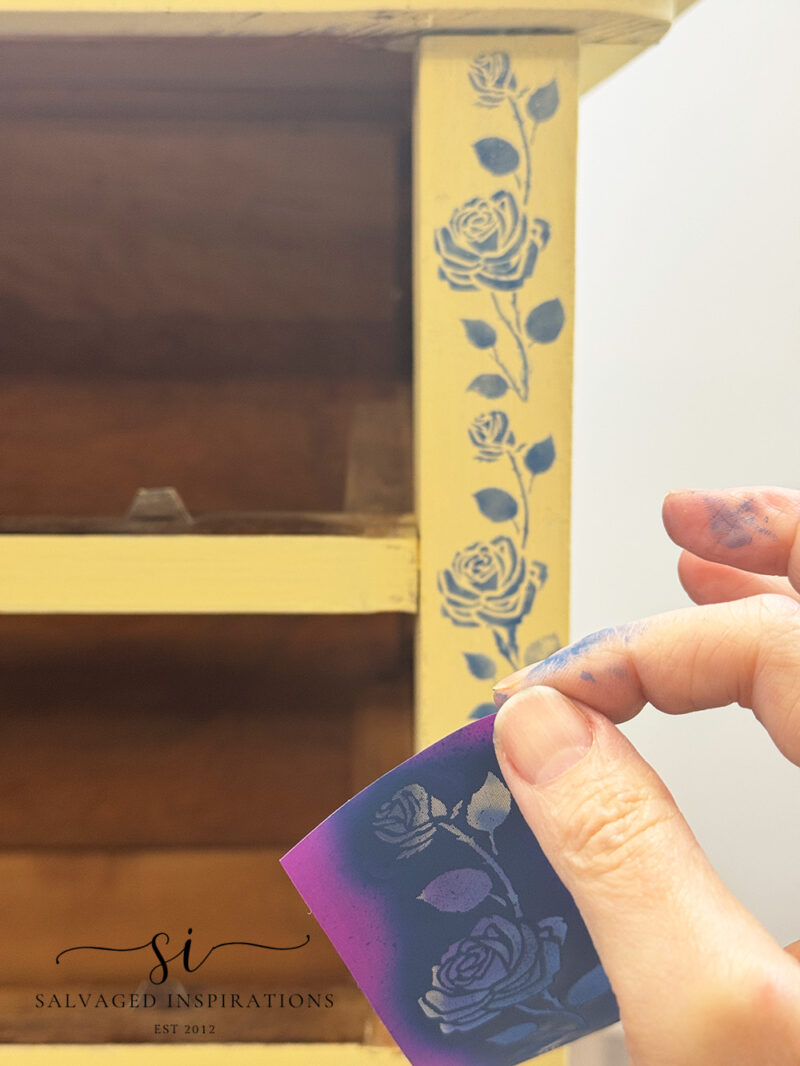
SILKSCREEN STENCILING
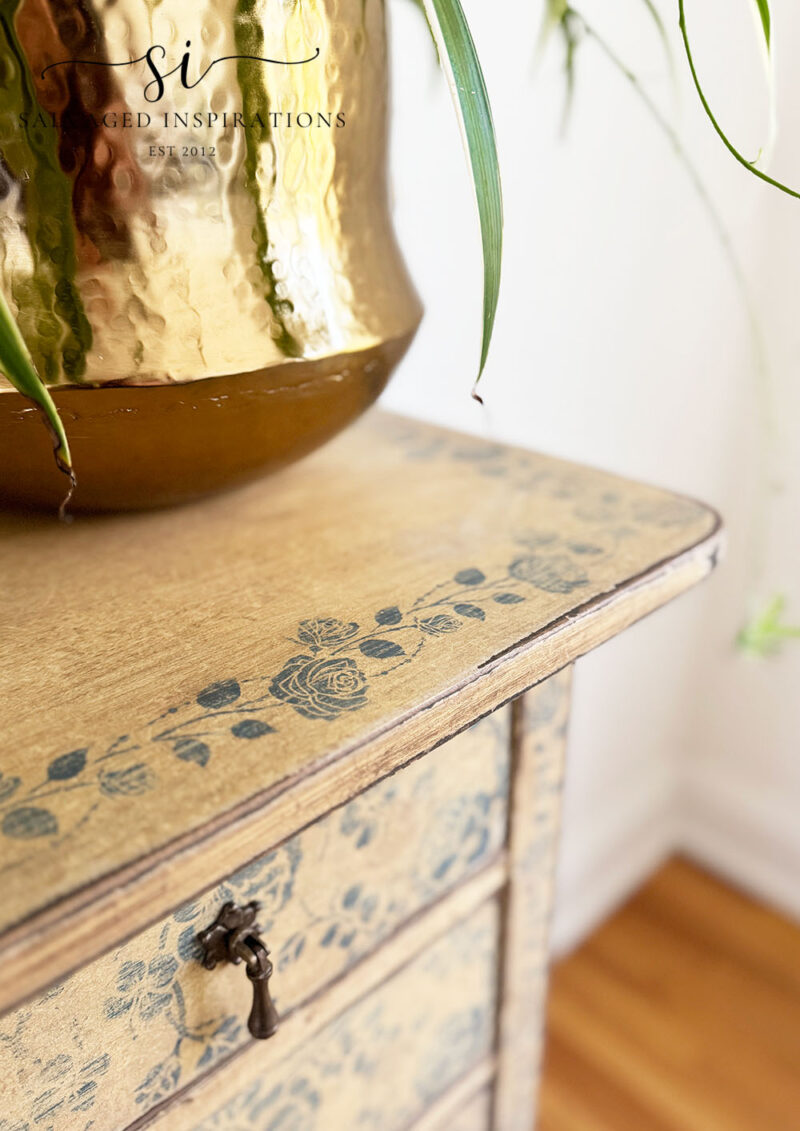
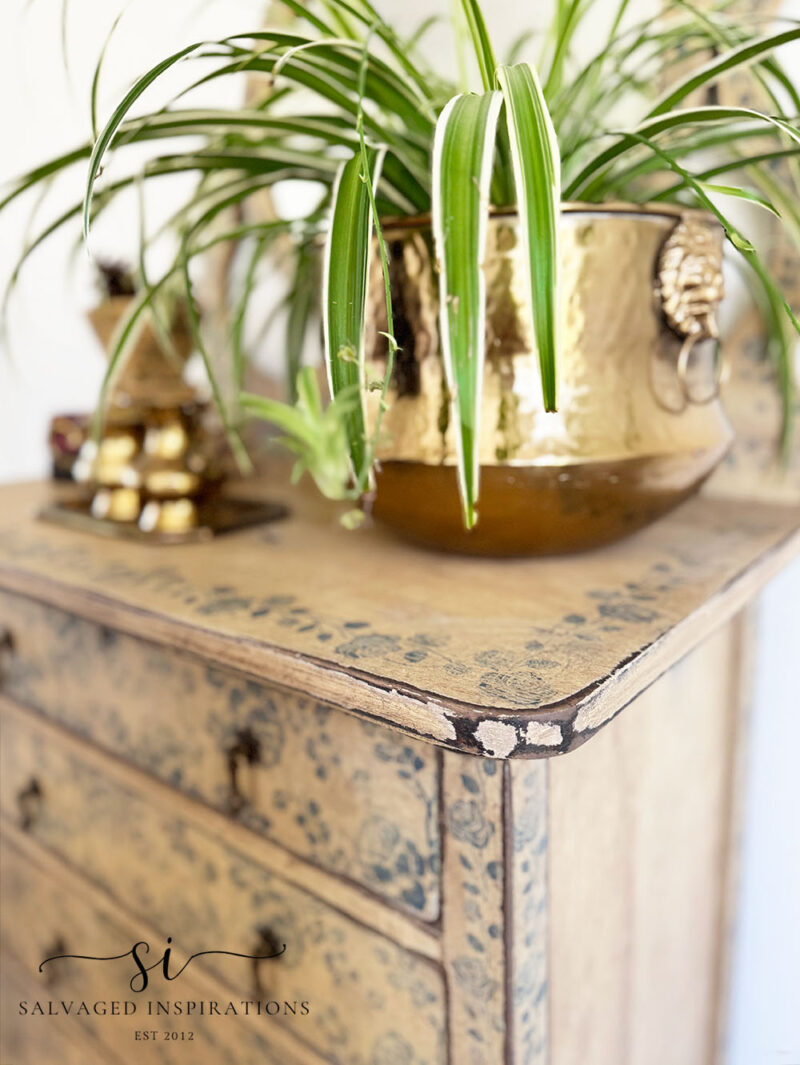
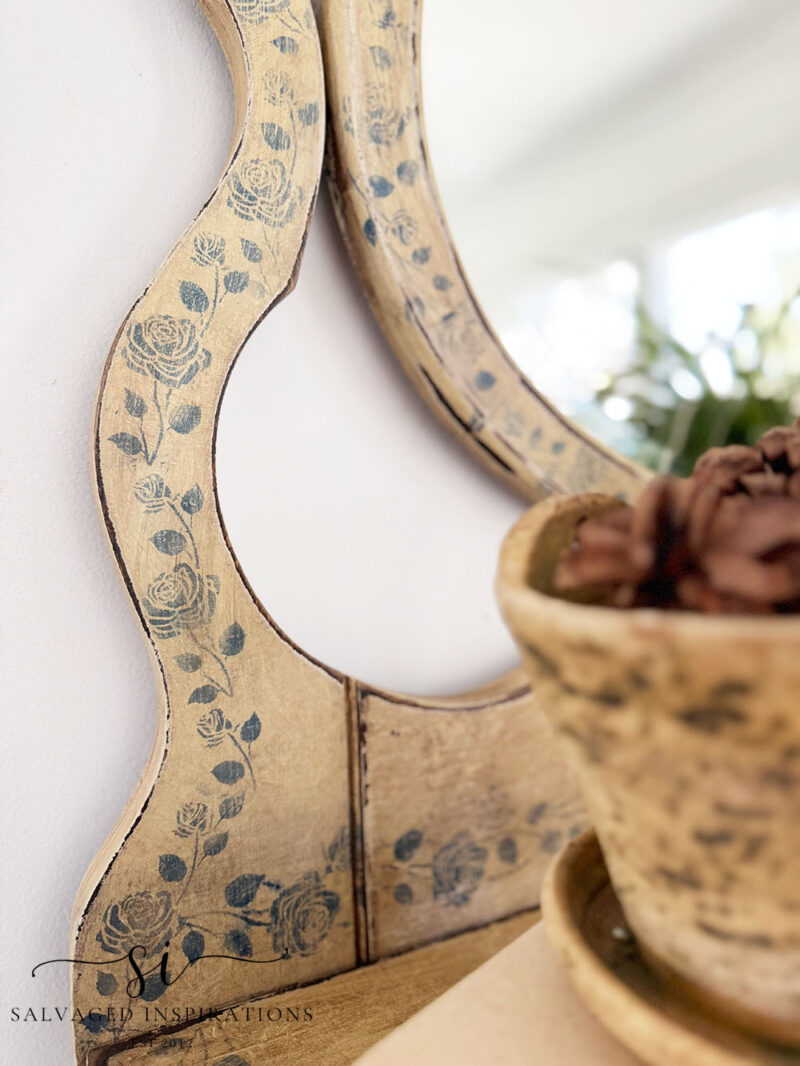
To add the vintage rose pattern onto this dresser, I used this Roses Silkscreen Stencil. The usual way to use these is to add some paint onto the plastic applicator (provided with the stencil) and run it across the silkscreen design. I used my Airbrushing Kit to airbrush the paint onto the stencil design instead. You may remember I airbrushed this English Ivy Dresser here. Using the airbrush tool for stenciling provides CRISP, clean lines and can create dimension as well. You can spray lightly in some areas and much darker in others. Below, I’m using Cape Current SILK Mineral Paint in my airbrush gun.

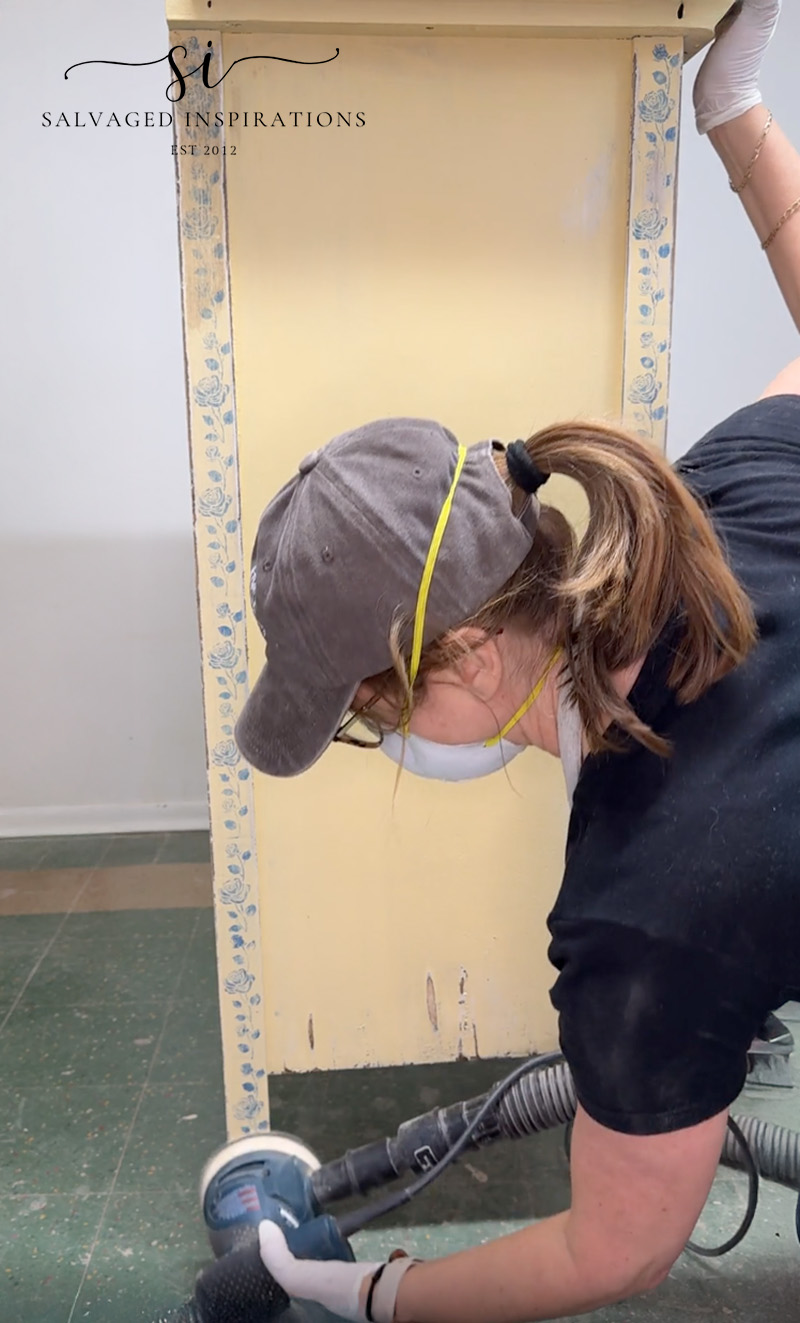
SANDING – DISTRESSING
I could have left the yellow and blue rose dresser as is and called it a day. It looked lovely, and the stencil really popped! But last week I wanted to do a distressed finish and changed gear, so this week I thought I’d stick to my original plan. To distress, I started hand-sanding with an 80 grit sandpaper. This works but it’s not as fast as taking an orbital sander to your finish. I’ll admit, this was a little scary after putting in hours of stenciling/painting. But within 10 minutes, I had the entire dresser sanded and distressed.
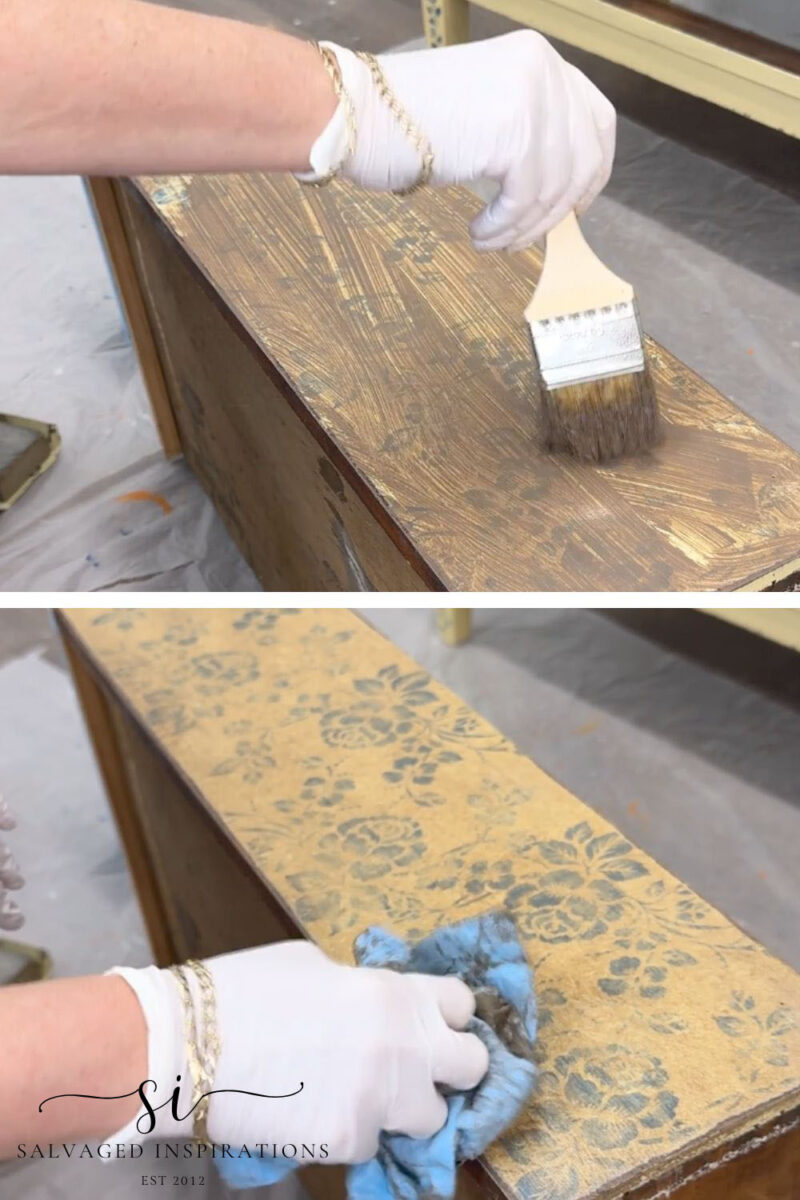
ANTIQUING WITH STAIN
Once I had the dresser sanded and distressed, it was time to add some serious years on this piece. This is super easy to do and creates a gorgeous aged patina. I used this Charred Hickory water-based stain. I poured some stain into a cup. Then, using a cheap and cheerful chip brush, I brushed a layer onto the drawer. The stain needs to be wet while doing this technique, so I work in small, manageable sections before moving onto the next. I brush the stain on. Then, using a shop towel, I wipe off the excess and then dab-dab-dab to create some variation. You can see this exact technique in action on this weekend’s YouTube video.
CLEAR WAX & HARDWARE
To protect this patina finish, I used this Easy Peasy Spray On Wax. I opted for this wax because I didn’t want any sheen to this aged look. It’s really easy-peasy to use. Spray on. Wipe off. I used a soft lint-free cloth, but I’ve also used a shop towel. You can wait up to fifteen minutes before wiping it back but I prefer to spray and wipe without any wait time.
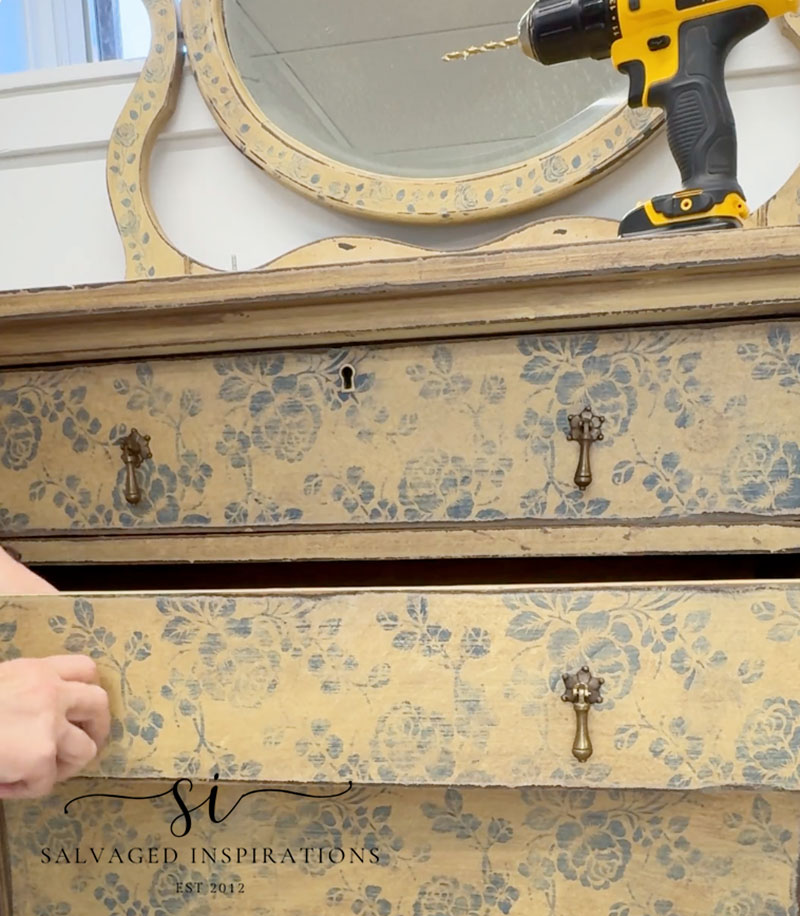
For the final detail, I added Antique Bronze Teardrop Pulls. I love the look of them on this finish buuuut, I only had six of them, ugggh. I have to order some more for the bottom drawers.
PIN AND SHARE 🤗
STEP-BY-STEP DRESSER MAKEOVER
THE BIG REVEAL…
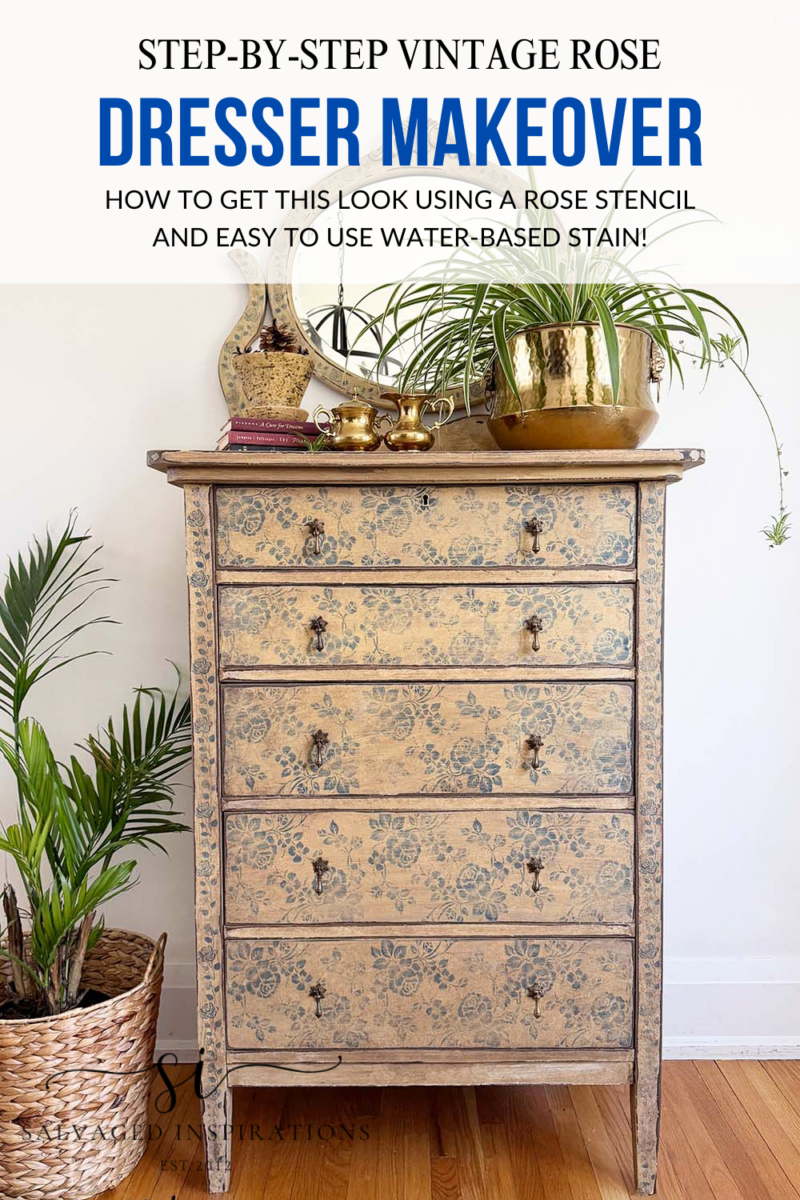
Here’s the finished look!
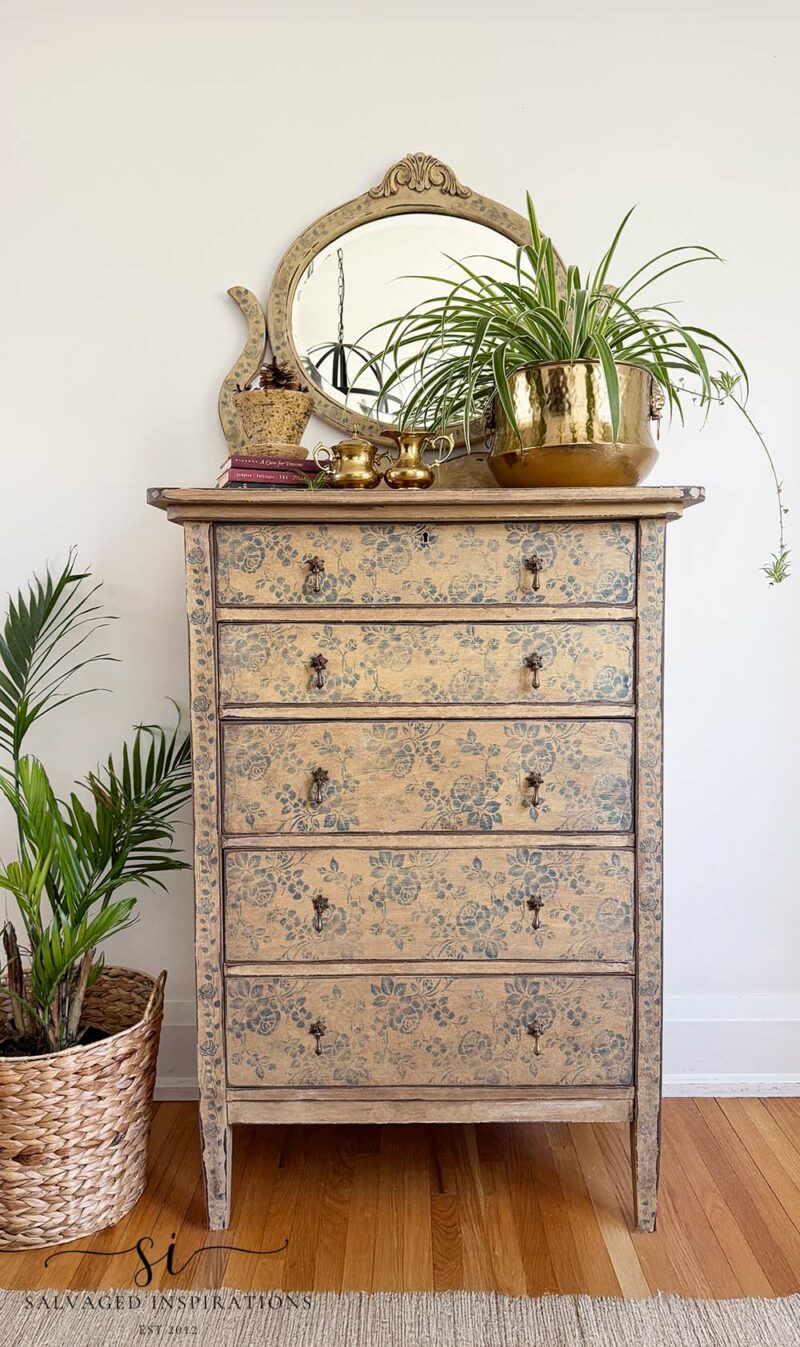
I think this is such a sweet floral update for a vintage vibe. It suits this style of dresser perfectly, don’t you think?!
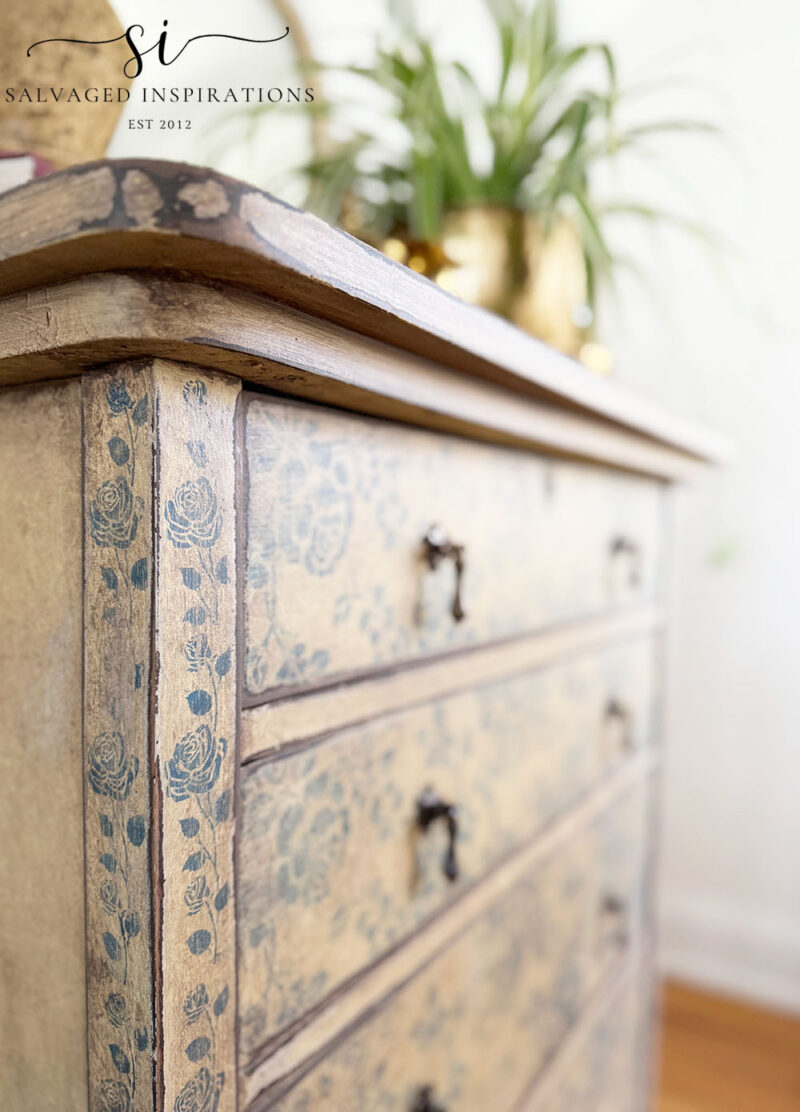
And check out the vintage rose border on the top.

Let’s not leave out the little roses on the harp mirror as well!
YOUTUBE TUTORIAL
I’ll have the full step-by-step YouTube video tutorial for you this weekend. Our #siyoutubefamily is already a community of 57.7K, so don’t forget to subscribe if you haven’t done so already. You’re the BEST, and I appreciate your support! 🙂
And now for some FURNITURE FIXER UPPER FUN!
You’re going to LOVE what these creative FFU ladies do! Below are the BEFORE photos. Visit the links to see the amazing AFTERS and learn how they did it! I’m heading over to take a peek as well!
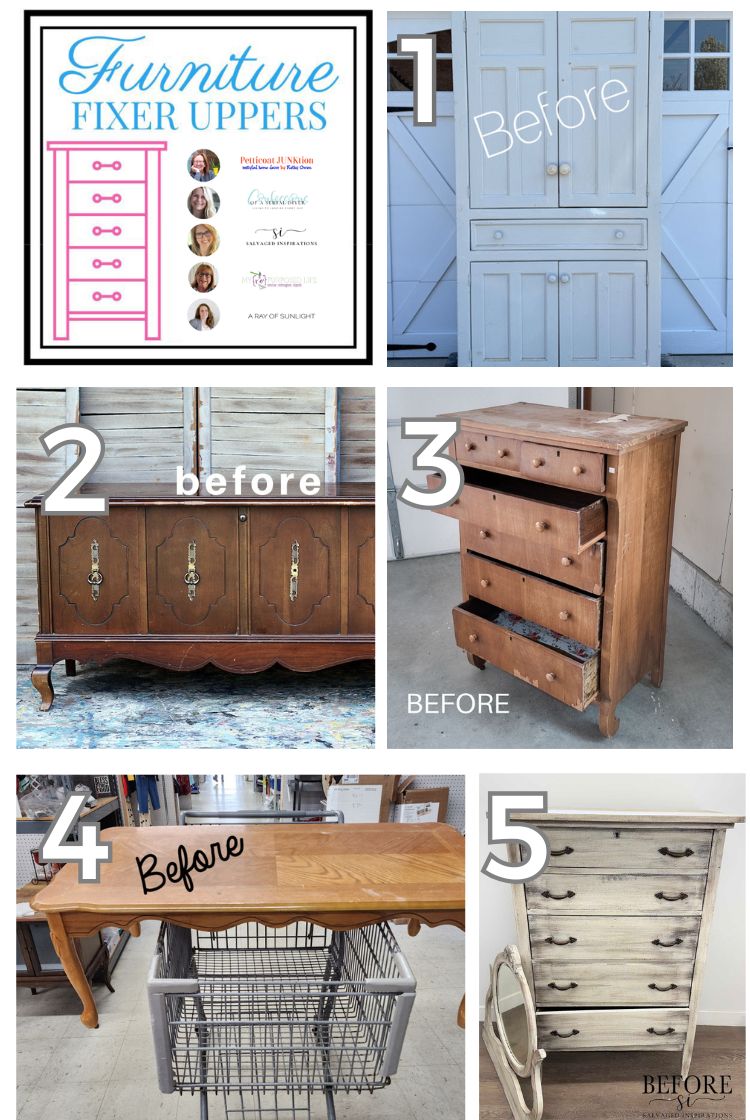
1. CONFESSIONS OF A SERIAL DIYER
2. PETTICOAT JUNKTION
3. A RAY OF SUNLIGHT
4. MY REPURPOSED LIFE
5. SI (HAPPY YOU’RE HERE!)
Here’s another look at this vintage rose-stenciled tallboy dresser before and after. I hope it’s inspired you and given you some ideas for your upcoming furniture painting projects!
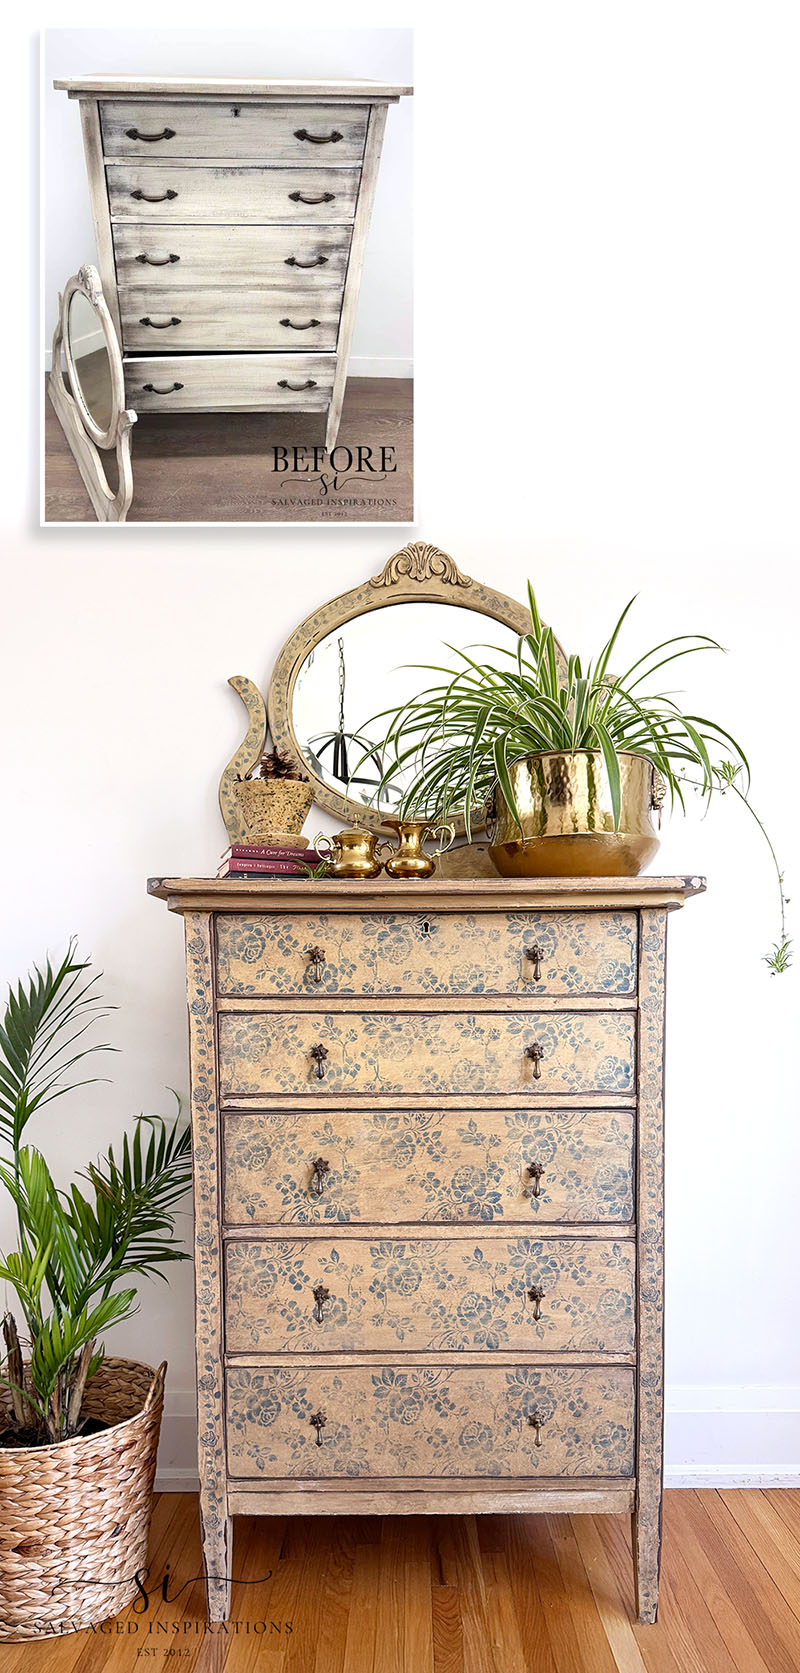
It’s always fun to restyle previously painted furniture. It’s interesting to create different looks using new techniques. This makeover reminded me that creating a pattern with silkscreen stencils can add a ton of character to old furniture!
Thank you so much for being here and for following along with our April Furniture Fixer Uppers Tour. Your comments, messages, and encouragement truly mean the world to me. If you have a question or want to say hello, I’d love to hear from you below — you always brighten my day!
Happy painting, sweet friends! 💙
Denise x
RELATED POSTS:
1970s DRUM TABLE MAKEOVER
DIY WEATHERED WOOD DRESSER | TAKE #1
HOW TO CREATE AN OLD WORLD PAINT FINISH
10 WAYS TO CREATE A DISTRESSED PAINT FINISH
PAINTED FRENCH PROVINCIAL IDEAS
PIN AND SHARE! 🤗

Leave a Reply