A $20 THRIFT TABLE GETS REPAIRED AND REFRESHED WITH A BEAUTIFUL WALNUT AND BRONZE FINISH | YOUTUBE VIDEO
Hi creative friends, and welcome back to the first Furniture Fixer Upper of the year! Today I’m fixing up this $20 vintage table, and what a lucky find! This console table is beautiful and just needed a little TLC to bring it back to life. In today’s post, I’m sharing –
- An inexpensive tool that makes veneer repairs EASY
- How to get a rich dark finish without using stain
- How to add Bronze Highlights in minutes
- And my FAVORITE paint color for a walnut paint wash!
*As an Amazon Associate, I earn from qualifying purchases. There are affiliate links in this post to other companies/products I use and love as well. You will never be charged extra when you purchase through these affiliate links. If you purchase from my links – A BIG thank you for supporting me and the #siblog! To see my full disclaimer, click here.
Bonus, it’s Furniture Fixer Upper Day! If you’re new here, on the fourth Thursday of every month, I join four super-talented friends (Christy – Confessions of A Serial DIYer, Kathy – Petticoat Junktion, Natalie – A Ray of Sunlight, and Gail – My Repurposed Life), and we share our before-and-after furniture restyles. I’ve included the links at the bottom of today’s post and I hope you join me in seeing what they’ve created this month! I always learn something new from these talented ladies.

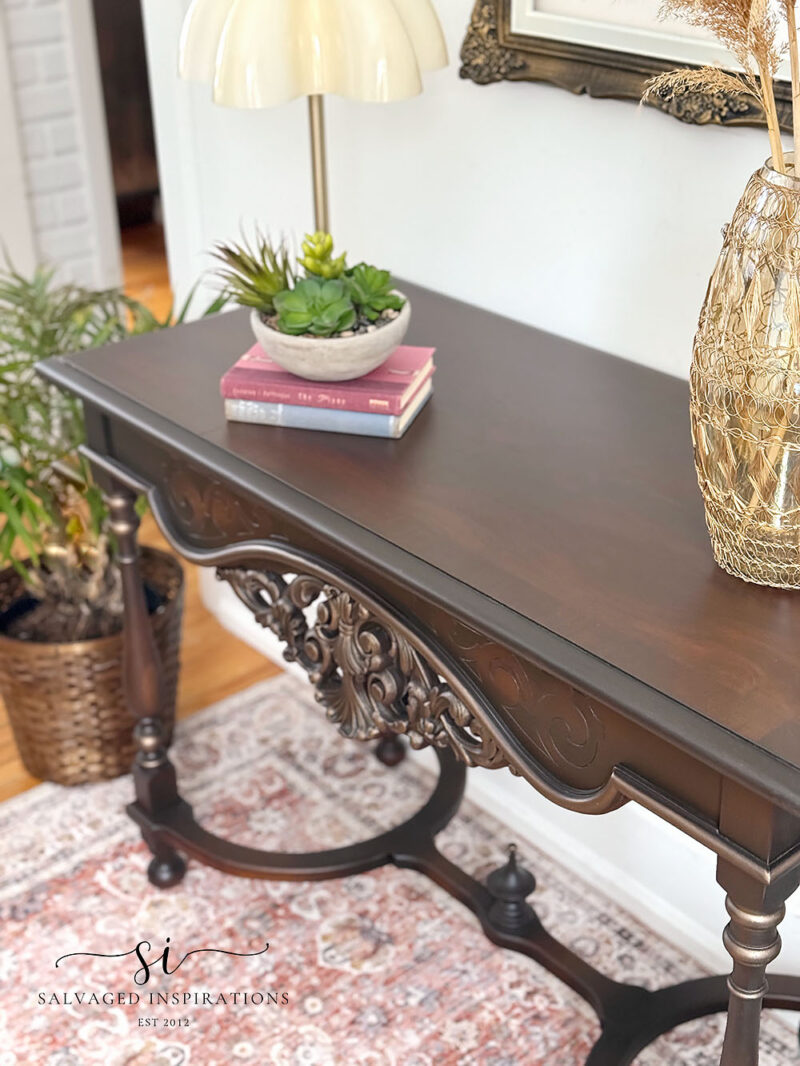
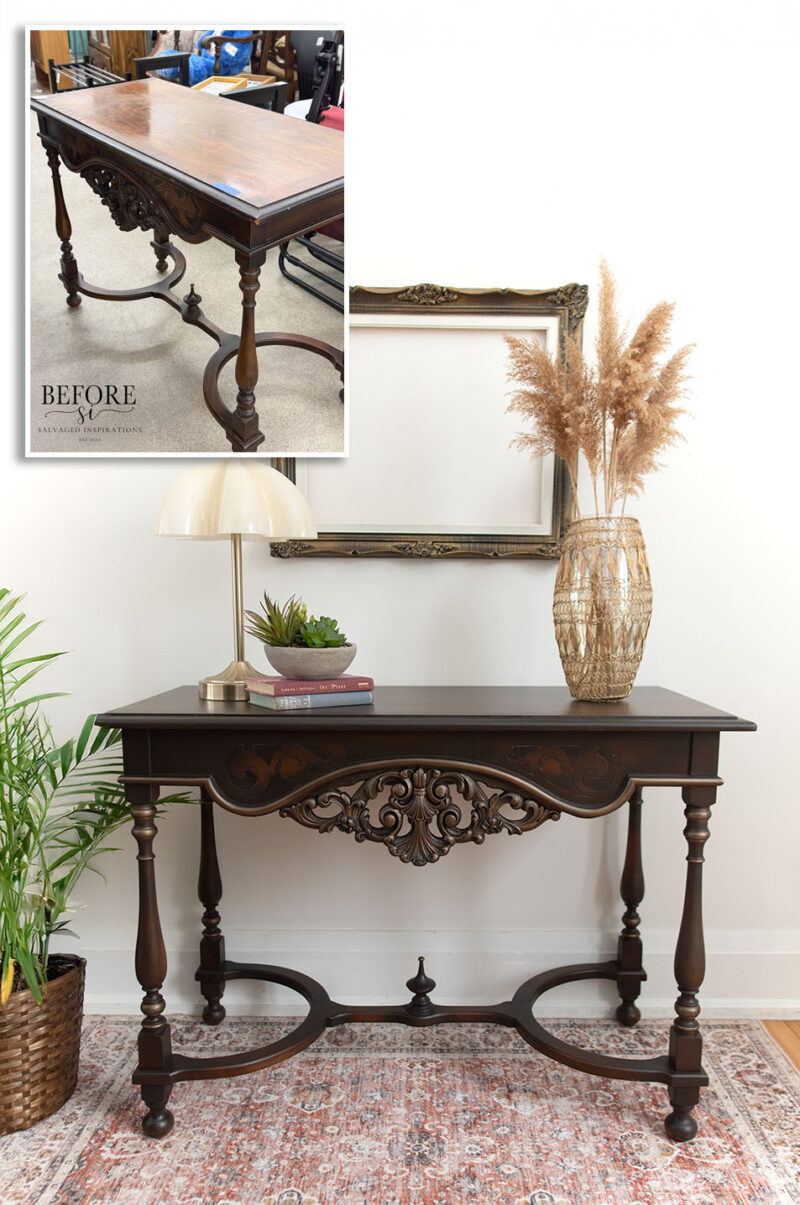
Below is the vintage table I found selling for $20 at my local Thrift Store. This was an awesome price, seeing as thrift store prices have increased over the last few years.
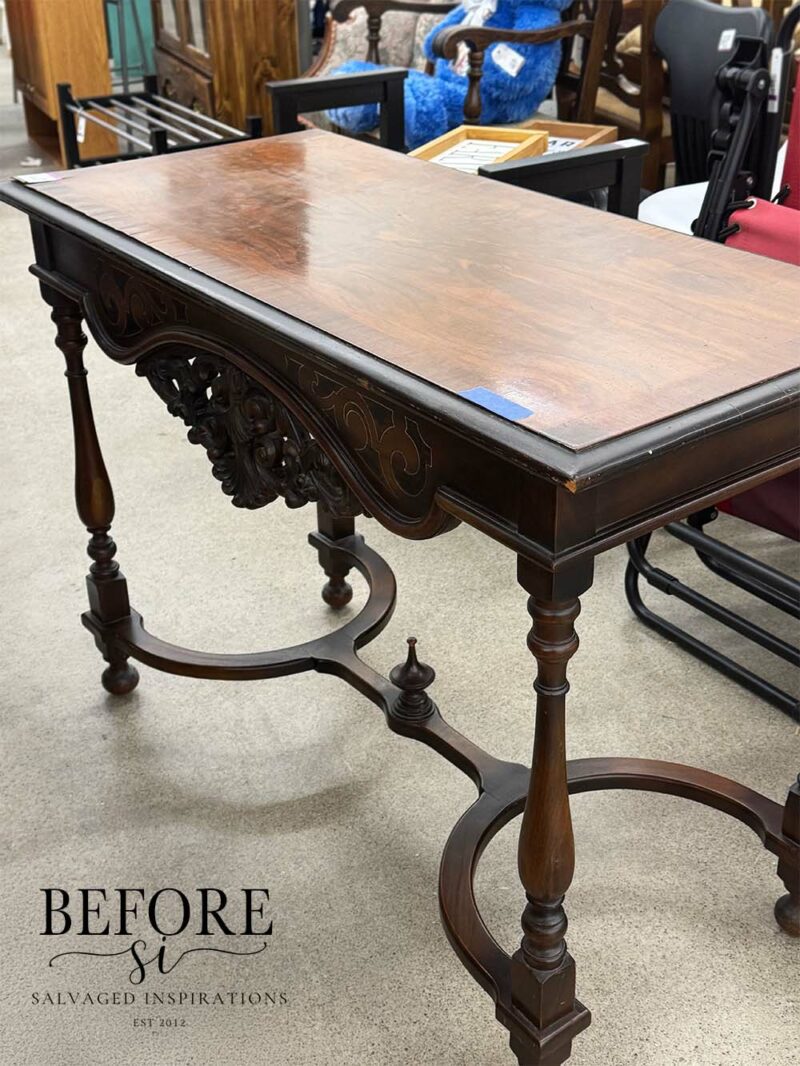
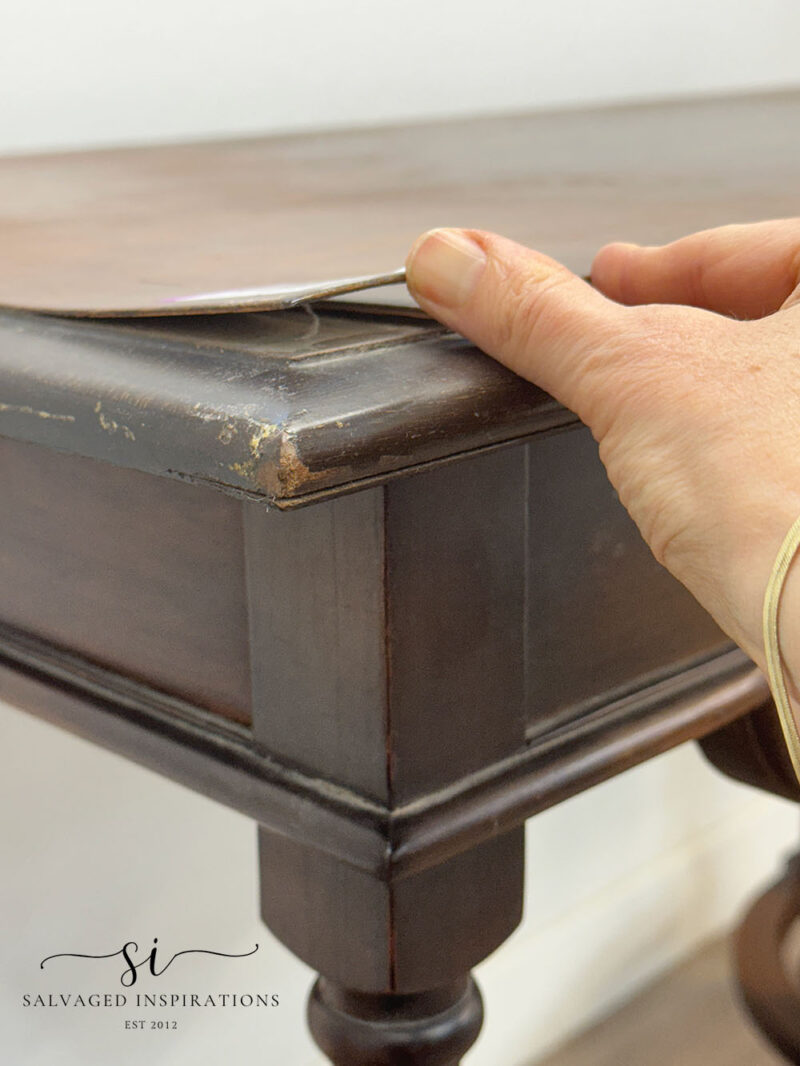
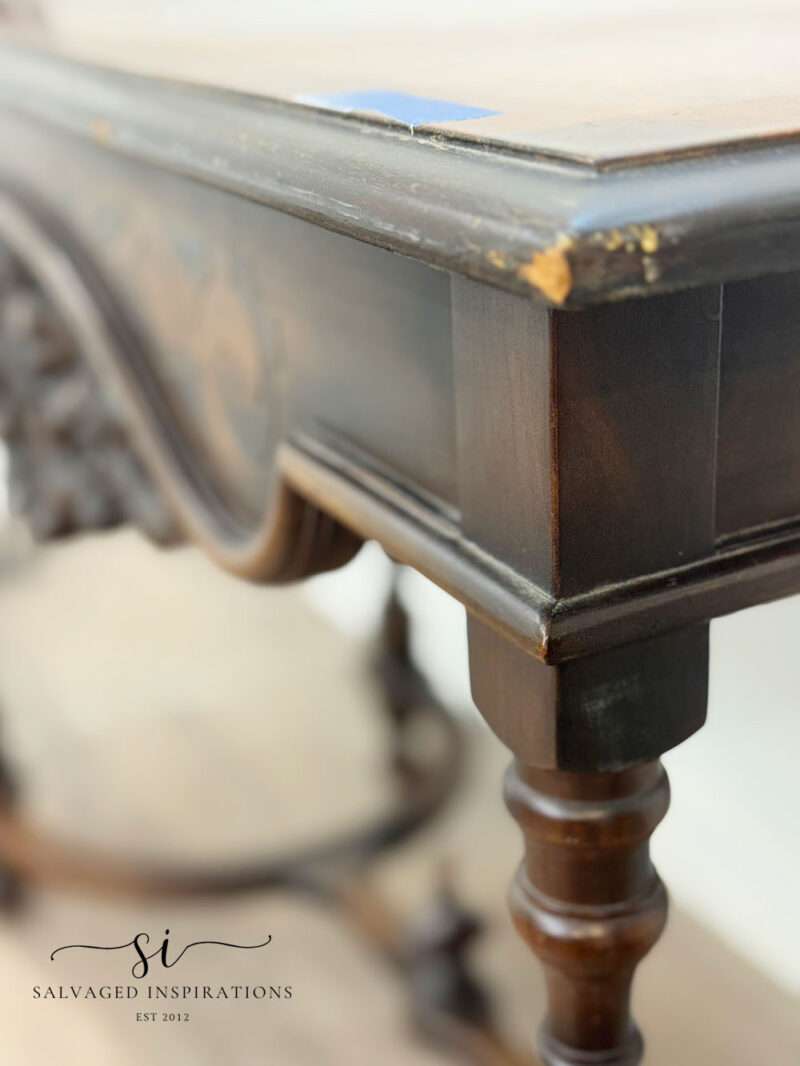
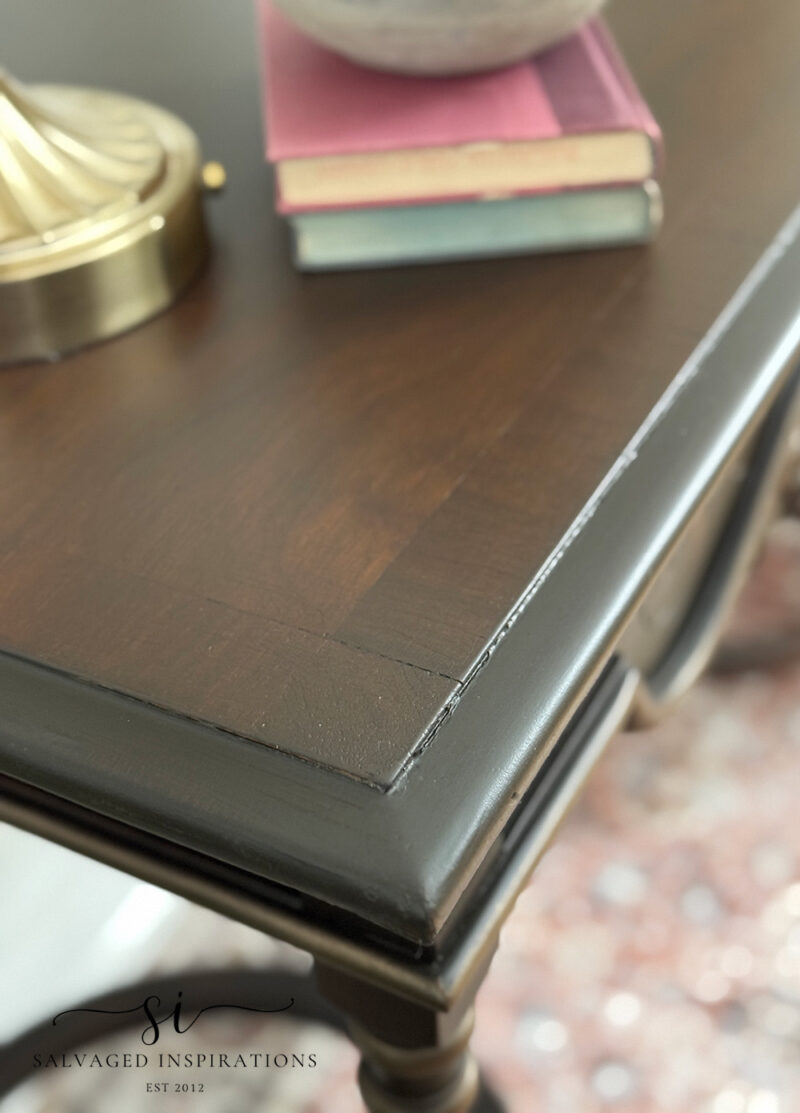
There was an issue with lifting the veneer lifting along the edges.
And some expected wear and tear from a well-loved table.
THIS POST IS SPONSORED/CONTAINS AFFILIATE LINKS TO PRODUCTS I USE. YOU CAN SEE MY FULL DISCLOSURE HERE.
SUPPLIES
Walnut Table – SALVAGED
White Lightning Cleaner
Auto Sponge
Titebond Wood Glue (32% OFF as of writing)
Glue Syringe
Sanding Sponge
2″ Angled Paint Brush
DB Brown Wood Filler
Continuous Fine Mist Spray Bottle
Coffee Bean Chalk Mineral Paint
Bronze Gilding Wax
Gator Hide Topcoat
TOOLS
Heat Gun
Plastic Putty Knife
Bosch Orbital Sander (26% OFF as of writing)
Furniture Clamps
Astro Euro HVLP Paint Sprayer 1.7mm Nozzle
CLEAN | REPAIR | SAND
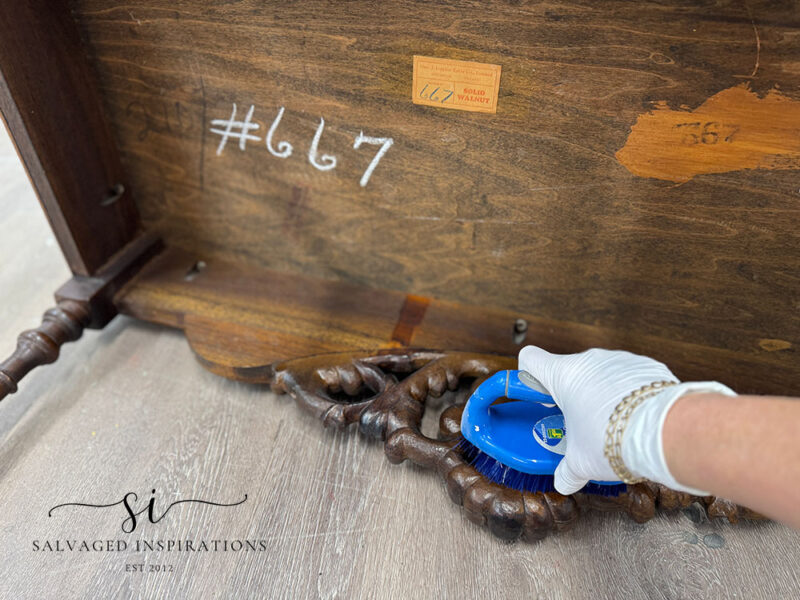
To start the prep process, I cleaned the top, sides, and legs with a heavy-duty furniture cleaner, and a large automotive sponge. For the gorgeous wood carving on both sides, I used a dollar store brush to get into all the details.

I also made sure to flip the table and clean the entire underside. I used the brush to get into the detailed carving from behind as well.
I let the table dry overnight and came down the next morning to do the repairs. I started by doing a glue-up of all the lifting veneer. This lifting veneer would have felt like an intimidating repair to me years ago. But after doing a ton of these, I’ve learned inexpensive glue syringes make veneer repairs soooo much easier, faster and cleaner.
I use these 1x-use disposable syringes that I buy online. I also suggest a good wood glue, putty knife and clamps or something heavy to weigh it down with until the glue up dries.
- Access the damage
- Fill the glue syringe with a good wood glue
- Using a putty knife, lift the loose veneer and squeeze some glue underneath
- Press down and move onto the next area to repeat
- Squeeze the excess glue out and wipe off with a damp cloth
- Clamp down with furniture clamps or something heavy and wait for it to dry
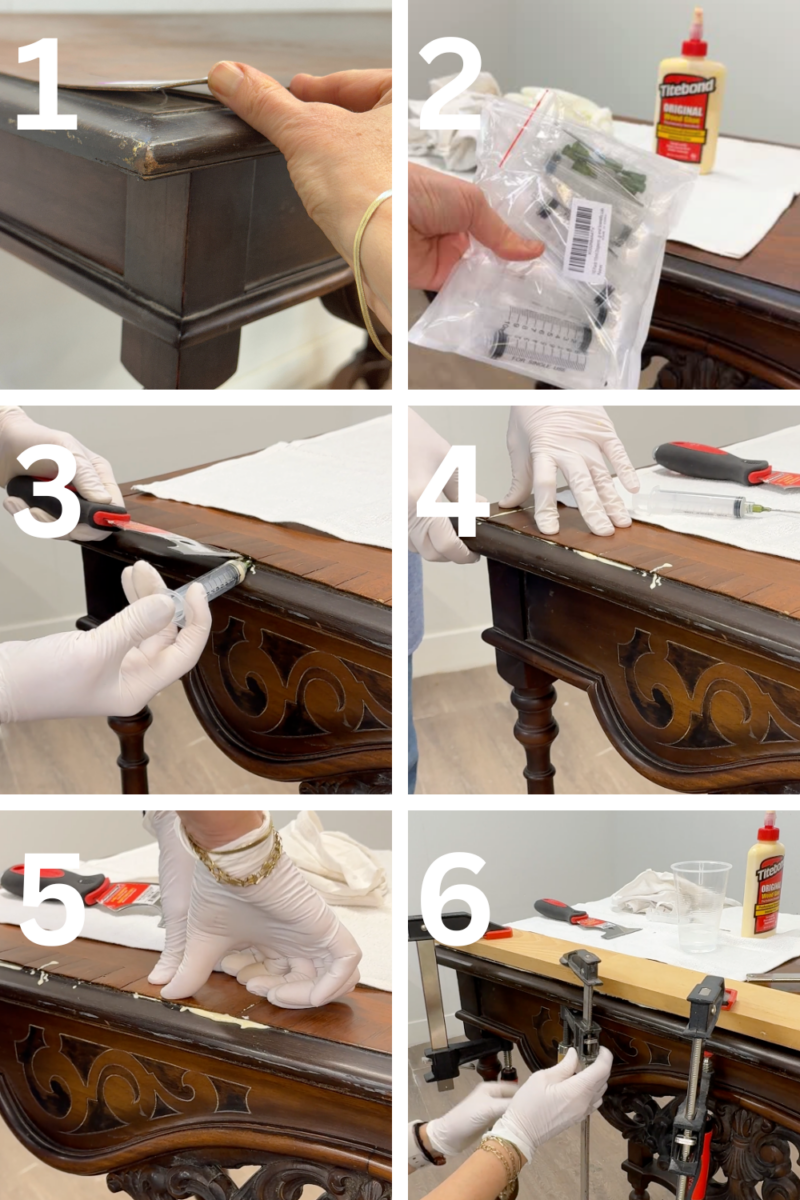
After the veneer was fixed, I went and filled in some of the dings with this brown wood filler which is super easy to sand by hand.
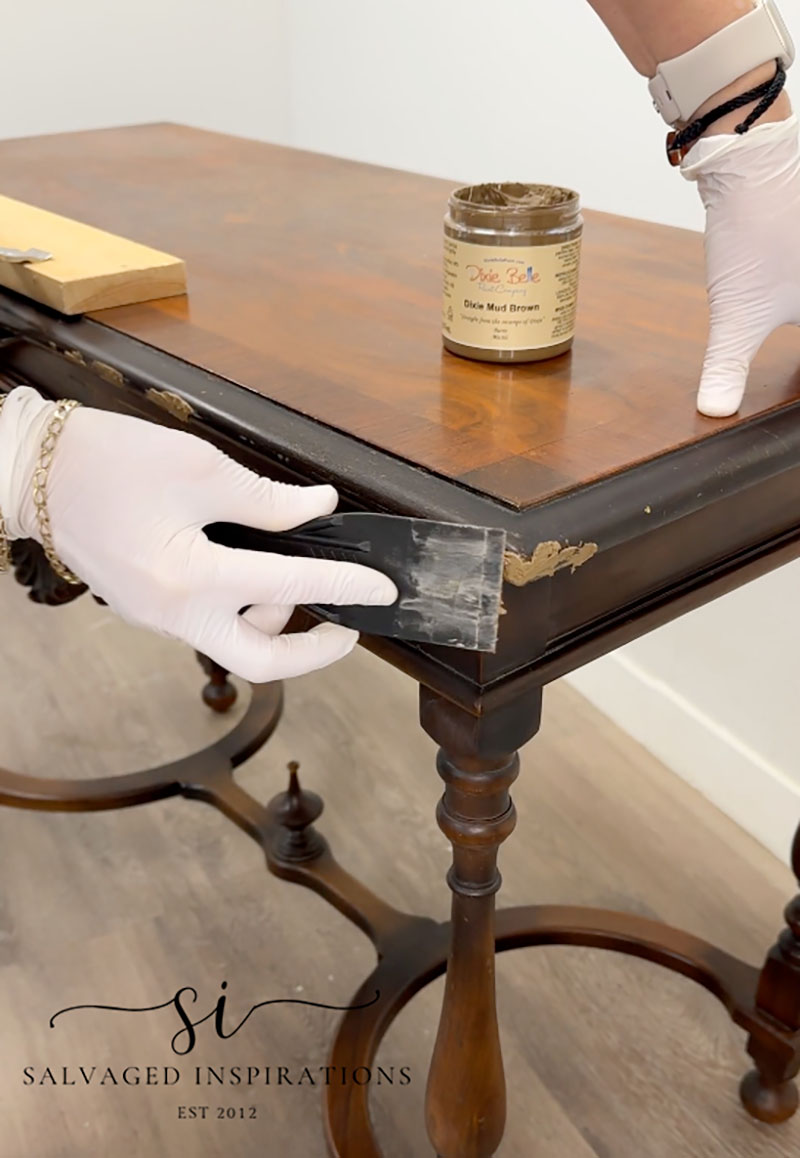
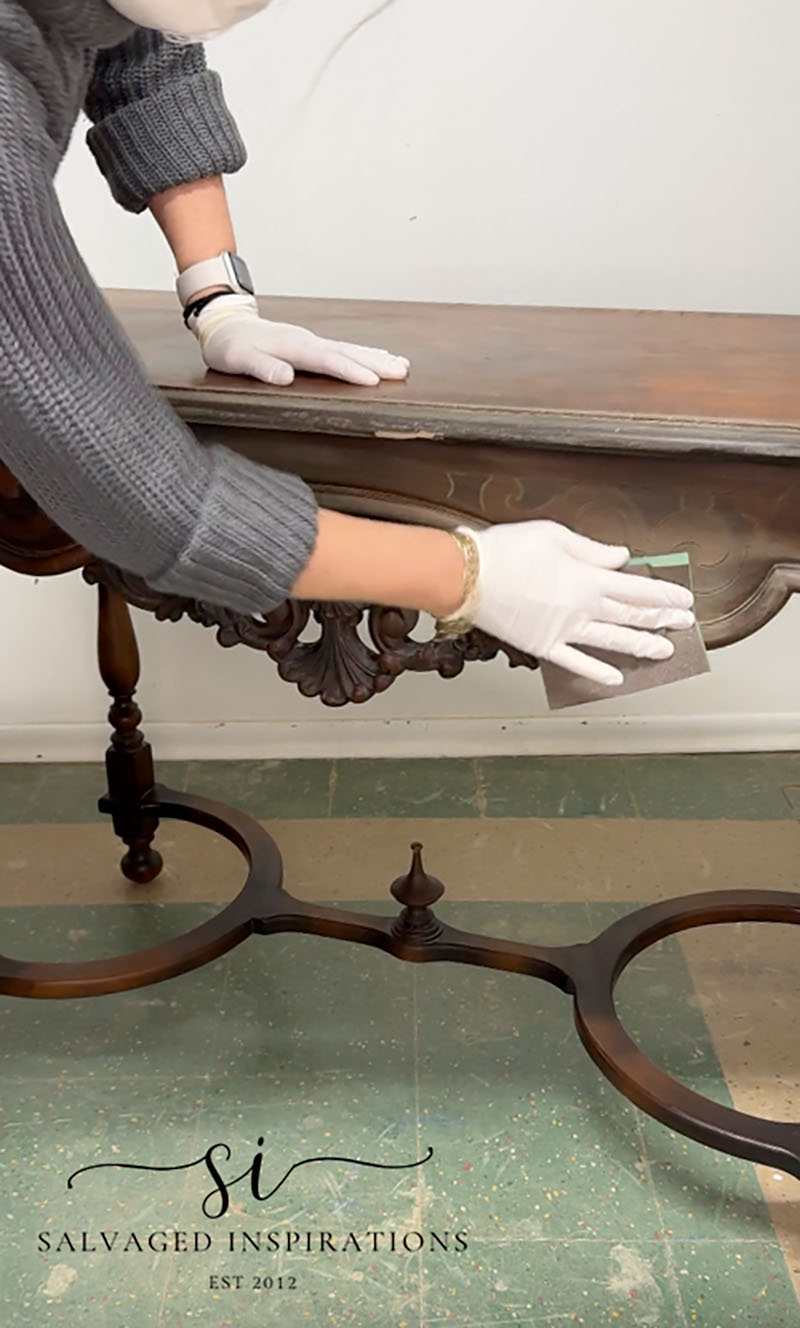
After the table sat overnight, I brought it into my sanding room and sanded all the wood filler and repair work smooth. The legs and body was hand sanded with a 220 sanding sponge. These sanding pads are fabulous to get around furniture nooks and crannies and rounded legs or spindles. The top was sanded with my orbital sander.
APPLYING THE PAINT WASH
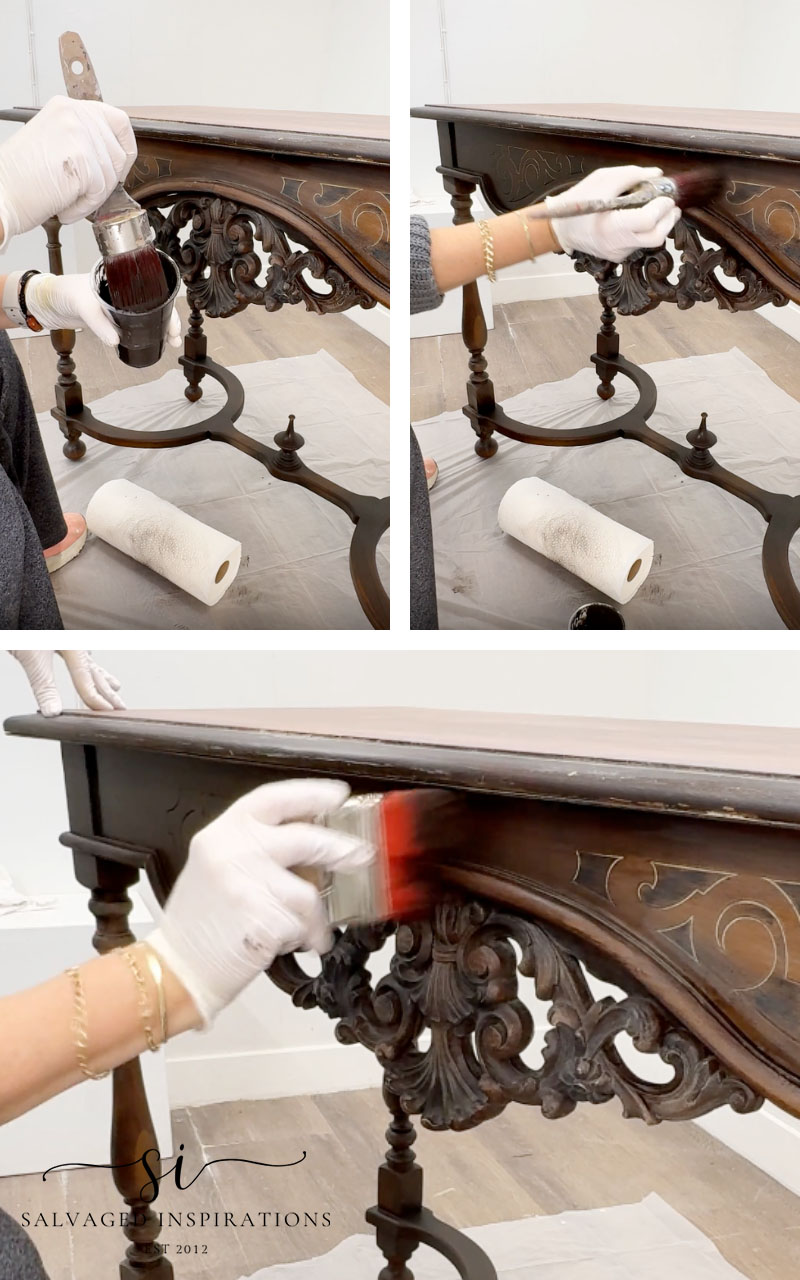
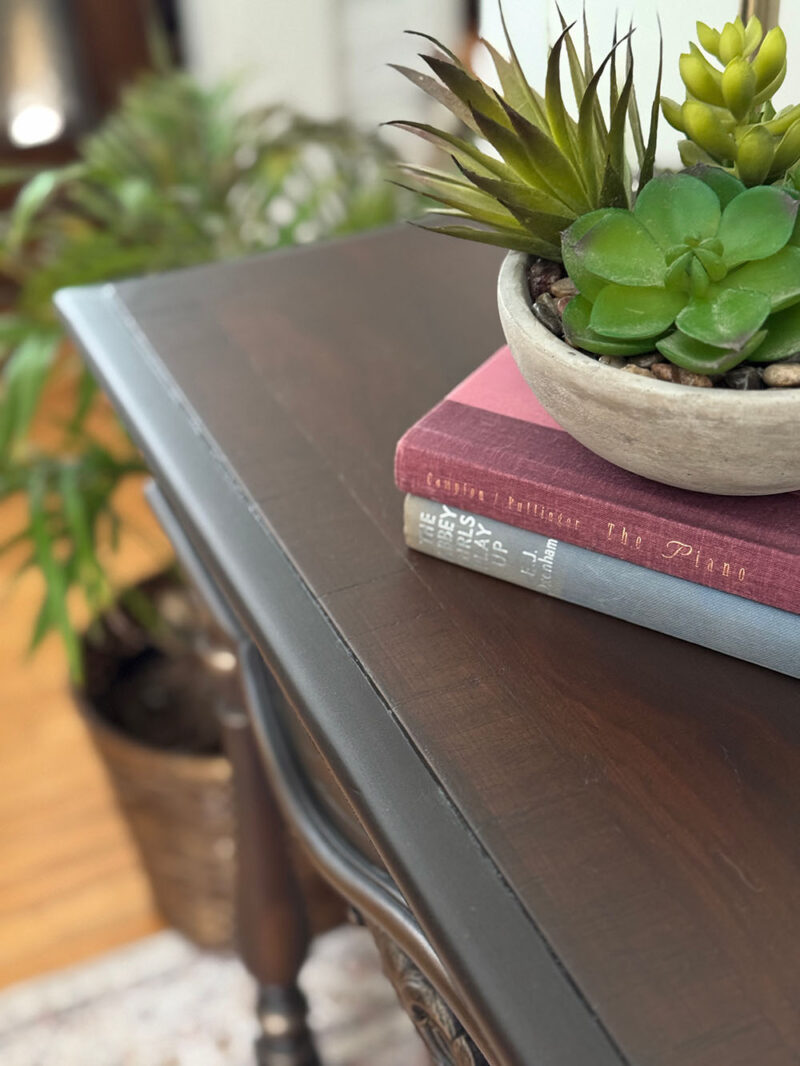
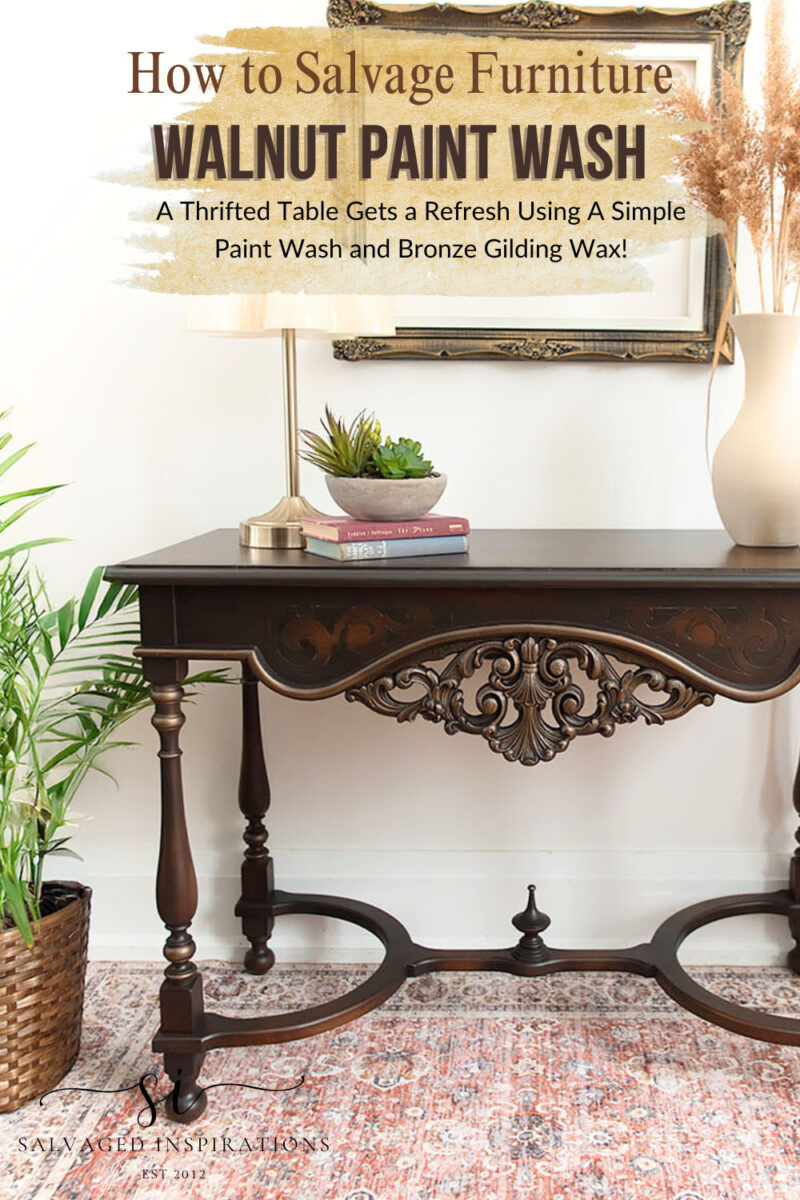
This table looked dull. To bring it back to life, I opted for a paint wash rather than stain. Why? We are having FRIGID COLD weather here in the GTA (-10 feels like -17) and I didn’t want to use fumey chemicals without opening windows for good ventilation. And who wants to open windows with those temps? The good news is that this provided me with an opportunity to share my FAVORITE paint color for a rich-looking walnut refresh. I’ll bet you can guess if you’ve been around the #siblog for some time – it’s Coffee Bean!
A paint wash is very easy to apply and very forgiving as well. If you don’t like the look, wipe it off while it’s still wet and try again. I like to add paint to a cup and thin it with a little water. I also keep my continuous water mister on hand to thin out and spread the wash. This technique requires very little paint and doesn’t take long to do – so it’s much less expensive than staining.
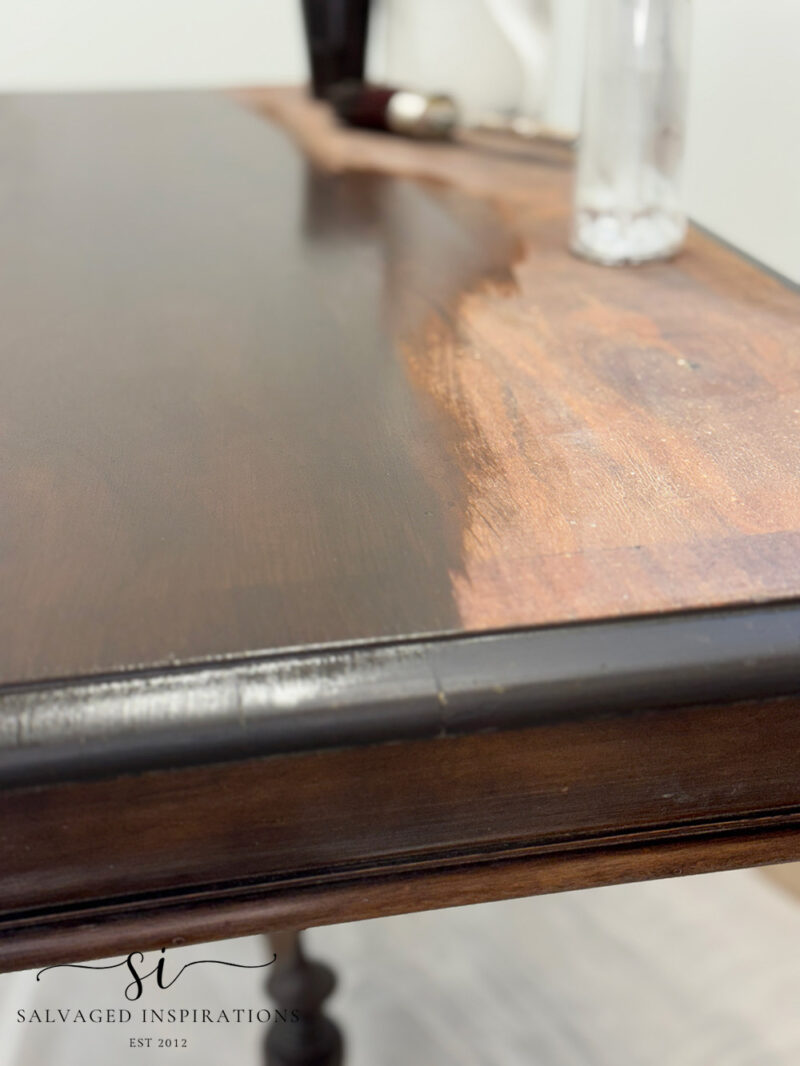
I apply a little paint to the tips of my water-sprayed paintbrush. I brush it onto the table, working in manageable areas. While the wash is still wet, I give it another mist with a little water and use another soft brush to smooth and thin the paint wash until I’m happy with the look. My goal was to darken the walnut wood while having some of the original grain show through.
Below you can see the difference between the washed side and the original veneer side.
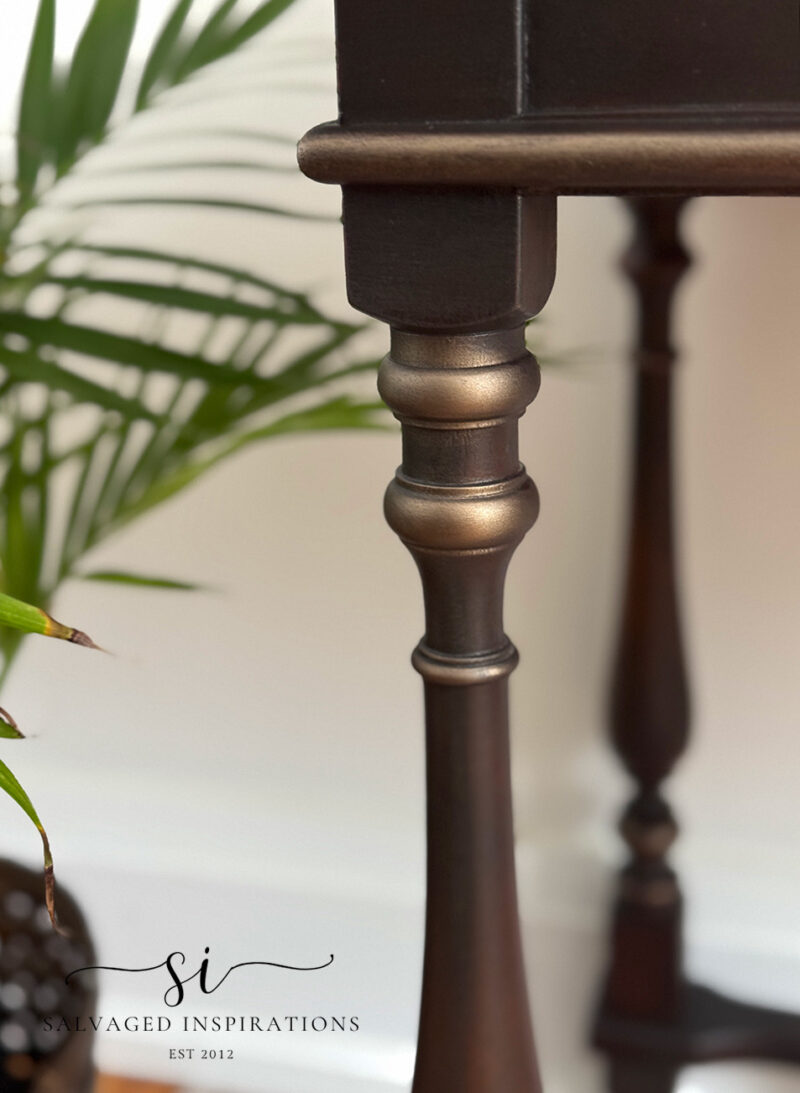
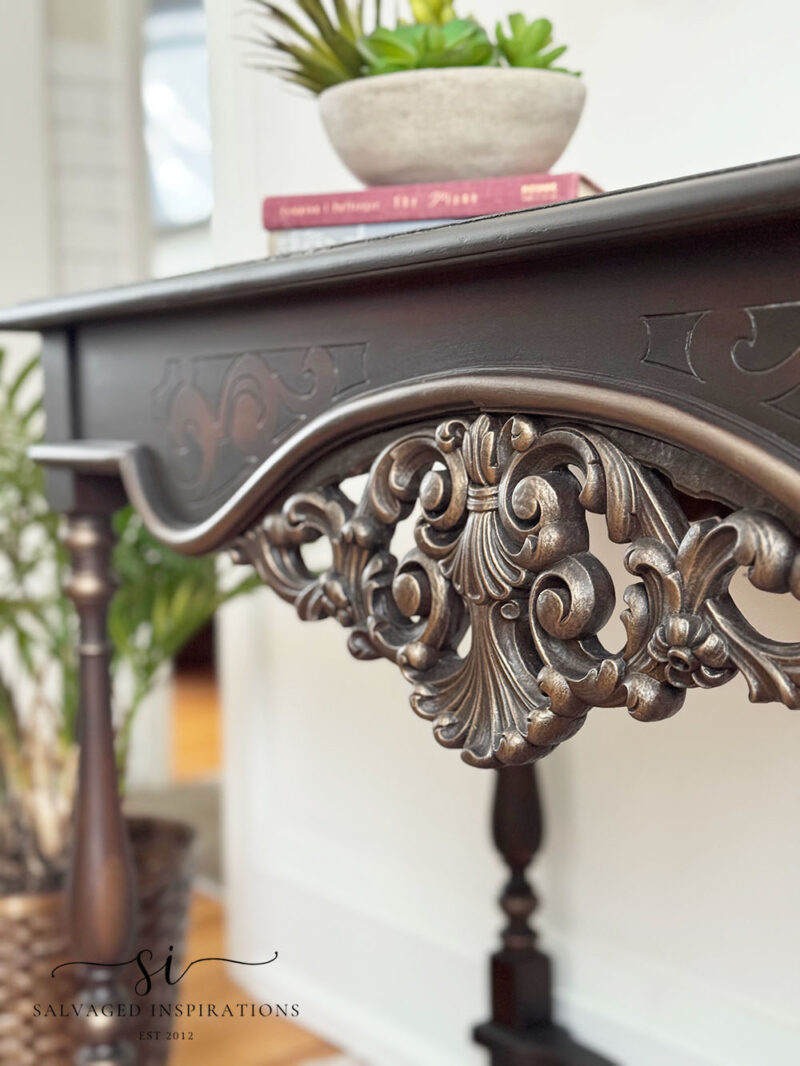
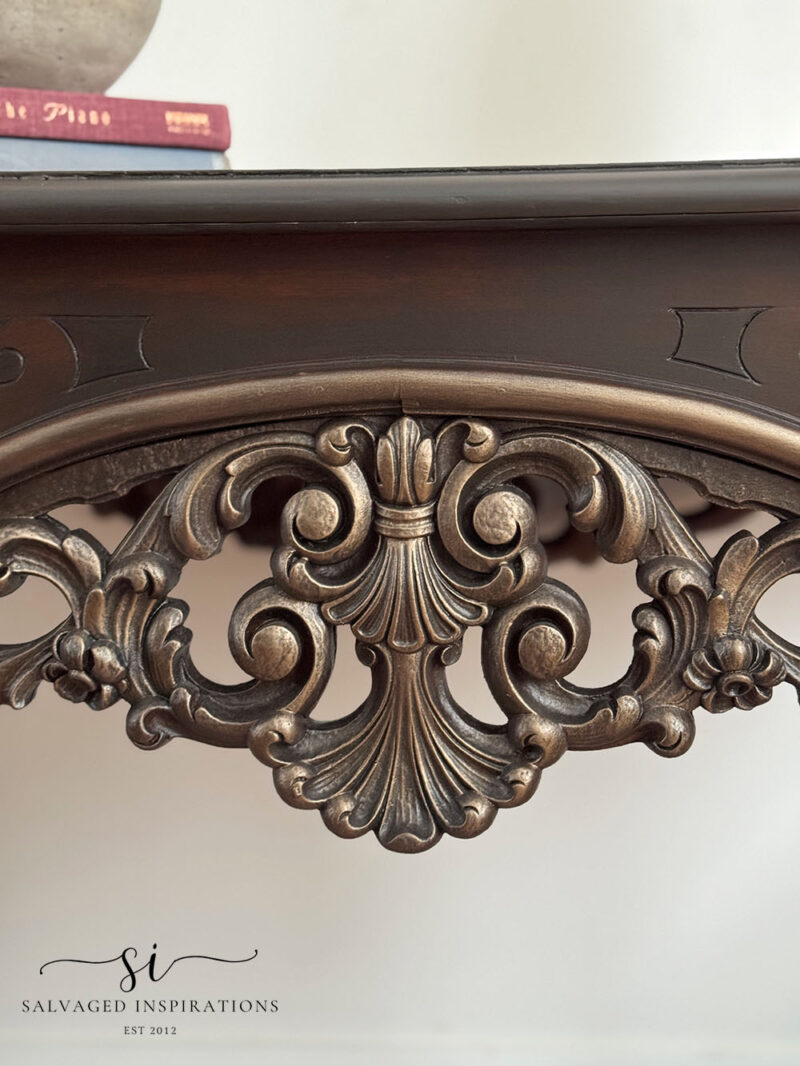
ADD EASY BRONZE PATINA
I waited for the paint wash to dry before adding a bronze gilding wax to some of the details. I added a little gilding wax to a piece of cardboard and used an inexpensive chip brush to lightly brush over the areas I wanted to highlight. This wax is buildable, so I started out with the tiniest amount and built it up from there.
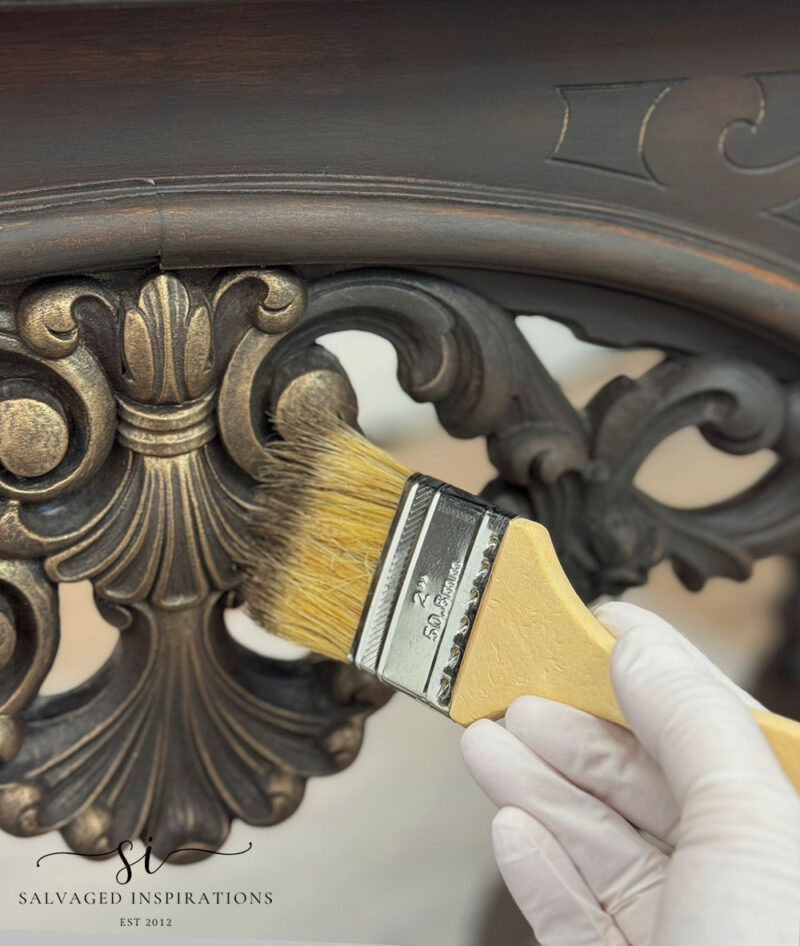
This chip brush is perfect for larger areas. For the smaller details, I added some guiding wax to my finger and traced around the edges. This is easier if you can steady your hand on a part of the furniture you’re working on.
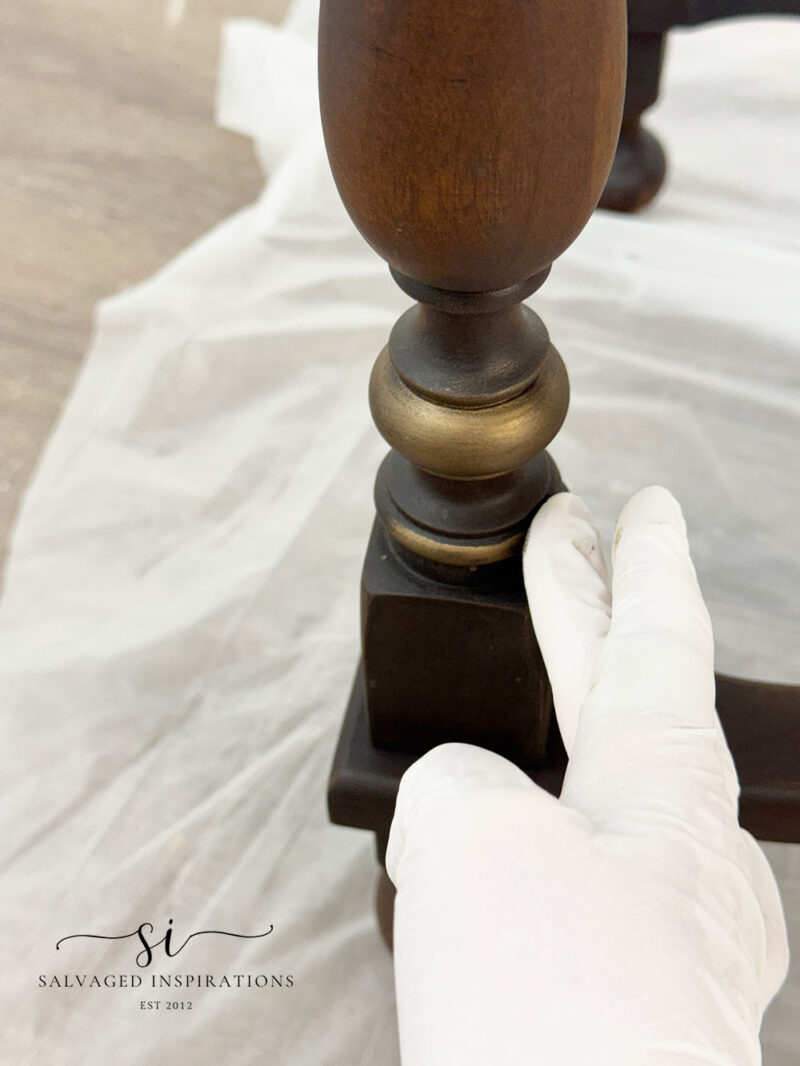
The last tiny detail (which actually took me the longest time to do!!) was to darken up the details on the sides. I originally thought it would look good in bronze but I opted to go dark with the Coffee Bean Chalk Mineral Paint. Using a toothpick, I added a little paint onto the tip and insterted it into the grooves and then spread it out with the toothpick. I know it’s a tiny detail but I much prefer the grooves dark and more cohesive looking.

DURABLE TOPCOAT
To protect this finish, I sprayed three coats of Gator Hide, which is perfect for high-traffic furniture. I gave the top a super light sanding between coats 1 and 2 and left the third untouched.

THE BIG REVEAL…
Here’s the finished look!
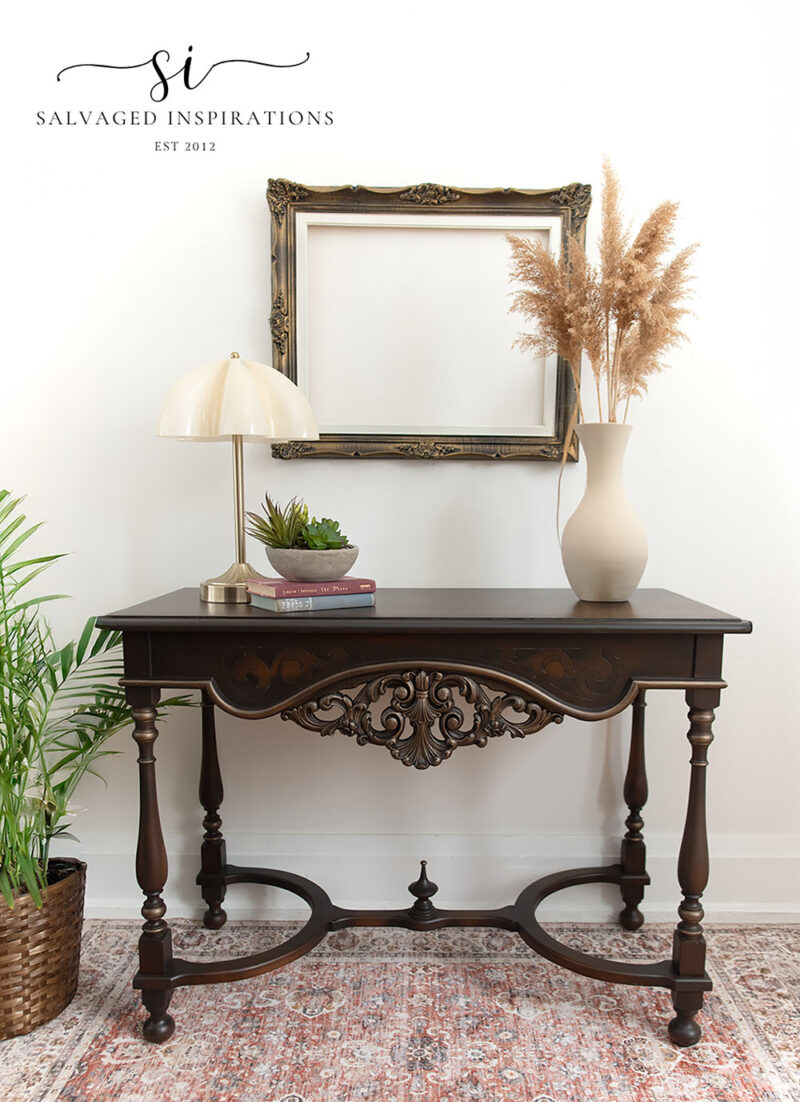
The top looks brand spankin’ new now!… well, almost. This table still has its gorgeous vintage vibe.
Below are a few close-ups of the repaired veneer.
And check out the bronze detail on these beautifully turned legs!
The bronze gilding wax looks so elegant.
And just for fun, I prompted AI to generate a roomscape with the focal point being this restyled thrift table. Here’s what it generated. Other than the wonky planter, it looks pretty good. I’m always amused by what it comes up with…

YOUTUBE TUTORIAL
Here’s the full step-by-step YouTube video tutorial for you below. If you have any problems viewing, you can also view it on YouTube HERE. Our #siyoutubefamily is already a community of 56.1K, so don’t forget to subscribe if you haven’t done so already. You’re the BEST, and I appreciate your support! 🙂
And now for some FURNITURE FIXER UPPER FUN!
You’re going to LOVE what these creative FFU ladies do! Below are the BEFORE photos. Visit the links to see the amazing AFTERS and learn how they did it! I’m heading over to take a peek as well!
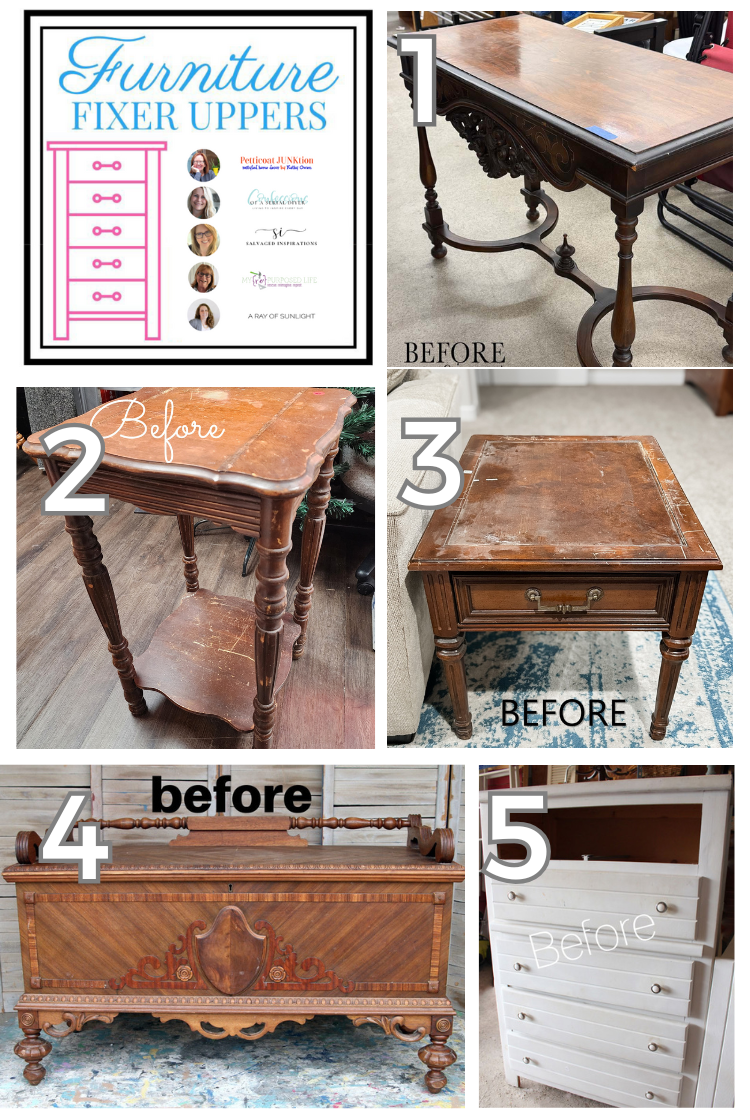
1. SI (HAPPY YOU’RE HERE!)
2. MY REPURPOSED LIFE
3. A RAY OF SUNLIGHT
4. PETTICOAT JUNKTION
5. CONFESSIONS OF A SERIAL DIYER
Here’s another look at this $20 thrift store walnut table before and after. I hope it’s inspired you and given you some ideas for your upcoming furniture painting projects.
I liked staying warm and cozy while working on this gorgeous table. Thank you for joining me for our first Furniture Fixer Uppers tour of 2026. I’ve included some Related Posts below, and feel free to leave me a hello or ask any questions you may have in the comments below. I always love hearing from you. It makes my day!!
Happy painting, my friends!
Denise x
RELATED POSTS:
COFFEE BEAN PAINT WASH 101
MCM CHOCOLATE PAINTED DESK
HOW TO BLACK WASH A FACTORY FINISH
PAINTED MID-CENTURY DRESSER
COFFEE BEAN PAINT WASHED DRESSER
PIN AND SHARE! 🤗

Hi Denise! I have used your technique a couple of times and I love it. Thank you for sharing.
Hi Cheryl!🤗 Thanks and I appreciate you leaving your comment/experience. If there is anyone on the fence in trying it, I hope you’ve just given them a confidence boost! Thanks so much and enjoy your day! XOXO
I adore this table. Could stare at it for hours. I also like the green velvet chair AI paired it with. Of all the pieces you’ve reimagined, this is one of my favorites. Gorgeous!
Such a huge compliment Cyndel, thank YOU! And ya, I’m really impressed by what AI comes up with. It’s fun to play with. 🙂
I love a paint wash, and the bronze accents are beautiful. Outstanding job on the makeover. I would buy that table in a heartbeat. Kathy
Aw, thanks Kathy and I love a good paint wash too! Stay warm my friend. XOXO
It turned out beautiful , love the color . And would look really nice paired with the chair as shown with the help from the Ai roomscape.
Thanks Teresa and I think so too! It’s fun seeing what AI comes up with!
Absolutely stunning end result. Your talent never ceases to amaze me.
Aw, thank you Erica, so glad you like it. It was a real pleasure working on this one! 🙂
What a beauty! You have such a creative eye and the incredible skill to bring it to fruition. You never fail to impress! I would like to ask a question if I may, what is your favorite source for furniture hardware?
Thank you in advance.
Donna
Thanks Donna!🤗 My very favorite source of hardware is my FREE stash that I’ve collected over the years. Everytime I take hardware off a piece, I salvaged it. I used to buy new hardware from LeeValley (Canadian and not inexpensive) but for the last few years I’ve been finding new hardware on Amazon – they have a great selection and variety. And because I’m a Prime Member, I get it delivered within 24 hours.
Very nice. Love it.
Thank you Patsy!🤗
Hi Denise,
I absolutely love your website and all the little tricks I’ve learned. I have a question though. Why do you always clean your furniture and then sand it instead of sanding it first and then cleaning it. Can you please answer this question as I have always been sanding it first. Thank you
Thanks Lezlie! Great question because I see it done both ways as well.😊 I always clean first for 2 reasons. First, I don’t want to ‘sand in’ any dirt, grime, crud or oils, into the wood grain/furniture. Second, cleaning wood furniture (damp or wet) can lift the grain and this causes the wood to open up and feel more rough. I clean and let it dry 100%. Sand. Wipe back the dust with a dry tack cloth and then I’m 100% sure I’ll get the smoothest finish whether I stain or paint.
This project is such a beautiful example of how patience and creativity pay off. I especially love how you repaired the veneer and used a gentle paint wash to enhance the wood grain.
Thanks Natalie! XOXO
Ohhhh, This piece is absolutely stunning. Elegant !! All the detailing is wonderful.
Cannot believe you got it for $20. Great find.
The paint wash looks amazing. And – the bronze wax was a perfect choice. You have an amazing eye.
The dark detailing gives it such a rich depth.
I also would love to learn from you – but being in CO would make that a little tough 🙂
I’m sure I will be watching your video – several times.
So amazing – it will surely disappear so fast.
This was a great find, i feel lucky to have grabbed it before someone else did! And ya, I would love to start teaching ‘live’ again but for now… I’ll have that vid out for you this weekend my friend. Hugs XOXO
Amazing, Denise!
I think this may be my favorite piece you’ve ever done! It’s a beautiful table, and a really good deal.
Thanks for all of the great tips using this technique. I love the wax!
Pinned!
gail
Oh WOW, thats such a huge compliment Gail, thank youuu! And thanks for the PIN! XOXO
That is gorgeous! Beautiful work.
Thanks so much Lizzy! Have a wonderful weekend my friend. XOXO
What a great find! You worked your magic and the table is stunning! 🪄
Aw, thank you Nicki! Yes, it was a fabulous find! 🙂
I was thinking the same thing….$20….wow and you did a fantastic job on it. Those thrifty finds are getting more expensive and you got a bargin with this one and yes cha ching! You’ll make a good profit on it, that is, if you decide to sell it. I love the style and the touch of gold is beautiful. All those details really stand out. Well, I’m off to view the other ones. Have a good weekend.
Hi Kathy! Yes, it was a fabulous find and I totally agree with you, many of the thrift stores are getting more and more expensive. Have fun on the tour and thanks for supporting us. Enjoy your weekend! XOXO
Hi Denise, beautiful piece you reimagined there! I have watched your videos for several years now, and find them so helpful. Thank you for sharing your knowledge! May I ask which AI app you used for this AI generated photo? There are so many. I appreciate your opinion on AI!
Thank you Martha and I’m so happy the videos are helping you out!😊 The two AI’s I’ve been using are ChatGPT (free version) and Gemini’s Nana Banana Pro (paid version for my business). The image generator in Gemini’s Nana Banana Pro is better for graphics imo. I’ll have the Youtube video out for you this weekend.🙂
Hi Denise. What an amazing find and only $20!!!! You did a beautiful job restoring this beautiful table. Gorgeous:)
Hi Monique!!!🤗 I was super happy when I spotted this one – it was a fabulous find! So glad you like it. Hugs!
This turned out fantastic and looks so elegant. The details on this piece are beautiful. The way you accented them makes it even more beautiful.
Thanks Leslie! As soon as I spotted this one I was in love with all the details. Great piece to work on! Have a wonderful weekend. XOXO
The table is gorgeous!
Thank you Tammy, so glad you like it!🤗
Stunningly beautiful! Great job
Thanks so much Josee! Can’t go wrong with all these gorgeous details, right?!😊
Denise,
I always love your posts, and though I am not a real fan of painted furniture, your pieces are phenomenal! What do you with all your make-overs?
Today’s piece is my kind of gorgeous!! I would give my right arm to be able to have it! Do you teach anywhere? To have an opportunity to learn from someone with your skills would be a dream come true!
Hi Charlene and thank youuuuuu, so kind! I do sell many of my pieces so if you’re in the Greater Toronto Area feel free to reach out for this table! I much prefer it when they sell this way (direct) than me having to post them on FBM b/c I’m horribly slow at posting them. I have more fun creating than I do selling. As for teaching, I used too via Dixie Belle and Redesign with Prima but I haven’t since.covid. I’d really love to again though. It was so much fun meeting everyone in person!🤗
This is an incredible piece, Denise, and I can’t believe it was only $20! You always know just what a piece needs! XOXO
I can’t believe it was only 20 dollars either, luck find! The ValueVillage I go to is a little odd. The prices are over the top and then sometimes you can find a gem in the bunch. Half my fun is finding that steal of a deal.😆 Have a great day my friend. XOXO
$20?! You’ll be making a fine profit on this one. It’s gorgeous!
Thanks Jeanne, and I know, great price, right?!?😃 Enjoy the rest of the week and your weekend. XOXO