
Hi guys! Have you ever thought of stenciling an ENTIRE piece of furniture? Have you been seeing those drop-dead-gorgeous furniture stenciling ideas on Pinterest and in decor magazines lately? I’ve been admiring the pieces with bold contrast and strong design and I finally found the perfect piece to try a full frontal on (okay, that sounds a little odd…lol) with Prima ReDesign French Trellis pattern.
I’m in LOVE with this piece!!! If any of you are on the fence about painting a large design onto your furniture, I really hope this encourages you to give it a try!
To give you an extra friendly nudge (wink-wink), today I’m sharing 7 Furniture Stenciling Tips. Just a heads-up. I’m not a ‘furniture stenciling’ expert. But that just goes to show if I can do this, YOU can do this.
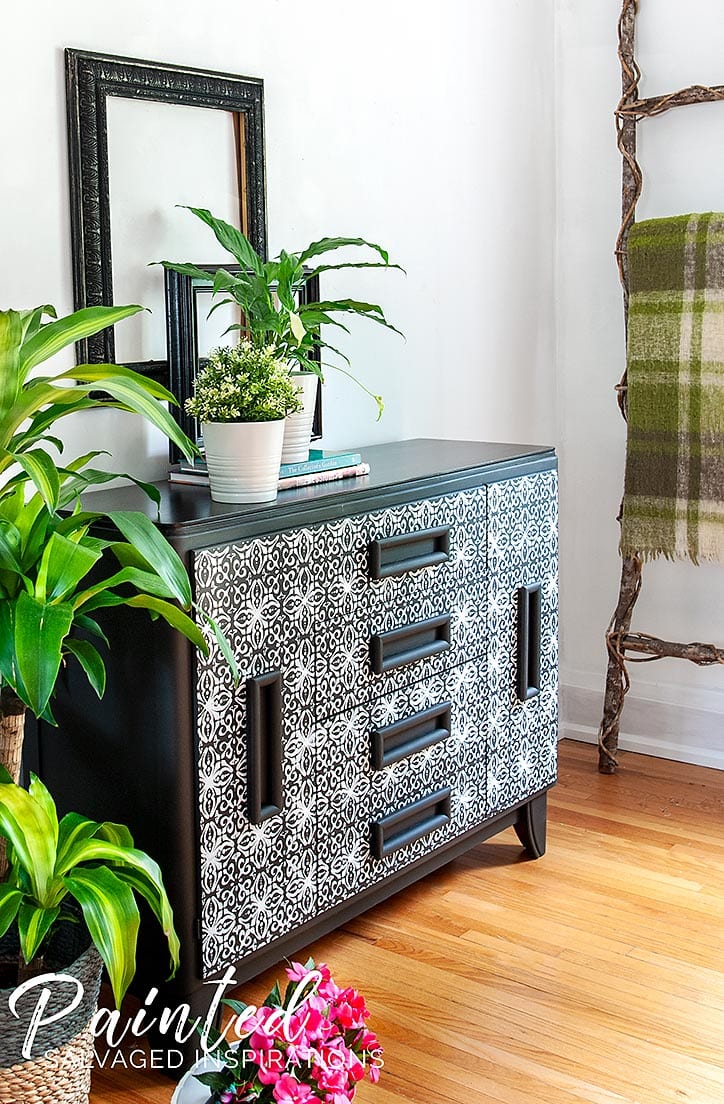
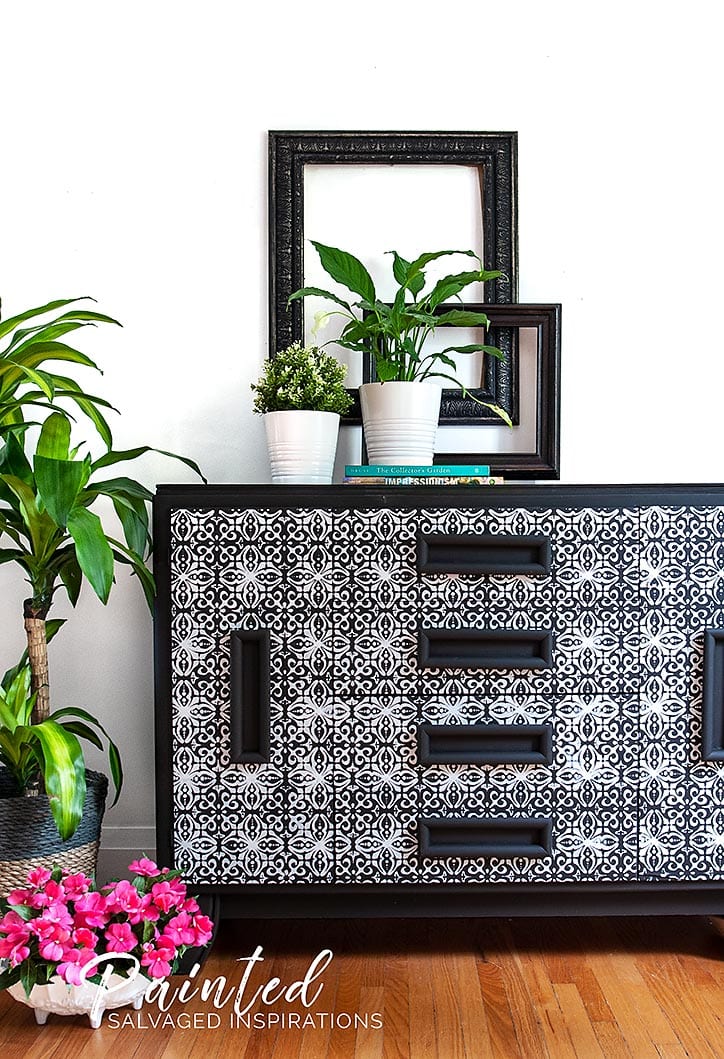
Here’s what I started with. This buffet was bought off Craigslist over a year ago and has been in storage ever since. You may remember the sister hutch I restyled in a blending paint technique with matching handles. I’ll include it in the “related posts” section if you’d like to take a peek.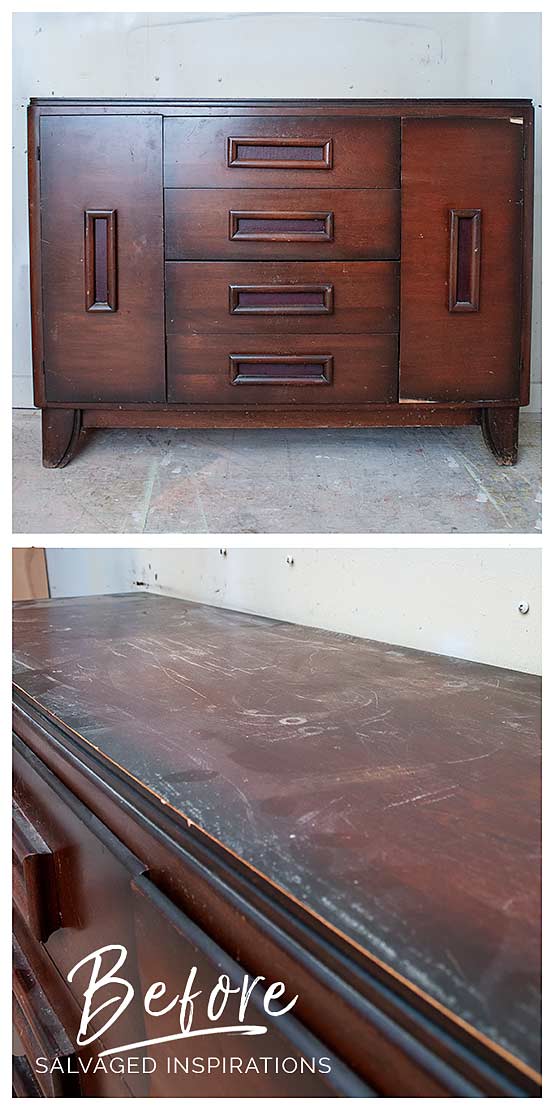 Here’s the restyled piece with the full frontal French Trellis pattern. What do you think?

THIS POST CONTAINS AFFILIATE LINKS TO PRODUCTS I USE. YOU CAN SEE MY FULL DISCLOSURE HERE.
SOURCE LIST::
-
- Buffet – SALVAGED
- TSP & Sandpaper 150-320 grit
- Paint Brush & Foam Roller
- Prima Re-Design Decor Stencil – French Trellis
- Coffee Bean Chalk Mineral Paint
- Cotton Chalk Mineral Paint
- Spray on Wax
- Dixie Belle’s Gator Hide
7 FURNITURE STENCILING TIPS::
1:: Stenciling a dark color over a lighter color is easier than stenciling a light color over a dark color.
2:: Using a spray adhesive helps keep down all the edges and keep your lines nice and crisp.
3:: Mark out the center of the stencil and the center of the furniture. Line it up for your first stencil positioning – work outwards from there.
4:: Use low tack painters tape to tape the stencil in place so it doesn’t pull up any paint when moving the stencil around.
5:: Lay the furniture flat on it’s back to stencil. I find this easier than stenciling while it’s upright.
6:: Use a foam roller to cover more area when using a large stencil for large areas and always offload excess paint before stenciling. Two light coats is much better than 1 heavy coat to prevent bleeding.
7:: Clean off your stencil before repositioning to continue the design OR wait for everything to dry and then reposition.
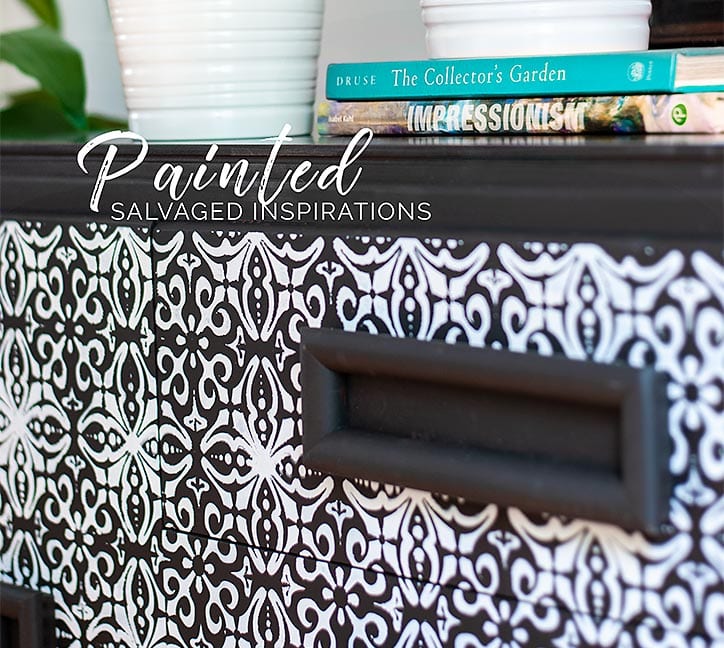
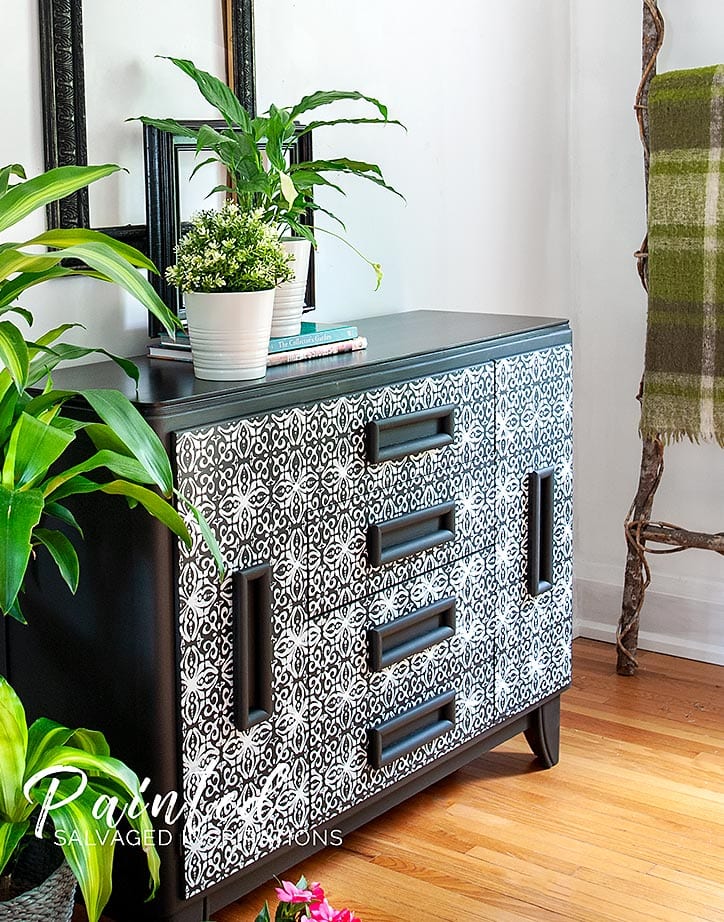
The base color is Dixie Belle’s NEW Coffee Bean. It’s a rich yet subtle black with dark brown espresso undertones. It’s been added to my-BEST-black-paint-list for sure… it’s right up there with DB Caviar.

This was my first time using a BIG stencil!
It covers a 22″ x 24″ area so painting the design went pretty quickly. The French Trellis has been painted in DB Cotton which is a stark clean white. They look amazing together and gave me the contrast I wanted. The top was protected with Gator Hide and the body with Spray on Wax.

DO YOU HAVE A PROJECT YOU WANT TO STENCIL? I’D LOVE TO HEAR WHAT IT IS AND WHAT YOU THINK OF THIS BUFFET MAKEOVER. FEEL FREE TO CHIME IN… I ALWAYS LOVE HEARING FROM YOU.
Happy furniture stenciling my friends!
Denise x
RELATED POSTS::
7 Inspiring Stencil Ideas
Mandela Stencils – MCM Makeover
How To Create A Raised Stencil Design
Blending & Layering Furniture Painting Techniques – Sister Piece
How To Make A Stencil – No Costly Gadgets Required!
PIN AND SHARE!


I used an adhesive spray temporary to hold a stencil down and then I could not get the spray off the stencil. It left gummy mess and could not find anything to dissolve the adhesive. it kind of ruined the stencil.. I think the brand was Elmer’s. Sure would like some advice! Thank you so much
Yikes. Baby oil may take off that glue residue Bonnie. Also, I’m not sure if your Elmers is designated for temp and permanent but that’s the one I always buy and have never had any issues. 🙂
Try a drop of dish soap (Dawn) in a spray bottle. Spray on to adhesive. Maybe rubbing alcohol?
Also, there is a cleaner from one of the dollar stores, called “awesome cleaner.” Place stencil flat in garbage bag, and spray generously with awesome cleaner. Leave overnight. The paint and glue will almost wash away, with minimal elbow grease needed. This was a hack from a dear friend that really saved my stencils!
I’m going to look for this at the dollar store!
Hi Denise, I am looking for the perfect piece to stencil on now. I can’t wait to try. I love this piece so much!
Hi Cheryl! If you find the perfect piece I’d love to see or hear how it all works out for you. It’s pretty amazing how a stencil can transform a plain piece!
You have such vision! Your furniture makeovers are so inspiring. I wish I was allowed to update our old stuff.
Thanks Justina! 🙂
What spray adhesive do you use to hold down stencil?
Hi Debra! I like this brand of Temporary/Permanent spray adhesive and find it works really well for temporary adhesion or permanent. If you give it a light spray and place it down immediately, it lifts easily and won’t leave any residue. 🙂
What you created is absolutely stunning; I never would have seen the potential in this chest that you saw. You make me really want to try this full-frontal (yeah, does sound odd!) on a piece needing an update. Thx.
Thanks so much, Jane. 🙂 And ya, it does sound a little odd, but thank goodness you guys get me! 🙂
Wow You are a Rock Star! Love everything about this piece!
Aw, thanks Tammy! 🙂 🙂 🙂
Perfect in every way Denise! Those handles look so dated in the before picture and absolutely stunning on the after. WOWWWW! You have a real talent and amazing vision.
Aw, thanks Nicki! I really wasn’t sure if I was going to keep the original handles or not but once it was all stenciled, I just loved them.
WOW WOW WOW!!! This is such an eye-catching piece!
Thanks Teri! I LOVE the new Coffee Bean! Such a rich and beautiful black. 🙂
Wow I’m in love! This piece is absolutely amazing!
Thank you Jasmin! And I realize how busy you guys are so thanks for dropping in! 🙂 🙂 🙂
Girl, we are on the same wavelength, I just finished an all over stencil on a dresser this weekend 🙂 Your tips are bang on! Love the black and white contrast on yours and the painted pulls are like the jewelry on this piece. Another gorgeous makeover, Denise!
That’s too funny… we’re kindred creative spirits, Marie! I can’t wait to see your piece. 🙂
Looks amazing Denise! I’ll have to check out that adhesive you used. I’ve always wondered what kind of adhesive I could use that wouldn’t leave residue behind.
Thanks Linda! And I’ve only tried the Elmer’s but probably any brand that states “temporary or permanent” will probably work nicely. 🙂
Just wow!l Absolutely beautiful. What great skill and imagination Denise 🙂 also love the colour. X
Thanks so much Nancy! I’m loving the contrast in colors too. 🙂
Wow Denise, you never stop impressing me with your vision and artistic talent. I wouldn’t have thought such a beautiful show-stopping buffet could be created from the sad and boring before picture;) Really gorgeous!!!!
Aw, thank YOU!!! 🙂 ha, it was a little sad, wasn’t it?! That’s why it sat in my inventory for so long. I couldn’t figure out what to do with it until now.
Hi Denise,
The buffet is absolutely stunning. Great inspiration! Thanks
Thank you Jill! 🙂
I love the stenciled piece with the french trellis design. Where did you get the stencil? I am inspired to use it on a large tabletop. I learn so much from your blogs. Thanks Jeanette
I love this stencil design too! I’ve included a link in the “Source List” or you can find the exact same French Trellis Stencil here Jeanette. If you end up doing your tabletop, I’d love to hear how it turns out. 🙂
Very artistic,especially if you are not a fan of MCM (that’s me). Love the colour choice!
Thanks, Laura! I like the Coffee Bean and Cotton together too. Dixie Belle has knocked it out of the ballpark with another amazing black!
I just had a stencil experience with a diamond stencil that I was trying to do on the top of a small dresser. I used the foam roller method and the edges looked so messy that I sanded and painted over it. I think the stencil was a little wonky from being bent for storage and it didn’t lie as flat as it should have. When you use spray adhesive, you spray the underside of the stencil and it doesn’t leave a residue on the piece? Also, you spray the adhesive each time you move the stencil? Would like to try again since I have some other beautiful stencils.
Mine was the same Cora. When the stencil came out of its tube package, some of the pieces were sticking straight up and didn’t want to lay flat. I find this brand of Temporary/Permanent spray adhesive works really well. I spray a really light coat on the underside and immediately position it where I want. It lifts up no problem and doesn’t leave any residue. You may or may not need to respray. It depends if the back still feels slightly tacky or not. Hope this helps and good luck with your diamond dresser. 🙂
As Always, a beautiful piece!! You have really outdone yourself with this piece. Wow! Wow! Wow!!!
Thank you for the tips and inspiration!
Pleasure and thanks SO much Celeste! Have a great day. xo
Oh la la I wasn’t really a fan if stencils on furniture but you make me want to try it now I love how it turned beautiful job Janet xx
Oh la la is GOOD… I’ll take it any day of the week! 😉 Thanks so much my friend. xo
Also, if you were stenciling on stained wood, would you seal it first, stencil & seal again? or just stencil on stained wood & only seal after stencil? These are the little details that drive me batty! LOL
You ask the best darn question Tracy! I’ve done both and it usually depends on what color I’m stenciling. For instance, if I’m using white over a stain, I topcoat so no bleedthrough shows and the white remains white. If it’s a black or dark paint, I’ve stenciled after the stain is 100% dry – then topcoated everything. I don’t know if this is right or wrong but it’s worked for me. 🙂
Ah, makes total sense.Thanks for that tip!
Your vision is just incredible as you somehow manage to create the perfect finish for each piece you do.. The handles on this piece perfectly chop up such a busy stencil. Love everything about it. I always have trouble butting the stencil flat against inside raised edges, how do you do that?
Funny that you say about the handles because I was thinking the EXACT same thing Tracy! 🙂 Ya, I have the same problem with butting up against raised edges. The spray adhesive helps a little but I still have to finagle those edges by holding and pressing them down with one hand while painting with the other. Mine never turn out ‘perfect’ but I just do the best I can. Another option is cutting the stencil to size at the edge, but then, of course, it a one-time thing, right? It may work for that one piece of furniture but then you’ve kind of ruined the stencil for future projects.
That’s it exactly, never want to cut the stencil, so I’ll keep “fenagling” too! Thanks.