 Hello friends! I hope you had a relaxing weekend and your week is off to a great start! For the past two weeks, I’ve been doing everything a little slower due to a rotator cuff injury. Thankfully I’m still able to work, I just have to be careful. No heavy lifting, and be sure to rest and ice my shoulder throughout the day. I’m working on finishing up a few client’s custom pieces, and I also found some gorgeous old furniture pieces over the weekend. I can’t wait to share them with you!
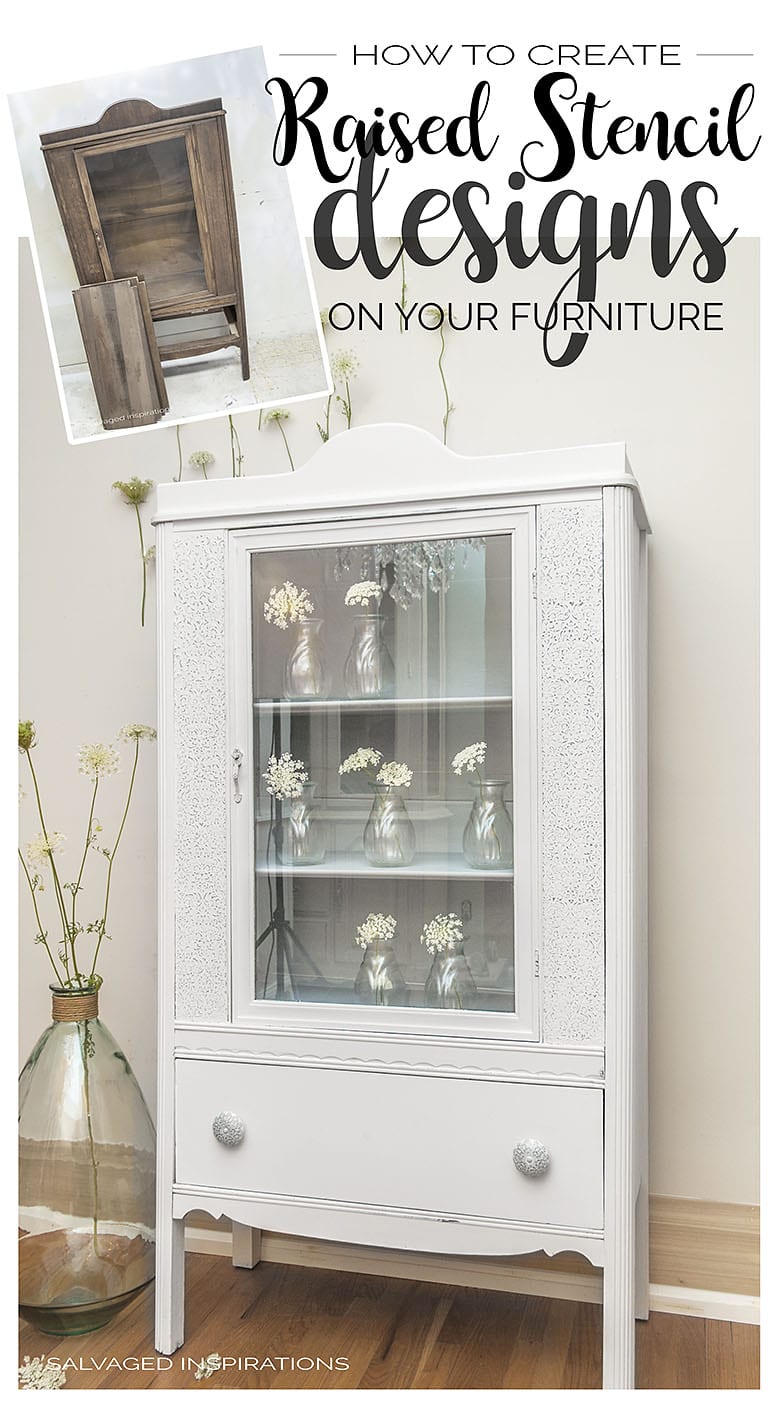
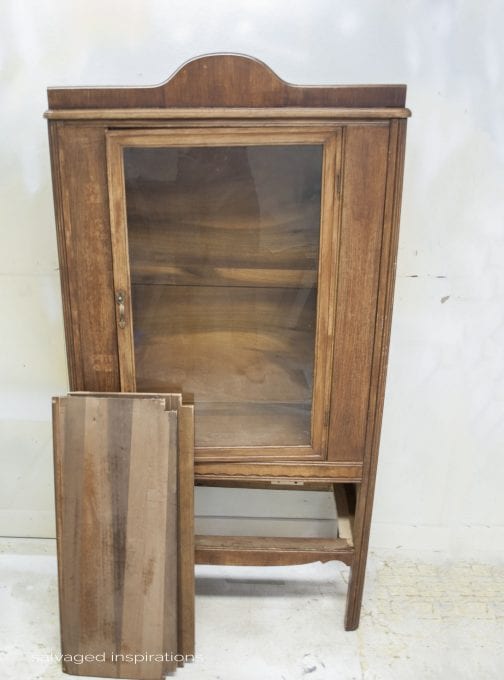
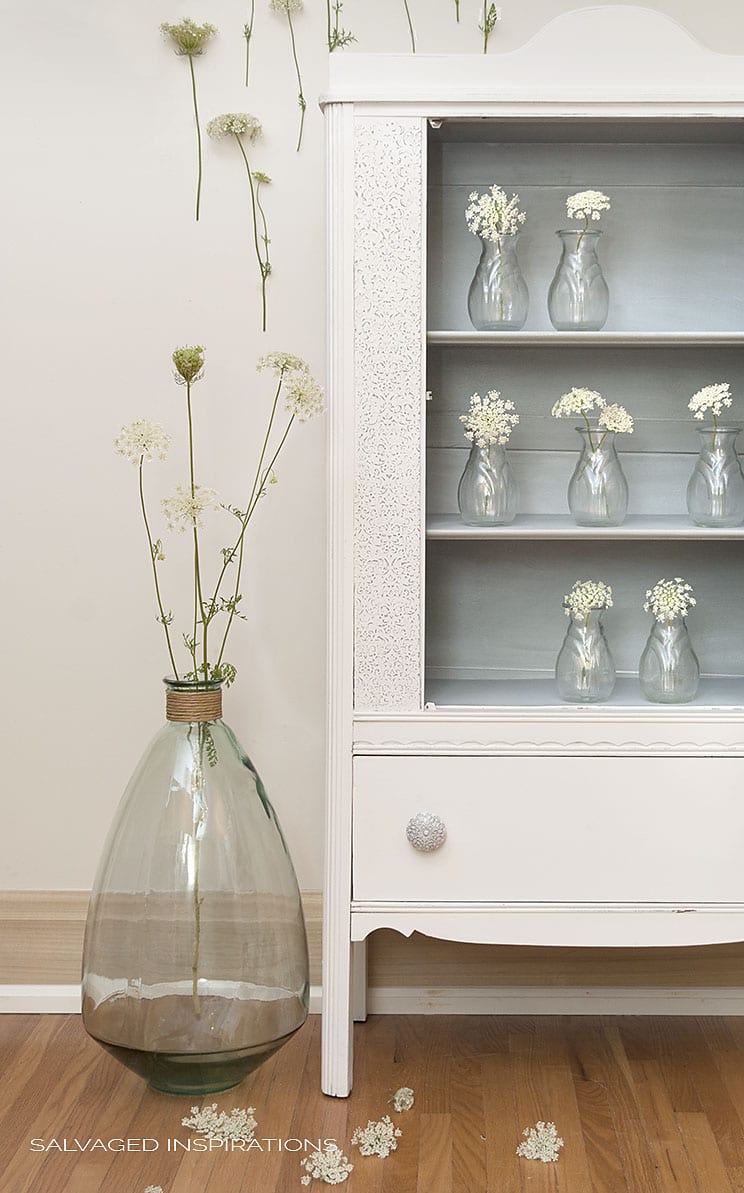
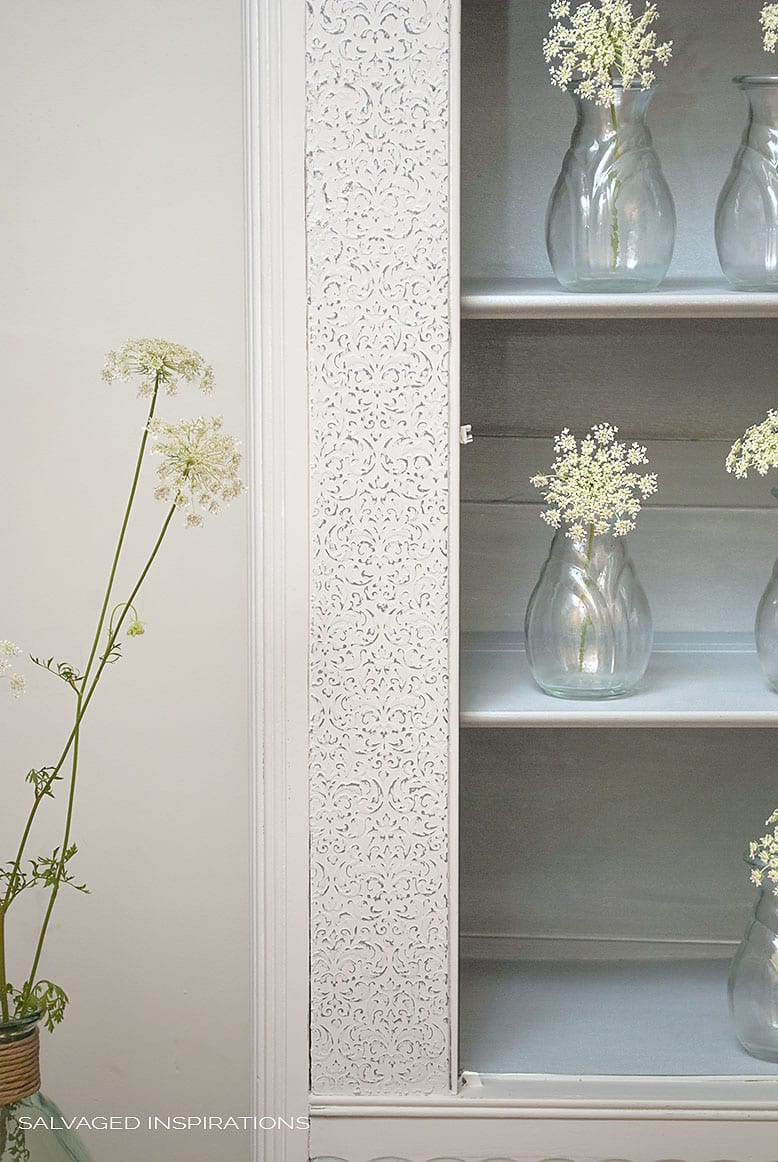
Today, let’s chat about how I created this raised stencil design. This Goodwill Cabinet was super sweet, but kind of plain. The two flat panels on either side were the perfect canvas for some detail.
 If you ever come across a piece of furniture that has a plain flat surface like this – or lacks detail and character, I hope this sparks some ideas. Back in 2015 was the very first time I fancied-up furniture with a raised stencil technique, and even for a first timer, it’s really easy to do. I like the way it adds beautiful texture and interest to an otherwise plain looking piece.
Here’s what the cabinet looks like now. Only a blogger would scotch tape weeds to a wall and call it a day, right? 🙂 … but I couldn’t help myself. While I was working on this makeover, it kept reminding me of the field of Queen Anne’s Lace not far from my home.
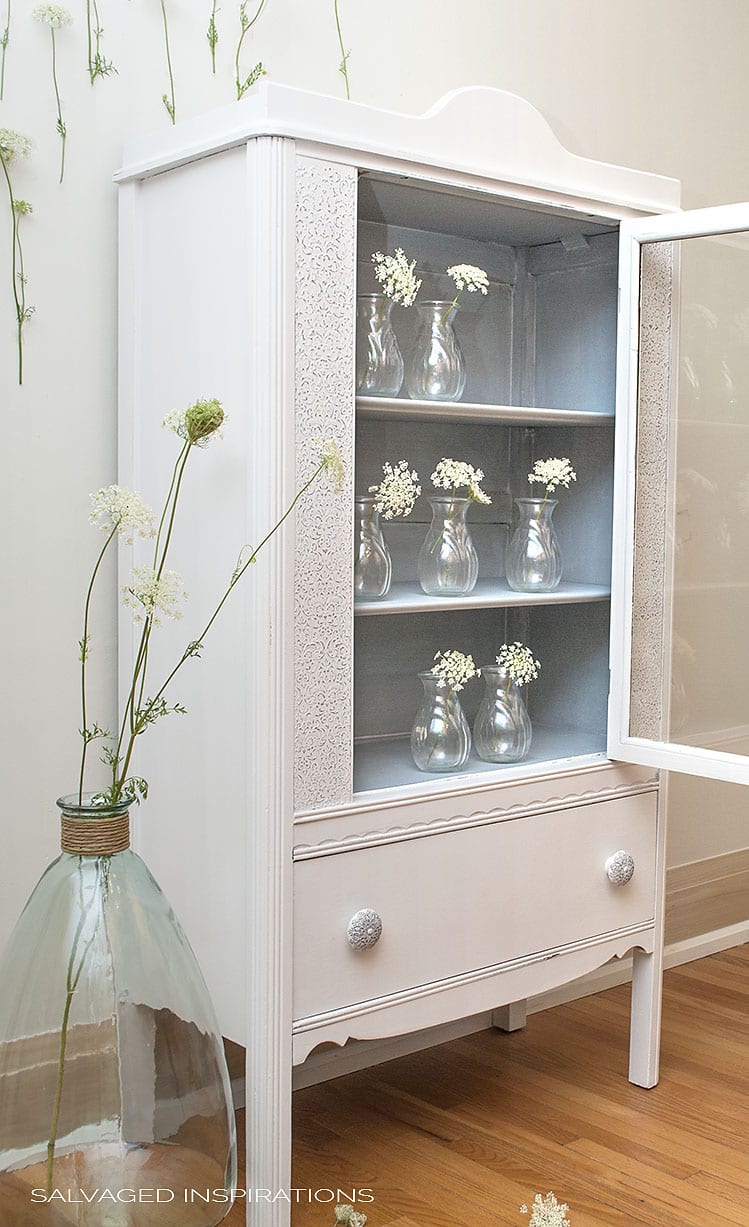
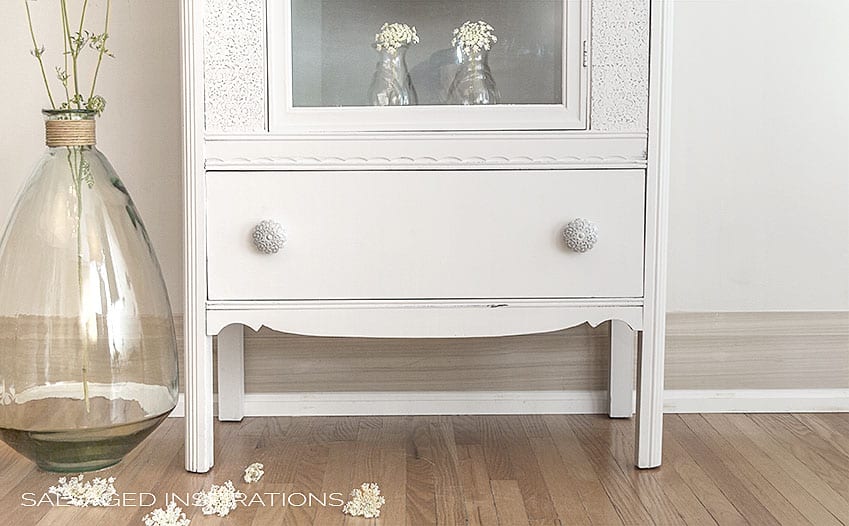
I even ended up adding knobs that remind me of this wildflower!
If you’ve ever stencilled with paint, you can do this! If you’ve never stencilled – you can still do this! 🙂
The basic technique of creating a raised stencil design is applying a plaster or plaster type medium onto a stencil design. Once you remove the stencil, the medium is raised above the painted surface to show a relief. Then to add even more excitement to this detail, you can paint it, sand it, dry brush it in a contrasting color, wax or glaze it to really enhance and bring attention to it!

This post contains affiliate links to products used. You can see my full disclosure here.
SUPPLIES FOR RAISED STENCIL TECHNIQUE:
- Stencil ( I used this one here)
- Putty Knife
- Artisans Enhancements VP Antico
- Sandpaper (120, 220, 400)
- Toothpicks
- Licorice Acrylic Craft Paint
- Dixie Belle’s Fluff
- Paint Brush
- 6×6 Stencil Design (similar)
- Dixie Belle’s White Wax
HOW TO – CREATE A RAISED STENCIL DESIGN ON FURNITURE
1:: PICK A STENCIL DESIGN YOU LIKE
The first step to creating a raised stencil design is picking a stencil design you like – and one that will fit nicely onto the flat surface of your furniture.
I’ve used this Flourish Stencil Design a number of times. You can see a few examples of it here and here. Love it! I do wish it was larger and covered more surface though. As you’ll see in some pics below, the stencil is only 6×6. I had to keep waiting for the first round of relief to dry before I could overlap and work my way down the panel. A pain in the you-know-what, but I’m really happy with the results so well worth the extra time.
Finding a great stencil design you love (regardless of size) is a great investment.
2:: ADD PAINT TO YOUR STENCIL MEDIUM
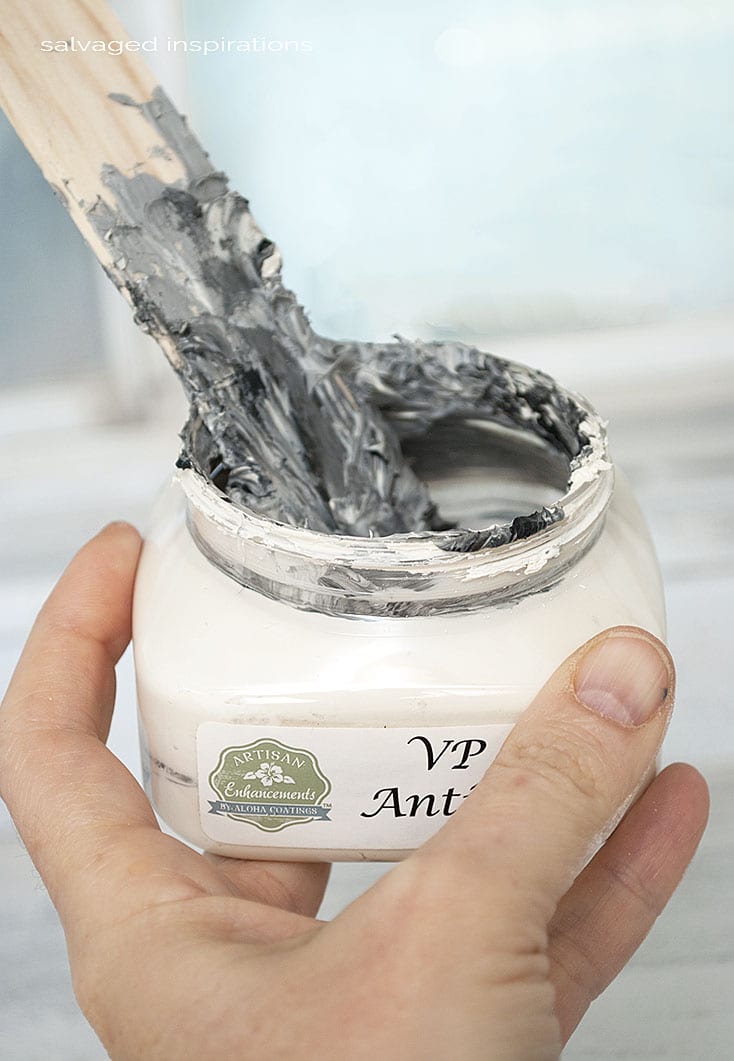
I used Artisan Enhancements VP Antico for my medium. You can also use Spackle, Joint Compound, Gel Medium, Embossing Cream, Decorative Cement Mix and Texture Paste just to name a few. I could have used it as is right out of the container but I didn’t want it to be the same color as my white painted cabinet. To fix this, I added this licorice craft paint. Not a lot of paint is needed. I mixed in about 1/2 tsp which was just enough to darken the plaster to a nice grey.
3:: PLACE AND SECURE YOUR STENCIL
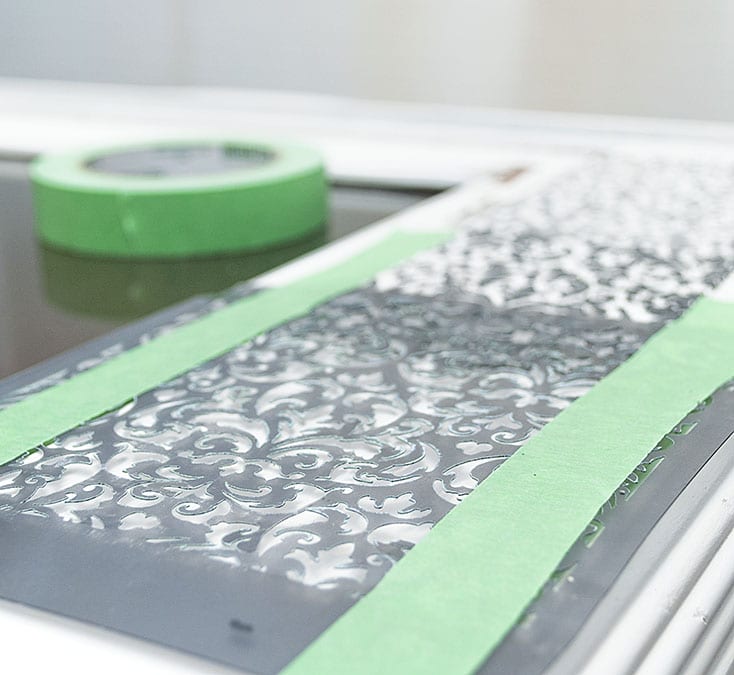
Place your stencil down on the flat surface of the furniture. I made sure my pattern lined up and was centered.
4:: APPLY THE MEDIUM WITH A PUTTY KNIFE
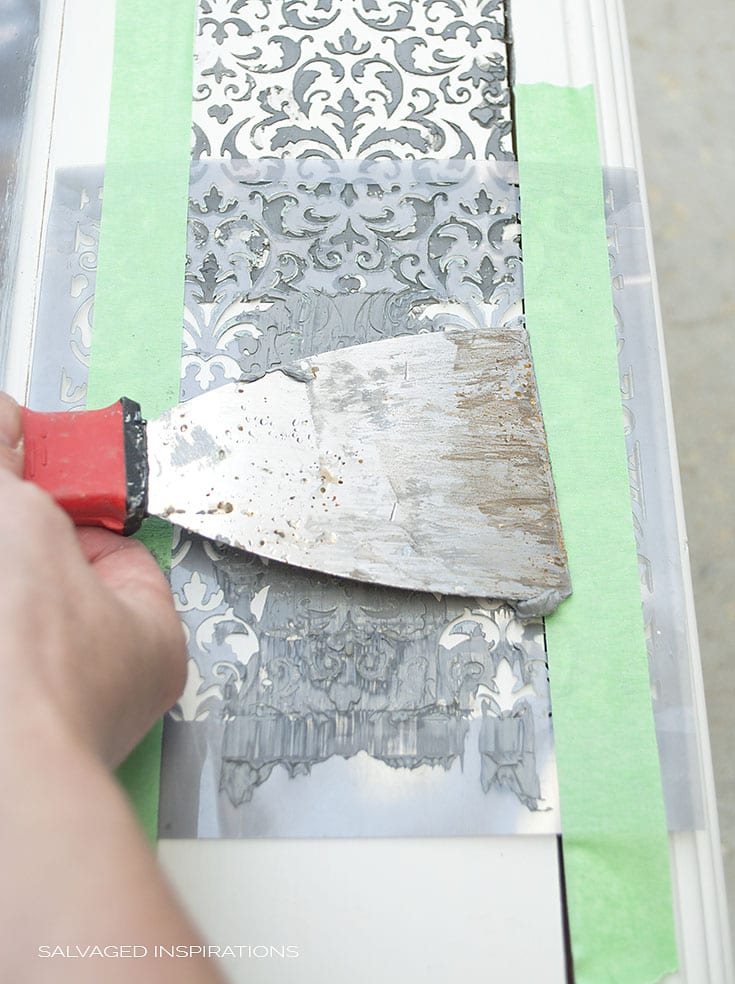
Here’s where the fun starts. I applied the medium with a putty knife. I started top to bottom, then applied it side to side at about a 30 degree angle making sure all the areas of the stencil were filled and evenly spread.
5:: REMOVING THE STENCIL
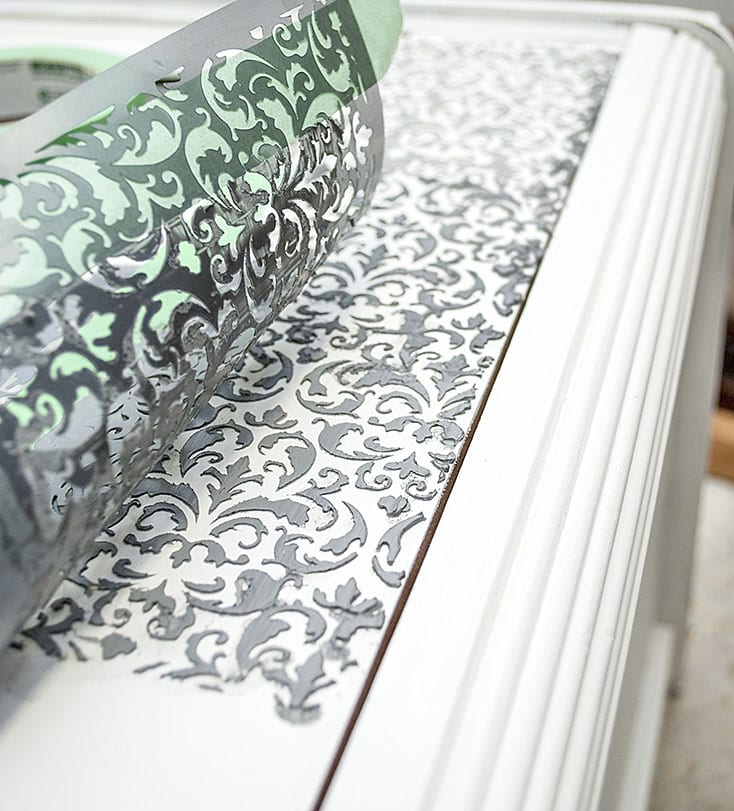
I carefully removed the tape holding the stencil in place and gently lifted it off. Here’s where the magic happens! You’re left with a beautiful raised stencil effect! Mine didn’t turn out 100% perfect, but it’s no big deal. I cleaned up some of the excess with a toothpick and left the rest as is. Once it gets painted and sanded, you can’t see any of the imperfections anyway.
6:: LET DRY, SAND AND PAINT
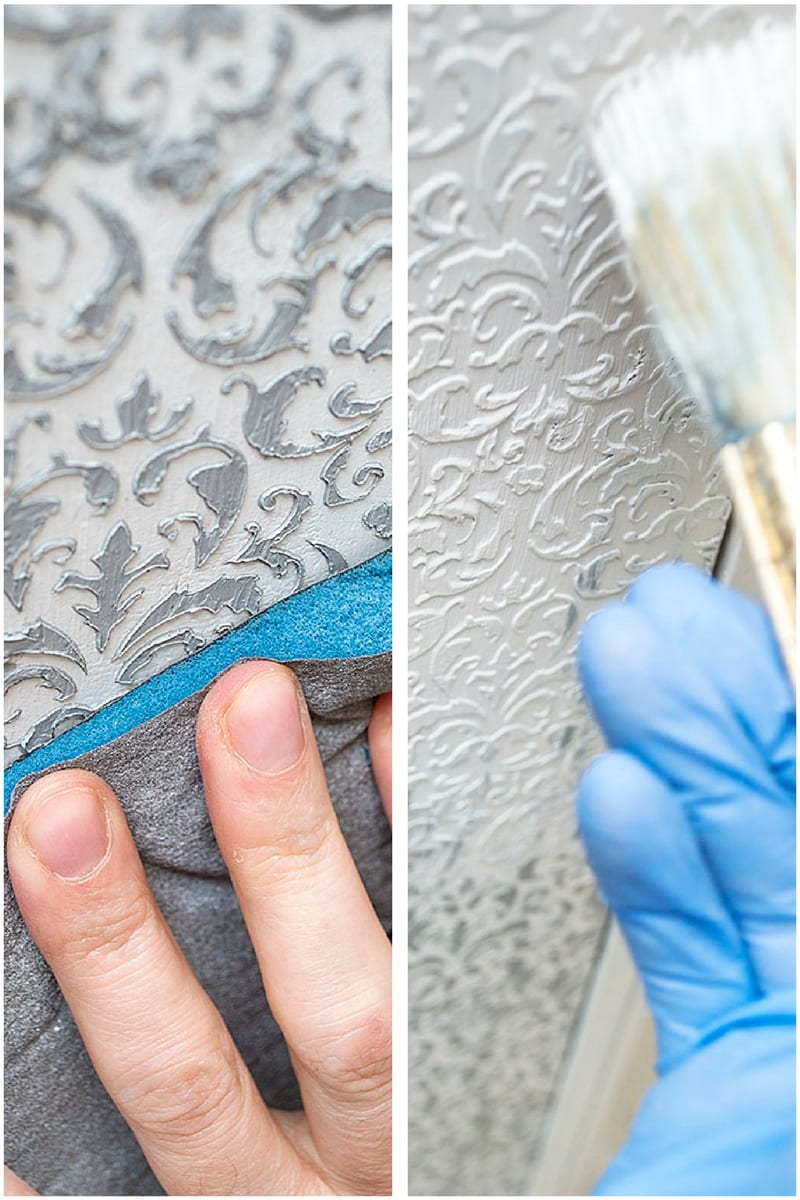
I let the raised stencil medium dry and then gave it a sanding with 120 to knock down any unevenness. Then I painted 2 light coats of Dixie Belle Fluff to match the rest of the painted cabinet.
7:: SAND BACK AND TOPCOAT

For the final step I sanded back some of the Fluff with 220 grit to reveal the grey raised stencil relief and then top coated the entire piece with white wax. It really adds a lot of detail and interest to this cabinet!

FEEL FREE TO PIN THIS PROJECT AND IF YOU HAVE ANY QUESTIONS, ASK AWAY. 🙂


What do you think of this cabinet makeover? I’m also curious if you’ve ever tried a raised stencil design and how it turned out for you? 🙂
Happy Painting and have a great day!

Denise, this is a very stunning piece. I love how you took an otherwise plane and simple piece of furniture and put in a simple design to really put in some bling to bring out the features of the whole piece. Thank you for sharing.
Hi Donnita!🤗 Thanks so much. I’m so glad you like it!
I love doing this too! I’ve been adding texture to wooden boxes 🥰
I’m glad I’m not the only one!
Me too! It adds SO MUCH, right!?!
The link you provided for your fabulous stencil no longer brings the specific one you used. Would you be able to give any more information about it? Thanks in advance
Hi Christina! Sometimes it’s frustrating with stencils and transfers. I find they stop producing them and they get difficult to find. 🙁 I found one very similar here though… it’s gorgeous and the exact same size. Hope this helps.
My bathroom ceiling is ceramic tiled. I’d like to create a painted, distressed Tim tile look with this tec hnique. Which medium do you think would stick to the tile best?
This is beautiful, really love it. Also loving the small glass jars inside the cabinet holding the Queen Anne’s Lace. Would be perfect for rooting avocado stones.
Thanks Jayne! Your photography is beautiful btw. 🙂
Hi Denise, I absolutely love your work. I have never seen a single piece you have done that I disliked. I have wanted to try this raised stencil technique but I have a question. When you move the stencil from one place to the next and you overlap the stencil how do you keep it from messing up the part you’ve already done? Keep up the great work I so enjoy following you.
Hi Renee! It depends on the look I’m after. If I don’t want the raised stencil to be perfect but more texture (like this dresser here), I don’t really worry about perfectly overlapping the design. I just wipe off the excess spackle on the stencil and move on. However, if I want the design to be more precise as with this cabinet, I let the spackle dry to the point where when I overlap the design, it won’t muck it up. Hope all that makes sense. Great question btw. 🙂
Denise, this piece is so inspiring! You are so very gifted and gracious to share your gift with all of us! I’ll be looking at my shed of treasures with this technique in mind……many thanks, Denise!
thanks so much Ellen! I hope you find the perfect piece in your ‘shed of treasures’ (love that btw!) to try a raised stencil on! 🙂
This is stunning . I’m going to source stencils and try this on the centre panel of my very old wardrobe that I chalk painted recently. . Thank you for a lovely idea.
Oh, my pleasure Jackie and have fun with your wardrobe…I think this technique will bring a lot of interest and beauty to the center panel!
I just found this on Pinterest and love the idea. I’ve never tried anything like this but I bought a very plain desk off craig’s list and was racking my brain for an idea to dress it up. I’m definitely going to give this a try.
Hi Denise, I’m so behind on reading blog post!! Summer and house guests have kept me away from my computer a lot 🙂 This piece turned out fantastic! I love how stencils can turn something simple into a fabulous.
Hi Annie – thanks – and good for you! Summer is meant to be enjoyed to the fullest and not glued to a screen. You may have noticed – I’m a little behind on a new blog post. 😉 Thanks for stopping by my friend… now get back out there and enjoy!!! 😀
Wow! Just wonderful and I never, ever would have thought of making raised stencils. The good news–I used to stencil every thing in sight so have a big supply and many are below the ceiling line ones so like 8″ tall and 15-20″ long in florals! Some are two and three parts for the different colors, so those wouldn’t work well, but many would. A very common ivy leaf/vine one comes to mind too as useful.
Couple questions–do you need to clean the stencil between each use of it while working on the same piece (not after done, as of course you would)? Also, by spackle, as you talking about the fluffy white stuff for nail holes in walls or the wood filler one which is thicker and heavier? Will the white stuff stick and hold well? I usually use latex gloves and just punch it into the holes then swipe excess off with my finger and it seems to come off painted surfaces pretty easily, but it’s still damp of course. It does dry fast though which might be a plus. Thanks–love your creations!
Hi Barb! Oh, with large stencils and all your past experience, this technique will be a breeze for you! Yes, I did clean my tiny stencil between each and every use. Great questions btw because I just realized I didn’t add that into the post – and keeping the stencil clean is an important part of the process. And no, not the fluffy white stuff and not regular wood fill. Raised stencils work best with spackle (I’ve used this one here)or joint compound which I believe is another word for gypsum plaster, and/or, your can buy specific plasters (there are various brands) like I used above. I hope this helps and have fun. 🙂
What a stunning makeover, Denise! This cabinet looks so pretty with the distressed raised stencil detail. I have yet to try raised stenciling but seeing this gorgeous makeover has inspired me to give it a try. Pinned and sharing 🙂
Thanks Marie! It’s fun and easy… and with your creativity – it would look spectacular I’m sure! 🙂 Thanks for the share and have a beautiful day! x
Absolutely precious! I just bought some beautiful stencils, so this is perfect for me!
Thank you!
Thanks Josefina! It’s funny, I have numerous stencils (and I keep buying them!), but I always gravitate to my favorite few. I hope you find some fav’s in the beautiful stencils you just bought! 🙂
I love this! Super
Thanks 🙂 <3 xo
I love how the panels look embossed. Really makes the cabinet look vintage/chic. I also really like the way you incorporated the beautiful Queen Anne’s Lace looking knobs. Gorgeously done:)
Thanks my friend! They’re the exact same knobs I used on my salvaged bathroom makeover … I just painted them up! 🙂 Have a beautiful day Monique. xo
Looks great! I did something similar to this using spak filler (that’s what we call it in Australia – the stuff you use to fill in nail holes in wood). I’d send a photo if I could work out how to do it 😂😂
Thanks Sonja! 🙂 I used spackle/filler on this dresser. It works great doesn’t it!
Gorgeous job. I haven’t actually used this method on a whole area, just cherry picked highlighted stencil sections to create a faux raised mold. Itching to try now 🙂
And do look after yourself hon. Take it from someone with a painful joint disease, you do not want to let a joint injury go unattended. Go to the ortho !
Thanks Chez! And it’s same-same whether you cherry pick sections or do it on an entire area. Easy. It would have been even easier if my stencil was a half decent size tho. 😉 And yes. I will take your good advice to heart my friend. After reading this, and a few comments on FB, I guess I really do need to go get it checked out.
You have such incredible vision to imagine just the right technique/color for each piece you do. Love this. Thanks for sharing your tips. Hope your shoulder heals quickly for you.
Thanks Tracy – Hugz!! I hope it heals quickly too… it’s quite annoying. 🙂
I love this! My favourite way of using a raised stencil is on drawers, especially if there is any damage or irregularity to the surface. The stencil hides a multitude of sins 😉 Thanks Denise. Beautiful job, as always!
Carole
I never even thought of that Carole… brilliant! 🙂 🙂 🙂
Raised stencils are one of my favourite ways to update furniture. Really makes a great impact. Love how yours turned out, Denise. I have a similar patterned stencil by Kaisercraft (it’s 12 x 12″) if you ever want a larger one…..I agree waiting for the spackle medium to dry is a pain.
Yes, a 12 x 12 would have been much easier for sure! I’ll go check out Kaisercraft. I’d love a larger one in this pattern… and this one is wearing thin from all the use anyway 😉 …thanks!