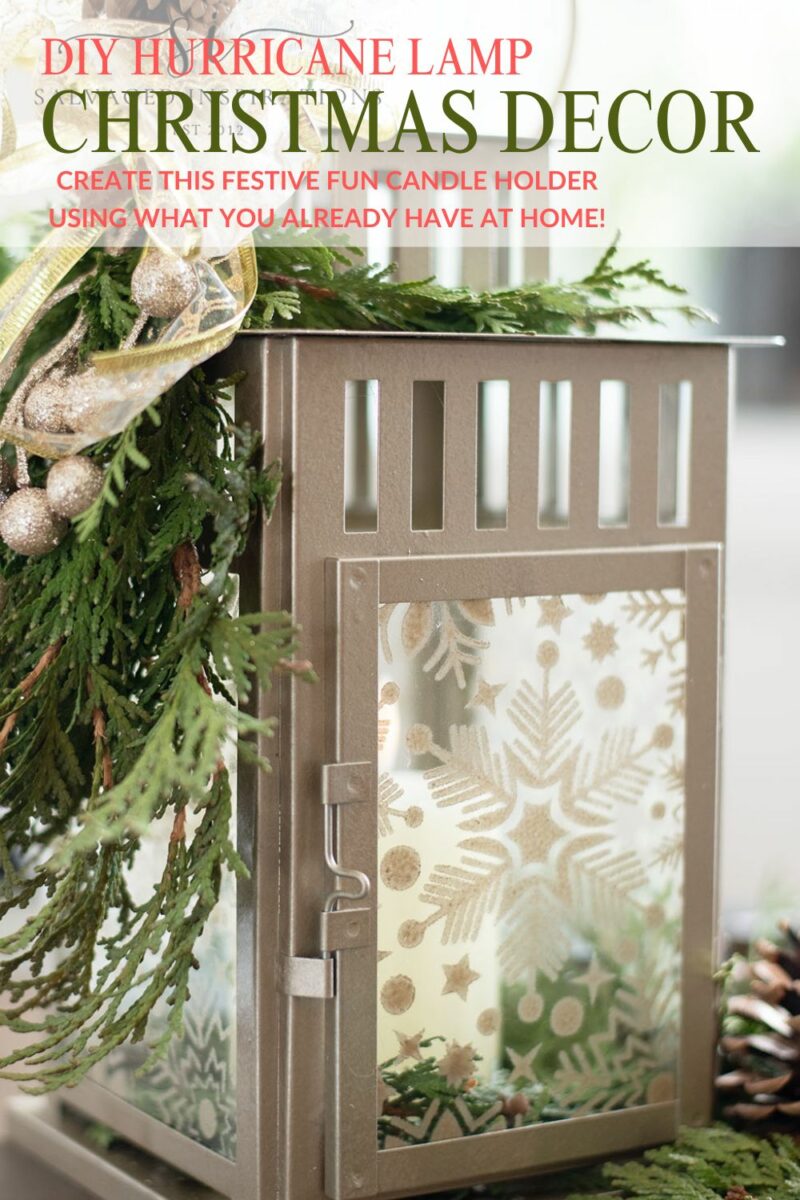
A FREE AND EASY WAY TO CREATE ELEGANT HOLIDAY DECOR | UPCYCLED DIY HURRICANE LAMP CHRISTMAS DECOR!

Hi creative friends! Over the weekend, I was out shopping and I spotted this sad-looking hurricane lamp someone had put to the curb. I put the brakes on for this one because I’ve seen some GORGEOUS holiday Christmas Lamps selling online – I was specifically looking at these lanterns – and I thought this could be transformed into something similar and festive! Here’s a FREE and easy holiday decor centerpiece that will inspire you to create with what you already have at home and in your own backyard!
*As an Amazon Associate, I earn from qualifying purchases. There are affiliate links in this post to other companies/products I use and love as well. You will never be charged extra when you purchase through these affiliate links. If you purchase from my links – A BIG thank you for supporting me and the #siblog! To see my full disclaimer, click here.
It’s also the second Tuesday of the month, and this means it’s Trashy Treasures Tuesday! Exciting NEWS! Kathy from Petticoat Junktion has joined our TTT crew! I’m looking forward to seeing what Christy at Confessions Of A Serial DIY’er, Nancy at Artsy Chicks Rule, and Kathy at Petticoat Junktion have all created. I hope you join me on today’s tour as well! I’ve included their before-and-after links down below.
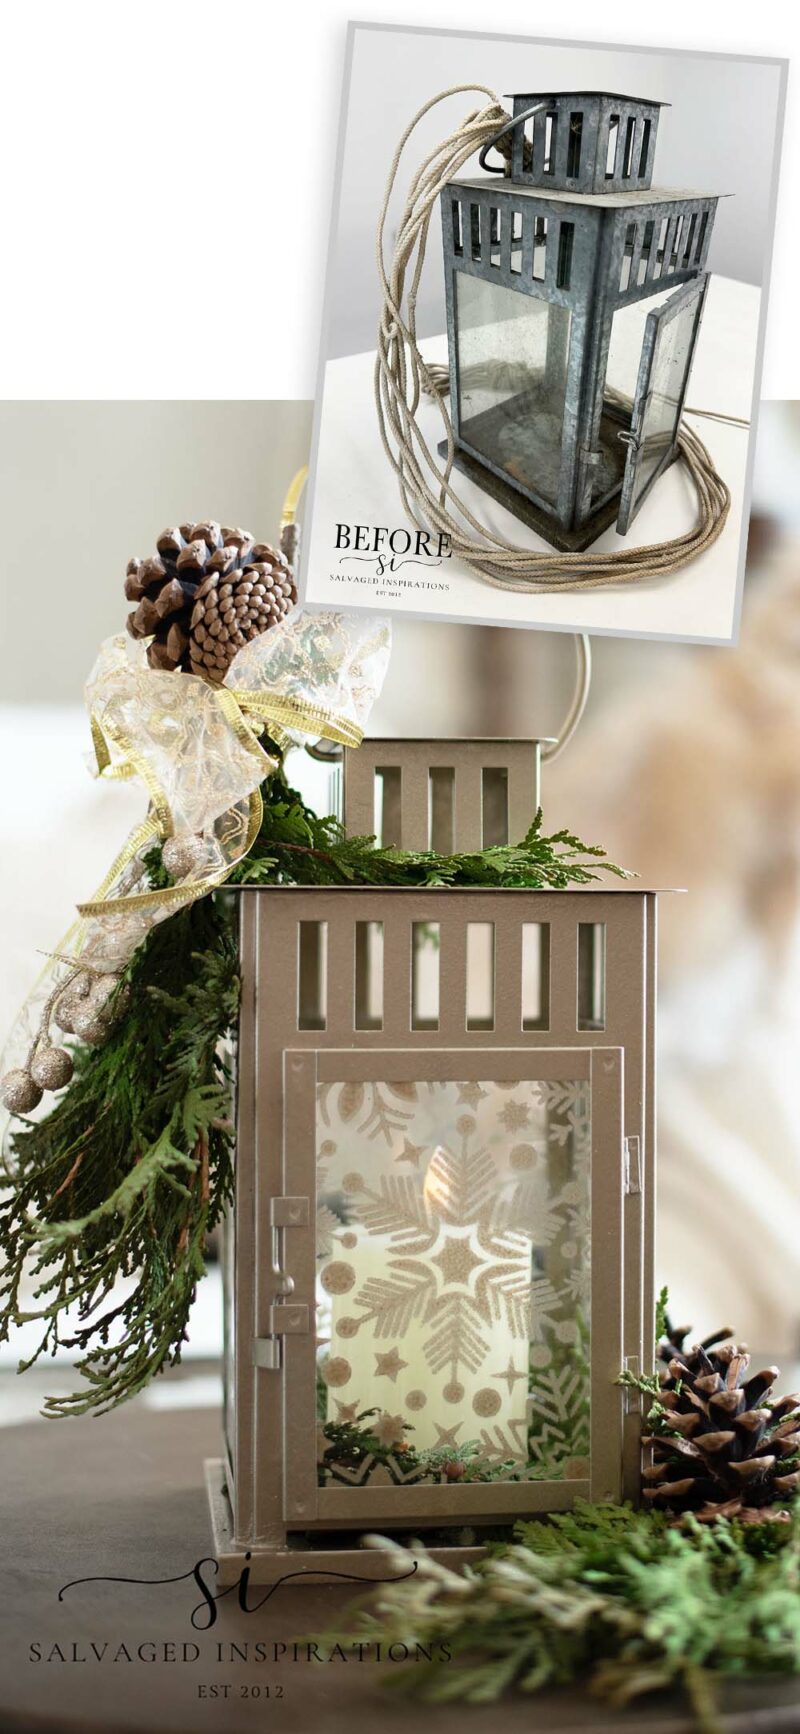
When I got home, I Google-lensed this metal candle holder and it looks like it’s the IKEA Borrby Outdoor Lantern.
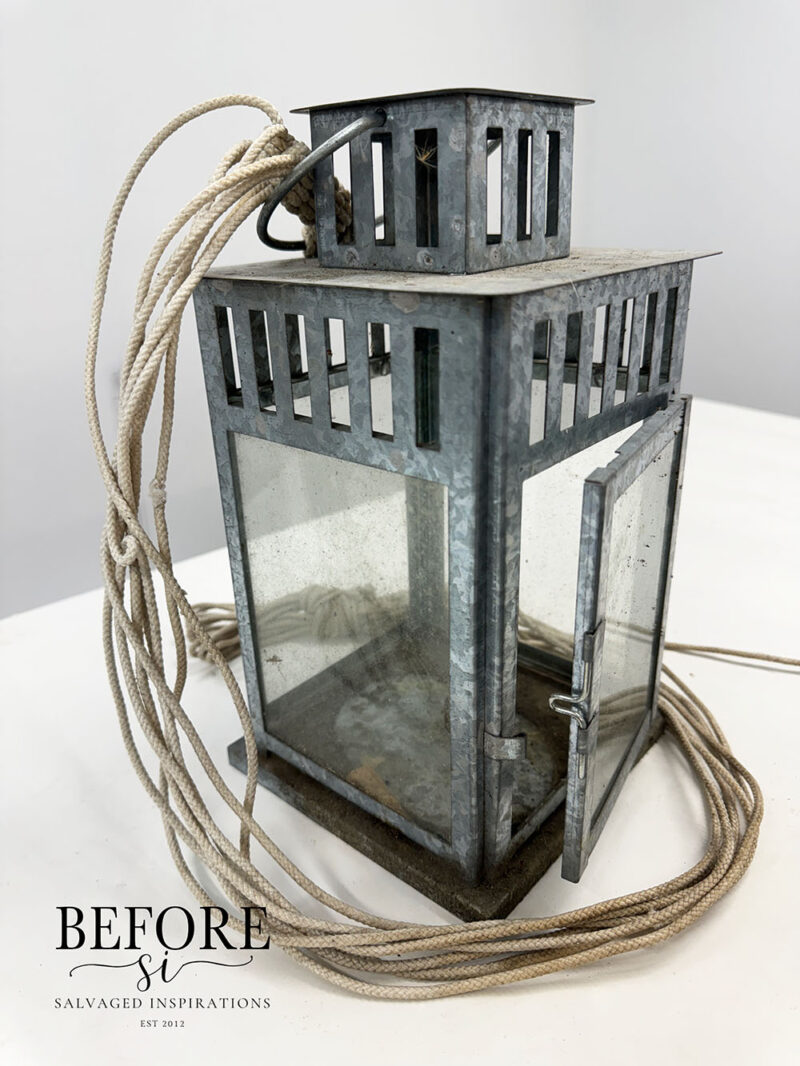
This was definitely used and/or stored outdoors because it was filthy. The good thing is that the glass and frame were in good condition.
THIS POST IS SPONSORED/CONTAINS AFFILIATE LINKS TO PRODUCTS I USE. YOU CAN SEE MY FULL DISCLOSURE HERE.
WHAT YOU’LL NEED
IKEA Hurricane Lamp – SALVAGED
White Lightning Cleaner
Greenery, Pinecones, Ribbon
Christmas Cheer Stencil
Rust-Oleum Champagn Mist Spray Paint
Pruning Shears
9 in 1 Painters Tool
DIY CHRISTMAS HURRICANE LAMP
Here’s how this holiday lantern decor all came together…
REMOVE GLASS & CLEAN
I started by removing the four panes of glass carefully. These glass inserts are thin and delicate, so I made sure to take my time. After they were out, I gave the metal frame of this lantern a good cleaning with my heavy-duty furniture cleaner. A dollar store brush and the hose attachment on my sink was a huge help.
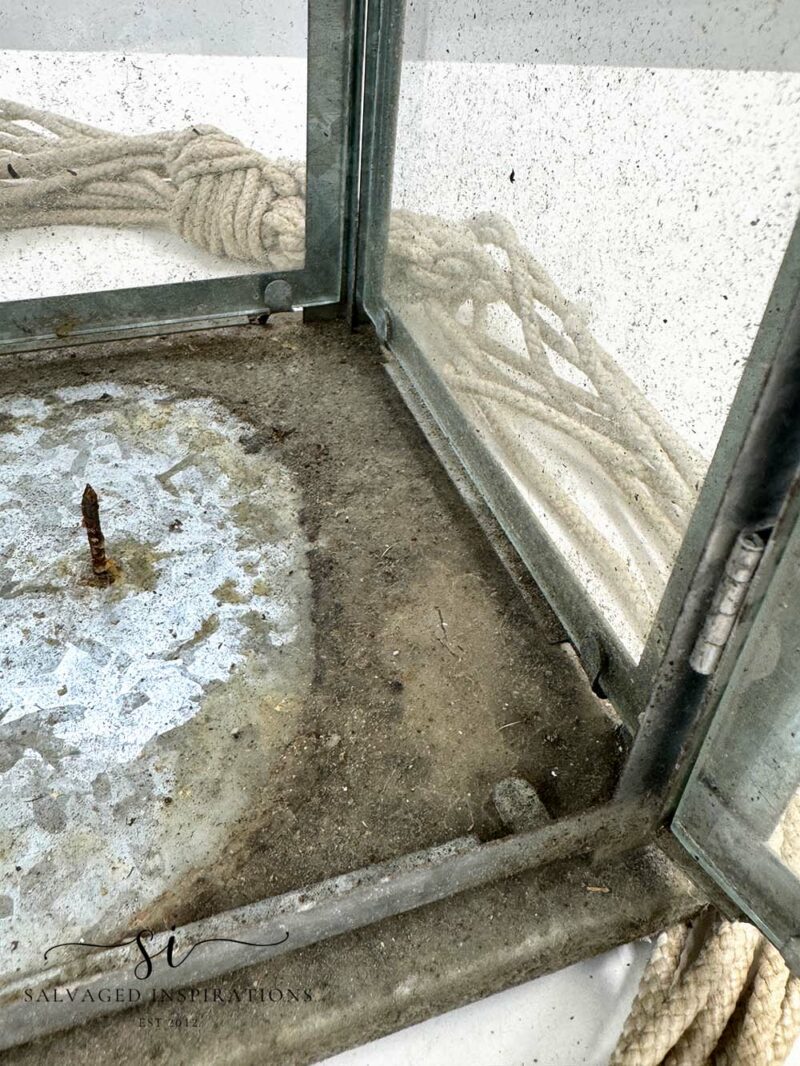
There was also a bunch of melted wax at the bottom of this candle holder. To remove the wax I used my handy 9-1 Painters Tool to scrape the wax off the metal. This tool is awesome for scraping paint off a roller, removing screws, cutting sand paper sheets, removing a paint can lid, applying bondo or wood putty, and apparently scraping off wax too. The sharp edge cut through the dried wax easily.

WINDEX THE GLASS
After the base was clean, I put the four panes of glass on a soft work towel and gave both sides a good cleaning using Windex and paper towel. I made sure to be very careful not to put too much pressure on this glass.

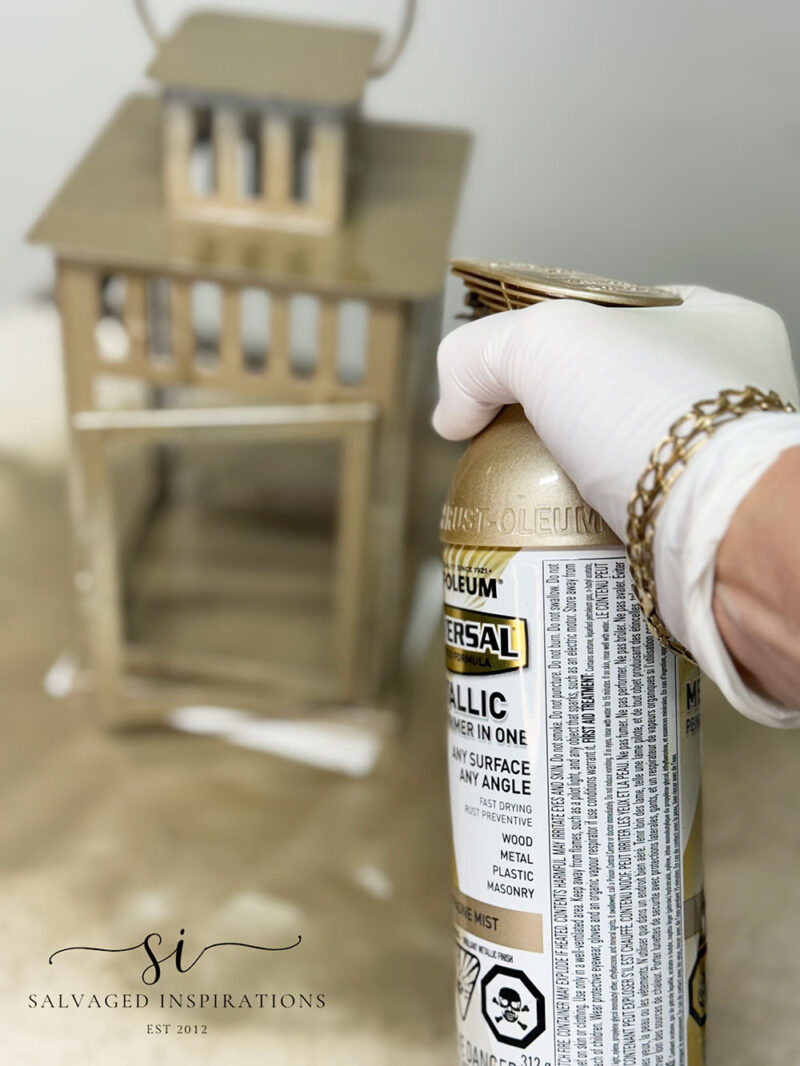
CHAMPAGNE MIST SPRAY PAINT
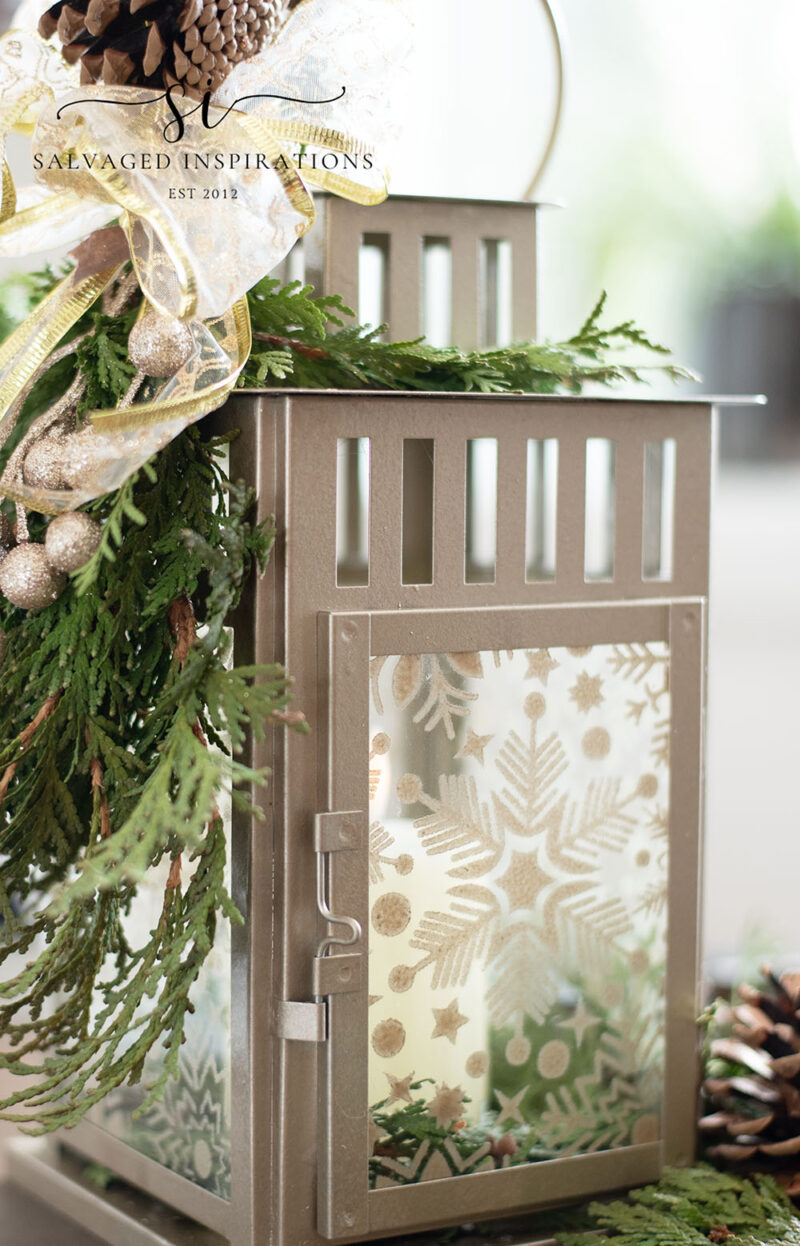
Around the holidays, everyone is pinched for time, so DIY’ing with an all-in-one spray paint that sticks to anything is a time saver. I picked this Rust-Oleum Champagn Mist Spray Paint, which is an elegant, muted gold. I’ve used this gold tone on old hardware and it always looks amazing because it’s more of a subtle gold. It’s a great spray paint to have in my inventory. This hurricane lantern took three light coats for full coverage. I sprayed in my studio (because it’s so darn cold out!) so if you are spraying indoors, make sure you have good ventilation because this stuff is smelly.
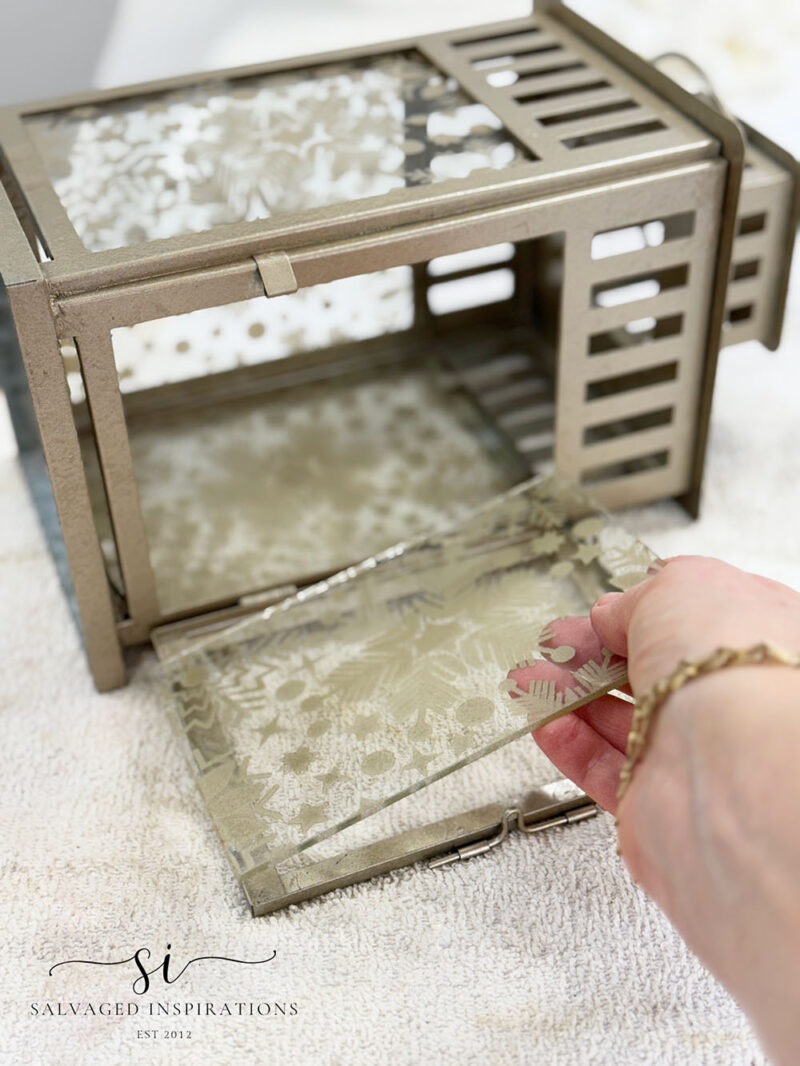
STENCILING GLASS
To put my own holiday spin on this lantern, I thought it would be fun to create a snowflake design on the glass panes. Using a sheet from this Christmas Cheer Stencil, I centered the stencil onto one pane of glass at a time. Then, sprayed a light coat of gold, lifting the stencil off immediately, then letting it dry.

INSTALLING GLASS
After the gold snowflakes had dried, I reinstalled all four panes of glass back into the lamp. Again, this glass is delicate, so I really took my time.
CREATE A MINI CHRISTMAS SWAG
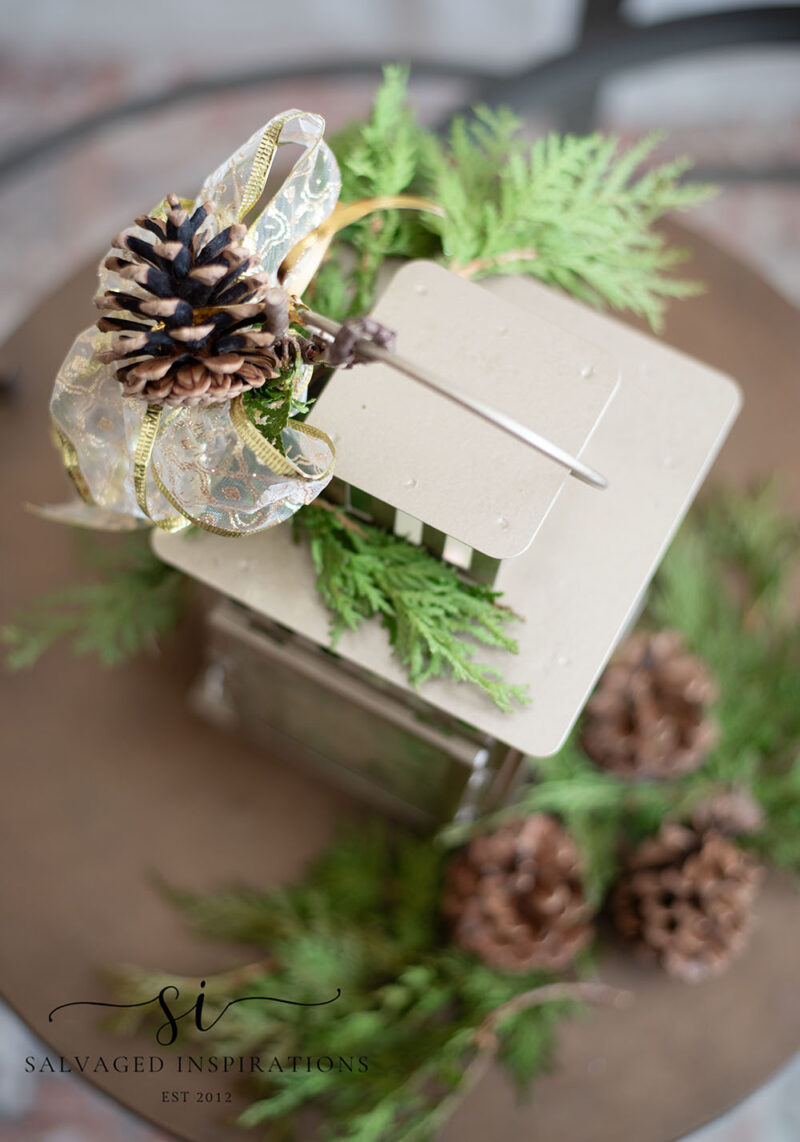
To zhuzh this up, I made a mini Christmas swag using evergreen branches and pinecones from my backyard. The ribbon and gold berries I already had on hand from my Christmas gift wrap stash. I tied my diy swag onto the handle of this hurricane lamp for a natural cascading look.
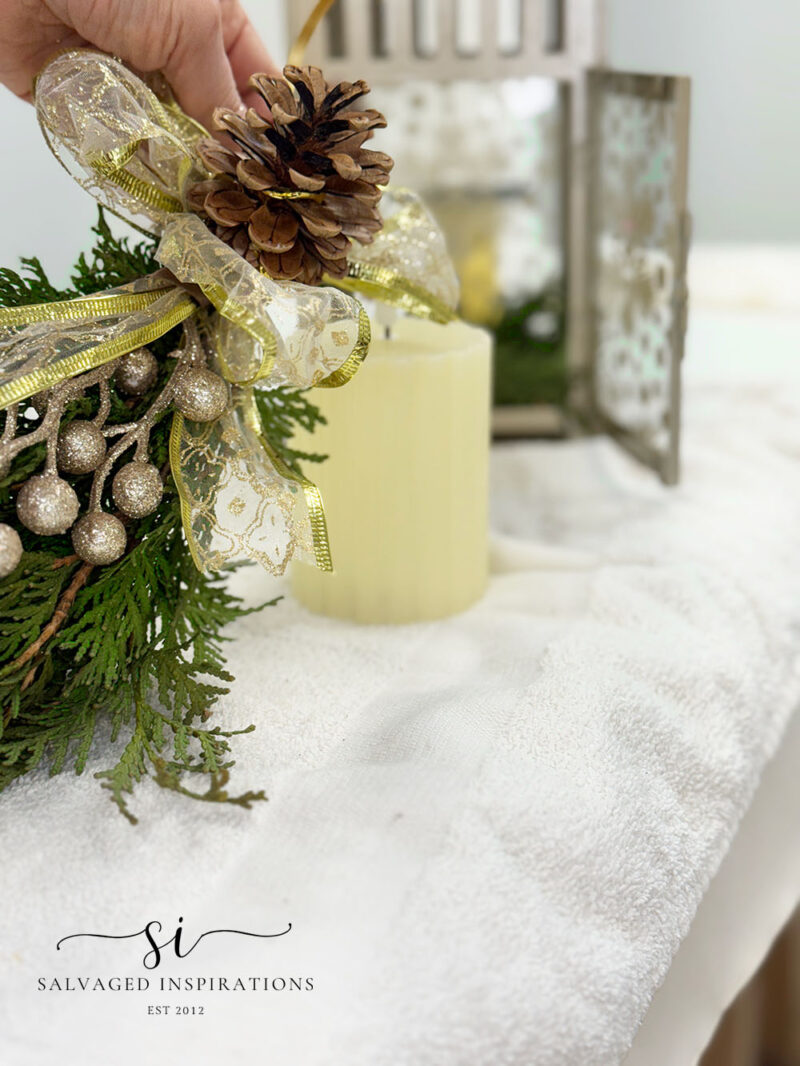
The great thing about this repurposed hurricane lamp is that I can reimagine it every Christmas. I made sure that the evergreen sprig can be easily removed because it is just tied and hooked on. So easy to remove. This way I can discard it after the holidays and start fresh next year with an entirely different color scheme!
THE BIG REVEAL
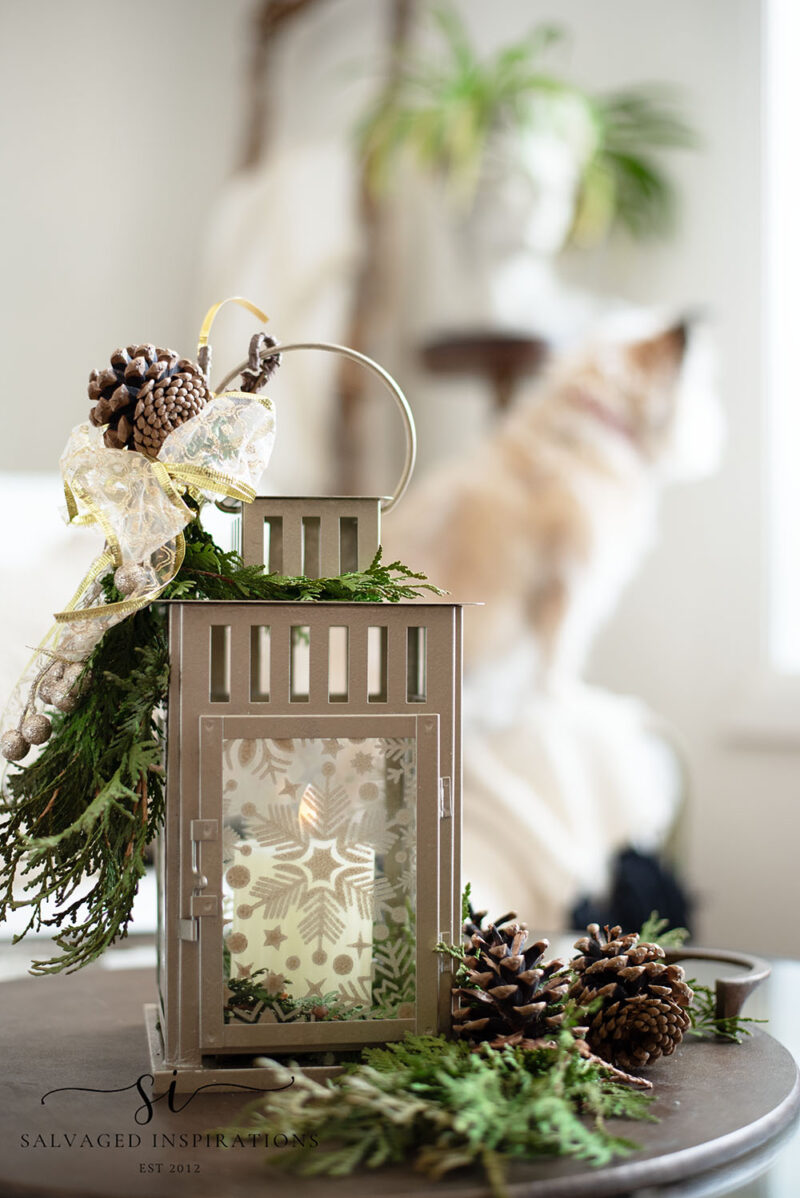
Here’s the finished look. Such a simple makeover that makes a sweet and festive centerpiece!
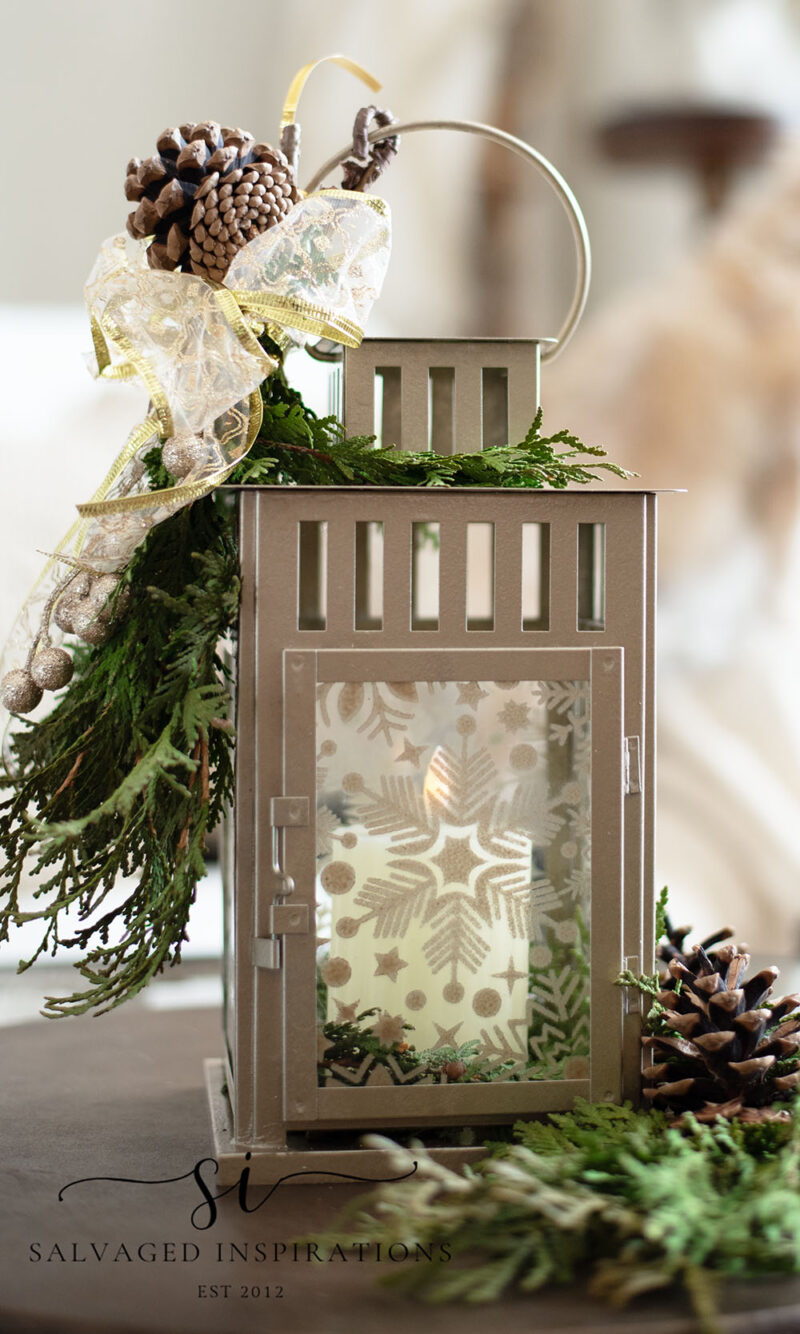
What do you think of the stencilled glass? I can’t wait to see how it looks in the evening when the candle is lit. I’m hoping it has a little sparkle to it. I should mention I’m using a battery-operated candle in this lantern. I find these faux candles look pretty realistic in lanterns and you don’t have to give them a second thought, safety-wise.
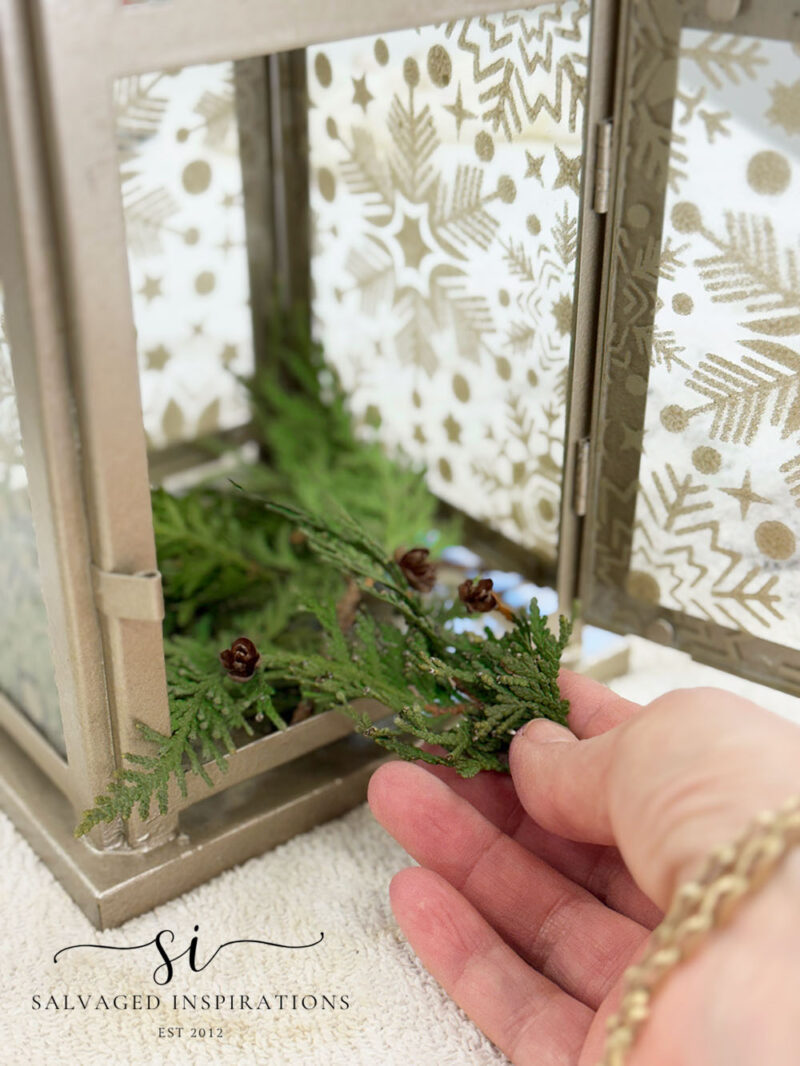
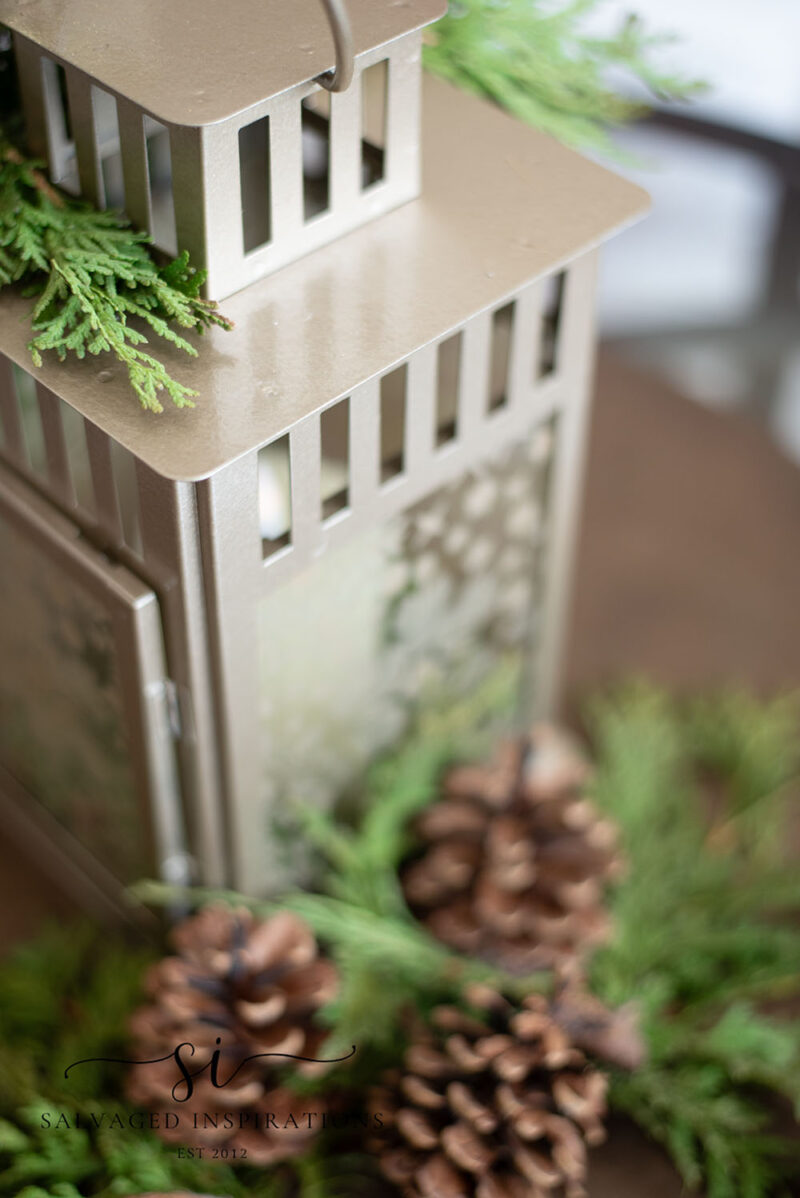
And here’s a top view where I tied the swag. I also wrapped one of the branches around the handle to help hold it all in place as well. Then added some extra greenery and pinecones onto the tray as well. You can find the full tutorial of the DIY Bronze Tray here.
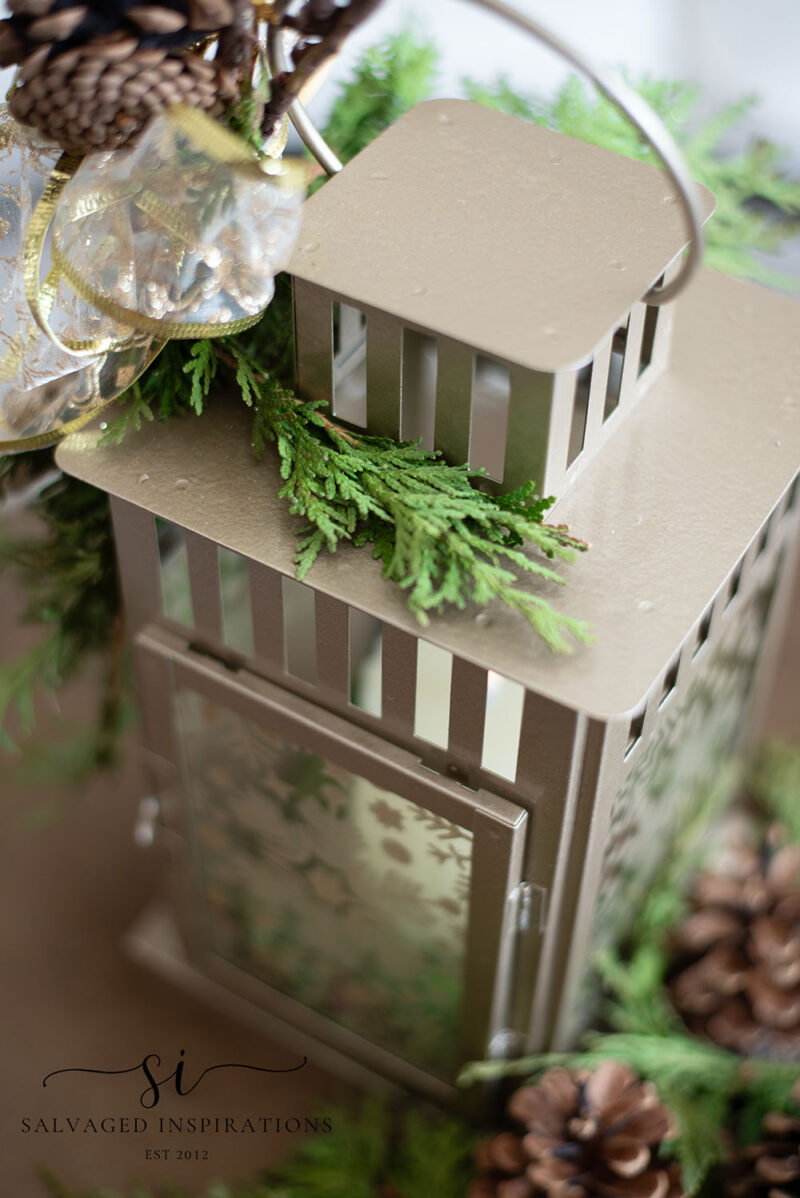
Bringing nature inside for the holidays looks amazing. The evergreen branches and pinecones add the perfect natural element around this hurricane lamp.
I enjoyed making my NEW holiday centerpiece, and it cost zero dollars because I already had all the supplies at my home and in my own backyard!
YOUTUBE TUTORIAL
While I’m taking a little break from long-format YouTube videos this December, there’s still creative fun coming your way! Keep an eye on YouTube Shorts, plus my FB and IG Reels — I’ll be sharing all the behind-the-scenes of how this holiday project came together. I’d also like to thank you for all your support over on our YouTube channel in 2025. Our #siyoutubefamily has reached 55.7K! Thank YOU so much and I’ll be back to long-format videos again in 2026!
And now for some Trashy Treasures FUN!
Below are the TTT ladies’ BEFORE photos. Visit the links below to see the amazing AFTERS and learn how they did it! I’m heading over to take a peek as well! x
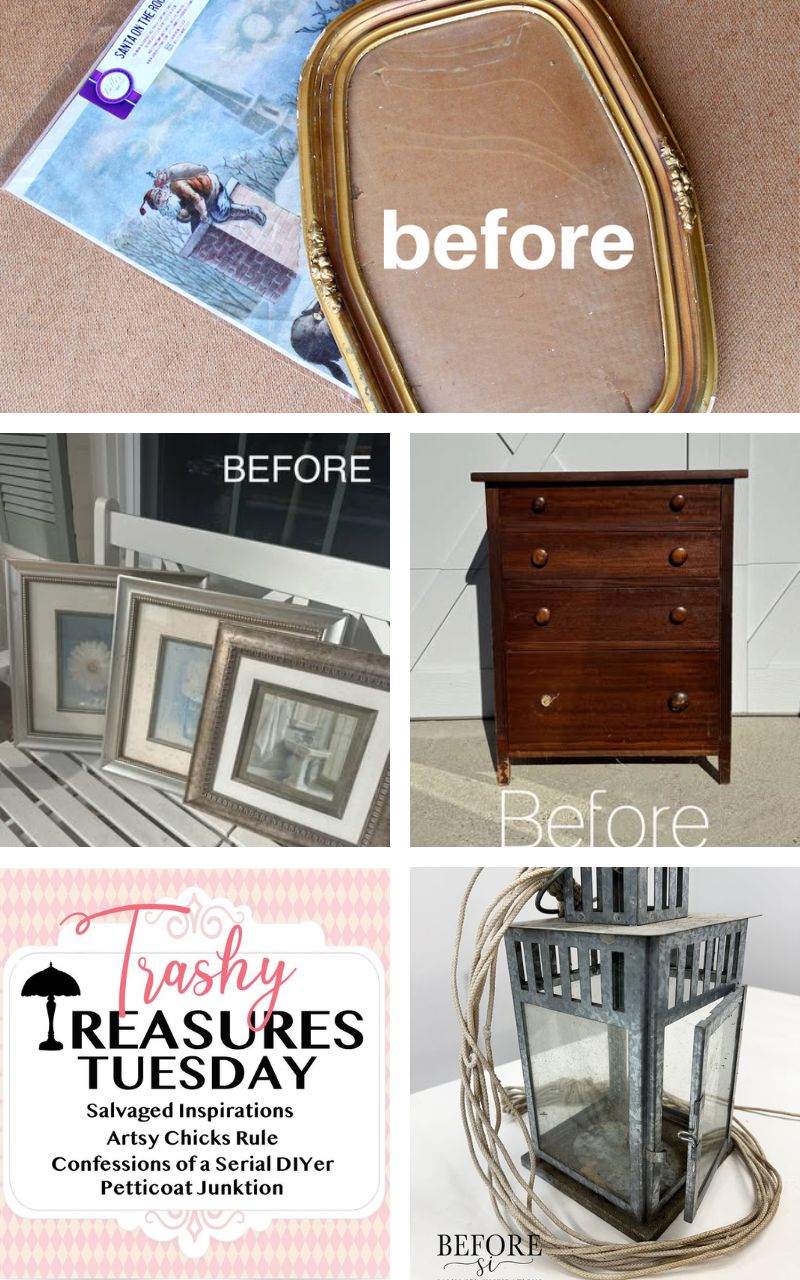
1. PETTICOAT JUNKTION
2. ARTSY CHICKS RULE
3. CONFESSIONS OF A SERIAL DIYER
4. SI (HAPPY YOU’RE HERE!)
Here’s another look at this before-and-after trashed Hurricane Lamp Christmas Decor Makeover. I hope it inspires you and sparks ideas for your upcoming holiday projects.
This was a fast and fun holiday project and a lesson to myself to shop my own home for supplies. I hope you enjoyed it, and thanks again for joining today’s TTT makeover. Feel free to drop me a hello and let me know what you think of this holiday lantern’s NEW’ look. I always love hearing from you.
Happy painting, my friends!
Denise x
RELATED POSTS:
HOW TO STENCIL W GOLD LEAF FOR THE HOLIDAYS
CHRISTMAS VINTAGE BOX MAKEOVER
PAINTED ‘MARBLE’ CHRISTMAS BALLS
HOW TO PAINT CHRISTMAS PLAID
DIY CHRISTMAS URN IN 10 MINUTES OR LESS!
PIN AND SHARE! 🤗

What a great save! I see these everywhere and don’t know why I haven’t grabbed them. A great way to add some charm for the holidays. Thanks for sharing my friend. Merry Christmas! 🎄 Pinned 📌
I see these lamps everywhere too! Merry Christmas my friend and thanks for the PIN! XOXO
Gorgeous. Fabulous job 👏
Yay, glad you like it, thanks Rebecca!🤗
FAbulous makeover! I’ve used the Champagne Mist color and love it too. Don’t you just love a good spray paint project!
Right…isn’t it beautiful?!😃 And ya, super fast and easy! Thanks my friend. XOXO
So beautiful, Denise!! I love, love the stencled glass! xoxo
Thanks my friend! xoxo
As always I am impressed! Made beautiful this trash to treasure. Well done creative girl!
Thank you Jewels!💕 And thanks for your lovely email as well! Hugs
How fun!!! And you did a marvelous job creating an object of beauty. Love it!
Thanks, so glad you love it! I did have fun with this one.It’s always fun seeing what a trashed be can become.😁
Beautiful! Great idea to add the stenciling! I have a lantern I want to try this on. 🙂
Aw, thanks Cyndi! The stenciling is so easy. I hope you give it a try!🤗
I wouldn’t have given that roadside lamp a second look but you turned it into a beautiful holiday centerpiece! I 💗 the snowflakes on the glass – so creative, Denise!
Aww, thanks Nicki! Holiday projects are always fun to do.🤗
WOW!! What a fantastic save this was…literally trash lol. I bet it is so pretty all lit up at night! XOXO
Literally trash turned treasure!🤣🤣🤣 I had it ‘on’ last night. It’s not as sparkly as I thought it would be but it looks beautiful – such a warm and cozy holiday vibe!🎄
Hi Denise. What a beautiful project. I love how you took it to another level by spraying the glass.
Aw, thanks my friend! I really like the stenciled glass as well… and so easy to do! Have a great week. XOXO
Your lantern is so lovely! I really like the pattern on the glass!
Thank you Carla, so glad you like it! Thanks for stopping by and wishing you a great week! XOXO