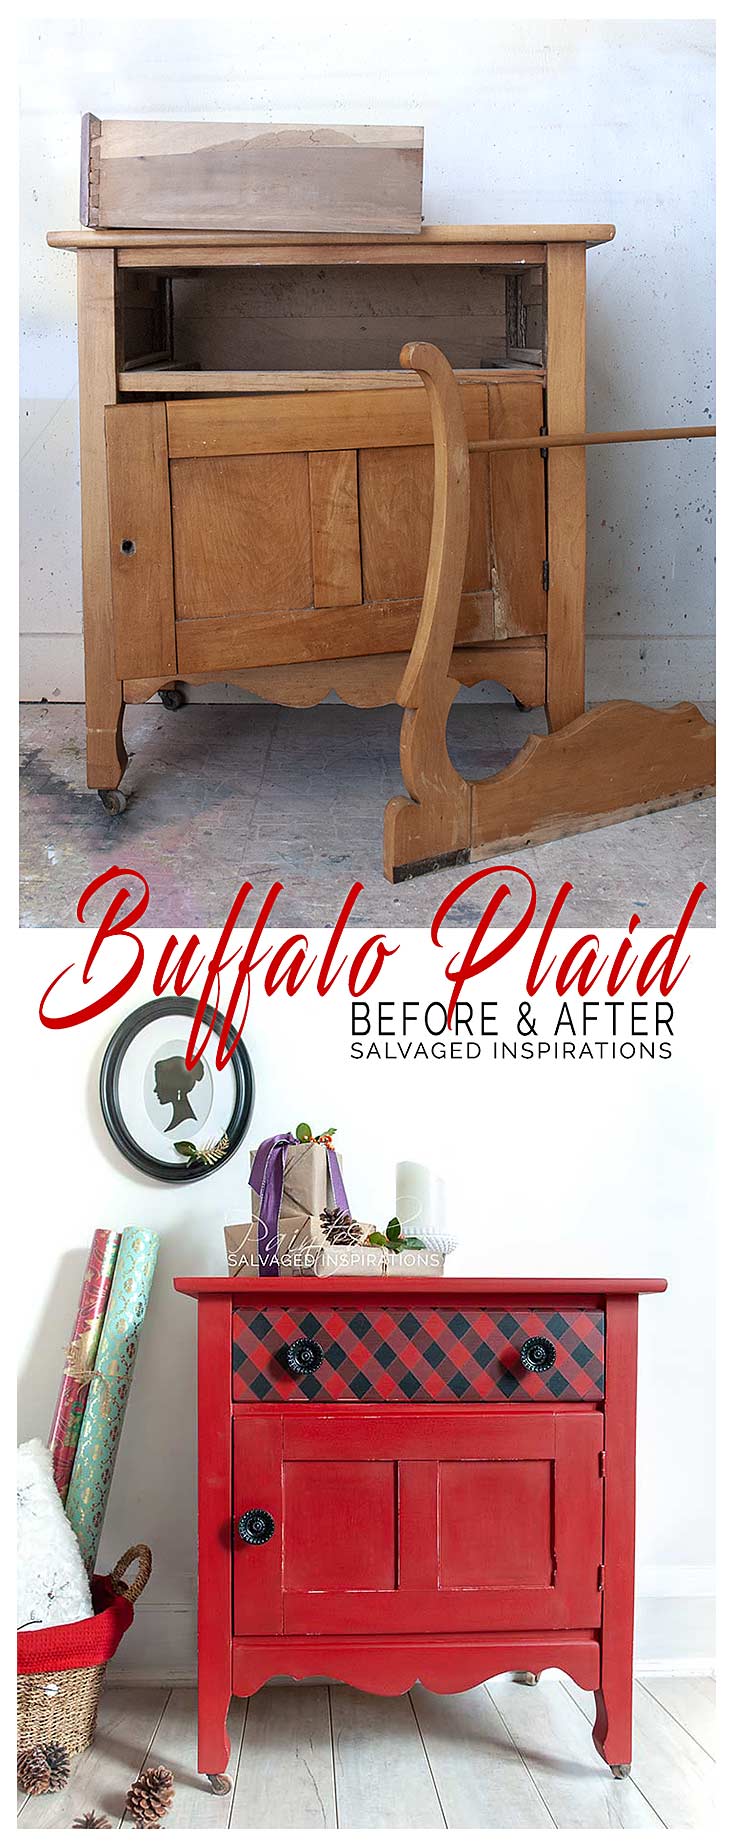
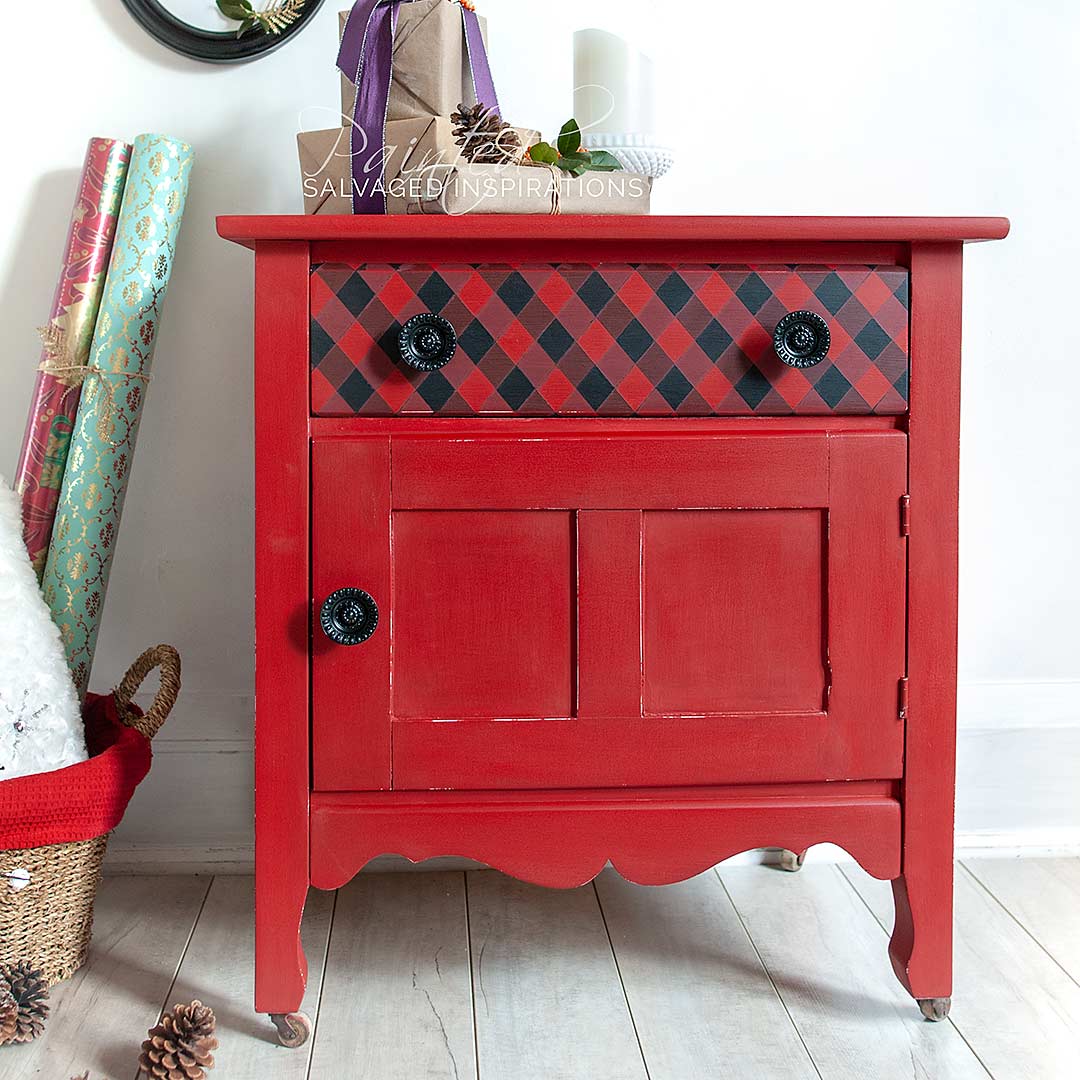
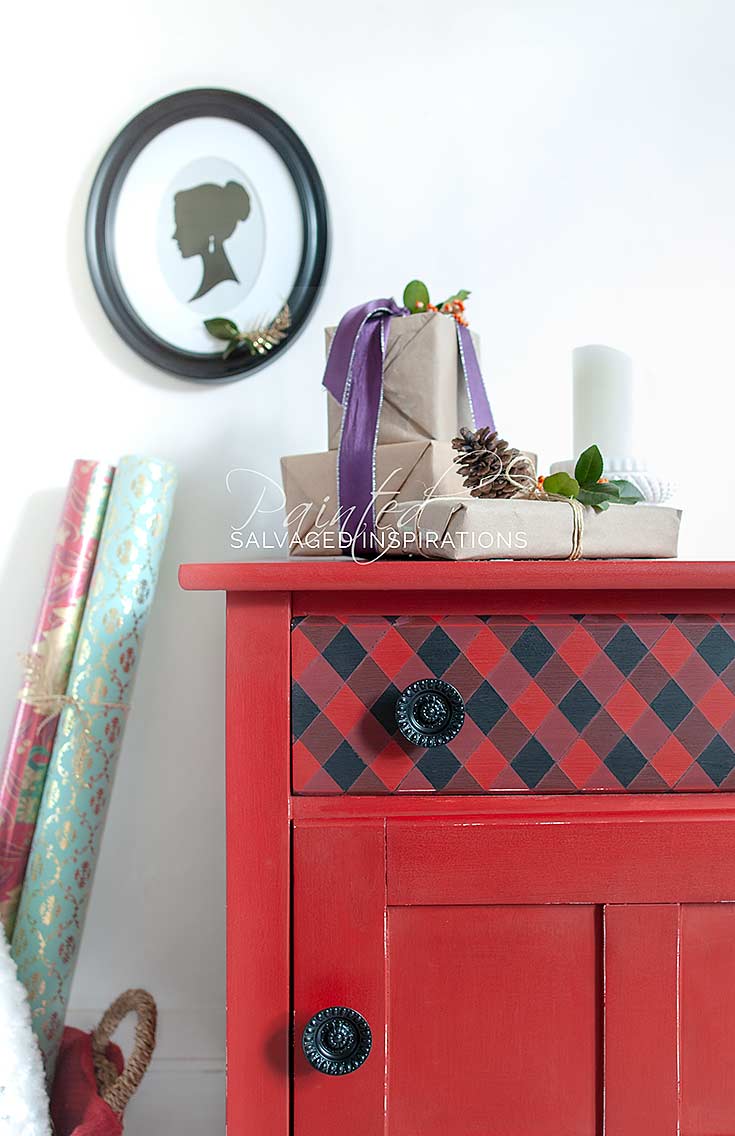
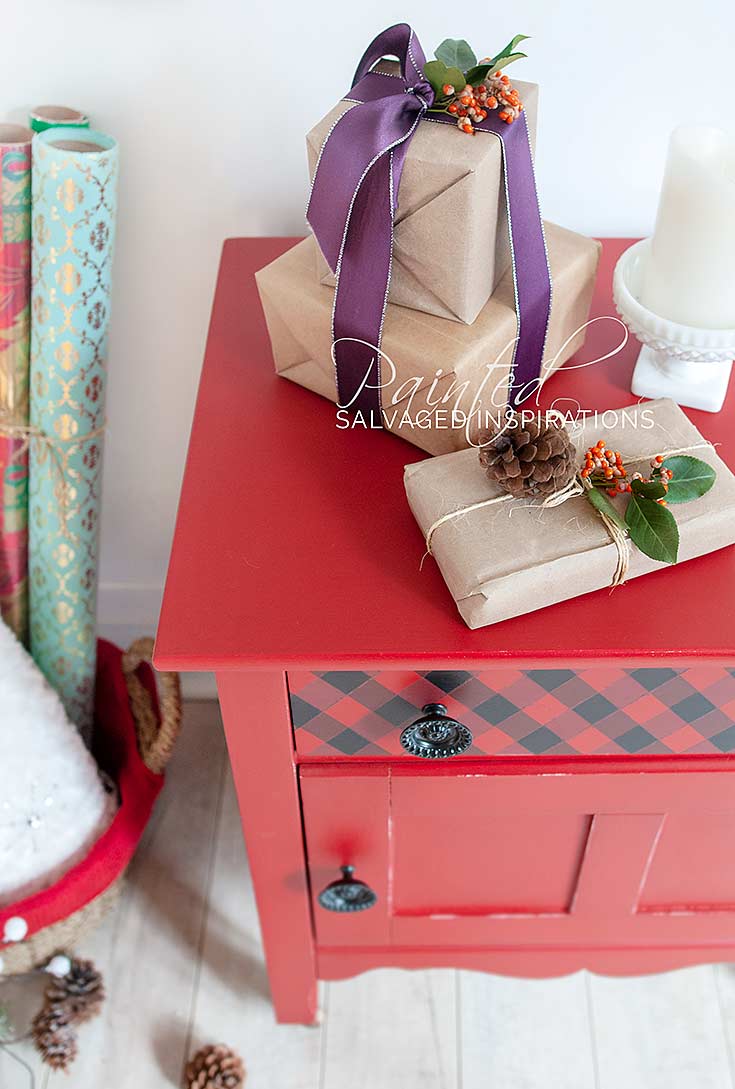
Happy Cyber Monday friends! With Thanksgiving and Black Friday under our belts, I thought a Christmas style makeover was in order… and this one is a charmer! I’ve been wanting to try Buffalo Plaid for months now. I don’t know about you, but I’ve been seeing it everywhere! Clothes, home decor, dishes, even dog wear. I just bought my Gidgy a Pink and Black Buffalo Check jacket and it’s sooooo cute!
Anyway, I don’t know about you but when I’m trying a new technique, I don’t want to take the chance on something BIG so this salvaged vintage washstand was the perfect piece to experiment on.
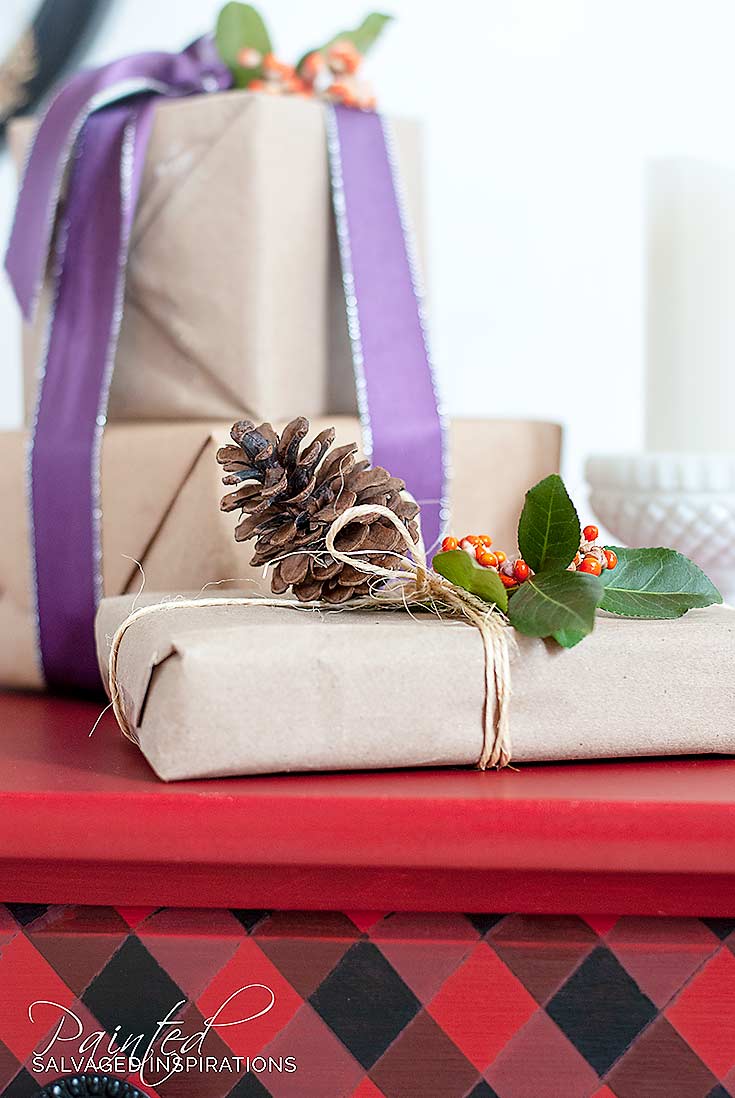
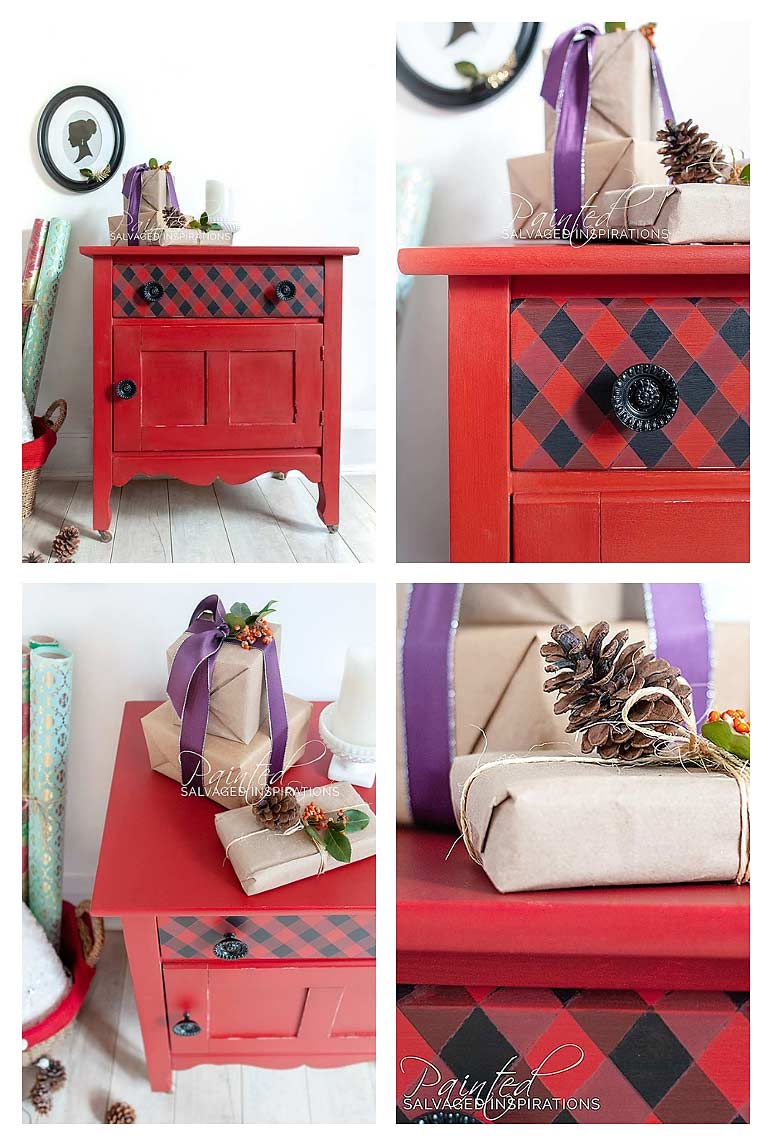
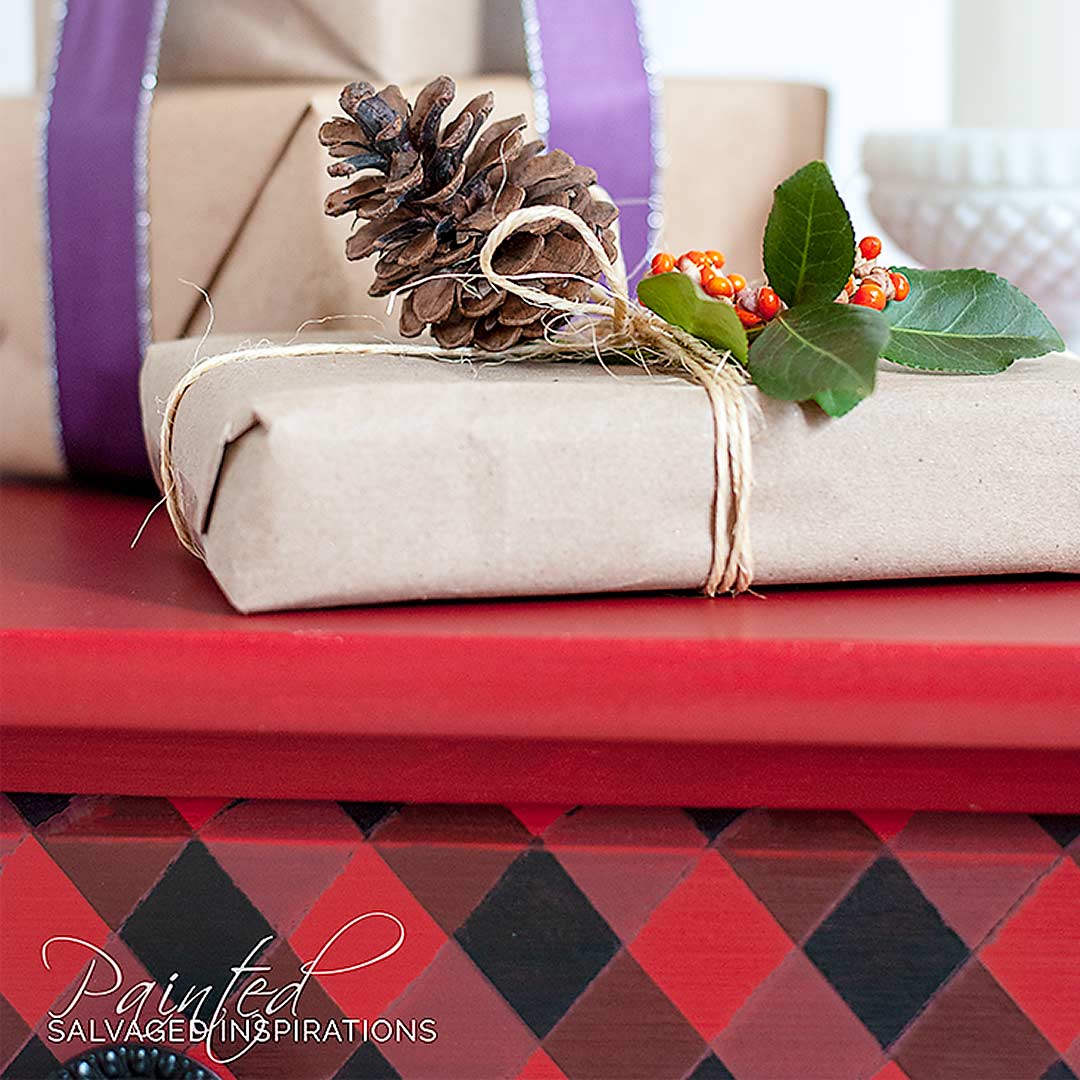
Here’s the before and after…. I couldn’t wait to share this one so the wax isn’t totally buffed — but I think it still looks Christmas-licious…
THIS POST CONTAINS AFFILIATE LINKS TO PRODUCTS I USE. YOU CAN SEE MY FULL DISCLOSURE HERE.
SOURCE LIST::
-
- Vintage Wash Stand – SALVAGED
- Water Mister Spray Bottle
- Paint Brushes
- 1″ Painters Tape
- BIN Shellac Primer
- Barn Red Chalk Mineral Paint
- Caviar Chalk Mineral Paint
- Clear Wax
HOW TO PAINT BUFFALO PLAID IN 5 EASY STEPS::
After giving this vintage washstand a thorough cleaning and letting it dry, I sanded the piece and removed all the dust. Then I applied two coats of BIN Shellac Primer to cover stains and then applied 2 coats of my base color.
Step #1:: Paint A Base Coat
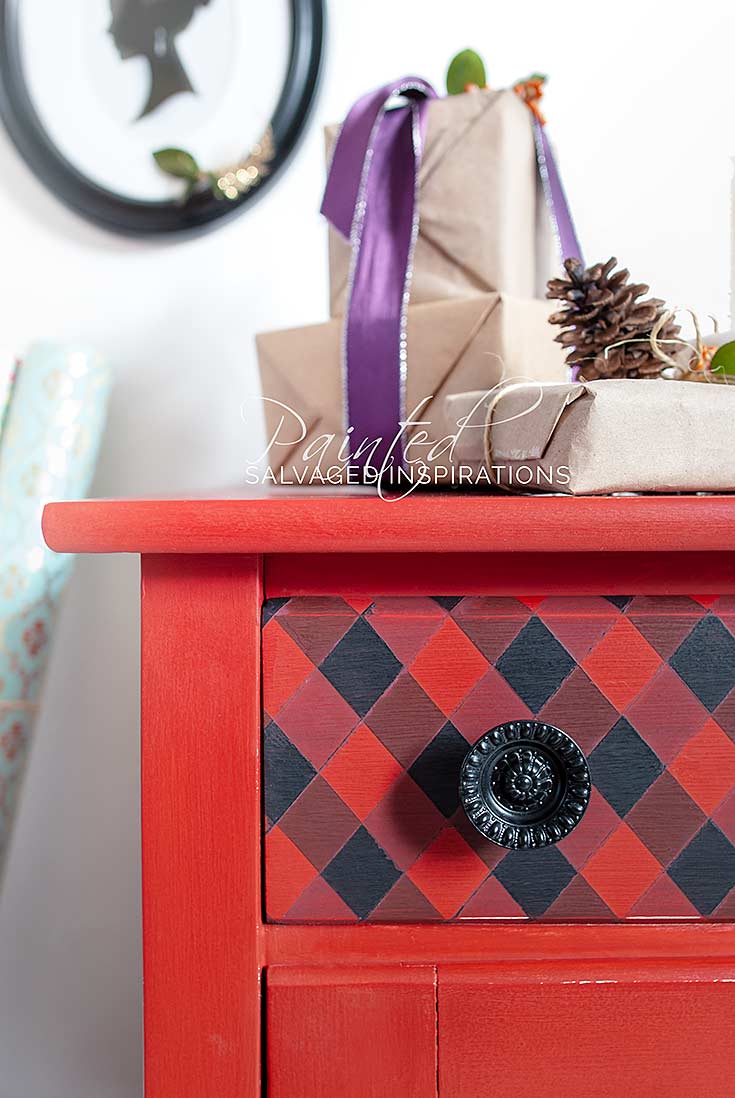
Your basecoat can be ANY color you like. I painted mine in Barn Red.
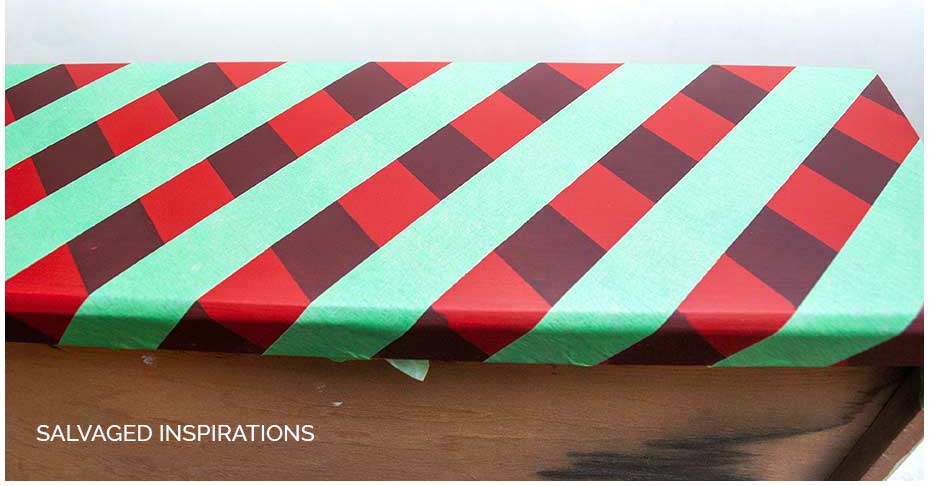
Step #2:: Lay Down Tape and Paint Stripes
After applying my base color, I laid my green painters tape in a diagonal pattern across the drawer. To create those perfect looking lines:
- lay down a piece of tape
- lay down another piece of tape to the right and left of the first piece with edges aligned
- remove the middle piece and repeat


Step #3:: Paint Stripes
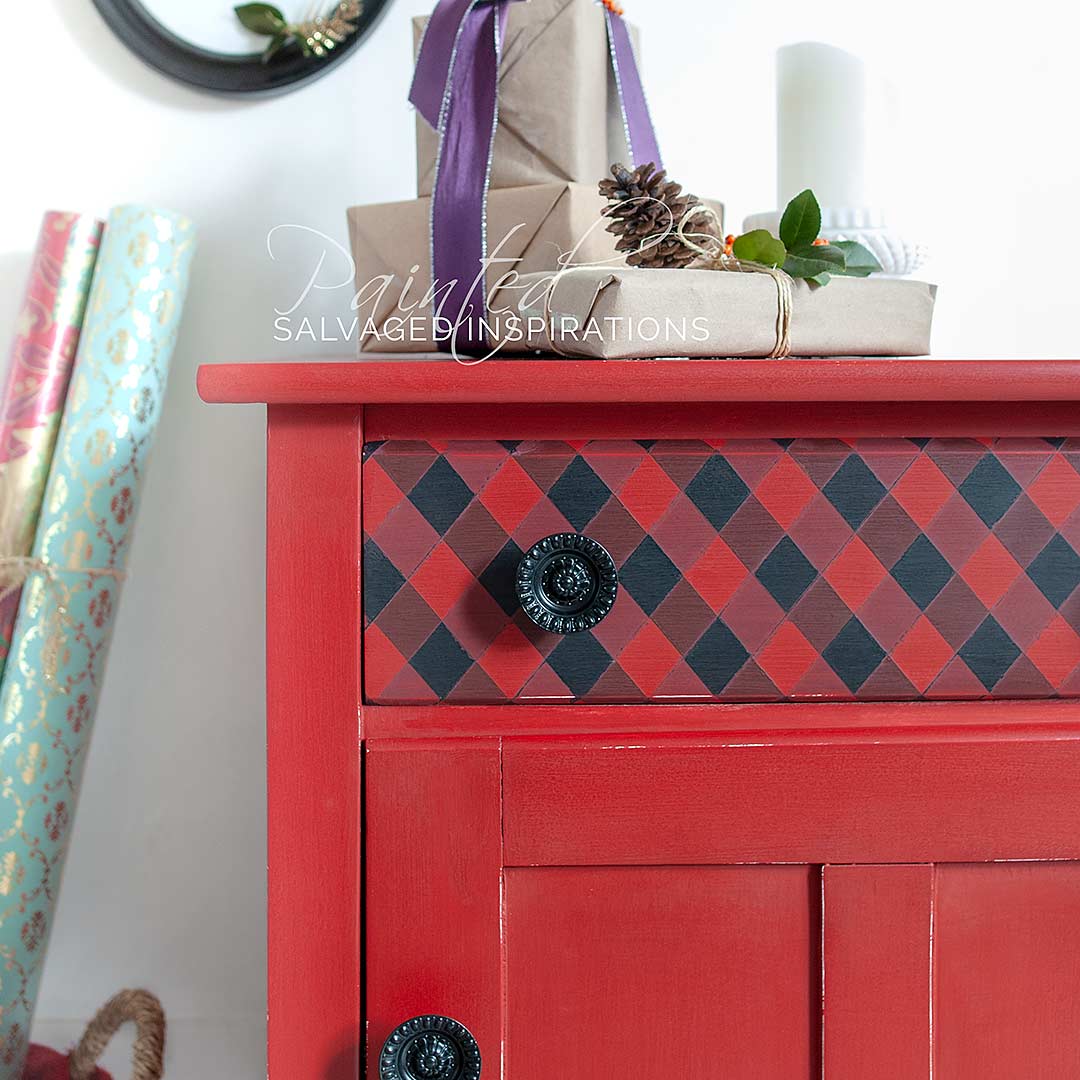
Once all the tape was laid out, I cut Barn Red with Caviar Black (approx 50/50 but you can do whatever ratio you like the looks of) and painted in the stripes. Then I removed the tape and let dry.
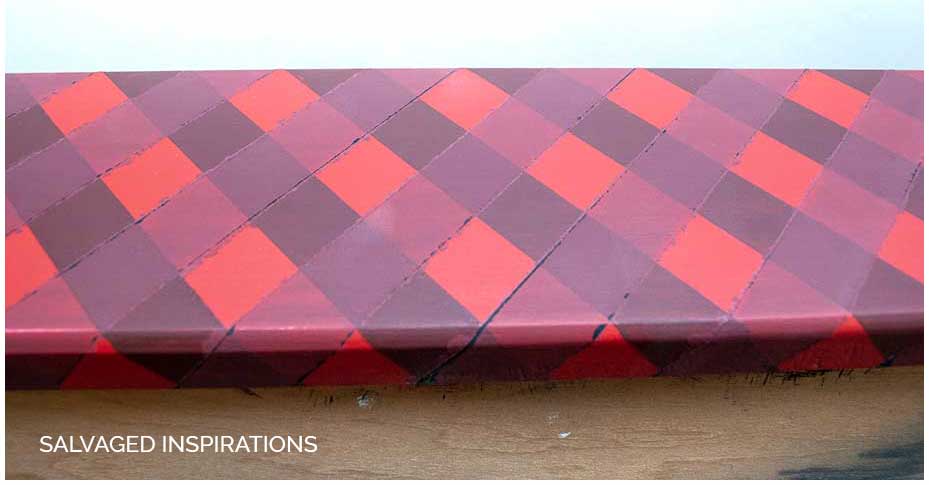
Step #4:: Repeat Step 2 and 3 In The Opposite Direction:
I repeated step 2 and 3 laying the tape in the opposite direction. The only thing I did differently in this step was I added some water to my 50/50 mix of Barn Red with Caviar Black to make the second set of stripes look more translucent.
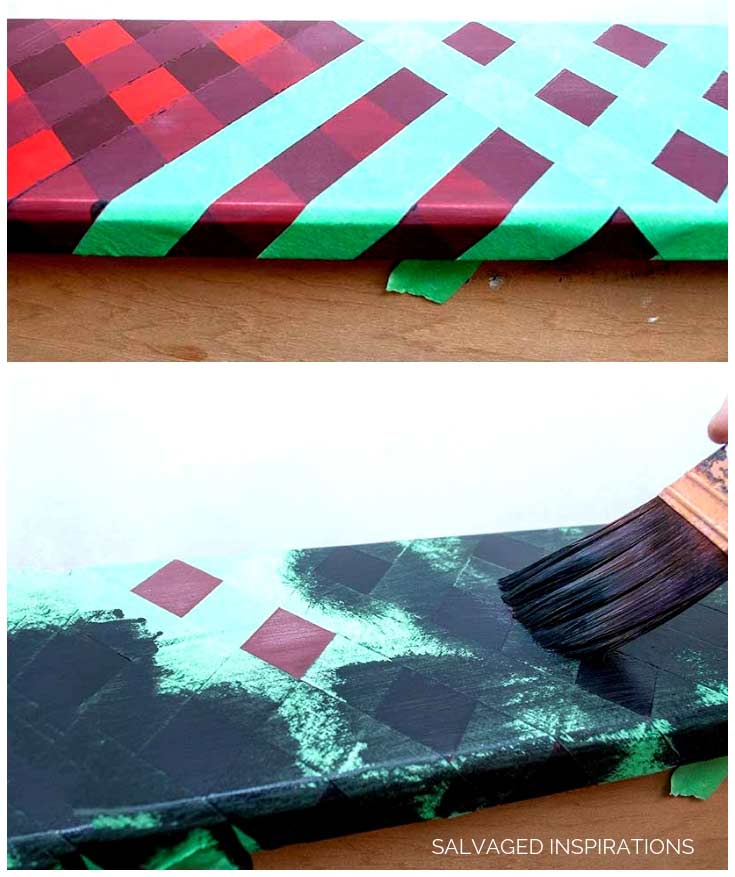
Step #5:: Add in Black Plaid Checks
To add the final black checks, I laid the tape following the diagonals in both directions leaving the translucent squares exposed. Once they were all laid out, I painted the final color.
Tips – Use fast drying chalk paint if you want to save time and speed up your project.
Also, if you didn’t want to bother with laying the tape, they do sell Buffalo Plaid Stencils that would make this painting technique fast and easy. I really like this one here. It’s a good size for furniture so I might just have to buy it and give it a try. 😉
I hope this Buffalo Plaid inspires some ideas for your upcycling projects. You guys always inspire me so thank YOU!
I’D LOVE TO HEAR YOUR QUESTIONS AND/OR TIPS. FEEL FREE TO CHIME IN… I ALWAYS LOVE HEARING FROM YOU. 🙂
Happy furniture painting my friends! 🙂
Denise x
ps – And before I forget, I’m FINALLY on Instagram now…. better late than never right! If you’re on IG too, I’d love for you to shoot on over and follow me so I can follow you back. 🙂
RELATED POSTS::
QQT – An Easy Way To Paint Stripes On Furniture
Buffalo Plaid Stencil
7 Furniture Stenciling Tips
Layering Chalk Paint | Empire Makeover
How To Paint Furniture WITHOUT Brushmarks!
PIN AND SHARE!


I just love this project, and want to re-create it!. However, when I copy your pictures, and try to paste them onto my document page, I get a blank, black block. Do you have your pictures protected so they can not be copied?
Hi Donna! So happy you’re trying this project. The settings may have been set up so pics can’t be saved because they are all copyrighted Donna. Hopefully you can pull them up on your lappy or ipad and use them. 🙂 I’d love to hear how the project goes for you. 🙂
Just came accross your tutorial. I had a small night stand given to me so I am transforming it into red and black buffalo plaid to use in our rustic Blue Ridge Mountains rental cabin. I’m almost finished and it looks so cool. Thank you?
A black and red buffalo plaid piece is going to look AMAZING in a rustic Blue Ridge Mountain cabin (which sounds fabulous btw!)… enjoy, and thanks for reaching out! 🙂
I know I say it a lot, but it’s worth repeating in my opinion; your readers are SO blessed ( myself included of course!) by you, your willingness to share your incredible talents not only by photo, but with FREE tutorials?!?! Seriously amazing, miss beautiful inside and out! Hate to turn this on me ( but I’m going to lol) I too decided THIS year I want to do buffalo plaiid for my front porch decor as I’ve always really loved it. . You said it though, it’s EVERYWHERE this year 🤦♀️. I don’t like to be trendy so I nearly changed my mind, however IF Denise can and is doing it, then by gosh I am too❣️ LOL
Every time you leave a comment you make my day Amy! I feel SO blessed to have readers like YOU! And as for trying trendy trends….lol…if you like it, why not?!?! It’s just paint – so it can always be changed down the road. Have fun and I’ll bet your front porch decor is going to look AMAZING! xo
I’m such a sap for anything red. I’d love this on my back poach.
Thanks Roseann, glad you like it! 🙂
Wow! I love that! Thank you for sharing all your techniques! I will be able to apply these tiles of any color eventually. Love!
Thanks Martine, and ya, they would look great in ANY color combo! I’m glad you’re finding the furniture painting tutorials helpful. Woohooo! 🙂
Oh I forgot to ask what you did with the harp from the mirror? If nothing do you have plans for it?
Ah, nothing for now but it’s in safe keeping. 🙂 I know I’ll use it for another upcoming project for sure.
Ok this is just awesome! You must have a lot of patience because something like that you would need it. The black knobs almost look like old checkers…beautiful just beautiful!
Thanks so much Shirley! It actually went quicker than I thought. The Dixie Belle Paint dried pretty fast. 🙂
Love it! You are so CLEVER! Having the check on the diagonal make it a bit different from everyone else! 😍 😍 😍
Thanks Lorin! When I was laying them out I much preferred the diagonal for this piece!
So cool looking. Great job Thanks for sharing
Thanks so much, Julie! x
Buffalo Plaid and Red – the perfect combination! Love love this makeover, Denise and swooning over the black knobs you used too. Pinned 🙂
They are old knobs I had from another makeover that I spray painted black! Thanks for the pin my friend. xo
This is so cute! Looks hard 🤪but I’m probably going to try it, too cute not to!!!
Thanks Susan! If you take it step by step it’s really easy. But I have to admit when I was trying to figure everything out in one shot… I couldn’t do it! 🙂
LOVE, LOVE, LOVE! I ‘ve only used it with fabric. Not daring enough for something permanent. You did a great job!
Thanks Jeanne and I love all the fabric options in plaid. I even saw the cutest pair of high heeled shoes online… not that I’ve been wearing heels a lot lately lol
Already following you on IG. 🙂 And this buffalo check is adorable and festive. This is a great idea for a Christmas sign for my front porch. Thanks!
Yaaay, thank Nicki! 🙂 And have fun with your buffalo check sign. I bet it’s going to look great. 🙂
Love, Love , Love this! I’ve been waiting for the right piece to try this! You did a great job as usual. 🙂
Thanks Lynda! And so was I! I didn’t’ want to overwhelm myself by trying this on a large piece so the drawer was a good start!… a confidence builder. 😉 Hope you find a great piece to try it on!
Holy smokes Denise! I’m in total awe over this one. Everything is spot on. You’re so talented with vision. 🙂
Thanks! Your buffalo plaid mason jars gave the little nudge I needed…. so thank you! 🙂
I love it! Thanks for the easy to follow instructions!
Pleasure Jane and thanks! It was super easy… just takes a little time in between for dry time. Hope you’re staying dry today btw. 😉
Wow Denise! What an adorable little wash stand. I LOVE LOVE LOVE the Buffalo Plaid /Checkered pattern and you nailed it:) I’ve been seeing it everywhere too. Thank you for sharing your technique and I’m looking forward to following you on Instagram.
Thanks Monique! I think its kinda cute too. 😉 And thanks so much for the follow. MUCH appreciated!!! XO