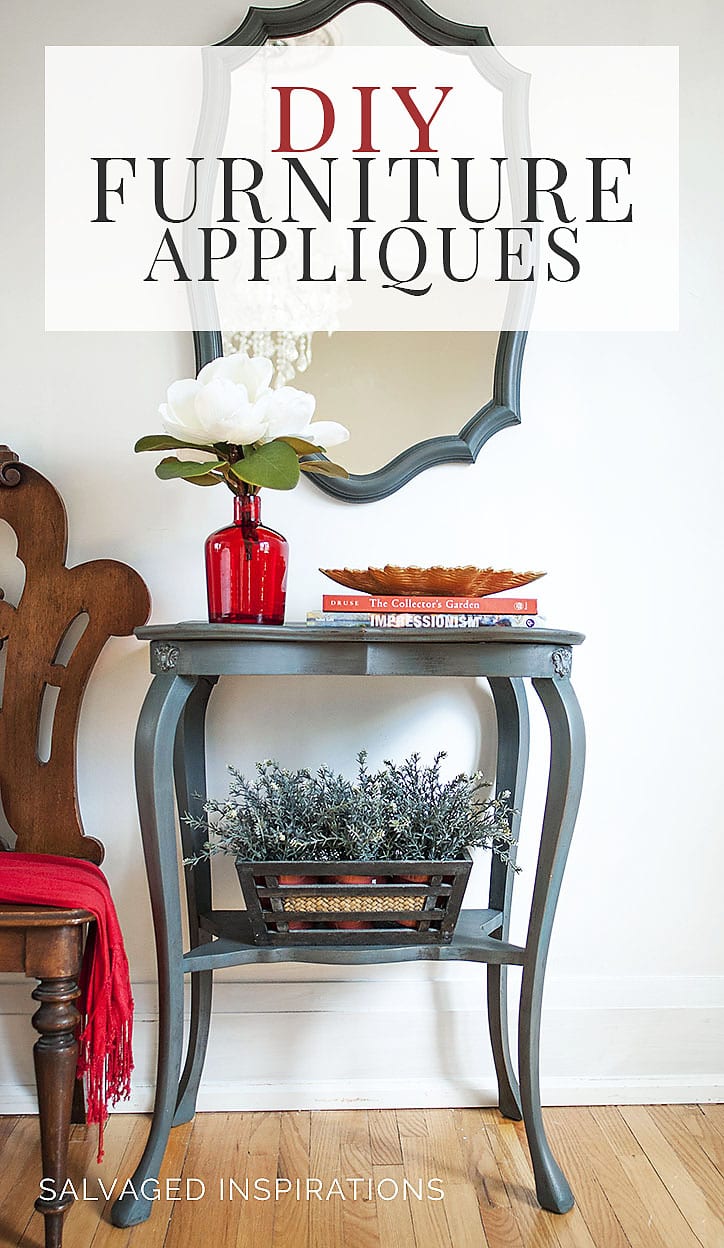
Hi friends! Have you ever considered making your own DIY furniture appliques? I’ve been buying wood or resin ones up until now, but today, I’m sharing my first try at using Iron Orchid Molds. It seems like a really easy and cost-effective way to make your own.
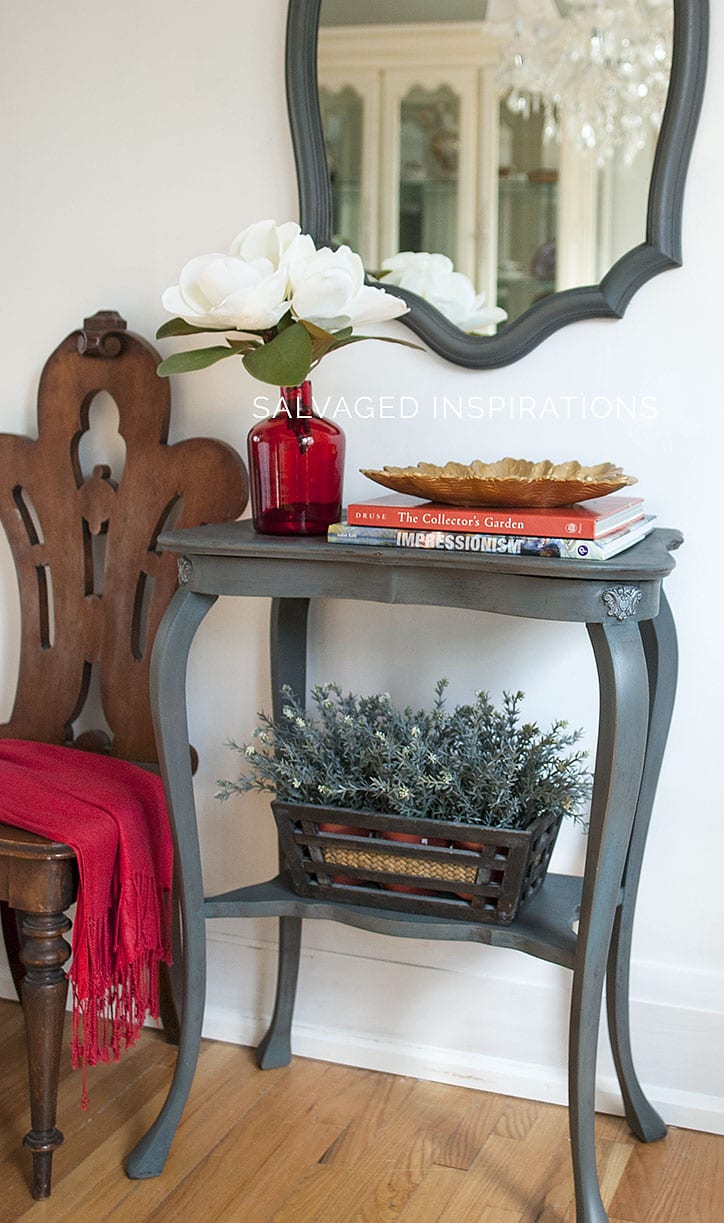
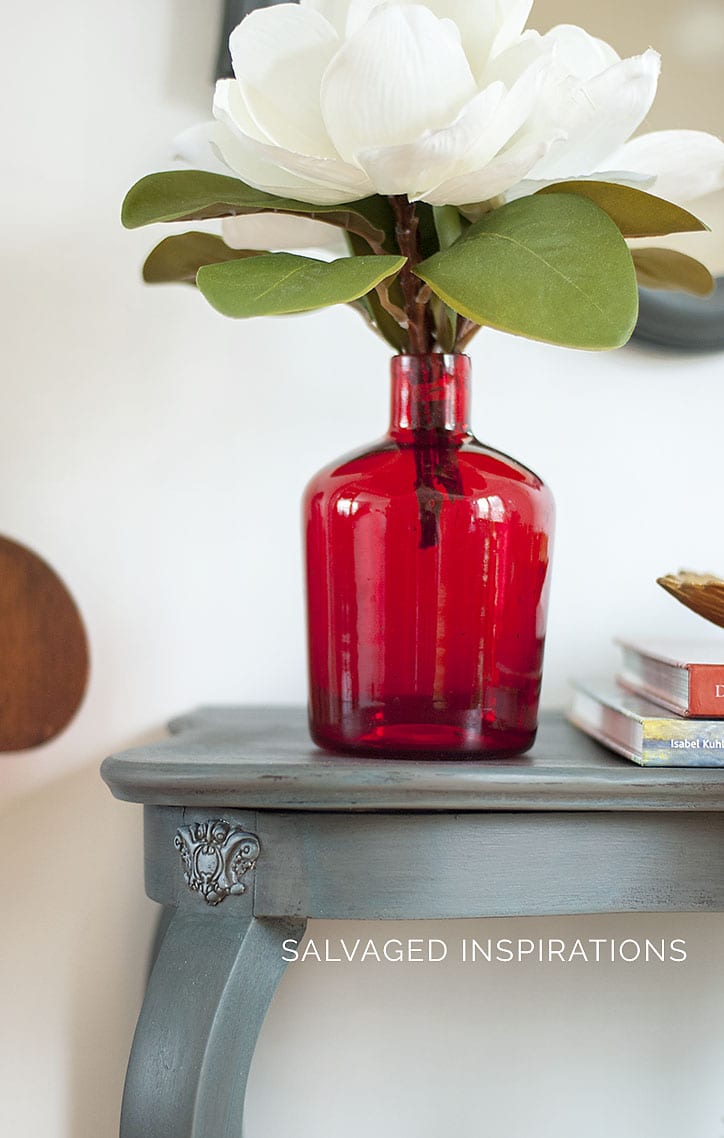
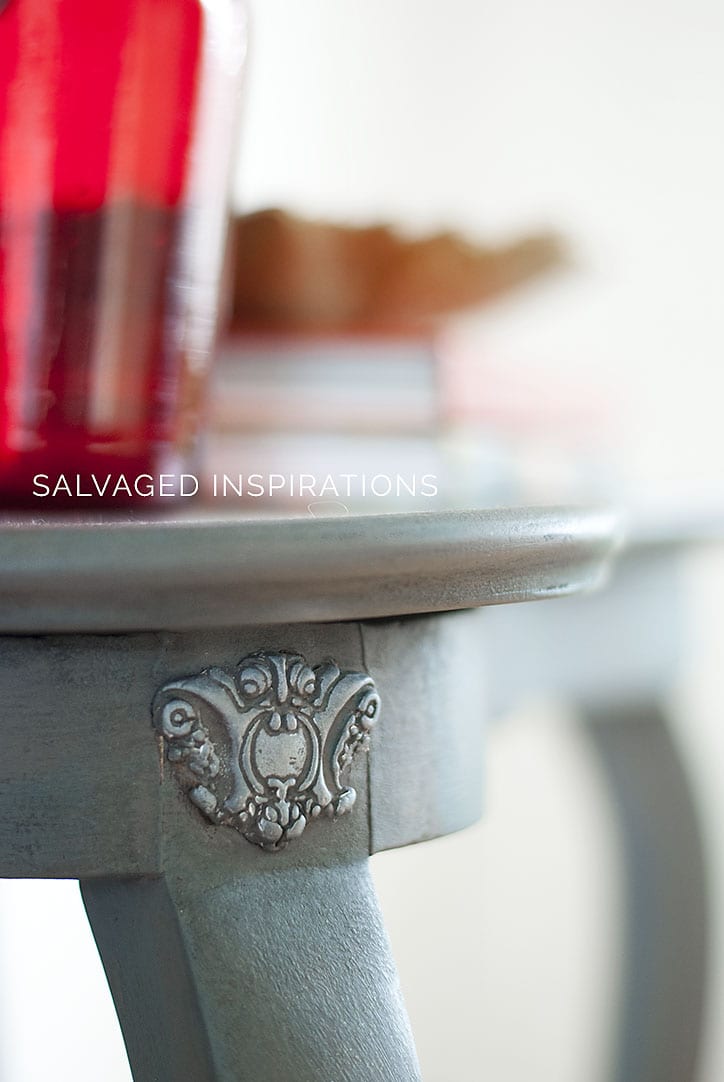
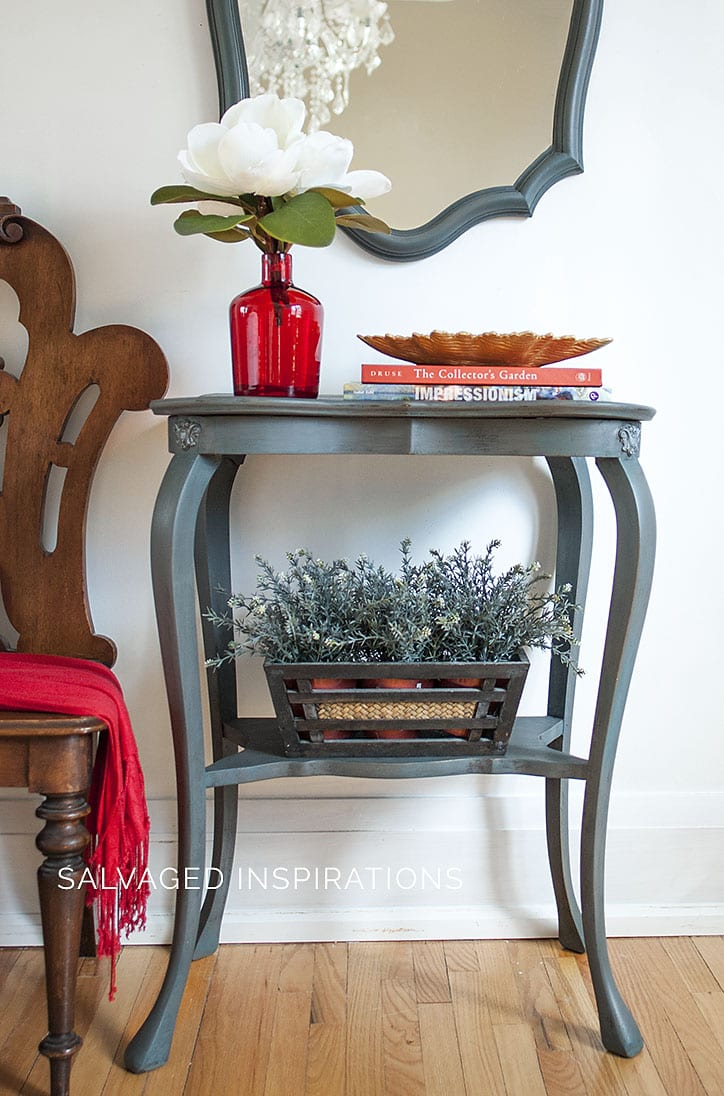
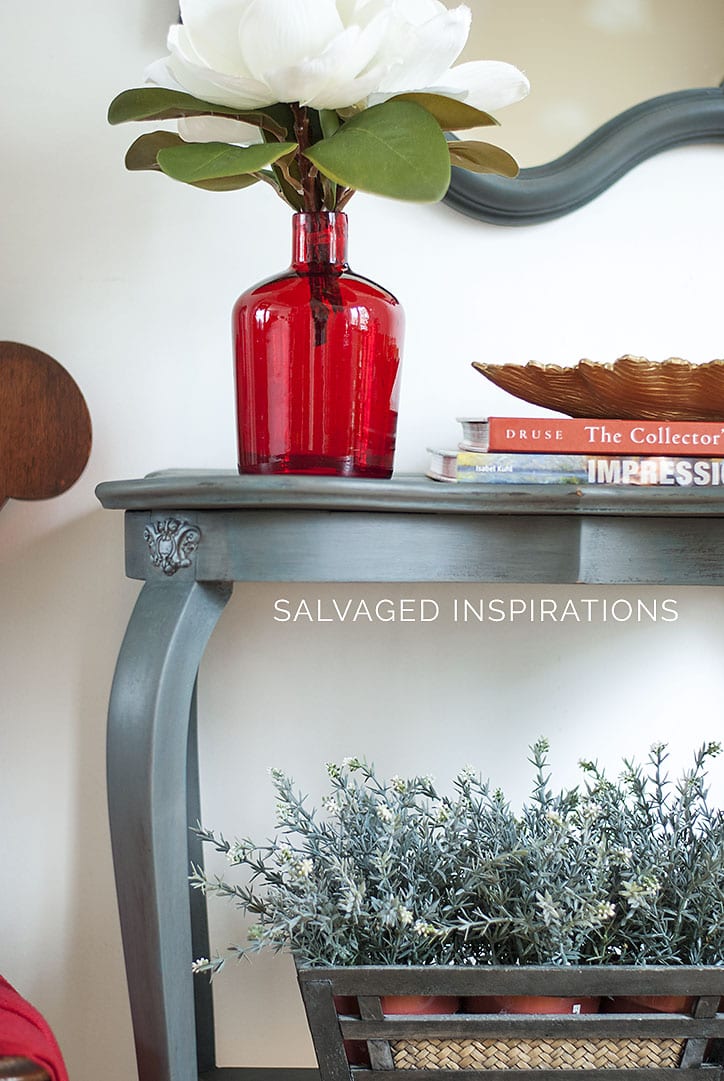
This entry table and mirror makeover is restyled for my sister Andrea. I have to admit, I prefer testing out new products on my own furniture (or someone close to me) before I use it for my clients. This way I can see how it reacts and holds up over time. So far, so good. 🙂 I used a small IOD Vintage Decor ‘tester-applique’ on each corner of this table. It really does add some interest to the overall look!
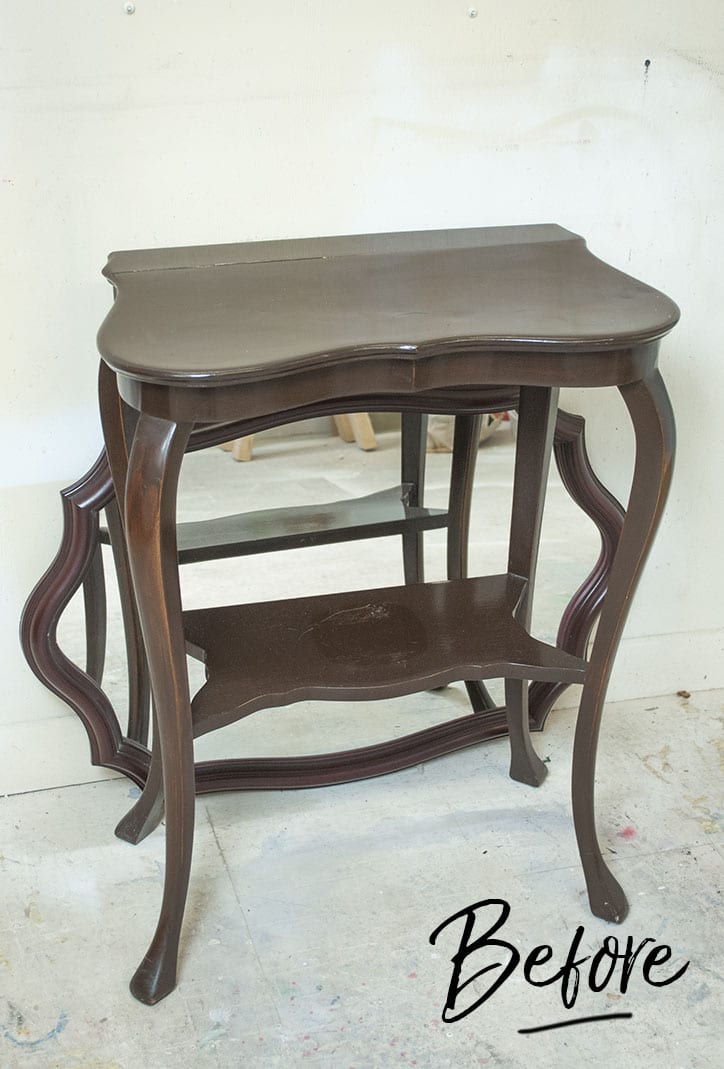
Here’s what we started with…
 THIS POST CONTAINS AFFILIATE LINKS TO PRODUCTS I USE. YOU CAN SEE MY FULL DISCLOSURE HERE.
 THIS POST CONTAINS AFFILIATE LINKS TO PRODUCTS I USE. YOU CAN SEE MY FULL DISCLOSURE
 SOURCE LIST
- Entry Table + Mirror ( Sister’s Salvaged Set)
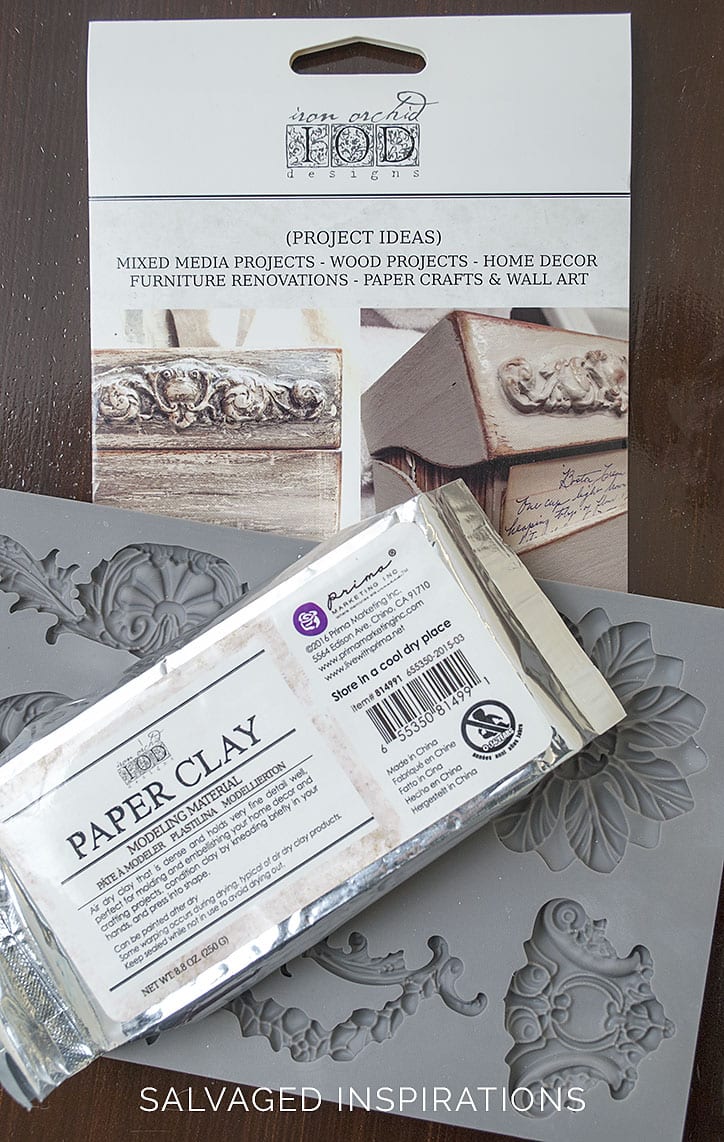
- Iron Orchid Vintage Design Mould
- IOD Paper Clay
- Sand Paper & Glue
- Chalk Mineral Paint – I used these colors here and here
- DB Black Wax
- Stirling Silver Gilding Wax
HOW TO – DIY FURNITURE APPLIQUES
I’m sharing the DIY applique process below, but if you’d like more info on the painting technique, you can see more here and here.
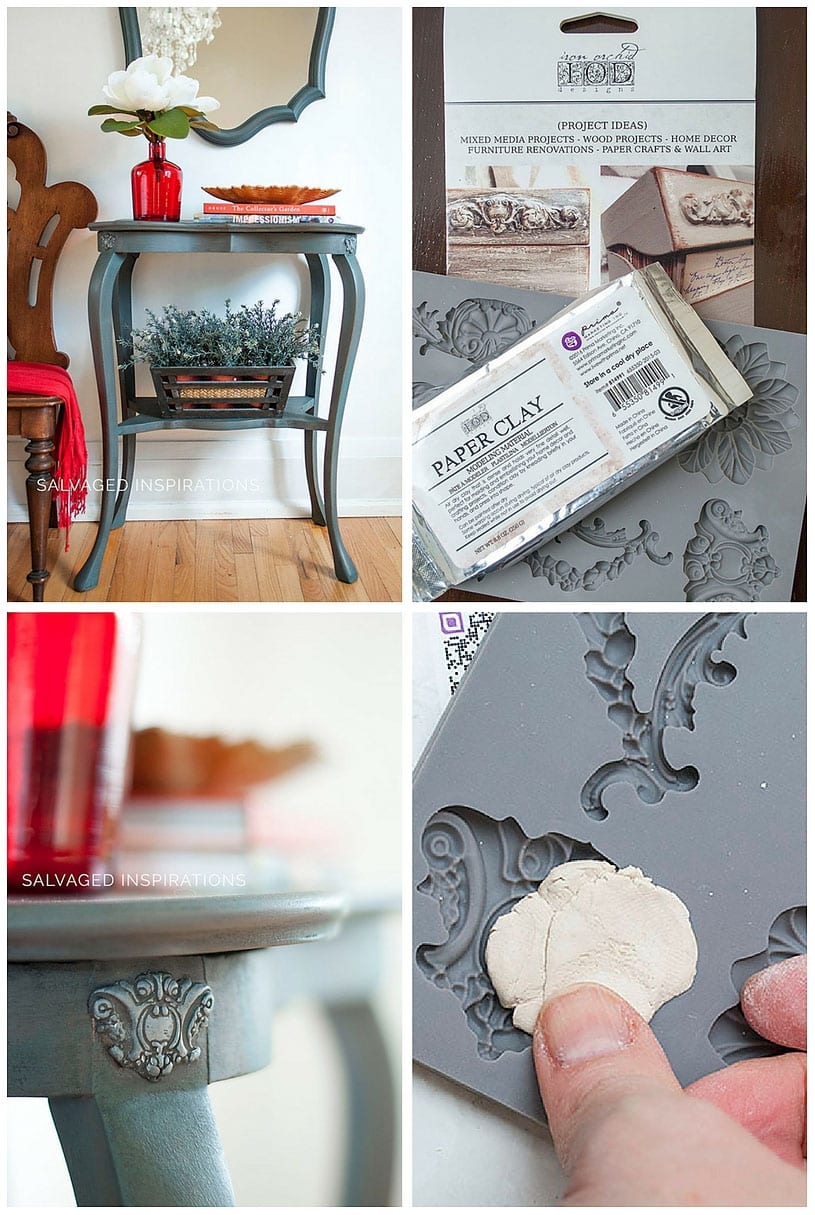
Step #1. Sanding and Prepping
I cleaned and lightly sanded the table to make sure the applique had a good surface to adhere to.
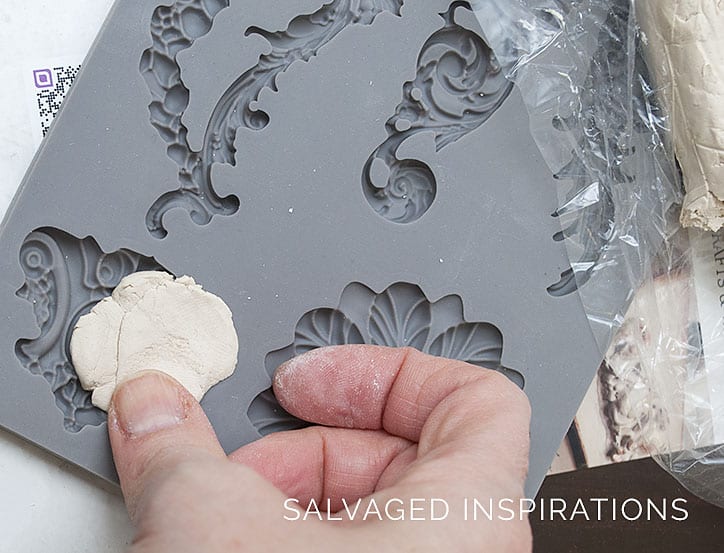
Step #2. Kneading the Paper Clay
Right out of the package, the paper clay is a little hard. It could be because I stored it in my studio – aka my basement – which is always a little cool. I tore a small corner off and kneaded it until it warmed up in my hands. This is FUN friends! It feels like playing with playdough – for real! And once it’s warmed up, it’s nice and flexible.
Step #3. Filling the Iron Orchid Vintage Design Mould
Pushing the paper clay into the mold reminds me of playing too. I was careful not to overfill it because I didn’t want to have to trim off any excess. I used just enough clay to fill the mold perfectly and then smoothed it out so the entire design was filled and covered. I also made sure the top (or back) was smooth and level with the mold.
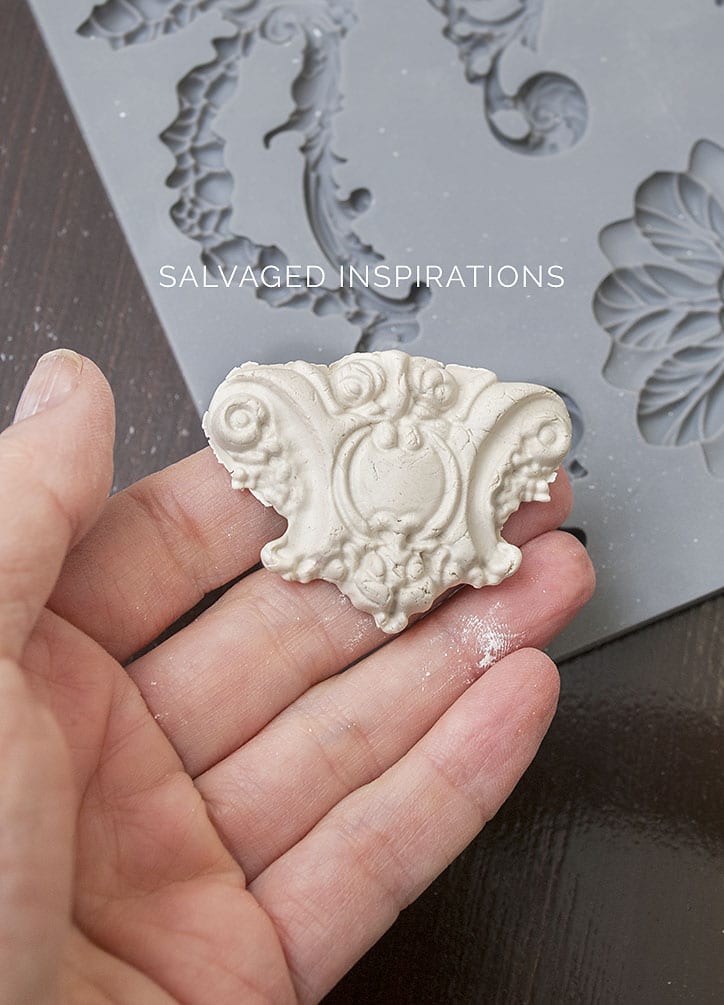
Step #4. Removing the Clay Applique
The Iron Orchid Vintage Design Moulds are very pliable, so removing it is super easy. I bent the mold and popped it right out.
Step #5. Gluing the Applique On
While it was still moist and pliable (you don’t have to wait for it to dry) I glued it onto the entry table with this Wood Glue. Any type of glue applicable to your project will work. To make sure it doesn’t slide around while drying, I used a low-tack piece of painter’s tape to hold it in place.

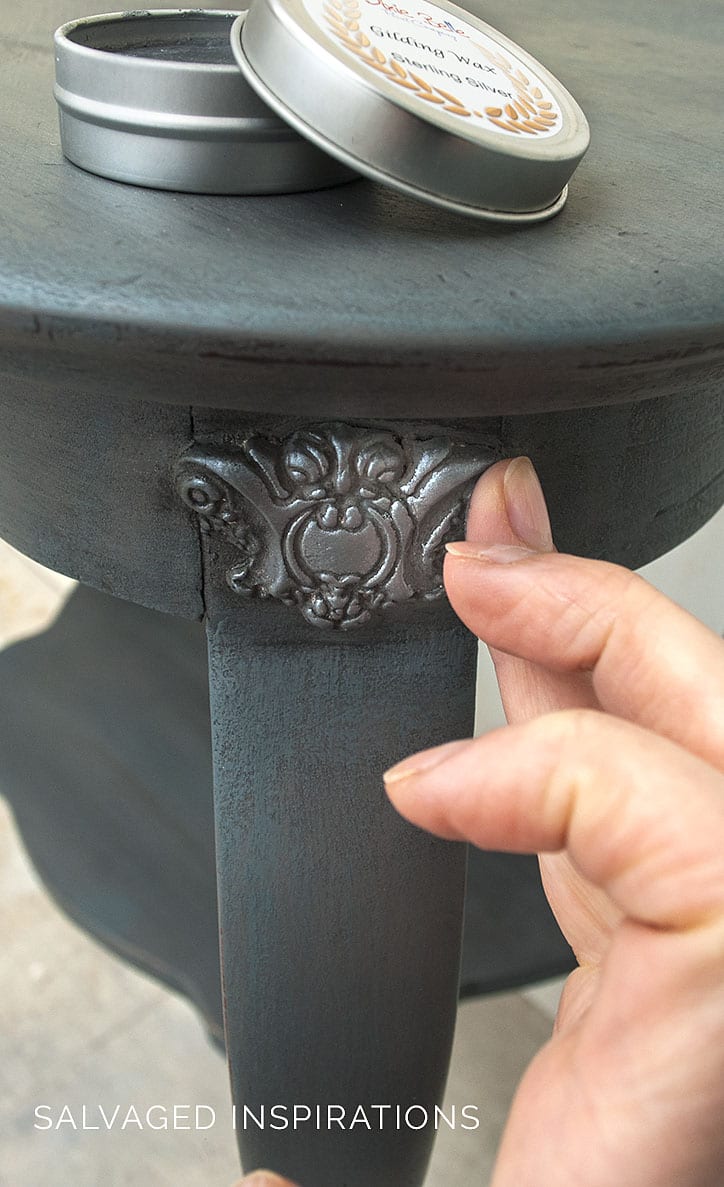
Step #6. Paint and Topcoat
The entire piece was painted with DB Hurricane Grey and Stormy Seas, and then top-coated with this Black Wax. To add a little distinction to the appliques, I used Sterling Silver Gilding Wax.
Pro’s of IOD Decor Mouldings
Usually, moldings are stiff and can only be applied to a flat surface – but I love that these are pliable enough to form the back of a chair or a curved leg on a table. Those of you who have hung around the SIBlog for a while now know I’m thrifty, so I love that these are cost-effective. I used a small amount of paper clay for the two small appliques. I’m guessing there are probably another dozen (at the very least) left in this bar of clay. For the $15 Iron Orchid Vintage Design Mould and the $8 paper clay Clay, that rounds out to be around $1.90 per applique! Can’t beat that price.
I also like how versatile they are. They can be used with paper clay, resin, epoxy, soap, wax, and even chocolate because they’re food safe! You probably want a ‘food’ designated one if you’re into that though.
Cons of IOD Decor Mouldings
The size is limited. I haven’t seen any really large molds.

I’D LOVE TO HEAR YOUR THOUGHTS ON THIS MAKEOVER…OR IF YOU’VE EVER TRIED IOD DECOR MOLDS. IF YOU HAVE ANY TIPS YOU’D LIKE SHARE OR HAVE ANY QUESTIONS, FEEL FREE TO CHIME IN… I ALWAYS LOVE HEARING FROM YOU!
Happy painting have an inspiring day my friends!
Denise x
PIN AND SHARE!


Hi Denise!I’ve just discovered your amazing site. I have a question, do you know/recomend another material to create this appliques? One thing more, If I wanted to make the frame of an old mirror with a large mold, what material would you advise me? Plaster for example? Thanks for your teachings.
Hi Juliana! Silcone works amazing and I have a video tutorial you can check out here. 🙂
do you prefer the paper clay or silicone for the prima molds? Or no preference?
Both work well but I prefer silicone. I find it more durable because I like to pour the casts in advance so I have them on hand for my makeovers. I’ve found the paper clay shrinks over time and also will warp if there is any humidity.
How is the durability of the paper clay molds? Do they crack and chip off?
My sister has been using this as an entry table since I wrote this post. Keys, dog leash and everything else you can think of end up on it so it’s been getting high traffic use. The molds/appliques have held up perfectly. I’m guessing if they were hit [impact] in just the right place they would crack… but for everyday normal use – perfect. 🙂
I am a new subscriber and boy am I glad I ran across your site!! Love the entryway table. I’m fairly new at furniture redoes, so I have a general question for you. Can you decopauge over a surface that has been waxed?
Hi Miriam and a BIG WARM WELCOME! 🙂 Wax is always the very last thing that should be applied, so no. I wouldn’t advise it. Better to decoupage, wait till it’s a 100% dry, then seal with wax. Hope this helps. 🙂
Hi beautiful job !!! Love everything about it
If I may ask where did you purchase the paper clay
And the molding?
Thank you
Thanks Antoinette! I got mine from The Painted Bench. You can buy them online or retailers… I think Micheals and Hobby Lobby sells them too. 🙂
Hi Denise: I just came across your site and you have great taste. Can you tell me please did you mix the two colors of paint or just use one stormy seas for the table and the grey for the applique? Thank you.
Hi Mimi! First I painted the entire table with Dixie Belle’s Hurricane Grey. After it dried, I layered on DB Stormy Seas. Both colors/layers were painted over the applique as well…and then I also silver wax to the applique as well.
I’ve been wanting to try this method of making the appliques. I saw a video on Youtube this morning and it looks easy and pretty fun. Think I’ll give it a try. Thanks for the encouragement. !!
Pleasure Gloria – and I’m sure you WILL have fun! Feels like playing. 🙂
Did you apply the silver wax over everything? Was this the last step? or did you apply a clear coat as the final? I can’t wait to get started!
Hi Cathy! 🙂 I applied the Silver Gilding Wax very last and then let it dry overnight, then buffed the next morning. But you don’t need to wait.. it’s just because I work late at night and pick up where I left off in the morning. When the light hits it just right, it looks amazing. 🙂
Love the that color! I love so much it’s in the entry, over the fireplace. I painted 2 nightstands and a dresser for our guest room with it.. Great tutorial as always!
Hi Lorin! I love your taste. 🙂 Your nightstands and dresser must look amazing!!!
Great job with paint colors. These appliques are fun to make, I’ve made them for a couple of pieces, stand up well and the best part is that you can use them on curved surfaces too. I’ve made both paper clay ones & Durham’s Rock Hard Water Putty ones. Great easy tutorial.
Omgosh Tracy…I JUST bought Durham’s Putty from a Home Depot cross border! That’s the wood filler with the weightlifter on the label… and you mix with water, right? I think I paid around $3 for it so that would be amazing if it works with these IOD moulds!!! Curious, are they as flexible as the ones made with paper clay?
Yes, that’s the one. No, they’re not flexible cos you can’t remove from the mold till dry r they will crack & fall apart as you remove them. Nice to have another option (even cheaper) for flat surfaces tho.
Okay, good to know! Thank so much. XO
I’m loving this alternative to expensive wood appliques! Added to my must-try list. The entry table and mirror makeover are stunning and as always, love the way you styled it!
I’m loving it too, definitely more cost effective for sure! And they’re a lot of fun. 🙂
I would like to find a source for wood appliques for a 1910 oak dresser.. So far just finding the molded phony ones. This is a fairly common dresser but appliques break and fall off and are kind of large. Thinking of just putting on bits and pieces and calling it good😂
Hi Cheryl! I’m not sure where you’re located but Home Depot, Lowes, and Lee Valley have a selection of wood appliques. If you want an extensive selection, there are online resources Architectural Depot. Hope this helps and have fun with your oak dresser. 🙂
Your timing has always been a dead ringer for me! First of all, when I see your post in my inbox I can barely wait to open it! Even if I don’t have time, I open it look real quick and always go back to read and or pin and save your work. I’m a bonafide fan! I am sending you an email as well, bc I have this piece that I’ve painted three times and I’ve explained in the email, however it’s sitting with just Stormy Seas on it and when I opened this post I was like that has to be Stormy Seas with something else and I love it so I have a couple of quick questions with a pic that I would absolutely love your two minute opinion on if you would be so kind! So many times you post something and I’m like that’s just what I needed! Thanks for your amazing timing and inspiration! You’re a rock star. I send tons of friends venturing into furniture painting to your site!
Hi Kim!!! You always put a big smile on my face… thank YOU! 😀 I checked my email and I don’t see yours. Feel free to send one out again and I’ll keep my eyes peeled. Have a great night. x
I had a hard time getting into your email? I left a post which I realized I should have left a “message” on your Facebook instead☺️
Okay, I’ll go take a peek. 🙂
Denise, this is positively brilliant! It’s just the diy idea I have seen! Thanks girlfriend!
Please keep your ideas coming, Suzanne
Yaaay, thanks Suzanne! I think it can really add some interest to an otherwise plain piece – on the cheap to boot! 😉
Lovely make over! I love the colors you used. I have used IOD molds with the paper clay to add to a few pieces and they turned out great but I had a few tries to get them right. You are correct about not over filling the mold. In order to save mine I had to sand off areas on the side and bottom. Another error I made was taking them out of the mold before fully dried. I thought putting them on a paper towel to finish would work but the ends curled up and there was no saving them once hard. I love making these! I too wish they had a larger design.
I kind of wish they had larger designs too! But maybe there’s a reason… possibly it wouldn’t dry properly, or maybe would crack ?? Anyway, I love your tips Susan! I actually took mine out while it was moist and then glued it right away and then painted a few hours later. They are fun, aren’t they?!! 🙂
I absolutely love that. The ones made of wood are so expensive. I want to go back and read everything underlined. Just one question. How long does it take to dry before you can paint?
You turned that plane little table into a beautiful piece of furniture.
Thank you for teaching me something new this morning.
Hi Denise! They wood appliques are expensive and you can’t mold them to a shape – which is what I really love about these! I painted them after a few hours (I think it was 2 or 3 hours), BUT you can paint them right away… at least that’s what the IOD website/tutorial says. 🙂
The appliques add just the right amount of “extra” to the table, and they look so easy to make. Thanks for the directions and pix.
Pleasure Dyan and thanks! 🙂
Denise,
I really enjoyed this article on applying appliques, particularily ones that we can easily make.
Thank you once again, you have opened the door to another opportunity for us to be creative!
You can be SO creative with these. Furniture, jewelry, chocolate and probably a ton of stuff I’m not even thinking of. 🙂
Good morning Denise. Thank you for sharing. I’ve also added interest to tables and night stands with appliqués and decorative trim but I bought mine at Hone Depot. Not as much fun as making your own but it was very effective in taking old plain pieces to new rich looking pieces. Also Finishing with antique waxing.is perfect as well over black/red combo.
Love black/red combos with black glaze or wax! And ya, any type of applique or mold really can change the entire feel of a piece. I’ll have to check out my Home Depot to see what they have!
What a sweet little table and mirror set. Your sister is very lucky:) I love the interest the appliques add. Another beautiful makeover.
Thanks, Monique! 🙂 I hope my sister likes it… she’s seen it in my home and online, but I haven’t actually brought it to her house yet. I’m hoping it looks great in her entryway.