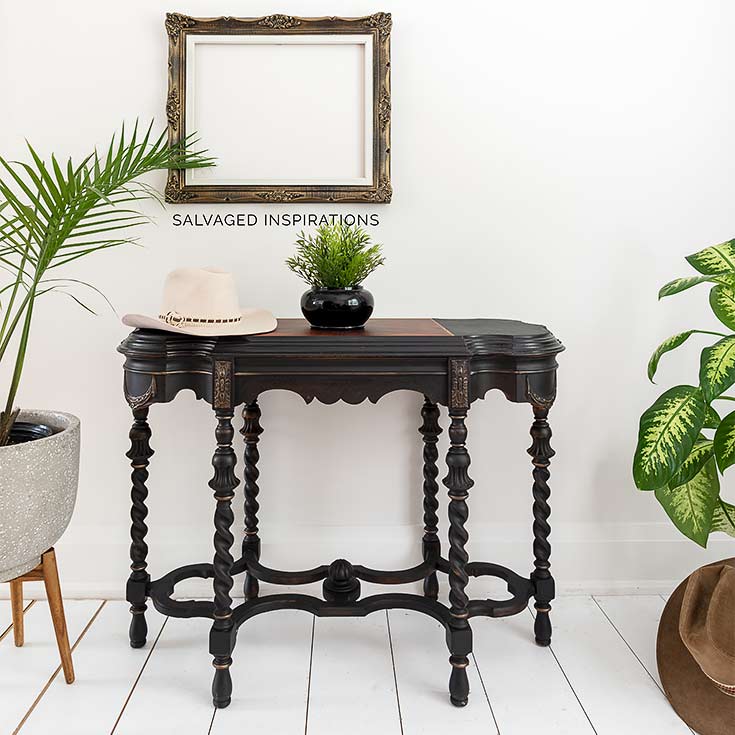
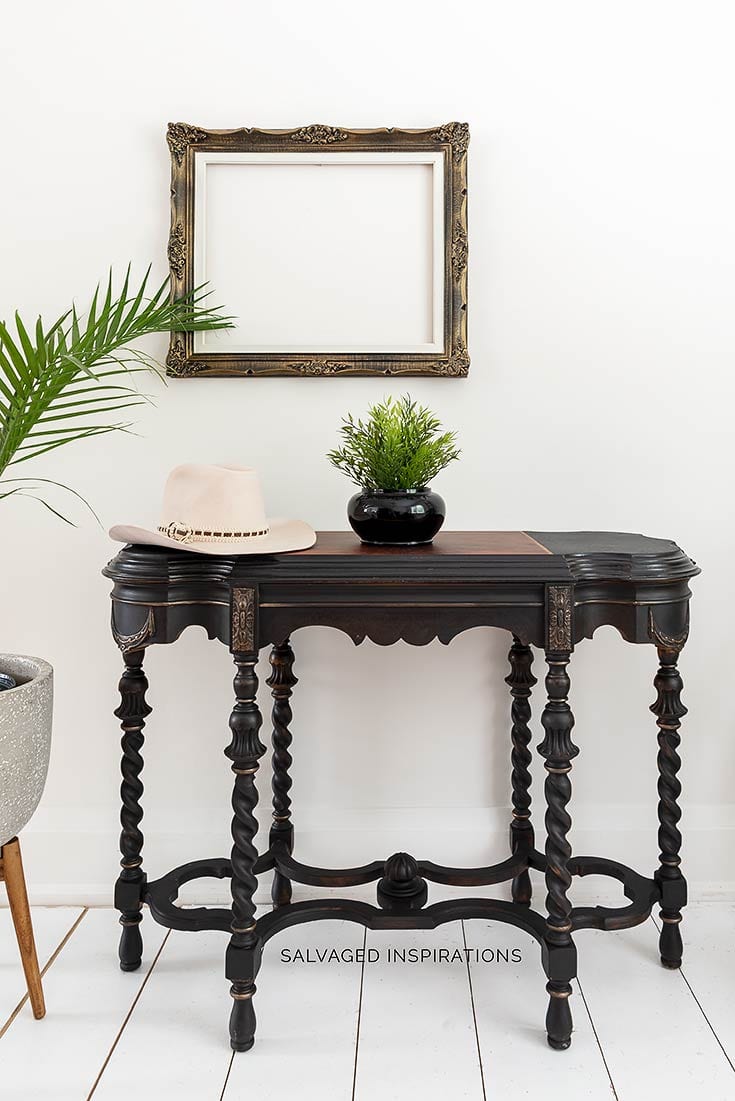
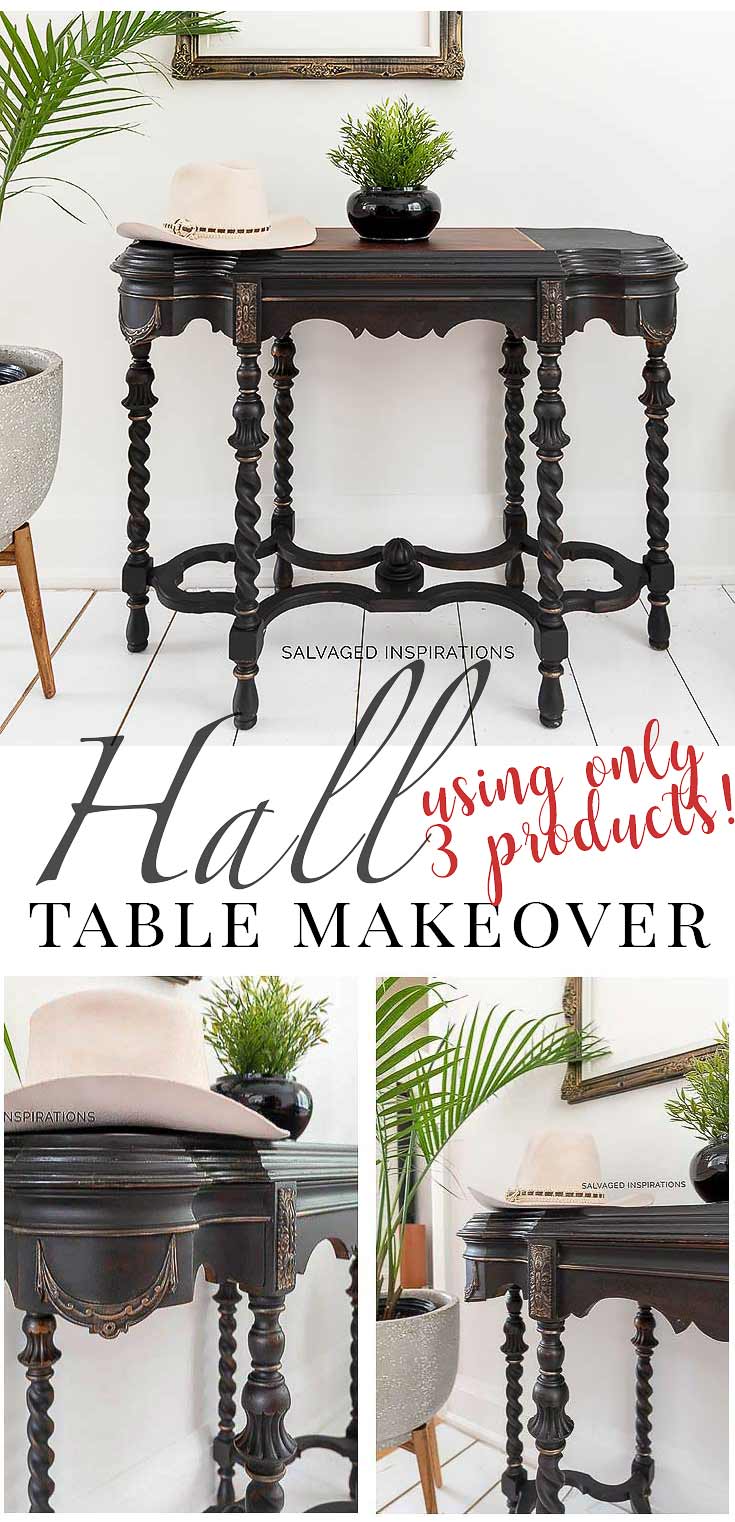
TODAY I’M SHARING A SUPER SIMPLE BEFORE AND AFTER. THIS ENTRY HALL TABLE IS STUNNING… AND I ONLY USED THREE (3) PRODUCTS TO GET THIS LOOK!
Hi SI family, thanks for joining me today! I spent the better part of last week resting and recovering from my weekend of teaching at the Redesign & Dixie Belle Workshop 2019. Recovering is the wrong word. Maybe coming down from the high of spending an entire weekend with the most fabulous creatives. I had such a blast and feel grateful I had the chance to meet everyone and be part of the event. That said, the jet lag was real. So rather than work on one of the large pieces I have in my inventory, I was looking for a simple makeover.
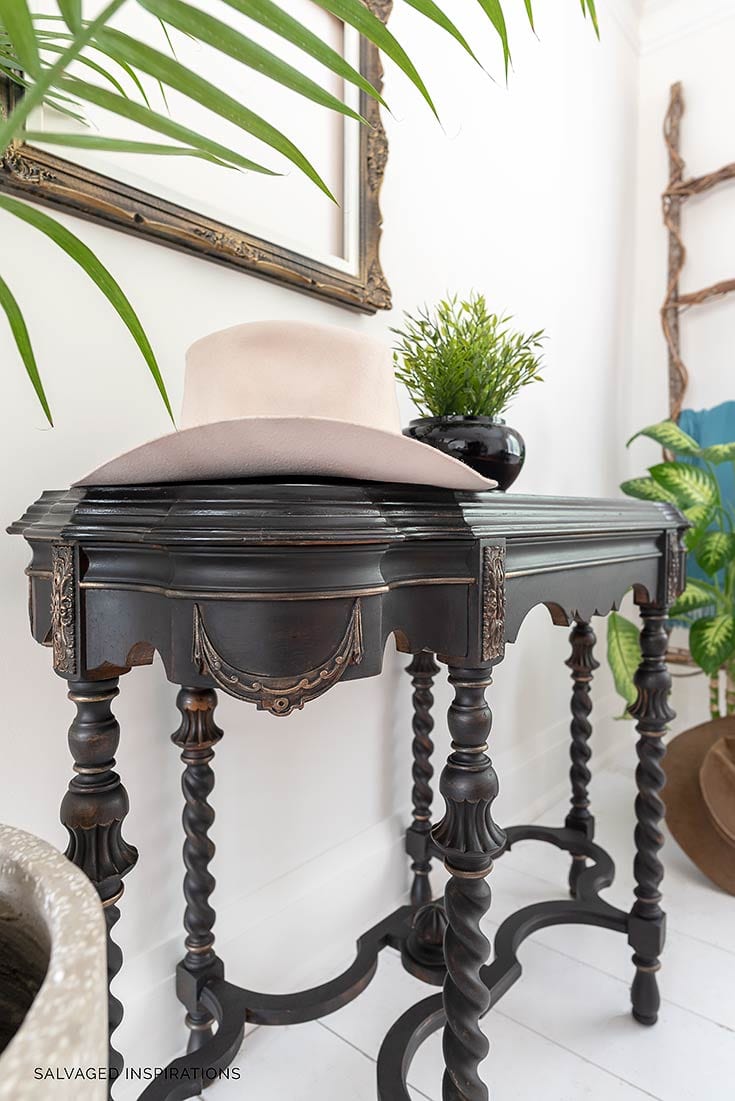
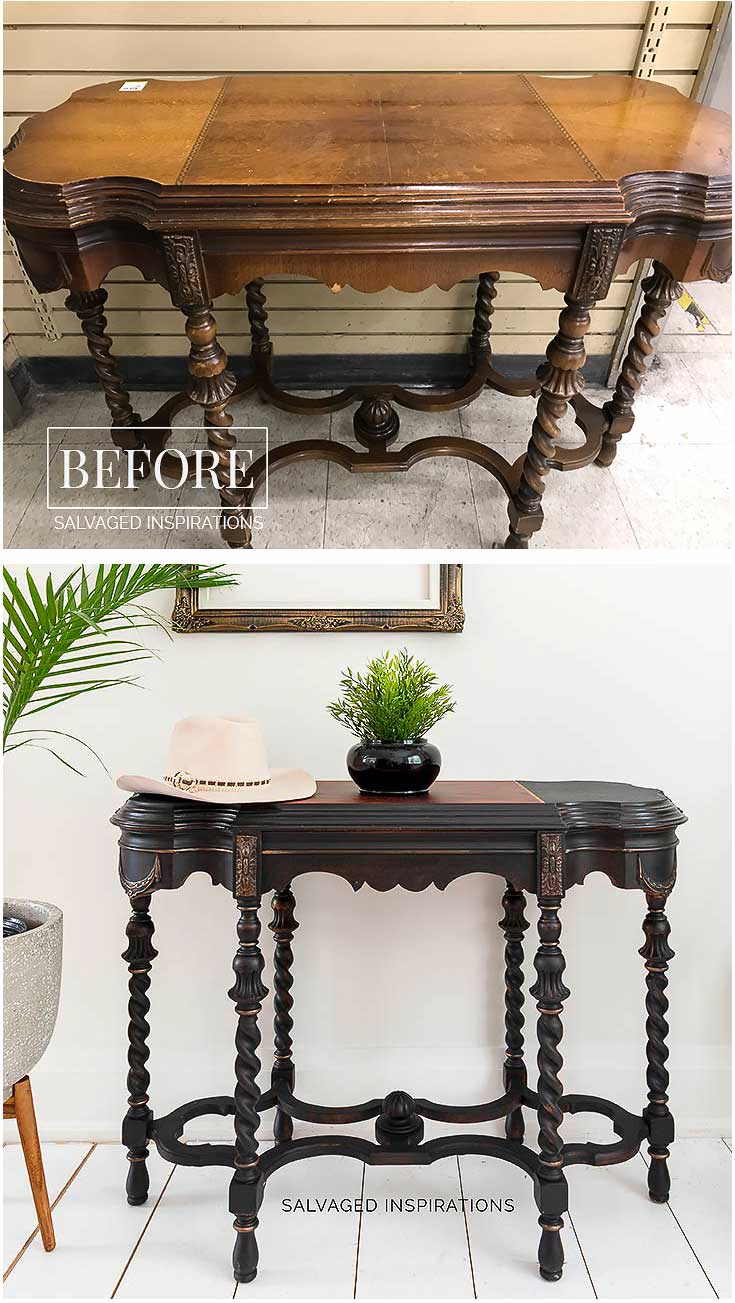
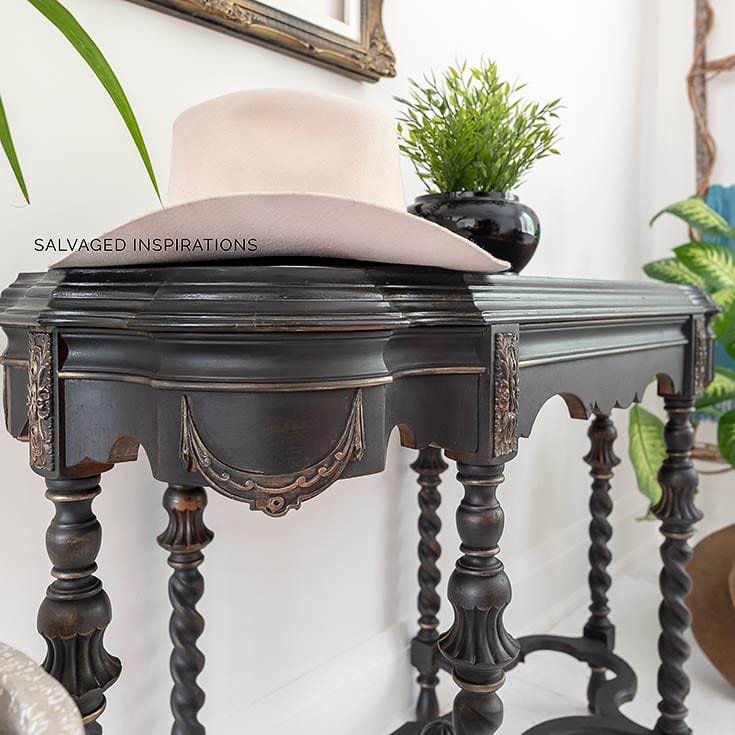
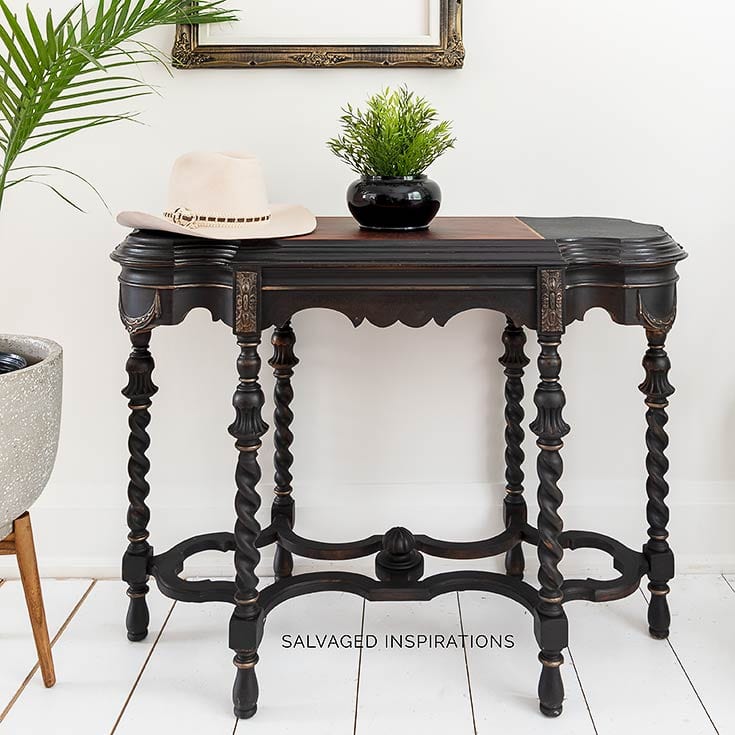
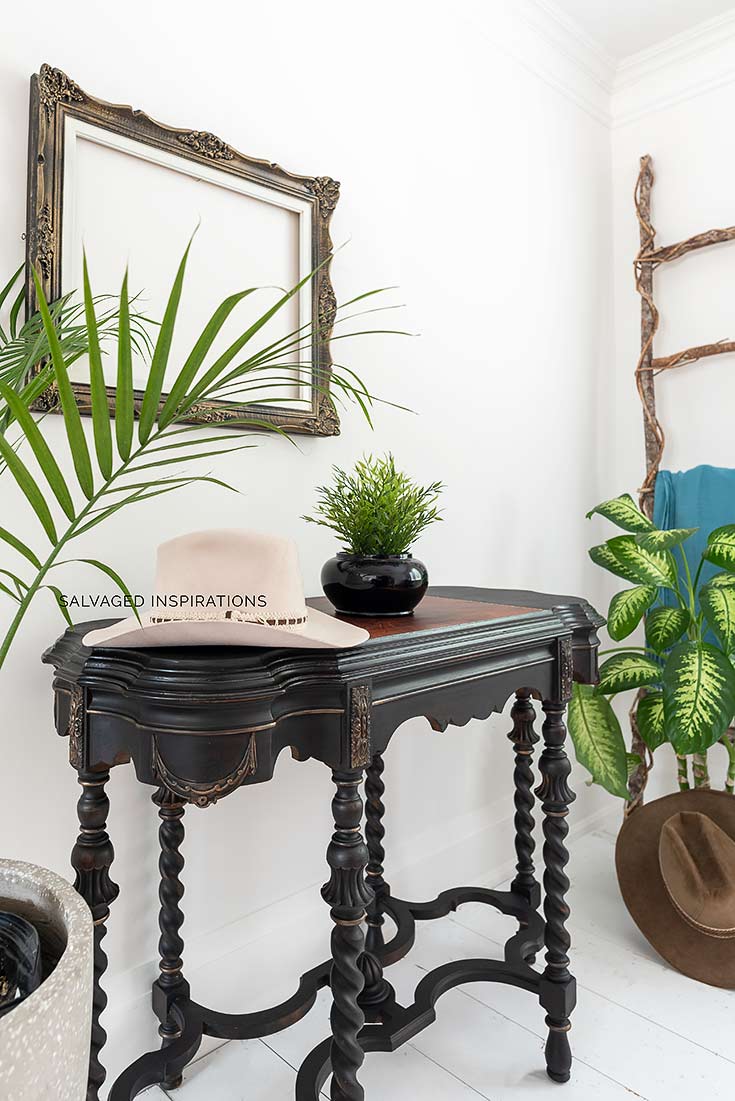
I can’t tell you how happy I was to come across this vintage entry hall table!
- Because it’s a drop-dead gorgeous piece of furniture.
- It was a steal of a deal. ($29.99)
- Because it was a super simple makeover and I only used 3 products to get this look!
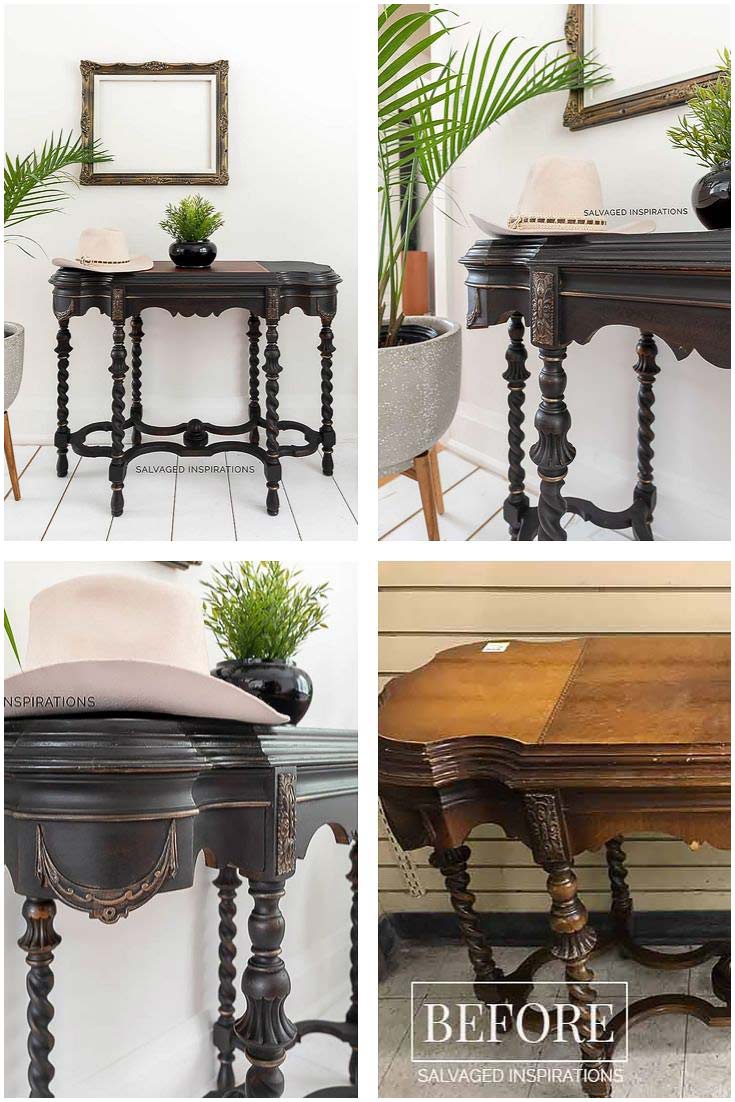
I keep telling myself I’m on a strict diet of existing inventory, but hey, who can resist a piece like this. Check out this before and after…
Aren’t these details beautiful?… and these legs!
THIS POST IS SPONSORED/CONTAINS AFFILIATE LINKS TO PRODUCTS I USE. YOU CAN SEE MY FULL DISCLOSURE HERE.
SOURCE LIST::
-
- Vintage Console Table – SALVAGED
- Paint Brush
- Dewalt Orbital Sander
- Sandpaper | Shop Towels
- Caviar Black Chalk Mineral Paint
- Hammered Copper Gilding Wax
- Hemp Oil
VINTAGE HALL TABLE::
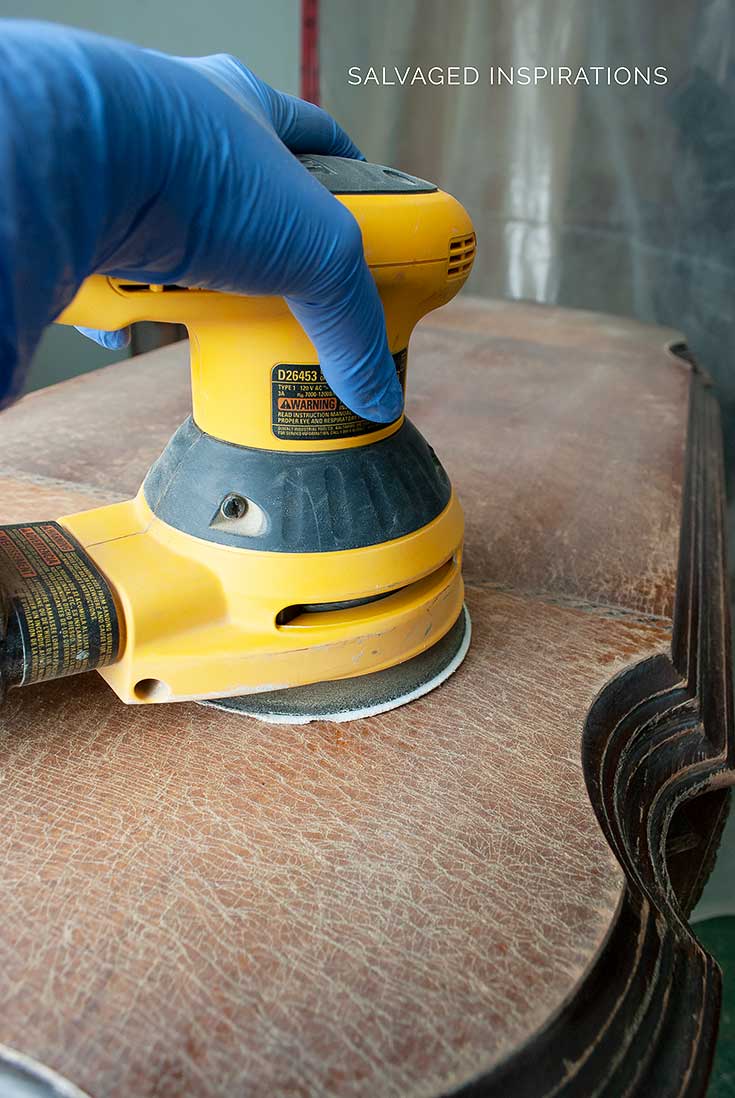
STEP #1:: CLEAN AND SAND
I started by giving this table a super good cleaning and then sanding the top using my orbital sander with an 80 grit. The rest of the piece was hand sanded using a 120 grit. The sanding is to create a rougher surface for the paint to adhere to and knock down the old thick finish. Also, the top was in rough shape. It was dry, cracked, gouged and scratched. I’m not sure how old this entry table is but it was definitely well used and took a beating over the years.
STEP #2:: PAINT
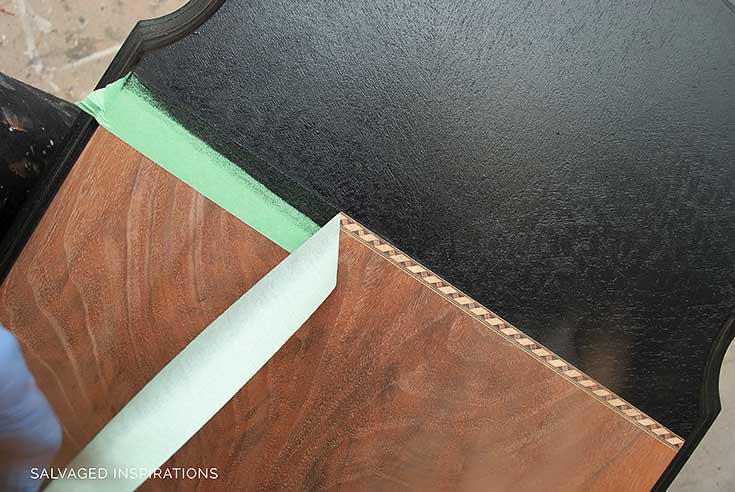
I painted this console table with two (2) coats of Caviar Black leaving a little bit of the original finish showing through in some areas. You can check out this black wash technique here. After the 2 coats of Caviar Black were dry, I sanded with a 220 grit for a silky smooth finish and to lightly distress.
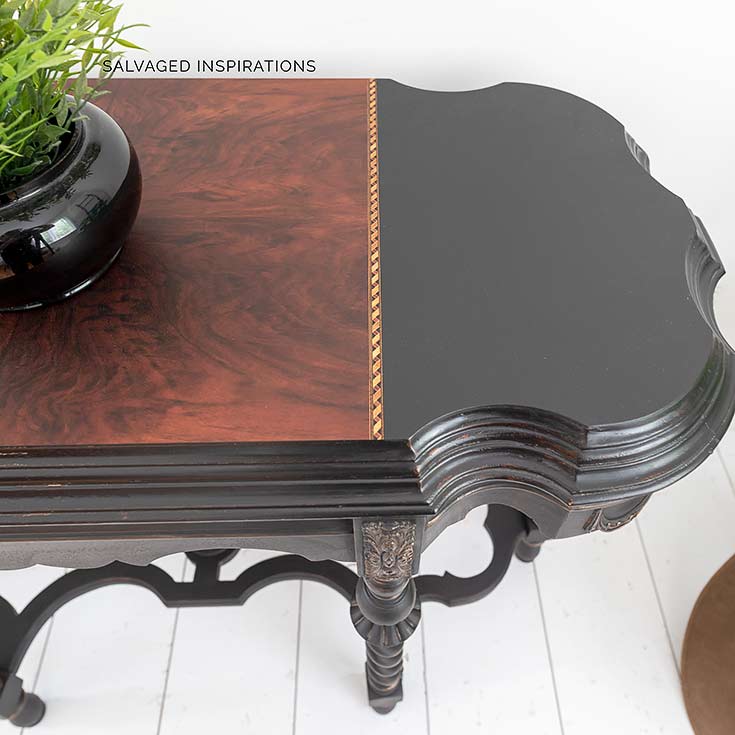
I originally painted the entire top black but it didn’t feel or look right to me. I ended up re-sanding the top down to the bare wood and keeping a portion exposed. The veneer on either side of the maple was so brittle I sanded right through the veneer. You can probably see the green spot on the left. Ugggh
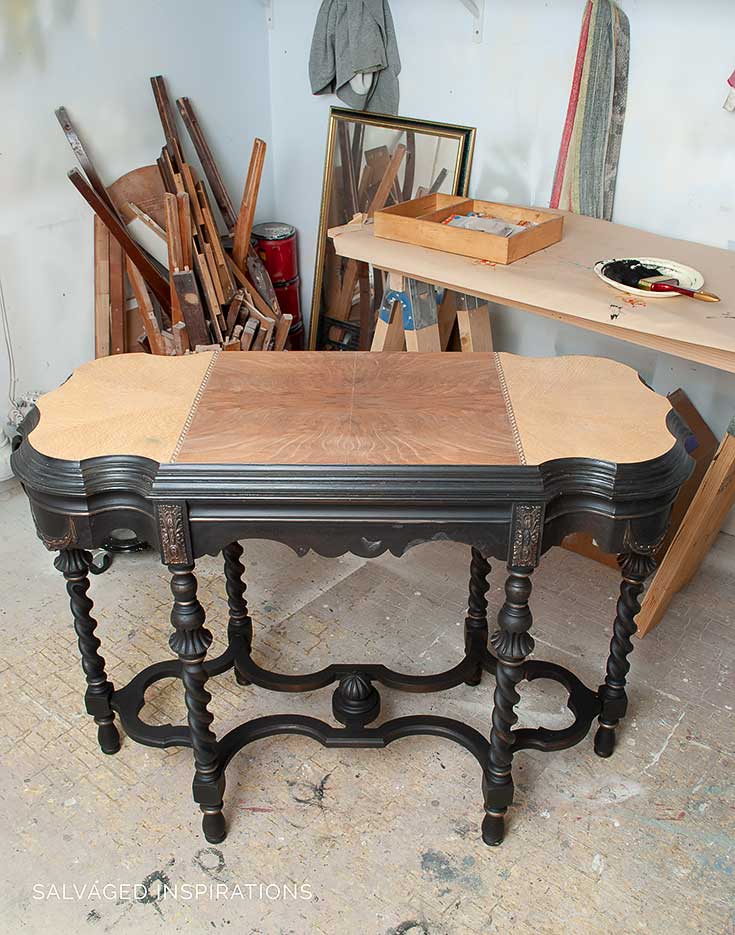
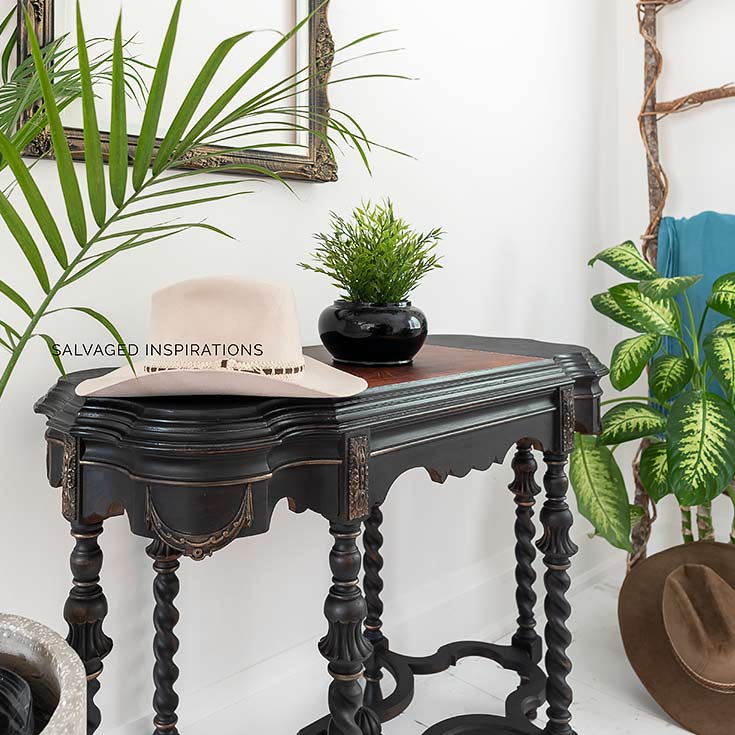
I’m glad the middle stayed intact. The lovely grain and this gorgeous inlay were too beautiful to cover.
STEP #3:: GILDING WAX
I used this Hammered Copper Gilding Wax to highlight the carvings and details. It’s super easy to apply. I rub a small amount on my fingers and then rub it onto the details.
STEP #4:: HEMP OIL TOPCOAT
I’ve used tung oil before but this was my first time using Hemp Oil. Love it! And it’s so easy to use. I poured the oil into a container and used a chip brush to apply. I let it sit for a few minutes and then wiped back the excess with a shop towel.
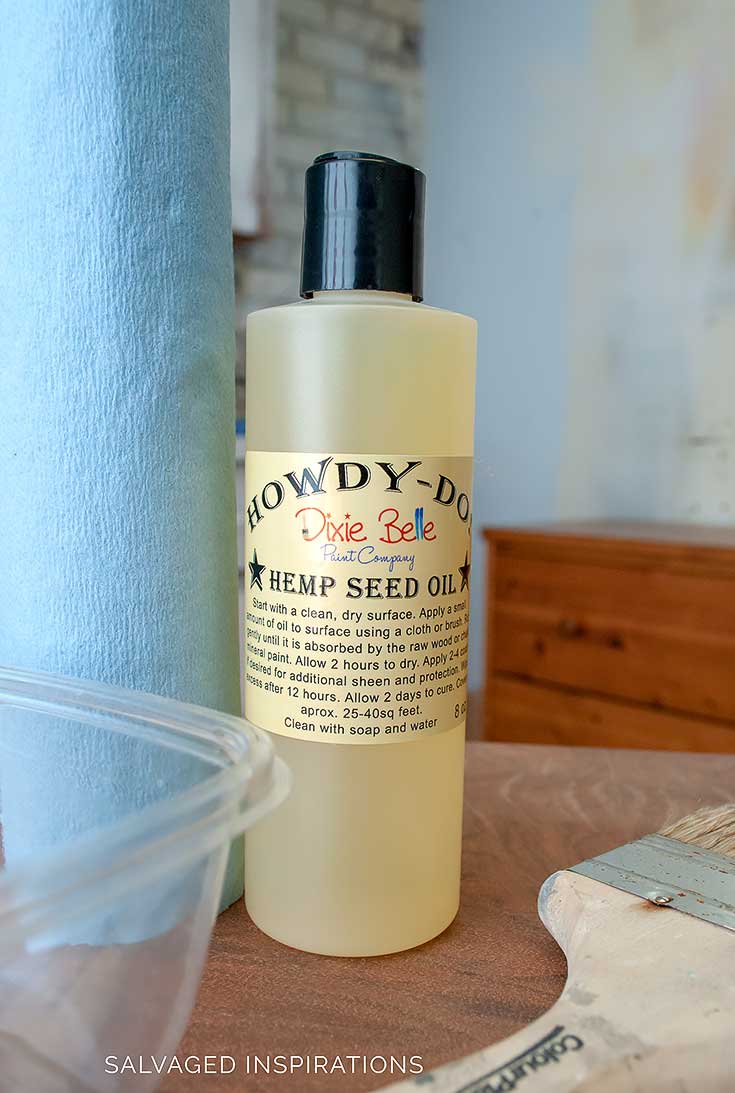
Hemp Oil works beautifully to restore old dry wood and works equally well on porous paints – like chalk, mineral or milk paint for example. It leaves no streaks or brush marks and is 100% all-natural.
Three (3) products for a stunning look! What do you think?
LET ME KNOW WHAT YOU THINK OF THIS ENTRY HALL TABLE … OR FEEL FREE TO ASK ANY QUESTIONS YOU MAY HAVE… I ALWAYS LOVE HEARING FROM YOU!
Thanks for reading. 🙂
Wishing you a beautiful day filled with inspiration and Happy Painting friends!
Denise XO
RELATED POSTS::
How To Create A Black Wash Finish
The BEST Black Paint For Furniture
How To BlackWash Wood
How To Paint Spindles WITHOUT Brush Marks
Layering Chalk Paint – Empire Dresser Makeover
PIN AND SHARE!

What style of console table is this
Please.
I’m really not sure… but I love it. It also sold very quickly. 🙂
Beautiful and inspiring! This has finally pushed me over the edge to redo an old side table I have, using the colors you used. I’ve been teetering for awhile, and then I saw this renovation. What a classy look! Thank you!
Thank you and good luck with your old side table, Carol! 🙂
I just love getting your emails! It is so fun to open them up and see what you can do to totally turn furniture around. I even save your emails, to go back and look at them again. Thanks for all you do to put smiles on peoples faces and to encourage us to update our own items. 🙂
Thanks for this Kathy, it means more than you know! With all that’s going on in the world it’s crossed my mind that upcycling and creating isn’t first and foremost on people’s minds… and it isn’t. But that said, a little distraction and ‘normalcy’ is probably a good thing for all of us. Thanks for brightening my day. x
Stunning! Beautifully done 👍❤👍
Thanks Annie! XOXO
Absolutely stunning piece!
Thanks Jackie! XO
It is just thrilling to see such an amazing piece come back to life! I’m confused about the inlay, dd you add new veneer? One of the photos appears as if you added new veneer with the decorative side piece. Or did you just paint up to the existing veneer? I have never even thought about adding a decorative veneer piece. I am going to be lost on the internet for hours now 😉
Hi Peggy! Glad its sparked some ideas! No, I didn’t add any veneer. It’s all original to the table but it was in such rough shape you could barely see it! I originally painted the entire top black – it wasn’t sitting well with me so I sanded down to expose the veneer and gorgeous inlay. The sides were so dry and cracked, I ended up sanding through the veneer which was kind of a blessing in disguise because I REALLY like that part of the top is black. It really shows off that inlay and gorgeous grain. Wheewww.. long-winded answer ..lol. 😉
Your work is beyond beautiful Denise and I never miss checking in with your website to see your latest creation; which always does one of two things: provides me with inspiration for picking up a paintbrush and making over an old piece of furniture around my home rather than buying new or makes me feel brave and confident enough to experiment with colours and finishes when trying to bring life and a wow factor to a tired old piece I’ve dragged home after spotting it on the side of the road. (I also just subscribed to your site so that may help as well with keeping up to date :-). I’m interested in the rotary sander you use as I’m about to upgrade from a mouse sander and invest in one myself, although my husband thinks this is unnecessary? How long does it take you and your sander to say for eg. sand back to bare wood a medium size buffet or chest of drawers. Currently it’s taking me days and days of sanding, which can really put a dent in one’s enthusiasm for a project. Any insight to quicker sanding and the benefits of your sander would be helpful. Kind thanks, Miranda (Sydney, Aust).
Hi Miranda and welcome. I’m so happy you subscribed and the #siblog has sparked some ideas for your makeovers. I can already tell we’re kindred spirits if you’re into curb-shopping!😉 Yes, love my Dewalt sander! To totally sand down a medium size dresser would take me a couple of hours. And that’s starting with a 60 or 80 grit and working up to a 220 for a smooth finish for say staining. It sounds like you’re ready for an upgrade if your sander is putting a dent in your enthusiasm. If you want to see my Dewalt in action heres a post I wrote which includes a video. Hope this helps.💛
You’re a gem! Thank you Denise. The sander video was wonderful and I’m off to shop for a new sander – yay!!!
Oh good!!! Have fun. And I’d love to hear how it works out for you. 🙂
Just remember that your Husband said the sander was “unnecessary” and make sure he keeps his hands off of it 🙂
LOL… too funny Kathy!😆
It is beautiful!!!
Thanks Teri!! XO
It is beautiful!
thanks Maryann!!🌸
Hi Denise! I love this table. WOW. Did you paint it or color wash? For some reason it looks lie Coffee Bean to me. Probably just my computer. I have a question for you. Where do you sell your pieces? Again, you are just my favorite furniture artist
Cheryl
Hi Cheryl! It’s a heavy wash/paint technique but it’s heavier in some areas, and lighter in others to reveal some of the original finish showing through. And funny that you said looks like Coffee Bean because I was debating between Coffee Bean and Caviar and then went with the latter. 🙂 I sell my pieces online (kijiji) and on FB/social, but I’m admittedly horrible and inconsistent at listing them. Sometimes they don’t make it to listing because I have people see it on the blog/social and ask if it’s still available. 🙂
You did a fantastic job .,Beautiful piece of furniture for your entry.
Thanks Donna! xo
Denise, I have posted on a few of your other projects, but this one is outstanding. You are my favorite Blog in this genre because you are not at all predictable, you absolutely have the eye of an artist and you respect the piece you are working on to show off good bones and nice wood details. I have a 1920s piano roll cabinet that apparently had a rough life before i found it out thrifting and I’ve been planning to do something with it, but just wasn’t sure what finish would do it justice and show off the pretty details. I think you found it for me today. I really like that copper wax to make the details pop.
I am so tired of looking at chippy chalk paint that is white, off-white or gray. It’s just not my style and I get so upset at the thought of beautiful wood under layers and layers of paint. Your use of alternative/decorative finishes, decals, etc is great and I’m so glad you restored the top of this piece to show off the beautiful inlay. I look forward to every project you post. Many thanks!
You just put a HUGE smile on my face Kathleen! Thanks so much. And your 1920’s piano roll cabinet sounds amazing. If you try out the hammered copper gilding wax, feel free to let me know how it all works out for you. I’d love to hear back. 🙂
Hello Denise
I have an old mahogany stained plant stand with intricate spindle legs and have been struggling with trying to remove the old stain without resorting to harsh chemicals….aargh!
Will paint it now and use the gilding wax to highlight those legs!
Thankyou,Florence from Australia
Hello, Florence from Australia… WELCOME! I’m so happy this vintage makeover has sparked a few ideas for your mahogany plant stand!
Absolutely beautiful Denise – you have given this hall table a new lease on life. I love the top.
Thanks so much, Jane! 🙂
I recently used the hemp oil on a couple end tables, and they didn’t seem to dry down. I wiped them down a few times, but they were still sticky after a week. Is that common? What could I have done wrong?
Hmmm, there could be a few things going on. Maybe there was some sort of topcoat or wax on the piece that didn’t let the hemp oil sink in ??? or maybe too much of the hemp oil was used ?? I’m not sure Shannon. I’m totally guessing. This was my first time using hemp oil so I don’t have much experience with it. But I do know with tung oil the above could be the reason. If anyone reading this has more experience with tung oil, feel free to chime in. 🙂
I have question about the patterned strip. What is it and where can I get it?
Hi Diane! The patterned strip is called a wood inlay. A lot of vintage furniture was built with solid wood but then covered in more exotic wood veneers to give the appearance of a more expensive wood piece. They would mix the wood grains and add in these inlays for detailing. You can still buy decorative inlays but I’m guessing there’s an art to veneering and adding them onto furniture.
Love that!
Thanks Stephanie! x
You have done it again! Beautiful work! I love the detail on this piece; can just imagine the work you had to do sanding those legs. I have never used hemp oil. Does it give the top a very protective finish ? It really gave it a nice shine..
Hi Jackie!! 😄 I didn’t spend too much time sanding all those grooves. I gave them a really quick once over as the DB paint adheres really well. As for the hemp oil – it’s an all-natural drying oil that polymerizes and hardens into a protective finish on furniture. First time using it and I’m impressed! MMS used it on her wood floors so it must be pretty durable! It’s waterproof and food safe but like wax, I think it may need to be reapplied a few years down the road.
LOVE. Just…love everything about that table. No way you could have passed that up. Isn’t it great to be able to see beyond the surface wear and tear to the sleeping beauty underneath? Well done!
…..”the sleeping beauty underneath”… I love this Marcia! Do you want a writing job… thats a great title for a blog post! 😉
I almost laugh-snorted coffee through my nose when I read, ” I’m on a strict diet of existing inventory,” This piece is magnificent and kudos to whoever (you?) does the staging and photography of your finished masterpieces. You bring delight to my day.
Oh Meredith, you just delighted MY day! I do my own staging and photography so this is a HUGE compliment. I use to struggle with staging my pieces. It took me hours to stage and I was never really pleased. Thank goodness it comes a little easier and faster these days but I’m still a work in progress.
You gave this piece of beautiful furniture an additional life. You do such amazing work. I look forward to practicing on my first piece.
Thanks so much Margie! XO
I am WOWED! You did a beautiful job. I think I’m going to get me some hemp oil. Thanks for this fabulous piece.
Thanks Lori! And if you try the Hemp Oil, I’d love to hear what you think. 🙂
Just LOVE it! Especially how you kept the top wood accent.
Thanks, Gail! XO So happy I kept the wood top accent too!
This table is stunning; it looks original yet so fresh & today looking. The pink hat may give it a challenge in the good looks dept though.
Thanks, Sher! XO And you don’t like the hat…lol.? I love the hats! 😄
Did you say $29.99? Wow, that’s quite the score! So pretty painted black and I’m in love with the copper gilding wax to make those gorgeous details pop. Gorgeous makeover!
Yes! $29.99! I find the thrift stores are increasing their furniture prices so when I come across a deal like this, it’s a no brainer!
I just can’t tell you how much I enjoy your projects. Each on is a work of art.
Thank you for sharing. It’s greatly appreciated.
Thanks so much Marion!❤️
That’s not a piece of furniture. That is a work of Art! Exquisite!
You’re too sweet Denise, thank YOU! XOXO
This table is simply elegant, Denise! What a great find and stunning transformation! ~ Nicki
Thanks so much!🌸
Absolutely beautiful!
Thanks Susan! 🙂
Hi Denise. Oh. My. Gosh. I am LOVING this little hallway table! Where do you find such fabulous old furniture to breathe new life into? Amazing. The wood left bare in the middle makes this table extra pretty. Great re-do:). So very beautiful.
Thanks, Monique!XOXO This table was found at a local Value Village (same as Savers in the US). So glad you like it. It’s such a pleasure working on these vintage pieces.
Wow! Great deal on the table. The finished look is amazing….the transformation was incredible. Tfs
Thanks Louise! XO
Absolutely Beyond!!! You had me with the first pic, but then … the surprise top treatment!😍
Thanks Diane! And ya, I’m super impressed with the Hemp Oil and how well it worked on the raw sanded wood and inlay… AND paint!
Hi Denise!
One question I have is how does an acrylic top coat (gatorhide) or any,… stay on over wax? I’ve always learned oil base to oil base and water based or acrylic to same base.
How is this possible?
It looks awesome.
-Shelley
I wrote an entire post on Poly Over Wax or Wax Over Poly. That said, with Dixie Belle products, they are ALL water-based so you can reverse the application and wax before you topcoat with poly. I don’t do this very often because I’m in the habit of not doing it – but so long as you wait for the wax to dry, you can apply a topcoat over it. I hope this helps Shelley. 🙂
LOVE this piece and your creativity! But I’m most excited to see your references in this answer to poly over wax!!! I’ve avoided using wax to finish because I had NEVER seen anyone say you could poly over wax. Game changer for me! Thanks for so freely sharing your expertise and techniques. Women lifting other Women through cooperation – no competition.
Thanks again!
N
OH THANK YOU FOR ANSWERING THIS QUESTION.
Now I will have confidence to try your techniques.
Your pieces are just stunning. Lends very well to masculine decor and updates the old boring “just plain stained” look. Can I order those products through you?
Awesome Job!!
-Shelley
This is gorgeous and a perfect solution to my problem with my hubby not wanting me to “paint” our antiques!!
This has a very British Colonia (think Hemingway collection) and will be stunning on some of my old pieces.
Thank you so much!! I will get these products and try it!
-Shelley
If you give it a go feel free to let me know what you think of the gilding wax and hemp oil Shelley… I know you’re going to love them! And hopefully your hubby will too! 😉
Oh em gee! When the first photo opened,, it took my breath away! This is stunning with a capital S….Great tutorial, too. pinning and pinning!
Aw, thanks, my friend. And thanks for the PIN/Share!❤️
Gorgeous!
Thanks Linda! XO
This is absolutely AWESOME. I love what you did in top. Followed your gut and it was perfect. Lots of spindles. I watched your video on painting spindles and paint spindles just that way now if I don’t spray.
Your sense of humor is so fun.
Hi Mollie… thanks! Yes, I should include a link to that spindle painting video for anyone who hasn’t seen it, so thanks for reminding me! The #slaponmethod is exactly what I did to paint these shapley legs. So happy it’s been helping you when you don’t spray! 😄
This is so gorgeous and classy! I found a beautiful 1920’s/30’s vanity with an attached glove box that is just asking for a makeover like this. I keep going back and forth between choosing black or white paint, because I know black will take longer to sell. Your table is stunning, though- and is just what I had in mind if I went with black. Thank you for the inspiration!
Thanks, Rebecca! Your vanity sounds amazing! And I’m sure it will ‘tell’ you in which direction to go – light or dark. 🙂 I find that black, white, creams and neutrals like gray all sell about the same around here.
What a beautiful table to begin with. You made it gorgeous !
Thanks, Kathy! 🙂 It is a gorgeous piece for sure. I just love working on these vintage pieces with so much shape and character! I’m always so grateful when I find pieces like this. 🙂
Lovely, Denise! All the details… and how about those legs! Always inspired by your work my friend. xo
These legs, right!!!? Thanks so much Do!😘
She is a beauty. You did a fabulous job. Thanks for sharing. I just might have to give hemp oil a try.
Thanks, Jo Ann! I’m definitely going to be using Hemp Oil on more of my projects. Once its cured it provides good protection and it’s SO easy to use. I really liked that I applied it over the wood and paint in one swoop!
This is one piece of gorgeous furniture and you did it justice. Super great look.
Thanks, my friend! 😘
That is gorgeous. Love the style of that table.
I seen one almost like it at an estate sale but didn’t bring it home with me cause they wanted more for it than what I could afford.
I’ve seen similar tables in antique shops selling for more than I wanted to pay too! And then when you’re not actively looking, that’s when you find the best deals… at least thats the way it usually works for me. 🙂
Wow. Just wow.
Thanks, Justina! XO
Amazing job, and perfect design. I don’t know if I would have ever picked this up to redo, but I tell you now it looks fabulous. Great design sense Denise. Leaving the top middle exposed was a great choice.
Thanks, Julie! I originally painted over the entire top but it just didn’t feel right. I couldn’t cover up all that gorgeous grain and the inlay. It felt like covering up part of this table’s character.