I hope this post makes good sense because I’m battling a head-cold which is driving me nuts. You know… the kind of cold where you feel congested, fuzzy headed and sound like you have 2 cocktail weenies stuffed up your nasal passage. The kind of cold where you say the most ridiculous things and then laugh at yourself while people look at you all weird….like YOU probably just did with my weenie comment. Well my friends, please give me an “A” for effort and be forgiving because here it goes… also, count your blessings that you’re my “on-line” buddy and not in direct contact with my germs.
![]()
Aside from choosing a stain or paint colour, the first thing I decide on when re-doing a piece of furniture is whether or not I’m going to change the hardware. Updating or repositioning hardware can turn a so-so re-do into a magical piece which will be cherished for years to come.
When I first started my furniture flipping business, I was under the impression that upgrading and repositioning hardware was a daunting task.
What if my new hardware doesn’t line up with the existing holes?
What if I drill the new holes in the wrong spot?
What if I don’t fill in the holes properly and it looks amateurish?
Once I stopped “what if’ing” and gave it a try, through trial and error I’ve learned there’s a simple way to take the guesswork out of repositioning furniture hardware and filling in the holes seamlessly.
Part 1: In this post I’ll show you how easy filling in hardware holes really is…. and my tip to making the fill seamless and flawless … it’s super simple!
Part 2: In my next post I’ll show you how I take the guess work out of repositioning furniture hardware… and reveal my secret ‘tool’, which is something every household has on hand!
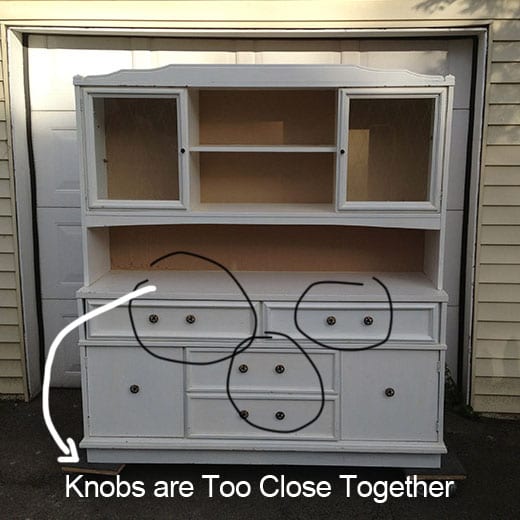
Below is a custom china cabinet which was ‘saved’ by my sister’s fiancee. It’s now warmly referred to as “Will’s China-Cabinet”. A great piece to up-cycle but the knobs are positioned too close together for such large drawers. Here’s the start to finish make-over!
To fill drawer knob holes you will need~
- The Drawers (this technique also works on cupboards/cabinets etc)
- Wood Filler – (read the label and make sure it’s suitable for your paint or stain)
- Putty Knife – (or use your fingers if you don’t mind goopy-ness)
- Screwdriver
- Paper towel/Rag
- Sand Paper
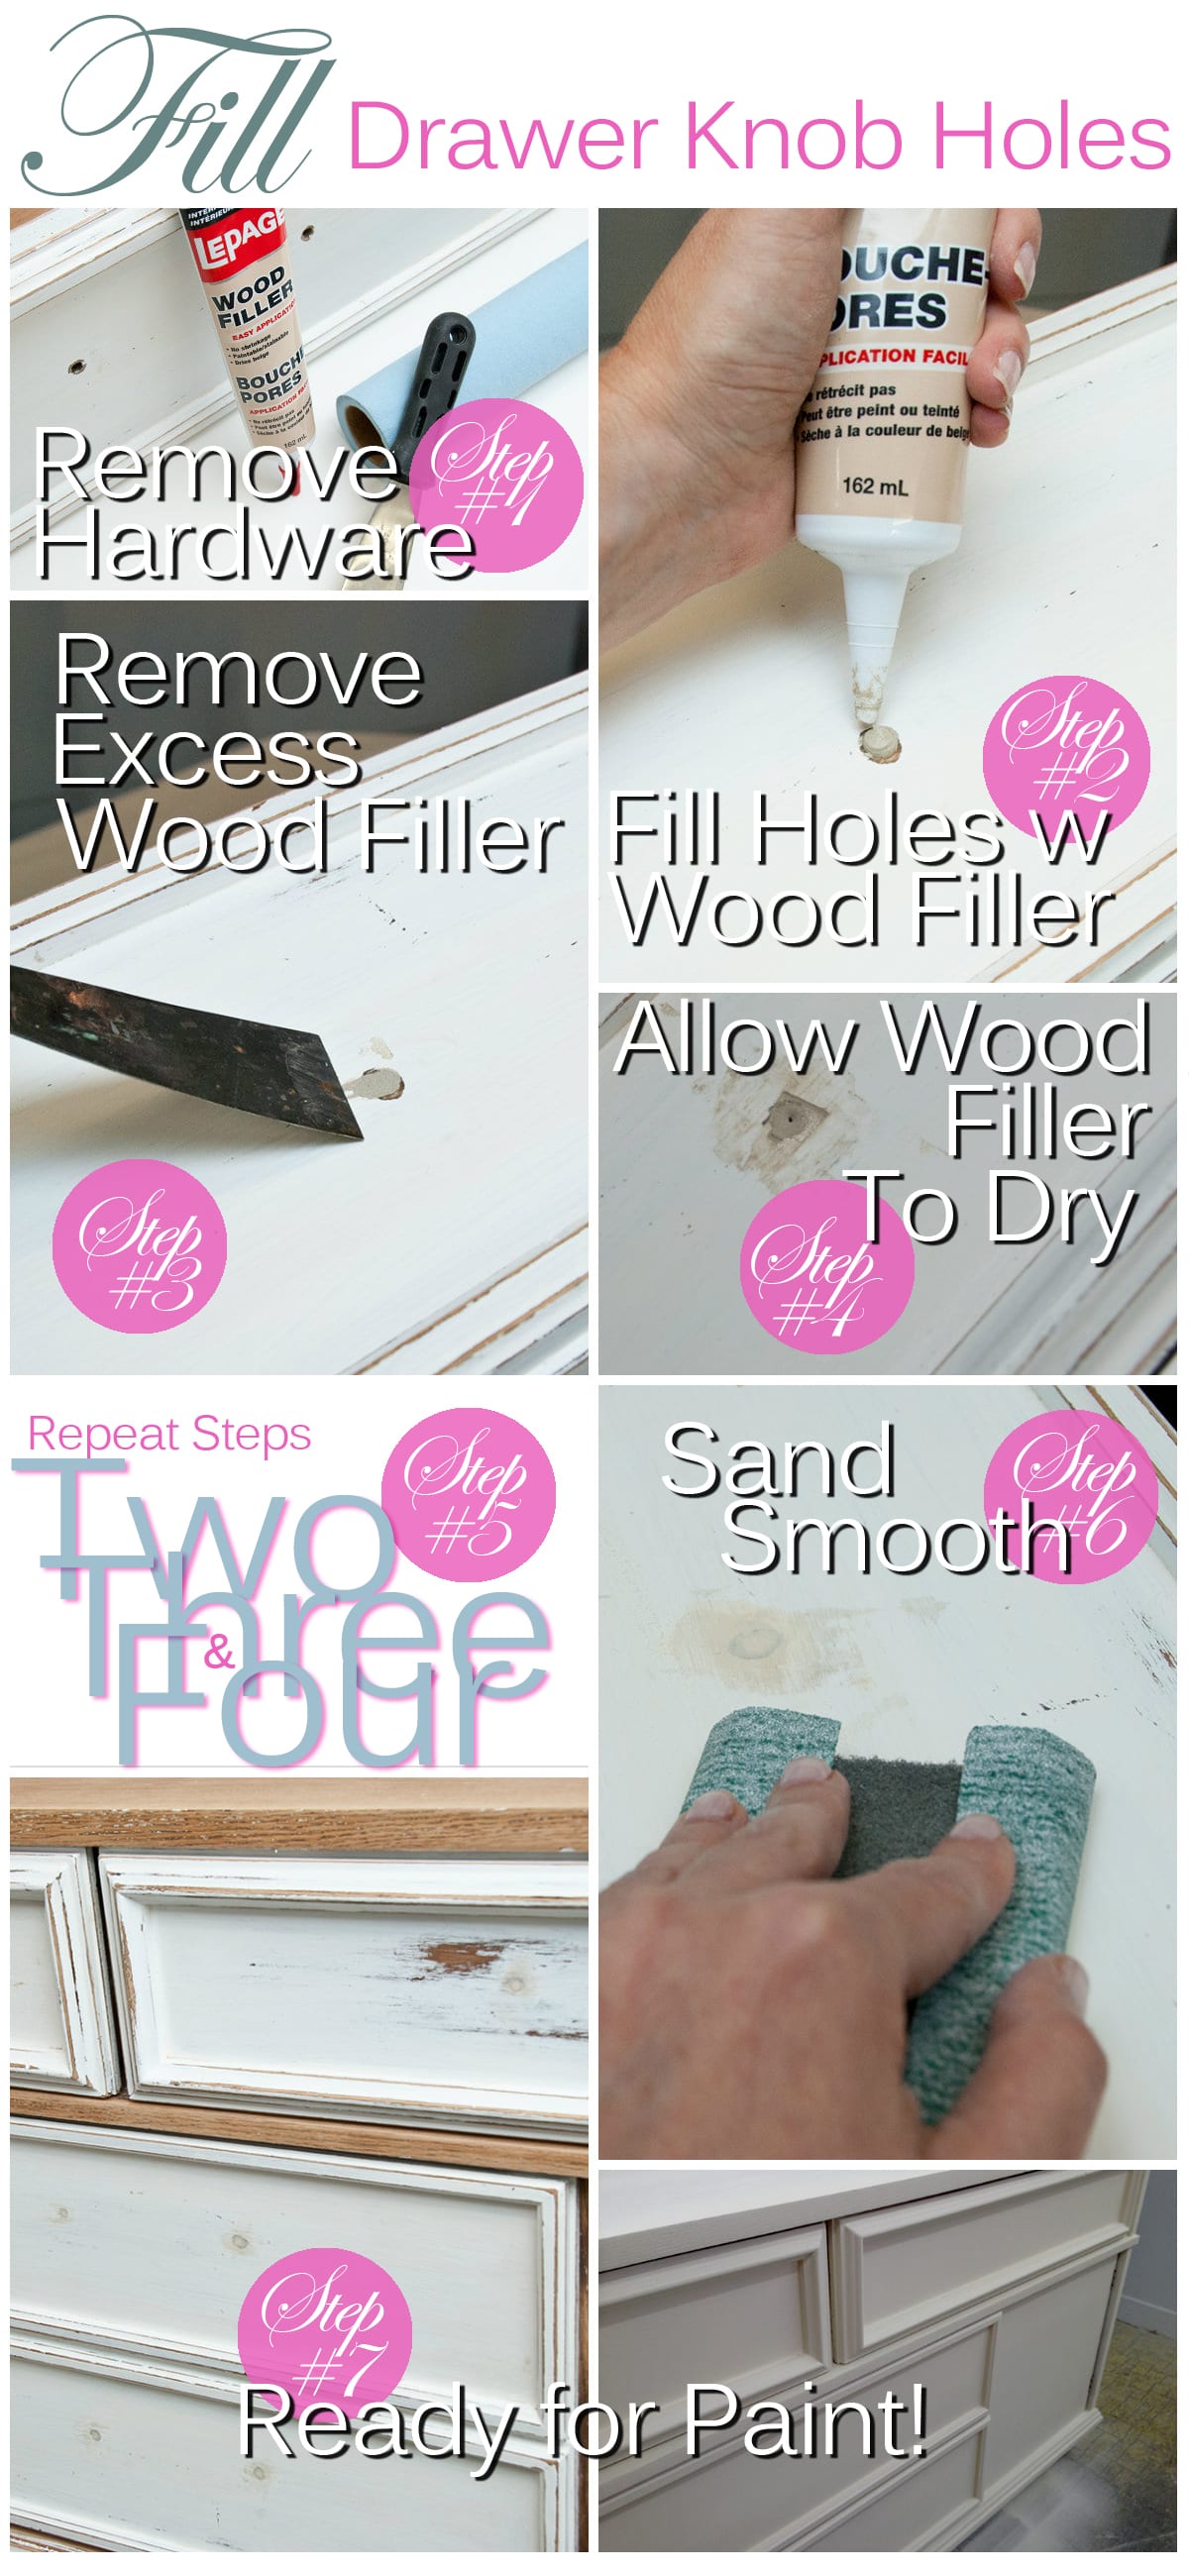
Step#1. Use a screwdriver to remove the old hardware from the drawers.
I always keep the knobs/screws together in a safe place in case I want to re-purpose them in the future.
Step#2. Use a wood filler that’s suitable for finish to fill in the entire hole.
When filling a drawer knob hole, it’s super easy when using the wood filler in a tube. Just insert the nozzle into the hardware hole and squeeze the filler out as you lift the tube out of the hole.
[box type=”shadow”] Tip ~ A general purpose wood filler works great when PAINTING furniture. Wood filler may NOT be ideal when STAINING furniture. Read the label because it MAY take stain differently. This can leave your repair noticeable. If staining your drawers, try using a wood putty that is an exact match to the type of wood you are refinishing. Putty comes in Walnut, Oak, Cherry and many other finishes.[/box]
Step#3. Smooth the wood filler flush with the drawer and remove any excess.
Using a putty knife, razor blade, bread and butter knife or even your fingers, remove the excess filler and smooth it out flush with your drawer. Don’t forget about the inside of the drawer as well!
Step#4. Allow the wood filler to completely dry.
Depending on which brand of wood filler you use, drying time can take anywhere from 2-8 hours. Be patient and follow the directions on the product.
Step#5. REPEAT STEPS 2,3 & 4!
[box] Tip ~ This is the step which is going to give you a professional seamless finish! Don’t try to fill the hole in 1 application. Once it dries, you may notice some air bubbles that have formed. Repeating steps 2 through 4 once or twice will ensure a perfect finish![/box]
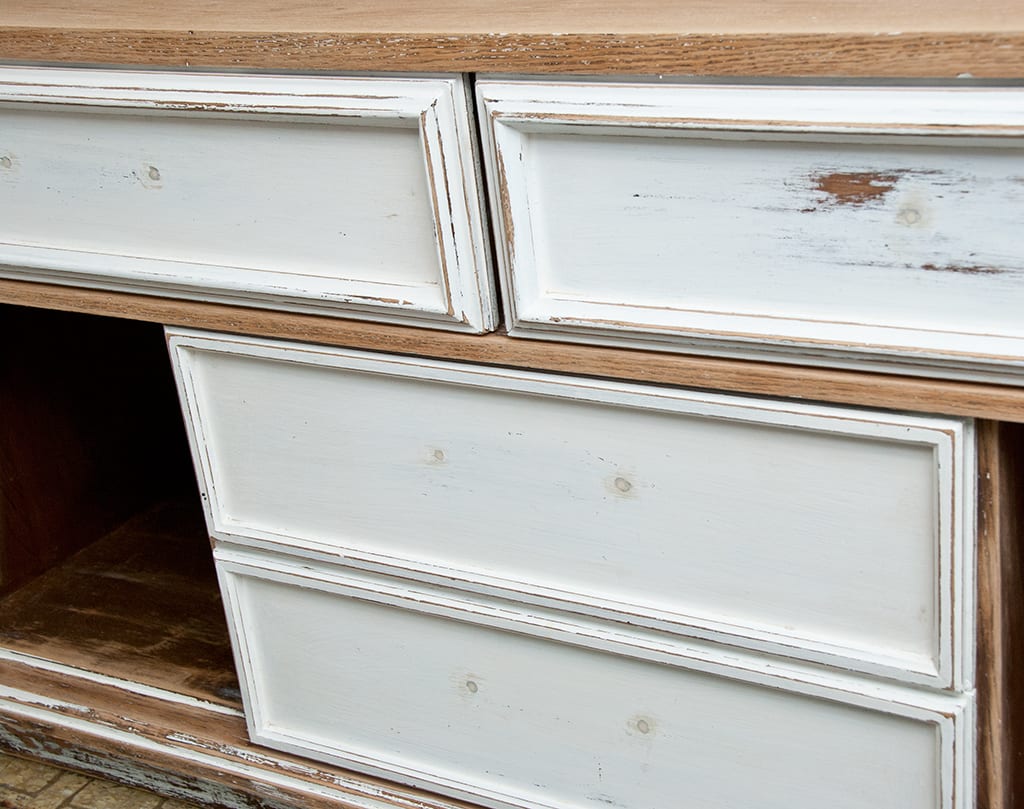
Step#6. Sand Smooth
Sand the wood filled area with a fine-grit sandpaper.
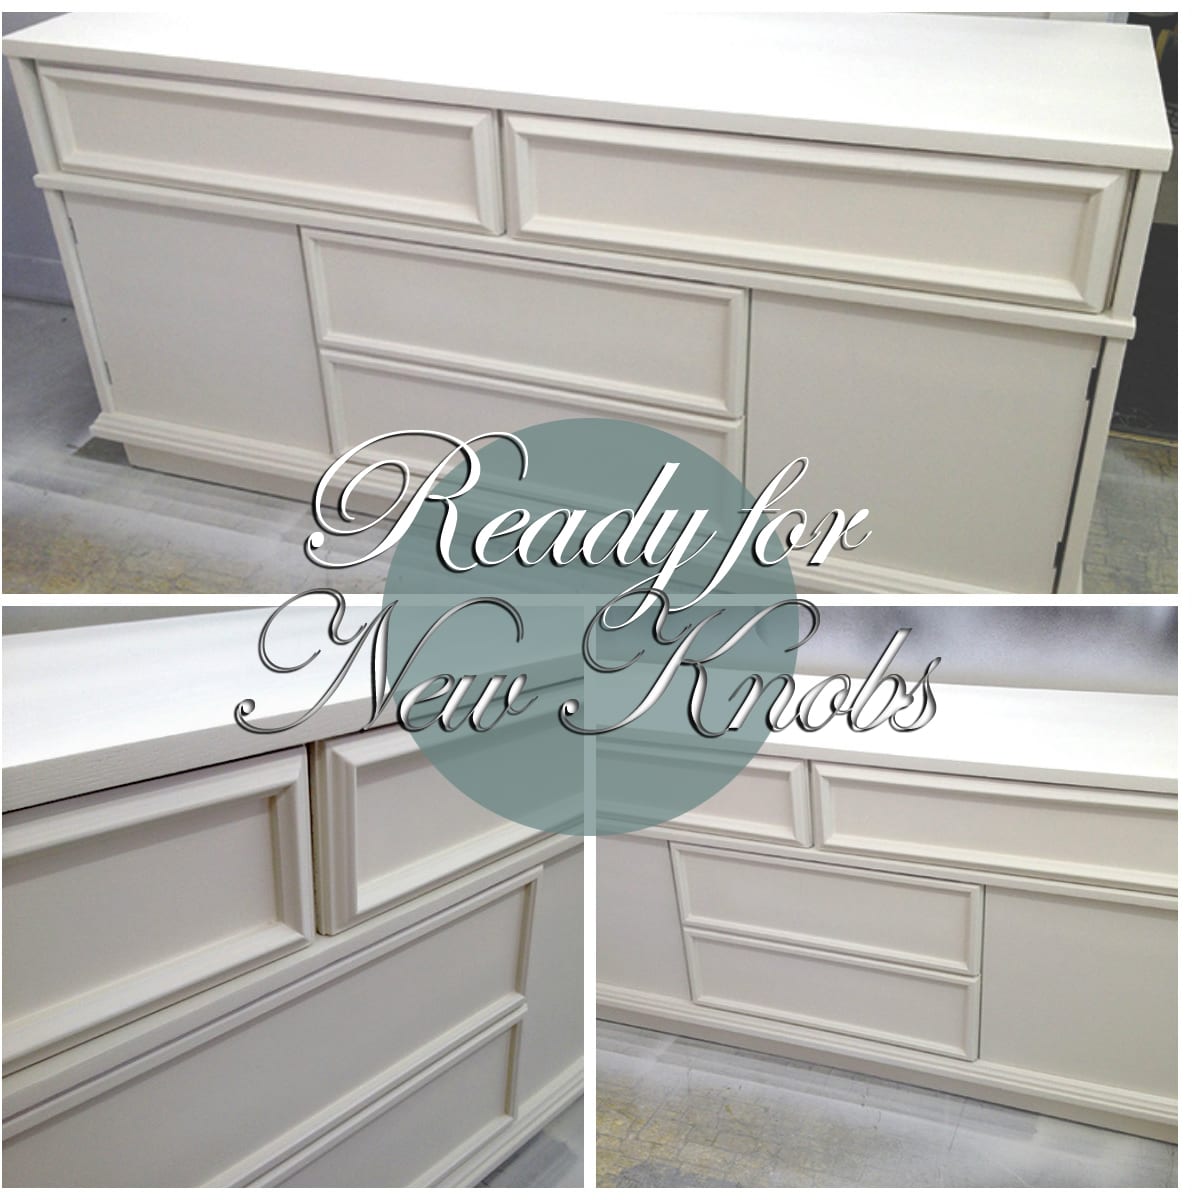
Step#7. Ready To PAINT!
Here is the painted piece all ready for new knobs! You can check out the handmade knobs I’m going to use here.
So gone are the daunting days of “what-if’ing” on myself… at least when it comes to repositioning furniture hardware and filling in holes! The secret to filling in the hardware holes seamlessly is is to completely fill the hole with 2 or 3 applications of filler. Then sand smoothly to create a perfectly level finish. For a large hole, you can use a wood shim or dowel, and then fill in the remaining spaces with wood filler.
Swapping out drab old knobs, pulls or handles is one of the easiest ways to update furniture. And believe me…if I can do it, YOU can do it!
Feel free to pop on over to Part 2 ~Take the Guesswork Out of Repositioning Hardware and see how the homemade knobs look on this piece.
Wishing you a great day… I’m going to get some rest now…

Thanks for this helpful information. I’m curious what the process would be if you only want to stain the final product and not paint. If I use dowels and/or wood filler I feel like it’ll stand out too much but I don’t want to to paint the beautiful wood grain. Any advice?! Thanks!!
I haven’t found a stainable filler that I like and I’ve tried a good few. Dowels and fillers are an option but a little faux painting and graining are required if you want a flawless match. If you want to go the staining route, the safest way is to find hardware that fits the original hardware holes. No-fuss.:)
Would it be possible to partially drill through a hold that was filled with wood filler? I need the holes to be only 1/4″ further apart, so when I drill new holes, they will most likely drill through part of the wood filler in the old holes.
In my experience, it really depends on the wood fill Natalie. For instance, when I used an Elmers wood fill, for example, I didn’t find it hard enough. When I use Bondo, dilling half wood and half Bondo is no problem.
The drawers I want to replace the hardware on have a trim piece attached to the second surface/back of the drawer so you can’t see/access the back of the hardware from the inside of the drawer. I “think” this piece was glued on as I don’t see any obvious other way it could be attached. It’s an antique drop leaf Pembroke table. Any suggestions on how to remove this piece to remove/replace the drawer pulls?
hello Cathleen, I see your question is from 2018 but I’m wondering if you found a solution; I’m having the exact same issue with a desk that I want to chalk paint; unfortunately I did not notice the second surface covering the screws to the hardware when I bought this old desk that I want to chalk paint.
Nice job! I just refiinished some pine chairs for children that had holes from where the screws were placed. I didn’t fill them initially and I’ve had to go back and use dowel rods to fill because I already poly and don’t wanna do this again. I thought about using a dremel (the dowels are not smooth) to sand just the spot and applying poly with a dropper . Does that sound like more work? Should I just resand the seats? Any advice is appreciated.
Hi Suzanne! I’m not sure it will be more work to fill with the dowels and then spot refinish, put the issue may be it will be quite visible where the spot treatment was done. I haven’t had much luck going that route. 🙁
HI! Im wanting to replace the hardware on white cabinets. the cabinets don’t need painting they are quite new. Can I paint just the spot where I fill the hole? it would be under the pull in the center. or do I have to repaint the whole cabinet anyways.?
Hi Lauren! If you spot paint where the old hardware hole existed, it probably won’t be seamless/invisible. That said, if it’s underneath the new handle, that might not be a big issue for you. If they were my cabinets, I would give one a try before repainting the whole shebang. 🙂
Have I totally messed up? I guess filling the old holes on my kitchen cabinets was not specified with my painter… they have already primed and painted – any way I can fill those holes now to add new hardware without totally repainting?
Unfortunately not Dawn. It would be very obvious if you try to move the hardware and patch the holes after prime and paint.
Hi. I can’t find the 9″ center brass pull handles I want for my kitchen cabinets. Can I do this my process for my kitchen cabinets if I’m not going to paint over them? If not, is there a process to get it done?
Hi Kelly. This process is for when you are painting over the filled holes. It will not work if you want to keep a stained cabinet because the wood fill would stand out like a sore thumb. Have you tried finding 9″ brass pulls online? There are SO MANY great options! If you ‘google’ 9″ centre brass pulls and go under ‘images’, there are so many beautiful choices!
I’ve tried and can’t find any. I’ve been looking all weekend. Thanks for replying!
Arrrrrgh!!! I thought my holes were done after 3 apps of wood putty! I applied primer then 1st coat of Ben Moore advanced paint and I can see them in certain light. What can I do? This is my 1st experience with this kind of paint and never had to fill holes before??. HELP!
Any advice would be awesome
Thanks,Alli
We’ve all had this happen Alli…so I know it’s frustrating. This is not the conventional way of doing things, but I’ve applied wood fill over a first coat of primer when I’ve missed a scratch the first time around. You could try filling it in again with wood fill or bondo (make sure it’s 100% adhered) and then paint again.
I filled the holes but I can still see the outline of the holes after priming. Do I need to keep filling it up or sand it some more? Thanks.
Yes Ana. When using a wood filler the first application may settle. If so, a second application is necessary to fill in the hardware hole properly. Then sand.
I have a roll top desk from 70’s or 80’s and I wand to paint it white. but it had UGLY plastic recessed handles on the drawers, I really hate them! is there any way to fill them in and put normal handles knobs on them? If they were brass or steel they would be OK. But ugly brown ughh. Help….please.
It’s a bit of challenge when you can’t see the piece or how large/small the recessed handles are on this desk, but possibly Bondo? Filling with Bondo may work if it’s not too deep Julia…. and then new knobs can be drilled in.
What colour paint did you use for this? it’s lovely!
Hi Laura. It IS a gorgeous white and I’ve used it on many custom pieces because my clients really like it too! It’s Sherwin Williams White Duck SW 7010
Can this also be done on a piece that is not real wood? Like a dresser that is finished with laminate?
Yes Angela – as long as you paint (laminate can not be stained) the process is the same. I’ve filled in old hardware holes and repositioned and/or used new hardware on many laminate pieces. 🙂
You should have put up a picture after putting in the new knobs…anyways great idea….thanks for sharing.
The pictures of this dresser and knobs are included in Part 2 Jen, thought I had added the link… thanks for the heads up!