
Hi sweet friends, I’m so glad you’re here! I’m excited to share the new technique I used to create this boho/old-world PINK wax finish. Not only because I LOVE how it turned out, but because I also know some of you have spent hours prepping and painting your furniture and are totally stumped (or worse yet, scared) to topcoat it. There’s this underlying feeling you may RUIN all your hard work by adding a wax or poly finish, right!? I get it… I’ve been there! I had similar feelings with this piece because I’d never tried a bold-colored wax before.
**This post was originally published on May 21, 2018. As an Amazon Associate, I earn from qualifying purchases. There are affiliate links in this post to other companies/products I use and love as well. You will never be charged extra when you purchase through these affiliate links. If you purchase from my links – A BIG thank you for supporting me and the #siblog! To see my full disclaimer, click here.
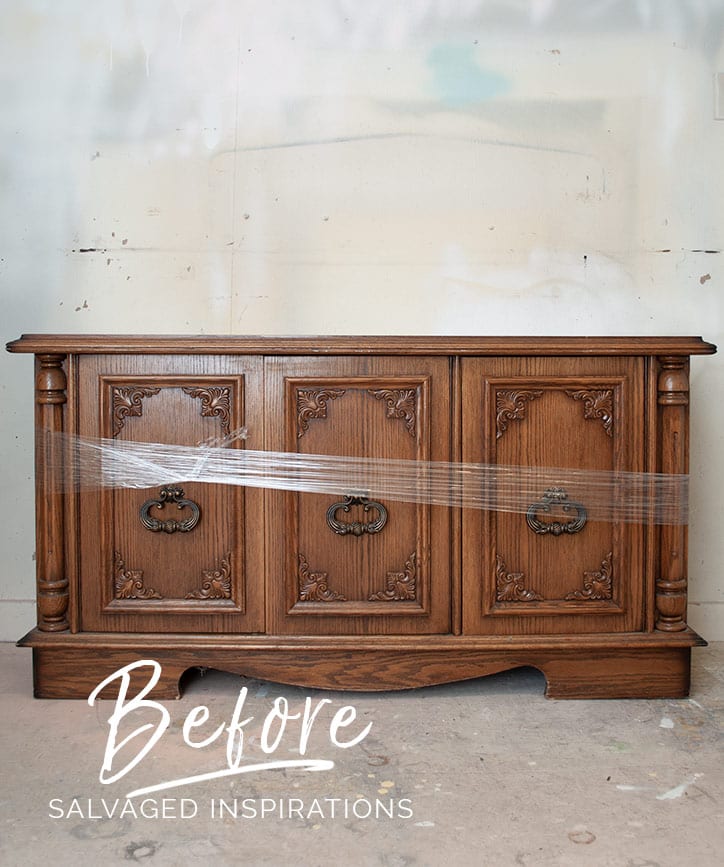
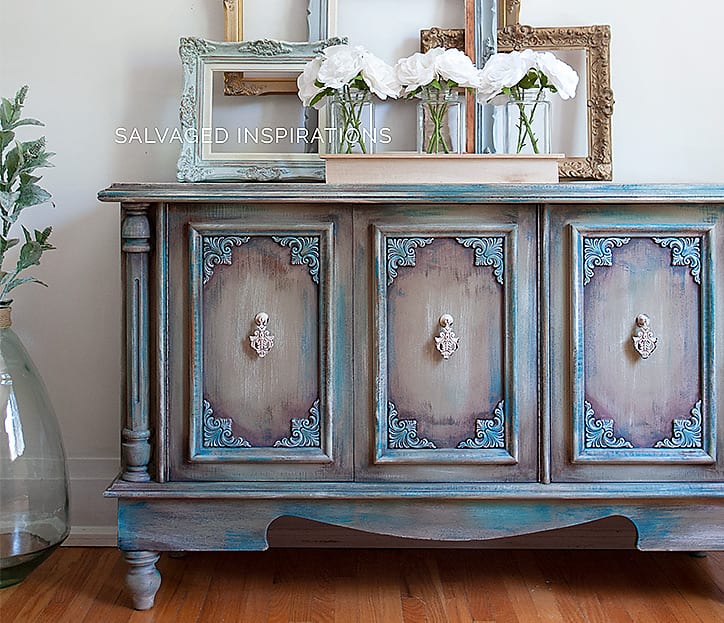
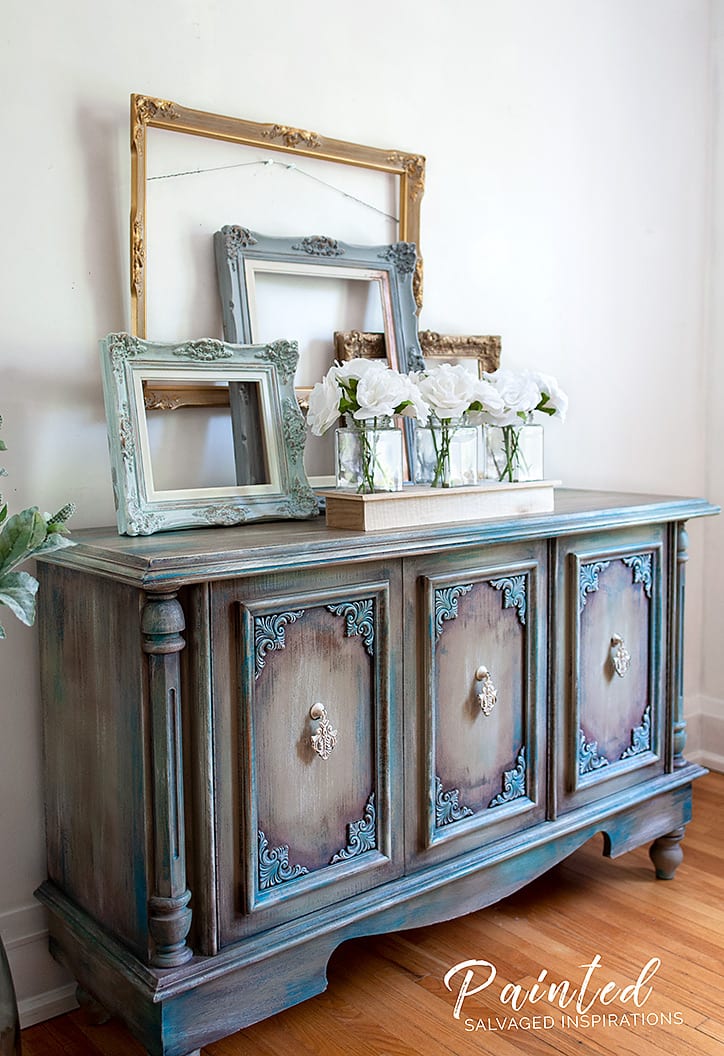
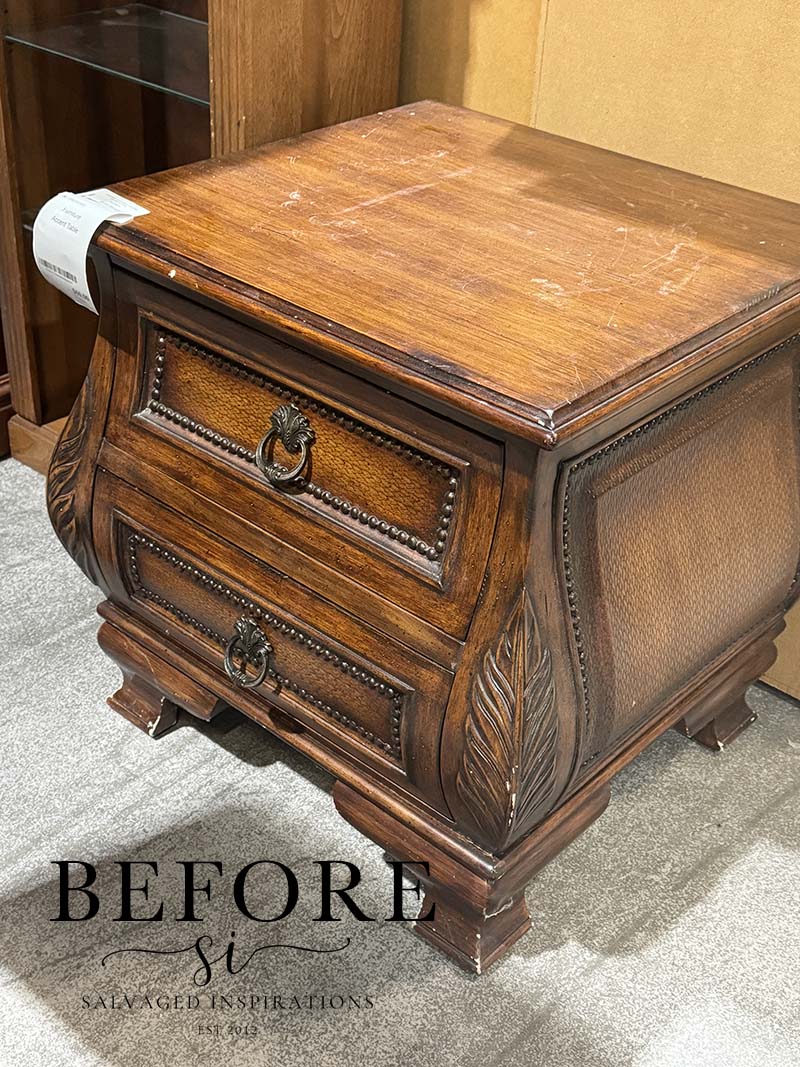
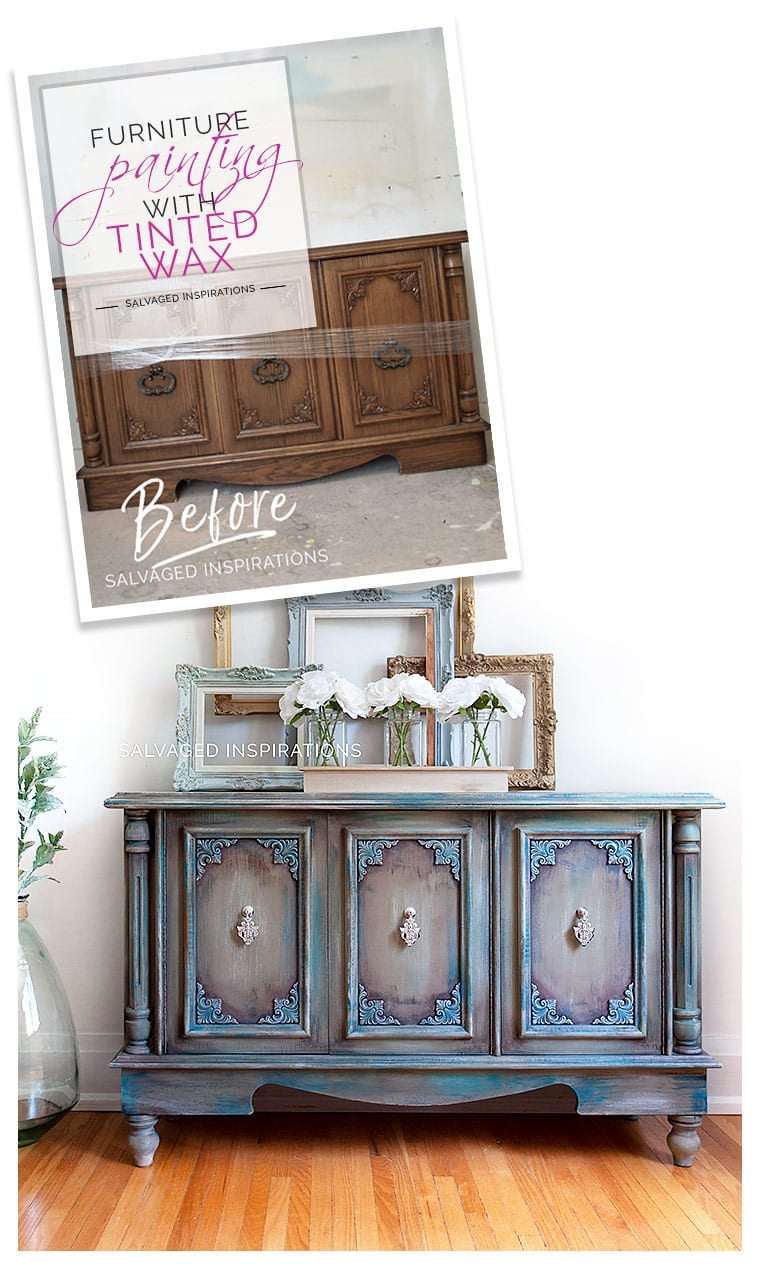
Today’s post will show you how forgiving this top-coating technique is! Not to mention the gorgeous effect furniture painting with wax can create. Here’s what I started with. This 70’s thrift store china cabinet bottom.
If you’re a long-time reader, you know I’m not a stranger to tinting my own furniture wax. I’ve been doing it for years. I’ve created custom darks, white wax, and even mid-tones, but I’ve never painted a finish with PINK-tinted wax!
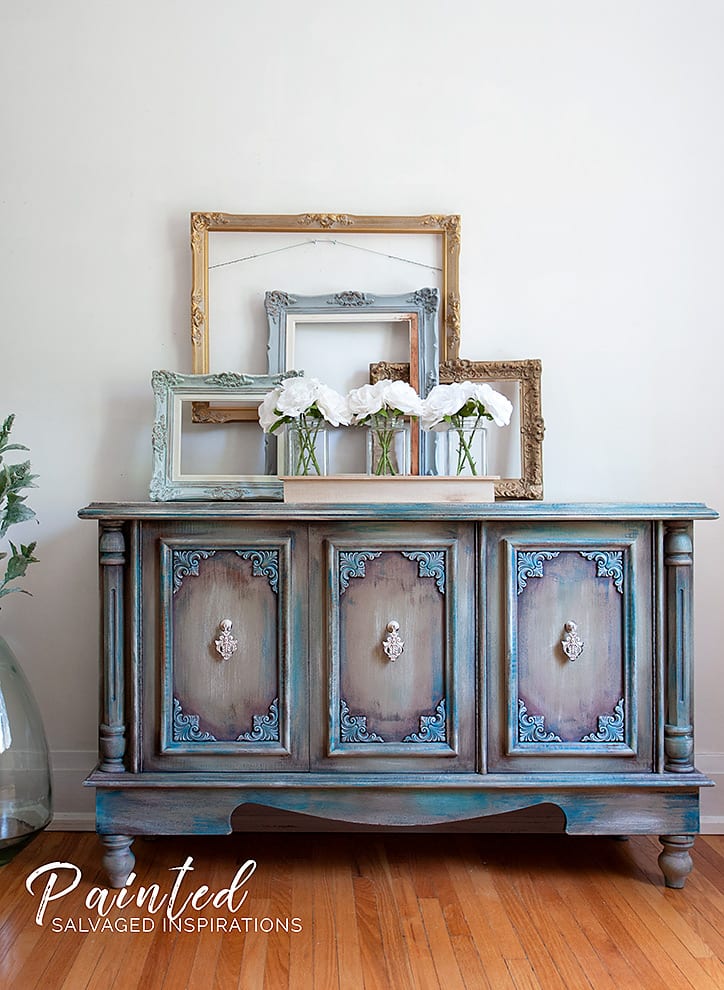
And I know what you’re thinking. PINK??? It must look garish and over the top, right? NOPE. This finish adds depth and interest with a boho/old-world style without being in your face… even though the peony I used is strong and bold. What do you think?

THIS POST IS SPONSORED/CONTAINS AFFILIATE LINKS TO PRODUCTS I USE. YOU CAN SEE MY FULL DISCLOSURE HERE.
SOURCE LIST::
- 70’s China Cabinet – SALVAGED!
- Sandpaper + Paper Towel
- Paint Brush & Chip Brush
- DB Peacock Chalk Mineral Paint
- DB Putty Chalk Mineral Paint
- DB Drop Cloth Chalk Mineral Paint
- DB Peony Chalk Mineral Paint
- Gator Hide Topcoat
- Dark Wax
- Clear Wax
FURNITURE PAINTING WITH WAX
Today I’m sharing the top coating method I used. But if you’re interested in the layered paint technique I used to paint the base of this piece, you can see it here. The only difference is the colors. For this buffet, I used Dixie Belle’s Peacock, Putty, and Drop Cloth which can all be found here. But any paint brand and/or a combo of colors will work with this method of finishing.
STEP #1 – HOW TO ADD PAINT TO WAX
After painting my piece, I top-coated and protected it with this water-based poly. This step is optional. I originally thought I was going to sell this piece, so I wanted the added waterproof protection. After the poly had dried, I mixed this pink with clear wax. It didn’t require a lot. I would estimate it was approximately a tablespoon of wax to about a teaspoon of paint. Of course, the amount you mix will depend on the size of your piece and how much area you want to cover.
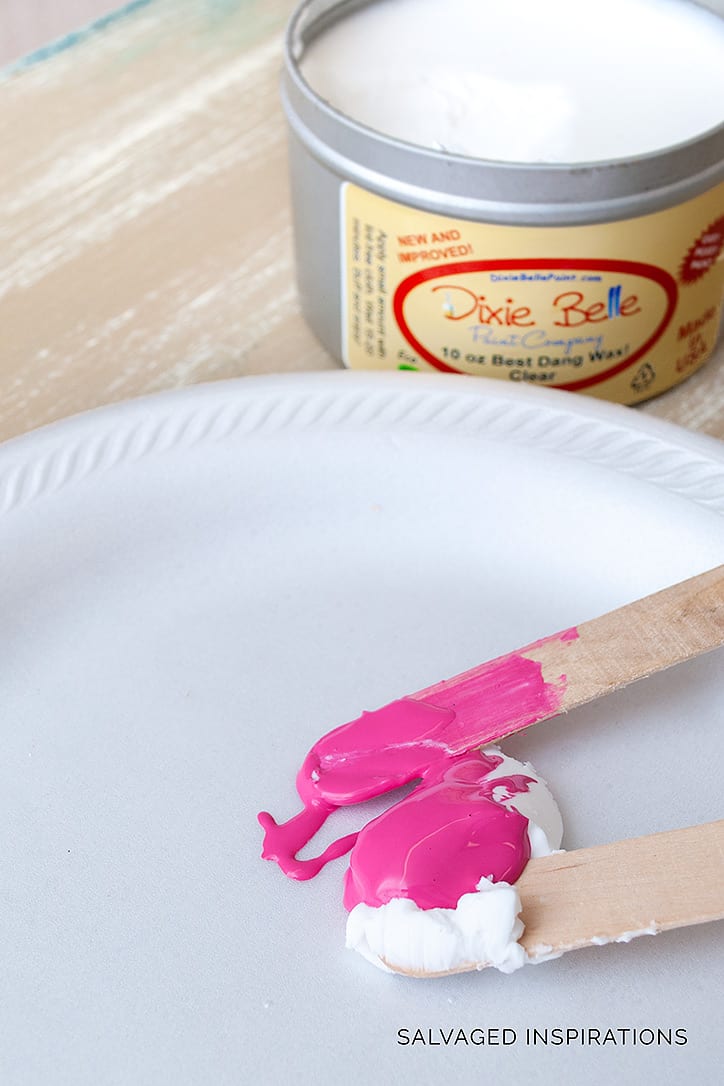
STEP #2 – HOW TO MIX PAINT AND WAX
I mixed the wax and paint together until it turned into a butter icing consistency. Doesn’t this look like it should be piped onto a cupcake?!
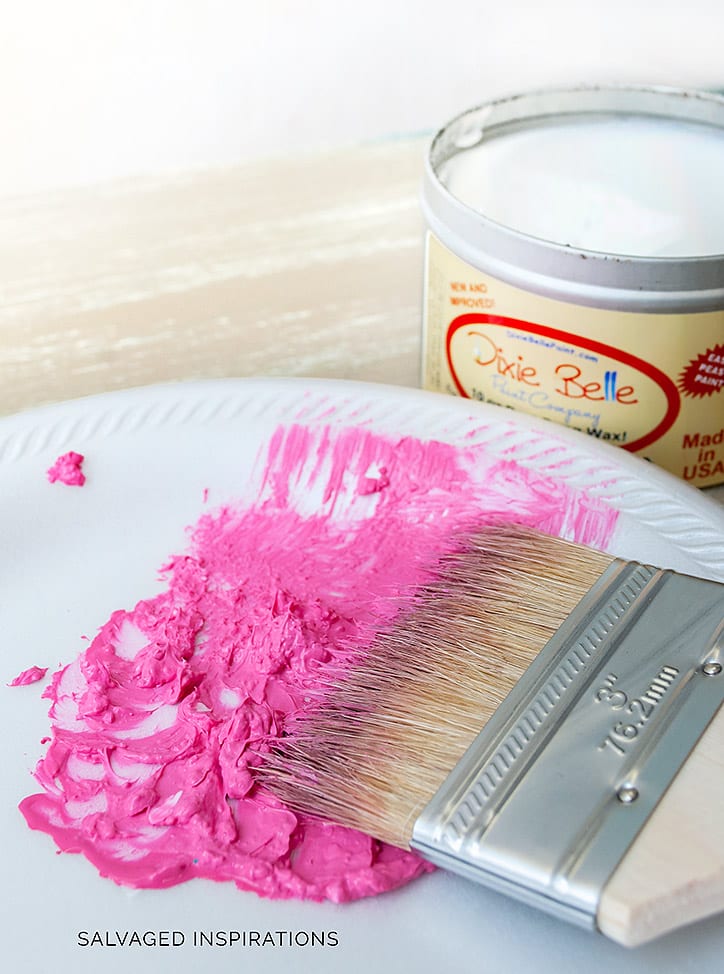
STEP #3 – PAINTING FURNITURE WITH TINTED WAX
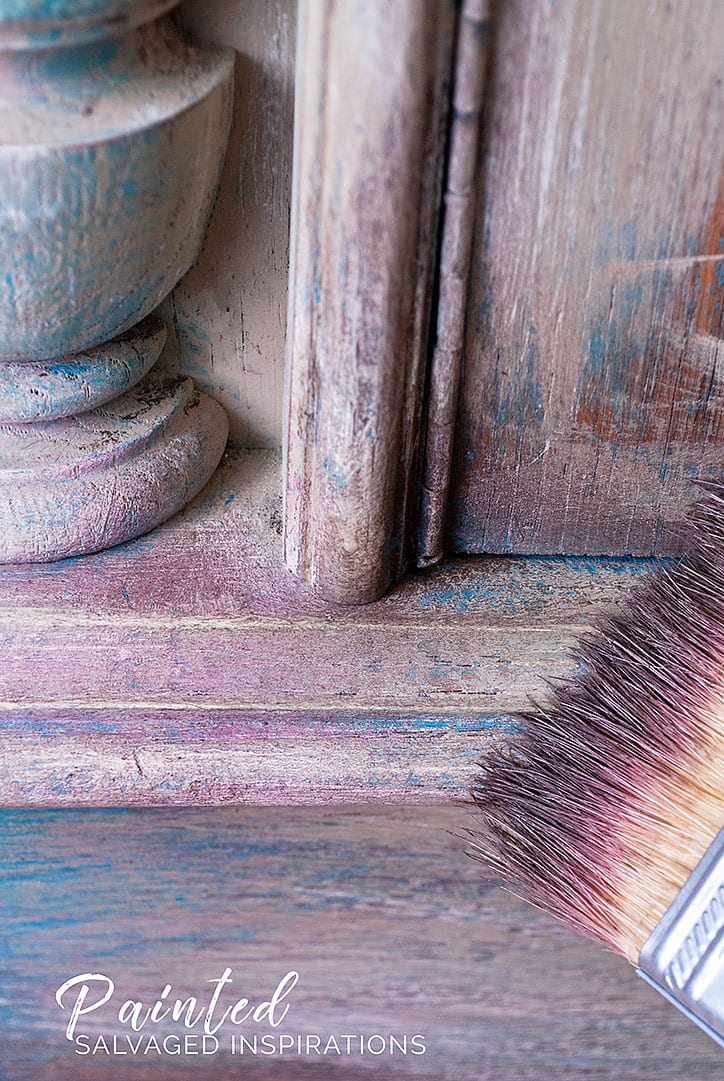
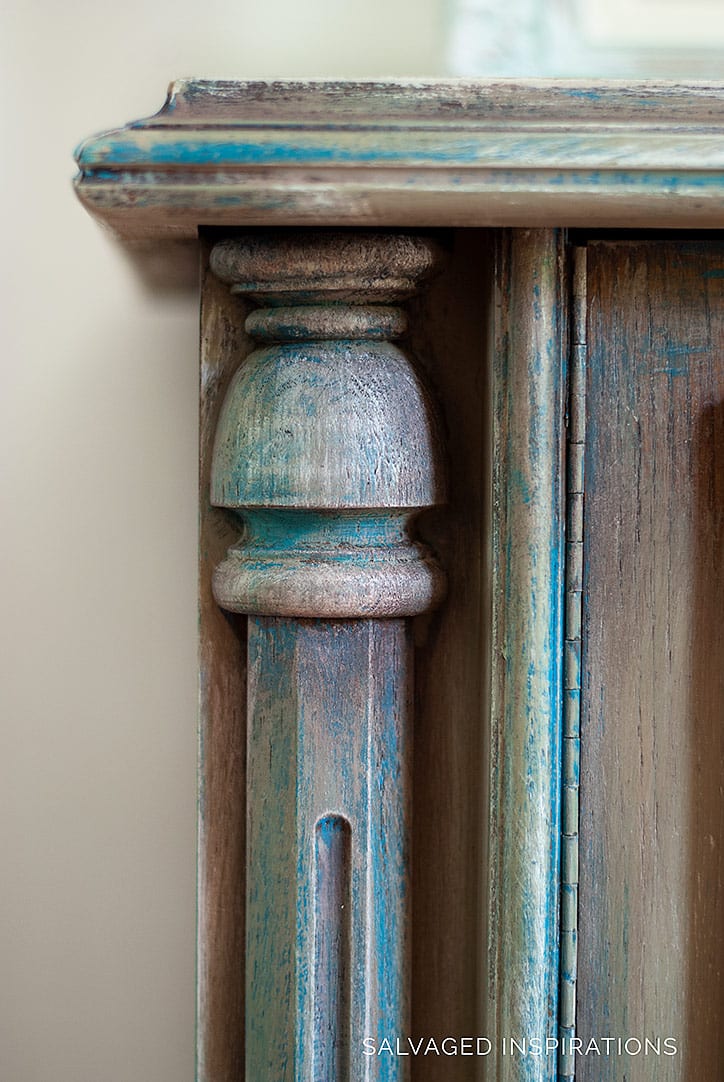
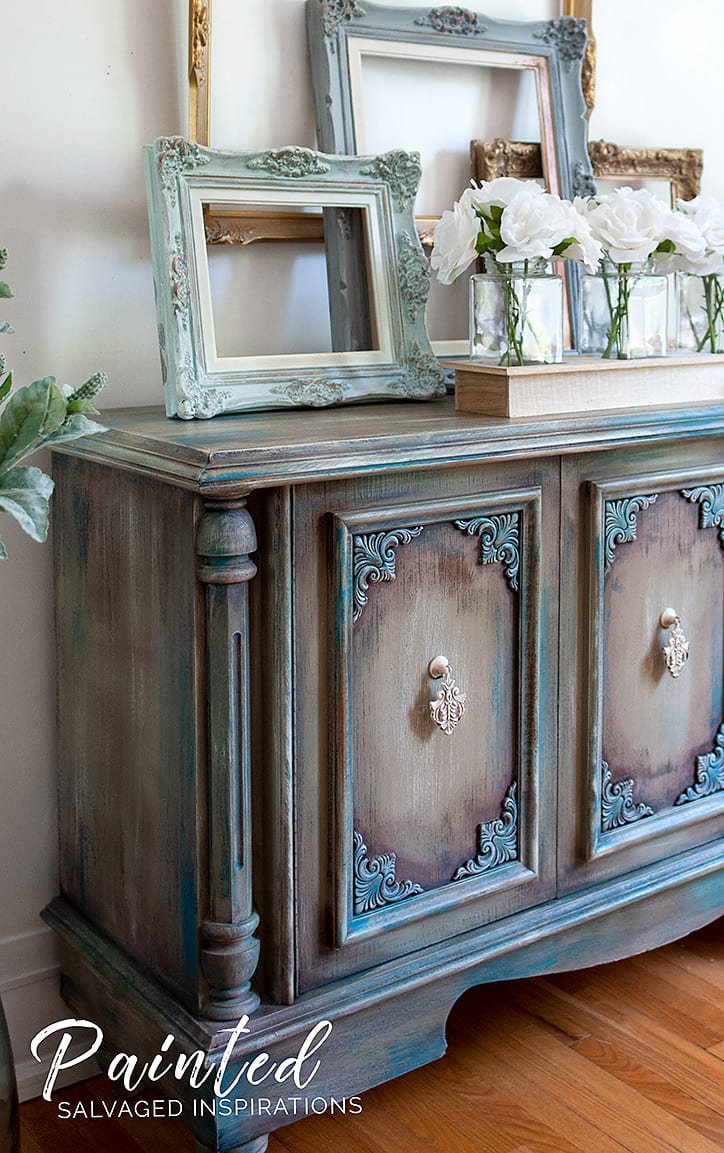
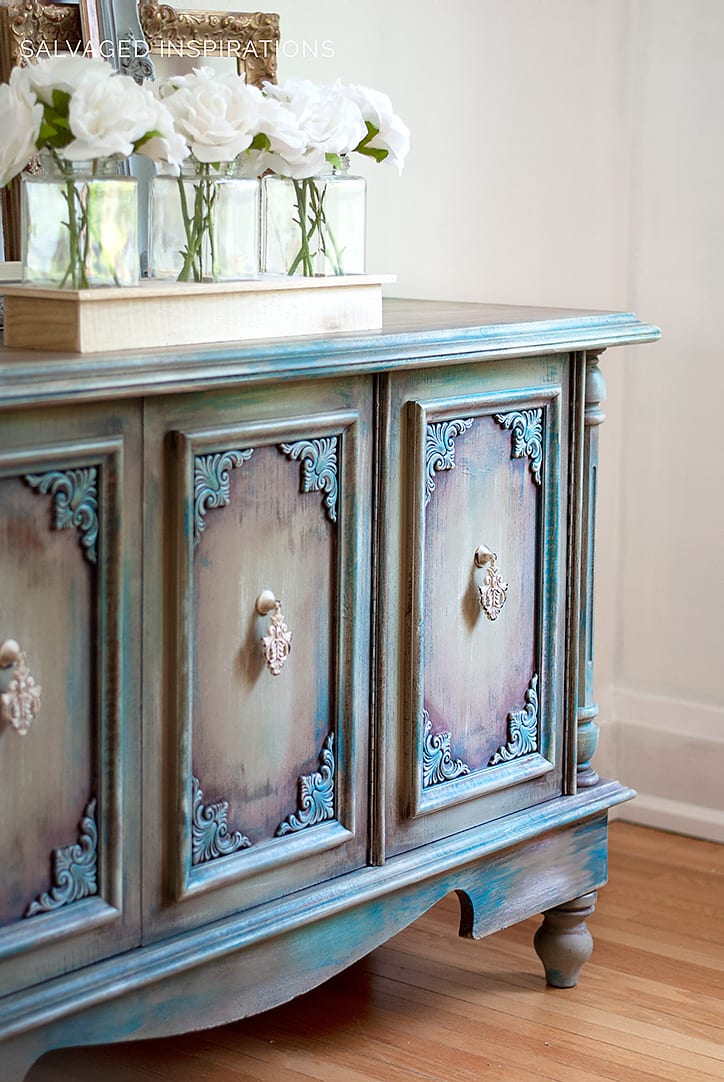
Once mixed, I used an inexpensive chip brush to apply the pink wax. I highlighted the inside of the panels, columns, and corners. If you apply it and find it’s not dark enough, you can apply – wipe it down – then apply another coat of your tinted wax.

Here’s what it looked like in the process. The pink wax was applied inside the left panel. No wax was on the right panel.
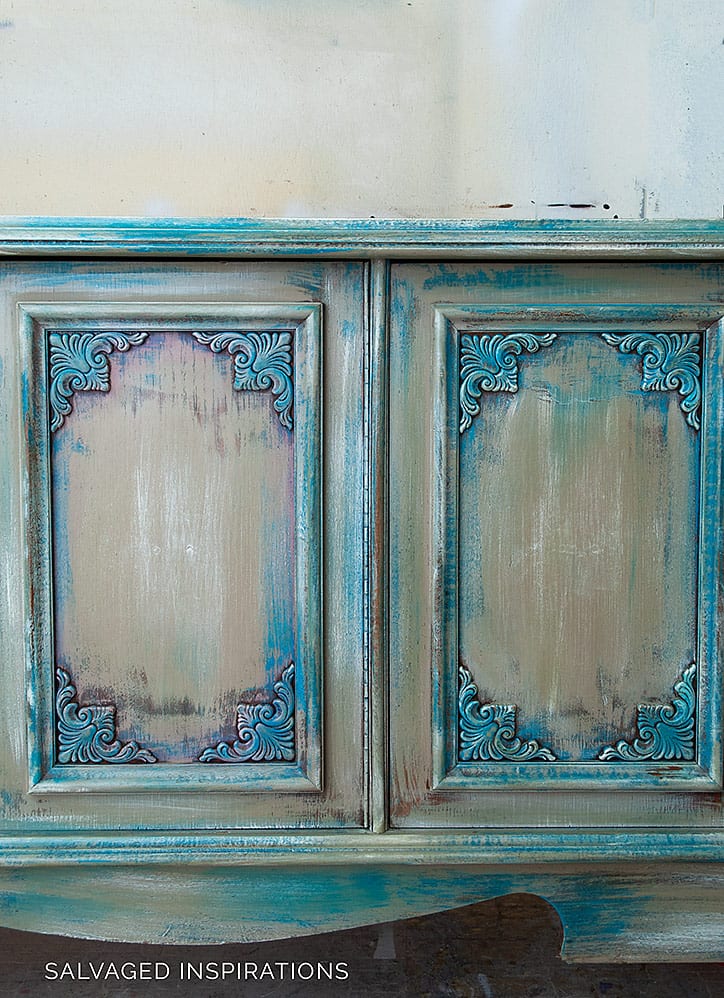
If the color seems a little bold or bright to you, no worries. You can “ERASE” your tinted wax with clear wax OR mute it with a dark wax… which is what I did in certain areas. Below, I’m applying a dark wax over the pink wax to create a layered and more antiqued effect. Look at all the depth and patina it creates!

The dry and cure time will depend on how much wax you apply and how much you wipe off. For this DIY Weathered Wood Bedroom Dresser, I brushed on the brown wax and just left it to dry. It took a few weeks to dry and a few more weeks to cure.
For this buffet, I won’t be listing it for sale right away for this very reason. I’ll probably wait a week or two until everything has dried 100%. It’s well worth the wait.
Update – This buffet never did get listed for sale. My sister Andrea fell in love with it. To this day, it sits behind her couch in her living room and looks awesome. 💙

I hope this has inspired you to give painting with wax a go. It can add depth and patina not to mention beautiful hues. The tinted wax options are only limited to the paint colors you have on hand and your imagination!
I’ll be back here on Thursday with my Furniture Fixer Uppers Crew transforming this Bombay Chest below. I’m SUPER excited. I’ve been searching for a Bombay piece of furniture to paint for years. They aren’t a common find around here so this is a special treat for me — I can’t wait to share what color I’m painting it!
Also, if you entered last week’s Dixie Belle Paint Giveaway, be sure to pop on over to this Painted Side Table post. A winner has been selected and has 48 hours to reply!
RELATED POSTS::
How To Tint Furniture Wax with Pant
DIY Weathered Wood | Bedroom Dresser Makeover
Layering Chalk Paint | Empire Dresser Makeover
Suzanne at Dixie Belle – How To Paint With Wax
I’d love to hear what you think of this painting with wax technique…and the buffet! If you have any waxing tips you’d like to share or have any questions, feel free to chime in. I always love hearing from you! Happy waxing and have an inspiring day!
Denise x
PIN AND SHARE!

That is a great technique, that can help when you just can’t get the last bit of paint to look like planned. I can see how it would be forgiving in getting things to blend better. Thanks for this tip. It may be a big help in getting, say a decoupaged poster/image to marry the poster edges better into the surrounding paint color. You did a lovely job on this piece.
It would be a perfect technique for blending decoupage!! Thanks Tracy! XOXO
Just lovely! Of course, you knocked it out of the park AGAIN!! XXO
Aww, thank you Caye! Hugs
Denise, I am amazed! You took a horrible piece of furniture and turned it into a gorgeous work of art! Talk about the ugly duckling transformation! Well done!
Aw, thank you so much!XOXO
I love this piece! & these colors
I’m going to try this – with red in place of pink – on a china cabinet.
Where did you get the knobs? Did you paint them too? If so, how, and what color(s) are they?
Thanks for sharing your inspiring projects!
thanks Keena! The knobs are from Hobby Lobby and not painted. Have fun with your china cabinet. I’d love to hear how it all turns out for you! 🙂
I simply love this piece! I am new to the chalk paint world. You said you ” top coated and protected it with this water-based poly. ” Do you know what kind you used? If I understand it correctly, you painted, poly top coated, and then did the tinted wax?
Thanks, Stacy! I used this Gator Hide Topcoat but it’s been so long I don’t remember if I applied it before or after the wax. With DB wax and topcoat they are water-based so are interchangable. Not so with oil-based waxes tho!
Beautiful!!
Thank you Lily! x
OMG Denise. This is my favorite piece so far! The colors are my style completely. I love everything you’ve done and am so appreciative that you share your ideas and techniques.
Have a lovely Thanksgiving!
Thanks Donna! Happy Thanksgiving to YOU! XOXO
Fantastic makeover and love the pink wax finish
Thanks so much Harjith! 🙂
Amazing transformation. You took this buffet from dated 70’s to gorgeous, updated, and fun.
Thanks, Monique! XOXO
Wow! Absolutely gorgeous!
Thanks Toni! 🙂
Well, I have to copy so many others. Thus puece us stunning. The technique is beautiful and takes it out of the 70’s. You do such beautiful work. I so look forward to your next project. Happy Thanksgiving. So thankful I found your blog. It really inspires me. Keep sharing with us.
Thanks so much, Kathy, and Happy Thanksgiving to you! 🙂
What a cool finish, Denise! You definitely are not afraid to try new things which is why you’re so successful! I recently chalk painted a Bergere chair with Dixie Belle caviar, after seeing some pieces you’ve done. But after distressing part of it, I don’t think I should have painted it. Now I want to take it back to the wood and have it in the light wood colour that is so popular right now. Where do you get your Citri Strip? Or should I just sand it back? Also, any ideas for how to finish the light coloured wood? It may be oak because it’s definitely hardwood. Any help would be appreciated!
Lee
I use to get my CitriStip at Home Depot or Amazon but when I looked on Amazon it was super expensive here in Canada… not sure about the States tho? yes. I would strip it back. At least the parts that are difficult to sand the paint off. Then maybe bleach it or do a white wash for a nice light look. I really like that look as well!
Thanks, Denise! I’ll sand off what I can and use stripper for the rest. I like your idea of bleaching the wood!
Off to work I go! 🤗
Thanks again!
Lee
That is sooooo gorgeous. I’m going to try this on a large old picture frame I have. Exciting.
That IS exciting! I’d love to hear how it all works out for you. 🙂
Majestically beautiful!
Thanks Stella! 🙂
Absolutely bold and gorgeous!!! What a transformation!!!
I hope to be so bold some day.
Thank you Meg! XOXO
Absolutely bold and gorgeous!!! What a transformation!!!
Thanks so much Meg! xox
This piece is fabulous. I love what you did to it. Thanks.
You’re sweet Lori, thank YOU! XOXO
I really love your work and your posts! Thank you so much for sharing!
Thank you! 🙂
This is fantastic and it will help me save several pieces that seem unfinished to me. I am a new subscriber and your work is gorgeous! Love it all!! Thank you so much for this – I am inspired again!
Hi Marilu and a big warm WELCOME! Thanks and I’m glad it inspired you! 😉
Denise, you can make the ugliest furniture pretty! this is now a beautiful piece! thanks for the inspiration!
lol… huge compliment, thanks Gwen!!!
Whoa! Who would have thought you could salvage 70s furniture?!? Love this! I have a bedroom set that would look great in this! Thanks for the idea!
Thanks and so glad it sparked some ideas! xoxo
Is this piece for sale?
Hi Brandi! 🙂 This piece found it’s forever home.
Hi Denise,
In what order was the paint layered? 1st ,2nd and 3rd?
Hi Cheryl! 🙂 I focused this post on ‘painting with tinted wax’ and not the layered colors. So yikes, there is no way I can remember which order I painted these colors…sorry! With custom pieces – once I get into the groove I get lost in it.
I love your work. I’ve never used wax before so I am learning so much from you. I actually have these crates I saved from work that are bright and colorful because it’s recycled plastic and metal. I have never attempted furniture in this way so I want to make sure I seal it right. I’d love to send you some pictures of the crates so you can see what I’m worki f with. Maybe you could have some suggestions on sealing and designing. I also thought about using some of the slats for wall decor. I wish I could post a picture but I can’t so I hope to hear from you!
Hi Brianna! Feel free to email me. I get quite a bit of email but I’ll do my best to get back to you asap. 🙂
Beautiful piece! Question tho… How or why is mixing paint with wax better than using wax alone?
Hi Robin and thank you! Mixing paint with wax isn’t better than using wax alone but it can help create different looks. By adding in a color paint (in this case pink) to the wax, it creates a pinkish hue when applied to the piece.
Beautiful technique! I love this piece! You have youtube channel with tutorials?
Thanks so much Lily! 🙂 And not yet, I’m working on it tho. 🙂
Hi! That’s amazing. Do you have an article how you painted this piece before the pink wax?
Thanks.
Hi Emilia! I used a layered painting technique similar to this but used the colors listed above. 🙂
I appreciate the directions, I’ve watched others videos but they get to talking rather than explaining. I’m the type of person that needs to know how, I don’t care about the Chit Chat. I really appreciate the right up. Beautiful piece!
I’m so glad you’ve found this helpful Carla and I appreciate YOU for dropping by. Have fun with your project(s). 🙂
Fantastic fabulous piece! I’ve been tinting my own wax for years and I think I learned it from you! 😉There’s something very different about all the techniques of finishing a piece. and so fun to layer them. Great post!
It is fun to layer, isn’t it!? And when you mix a custom wax that works spot on with what you envision for a piece, it’s so rewarding. I’m glad you enjoyed the post Lorin. XOXO
You are a furniture fix genius ! I think you need to write a book or make a DVD with all your awesome techniques.I would definitely buy..I would never have thought of the added legs but what a big difference.. LOVE LOVE LOVE
What a HUGE compliment Feriba, thank YOU! I’ve thought of creating a DIY Furniture Painting book but the time it takes to put together always escapes me. I’m so glad you dropped by and found a little inspiration in this piece. Thank you! 🙂
This buffet is AWESOME! I have a set of night tables similar in style that I can’t wait to try this on. Thank you and I love all your work.
Thanks, Nicki! It’s a fun finish. If you decide to give it a try on your night tables, I’d love to hear how it turns out for you. 🙂
Love your techniques! So awesome to see folks who aren’t afraid of color! Never have understood that exactly. You can always paint a piece again if you don’t like the color. I usually find that some of my “mistakes” are my best works. One technique I use a good bit will give the finish a fantastic sheen, different from regular polishing of wax, is to use fine steel wool. I use it to vary the color which the wax deposits also as you can vary the pressure you apply. The steel wool seems to produce a harder finish to the wax than cloth does. I have found it especially pretty on blue and white or off-white pieces. I also use very fine sandpaper at times to polish the wax. It gives a hard finish like the steel wool, but doesn’t produce the same sheen. Thanks! Von, “Bashful Rabbit”
I’ve never tried steel wool to buff out wax! Thanks for this – a must try! 🙂
This is just beautiful! I love all the colors you chose, it’s just perfect on this piece.
Thanks so much Kaycee! XO
Absolutely exquisite buffet Denise!!! I am IN LOVE with this piece of furniture. You turned it from outdated ugly 1970’s to simply beautiful. And unique. And wonderfully colorful. AMAZING 🙂
So glad you love it and thanks so much!!! It was kind of dated 70’s, wasn’t it?.. 😉 I don’t know if you noticed but I also added new feet and that really helped update the look too. I’m tempted to seek out more of these 70’s pieces now. 🙂
I have never tried tinting wax with paint but oh my do I ever love the results! Looks to be so much fun and the possibilities are endless. I pinned this project twice; once to my Painting Tips Board and the other to my Buffet Makeover Board. Gorgeous gorgeous gorgeous 🙂
Hi Marie! Painting with wax is fuuuuun so if you ever give it a try, you’ll have to let me know what you think. 🙂 Thanks for the PINS, my friend!!! Hugs XO
Hello Denise, I love this technique, it is certain that I will do this technique with tinted wax, I really like the final effect, this piece of furniture is simply
splendid, thank you for this tutorial! Can I know that it is water-based poly you use on your furniture before going to the wax?
Hi Martine! Yes, I used this waterbased poly. I like it because it’s really easy to apply with a sponge, levels nicely, is totally matte AND it’s waterproof. 🙂
In love!! Love these color choices <3
Thanks so much, Alanna! DB has amazing colors to choose from. 😉
Wow!!! Love the finished look! I do enjoy your finished furniture pieces. Thanks for inspiring us to step outside our usual comfort zone,😊
Thanks, Louise! 🙂 🙂 I find it fun to step outside my comfort zone so I don’t mind being the guinea-pig…lol. 😉
Wow! You continue to amaze and inspire me!! So beautiful!
Hi Debra! 🙂 So glad you like it…thanks!
Denise you do such beautiful work! I noticed that you put a coat of poly on before the wax; can you add another coat of poly over the wax to make it more durable? I’ve seen where wax finishes don’t hold up well without re-waxing in a couple years. and I don’t want to sell it to someone if the finish has to be re-waxed later on.
Hi Jackie! No, I wouldn’t recommend it because wax repels water based poly. I wrote an entire article on poly over wax here if you’d like to take a peek.
Absolutely STUNNING!!! Thank you so much for sharing your techniques!!!
Thank YOU Suzanne! Sending you a hug (yes, I’m a hugger!) for amazing products and inspiration! 🙂
I look forward Mondays to view your weekly newsletter. You inspire me! Didn’t know I could color wax, but now I will try it.
I need your creative advice. I have a dresser and mirror that has chip carving on it: leaves, flowers, and vines Not sure how to take advantage of this interesting detail. This vintage piece is made of walnut wood. I love painting but I am torn between finishing the beautiful wood with Danish oil, or a full blown paint,distress,wax job. If I paint, I’m not sure how to deal with the recessed carving to highlight it. Do you have any pieces you have done like this? Thanks!
Oh, so many options Elizabeth and yes, I’ve done my fair share! 🙂 To highlight those gorgeous carved details you could use gilding wax, tinted wax, or maybe a dry brush technique to bring out all that goodness. You could also paint and then distress by sanding back if you like that look. It sounds like a beautiful project either way you go. 🙂
Holey Moley you scared me with that hot oink! But what a gorgeous difference!
Thanks so much, Theresa! I was a little scare too..lol. I wasn’t 100% sure it was going to turn out like I envisioned but even if it didn’t, it’s easy to ‘erase’ or go over it with dark wax etc. 🙂 So glad you like it…thanks!
Wow!! That piece came out stunning. It originally screamed 1970’s, until you brought it to another level. Beautiful. And using the pink wax brings me back about 20 years ago when I was learning to paint with acrylics. My mentor was showing me different techniques to make a painting come to life. I was working with Rookwood Red as a base color. She had me take Hot Shots Fiery Red to highlight. I was struck with fear, since I worked so hard at the base coat on the piece. But once I added that incredibly harsh color to the red, it brought the best highlight I could have ever imagined. That particular piece brought courage to me that I appreciated my mentor coaxing me to use anyway. Thank you for this wonderful post!
Thank you! And I LOVE that you shared this because that’s exactly how I felt Cindy! Once you put in all the work to create a piece, experimenting with something new feels risky, doesn’t it?! Are you still painting with acrylics? I recently bought myself watercolors and watercolor brushes, paper etc. I played around with watercolors many years ago but I have the urge to give it a try again. For some reason, watercolors feel less intimidating to me than oils or acrylics but I would love to try them one day too. 🙂
Absolutely stunning!
Thanks, Katherine! XO
Yet another beautiful transformation Denise! Happy Victoria Day my friend xxx
I’m a day late because I was basically offline yesterday, but Happy Victoria Day to you too Carole. I hope you had a fun relaxing long weekend my friend! And thank you. XOXO 🙂
Amazingly cool finish! Where did you find the lovely new hardware? (Sorry if I missed that part! Three kids home today I’m so scattered. Lol)
Hi Mary Beth! Thanks so much. The hardware is from Hobby Lobby. To blend them in nicely, I used a little dark wax to antique them. Sorry, I’m a day late with comments, but I hope you enjoyed the day with your three little ones. 🙂
So beautifully done, as always! I love the Dixie Belle product line and love the many different looks you create with it. This one is amazing in its own right. A true stand out from other painted pieces. And isn’t this what hand painting is all about? Art and the decor coming together? There’s a Boho loving person out there who is in for a real treat! XOXO ~~ Susie from The Chelsea Project
Thanks so much, Susie! XO Dixie Belle carries these striking colors that get me thinking and push me out of my comfort zone.. it’s like I’m addicted…what can I do next! 😉
Oh my, you are such an inspiration… in fact you’re to blame for me redecorating my entire house. I’ve re-purposed just about all of my furniture too. But THIS is particularly beautiful. 🙂
I’ll take that blame all day long! hehe 😉 I’m so glad you like the piece, thanks Cindy. XO
What a gorgeous piece. I would never have thought of pink but the blending and the other colors are just perfect. Great job!!!
Thank you Angel!!! 🙂