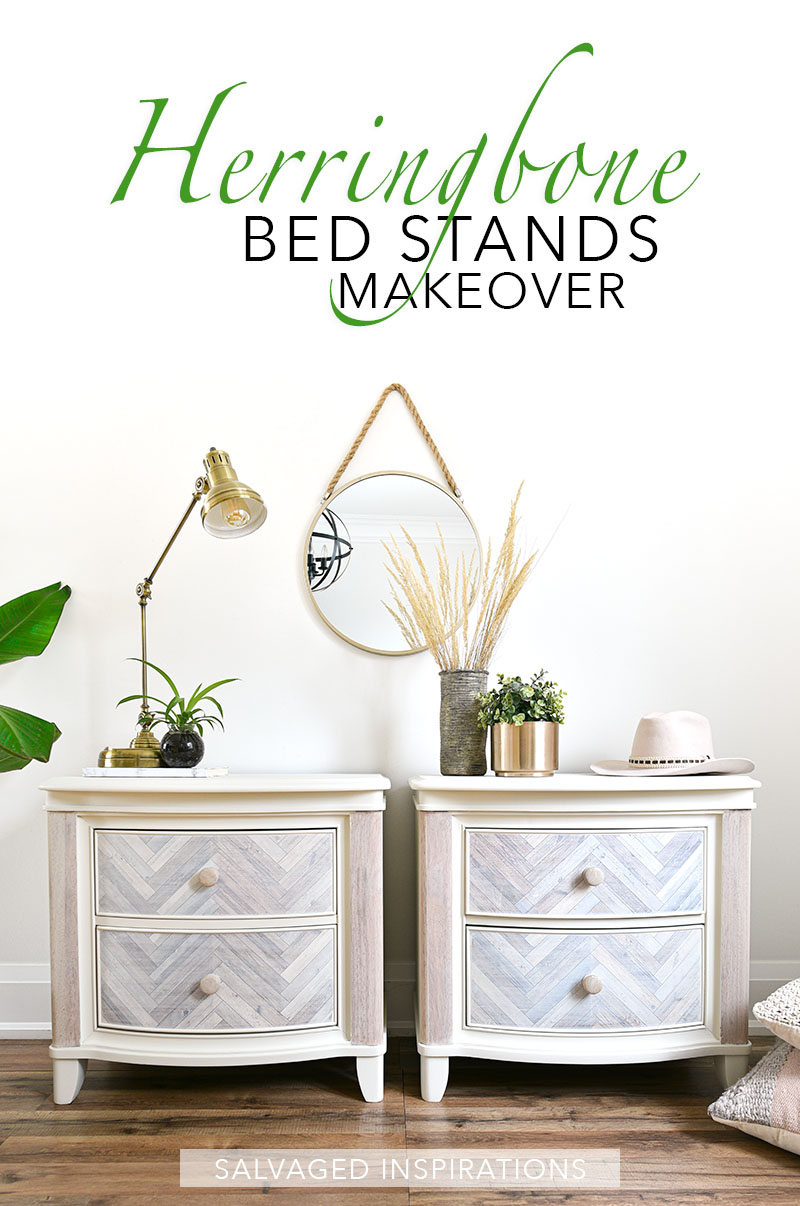
HERE IS A SIMPLE WAY TO ADD SOME HERRINGBONE ‘WOOD’ DETAILING TO YOUR PAINTED FURNITURE! | $12.99 BEDSTAND MAKEOVERS
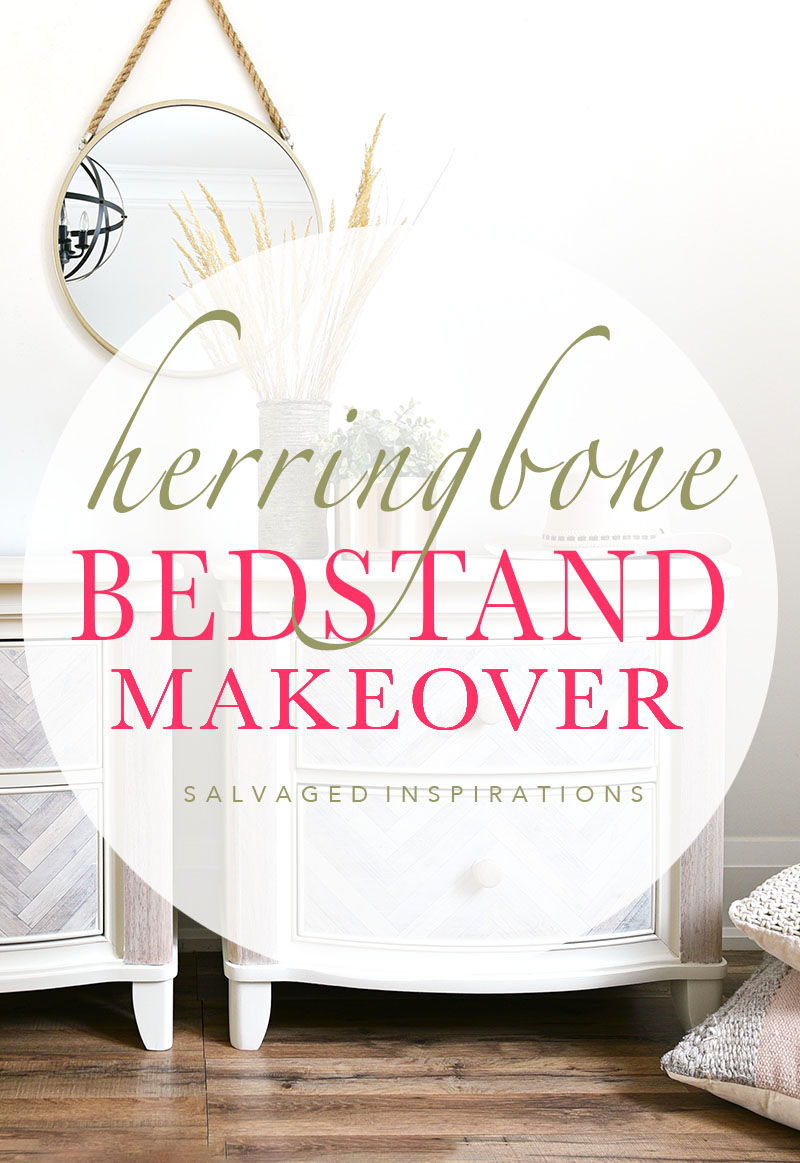 Hi sweet friends! I have an EASY way to dupe the popular Herringbone Detail Trend onto your furniture without the work or cost of using real wood. I can’t wait to share how this $12.99 bedstand set came together. You’re not going to believe how authentic and gorgeous this looks!
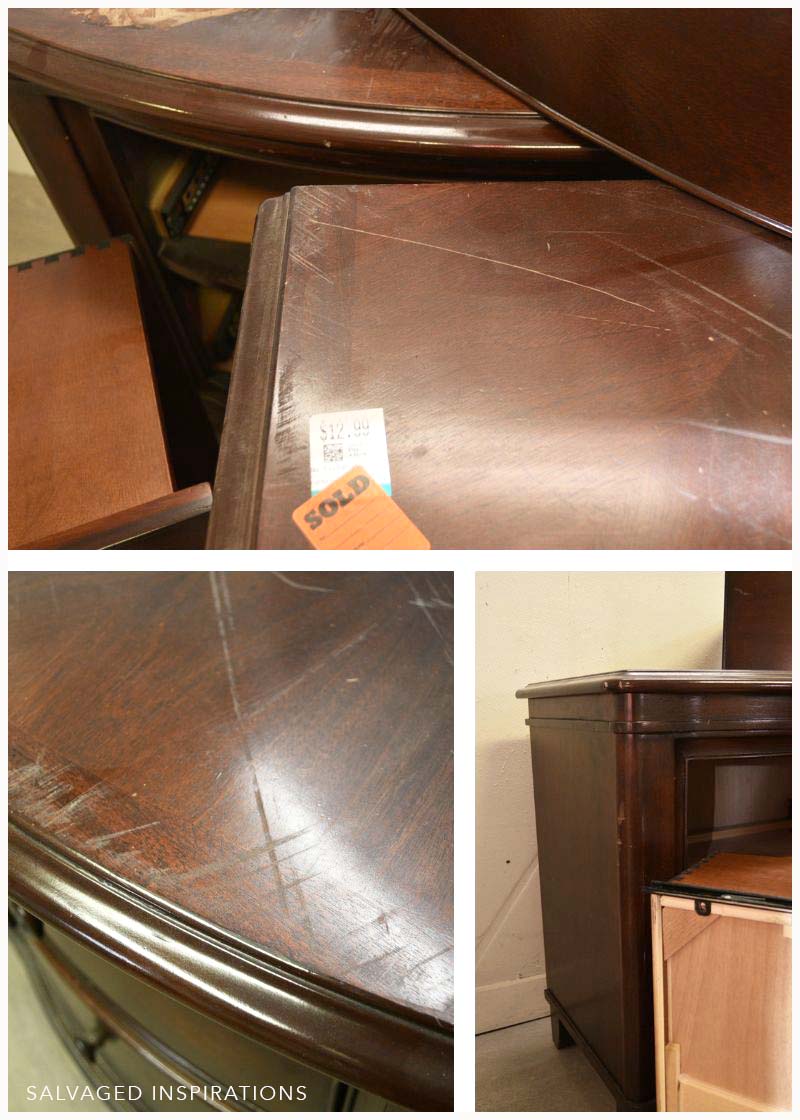
Here’s what I started with. I found these nightstands at my local thrift store for selling for $12.99 for the set.

Both were structurally sound. All the drawers worked great. However, they looked dark and dated. They were also scratched up. I was originally thinking they would look amazing sanded down to bare wood but these nightstands fought me every step of the way. These bedstands took me what felt like forevvvvver to finish… at least triple the time I had originally planned on spending on them.
Below I’m sharing all the ‘twists’ I ran into with this makeover. If you’ve ever been frustrated or felt like giving up on a project, you’re NOT ALONE! It happens. Even after years of painting furniture — things don’t always go smoothly and these nightstands a the perfect example.
THIS POST IS SPONSORED/CONTAINS AFFILIATE LINKS TO PRODUCTS I USE. YOU CAN SEE MY FULL DISCLOSURE HERE.
SOURCE LIST
$12.99 Bed Stand Tables – SALVAGED
White Lightening
Sand Paper | Tack Cloth
Shop Towels
Wood Filler
BIN Shellac Base Primer
2″ Mini Brush
Endless Shore SILK Paint
Rustic Herringbone Transfer
Satin Clear Coat
TOOL LIST
Orbital Sander
Sponge Attachment for Sander
Putty Knife
Fine Spray Water Mister
Paint Scraper Tool
Heat Gun
HERRINGBONE BEDSTANDS
This was one of those makeovers that took a few twists and turns before I got it right but I’m so glad I hung in there and finished them. Here’s how it came together…
PREP | CLEAN | SAND
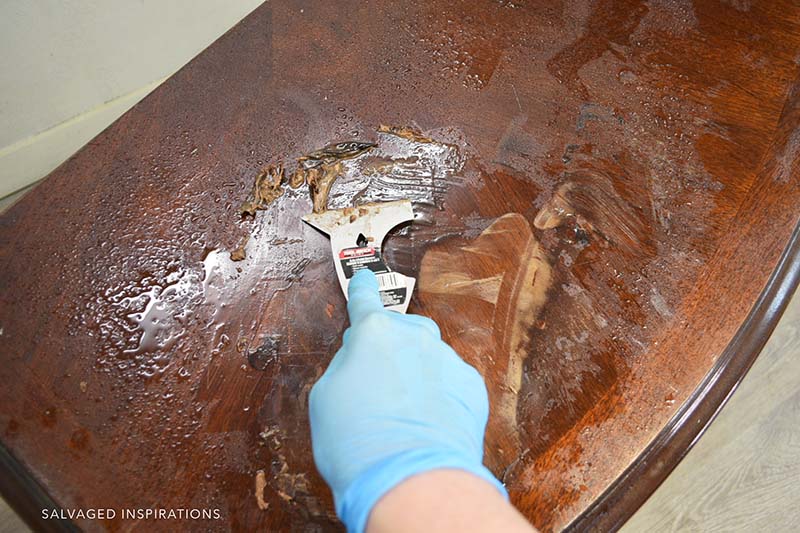
I gave these stands a good cleaning with this White Lightening. I used a paint scraper tool to scrape off the crud on the top and also inside the drawers. The stripper I’m scraping off in the pic below was applied by ME.
Twist #1. When I brought this set home, I applied some Citristrip to see what the raw wood underneath looked like – but then I forgot about it. Then had a dried mess which took extra time to clean.
SANDING
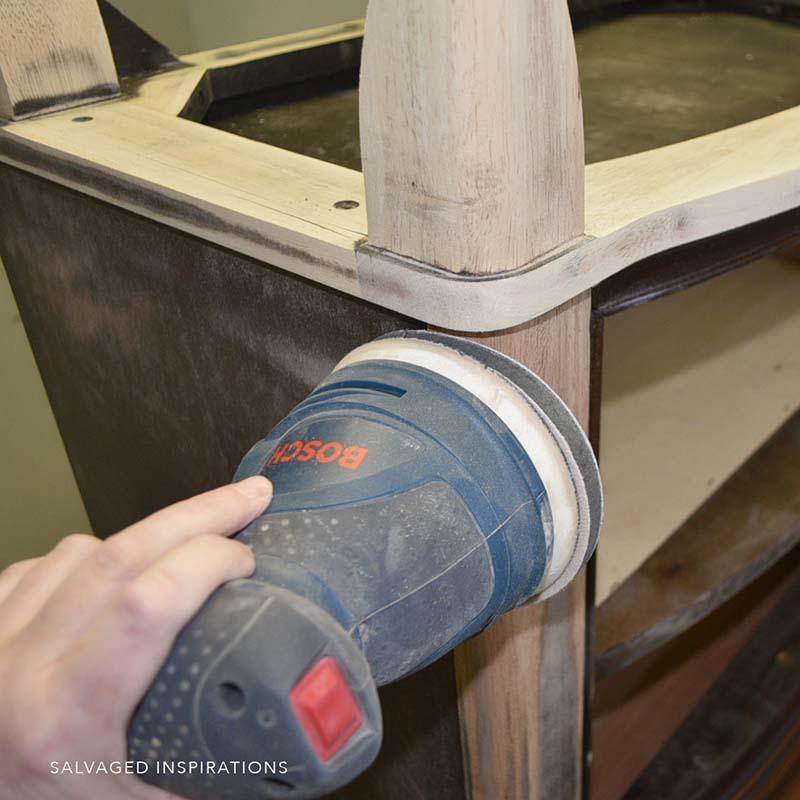
With the help of a sanding sponge, I started sanding the dated finish off the legs, sides, and tops. These soft sponge cushion sanding sponges are super helpful when sanding rounded and contoured edges. They attach to my orbital sander and then the sandpaper attaches on top of the sponge so a cushion is created.
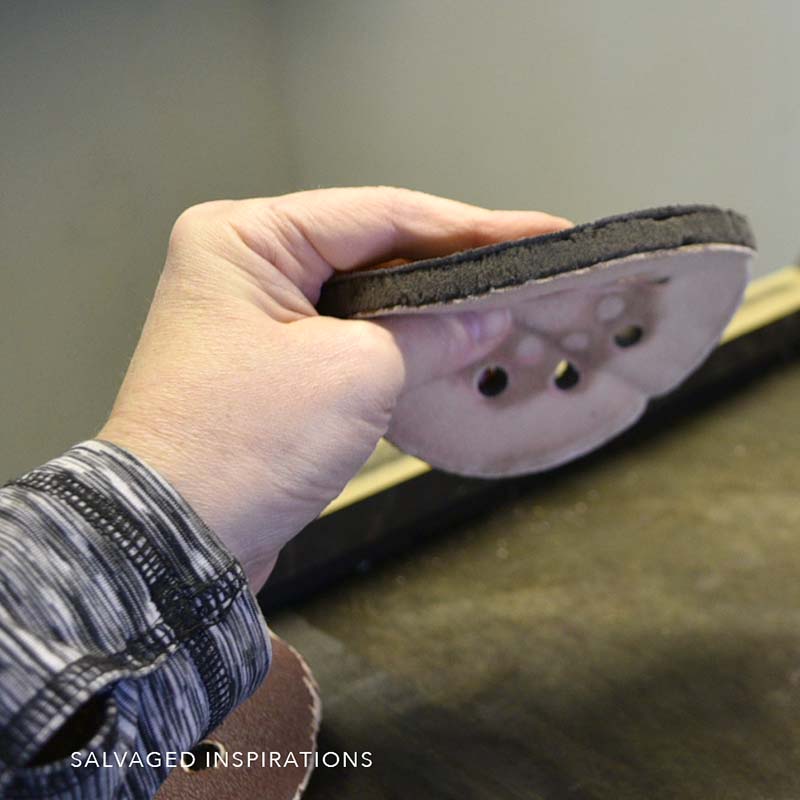
I paid around $15 for a pack of two. It’s six months later and they still work really well. If you’re on a budget or just starting out, it’s a great alternative to some of the more expensive sanding systems out there.
DESIGN CHANGE
After sanding I wasn’t woohoo about what I saw.
Twist #2. First off, I sanded through the veneer top on one of these night tables which I’ll share in this Saturday’s video.
Twist #3. Also, the wood on the two side panels didn’t match the wood feet or base. So rather than continue with my original plan (sanding the drawer fronts as well) I changed my design plan.
SKIMMING FOR A SMOOTH TOP
Because I had sanded the entire top (and sanded through the veneer) on one of these nightstands, I had wood grain grooves on one top but a smooth finish on the other.
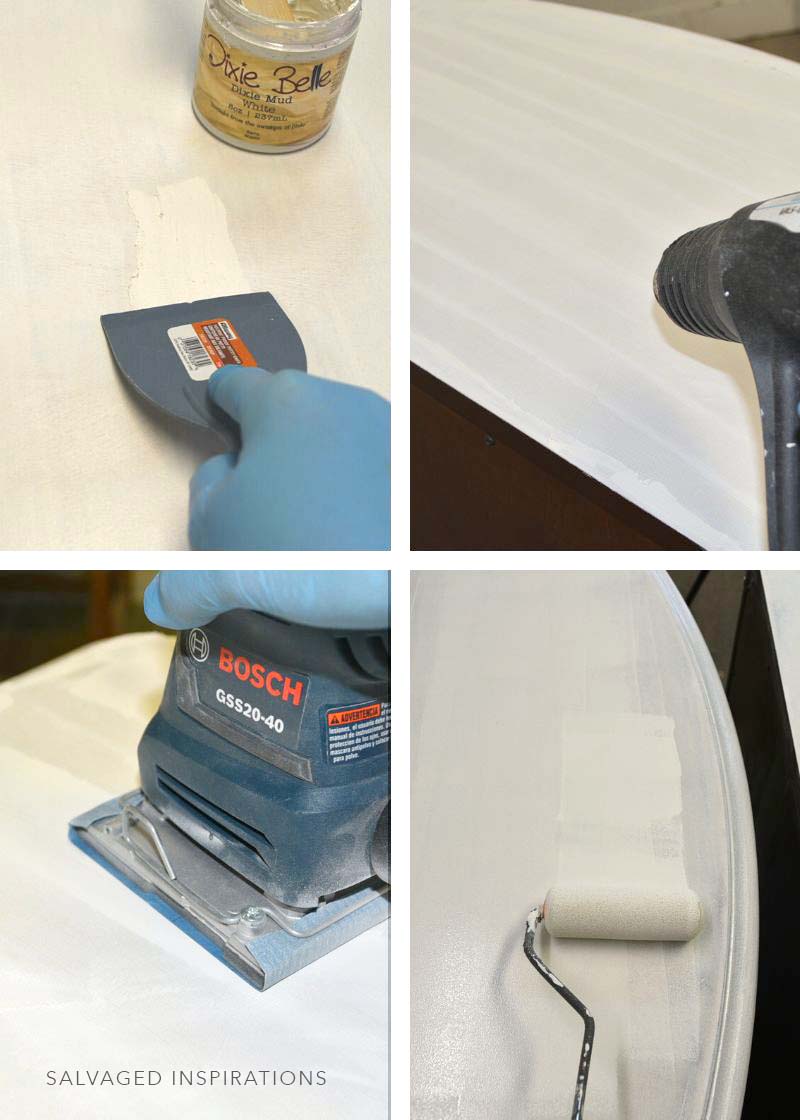
To fix this and create a perfectly smooth top so they matched, I used Dixie Belle Mud to skim the entire top of the bedstand.
- I used a putty knife to apply a thin layer of mud/wood fill.
- I sped up the dry time with my heat gun.
- I sanded it down perfectly smooth.
- And then reprimed the top with BIN Shellac Base Primer.
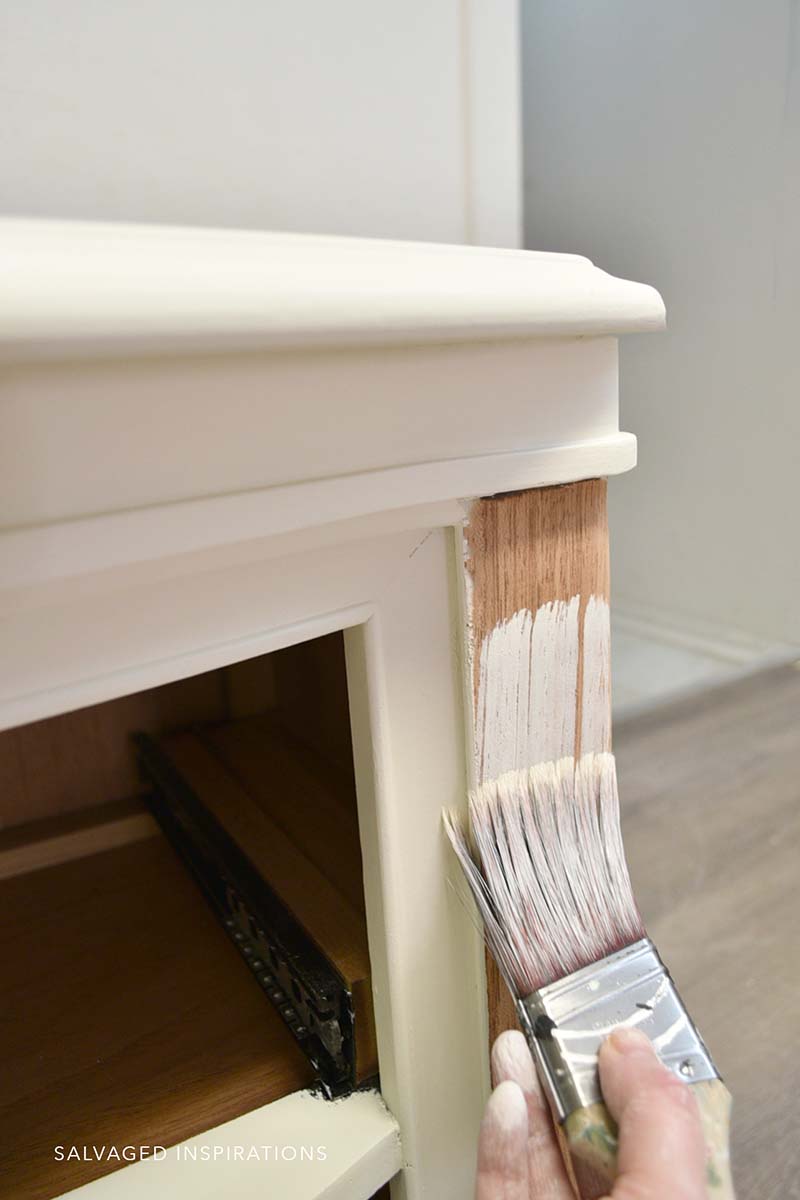
PRIMING & PAINTING
After all the skimming was sanded smooth and dry, I went ahead and added two coats of BIN Shellac Base Primer to cover all the bleed-through sanding between each coat. Then using my 2″ Mini Brush, I applied two coats of Endless Shore SILK Paint.
Twist #4. After all of the above I STILL had some bleedthrough peeking through so I gave it a light sanding and applied a third coat.
HERRINGBONE DESIGN
After all that sanding and priming and painting, I was excited to create a faux herringbone wood design on the drawers using this transfer!
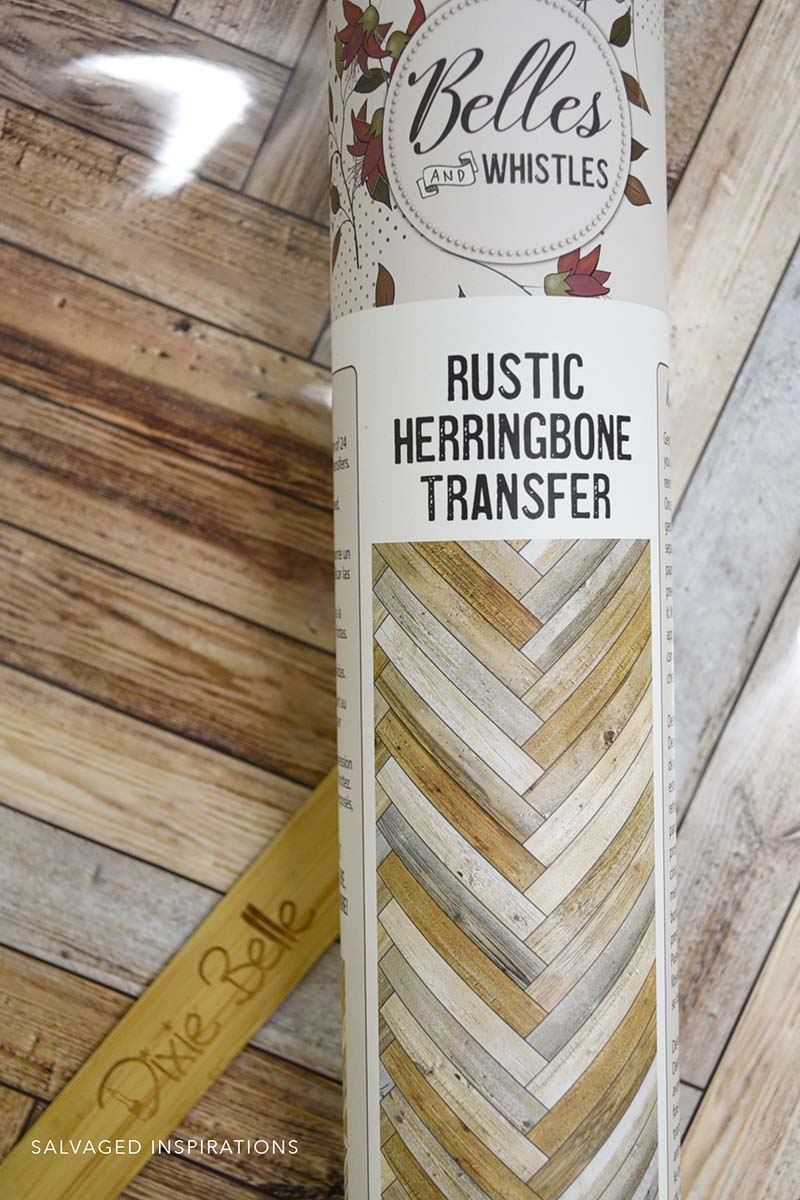
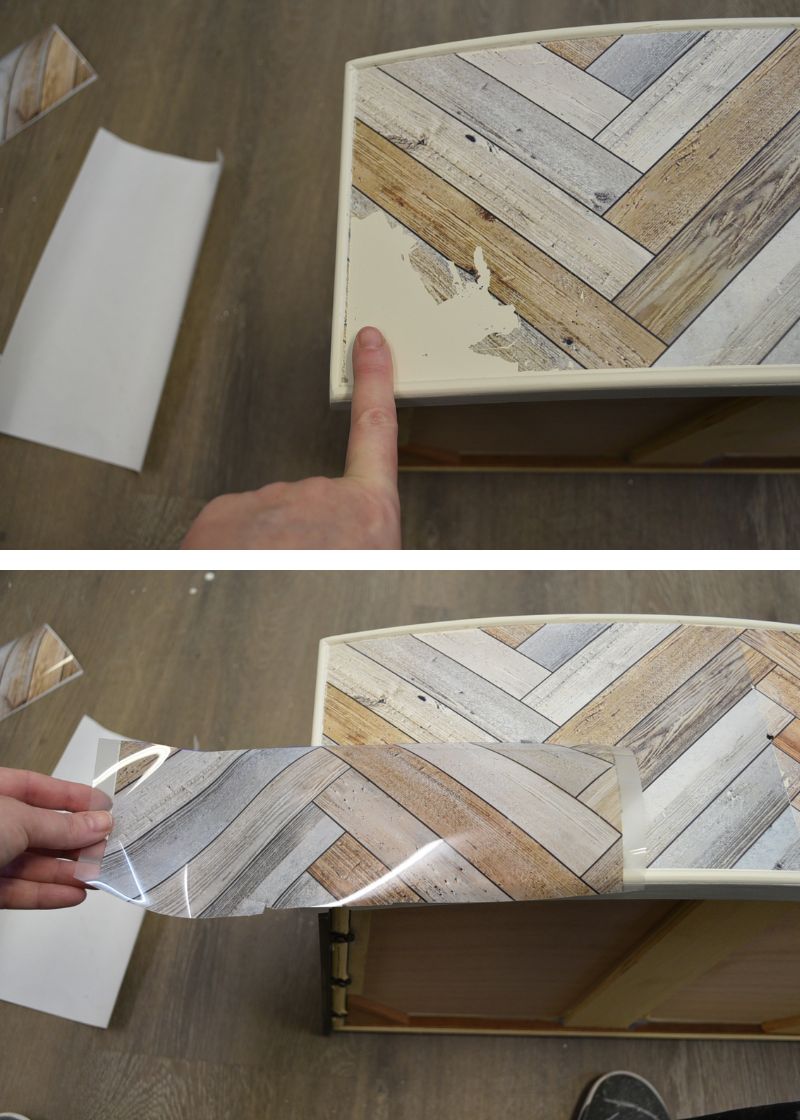
APPLYING THE TRANSFER
Here’s where I ran into a few more hiccups that also took a significant amount of time. This transfer was stored in a box on my basement floor. We’ve had some extremely cold weather and my studio floor “aka my basement” is cold.
Twist #5. While I was rubbing this transfer on, it kept cracking and tearing. Then when I removed the plastic, it took up a hunk of the design. To fix this, I had to keep matching designs from a leftover sheet and rub it on.
PAINT WASHING
To tie these bedstand tables together I made a paint wash. I added a 1/4 cup of Endless Shore and a 1/4 cup of water to create this wash. I applied three coats to the Rustic Herringbone Transfer.
Twist #6. The first coat repels and beads up so some patience and time is required. I added three coats of wash waiting for each coat to dry between coats.
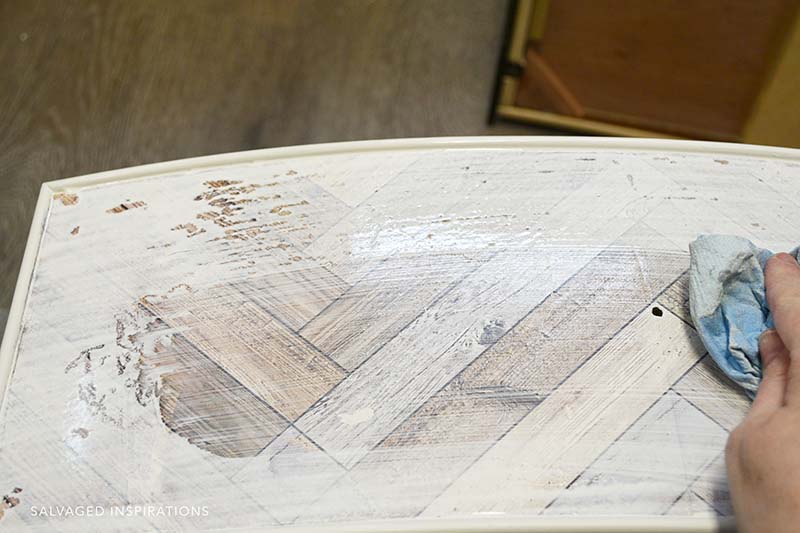
A paint wash is really easy to do and more cost-effective than using a stain. I did the exact same technique for the two raw wood side panels. The wood only took one coat of wash since it absorbed the color nicely.
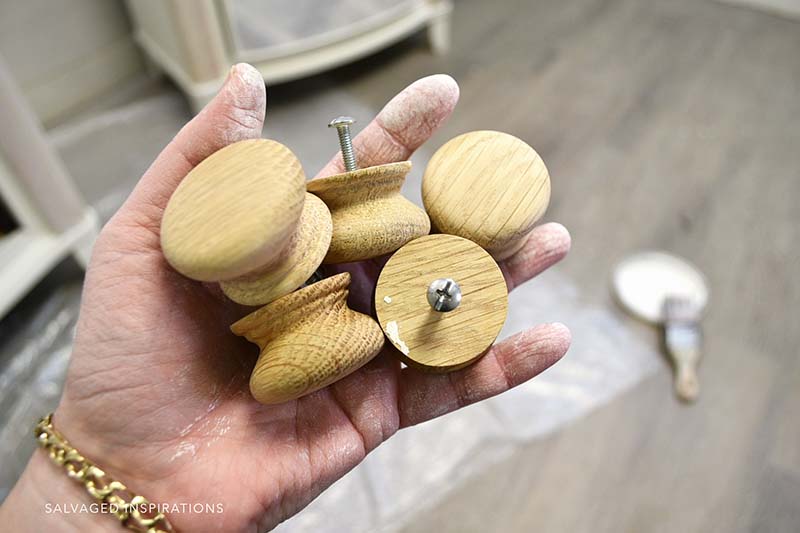
ADDING HARDWARE
I found these old wood knobs in my inventory and to match them up I gave them a paint wash and then a few coats of rub on poly for protection. They tie in with the theme really well!
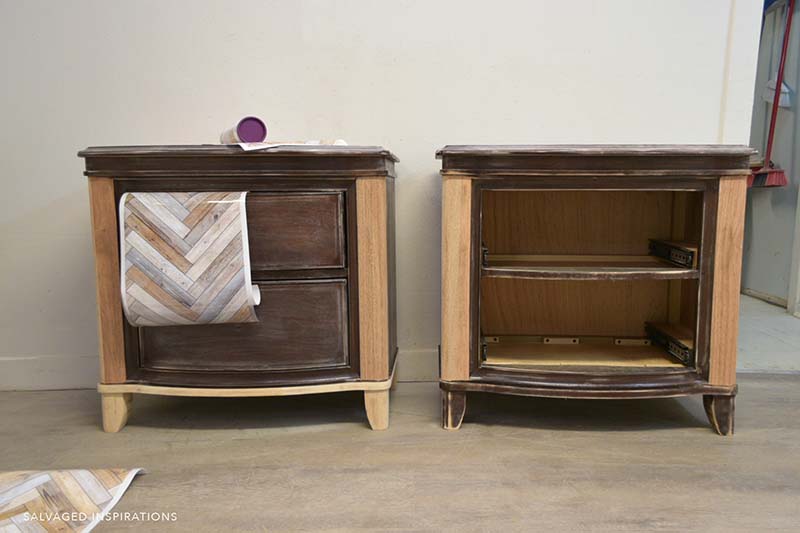
And before I share the finished look, I’m often asked how much paint I used on a project. For these two nightstands, half of this 16oz container was used.

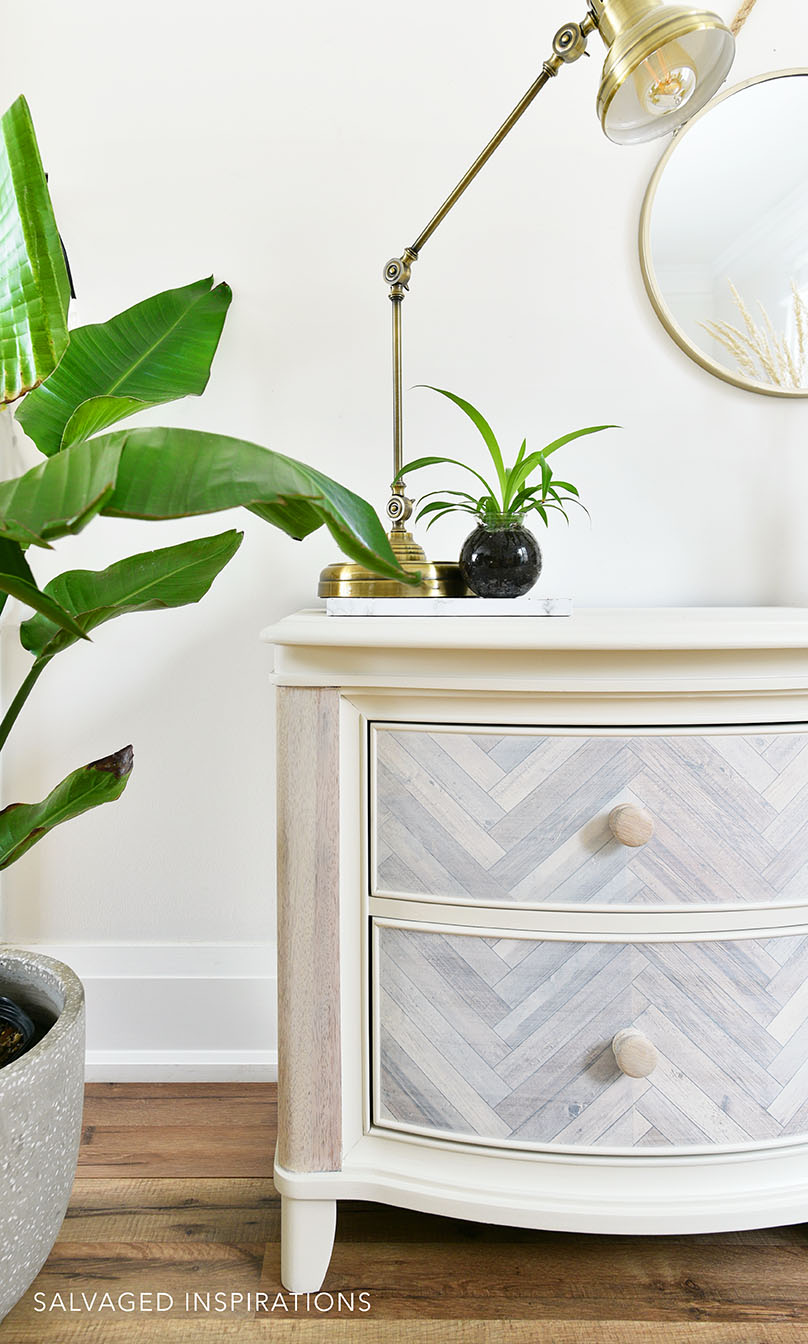
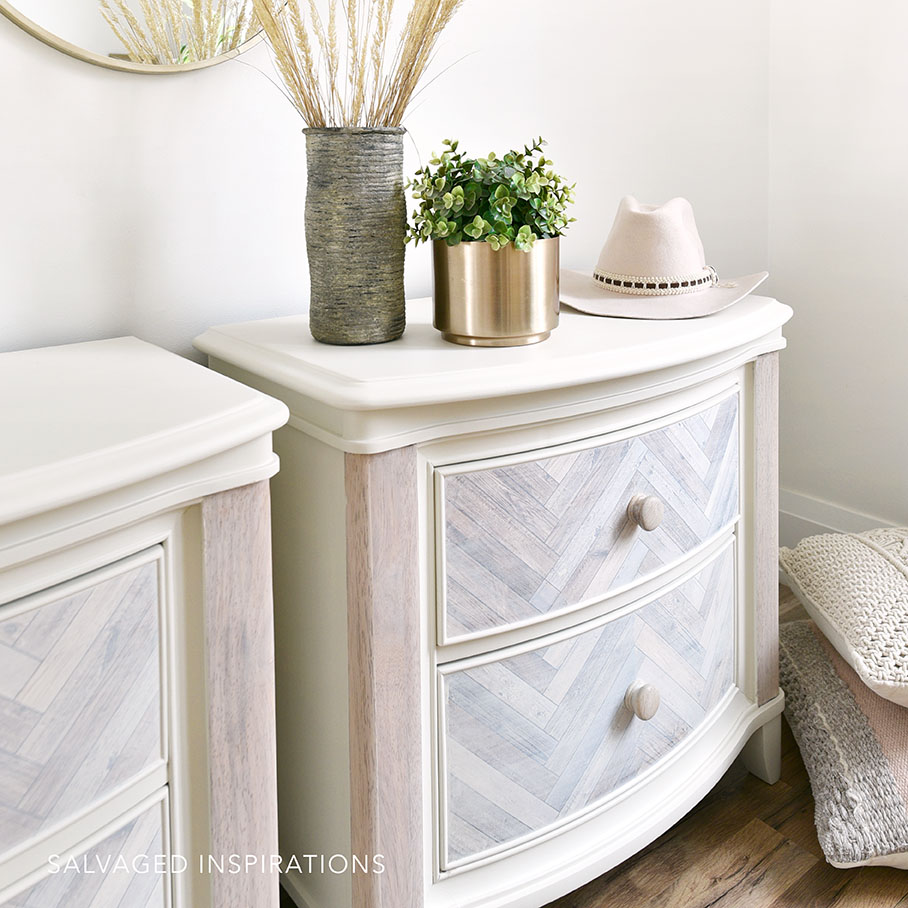
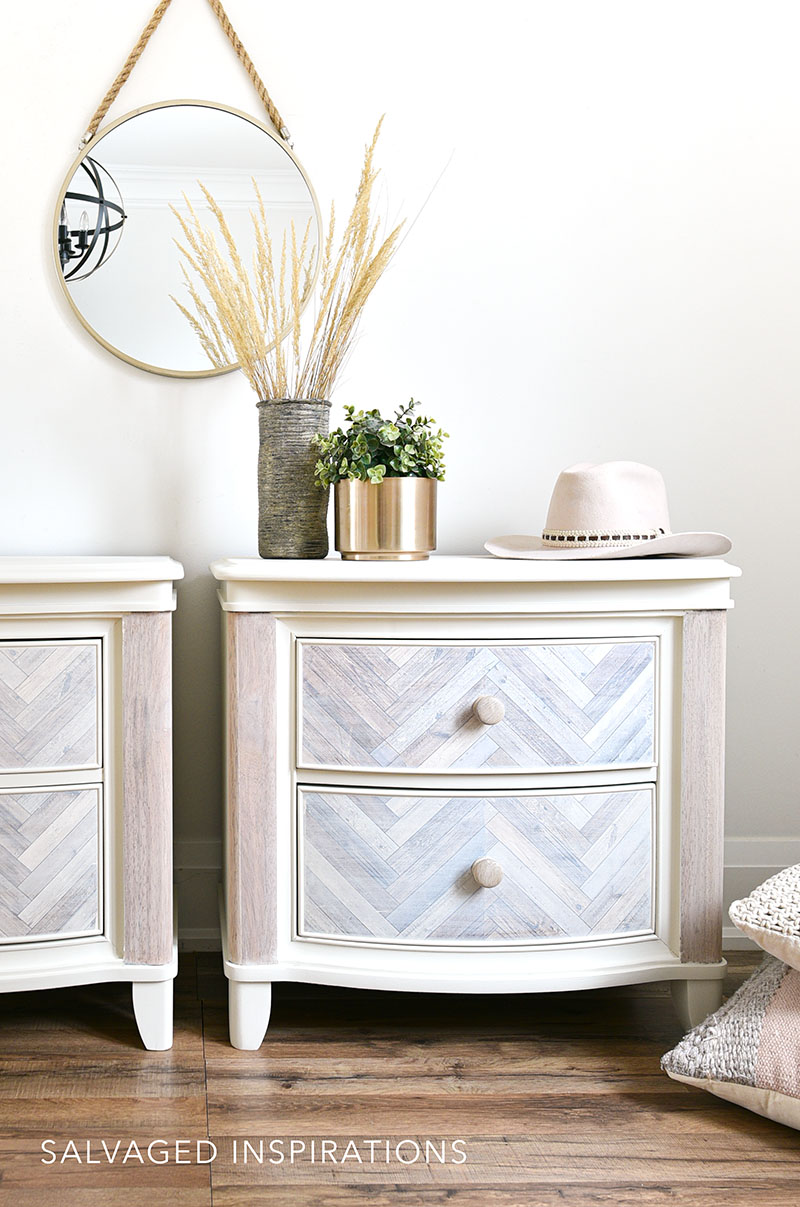
Whewwww… and here’s the finished look!
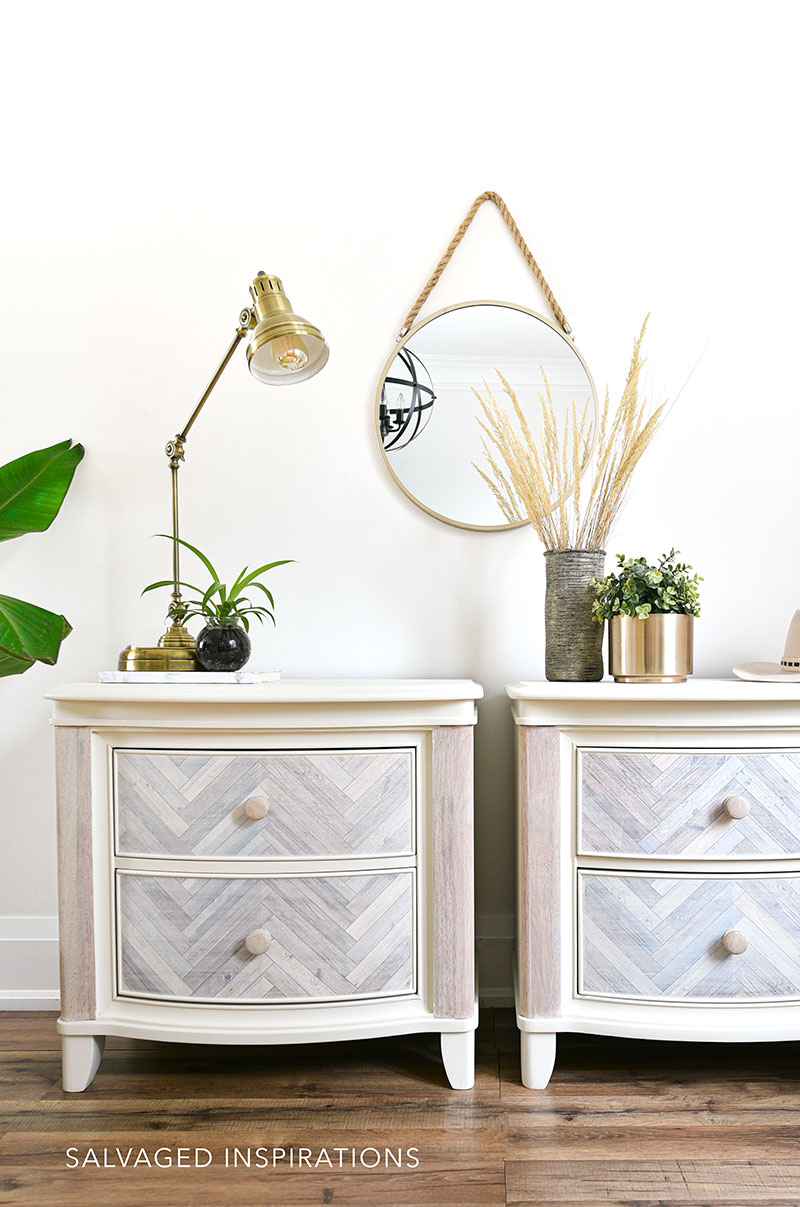
I LOVE the way they look and can’t wait to hear what YOU think!

Doesn’t the paint wash tie the herringbone pattern together really nicely?!
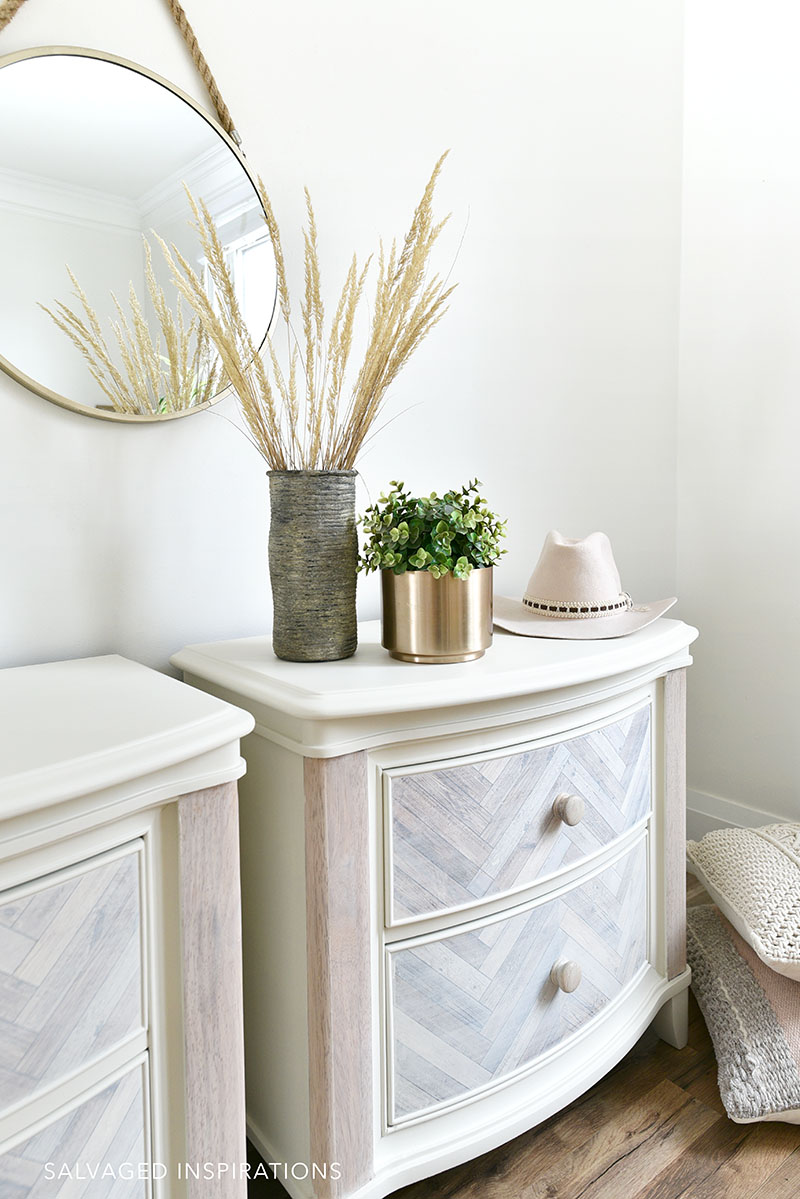
It looks even more authentic and beautiful than I thought it would.
YOUTUBE TUTORIAL
Here’s a step-by-step tutorial on Youtube. If you have any problems viewing it below, feel free to watch it on my Youtube Channel HERE. Our #siyoutubefamily is already a community of 35K so don’t forget to subscribe if you haven’t done so already! So exciting, thank YOU! 🙂
Here’s another look at this herringbone set before and after. I hope it’s inspired you and given you some new ideas for your projects. I also hope it has encouraged you to hang in there if a project is giving you a hard time. Feel free to PIN and SHARE so you can save it for later!

LET ME KNOW WHAT YOU THINK OF THIS HERRINGBONE TRANSFER ON THESE NIGHTSTANDS. ALSO, FEEL FREE TO ASK ANY QUESTIONS YOU MAY HAVE… I ALWAYS LOVE HEARING FROM YOU. IT MAKES MY DAY! 🙂
Happy furniture painting friends!
Denise x
RELATED POSTS::
PAINTED KITCHEN TABLE MAKEOVER
HOW TO WHITE WASH WOOD W STAIN
HOW TO WHITEWASH FURNITURE
HAIRPIN TABLE MAKEOVER
HAMPTON OLIVE ENTRY TABLE
PIN AND SHARE!


Wow. After going thru problem after problem, this is gorgeous! I don’t know how you come up with ways to fix things. You’re great at what you do!
I appreciate this Patty… this one tested my patience ;)…lol…thanks so much!
Love the imagination you bring to each of your projects and how often you create one-of-a-kind items. Although I’m not generally a fan of herringbone, I rate your nightstands an unqualified win.
Yay, huge compliment Cyndel, thank YOU! XOXO
Absolutely stunning!!! I would never have thought of doing the treatments you did but I absolutely love your results!! Great job and great inspiration!
Thank you Robin! 🙂
Hi Denise, They turned out gorgeous Love them!!
Thanks so much Donnita!
Hi Denise! I love this post- it has really inspired me. I have never tried a paintwash over a transfer before. Did you have to seal the transfer first with a clear top coat before you applied the paintwash? These came out so beautiful and Wow! $12.99 for the set?! I love thrift store finds. Take care & can’t wait for the next transformation! 🙂
So happy it’s inspired you with some ideas Crystal! I did not seal the transfer first. I just went ahead and applied 3 coats of wash. 🙂
Beautiful work !!!!!!!!
Thank you, thank you, thank you for sharing !!!!!
You’re an endless well of ideas !!!!!!!!!
Aw, thanks so much Pilar! XOXO
Hi Denise!! Wow! They turned out amazing. I have had trouble with a transfer before and I had to paint over mine it was so bad. Very frustrating. I didn’t think I would like the Herringbone transfer but you really made it work. Great job!
Thanks Cheryl and so frustrating, right?😟 And when I first saw this transfer I was kind of on the fence too but I actually LOVE it!
The night stands are beautiful! You have an endless number of great ideas and what a talent you have for sharing your ideas with all of us.
Super sweet, thanks so much Shari! 🙂
Gorgeous! So amazing how your vision and the transfer, paint, and the wash pulled together the different woods on the pieces. I know already that these pieces are going to be a 2023 favorite. Maybe even one of my all time favorites of yours.
Awww, I’m so GLAD you like them Joanne!!! Thank YOU! XOXO
Love, love, love 💕 💕💕
Thanks Susan! 🙂
Denise,
These are amazing! I don’t see how you even come up with these ideas. I would have snapped these up if I had seen them in a store!!!!!!!! I can’t wait to see what you do next.
Aw, such a huge compliment… thank you Marian! XOXO
OMG! Fabulous Job
Thanks so much Rebecca! XOXO
Gorgeous! Even though you had problems with the transfer (I’ve had that happen too–I attributed it to the temp of where I stored it, BTW) it’s a better solution than creating that herringbone look with wood. AND, you really improved that transfer with the wash. You made it modern and pretty, Another great job! You inspire me!!
Oh, thanks so much Leslie!!! Now that a few of you have said you’ve had the same problem, lesson learned! I’ll be storing my transfers properly from here on in! TY
You pushed through all the problems when most would have chalked this project up to a lesson learned! You have such great taste and consistently overcome to make great design decisions always appropriate for the pieces that are most challenging!!
Thank you so much for the encouragement you give to take projects like this on! This project is definitely an upscale for sure!
Thank you Frank!🤗 This project did teach me a few things so I’m glad I pushed through. NOT to ‘store’ my transfers on my basement floor is one big lesson!
Hi Denise your perseverence sure paid off! These are just fabulous! What a great use of multi ideas all on one set!
Thx so much for continued inspirations!
Yay, thanks Dawn!!! You just put a smile on my face! XOXO
I love the nightstands. The colour of the paint is a great choice. ; I also love the transfer. You always do a fantastic job on all your projects.
Thanks so much, Margaret! 🙂
Amazing transformation! SO much better.
Thanks Lizzy!🤗💕
Very classy! Ordinarily, I’d pass on anything herringbone, so I’m glad I opened this post and took a look. They are really beautiful. Makes me wish I had a place for them in my house. You did a wonderful job, and I’m beyond impressed that you hung in there through so many problems. You go, girl!
This is a huge compliment, thank you Gloria! XOXO
It stinks that these gave you so much trouble, but they turned out so cute!! XO
Double trouble!😅 Thanks my friend! XOXO
Well THAT was an ordeal for you! I have a couple of thoughts…Since the transfer was shiny how long will the 3 coats of wash last on the slick surface without it becoming marred? I betcha that the drawer fronts, since they are most visible, would probably have been identical pretty wood grain. So I would’ve treated them the same way as you did the unpainted front frame as it would have matched. You did a fine job with the painted portions. I believe the pieces would have come out just as nice without the hassle of using the transfer during inhospitable temperatures and paint washing on top of it, to boot. IMHO, of course.
Once the transfer is sealed there should be no issue with the wash. And I do agree the drawers would have looked lovely sanded down to bare wood… but I don’t think ANY part of these nightstands wanted to be sanded.😆
I had no idea you could wash over a transfer; so glad you did this! I experienced a transfer cracking too, but only after it was on and sealed. I can’t figure out what went wrong.
After it was sealed, eh? Ya, I’ve never had so much trouble with a transfer before and I can’t figure out what went wrong either… other than the temp it was stored at. ??
You never cease to amaze me with your talents of using patterns in a way that are complimentary but not over powering. LOVE this one, Denise. 🖤🤍🤎
Aw, thanks my friend! XOXO
I don’t normally like herringbone, but you did an amazing job with these! They came out beautifully.
Thanks Debbie!! 🙂
They are absolutely adorable!
Thanks Diane! 🙂
LOVE how you changed a tough project into gold! I really like them, and it’s great that it’s hard to know if those drawers are real wood or not. Good job once again, Denise!
Aw, thanks so much Caye.💚 And ya, the transfer did a really good job, didn’t it!?!😃 It turned out better and more realistic than I thought it would!
They are stunning! You do such fabulous work, Denise!
I’m soooo happy you like them, Jackie! They were so much work but I’m glad I didn’t give up. I was tempted… believe me!😂
Lovely! The wash makes the look! Denise, you are one talented, and patient (lol – I would have given up after twist 3!), lady!
😂🤣 I seriously near lost my patience on these!… but so glad I hung in there! Thanks Gayle! XOXO
Hi Denise. It sounds as though you had a difficult time getting these nightstands to their final GORGEOUS look, but WOW….they look FANTASTIC!!! I’m in love with the modern herringbone pattern paired with the wood and paint. Absolutely stunning.
Aw, thanks so much Monique! It was challenging for sure but the herringbone looks pretty good, eh?!?😃 I guess it all turned out like it was supposed to. The good thing is I learn more from my mishaps then I do when it goes smoothly. 🙂
This set is beautiful Denise. I’m curious though, transfers won’t work in certain temperatures?
Thanks, Nicki! Hmmm, good question. I’ve never had an issue with transfers in the heat or the coolness of my basement. But then again, I usually don’t store them on the cold floor.😕 If anyone reading this has any additional info I’d love to learn as well.
It’s amazing ! I wish I could salvage great furnitures like you !
You are very talented and have a lot of experiences !
Thanks Helene! With all my experience these nightstands still knocked the stuffing out me😂 … but I’m so happy I stuck with it!
They are gorgeous!
Thanks so much Jennifer! 🙂