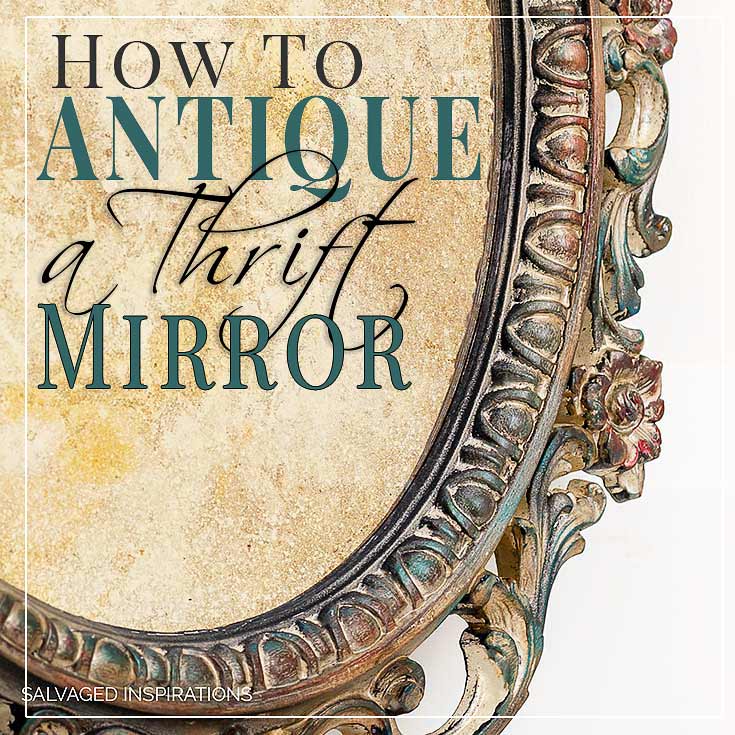
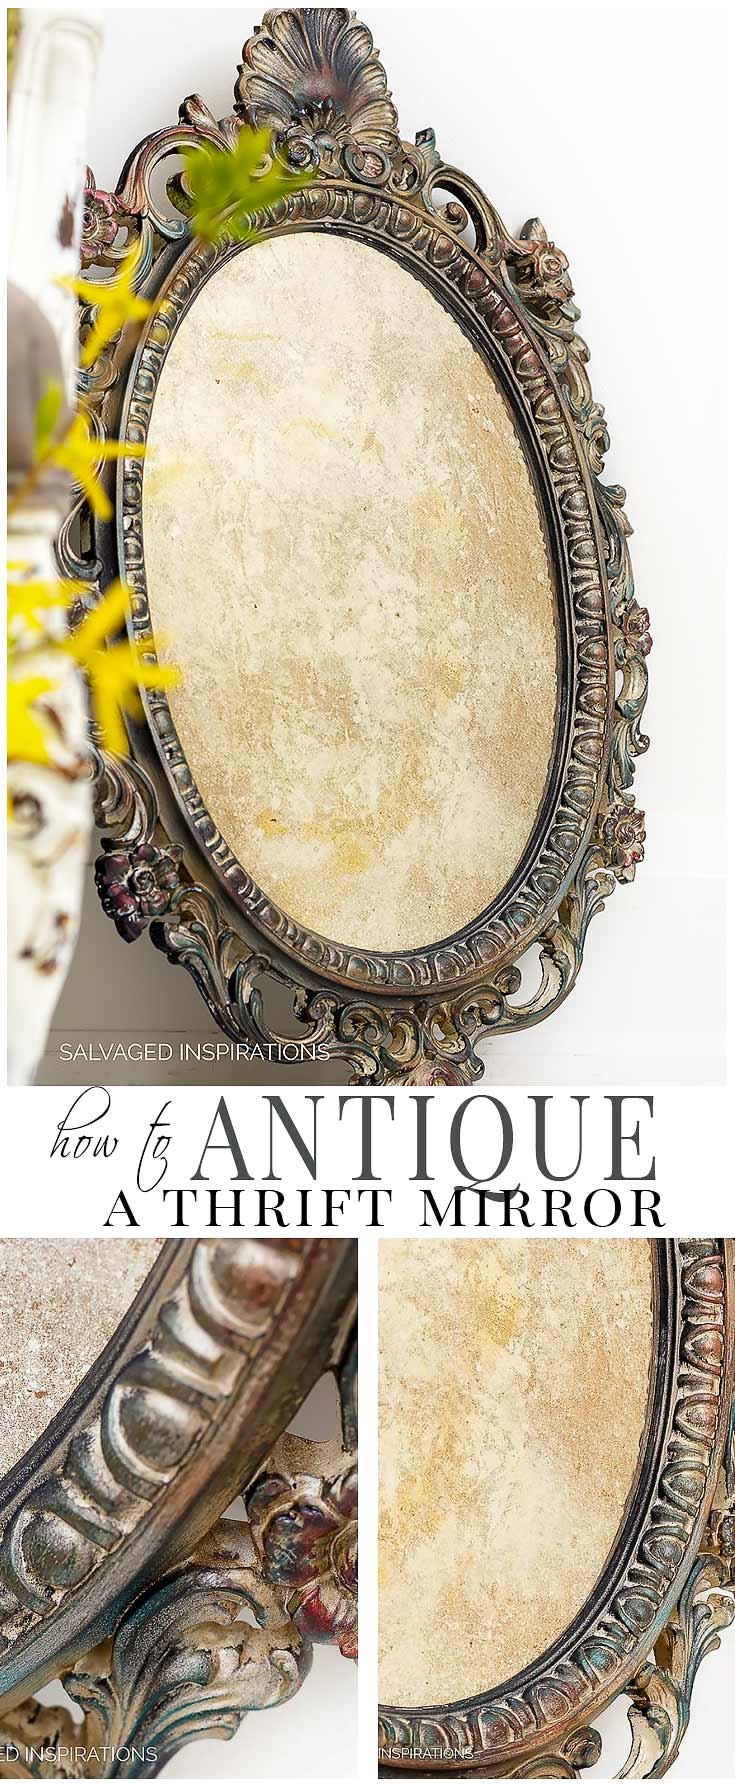
CREATE A GORGEOUS DIY ANTIQUED MIRROR USING WHAT YOU ALREADY HAVE IN YOUR OWN HOME – WATER AND BLEACH!
I had such a huge response from the mirror I restyled a few weeks back – thanks, everyone! I’m thrilled you liked the makeover and it gave you some ideas on what to do with those orphaned mirrors we all have hanging around!
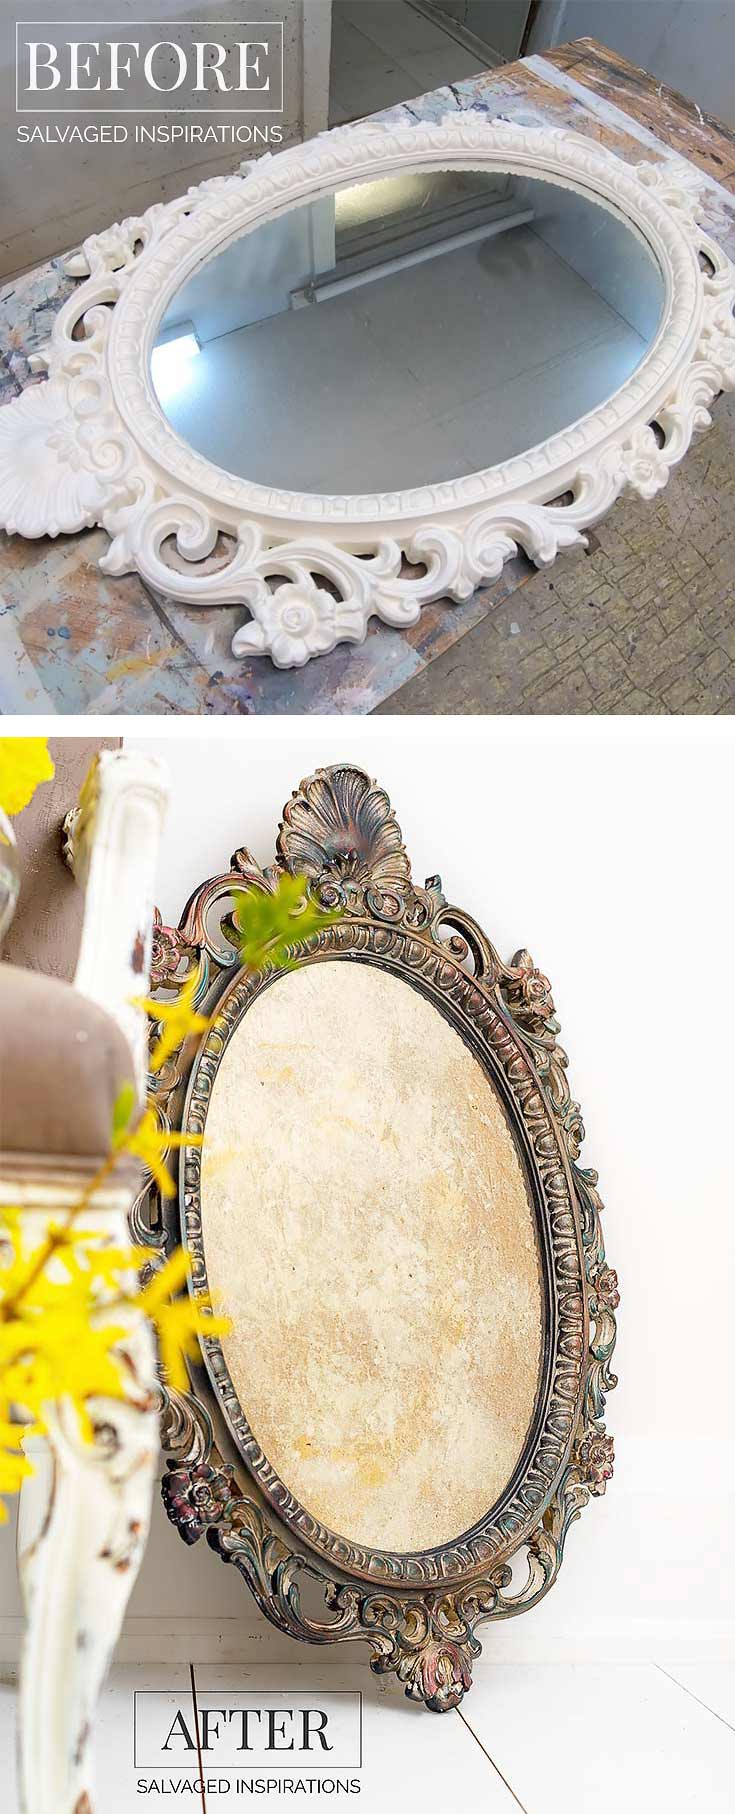
Apparently, it gave my sister Andrea some ideas too. Since sharing that post, she’s already dropped off two mirrors. A gorgeous large beveled beauty and this plastic cutie she picked up from a thrift store for $4.99.
I have to admit this plastic one caught my eye because of all the amazing detail… and well, it’s plastic. Challenge ON! Turn a cheap looking plastic into something vintage and jaw-dropping!
I can’t wait for you to see this before and after… it’s truly a night and day makeover!
What do you think?…..
THIS POST IS SPONSORED/CONTAINS AFFILIATE LINKS TO PRODUCTS I USE. YOU CAN SEE MY FULL DISCLOSURE HERE.
SOURCE LIST: MIRROR
- Mirror – SALVAGED
- Water + Bleach + Spray Bottle
- CitriStrip
- Chip Brush + Plastic Scraper
- Shop Towels
- Krylon Caramel Spray Paint (similar)
ANTIQUE FRAME
- In The Navy Chalk Mineral Paint
- Kyrlon Caramel Spray Paint (similar)
- Gilding Wax(s) Anastasia + Teal + Bronze
HOW TO ANTIQUE A MIRROR::
Here’s a video on how to antique a mirror with what you already have on hand in your home – water + bleach. It’s a step by step on how I achieved this look.
A few weeks ago I restyled this dresser mirror by distressing the glass and adding a French transfer. If you’d like to read the step-by-step instructions on how to antique a mirror and watch a video on how to apply a transfer, you can find them here.
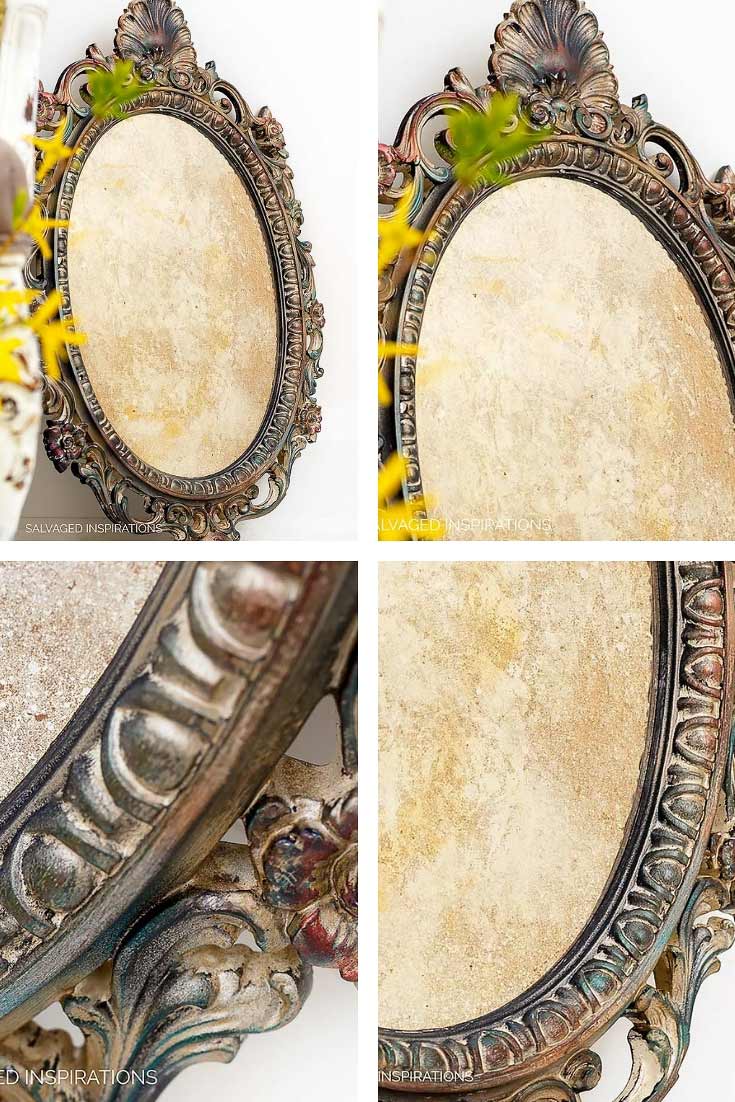
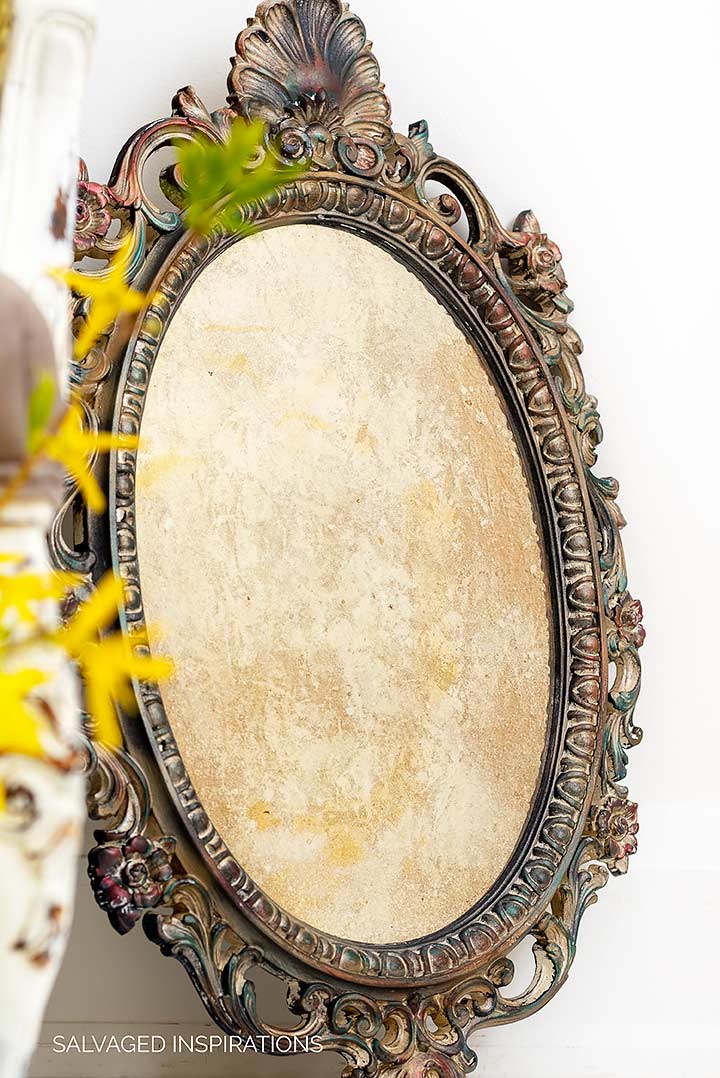
Here’s a closer look. It ended up distressing WAY more than I planned but I LOVE how it all turned out. The Krylon Caramel really shines through and gives this mirror a rich antiqued finish.
This is one of those finishes that will turn out different on every mirror and every time you attempt it — but that’s kind of exciting!
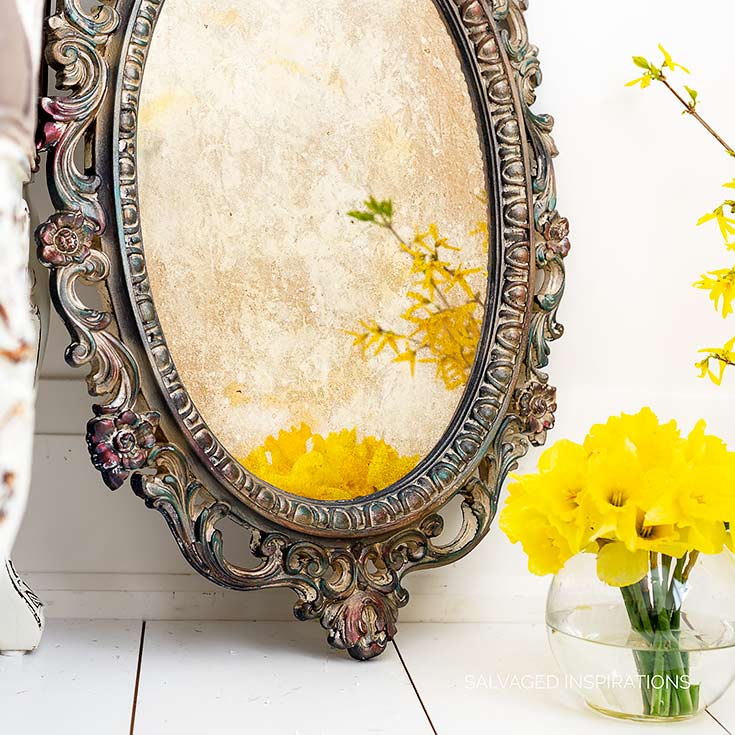
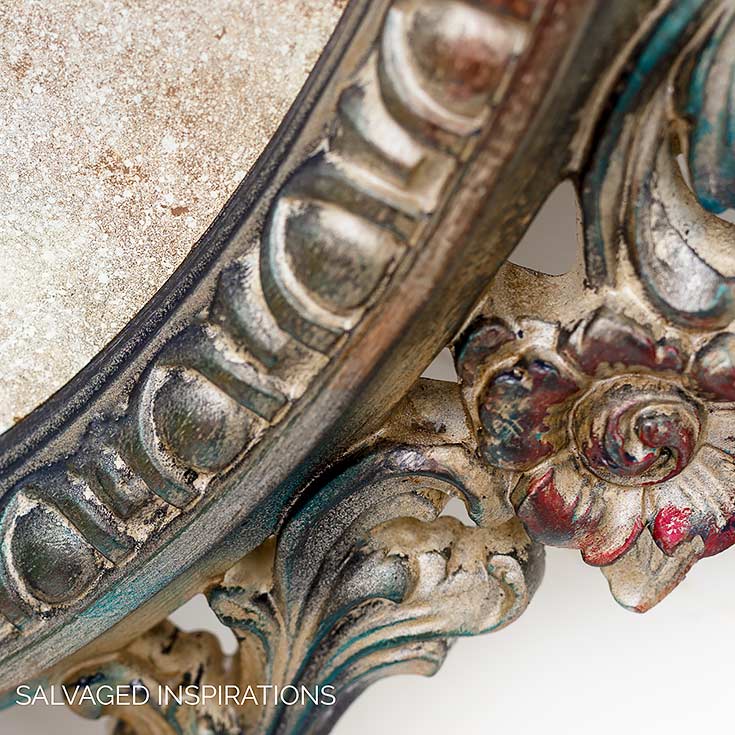
Here’s a closer look at the painted and gilded frame. I’m in loooooove with how it turned out. Doesn’t look plastic anymore!!! I started by painting it with In The Navy and then sprayed with this Krylon Caramel.
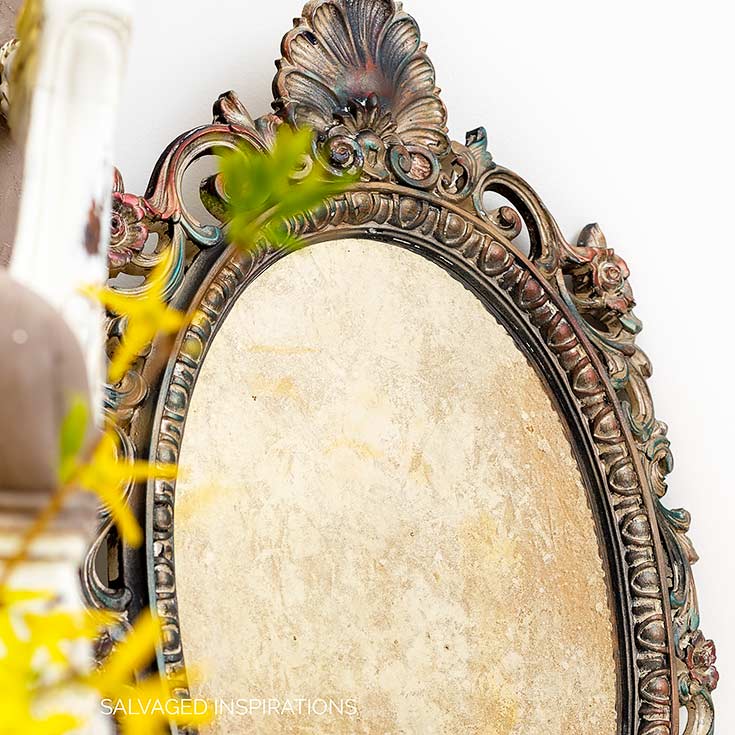
All these gorgeous colored highlights were added using gilding wax. Anastasia, Teal and Bronze.

This mirror would be perfect for staging and styling my painted furniture. Anytime I need it, I’m heading on over to Andrea’s and plucking it off her wall. 😉
LET ME KNOW WHAT YOU THINK OF THIS PLASTIC THRIFT STORE MIRROR MAKEOVER… OR FEEL FREE TO ASK ANY QUESTIONS YOU MAY HAVE… I ALWAYS LOVE HEARING FROM YOU.
Happy furniture painting my friends!
Denise x
RELATED POSTS::
How To Apply Furniture Transfers
Antiqued Mirror w Transfers
Layering Chalk Paint | Empire Makeover
Stop Bleed Through When Painting
How To Paint Laminate w/o Sanding
PIN AND SHARE!

I have this exact same mirror! It is all gold. It hung in the same spot for over 50 years in my childhood home. Because it is plastic, I assumed my mother painted it gold to make it look fancy. I never knew it was plastic until I took it off the wall to bring to my home! She may have painted it because she did a lot of furniture refinishing and other crafty things during my childhood. I have googled these mirrors and they are “worth” quite a bit. I will never get rid of mine.
Very interesting! I had NO idea these mirrors were that old! So nice that you’re keeping yours in the family Laurie. XO
I wish you could print the directions to do this mirror. Your video plays perfect until it gets to after the backing is taken off. Don’t know what’s wrong. I’ve tried playing it a few times. I found a mirror exactly like the one your doing here to copy and give to my grand daughter.
I’ll look into the video player Linda. Thanks for the heads up! Do you want to try watching it directly from my YouTube Channel… it might work better there. ??
Doubt you’re looking at comments from 2019 post lol, but would love more detail on how you did the frame 😊
Hi Kim! The frame was SOOOO easy! I used the Caramel Kyrlon Paint and sprayed the entire frame. Then added the 3 gilding waxes listed in the “Source” section above. I used my fingers to rub on the gilding wax and mix them together until I was happy with the look!😊
Hello Denise . I can ask you
What type of color do you use to represent the past (old) display of objects?
Oil colored . Gouache Acrylic or …
tank you so much
You are such an artist and this mirror proves it. Completely beautiful. Wish I could borrow you for a week or two….or ten.
Aw, thanks Susie!… and if you were to bake me your homemade cookies – I’m in!…lol 😉
Love the mirrors, you do such lovely work! I have a large round mirror I want to try the antique method, it’s already a little distressed. I am going to try a transfer for the first time. Do you have any suggestions for framing? It has absolutely no frame.
Thanks!! I love finding frames at the thrift store and then restyling/painting them to compliment the project. Even if they are not the correct size, if you buy them larger you can always cut them down and reassemble them to fit perfectly! See, I love your questions! I think you just gave me another idea for a new blog post Martha. 🙂
Wow! Absolutely stunning! I’m dying to try this out!
Thanks Lorin! If you give it a try I’d love to see what you come up with!! 😀
I’ve got two mirrors waiting for makeovers in the workshop. I used toxic muriatic acid to antique a couple of mirrors in the past but that stopped after seeing how you use bleach and water to get the same look. My lungs are thanking you! The pretty gilding waxes on the front are stunning. Your sister must be thrilled with her $4.99 mirror now – gorgeous!
Thanks Marie!! XO I have nothing to compare this antiquing technique to (because this is the only one I’ve tried!) but ya, using the muriatic acid didn’t sound that appealing to me. Do (previous comment) was saying even water and vinegar works so I might give that a go down the road. 🙂 Have fun with your mirrors… I can’t wait to see. 🙂
Just to add…please forgive if it’s already common knowledge and I’m late to the party….. the pH of bleach is around 12 (very alkaline) and the pH of vinegar is around 2.5 (acidic)… this would matter if the substrate you’re cleaning is pH sensitive or if the goo being cleaned off will create an acid/base reaction . Either one could harm the piece… maybe I’m overthinking…but just thought I’d add it….just in case.
This is GREAT info! I noticed that the 2 mirrors I did with bleach turned out VERY different. The bleach (acidity) ate threw this very differently from this plastic one! Maybe because of what they are made of or exactly what you’re saying, what I cleaned them with. I wonder what the pH of muriatic acid is? It must be high!!
Bleach would be basic (alkaline). If something feels slick between your fingers..it is most likely basic. You know how slick bleach feels? Any hoo…muriatric acid is hydrochloric acid’s less pure and supposedly less weak cousin. But heads up….muriatic acid can have contaminants added to increase its aggressiveness. So suggest caution…maybe check how the piece will respond to the use of this agent before adding it all over. Just some thoughts…. thanks for allowing me to be part fo the conversation….
this is great info Susie! Thank YOU… I will be really helpful for people reading and trying to make a decision on what to use!💙
Hello. There is a lot of creativity in you. good luck
Thank you Morteza! 🙂
Gorgeous!!!
Thanks CC! XO
Wow! How pretty! I have an old gold colored metal sconce that I need to change and wondering if I should paint it white first to get this lovely effect. I have used Caramel and still have some so I’m halfway there! Nice job!
Hi Cecilia and thanks! I’m a big believer in work with whatcha got.;) If it already has a gold, why not use that as your foundation and add color to it!? I’m guessing it would look amazing!!
Wow! How pretty! I have an old gold sconce that I need to change and wondering if I should paint it white first to get this lovely effect. I have used Caramel and still have some so I’m halfway there! Nice job!
Thanks, Cecilia! XO
Beautiful
Thanks so much Janie! xo
Denise- This amazing!!! Who would guess that this is a plastic mirror! I love it!
Right! Doesn’t look plastic anymore! 😀
Amazing how easy it is to antique a mirror, would never have thought., but was hoping you would demonstrate the technique you used to refinish the frame. Is there another tutorial for that technique? I have a smaller plastic framed black mirror I’d like to do something with.,
Thanks Mary! And if I do another project painting with gilding wax I’ll be sure to post it for you. It’s really simple tho – these gilding waxes are easy to use. In a nutshell, I painted the frame with In The Navy (and it wasn’t even complete coverage, some of the white was showing through!), then sprayed randomly with the Krylon Caramel Stain spray paint. Once this base dried, I took the 3 colors of gilding wax, rubbed some on my fingers (using gloves) and rubbed on! Super simple and the results are amazing, imo! Hope this helps. 🙂
CRAZY GORGeous, Denise! The way you painted the frame highlights the antiqued mirror to a T!
Thanks Nicki! I had fun antiquing the mirror AND with the gilding wax! The best part is Andrea is happy. 🙂
I’m usually pretty conservative in commenting, but I must say, I LOVE THIS MIRROR!!! It is STELLAR!! OMGosh, I can hardly believe it. Thank you for doing this project.
Thanks SO MUCH Cate! I really appreciate this. XO I’m pretty impressed with how it all came together too. Now my eyes will be peeled for anything plastic in a thrift store…lol.
What a great transformation! I’ve used the vinegar and water but for sure I’ll be trying your method. Just beautiful. xo
Thanks, Do! I should give the vinegar and water a try! It’s always interesting to see what you’re going to get, isn’t it!? Different every time!
THIS MIRROR!!!! I love everything about it! The colors from the wax are the perfect finishing touch! It would’ve been hard for me to give it back to my sister. Simply beautiful ❤️
Thanks, Deb! And ya, I know where she lives…lol… unless she glues this sucker to her wall, it WILL be MIA for my furniture staging! 😉
Oh…quick question I forgot to ask in my last comment. Do you post your videos on YouTube (or anywhere else) online in addition to on your blog?
Yes! Here’s the link to my Youtube Channel and I’m also starting to post them on my social media here and there. I should probably add this to my sidebar so it’s easy for you to link to. 🙂
Wow Denise! You did it again. I love how you turned something cheap and inexpensive into an heirloom looking piece! Beautiful and elegant. Your sister is very, very lucky:). By the way, thanks for the video. I process and learn “how to” by seeing AND reading how things are done, so video tutorials in addition to your blog are incredibly helpful.
Thanks, Monique and thanks for the input! I’m still learning but I’m so happy you’re finding the vids helpful. XO