Some of the pieces I salvage have “real-character”. Old furniture with great shape and detail, history and charm. Others pieces, well… not so much. For me, it’s always a fun challenge to transform a ‘nothing-special’ plain looking piece into something noteworthy.
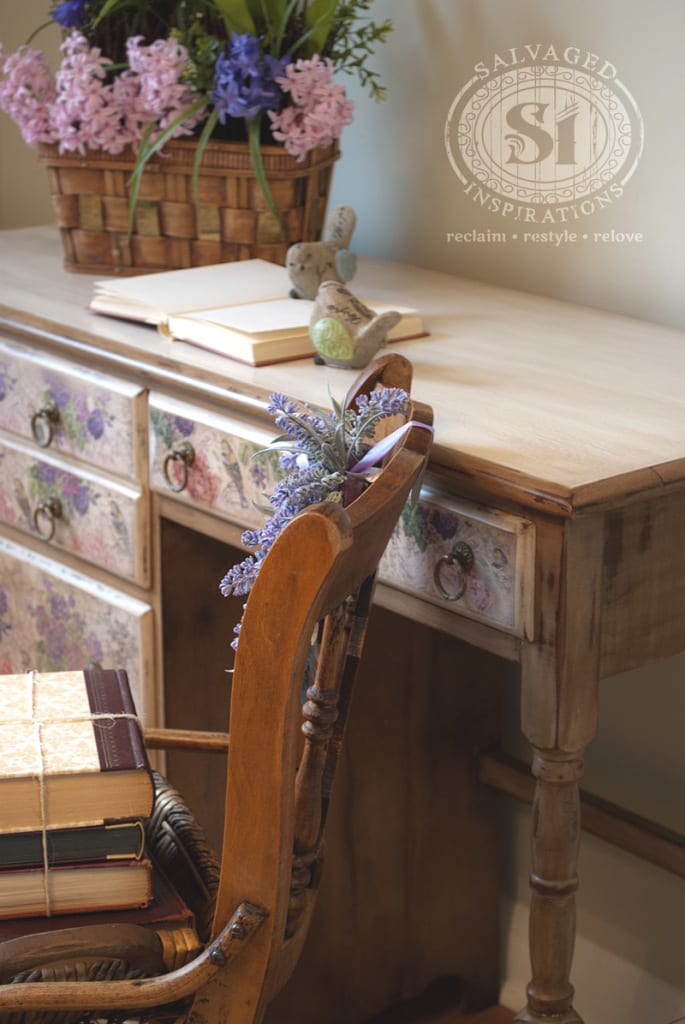
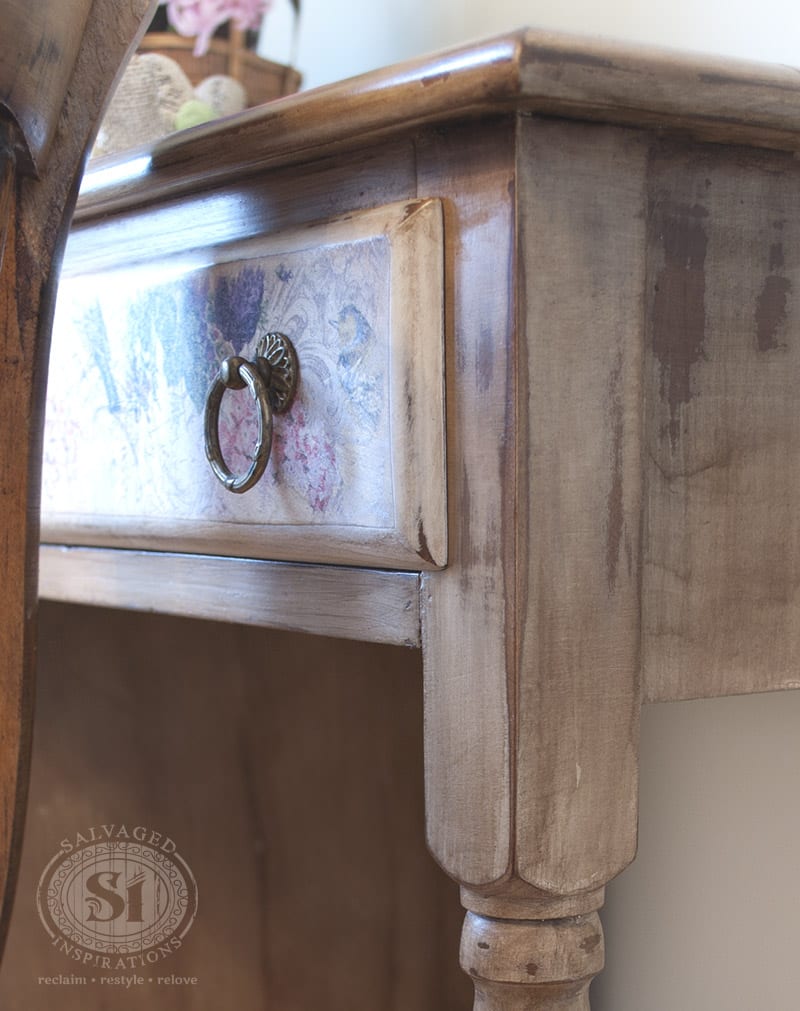
This plain old desk I decoupaged with napkins is a perfect example. This desk has been restyled from seen-better-days to a ‘French Country Charmer’ – and it’s aaaah-dorable! I’ve included more close-up after pics after the how-to’s! {smile}

The story on this piece:
A few weeks ago I tried to decoupage a dresser. I was inspired by Shausha at Sweet Pickin’s Furniture. Sausha created a video of decoupaging furniture with floral napkins. Seriously sweet and you can see the video here!
My first attempt with my napkin decoupage didn’t turn out well. Disastrous really. After numerous tries, I ended up using tissue paper.
You can see my failed attempts here.
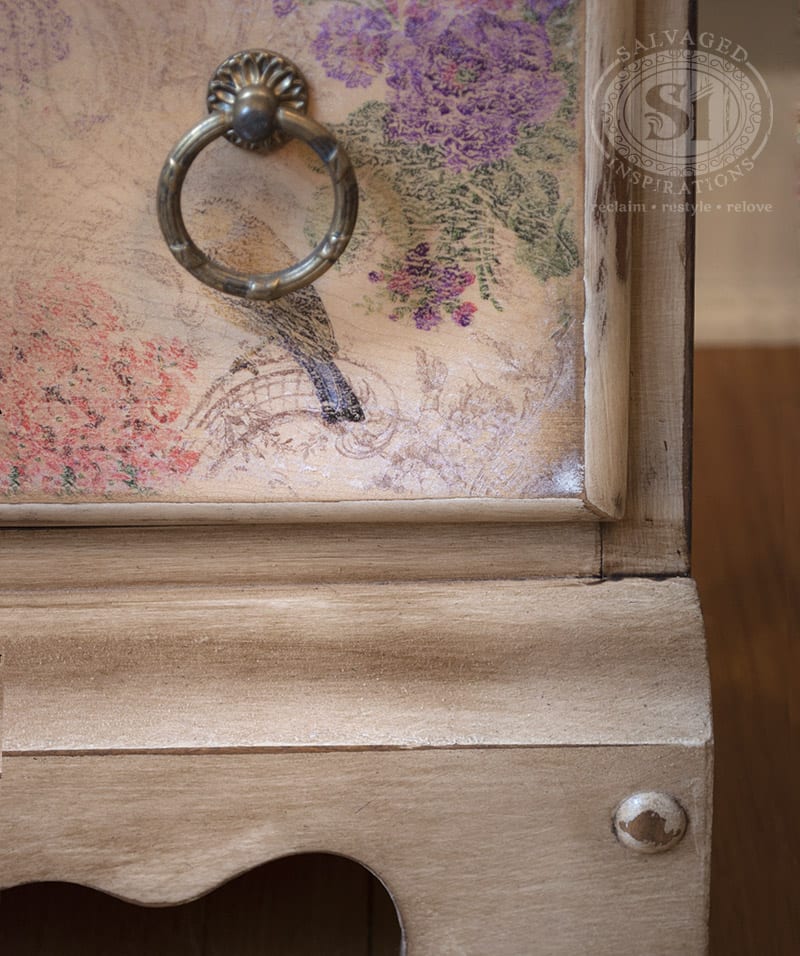
So, when I saw these gorgeous floral-bird napkins at The Painted Bench the other day, I was inspired to give this decoupage technique another go.

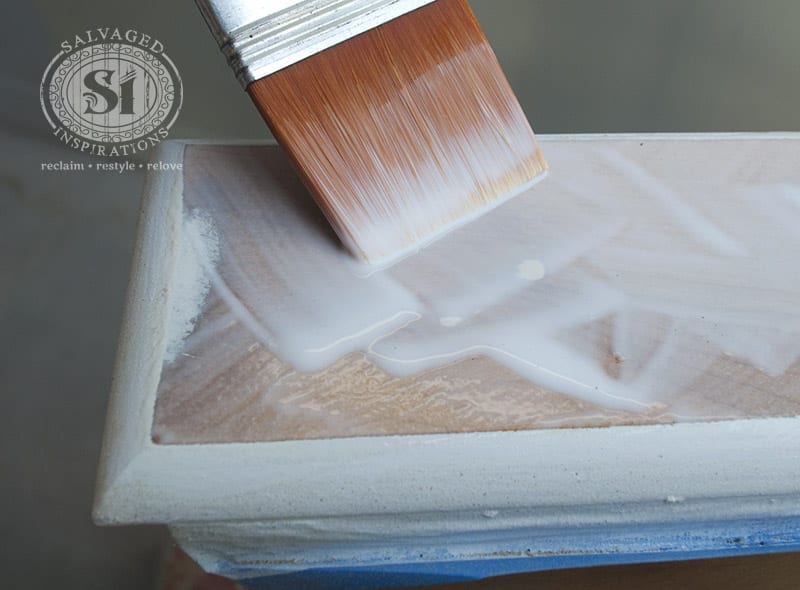
I started by painting the perimeter of the drawers with Old Fashioned Milk Paint in Snow White, I filled in the hardware holes and completely sanded the drawers down. The Mod Podge was watered down about 15-20%, and then working with one drawer at a time, I applied a good layer to the exposed bare wood.
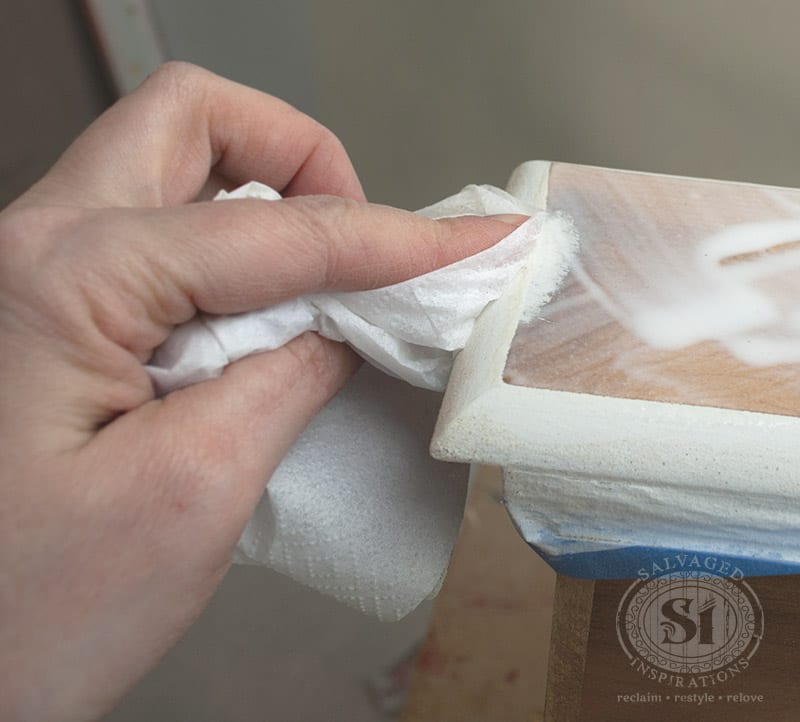
To make sure my napkin design didn’t cover any part of the drawer I had painted, I wiped any excess Mod Podge off the sides.
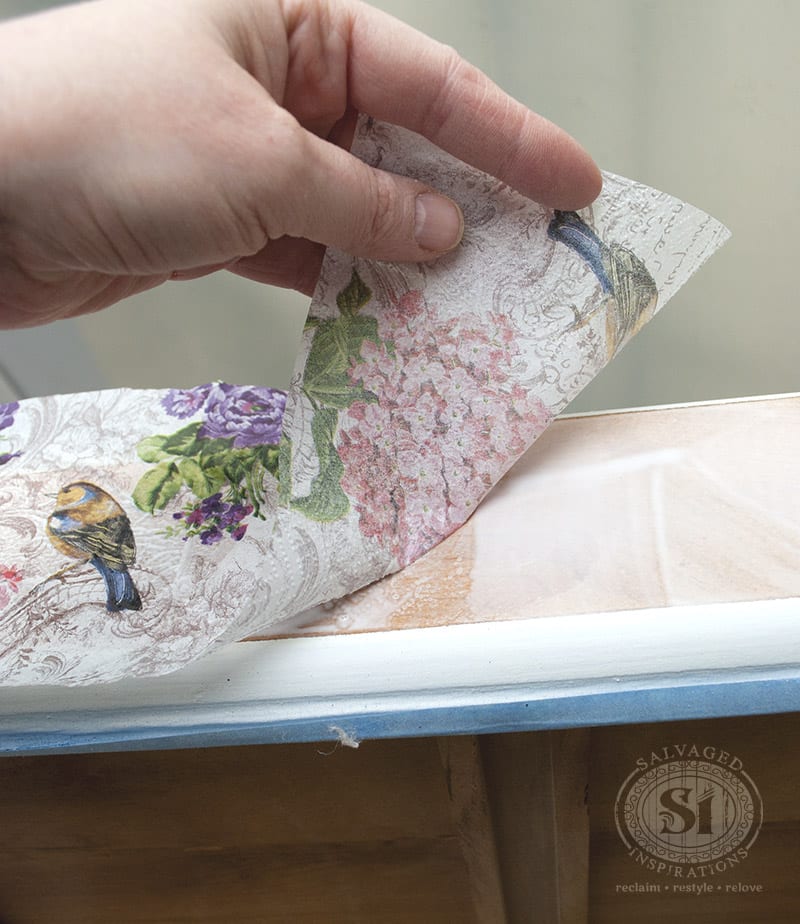
With the glue still wet (the water really helps to extend work time!), I applied 1 ply of the tissue paper on to the front of the drawer.
Here are 3 tips I’d like to share with you from my ‘near’ mistakes:
1. The key to getting this napkin decoupage technique to blend in with the wood or painted surface below is to use ONLY 1 PLY! When I was removing the top-ply of the tissue (the top-ply or sheet is the only one with the design on it) I was under the impression these were 2 ply napkins. Wrong… they were 3 ply. Luckily I noticed before I started decoupaging them on and removed the extra ply of napkin.
2. Apply your napkin motif/design right side up! This probably sounds like a silly I’d-never-make-that-mistake …right? But when I was working with all the drawers facing all different directions… well, you get the picture. Thankfully I noticed I was applying my design upside down and removed the napkin and reapplied before it had a chance to dry.
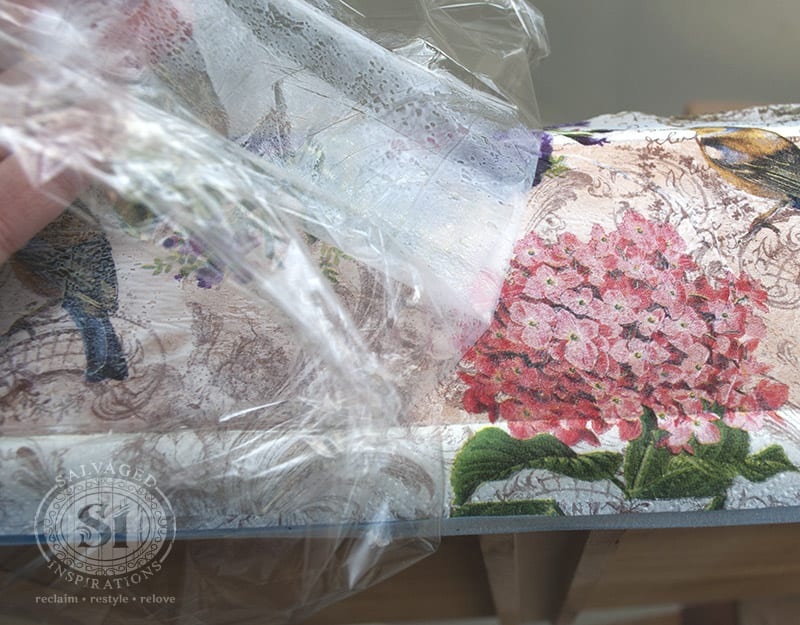
3. Try adhering and smoothing the freshly applied napkin with plastic wrap. Another little snag I ran into was pressing the thin delicate napkin into the Mod Podge to adhere. When I tried pressing the napkin on and smoothing it out with my hand; it kept tearing.
A little bit of tearing isn’t really a big deal if you’re going to sand it down for a distressed look, but it was really tearing. My solution was to put a piece of plastic wrap on the freshly applied napkin and then smooth it out with my hand. This worked GREAT. Easy sliding so it’s effortless to press down and smooth out.
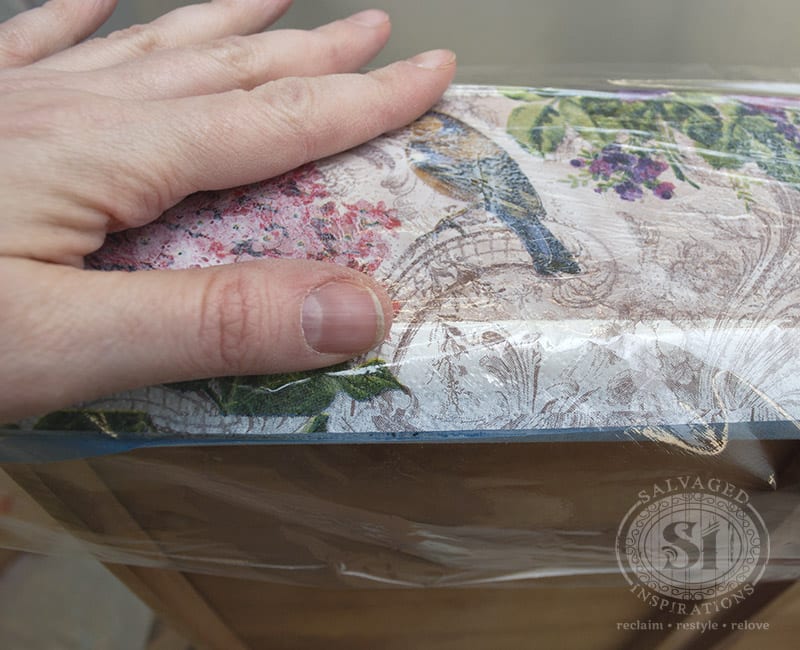
And as an added bonus, I didn’t need to apply any more Mod Podge on the top of the napkin. The adhesive soaked right through as you can see on the plastic wrap below. And …no messy hands!
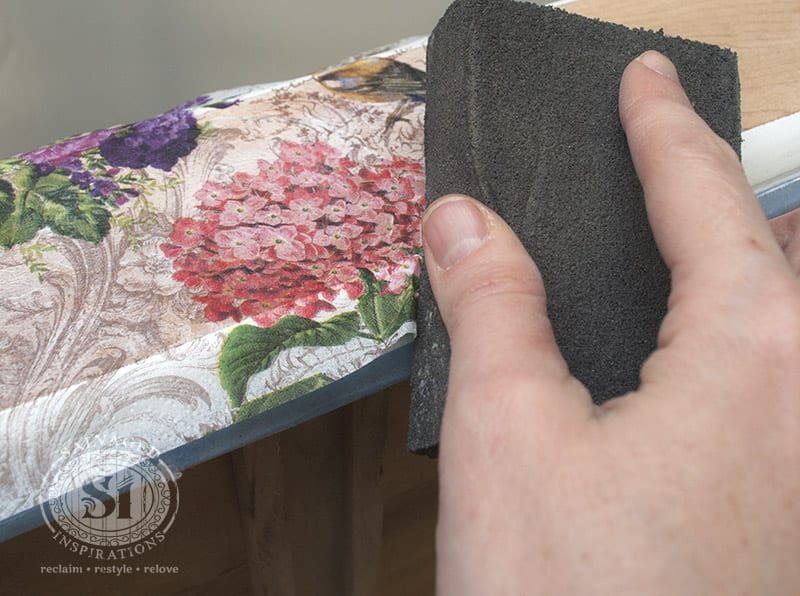
Once the napkin was adhered and fully dry, I used a sand sponge to remove the excess hanging off the drawers. Then to distress and allow the wood to show through in areas, I used my DeWalt sander with a 220 grit sand paper to lightly sand down the entire drawer front.
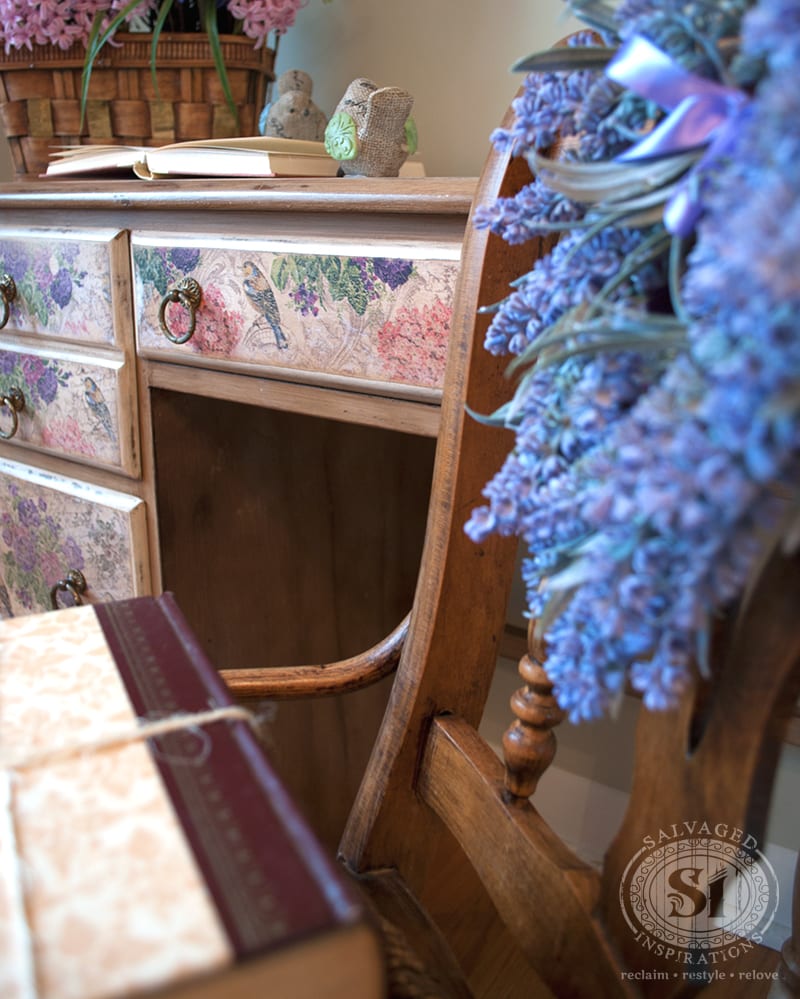
And here’s the finished makeover.
The body of this desk was painted with Old Fashioned Milk Paint in Snow White. To get a warm antique look, I glazed with multiple layers of General Finishes Van Dyke Brown Glaze Effects cut with Behrs Faux Finish Glaze to extend my working time. The entire piece, including the decoupaged drawers, were clear waxed with Minwax Furniture Paste for a beautiful sheen.
I truly love the way this French Country Desk all came together.


I love salvaging furniture. I love taking an old piece that has seen better days and restyling it into something beautiful and useful. And when that revamped furniture finds a new home – seriously gratifying. {huge smile}
If you have any questions about decoupaging, feel free to ask in the comment section below! And please chime in with YOUR decoupage experience! Have you tried using napkins? If not napkins, what have you used? As always, I’d love hear from you!
Enjoy your day and have fun with your next project!
Denise x
_____________________________
Like what you see? Subscribe to Salvaged Inspirations so you’ll never miss a post!
Follow along on Pinterest, Google+, and Facebook for more inspiration!


Denise, Have you ever decoupaged over oil-based stain? Some websites are saying that the Mod Podge will not adhere to the oil base. I’m experimenting with sealing the stain with Polycrylic and then decoupaging. Any ideas?
Thanks for your expertise!
Hi Kathy! No, I’ve never decoupaged over an oil-based stain but your idea of top coating the stain before decoupaging sound right on the money. If you want to use a waterbased topcoat – here are some tips. After your top coat has fully cured, decoupaging should be no problem. 🙂 Have fun!
I have never decoupaged anything, but I have been wanting too since I saw one of these beautiful creations on Pinterest! I have beautiful pieces of fabric and I am not sure why I thought I could use fabric to decoupage. My question is I have a desk that looks horrible, but I’m thinking I should start smaller? What would be your suggestion to start? Also must all your decorations be in a form of paper, such as these beautiful napkins or wallpaper ? I have several old Birthday cards from when my mother was a little girl I would love to use . Anyway, thanks for even taking the time to read this I hope it’s made some sense. My phone isn’t working well so I can’t see what I am typing.! Lol ! Btw your work is amazing! I can’t believe how you transformed that piece!
Hi Michelle! Yes, you can definitely decoupage with fabric or vintage cards! Just keep in mind that if you are using thicker card stock or a thicker fabric, the decoupage medium will take longer to dry and the surface you’re applying it to may have a slight ridge where the decoupage has been applied. If you’re concerned a desk is too large of a project to start on, you could always practice on a wood board or smaller project to build your confidence. I’d love to hear how it all works out for you, so if you have the time, feel free to drop in again. 🙂
Hi Denise! I am about to decopauge both drawers on a small nightstand. How long did you wait before sanded them. I was surprised you used a sander but I am all up for that. What if the napkin doesn’t cover the entire drawer?
You don’t have to use a sander, you can do it by hand and when the napkin didn’t cover the entire surface I just used another napkin and matched the pattern up side by side. I don’t remember how long I waited to sand but it does have to be 100% dry. Then it’s good to go. 🙂 Have fun, Cheryl!
really great read and very inspirational.. I’ve been looking into decoupage recently and have tried a few sample designs but mainly on stone and plaster designs.. I just wonder how well the finished desk holds up to scratches and wiping clean.. Any time I’ve tried decoupage with tissue paper, my design on tissue seems to become less visible when applying any type of gloss varnish over it. It’s like it becomes watered down and the colours don’t show through very well. They look very washed out and nowhere near as colourful as the original design on tissue prior to applying glue and varnish. Do you find this happens aswell?
I work mainly with plaster sculptures and wondered what the best methods of applying tissue paper would be so as to keep the colours really strong and vibrant but to also protect the overall decoupage from scratches.
Hi Dave! Your work sounds amazing. I’ve never decoupaged over plaster or stone but as far as I know (this desk was sold) I believe it’s held up well. I haven’t got any complaints. 🙂 It sounds like you’re using a varnish/shellac based topcoat? If so, you might want to try a durable waterbased poly… possibly this might preserve the vibrancy/detail. ??
Beautiful results. I decoupage cans and cardboard with different fabrics. Will try patterned napkins next. Thanks for sharing. Patty
This is amazing! The napkins look like they were painted on. They go perfectly with the desk. Did you overlap the designs or line them up so it looked seamless? I know paper napkins aren’t very big, so I was assuming you layered or lined the designs up somehow. I was wondering how you cut the designs and made them look so perfect!
I have an old english saddle. I would love to try some kind of decoupage on it for a cool art piece. I just don’t know what theme or design. I had thought of using napkins and blending in with the natural color of the saddle, which is aged. Maybe a Victorian fox hunting theme. Not sure. I wonder if decoupage would work on a leather saddle.
Hmmm, I’ve never decoupaged on leather so I’m not sure… but I LOVE your idea!
Thanks so much Sheryl. And ya, I lined them up to look seamless – didn’t overlap. 🙂
I did the iron process with napkins, on a wooden box tray. It was completely dry (3 hours worth) and when I put a layer of mod podge to seal it, I got bubbles. I am so bummed. What did I do wrong?
It was definitely worth trying again! How beautiful!!! I use napkins for bible journaling and a friend just started using them on canvas. I think furniture is a fabulous idea and I’m going to try it on a piece of furniture I have. Thanks for the inspiration!!
Hi Rebecca! Napkins for journaling and on canvas sounds like a fabulous idea! 🙂
This looks gorgeous…
But what about the top of the desk..did you only sandpaperd it..or applied any kind of paint..!!!
Thank you.
Thanks Noha! yes, the top was sanded, then whitewashed and top coated with poly.
I tried this on a crateI made, I was on the sanding stage (with my electric hand sander) and it was almost remelting the modge podge, am I doing something wrong?
A electric hand sander is probably too aggressive. The idea is to gently hand sand a bit. The hand sander created a lot of friction and heated up ypur glue job. I’ve heard Modge Podge has some plasticizers in it, and they were likely melting.
This dresser is gorgeous! I am finding some beautiful napkins, but they all have those crimped edges. Does this show up on a decoupaged item? I don’t want the wood to show through in these – I will paint the background white.
Hmmm, not sure Jan. I’ve never used the ones with the crimped edges but my guess would be they wouldn’t lay totally flat.
No. In my experience you can smooth out all bumps with a plastic credit card or old gift card. This will also get rid of extra glue and glue bubbles.
Hi mind blowing piece of art!!!
Can we use wax paper for decoupage??? If napkins or other preferred papers are not available…
*Get the print on wax paper and decoupage on wood..
I would like to try the napkin process on some wood trivet I have, do you think that all the spaces in between the slats are going to be a bid problem and not worth my effort ?
Hi Arlene! I’m sure it can be done but yes, it would be more work than a flat surface for sure. If you will be using it to put warm/hot items on, just ensure it is properly top coated. 🙂
Incredibly beautiful! Well done!
Hello, I love your dresser make over. I am currently working on a
Piece of furniture using chalk paint. I’ve never heard of milk paint, what is it as I like the finish you havce created. Also, is it possible to decourpage oak internal doors, I would like the grain in the wood to come through.
Many thanks,
Aine, ( Ireland)
Hi Aine from Ireland! I would LOVE to visit your beautiful country one day. Milk Paint comes in powdered form and you mix in some water to create the paint. Here is some more milk paint info for you. And yes, you can decoupage while letting a wood grain show through. I did just that on this dresser here using printed tissue paper.
Hi I’ve been doing furniture for two years or so. I was a complete novice when I started and have learnt as I’ve gone along and by reading brilliant blogs like yours.
I stumbled across your blog after googling hints on fading decoupage out to make it just visible…(still waiting for mod podge to dry so I can attempt to sand it..fingers crossed), Anyway just wanted to say your furniture is beautiful, I have avoided using paper for dcoupaging and just used fabric as I’ve seen a lot of awful results with napkins etc. All my pieces have been quite retro or gothy, but I wanted something more subtle for myself so I’m now using wallpaper, I’ve soaked the backing paper of and was surprised how easy it was to work with. I didn’t put mod podge on the furniture, it was wet from where I had soaked it so it stuck to the wood, once it was in place I glued over the top….so far no bubbles. I’m Hoping sanding will blend it into paint, I want it to look like it was painted years ago and has faded over time. I have no idea how it will turn out. I guess if it’s a fail I can just shabby chic the life out of it.
I’m sure I could have made that a much shorter comment lol . I’m looking forward to seeing more of your work for inspiration
Thanks Wendy and I’d love to hear how the wallpapered decoupage turns out for you. 🙂
I would really love to see how yours turned out!
Thank you so much for your reply Denise. I did try decoupaging the linen napkin but I don’t like the fact that it clearly shows I stuck a a napkin on. How do i blend it in to the background? Can i sand the edges down?
Thank you
Unfortunately, fabrics don’t really lend themselves to sanding/distressing Hasina. Just a thought – a really nice look (that may or may not work on your piece) is bordering the decoupaged area with wood trim painted in the same color of your piece. It’s a really nice finished look!
You cam use an ecacto knife to slit between . if the spaces are not to big the picture will still look whole. I do this between drawers on dressers.
Hi Denise,
I would really appreciate your advice, I recently bought napkins for decoupage but when I got it home I realised it was linen napkin. It’s quite thick and I can’t remove any layers. Can I decoupage with it? If so how?.
Thank you so much
Hi there Hasina! You can decoupage with fabrics (including linen) and the ‘how-to’ is the same as above. However, you can’t distress fabric so no sanding is required.
First off, BEAUFTIUL desk. It inspired me to try to decoupage a piece of my own. But unfortunately it is my first attempt and it’s not going so well, and I was wondering if you had any advice.
I mod podged napkins onto the top on my table, and even applied an extra layer of mod podge, let it dry for 16+ hours, but once I tried delicately sanding it, the napkins came right off revealing bare wood. Any advice? I am using 120 grit because that’s all I have on me, but I barely brush it over the napkins before they come off.
Hi Hannah! I had some issues the first time I attempted this too. A few tips- apply a slightly watered down layer on the surface before applying the napkin, then another layer to adhere it. No extra layer required after that. Also, I do believe 120 is too rough for napkins/decoupage. I would recommend 220 or higher! Even if you use the lightest hand with rough sandpaper, it’s still rough. Good luck 🙂
I’m also in UK & very new to the art of decoupage/decoupatch and its many possible techniques!
My main problem at the mo is getting pretty napkins to practise with but without spending a fortune!!
Is acrylic varnish the best thing to use on all projects? I have some mod podge although its glossy but it was suggested that pva or pva mixed half & half with water may be as good? (Bearing in mind i am only doing small trinket boxes atm)
Love your work – so much inspiration!!! 🙂
Hi Ellie! DIY Mod Podge can be made by mixing 50/50 glue and water. I’ve never tried this technique, but have heard other bloggers having good results. As for pretty napkins, maybe try Amazon!
Hi Denise
I am writing you from Turkey. I am one of the best decorative painters in Turkey. I have workshops all over Turkey for 16 years.
I always love your work and I am great follower of your works.
I am going to publish the first book od decorative paintings in Turkey and in order to put some energy to my book, I wanted to include your napkin project to my book with your name, with your web site and short story why I follow you. With your permission of course. Thank you
Hi there Ece! Turkey!!! 🙂 My sister and I had the pleasure of spending 2 days in Istanbul and it’s a FABULOUS city! Amazing food, shopping and night life not to mention beautiful. We visited the Blue Mosque, Aya Sofya, the Grand Bizaar and more but I wish we had had more time to explore. In regards to your book – how exciting! If you wouldn’t mind emailing your request to ([email protected]) I’d love to take a look!
I know I am late to this ball game seeing it is the summer of 2016 but I need to know exactly how you got no wrinkles??? I did this and mine is a single ply but it is wrinkled beyond belief!! I keep thinking I’m going to try sanding but there are so many wrinkles it may look awful if I sand them all away…there maybe nothing left haha! I wish I could share a picture. It’s awful.
Hi Suzi! when going for a distressed look, a few wrinkles create an amazing look because once sanded, the wood or under layer shows through. But if you feel you have too many, the plastic wrap REALLY helps smooth things out. Also, adding a little water to thin out the ModPoge makes a big difference because the napkins slide much easier – therefore easier to manipulate and smooth out. good luck!
four pieces on that I as well left one extra ply under the pattern, is it going to sand ok? do I have to sand those pieces down to bare wood and reapply? Thank you
Myra, if it were me, I would try sanding to distress first to see if I like the results with the extra ply underneath. It may turn out just fine and look fabulous once top coated. If I wasn’t pleased, then I would worry about starting again by removing it all.
Love your project. Have previously decoupaged small pieces using napkins. Want to tackle a table top. Will be using MacKenzie-Child’s Courtly Checks. Do you think it’s better to use tissue paper or napkins?
If you’re referring to their wallpaper, it will be much heavier than tissue paper or napkins Cheryl. Wallpaper provides an opaque pattern where as tissue paper or napkins can lend themselves to a more distressed look with the furniture’s finish showing through.
Actually wasn’t thinking about wallpaper. They have napkins, tissue paper and wrapping paper. Wasn’t sure which I should buy for a table top. Was thinking maybe tissue paper since it was thin and came in larger sheets so less piecing? But didn’t know if it was harder than napkins.
Tissue paper is not that much different than working with napkins Cheryl. Reason being, you separate the napkins into 1ply anyway which leaves is super thin/sheer. I think the tissue will look amazing for your table top! 🙂
Can I use a bristol board dresser to do this with..
Ruthanne, do you mean a particle board dresser? If so, yes you can decoupage over particle board. I probably wouldn’t do any heavy sanding and/or distressing though. Because where the napkin/paper wears thin, the particle board may show start showing through.
This turned out beautifully – as if you’d done it a million times! I do a lot of decoupage and wanted to pass on a couple of my tricks to hopefully help where you were struggling – an all too familiar struggle! I use good old elmer’s school glue instead of mod podge – dirt cheap and looks and behaves better I think.. 2 parts water, one part elmer’s. I’m so gonna try your cellophane method, but mine is to have a damp/wet washcloth (not a fuzzy plush one or there’s fibers everywhere) or tea towel kind of wrapped around my fingers when I smooth the paper out.. That way the paper isn’t sticking to you and tearing, and it gets the top side of the paper damp and more workable.. Then you can easily clean up the edges with the cloth too. I do it this way for all papers, but the thicker the paper, the wetter the cloth.
Hi Denise,
I would like to decoupage an outdoor plastic bench. The type that has a lid, like a toy chest, to store patio cushions, etc. I want to cover it in travel stickers like on old steamer trunks. Does it matter if I use paper or material? How do I seal it so it will hold up the in Arizona heat? The difference in the plastic I have read about seems to be the texture. Lawn furniture and tables are smooth and the storage bench has more of a bumpy texture. Any advice you can give would be helpful.
Sounds like an amazing project Joan! I’ve never decoupaged an outdoor item so I’m going to ‘wing-it’ here. My guess would be paper may be your better option over fabric simply because you can slightly sand your plastic bench (which will give some tooth for the decoupage to stick to) and the paper is thinner and should cling better to the bumpy texture. As for sealing, at least 3 coats of outdoor varnish or polyurethane should do the trick. I would ensure your decoupage has thoroughly dried and adhered before applying a topcoat though!
Can this be done with fabric ?
You can decoupage with fabric for sure Marie! As for distressing the fabric with a sander afterwards, I’ve never heard of that – I think fabric fibers wouldn’t work well with distressing.
I am a beginner and have only used napkins for decoupage. How do you get the napkin to fit across the width of your drawer. Did you stick two together and did you get a seam line.?
Yes Jeanette, you may require more than one napkin to cover an entire surface. I don’t ever overlap. Instead I butt the seams together. If you’re looking for seamless look, this may mean cutting the napkins so the pattern matches. Because I’m after a distressed look, it doesn’t matter if the pattern (at the seam) isn’t an exact match.
I have an old desk that looks identical to this one that I’ve been trying to figure out how to fix it up. This was very inspiring to say the least. Thanks for sharing!
How beautiful!!! I decoupage with napkins all the time and don’t have a problem with them using all the plys. I just have to remember that it usually looks “not so good” until it has dried. I’ve done the top of coffee tables, a parson’s table (the entire table, legs too), chairs, etc. and I love decoupage . . . especially since I’m not that great of a painter lol
love the idea of plastic wrap. I will try that next time as I hate getting glue all over my hands
Thank you for the tip : plastic wrap!….. I have a sudden urge to go out and find some pretty napkins to try this . !
Denise, to save money( very important when reselling an item),I use watered down white glue. A 50/50 mix works well. Then you can poly over it. Thanks for all the inspiration.
Love this…thank you Jeri!
Hi. I glue my serviettes down with gold leaf glue/ size. Leave it to dry and then attach the single layer of serviette. You can even reposition the serviette. Then mod podge etc…
Denise, this turned out beautiful! Thanks so much for sharing!
Fantastic tutorial Denise and I love how the desk turned out. You have inspired me to give it a try too 🙂
Carole
This is seriously beautiful. Thanks for the amazing tips with the plastic wrap. I can’t even tell you how many times I have ripped, torn and ruined my paper trying to get it smooth. Fabulous tip. sk
This is absolutely gorgeous! Love it!
You really did take a humble little desk and turn it into something really special! I have done a little furniture decoupage, but have never tried the napkin technique. I love how the drawers look like they were artfully painted a hundred years ago and have gracefully aged over time. Lovely technique and so clearly explained. I will have to give it a try! Thanks, Denise!
“…drawers look like they were artfully painted a hundred years ago and have gracefully aged over time.” I *LOVE* the way you phrased this Jennifer… thank you. 🙂
Love this! Absolutely stunning…
Thanks for the great tutorial. The desk is gorgeous! I like the little birds too! Where did you get them? They’re adorable.
Thanks Sally! And I picked the birds up at Michael’s. 🙂
Lovely! You did a really fantastic job and I so appreciate your tips on how to achieve a similar look. Thank you!
Thank you so much!!! This is beautiful!!! I have always been afraid to try decoupage with napkins because my attempts with paper have been so wrinkly. I’m hoping these tips solve the problem!
I was a little afraid to! Now that I’ve tried it, the nice thing about napkin or tissue distressed decoupage is it doesn’t really matter if it’s slightly wrinkled or torn. Once you sand it down, part of the charm is that you have the background (whether that be bare wood or painted) showing through. Feel free to let me know how it goes if/when you decide to give it a try Tess. 🙂
very pretty
Denise this makeover is wonderful! Thank you for the tip with the plastic wrap. I also don’t use Mod Podge but matte acrylic medium (not soluble in water once dry unlike Mod Podge)
The napkin design is perfect for this project!
I am so glad I found your blog. I love your work; you are very creative & talented. Thanks for sharing your beautiful desk!
Your pictures and tutorials are fantastic thank you so much. I bought tissue paper from Amazon just to try this on one of my pieces!! (From one of your other posts). I haven’t done it yet, but I am so excited to try. This just makes me even more anxious to give it a go. Your project turned out wonderful…I love it. Thanks so much for sharing.
Amazing job Denise and great tutorial. Really love this look!
Thanks Judy! I’m really pleased with how it all turned out too! 🙂
Very pretty!!! Thanks for sharing the steps.
Pleasure Debbie – thanks for dropping by! 🙂
hi again, it’s so gorgeous that desk, so what did you glaze, the whole desk or just the decoupaged drawers.
Some of the materials you use are difficult for me to find as I am in England, you once got some gorgeous drawer knobs quite cheap but for the life of me I couldn’t get hold of them in England
Maureen, the top has been ‘washed’ with 1 coat of glaze over the white milk paint and the body (excluding the drawers) have multiple layers of glaze. I kept on applying additional layers until it was the depth and shade I wanted.
Do you know if a decoupage do piece will hold up outside under a covered porch?
I am in England too and all these materials are readily available on ebay, amazon, Hobbycraft to name a few. There are literally thousands of handles old and new on ebay.
Another tip for decoupaging napkins is to lay the napkin on the surface and apply the glue right over top. The glue will soak into the napkin and adhere to the surface. You can also thin the glue with a little water to make it easier to apply
Oh, I love this Melanie! That may be even easier… I’ll give it a try!