When I first started painting furniture, brush marks drove me bonkers. For me, it was the equivalent of having wet toes when they’re supposed to be dry. Yaaa, it’s one of my weird pet peeves. Anyway, I remember trying to get a smooth finish but the more I fussed with the paint, the worse it got. And ironically, once I moved onto using thicker and more expensive chalk and mineral paints, it got even worse.
So, I thought it might be fun to take a trip down memory lane and revisit where I went wrong and what I’ve learned along the way. I hope some of you starting out can learn from the mistakes I’ve made and get that super smooth finish. And for those of you who are veterans of furniture painting, I’m continuously learning from YOU so feel free to chime in and add your tips.

THIS POST CONTAINS AFFILIATE LINKS TO PRODUCTS I USE. YOU CAN SEE MY FULL DISCLOSURE HERE.
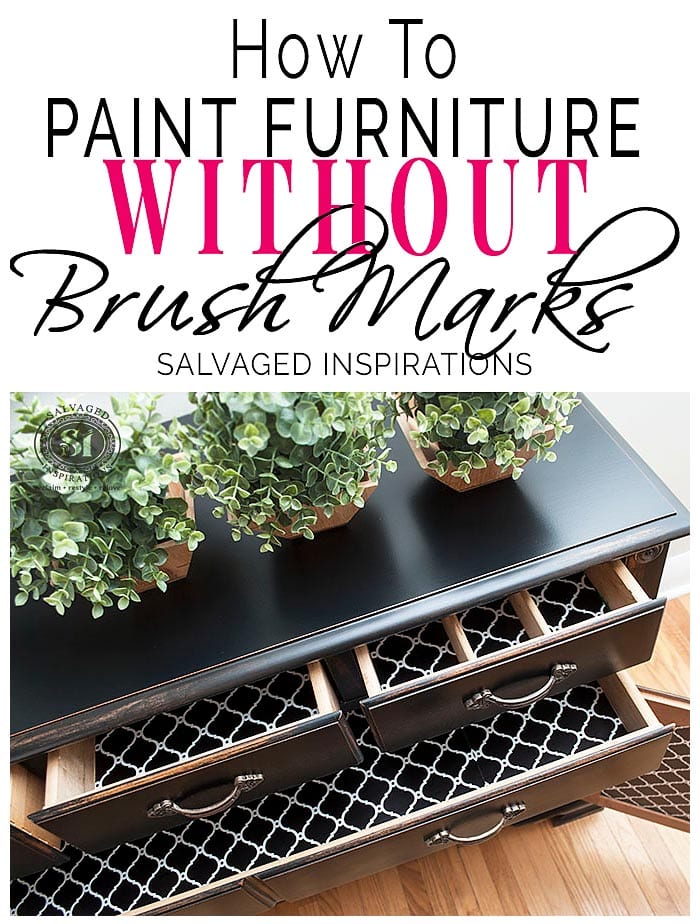
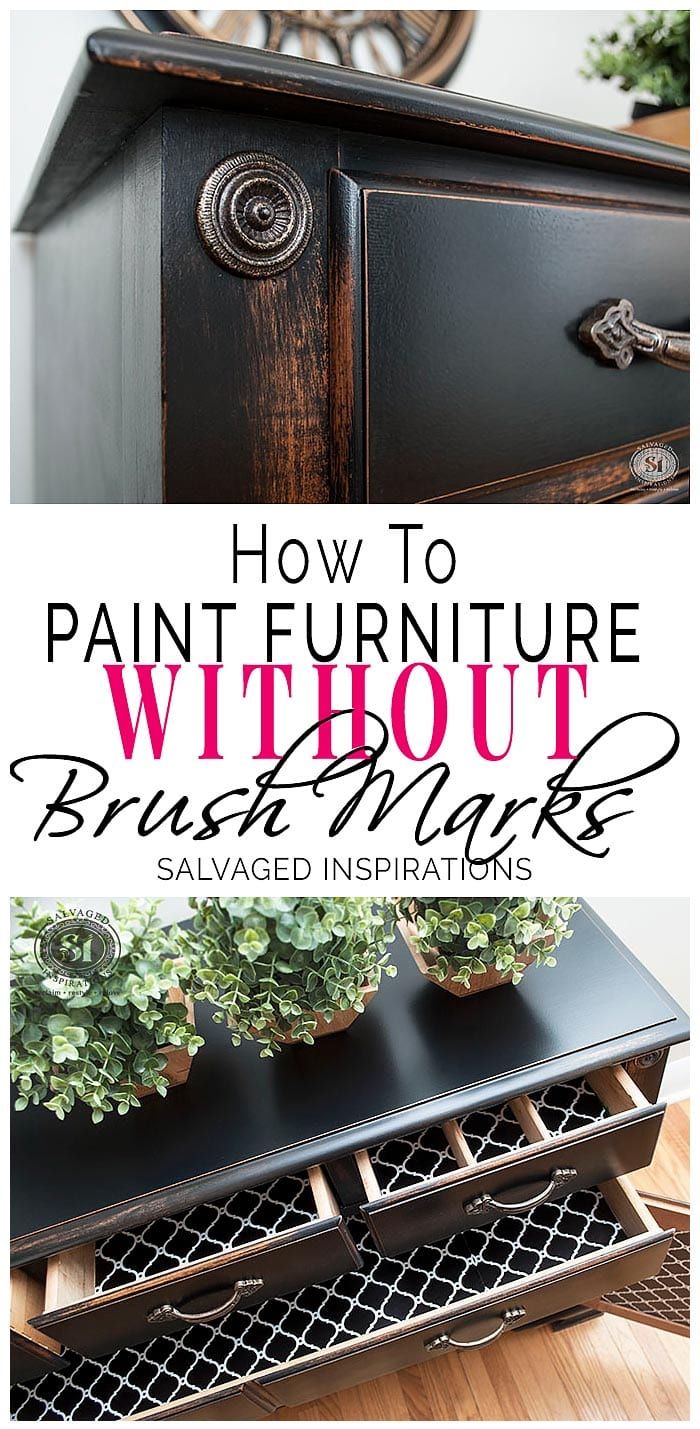
How To Paint Furniture WITHOUT Brush Marks
Mistake #1: Skipping the Prep
This is one of those things we hear ALL the time, yet it’s hard to follow. When I was starting out, there were times I skipped over properly prepping furniture thinking “the paint will hide it”. It NEVER did! And worse yet, it made it way more difficult to get a smooth finish. I’ve since learned proper prep is key to a professional-looking project.
This includes…
- A thorough cleaning to get rid of any dust, dirt or grime
- Proper sanding to smooth out any previous paint job or topcoat
- Filling and sanding any deep scratches or imperfections with Wood Fill or Bondo
Mistake #2: Not Sanding Coats
Another step I skipped was sanding between coats. A light sanding after each coat of paint makes a BIG difference… you’d be amazed! It only takes a few minutes to knock down the paint with a high grit paper (220+) and it REALLY helps eliminate the buildup of pesky brush marks.
Mistake #3: The Brush
Over the years I’ve used A LOT of brushes. From cheap dollar store brushes to popular brand names – synthetic bristles to natural bristles – rounded and angled. Here are a few pointers to keep visible brush marks away…
- I use the right size brush for the job (small details = small brush = fewer brush strokes)
- The less coarse the bristles, the less chance of leaving brush marks
- Properly cleaning and reshaping my brushes keeps them in good shape which reduces brush marks
- The more comfortable the brush is in my hand, the smoother my results
- I let the brush do the heavy work and don’t apply too much pressure
I’ve been asked if these rounded chalk paintbrushes are better for chalky paints. I don’t frequently use mine because I prefer painting my furniture with a traditional angled style brush. The brands I’m frequenting most are these Purdy Brushes and this short Wooster Brush… but again, it’s whatever feels more comfortable to you.

Mistake #4: Using Too Much Paint
I used to overload my brush and use WAY too much paint – which causes extra brush marks. Using paint sparingly helps cut down on brush marks. A rule of thumb I use, when loading my brush, I dip and load the bristles about 1/3 of the way up.
Mistake #5: Not Thinning Paint
Thinning thick paint is the BEST way to avoid brush marks because it allows a longer dry time so the paint has time to settle and lay nicely. Here are a few ways I thin my paint…
- Mixing in a little water directly to the paint
- Dipping my brush bristles into the water before I dip my brush into the paint
- Using a water bottle or mister while applying and brushing the paint onto my furniture
Misting my furniture has been my preference lately and this is my favorite brush mark eliminator tool. I’m loving the little mister. It doesn’t spray or shoot the water out…it mists the water beautifully! I find it makes a big difference in the look of the smoothness and it’s really easy to control how much water is applied.
Bonus Tips:
- Focusing on one section at a time allows me to work with the paint while it’s wet
- Painting into a wet edge reduces noticeable brush marks
- A high-density foam roller for larger flat surfaces to create a nice smooth finish with no brush marks
- Light feathery brush strokes are better than too much pressure
- Laying drawers face up allows the paint to lay nicer
- I don’t overwork the paint (unless I’m trying for a textured finish)
- Better to paint a few light coats rather than one thick coat which is sure to show brush marks
Spray Gun
This is the guaranteed way of getting a flawless finish. I’ve been using this Husk HVLP Spray Gun for years and it still works great. There is a learning curve for spraying furniture and proper ventilation and equipment like a compressor gun etc is needed, but it’s A LOT of fun. I like switching it up every so often and spraying my pieces for a modern flawless finish.
I HOPE THESE TIPS HAVE BEEN HELPFUL. THE FACT THAT I CAN BE A SMALL PART IN YOUR CREATIVE JOURNEY IS A REAL HONOR! I LOVE CHATTING WITH YOU SO FEEL FREE TO CHIME IN WITH QUESTIONS OR YOUR TIPS BELOW. 🙂
Happy brushing my friends!
Denise x
RELATED POSTS::
Salvaged Sewing Desk Makeover
Mustard Yellow Dresser Makeover
Vintage Teacart Restyle
DIY Pottery Barn Knock-Off | Buffet Makeover
PIN AND SHARE!

I love your blog and all your tips! I have a huge problem and have no idea what to do. My third piece ever painting is a solid wood desk and hutch. I painted 3 coats of DB chalk paint on the desk only. It sat in my garage for a week and the more I looked at it the more I didnt like the color. Its a blue gray amd I want a dark gray. I started hearing about DB new line silk so I got black sands. I used a mouse sander to sqnd the desk. I sanded till smooth not down to bare wood. Is that ok, can i apply silk or do I have to sand down to bare wood? I feel like ive ruined it! And because i havent done anything to the hutch if i use black sqnds on both will they look the same?
Hi Ginger! YES and YES! You didn’t ruin anything. If you sanded down the blue-gray to give it some scuffy-tooth (no need to sand down to bare wood!) you can use the SILK All-In-One Mineral paint with no issues. Also, the top of your hutch will look the same once painted. I recently used Silk in Black Sands on this Tea Cart Makeover and its fabulous!
Thanks so much for your helpful article. One thing I really struggle with is brush marks along edges where my roller can’t reach. Do you have any tips for that ‘transition’ point between roller and brush? Thanks!
I do. I would brush your edges FIRST (I like brushing edges on the diagonal so it doesn’t make a mess on the side! and use a spray mister for thicker paints) and once you’ve brushed, roll over the entire top getting as close to the edges as possible. Let me know if this helps. 🙂
Hi, your tips are great! I’m a little confused though. Do you add water to oil based paint? It seems as though it wouldn’t mix.
Hi Sondia! No. No water in oil based paints. For the most part, I only use water based products.
Best advice ever! I use all of these tips and they work well! Also have found shortcut brushes to be my favorite. Your work is stunning!
Thanks so much Judith! xo
I agree.. …best advice ever. But I admit at first I got a little carried away with Mr. Mister..and over misted just a tad. But once I got the hang of it (and finished misting the dog) my cabinets were perfect.
Hi!
How do you get such a beautiful finish coat? What do you use as a top coat?
You’re work is amazing!
Hi Mollie and thanks! For this black buffet, I black waxed the bottom and used a satin poly on top. 🙂
Your furniture is beautiful! I too hate brush strokes. I think I have the painting part down. What type of applicator and techniques would you recommend for a smooth top coat using a water based polyacrylic? I’ve seen suggestions for both sponge type and synthetic brushes. Thanks!
I’ve been spraying all my topcoats which if you have a sprayer will give professional results. Depending on the water-based brand, I find these sponges work really well!
I just recently painted my twin boys dresser to match their beds. I cleaned it, sanded it really good, used a tack cloth to clean the dust off, then used a primer then I had to paint it 5 times to cover it. I read that I should sand after every coat of paint with fine grit sand paper but when I did it took the coat of paint off that I just put on. I was getting nowhere. Now the dresser is very rough but if I barely touch it with sandpaper the paint comes right off. What do I do? Help
It sounds like you may have used a Water based paint over some sort of an Oil based original coating. I have made that mistake on flat hard surfaces like a door and after drying the Water base paint almost peels off, sand paper would certainly take it off.
Some guys will argue with me here but for furniture or anywhere I want a hard durable smooth finish I use an Oil based product. On a wall (especially with some texture) you can get away with Water base, there’s something for it to hang on to, the first coating on the wall was probably Water base anyway.
If spraying forget Water based paint, being successful at that is beyond what most of us would have to do.
You have a mess on your hands now but if you can get that paint scraped off start again with an Oil based primer and paint. I guarantee that a sanding between coats, tack cloth and another coat will give a nice hard smooth finish. The same goes for a clear finish.
If you insist on using Water based paint thin it with something like Flotrol and don’t sand between the applications. I know there are people who will read that and insist that they have been successful sanding Water base paint, good for them, most of us don’t have success with that. The thing is that if you are going Water base you are taking the easier route already, you can’t expect a professional finish.
I just painted my first coat (over primer) using the water bottle you show, but I’m seeing lots of bubbles dried. I used a dense foam roller. Any idea what I did wrong and how I can prevent it next coat?
My, my. Kudos. to you kiddo.
Eighty years old,believe I know a lot
Years of cooking (and believing I know a lot) and then BAM! Spray Pam on the spatula also.
Painted cars, houses and a myriad of other things. Some good, some bad and then BAM!
Acrylic latex? Yep ! Keep the brush wet with water, paint quickly and the drag the brush tip (referred to as tipping) GENTLY across you work and VOILA! A beautiful job.
Thanks, I will remember to spray my spatula AND keep my brush wet.
Jim
You taught me something new today…spraying a spatula!!!… BAM! Thanks for the kindness and the smile. 🙂
You must be a lovely person if you are eighty and willing to admit that you do NOT, in fact, know everything! I did not think about Pam on the spatula (I will tell my husband, the cook), and I did not think about keeping the brush wet! Love learning new things and better ways to do old things.
When my triplets were young, I learned CASE- Copy And Steal (from) Everywhere…. you never know from whence you will find a new idea, and cross-application (de-sticky both the vessel and the tool – other applications, anyone?)
Thanks, Jim!!
I’ve never misted while painting. Do you have a video of this process? I’m going to be painting a hutch at some point but have been putting it off because I have not had good luck with avoiding paintbrush streaks. This is too big of a piece to mess up. Thank you!
Hi Charley! What a great project! I’m pretty sure a good few of my videos have me misting but here’s one where I mist and blend. https://youtu.be/yVcRFexBOto When blending you can’t have any brushmarks so hopefully, it’s a helpful example for you. 🙂
I’m sorry I didn’t read through all of the comments posted,and someone may have already asked this question, the tips you use to thin paint, do you use all three tips at once,, or do you use one or the other, depending on your mood?
Hi Patricia! All these tips are super helpful but no, they don’t necessarily have to be used all together on every piece. It really does depend on the piece of furniture and the finish I’m going for.
i love the green dresser! can you tell me what color that is and the brand? i’ve only used chalk paint once and didn’t like it because it didn’t seem smooth at all so will the water spray tip. thank you!
Hi Kimber! I love that green dresser too. It actually made it into a magazine which was SUPER exciting. I used this here greenthis here green and a water misterwater mister is a great help when working with chalk/mineral paints. I recently wrote an entire post on thinning paints herethinning paints here. Hope this helps. 🙂
I am painting my granddaughter’s dresser. She is expected to arrive earlier than planned. What paint sheen do you use, and is sanding required after each coat? Also, to clarify a post higher up in the thread, did someone suggest putting poly coat on then rolling over it with a dry foam roller to get bubbles out? Last question,…How long do you wait to put poly coat on after the piece is painted
Hi Hope. I usually use a matt or satin sheen for furniture and the majority of the time paint with chalk/mineral paint. When applying poly, I like to use a brush or spray gun. A foam roller or brush can cause bubbles so I wouldn’t advise using them for top coat. Also, once the paint is 100% dry, poly can be applied. Have fun with your granddaughters’ dresser. 🙂
Have you used Dixie Belle’s Gator Hide in a sprayer? If so did can you give me some pointers
I have not but funny that you bring this up, Jackie. While I was debating which topcoat to use on the last piece I painted I wanted to try spraying Gator Hide. Then I remembered hearing that Gator Hide doesn’t work well with transfers. When I give it a try I’ll be sure to post about it. 🙂
Hi there,
Love your blog! And love your beautiful pieces more!
So I am new to all this and I started with an old, oak bathroom vanity. I painted it an antique white color after two coats of Zinsser stain remover (as a primer). The deed is done, the paint has dried and I’ve got brushstrokes infesting the whole piece. I can’t seem to sand them out . . .do I have to start all over? HELP!!!
Thank you!
Hi Sammer! I find its difficult sanding brushmarks out by hand. I like to use an electric sander like a 1/4 inch or orbital. This way I don’t have to strip all the paint off, but the sanders are powerful enough to sand all the brushmarks down to a super smooth finish to prep for repainting. I hope this helps and good luck. 🙂
Hi Denise, loving all your posts! Beautiful work!!
Did you paint the piece you pictured between tips #4 and #5? Do you have a port for it?
Thank you so much!! I can’t stop reading your blogs 🙂
Hi Ionara! Yes, I’ve painted all these pieces. I think you’re referring to this one here.
Hello and thanks for the many helpful hints. What compressor are you using with your Husky HVLP sprayer? I’ve just ordered a SprayIt LVLP sprayer with the hope it will perform well with our pancake compressor. This LVLP sprayer is rated for rhe CFM range of our compressor, but it has received mixed reviiews for performance.
My compressor is 11-gallon(41.6L) CFM 6.2 @ 40 PSI and 5.2 @ 90 PSI. My spray gun sprays at 40 PSI. Sometimes a smaller compressor is NOT the best choice. You will need a compressor that holds enough air and pressure (plus reserve) compatible to your paint gun. (Your Spraylt LVLP will have the details). You don’t want to be spraying and have to stop every few minutes because your compressor is the wrong size. Hope this helps. 🙂
Well that does it…..hello Amazon….please bring me a mister. LOL… In all seriousness, these are fabulous tips and I’m thrilled to send them into the digital world. XO
awww, thanks Susie! I hope you have an amazing weekend my friend. XO
Hello Denise,
Have you ever used a leveling agent to your paint fro less brush marks and smoother paink
Ya water…lol. Water is my go to but I have also used Flotrol which works nicely. 🙂
Hi,
Have you eber used flotrol in chalk paint? I always wondered if you could use that
Hi Ashley! I use water to thin down my chalk paints but I believe Flotrol works with ANY type of water-based paint. 🙂
LOVE your blog – thank you for all your tips!!! I just finished painting a secretary with Behr chalked paint in 2 shades of gray. I hated the medium dark so I dry-brushed the lighter gray over it giving it that weathered look. Even though I sanded between coats, the brush marks made it really rough! I even sanded after the final top coat of clear top coat by Rustoleum and it’s still rough. I’m not sure what I did wrong? Maybe used too much paint for the dry-brushing? Help!
Hi Laura! I’m guessing you answered your own question because for dry brushing – verrrry little paint is required to get the effect. Very fixable though. I would sand it smooth (just so your paint is smooth… not totally off) and then apply a thin coat of your base color and a very light dry brushing over top. I hope this helps.
Thank you Denise! I’ll try it!
Thank you so much for your tips/advice! I look forward to reading your future tips!
Thank you for posting this! I’m currently struggling with this very problem! I’m going to try your steps and see what happens.
Thanks for the blog it is the best. I am going to paint my baby grand piano, I thought I would use chalk paint but I don’t ever get a sleek finish as you do, I thought maybe I needed to use a different kind of paint. What kind of paint do you suggest?
Thank you for your tips I will use them on the new projects.
Nelda
A baby grand…what an amazing project Nelda! Chalky/Mineral paints work really well but possibly you would find thinning them with a little water helpful. Brand names I’ve worked with (and have really liked) are Annie Sloan, Dixie Belle, Fusion, Bluestone House or you could go with milk paint – Miss Mustard Seed, Homestead. If you’re not into ’boutique’ type paints, even a Rustoleum Chalky Paint or enamel-like Sherwin Williams All Surface Enamel will work very nicely. 🙂
Thanks for this article! I have a question about misting. Do you mist the piece then add paint? If so, I assume you let that coat dry and then mist again before adding second coat? Clearly, I am new at this and am so happy to learn from folks like you!
Hi Trish! Lately, I’ve been misting the paint right on my plate/palet to thin it down before I dip my brush but yes, you can mist the piece and then paint over it. There’s really no exact science to this. Just do whatever feels comfortable. Whatever thins the paint down a bit works wonders. 🙂
Good good article. No matter how much i know i still read the articles to refresh my library. Haha! One can still learn from the articles no matter how old we get. Thanks
Very helpful? Thank you so much. What beautiful painted pieces you’ve done.
I’m SO glad you’ve found it helpful Dee. Happy painting!:)
Thank you so much for the article on preventing brush strokes. I have been dying to try chalk painting but have been so ice to try my hand at it. This article restored my courage to give it a try. Thanks again! I really love this site.
This makes my day Jill! I really hope you give it a go… I’m cheering you on from this end. 😀
Well first, your eyebrows are on point! 🙂 Although I dip my brush into water initially, I never heard of misting while painting! I’ve done several pieces with GF milk paint using chip brushes [sometimes leave bristles] and will try the brands you suggest. Great info, thanks!
Do you use a topcoat? Thankful for this post and links. Hopefully tackling our 30 year old bedroom furniture soon.
I always use a top coat whether it’s wax or poly – or lately a combo of both. Poly top and waxed body. Have fun with your furniture makeover Tish.
I’m using a antique white Kelly Moore durapoxy. What top coat would you recommend for a child’s nightstand?
Love your posts! And your emails! So much great info!
I have been doing all my furniture painting with a sponge, I just keep cutting a new piece of memory foam from an old pillow and I will use it for a long time, if it gets to where some of the paint dries on the edge I just trim that off, this is super easy for paint legs of chairs or furniture with legs.
Memory foam! I’ve never heard of that but I guess it would be similar to a high-density roller!
Memory foam!? Sounds like a brilliant idea! Cannot wait to try it out. Thank you for sharing
Thanks for this info. I just started using Fusion paint and boy is there a learning curve for those brush strokes. Very frustrating at times but your tips should help a lot
I know… but I’m glad you’re finding them helpful Gail. And keep at it cuz practice makes perfect and Fusion can give a really nice smooth finish. xo
My problem is getting a nice smooth finish with the topcoat. I have been using polycrylic. Iv’e tried brushing it on and I get brush marks. Foam roller leaves bubbles. It is so frustrating to get that far then ruin it with the topcoat
I used to use lettering enamel paints for sign making. We used pipe insulation on a small roller to apply then do a feather light pass to pop bubbles. The paint would then flow into a glass finish as it dried. Perhaps you could try something like that?
I’ve tried all the polys and they just don’t work for me. I like to use General Finishes for my top coat.
All of your tips are great. My father in law was a furniture maker and he taught me to use the dry roller method. Paint the furniture with a good brush in small sections. Then use a small, 4” dry roller to go over the wet paint. The brush fills all of the areas assuring good coverage and the roller removes the brush marks. If the roller gets too full of paint, get a new dry roller.
Great tip from your father-in-law. 🙂 I love this Kristy!
So you paint with a brush, then use a dry roller over the wet paint? A dry foam roller? Please clarify this method.
Also, misting over wet paint after you apply it? Do you use a high gloss or a semi gloss paint for dresser?
Great tips…I really agree with your advise on prepping your piece before painting… It makes such a different …thank you for sharing your tips…
Thanks Lisa… and thanks for dropping by today. Have a good one! 🙂
I have the paint, i have pieces to paint and your infomation came at the right time before i start my first piece. Thank you for sharing such good information.
Pleasure May, I hope you have fun. 🙂
Great tips! I’ve been painting a long time and I tend to get lazy and skip some of these steps, but when I follow the process you described, I am always pleased with the results.
Can’t wait to see your next project!!
Thanks Anne, and looking forward to sharing my next project. 🙂
I absolutely love your posts. Thank you so much 🙂
I’m SO glad Jane… thank YOU! 🙂
I appreciate all these tips, Denise! I tried using a spray bottle once and the end result was a drippy mess. I’ll try the water mister. Thank you!
Hi Nicki! Pleasure, and I’m sure the water mister will work better for you. Have fun! 🙂
Those misters are also making a huge hit in the curly hair girl community for damening just that area. 😀
My hair is pin straight so I wouldn’t know…lol. 🙂
This old dog loves a new trick. Thanks
The learning never ends… that’s part of the fun! 🙂
I’m actually in the middle of painting 2 cabinets to put up in my laundry room. It’s been years since I painted something this large by hand. I bought just a white high gloss enamel and it’s definitely a bit hard to keep the brush marks at bay. I have a good set of brushes that I purchased just a few months ago…do you think I can find them?? Lol so just wanted you to know your tips and tricks are definitely going to help. You gave a lot of great tips and ideas here…thank you!
Too funny Shirley! I can’t tell you how many times things go MIA in this household…lol. Good luck and have fun with your 2 cabinets! 🙂
So on the piece you did with the navy blue paint and the copper gilding wax did you start by completely sanding that piece first nc how did you get that dark brown color to come through the first coat?
Really good tips here Denise. I’ve never tried the spray mist while painting before but it totally makes sense for moving the paint. Trying this on my next project 🙂
Thanks, Marie… and I’m LOVING my little mister. LOL Can’t wait to see what you’re working on this week. 🙂
Floetrol works wonders for this issue and insn’t too cost prohibitive either. A mist bottle does helps ton too.
Yes! I’ve used Fleotrol and always have some on hand as well. Great tip, thank you Aaron. 🙂
I’ve got a Lanes storage bench that I want to make over. The cushion on top is outdated.. I’ve already bought new fabric to cover it. The inside of the bench is oak, but sadly the outside front is that ugly vaneer stuff. My goal is to paint it white. Any tips for this type of project? I’m guessing u need to lightly sand the vaneer front before attempting to paint.
A light sanding is beneficial. But because you’re using white, if you notice any bleedthrough issues (depending on the veneer/finish), a sealer will help. Shellac, B.I.N or BOSS will take care of it. Hope this helps Samantha. 🙂
Thank you for these tips. For some reason the link for your favorite brush mark eliminator tool is not working so I have no idea what this mister looks like.. Funny cos all the other links work. You’re right about spray bottles spitting out droplets of water unevenly. A great tip for applying smooth water based top coats is the Detailer’s Choice EZ Grip Applicator Sponge.. It allows you to work much faster so you can apply it smoothly before it starts drying. Great little tool..
Sorry, Tracy, I’ll look into the link… thanks for letting me know! And I just googled the EZ Grip Sponge, brilliant! I use a similar blue sponge for applying poly topcoats and I agree – they work GREAT. I’m going to check for the EZ Grip Sponge next time I’m a Home Depot because it looks a little larger than mine.
Question about the sponge ? Is this just for use for applying top coats, or can you use it to apply paint also? I’m very new. I haven’t bought anything yet to start painting. I have been doing nothing but watching videos, reading blogs, etc. Yoiur blogs are so helpful. I won’t be using a paint sprayer. Not many talk about brush streaks. That’s the main thing holding me back from actually purchasing products. The chalk paint brushes are so expensive for one. I am very confused on what kind of brushes to buy! Any suggestions on brushes would be greatly appreciated!
Hi Lisa! Sponges can be used for ‘texture painting’ to create the appearance of say a faux rock or old world finish, but if you would like a nice clean brush free finish, a brush or roller is the best option. When I first started painting I would use cheap dollar store brushes because that’s all I could afford. And I’ve also used PurdyPurdy, WoosterWooster, Redesign and Dixie Belle brushesDixie Belle brushes. The best advice I can give is work with what you can afford and when you’re able, test out different brushes to see what you like. If you follow the tips above, you will end up with a really nice finish. 🙂
Hi Denise thank you for the wonderful post as usual! I thought I would pass along my factoid.. I purchased a bottle of One by Febreeze…..the bottle is a mister just like you recommend and I am trying to hurry up and use it because I plan to reuse it as a mister in my “studio” real soon! Thanks again!
Brilliant Melanie… upcycling at it’s best! 🙂
Do you use spray gun with chalk paint? I do have the spray gun and was just wondering if it’s possile to use it for chalk paint, but was afraid it would be to thick. At what ratio do you thin it with water?
I do Anna! And yes, I usually thin the chalky type paints by adding in a ratio of around 10-15%… so it drips off a stir stick like a melted milkshake would. If you’d like to take a peek I sprayed with chalky paints here and here. 🙂
Thank you! I am going to re-do my kitchen cabinets soon and I will apply your tips!
I haven’t had the time to tackle my kitchen cabinets yet but it’s on my ‘list’. Great project! Have fun Shannon. 🙂
THANK YOU for the tips ….. I sure needed them for next project.
I also think that a LOT depends on the paint you use. The most expensive is not always the best. I have tried many different chalk or mineral based paints and have my own favorites.. I like Dixie Belle, valspar’s Chalk paint and velvet finishes. I have never had any brush strokes with velvet finishes. I agree about Purdy and Wooster brushes. In fact I think the brush is as important as the paint. I just think it is important not to be intimidated and try a small project. Once you gain confidence you will find painting furniture is fun and not a project to be dreaded. Thank you for all of your inspiration.
I agree Deb. The most expensive is not always to best. I haven’t tried Valspar’s Chalk Paint or Velvet Finishes, but Dixie Belle’s Chalk Mineral Paints are my go-to lately. VERY reasonably priced with exceptional coverage, workability, durability, etc. And excellent advice about starting small and gaining confidence. It’s risky when the first project is great Grandma’s entire dining set that has been passed down 3 generations. 😉
Love reading your tips and tricks!! We are moving into a new house at the end of August and all I can think about is “What furniture can I paint!!” Can’t wait to start my next project! You inspire my creativity!
Thanks Rosanne! And all the best with your move and your new house!
Do you sand your final coat? When misting, do you mist the area you are about to paint before you apply the paint, so the brush is essentially collecting the water as you go along? Do you seal every piece?
I love you work and I’m really inspired by your blog.
Thanks Jody
Hi Jody! I work in sections and usually mist where I’ve already applied some paint – but you can mist before – or even mist the brush. All will help. 🙂 Yes, I sand my final coat before I topcoat/seal and protect (all pieces!). Having said that, there is paint that is not mandatory to seal because they’re durable enough on their own. Fusion and Dixie Belle being a few examples.
I struggle with the brush marks also. I figure it’s just the nature of the beast with chalk paint but I would like a smoother finish especially on the top of the piece. I do everything that you do so I’m going to try the mister. I do use Cling On brushes most of the time or Purdy. Zebra brushes have some great special shape ones I also use. Do you mist and brush or just mist and it helps level it out? Thank you for any help! And I love all your pieces!
You’re not alone because many painters have Susan! Thick chalky paints are perfect for creating texture if/when you want it but if your looking for a super smooth finish, they can give you that too. I think you’ll love the mister… feel free to let me know. 🙂 And a few of my blogger friends rave about Zibra brushes. Now that you’ve brought it up, I’d like to try!
Thanks for this great article. Do you use your mister for chalk paints only or also for other paints (Sherwin Williams semi gloss).
Thanks Rebecca! I use the water mister for thicker chalk and mineral paints. I never found a need when using SW. 🙂
Thanks so much for sharing! I’m buying the spray bottle right now!
Thank you Janie…. feel free to pop back in and let me know how it works for you. I think you’re going to love it. 🙂
Thanks for the tips Denise. I just realized my main mistake has always been overloading my brush with paint! I’m kind of a more-is-better sort of person, but I think maybe that doesn’t apply to painted furniture. Lol. Great tips:)
Sometimes it applies. Over the weekend I ate the most DELICIOUS lobster from Nova Scotia – and more would have been better! LOL 😉