
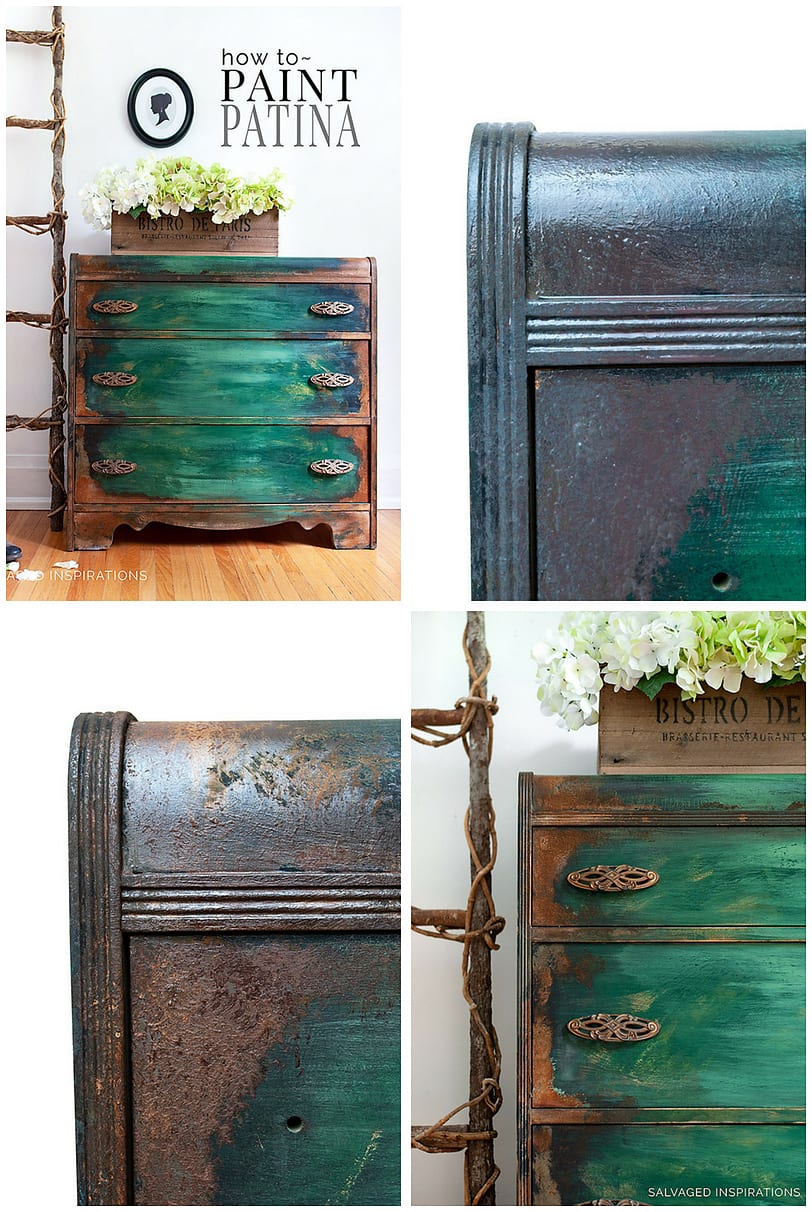
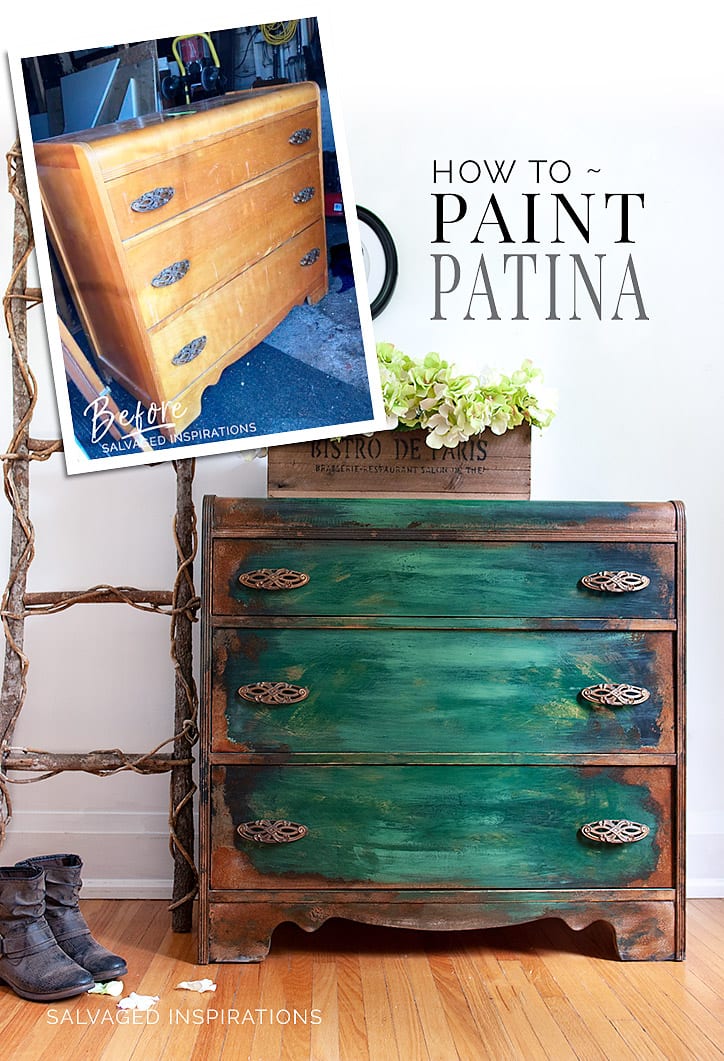
Today, I’m sharing my first attempt at painting patina. My practice-piece was this waterfall dresser, but this technique can be used on any wood, metal, glass, ceramic, plastic etc. Last week, Do from Do Dodson Designs warned me this technique is addictive. After trying it, I totally agree. So, now I’m passing this warning on to you my friend. This process is fun and fascinating! Try it once and you might just find yourself rummaging through your home looking for anything and everything you can patina. 🙂
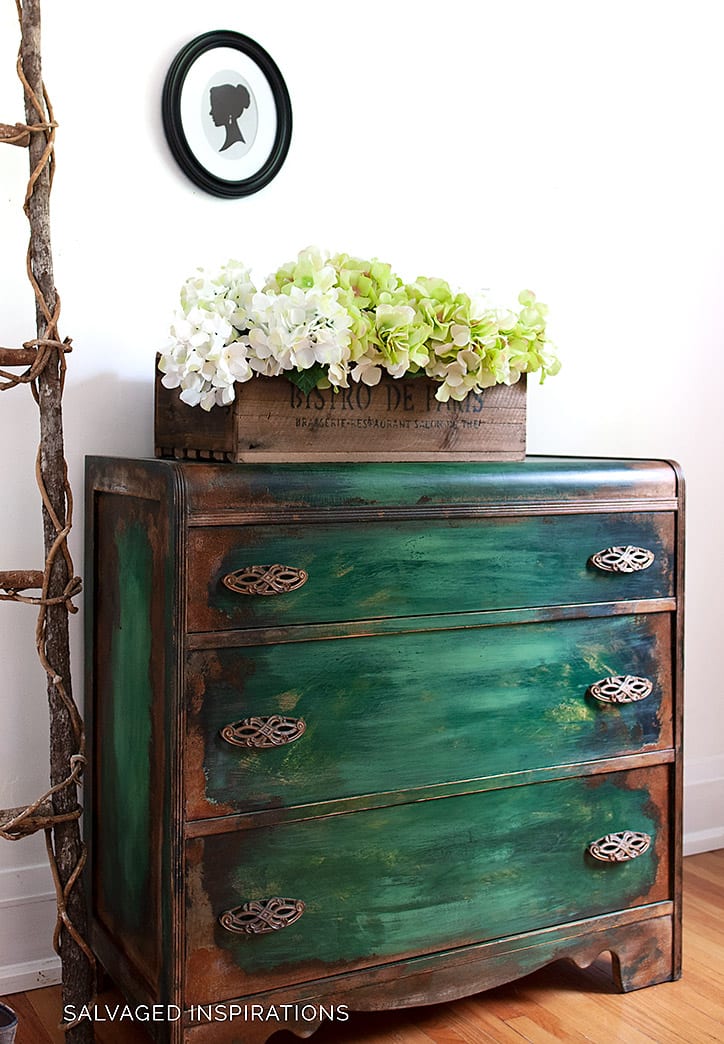
Here’s the waterfall dresser I picked up at my neighbor’s estate sale a few weeks ago.
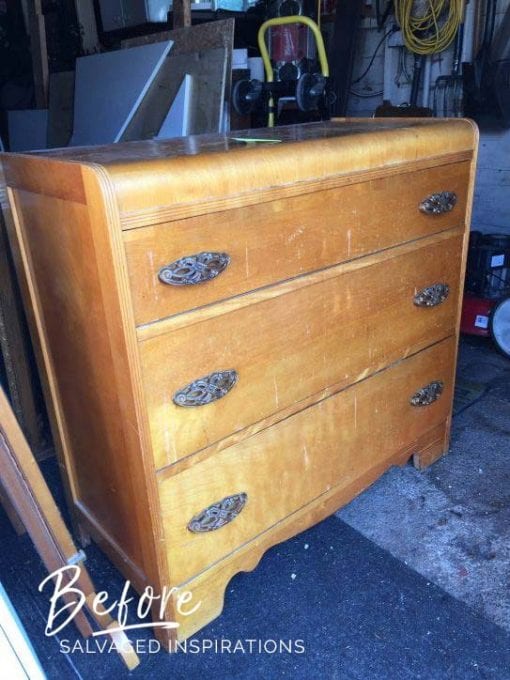
I chose this dresser to ‘practice on’ for two reasons.
-
- The rust on the vintage hardware was inspirational. My goal was to match the rustic finish.
- I have mixed feelings about waterfall furniture so if it didn’t turn out like I wanted, no biggie.
In my experience, it’s always a little easier to experiment with pieces that you’re not attached too.
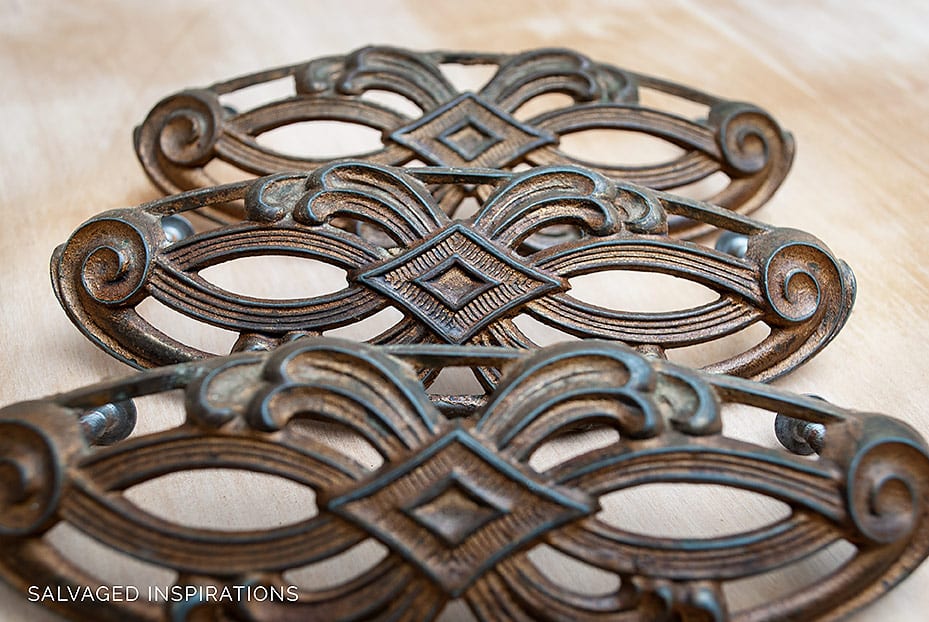
That said, I couldn’t be happier with how this dresser turned out. The rust patina against the vibrant green adds contrast and character… and really ties in nicely with vintage hardware! What do you think?
THIS POST CONTAINS AFFILIATE LINKS TO PRODUCTS I USE. YOU CAN SEE MY FULL DISCLOSURE HERE.
SOURCE LIST::
-
-
- Painted Waterfall Dresser – SALVAGED ESTATE SALE!
- Chip Brush
- Iron Patina Paint
- Green Patina Spray
- Sand Paper 220+
- Tack Cloth
- Gator Hide Topcoat
- Sponge Applicator
-
HOW TO PAINT PATINA::
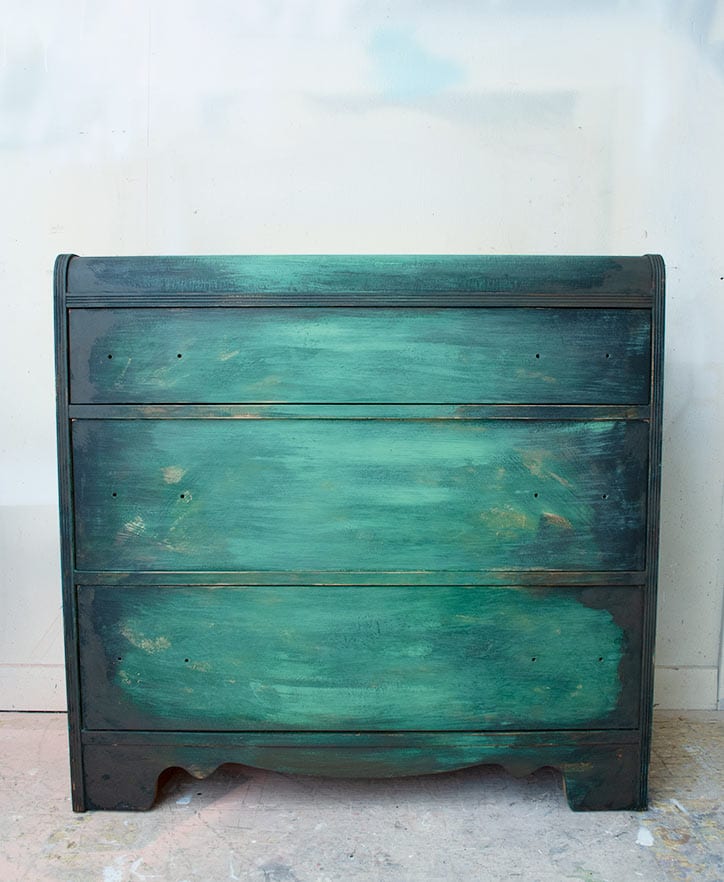
I’m sharing the technique I used to create the patina. But if you’re interested in the layered paint technique I used to paint the base of this piece, you can see it here. The only differences are the colors and the more prominent brush strokes I used… because I wanted a more rustic look.
The paint I used to achieve the look is Annie Sloan’s Amsterdam Green, DB Caviar and Kudzo. Depending on the look your after, any paint brand and/or combo of colors you like will work with this finish.
Step #1 – Mixing the Product
After my piece was all painted and 100% dry, I used iron paint and green patina spray to create the rust. The very first thing I did was mix the product REALLY well. There is actual metal in this patina paint (which causes the activation process) so it needs to be mixed thoroughly to work.

Step #2 – Apply the Patina Paint (2x)
Once the iron paint was mixed, I used an inexpensive chip brush to apply my first coat around the edges of the waterfall dresser – just in the areas I wanted rust to appear – and then let it dry. Here’s the dresser in progress. The iron paint is brushed on just around the edges and I have to admit – not looking too impressive.
Once that dried, I roughly dabbed on a second coat of iron patina paint to create a bit of texture. This ends up giving the patina an authentic natural look.
Step #3 – Apply the Patina Spray to WET Iron Paint
While the iron metal paint was still WET – I sprayed it with this patina spray and then headed upstairs to wash dishes, opened mail etc. After 2 hours (and a clean house) I had a rust on this dresser!
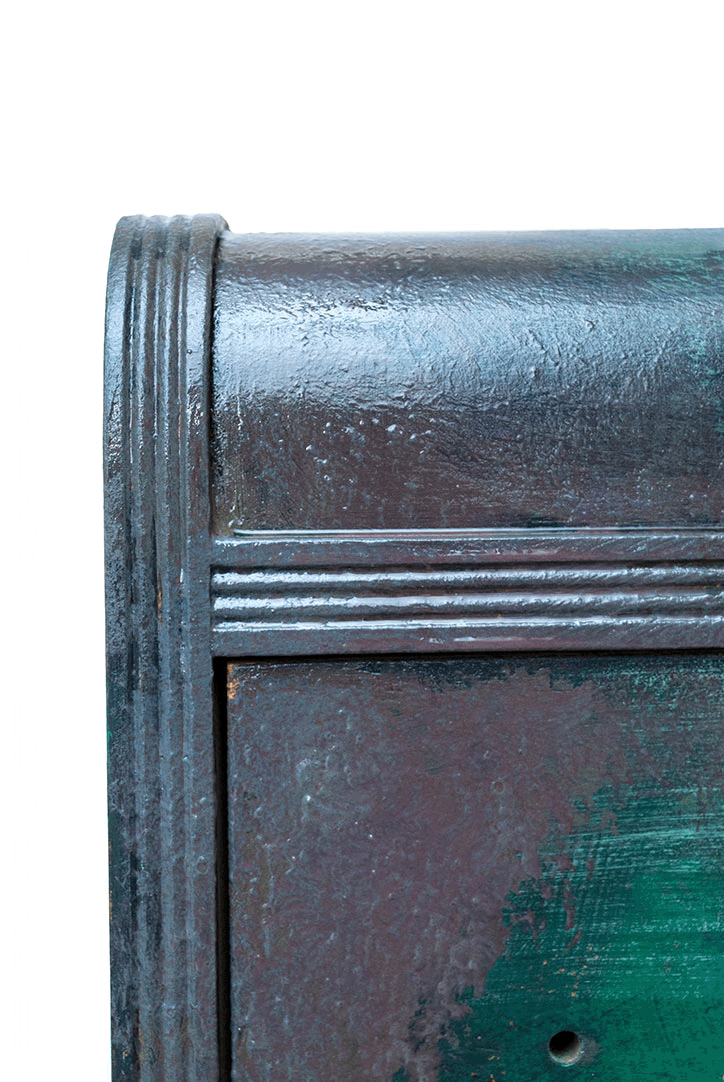
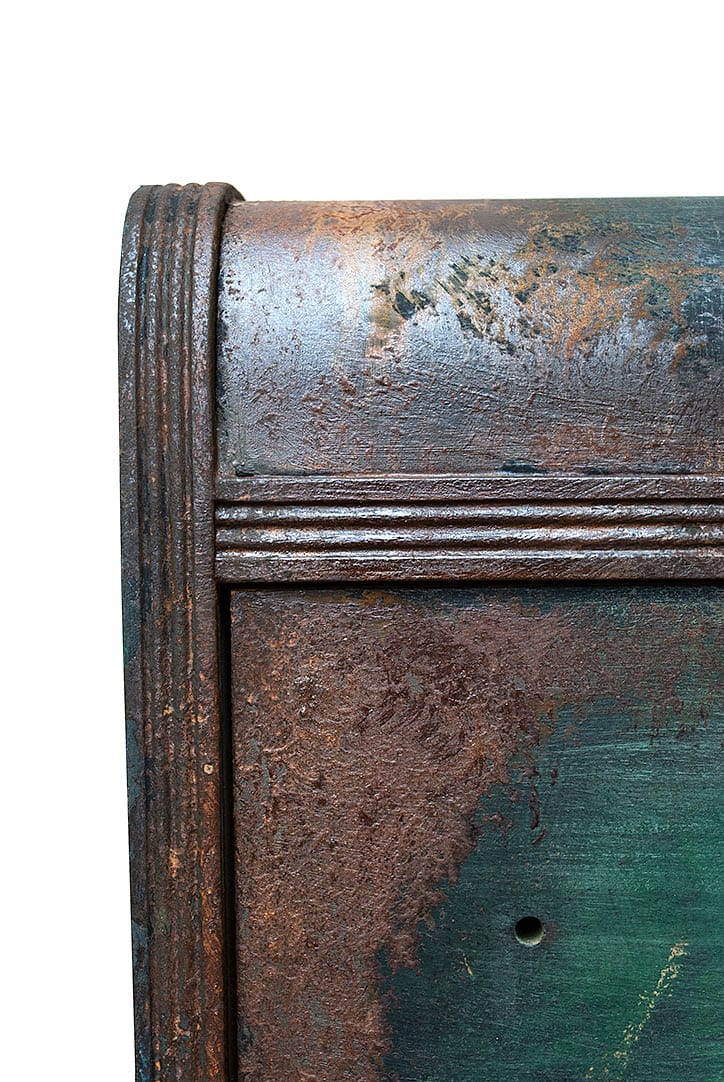
I was curious what it would do if I left it for another 2 hours, and the rust became even more prominent. This is a really fascinating process!

Step #4 – Sand
After 4 hours, I was happy with the look so I sanded the rough spots down with 220 sandpaper and removed the all the dust with a tack cloth.
Step #5 – Topcoat | Protect
To protect and topcoat, I used this sponge applicator to apply Gator Hide Topcoat. I’m guessing (because I’m no expert) this stops any further activation from taking place. Gator Hide also and gives the dresser a durable waterproof finish with a flat matte finish.
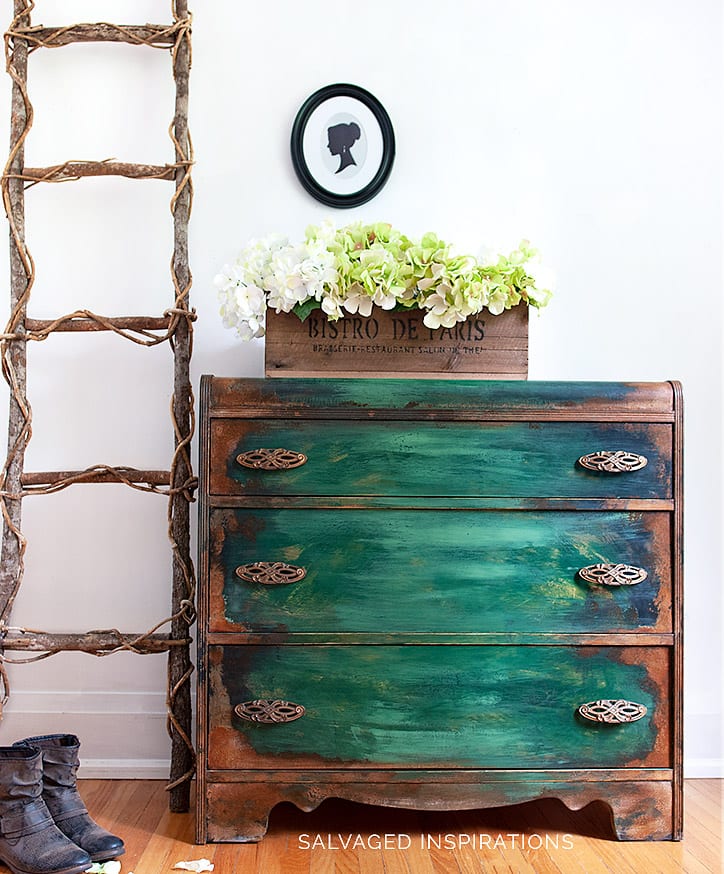

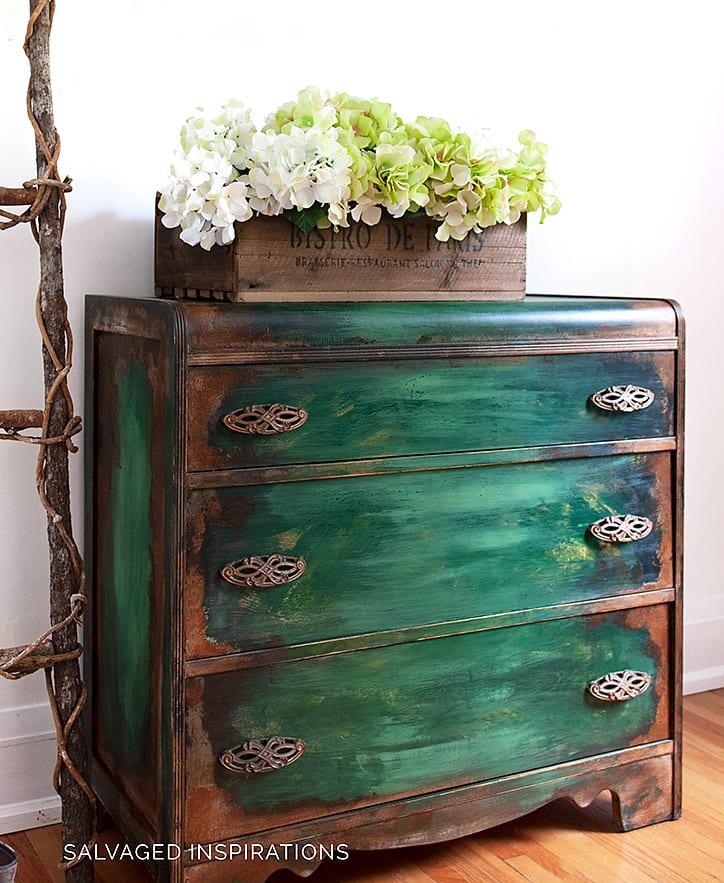
There’s still a small drawer repair to do on this piece and then it’s ready to be listed. I don’t know if this will be a quick sell in my area but the process was amazing so it doesn’t really matter. I’m excited to use this technique on other items… and I’m a huge advocate of trying different techniques and styles to keep things interesting and continue to learn and grow.
I hope this has inspired you to give something that interests you a try!
RELATED POSTS::
Patina Paints
Patina Painted Furniture – Ideas & Inspiration
Layering Chalk Paint – Empire Makeover
Layered Stormy Seas Vintage Vanity Makeover
Think Green – 25 Beautiful Furniture Makeovers
I’D LOVE TO HEAR WHAT YOU THINK OF THIS PATINA FINISH. IF YOU HAVE ANY TIPS YOU’D LIKE SHARE OR HAVE ANY QUESTIONS, FEEL FREE TO CHIME IN… I ALWAYS LOVE HEARING FROM YOU.
Happy painting and have an inspiring day my friends,
Denise x
PIN AND SHARE!

This turned out beautiful and it inspired me to try this technique on a dresser of my own. Question: I have seen conflicting articles on how to topcoat patina. You said you used Gatorhide all over your dresser, right? I really want it to keep that matte look and yours looks matte in the picture but I have used Gatorhide on other pieces and it seems like it gives it a shinier look. I guess my question is will it stay matte if I use it? If not, do you have another suggestion? Can I wax over patina? Thank you so much!
Hi Sherral! Yes, if you don’t want any sheen that the Gator Hide may provide, a wax is a good option. I find this spray wax from DB is very matte and super easy to spray on especially if you have a little texture with the patina. Hope this helps.
Hello Gail, The dresser looks amazing!!!! I have one question did you mix the spray and paint together in the beginning.
Gorgeous! I know my question comes a little late. But, may I ask what paint colors and brand you used? I know green, was a blue base also used? Thanks!
Hi Stella and thank you! I used Annie Sloans Amsterdam Green along with DB Caviar and Kudzo Green.
Hey there how much paint and spray did u use??.
Very little. I’d say less than a 5th of an 8oz paint and the same for the spray bottle. A little goes a long way. I’ve done other patina projects as well and still have a more than 3/4 of my paint and spray left.
Have you ever found anywhere to purchase similar vintage hardware? I love it but re-read and realized the ones here came with the piece when you bought it originally, but I would love to find these on their own….
Gail this is gorgeous! I have a waterfall dresser and I am going to go for it! I had a question about the paint before. Did you paint the entire piece with the green? And then blend the other two colors? Thank you and thank you for inspiring me to take the plunge 😀
Yes, the entire piece was painted green – heavier in some areas lighter in others. I didn’t want a ‘perfect’ paint finish underneath the patina. Have fun with your waterfall dresser Christina. 🙂
Sorry for calling you Gail! 😢😢Thank you for replying!
No worries… and my pleasure. 🙂
This is beautiful! I just Painted a Vintage Wood Ironing Board with a Metal Base and I used the Patina on the Bottom! The Patina is so fun to work with! You did a beautiful Job. I can’t wait to use the Patina on other Furniture Pieces
Hi Deb and thank you! The patina is fun to work with. I found the process fascinating. I bet it looks amazing on a vintage wood ironing board! I have some garden pots and ornaments I’m going to use this on. 🙂
Wow, i came across your site and just love your furniture, So, just to be clear, your not sanding pieces first? your just painting those paints on over top of other paints? What about furniture that has varnish on? What process do you do? And why did you fill in previous handle holes with bondo? Is it because you made new holes for the new hardware?
Thanks for your time 🙂
Hi Suzanne! I’ve been doing this for so many years, I’m actually in the habit of giving most of my pieces a light sanding (and/or heavy-duty sanding if the wood is not in good shape) before priming or painting. That said, many of the paints I use (Annie Sloan, Dixie Belle etc) don’t require sanding so there are some pieces I forgo the sanding. I know this isn’t a straight answer but it really doesn’ depend on the individual piece and the products I use. And yes, I fill old hardware holes so I can switch up with new hardware. 🙂
Interesting! In every furniture there should be a type of paint but at least you can pick what color you like…
It’s bloody brilliant Denise! I love the colours your chose and the patina you created…wow!
BTW I feel the same about waterfall dressers, definitely not a favourite style of mine 🙂
Hi Annie…thank YOU! I’m really liking the rust patina against the green also. It stands out and makes a statement. And yaaaa, waterfall furniture I have very mixed feelings about. There was one piece I REALLY liked that I spotted in a small boutique. The waterfall vanity wax repurposed into a bench. So if you can imagine, they took the mirror off, used a headboard backing, and reupholstered the ‘seat’ between the drawers on either side. It looked phenomenal! If I ever find one of those to repurpose, I’ll be super enthused. 🙂
That’s sounds amazing, wish I could have seen it!
That turned out amazing Denise! You are definitely inspiring me to pull out the Patina paint!
Pull it out Linda!!!! 😀 I know you’ll do something AMAZING that I’ll be swooning over. 🙂 XO
Too funny Denise, I’ve got a waterfall dresser in the works right now using a patina finish – different product-different patina but similar effect. I LOVE how yours turned out and swooning over the hardware too! Pinned 🙂 The possibilities are endless with all that rusted goodness. Added DB rust patina to my Must Try List.
…”all that rusted goodness”… love that Marie!!! There are SO many wonderful products to pick from, isn’t there?! I can’t wait to see how your waterfall turns out. We’re like twins. hehe 😉
Oh Denise! This is lovely! I’m so glad you are continuing the pursuit of art as you Refinish furniture.. Creating Unique pieces is a special gift. Thanks so much for sharing your amazing talent with us. Susie from The Chelsea Project
Susie, if you were here I’d be giving you a big hug. You always phrase things so beautifully. 🙂 Thank you!
Hello Denise,
The furniture piece turned out so pretty. I enjoy reading your post so much. I love how you explain every step so well. You have really inspired me, Please keep giving us inspiration.
Cheryl
Hi Cheryl! Thanks so much and I’m glad you find the tutorials helpful. 🙂
This piece is so interesting. I would like to hear how long it takes to sell! Could you keep us posted?
Thanks so much for all your great inspiration!
Hi Gail! I have a really full week so I’m guessing I won’t get around to fixing the drawer until this weekend, but I’ll definitely keep you posted. 🙂
Denise, it turned out wonderful! How exciting! I can see where it would be very addictive. I’d be tempted to pull up a chair for the two hours just to watch it evolve! It doesn’t look like the color changed much when you added the topcoat, which I had read could be a problem.
You’ve inspired me. I am going to get out my copper paint today and play with it! And I’m adding the iron to my list to buy.
You are so generous in sharing your talents. I love your step by step directions, your blog is an incredible resource.
Can’t wait to see what you do next!
Hi Rebecca!!! 🙂 I was tempted to sit there and watch it too but my messy kitchen was making me feel guilty, lol. The color didn’t change at all when I added the topcoat but the feel sure did. When it’s left unprotected if feels like rust – textured under your fingertips, whereas when I sanded it and used the Gator Hide, it still looks textured but feels smooth as glass. I’d LOVE to hear how your copper project turns out. 🙂
OH. MY. GOSH. Wow!!!!! What an interesting and beautiful waterfall dresser. I had NO idea there was even a product that could create rust on wood available. Love the finished look:)
Hi Monique!!! 😀 That’s exactly how I felt when I went back downstairs the first time, oh-my-GOSH! I’m sure there are other ways to get a rusted old look, but these products make it super easy, that’s for sure. I’m looking forward to trying it on some frames and this old clock I picked up. 🙂
Looks fantastic! What a combination, love the green.💚 💚 💚 and the rust together!
Thanks Lorin! Meee too. I really like the contrast in color and texture. This was such a fun finish!
Beautiful! I’m planning on trying it.
If you give it a whirl, I’d love to hear how it turns out for you Tania. 🙂
Ah-mazing Denise! I have mixed feelings about waterfall furniture too but this look is impressive. Those two close-ups of the dresser corner and how the rust evolved are crazy! What happens if you apply the spray and then decide you want more patina?
Hi Nicki! Ya, I was pretty impressed with the whole process. Super fun. And if you spray the patina on the wet paint and then decide you want more rust, I believe you would just apply more paint and spray away. If anyone reading this has tried adding more mid-process, feel free to chime in because I’m curious too. 🙂