HOW TO MAKE YOUR VERY OWN ONE-OF-A-KIND STENCIL PATTERN USING BASIC SUPPLIES YOU PROBABLY ALREADY HAVE AT HOME!
Have you ever wanted to create a custom stencil but thought you needed expensive cutting machines or fancy tools? Good news—you don’t! Making your own stencil is easy, budget-friendly, and only requires a few basic supplies you probably already have at home. Whether you’re personalizing furniture, walls, or fabric, this simple DIY method will give you endless creative possibilities. Let’s dive in!

The growing trend of stenciled furniture, walls, floors, pillows, curtains, or pretty much anything with a flat surface inspired me to create my own DIY Stencil Design in 2013 when this blog post was originally published.
**This post was originally published on Nov 9, 2013. As an Amazon Associate, I earn from qualifying purchases. There are affiliate links in this post to other companies/products I use and love as well. You will never be charged extra when you purchase through these affiliate links. If you buy from my links – A BIG thank you for supporting me and the #siblog! To see my full disclaimer, click here.
I found a geometric design I really liked in Photoshop. One green tea and an hour later, I had searched Cutting Edge, Royal Design Studios and The Stencil Library (just to name a few) for a similar shape and size stencil. ZERO LUCK. Well, no worries. I’m a Blogger and DIY’er right? … not to mention I’m too impatient to wait days or weeks for delivery anyway. How hard could making my own stencil really be?
I’m happy to report that, although a little time-consuming (my stencil was large!), making a stencil is super easy. Here’s a peek at how my DIY Stencil project turned out … using NO costly stenciling gadgets I may add! 🙂
This post contains affiliate links to products used. You can see my full disclosure here.
How To Make A Stencil with No Costly Gadgets … believe me, if I can do it … YOU can do it!
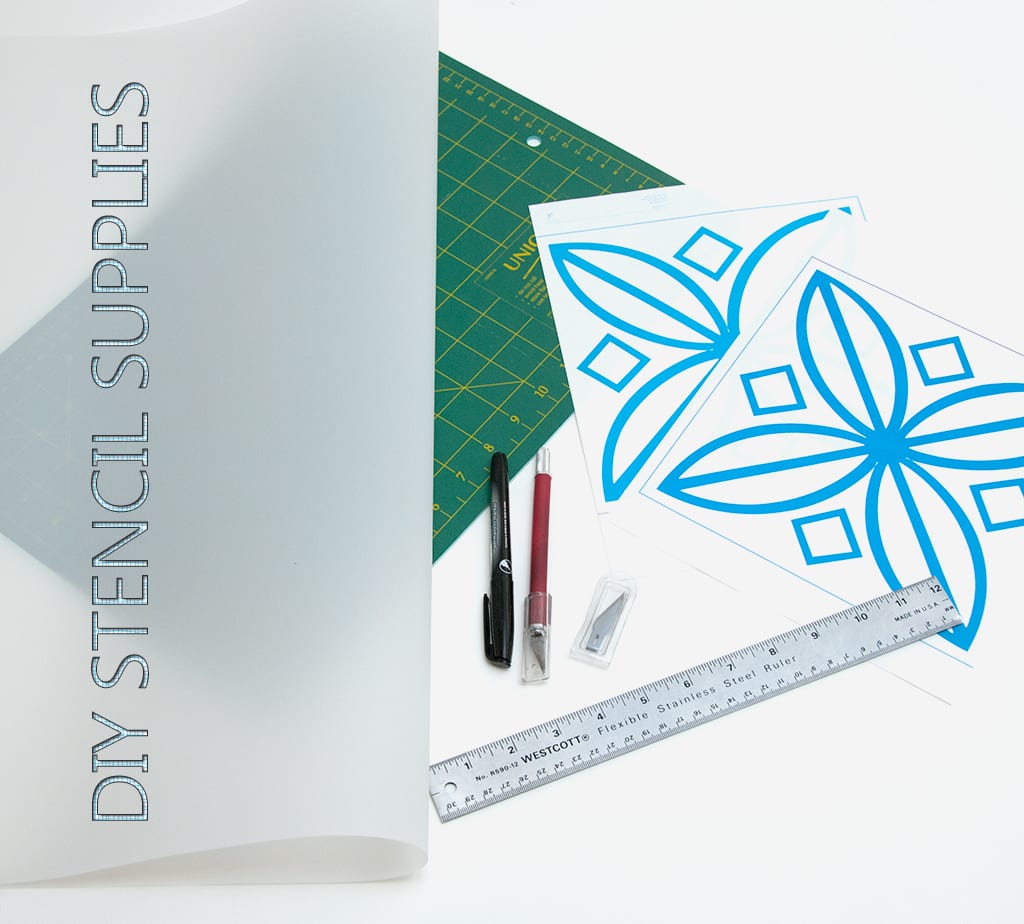
Supplies You’ll Need:
Printer (for printing your stencil design)
Transparency sheets, mylar, or thin plastic (for durability) OR cardstock (for a single-use stencil)
Sharp craft knife or precision cutting tool
Cutting mat or thick cardboard (to protect surfaces)
Tape or repositionable adhesive spray
Fine-tip marker or pen
Ruler (for straight edges)
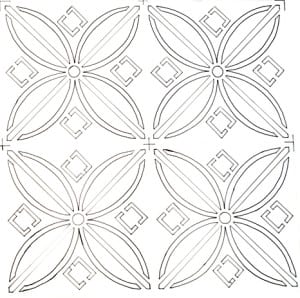
1. Find a pattern you love.
I found my pattern via shapes in Photoshop. I simply printed it out to the exact size I wanted for my china cabinet. I also made sure to print out a border around my stencil design. This gave me a guide to line up while tracing and painting.
 If the stencil is for your own use, you can find inspiring patterns online, in books, upholstery, china or wallpaper.
If you’re artistic, why not try drawing a design freehand!
Just keep in mind, if you choose a pattern that does NOT have disconnected parts (like my pattern shown above), you need to draw them in yourself as I did here on the left.
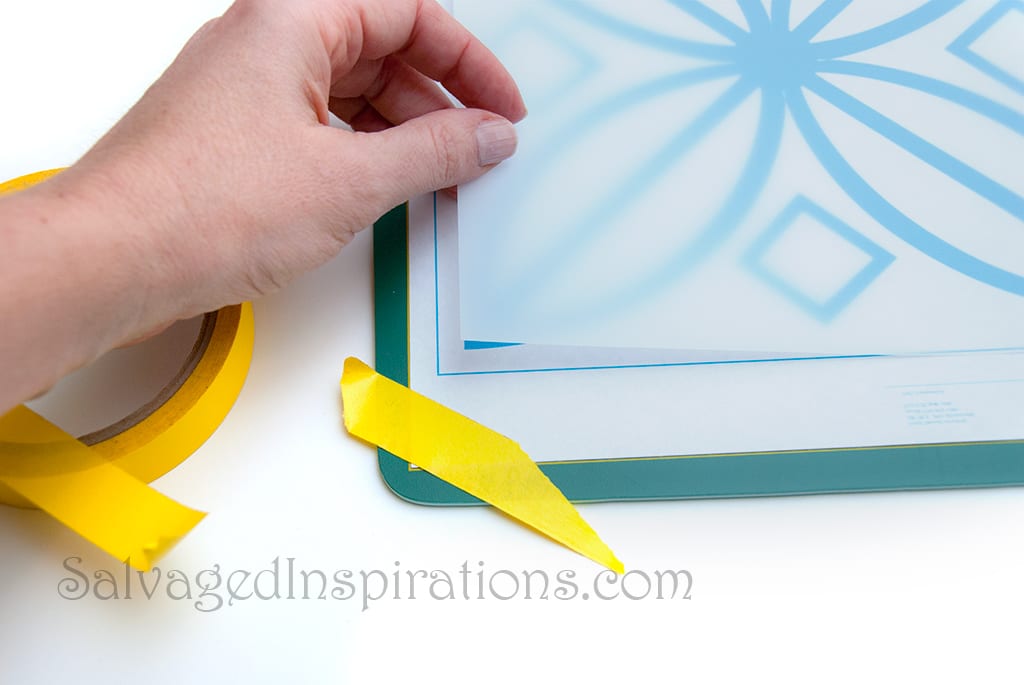
2. Line up your stencil design and Mylar sheet square and even.
This is really easy if you’re using a craft or cutting mat because most mats provide ruled guides. If you’re using a piece of cardboard or something else to cut on, a ruler will work just as nicely. Once you have your stencil design and Mylar sheet square and even, tape it in place.
3. Trace your stencil design.
Using a Sharpie or fine tip marker, start tracing your design. My stencil was a large 3ft x 2ft so I used the printed guidelines to move my pattern around and repeat the design. I took my time tracing and had fun… you’ll feel like a kid back in grade school!

I used a ruler to trace the straight lines and freehand for everything else. I don’t know if this will work for you, but the more pressure I applied to the marker, the more even my freehand lines!
Take your time with the tracing. If you do make a mistake, no problem. Permanent marker wipes off of Mylar very easily with a Q-Tip and rubbing alcohol.
4. Cut out your traced stencil pattern.
Cutting out your pattern with an exacto knife is easy but does take some time. For this large 3ft x 2ft stencil, it took me 3+ hours. The key is a super sharp blade and a ruler for cutting straight lines. The Exacto Knife works great if steady, even pressure is applied. Then “pop” out the cut piece being careful not to rip the Mylar. 5. Your stencil is ready to use!
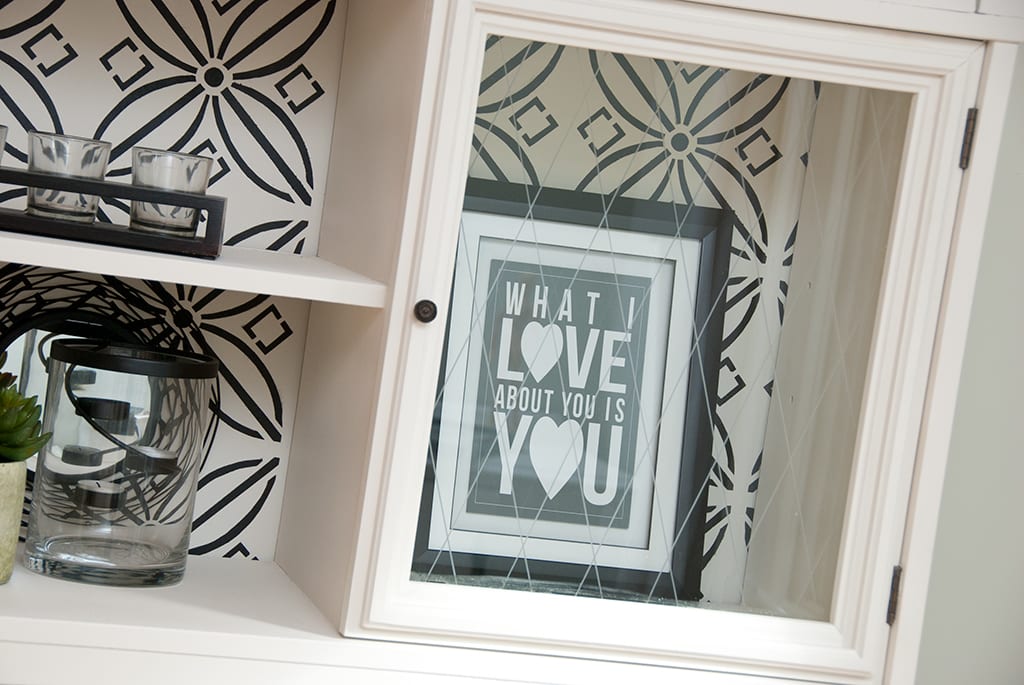
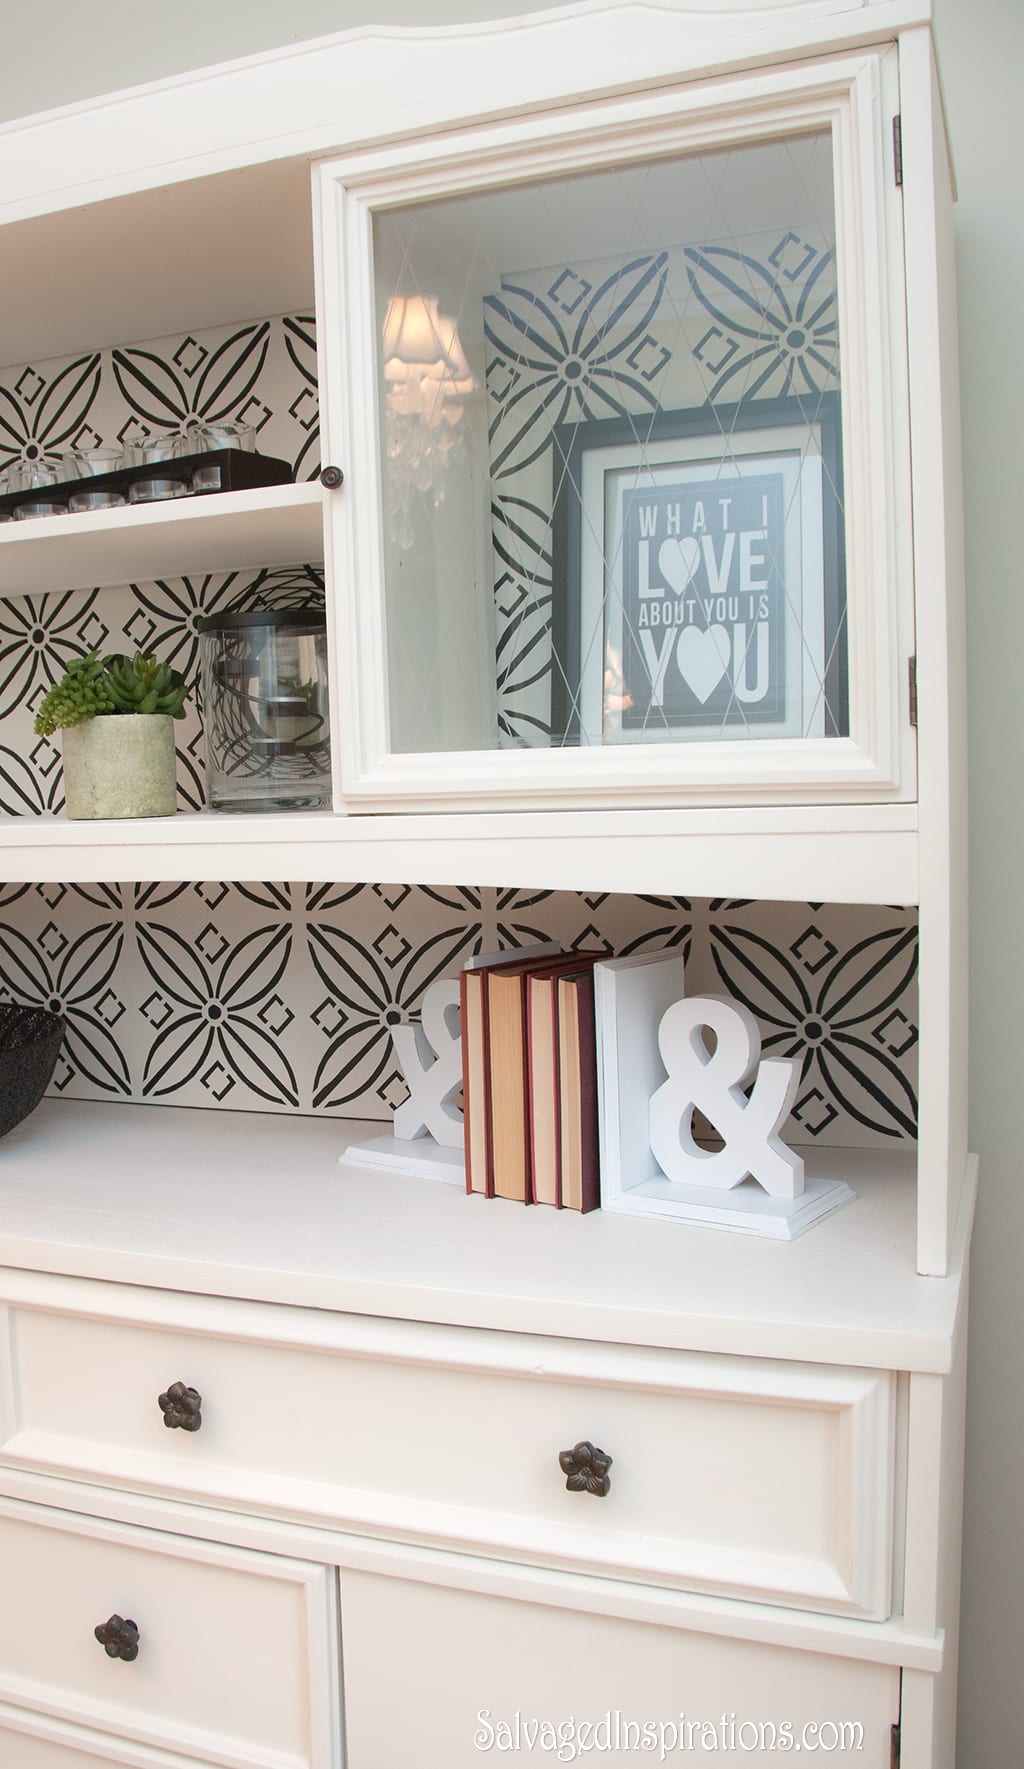
Once all your pieces are cut out, your stencil is ready to use. Here what my completed stencil looks like. Oh… and more pic’s of how well it worked on the back of Will’s China Cabinet below.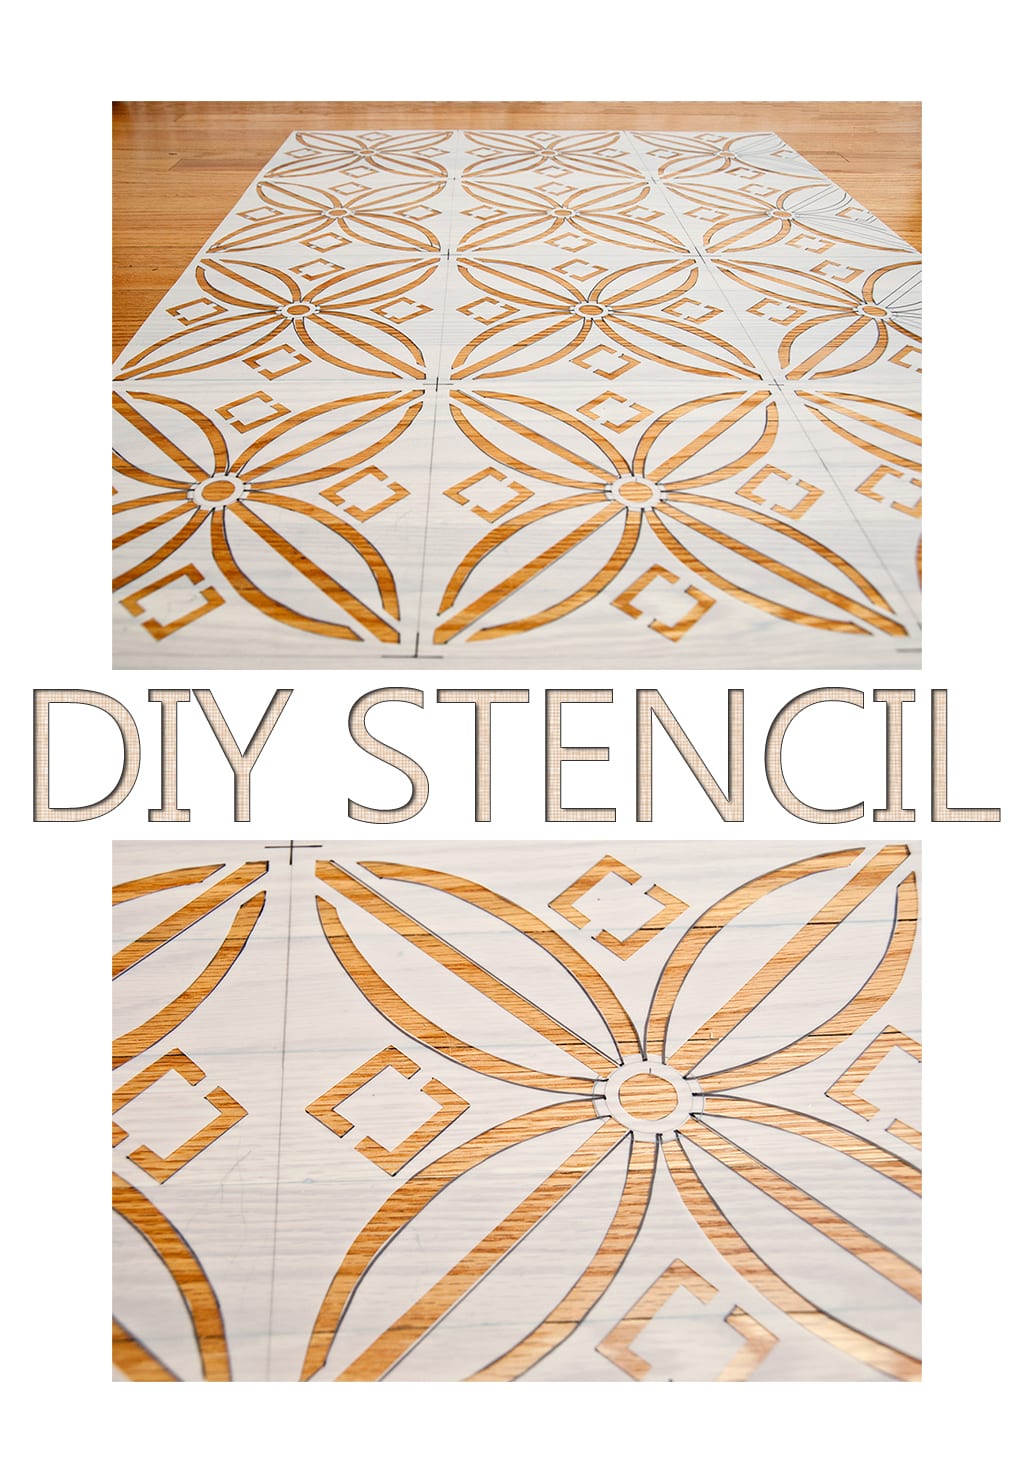
The “Pros” of Making My Own Stencil
~It’s a “Custom” Original. I chose my favorite design and I was able to customize and adjust the design for what size of pattern worked for the project.
~It’s Re-Usable. This stencil can be used over and over again like any store bought stencil.
~Time Saver. It took some time to cut the stencil out, but overall I saved time. I didn’t have to wait for delivery or spend hours driving to a variety of craft stores in search for a design.
~Inexpensive. This stencil cost me $6.
The “Cons” of Making My Own Stencil
-Time. I did set aside a half day to complete my stencil and the cutting of this 3ft x 2ft stencil took 3+ hours.
~Requires a “somewhat” steady hand. I did really well but my stencil is not as “perfect” as a machine cut stencil.
~I needed to change blades. I changed blades a few times because I was applying too much pressure while cutting.
Frequently Asked Questions
1. What’s the best material to use for DIY stencils?
For a one-time project, cardstock works well. For reusable stencils, opt for mylar, plastic folders, or transparency sheets.
2. Can I make a stencil without a craft knife?
Yes! If using a simple design, small scissors or a hole punch can work for cutting. For fabric stencils, try a heated wood-burning tool.
3. How do I stop paint from bleeding under the stencil?
Use very little paint and blot excess off your brush before applying. You can also spray adhesive on the back of the stencil to keep it firmly in place. I have a full tutorial on How To Stencil A Perfect Design here.
4. Can I use these stencils on fabric?
Absolutely! Use fabric paint and a sponge or stencil brush for best results. Heat-set with an iron to make it permanent.
5. How do I clean my stencil for reuse?
Wipe it down with a damp cloth or use mild soap and water. I like using these Scrubby Soaps for super easy stencil clean up. If using spray adhesive, rubbing alcohol can help remove residue.
Final Thoughts
Making your own stencil is a fun and budget-friendly way to personalize any DIY project. Whether you’re upcycling furniture, creating wall art, or designing custom fabric prints, this simple method lets you bring your creative vision to life—without costly gadgets!
If I ever start creating a lot of my own patterns and DIY Stenciling, this Cricut or other stencil-cutting machines would be a fabulous investment. This “old-school” method is what I’m sticking with when I can’t find the exact design I’m looking for.
If you’re searching for inexpensive stencil designs, check out Stencil Designs here.
Thanks for joining today’s updated post. Feel free to ‘PIN IT’ for later and share it with your DIY family and friends and don’t forget to leave me a ‘hello’ in the comments below. I always love hearing from you. It makes my day!! I’ll be back this Thursday with my Furniture Fixer Upppers ladies and this curbshopped piece below. 🙂

Happy painting, my friends!
Denise x
RELATED POSTS::
ONE COLOR STENCIL DESIGNS
HOW TO STENCIL ON FURNITURE
HOW TO ADD TEXTURE STENCIL TO FURNITURE
HOW TO USE SILKSCREEN STENCILS
HOW TO STENCIL WITH GEL STAIN
PIN AND SHARE!


How do you get the stencil to lie flat against the wall while you paint
Hi Lynn! When I’m unable to lay a project flat and hold the stencil in place, I use a temporary spray adhesive like this one here – works amazing!
Thank You so much! I have never really found a planner that has worked for me so I wanted to make a stencil to make it easier to do each day/month of the year in a dot journal. I am thinking of using a light board to transfer my image to a piece of card stock and then laminating it so it can last longer.
Thank you for this tutorial!
Thanks so much for sharing this stencil diy. I have been wanting to use something like this for the backsplash in my kitchen. We are having our this week, but I would love to do this once that project is done! Thanks so much for sharing!!!
So happy you’ve found How To Make a Stencil helpful and good luck with your cabinets Jackie! 🙂
Have you tried or thought about using fused plastic bags to make stencils? I’m gonna try that, and thanks for the article and ideas!
what size stencil did you buy? the size of your plastic looks huge. where did you buy it?
Great job! Thanks for the inspiration. Did you make registration marks to align your design? Can you detail that for me?
This is very, very cool and extremely professional looking (not to mention the fact that you can reuse it many times!)… Gotta give you a huge thumbs up!!. I’ve recently gotten into airbrushing… I have zero ability/talent for free hand drawing…. But I also have an almost zero $ budget & after purchasing the paint & all the necessary supplies (other then stencils) I’m left with no stencil money. What I’ve been doing is using file folders, drawing out my desired shape…. Then drawing over it about 50 more times until it looks the way I want it to (😸) & whalah…..a 15 cent stencil!! Granted, this is not necessarily a reusable method… I’ve been able to reuse one three times (most I’ve ever tried) & most likely, that’s it… Stencil dead…. Just wanted to throw this out there for anyone who doesn’t need a stencil to use over and over.
Oh, I want to try airbrushing as well! It looks so interesting to me! And so brilliant using the file folders. I never would have thought of this! TY