HOW TO MAKE YOUR VERY OWN ONE-OF-A-KIND STENCIL PATTERN USING BASIC SUPPLIES YOU PROBABLY ALREADY HAVE AT HOME!
Have you ever wanted to create a custom stencil but thought you needed expensive cutting machines or fancy tools? Good news—you don’t! Making your own stencil is easy, budget-friendly, and only requires a few basic supplies you probably already have at home. Whether you’re personalizing furniture, walls, or fabric, this simple DIY method will give you endless creative possibilities. Let’s dive in!

The growing trend of stenciled furniture, walls, floors, pillows, curtains, or pretty much anything with a flat surface inspired me to create my own DIY Stencil Design in 2013 when this blog post was originally published.
**This post was originally published on Nov 9, 2013. As an Amazon Associate, I earn from qualifying purchases. There are affiliate links in this post to other companies/products I use and love as well. You will never be charged extra when you purchase through these affiliate links. If you buy from my links – A BIG thank you for supporting me and the #siblog! To see my full disclaimer, click here.
I found a geometric design I really liked in Photoshop. One green tea and an hour later, I had searched Cutting Edge, Royal Design Studios and The Stencil Library (just to name a few) for a similar shape and size stencil. ZERO LUCK. Well, no worries. I’m a Blogger and DIY’er right? … not to mention I’m too impatient to wait days or weeks for delivery anyway. How hard could making my own stencil really be?
I’m happy to report that, although a little time-consuming (my stencil was large!), making a stencil is super easy. Here’s a peek at how my DIY Stencil project turned out … using NO costly stenciling gadgets I may add! 🙂
This post contains affiliate links to products used. You can see my full disclosure here.
How To Make A Stencil with No Costly Gadgets … believe me, if I can do it … YOU can do it!
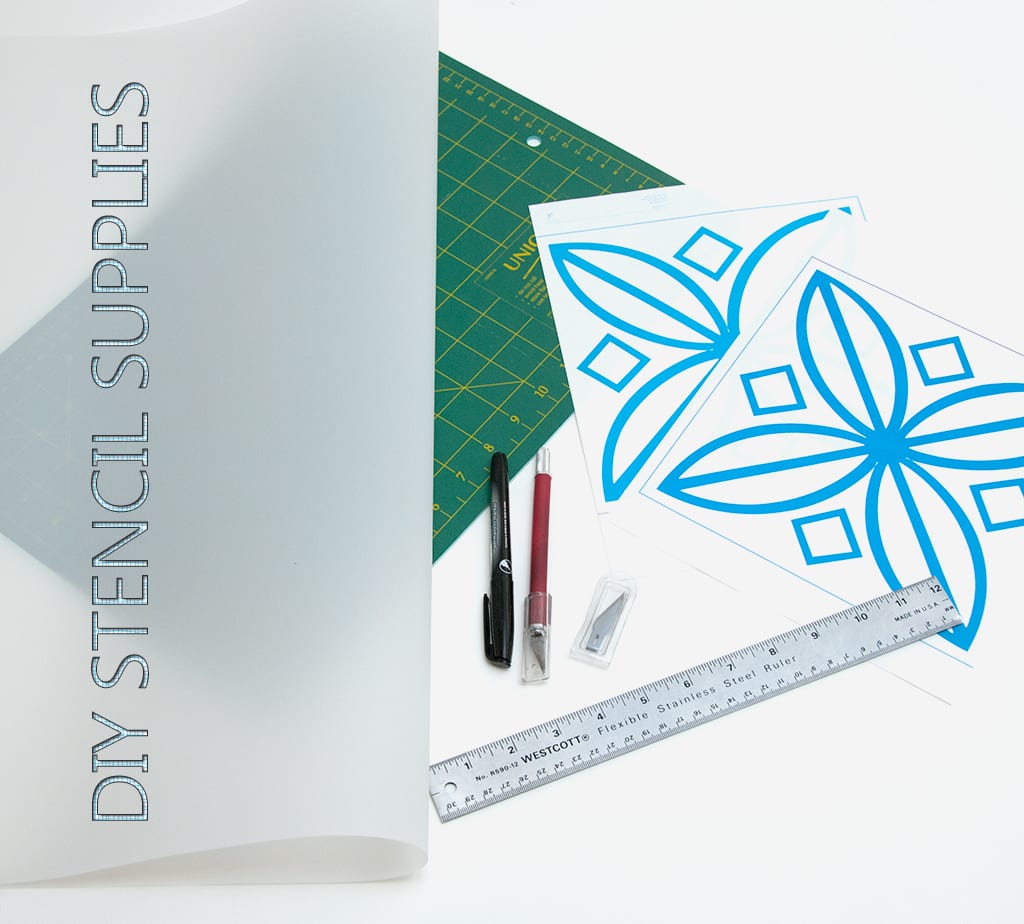
Supplies You’ll Need:
Printer (for printing your stencil design)
Transparency sheets, mylar, or thin plastic (for durability) OR cardstock (for a single-use stencil)
Sharp craft knife or precision cutting tool
Cutting mat or thick cardboard (to protect surfaces)
Tape or repositionable adhesive spray
Fine-tip marker or pen
Ruler (for straight edges)
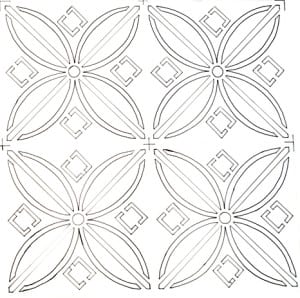
1. Find a pattern you love.
I found my pattern via shapes in Photoshop. I simply printed it out to the exact size I wanted for my china cabinet. I also made sure to print out a border around my stencil design. This gave me a guide to line up while tracing and painting.
 If the stencil is for your own use, you can find inspiring patterns online, in books, upholstery, china or wallpaper.
If you’re artistic, why not try drawing a design freehand!
Just keep in mind, if you choose a pattern that does NOT have disconnected parts (like my pattern shown above), you need to draw them in yourself as I did here on the left.
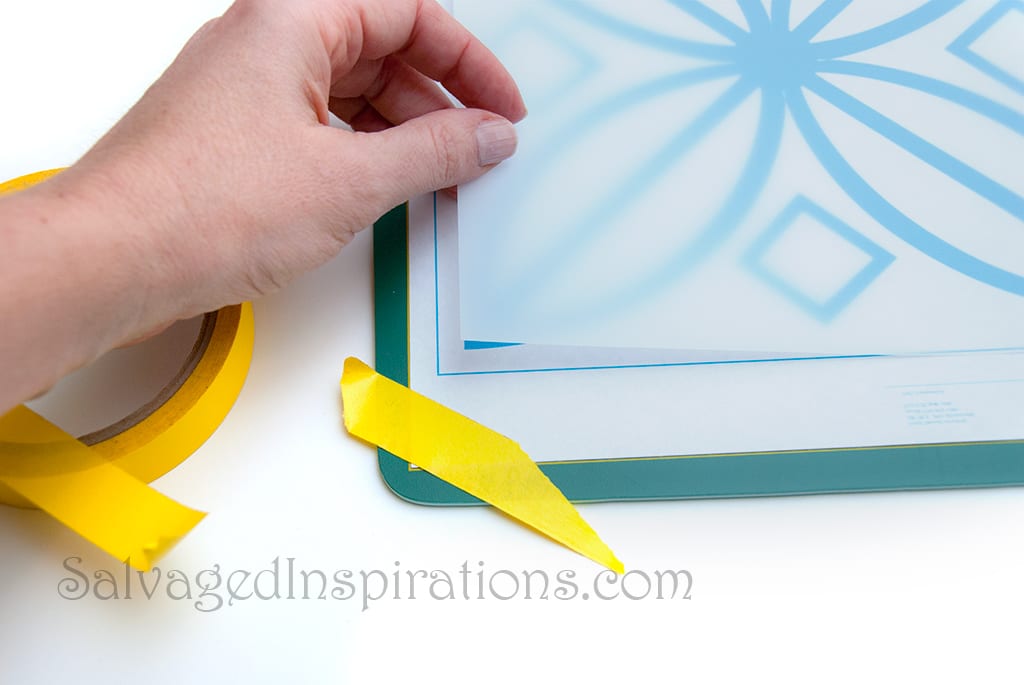
2. Line up your stencil design and Mylar sheet square and even.
This is really easy if you’re using a craft or cutting mat because most mats provide ruled guides. If you’re using a piece of cardboard or something else to cut on, a ruler will work just as nicely. Once you have your stencil design and Mylar sheet square and even, tape it in place.
3. Trace your stencil design.
Using a Sharpie or fine tip marker, start tracing your design. My stencil was a large 3ft x 2ft so I used the printed guidelines to move my pattern around and repeat the design. I took my time tracing and had fun… you’ll feel like a kid back in grade school!

I used a ruler to trace the straight lines and freehand for everything else. I don’t know if this will work for you, but the more pressure I applied to the marker, the more even my freehand lines!
Take your time with the tracing. If you do make a mistake, no problem. Permanent marker wipes off of Mylar very easily with a Q-Tip and rubbing alcohol.
4. Cut out your traced stencil pattern.
Cutting out your pattern with an exacto knife is easy but does take some time. For this large 3ft x 2ft stencil, it took me 3+ hours. The key is a super sharp blade and a ruler for cutting straight lines. The Exacto Knife works great if steady, even pressure is applied. Then “pop” out the cut piece being careful not to rip the Mylar. 5. Your stencil is ready to use!
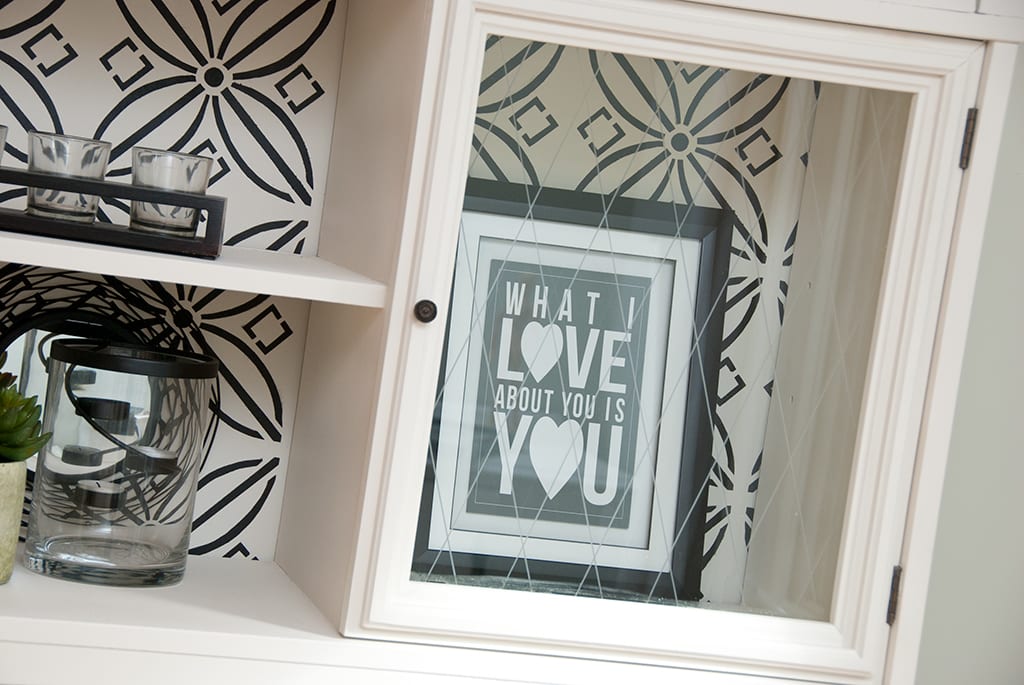
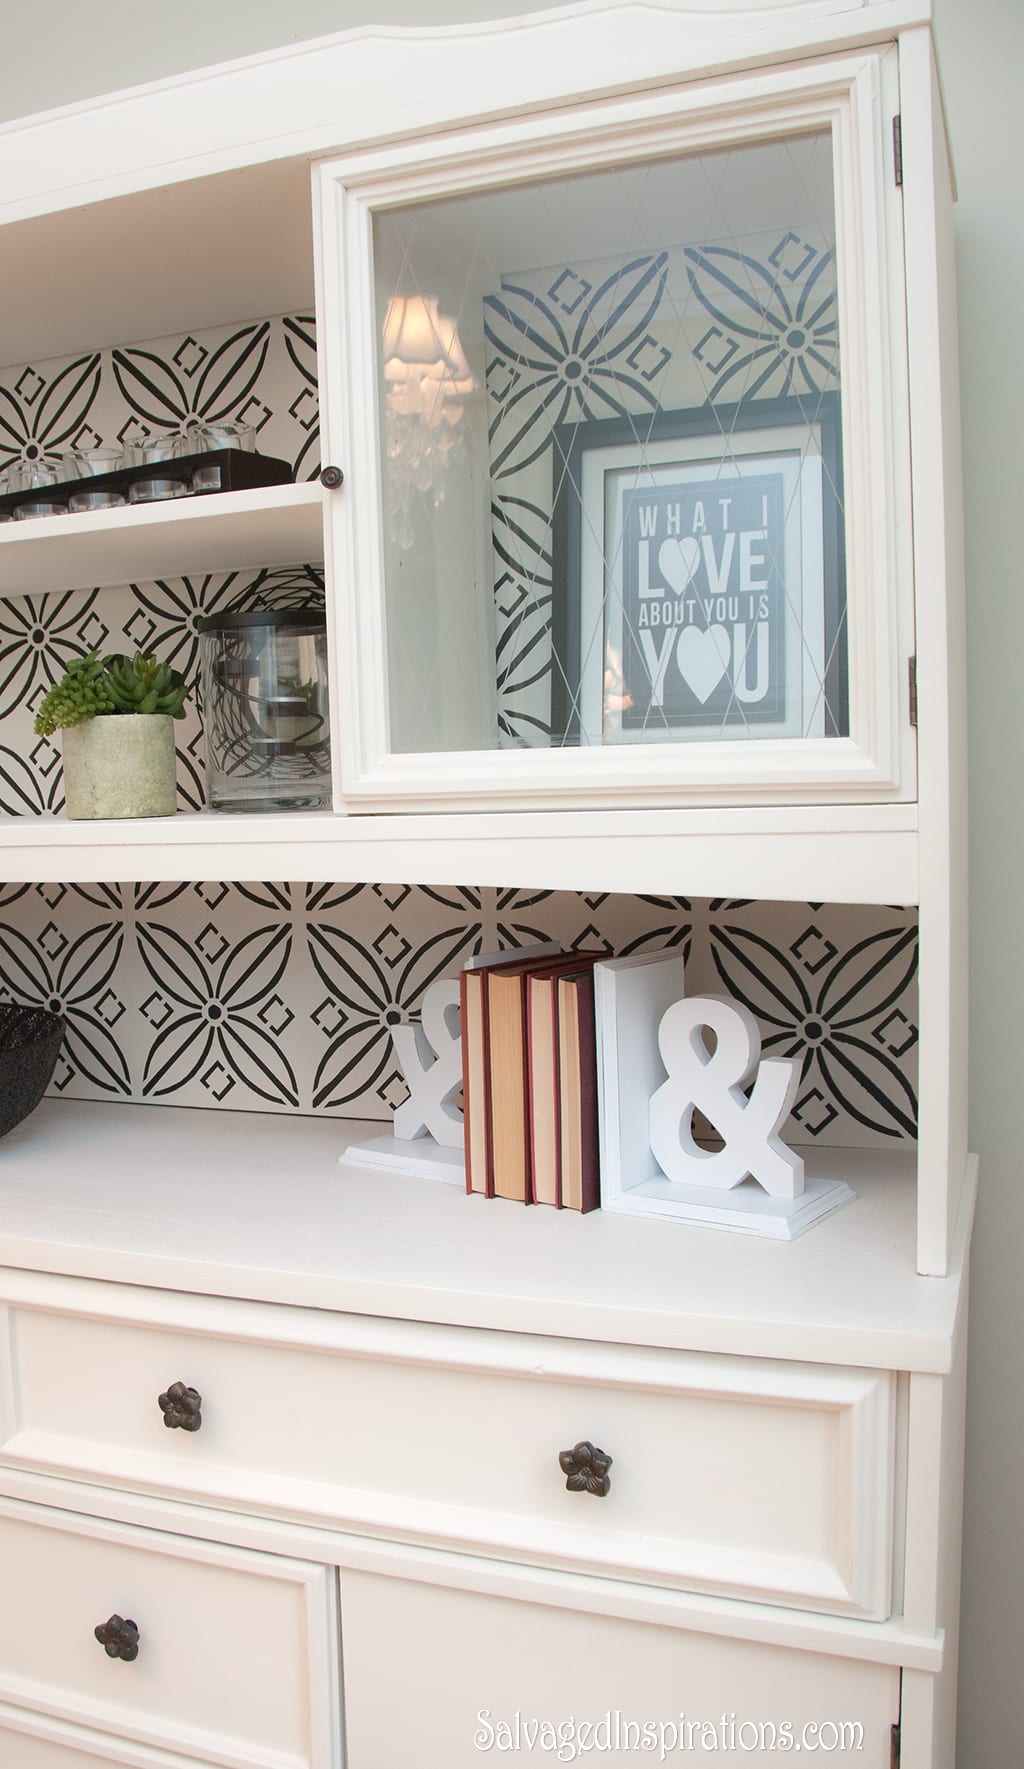
Once all your pieces are cut out, your stencil is ready to use. Here what my completed stencil looks like. Oh… and more pic’s of how well it worked on the back of Will’s China Cabinet below.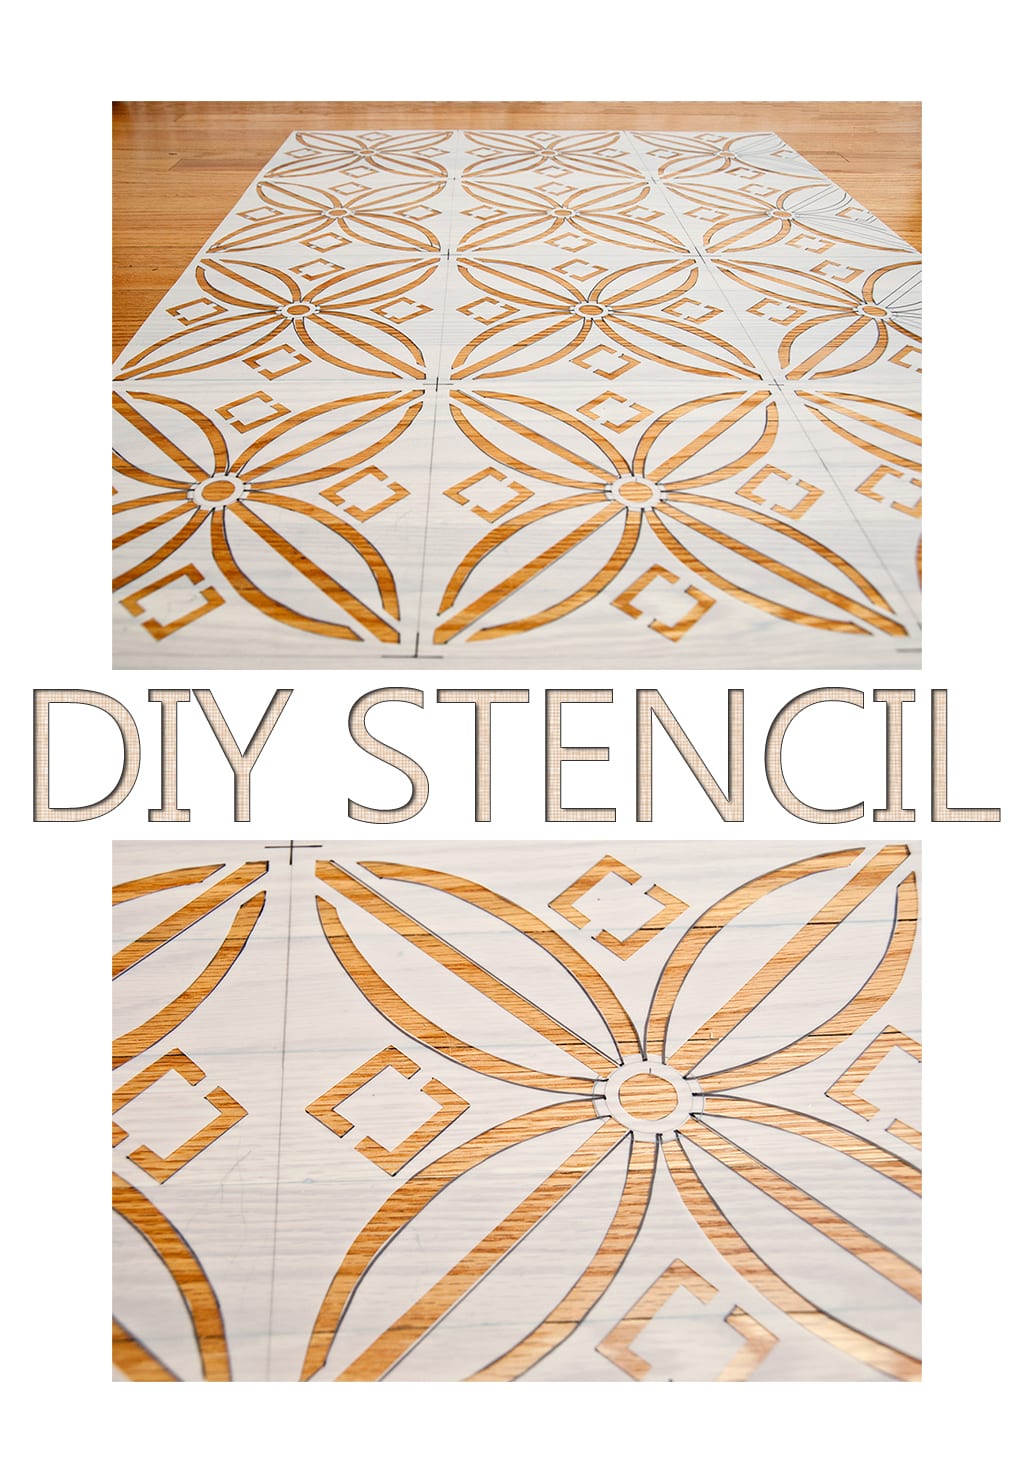
The “Pros” of Making My Own Stencil
~It’s a “Custom” Original. I chose my favorite design and I was able to customize and adjust the design for what size of pattern worked for the project.
~It’s Re-Usable. This stencil can be used over and over again like any store bought stencil.
~Time Saver. It took some time to cut the stencil out, but overall I saved time. I didn’t have to wait for delivery or spend hours driving to a variety of craft stores in search for a design.
~Inexpensive. This stencil cost me $6.
The “Cons” of Making My Own Stencil
-Time. I did set aside a half day to complete my stencil and the cutting of this 3ft x 2ft stencil took 3+ hours.
~Requires a “somewhat” steady hand. I did really well but my stencil is not as “perfect” as a machine cut stencil.
~I needed to change blades. I changed blades a few times because I was applying too much pressure while cutting.
Frequently Asked Questions
1. What’s the best material to use for DIY stencils?
For a one-time project, cardstock works well. For reusable stencils, opt for mylar, plastic folders, or transparency sheets.
2. Can I make a stencil without a craft knife?
Yes! If using a simple design, small scissors or a hole punch can work for cutting. For fabric stencils, try a heated wood-burning tool.
3. How do I stop paint from bleeding under the stencil?
Use very little paint and blot excess off your brush before applying. You can also spray adhesive on the back of the stencil to keep it firmly in place. I have a full tutorial on How To Stencil A Perfect Design here.
4. Can I use these stencils on fabric?
Absolutely! Use fabric paint and a sponge or stencil brush for best results. Heat-set with an iron to make it permanent.
5. How do I clean my stencil for reuse?
Wipe it down with a damp cloth or use mild soap and water. I like using these Scrubby Soaps for super easy stencil clean up. If using spray adhesive, rubbing alcohol can help remove residue.
Final Thoughts
Making your own stencil is a fun and budget-friendly way to personalize any DIY project. Whether you’re upcycling furniture, creating wall art, or designing custom fabric prints, this simple method lets you bring your creative vision to life—without costly gadgets!
If I ever start creating a lot of my own patterns and DIY Stenciling, this Cricut or other stencil-cutting machines would be a fabulous investment. This “old-school” method is what I’m sticking with when I can’t find the exact design I’m looking for.
If you’re searching for inexpensive stencil designs, check out Stencil Designs here.
Thanks for joining today’s updated post. Feel free to ‘PIN IT’ for later and share it with your DIY family and friends and don’t forget to leave me a ‘hello’ in the comments below. I always love hearing from you. It makes my day!! I’ll be back this Thursday with my Furniture Fixer Upppers ladies and this curbshopped piece below. 🙂

Happy painting, my friends!
Denise x
RELATED POSTS::
ONE COLOR STENCIL DESIGNS
HOW TO STENCIL ON FURNITURE
HOW TO ADD TEXTURE STENCIL TO FURNITURE
HOW TO USE SILKSCREEN STENCILS
HOW TO STENCIL WITH GEL STAIN
PIN AND SHARE!


Hi, would you happen to have a video? I’m not great at printed direction. LOL. I’m trying to make a stencil of the Detroit Red Wing logo. I was just going to order it, but they’re quite expensive.. For a logo of 3 x 6 they want $18.00 plus shipping and I need four of them. So super expensive. Any ideas how I can make one?
This is an older post so unfortunately, there isn’t a video.
What if you bought 1, and made 3 more? Cara
Thank you so much for this! I am SO glad to see someone doing these by hand so beautifully, and having fun! I found a great old book that was written by a British decorative artist who stencilled professionally during the early 1900s: W.G. Sutherland’s Arts and Crafts Stencilling, published by Gibbs Smith Publishers in Salt Lake City, 1925 (there’s a reprint edition from 2003, and possibly after that–I don’t think it’s impossible to find!). ISBN: 1-58685-252-3. It was actually mind-blowing: techniques in the book are still relevant, and he even discusses how he saves his stencils, how to design “all-over patterns” (patterns that you can connect up, the way you did, with no “seam” really showing, so that you can cover an entire wall and not have it look “blocky” or simplistic), best ways of using color and applying shading and light, … I can’t say enough good things about it. 🙂
I’ll have to check it out!! Thanks Jerise!
Hey thanks for the help I needed this for a school project and I really apricate the help you have provided me with! 🙂
I have a question not so much related to making my own stencils (Google failed me this time) but I have some store bought stencils that are a thin cardboard material (haven’t been used yet) but I would like to reuse them in the future…….what could I spray/paint on them to help make them reusable? I thought maybe a clear acrylic spray or mod podge…….any suggestions welcomed!!! TIA 😊
Hi Heidi! I think you answered your own question hehe. A clear poly/acrylic spray would probably work nicely. I’m still not sure HOW many uses you’d get out of it. It would probably depend on what type of medium you were using for the stenciling, but def worth a try imo. 🙂
Hello Heidi ,
If you want to save them for years to come, try covering them on both sides with the self stick lamination sheets that are made by Avery. I have made stencils from printer paper and cardboard, covered them with this and used them for years. Just do not soak your stencils in cleaner or it will soak in between the lamination covering and ruin them. I post a link for info, you don’t need to buy from there. They also make different pert numbers of the item so check for your use which to purchase.
Avery® Self-Adhesive Laminating Sheets, 9″ x 12″, 50 Sheets (73601) About 26.00 a pack.
Hi Denise..I use old xray sheets for my stencils..they work just fine. I recently bought a wood burning tool that has a knife attatchment so Im really looking forward to using it to cut out some new stencils. Xrays are quite thick and sturdy so Im hoping the heated blade will work ok…i.ll let u know 😊
How interesting Kaz! I’d love to hear how it works out for you. 🙂
I’m looking at diy t-shirts for an upcoming cruise with friends. Your post gave me an idea…. I have tons of laminating sheets. I’m wondering if I print my design out, laminate it, then cut out the stencil if that would work. No tracing involved, but I’m wondering how crisp the lines would be…..🤔
Not sure how crisp it would turn out on fabric but if you have the supplies, worth a go! 🙂
Could you use a heated tool on Mylar? I have a Woodburner tool with a stencil tip. I
I don’t think so Shelly… I’m guessing it would melt and the lines wouldn’t be precise.
Hi Shelly, if you check on Google or pinterest, they show you how to Mylarv and a wood burner and they make perfect stencils😊
Hi i didnt read the comments so my apologies if someone already asked but do you think it would be ok to use spray adhesive to temporarily adhere the stencil to the wall while using it?
Yes, many spray adhesives have the instructions right on the can for temporary adhering. 🙂
Hi so I’ve been researching on materials and stuff for stenciling. I know you are doing stencils more for flat surfaces, but would you recommend the mylar film for t shirts and stuff?? I wanted to try the vinyl because I know I can get it to stick on the material (I think) I am still trying to understand all this stuff… I would like to invest in a cricket, but I love to custom make my own things…. Just wanted to get your input.
Hi Sally! I’m with you… I would LOVE a Cricut machine to create my own designs! Hmm, as for the mylar for tshirts and stuff, I’m not 100% sure. So long as you flatten the fabric and it’s on a flat surface, I’m guessing a little spray adhesive and you’d be good to go. I know my friend Marie at Interior Frugalista has stenciled pillow covers using this method and they look amazing. 🙂
Far better to use shelf liner for t-shirts. It holds up pretty well and liquid won’t sink under the stencil
Do they have a clear shelf liner so you can see your pattern? I’m trying to nicely and clearly mark my Dad’s clothing that keeps disappearing in the laundry since he is now in an Alzheimers/Dementia unit. I would like like to put his full first and last name rather than initials and I originally bought an alphabet stencil of letters but there is not a way to separate them and it will take me forever to do one letter at a time.
Hi Debbie! When our Dad was in the nursing home we had the exact same problem – missing clothes! My sister bought a roll of sticky labels along with a permanent marker for fabric in the sewing section of Walmart. total cost for both was under $5 and it saved the day. Dads clothes were all labeled and all returned after laundry day. This might be an alternative solution to stenciling. 🙂
I want to make a Batman one I can put on my dogs harness. His name is Bruce Wayne.
Hi Denise, Does it make a difference if the sheets are *frosted”… the Co. from link you posted are out of the 8.5 x 11 and the only others available are frosted ::) I’ve been trying to figure this out for months & your instructions are so easy to follow…so THANKS!
Denise
Hi Denise! Hmmm, I guess it would depend on how frosted it is. There has to be some transparency because design underneath needs to be visible for you to trace onto the mylar sheet. If you notice in my pics, my mylar sheet isn’t 100% clear (slightly frosted/milky) but I had no problem seeing my design through it. Sorry, I know this isn’t a definite yes or no answer, but I hope helpful.
Hi Denise, LOVE your tutorial! I am a bit hung up, though. I am trying to cut my own alphabet stencils (for using with a Dremel) out of cardboard. Problem is, on a lower case “e”, I don’t know how to create a “bridge” sp I can have the center of the e show. Does that make sense? I know I have to use a bridge, but have no clue what I am doing. Your article is the best I have come across!
Thanks for any help,
Elisa
Hi Elisa! Here’s a free download for a lower case “e”. http://freealphabetstencils.com/sans-serif-elegant-alphabet-stencils.html Hope this helps and have fun! 🙂
Hi Denise. I wanted to ask what if i dont or cant find a craft knife . Can i use a scissor or Sharpended bread knife? If not what can i use?
Scissors may work on a larger simple design, but I wouldn’t advise using a bread knife. A craft blade or Utility knife would work and can be purchased at any dollar store.
Your post really inspired me to start creating my own stencils. I was fortunate enough to have materials on hand so I didn’t need to purchase anything. In my case, I used an X-Acto knife from a tool kit my husband had, stock paper (or the like – it was some kind of craft paper so thicker than construction paper but not great with paint), and foam insulation (thick hard insulation) that we had left over. I printed a black silhouette image, placed the image on a transparent clipboard I had around the house, put the stock paper on top, and used a tablet for back-lighting. I used a black sharpie to trace and it worked incredibly well. The whole process took less than 15 minutes but mine was a simple design (dachshund). I used the same stock paper to practice painting using the stencil and the images turned out better than expected. I was able to use the stencil and the cut-out 3x each and can continue to reuse. The paper can take a beating. I didn’t use tape so I did end up painting my fingers a bit while holding down the stencil and cut-out. Now that I have practice, I plan to do some on canvas.
wow this is beautiful. I love the pattern and it never occurred to me to use it on a cabinet.
really beautiful, I just need to get all my materials and my pattern and try this at home.
thank you for being an inspiration.
Thank you mere… and have fun! x
Hi Denise,
I was wondering what you use underneath the mylar for cutting?
Thanks!
Hi Kaytlin! I used a cutting matte – the kind you use for sewing and/or quilting. 🙂
I’ve made my stencil on Mylar and it looks great. BUT when I taped it down to a sample board and dabbed the paint on, it bleed terribly. There are some very intricate patterns in my southwestern design. Do I spray the back of the Mylar with some adhesive to hold down those intricate pieces?
Yeah, you sure can Linda. Semi-permanent adhesive spray works great. Also, you’re probably already doing this, but be VERY sparing with the amount of paint on your brush. The less the better. There have been times when I went in with a loaded brush and made a mess.
Will the adhesive spray be appropriate to use on chalk paint that has not yet been “sealed” yet. In other words, do you think it would leave the chalk paint intact?
Thanks and I love your diy stencil advice. I will be trying this tonight!
Yes, I’ve used it on all different types of paint and I’ve never had a problem Angela. 🙂
If you are painting your stencil on wood I highly highly suggest using modge podge before you paint! Just put a thin coat on first than let it dry (only a few mintues) than paint over it. The modge podge helps prevent any bleeding.
Brilliant. Thanks for this Jasmine! 🙂
Will mod podge work on a “reverse stencil”.? I’m attempting the create a “reverse stencil” where the wood will show as the stencil and paint around it. I’d like to avoid paint seeping into the area where I want the wood to show through. Any thoughts or suggestions?
Hi Tara! Offload your brush and make sure it’s quite dry. It takes more layers of paint, but this will ensure a nice crisp edge.
THank you for the tip, Denise! 🙂 We’ll see how it goes.
I love your tips and tricks! I want to use stencils to create a staircase that looks like books. I think stencils will be great way to make nice crisp book titles in lots of different fonts.
My question is for what comes next after your steps – how did you lay the stencil down when you painted it? I can’t imagine holding it with one hand and painting with the other… Did you use tape to affix it to the furniture? Did you use a low tack spray adhesive? Would you suggest using the stencil to trace and then paint by hand.. or using it to paint directly?
Thank you from Canada!
OMG, why have I never thought of that before? And I have everything I need at home from my students days too!! (not saying they ended more than 10 years ago, nooo…)
I’ve discovered your blog while searching for a recipe for chalk paint but I’m sure going to bookmark it and explore it thoroughly later!
I just found this and thank you for posting an easy (using term loosely) way to make a stencil. I don’t have a machine and was looking for something to do for a homemade gift. Can’t wait to try it out.
Hi, can you tell me where I can find the Mylar sheets?
Hi Nadia! I added a link in the post under DIY Stencil Supplies. If you’re not comfortable ordering online, try a local art store. They usually have mylar or plastic sheets you can use for diy stencils. 🙂
Hi Denise, love your tutorial. The link you have for the Mylar sheets takes you to a page of 8 1/2 by 11 sheets, but your stencil was 3 feet by 2 feet (much better size for my intended project – stenciling a floor.) Where did you find that size?
Denise…LUUUUUUUUV your blog/info/site!!!!
I have worked extensively w/children w/Autism & currently co•teach 3 year olds @ Walnut Hill Elementary [100 years young!], the number 1 DISD school in Dallas, Texas [Go Hawks!].
Most tragically this winter, the extended family of one of my students were ALL murdered by their father [mother, 2 children & he graciously took his own life]—w/exception of the ‘baby’. As an avenue to promote Healing & pluck something ‘positive’ from this unspeakable tragedy, I will be painting a large, geometric work/play circle similar to one I have created repeatedly w/chalk. It will entail color, shapes, patterns, numbers, letters, LOVE, etc…can you PULEEEZ tell me what & where you located your ‘stencil material’ [the plastic from which you cut your patterns]??? We will be surprising the family @ our 100 celebration, inviting them to ‘cut the ribbon’ on April 8th! Will send photo’s!!!
THANK YOU in advance!
Peace & Love,
Miss Stefani
Ohhhh Stefani, that’s so sad and tragic this happened to the family of one of your students. It’s so thoughtful you will be surprising the family at your 100 year young celebration…and I would LOVE to see some photo’s!!! I purchased my mylar/plastic at ‘Currie’s’ which is an art store we have here in the GTA. However, if you don’t have any art stores in your area that sell large pieces, you can order larger pieces of Mylar/Stencilling Plastic on Amazon. All the best at your ribbon cutting. xo
Me gusta mucho el tutoria del stensil mi duda es como estar segura de una vez tener el dibujo como guiarte de lo que hay que recortar,o como imprimirlo para guiarte y no cortar lo que no corresponde
Espero que Google Translate haya hecho un buen trabajo y estoy entendiendo tu pregunta Susana. Sea cual sea el diseño que elija, tiene que ser cuidadosamente cortado en secciones más pequeñas para crear una plantilla de trabajo. Hay algunos sitios en línea que ayudan con esto incluyendo http://stencilgram.com/. Aquí puedes subir una imagen y te ayudará a convertirla en una plantilla.:)
Hi, i came across your blog while looking for a way to create a stencil for my new venture. I am planning to embroider a few linen items. The method used by you is exactly how i was thinking of…however my design is as thick as a line, cant be cut as thick pattern. So i am thinking of cutting the stencil as dashed line instead of double line as cut by you. Let me know if you have any better idea to create a stencil.
Hi Arundhati! A dashed line sound like good a good idea. And as a side note, I’ve done my fair share of embroidery projects too! Lately I have a paint brush in hand rather than a needle – but I miss it! Have fun and good luck on your project! 🙂
What brand of spray adhesive have you used in the past? I can’t wait to give this a try.
Hi Donna! I have Elmer’s Craft Bond Multi Purpose Spray Adhesive in my workshop. It works on all types of surfaces, is acid free and can be used permanent or temporary.
I like your site!I wanted to reach out to you and see if you would be willing to test out some of my glass etching craft supplies for free for feedback. Can you let me know if you are interested by email? I will ship the supplies to you all for free with cream and stencils. I look forward to hearing from you. Thank you Eric
Inspired
I’m going to create a fairy bedroom for my daughter looking forward to getting started. Did you just use the type of plastic that schools use for projectors? Did you use an adhesive?
Oh, a fairy bedroom – great project! Yes, you can use those plastic sheets for sure but I used a 3 x 2 Mylar Sheet which I bought at an art store. I didn’t use any spray adhesive, but I have on other projects. Works great to hold stencils in place.
That is just beautiful! Really needed this information as I have an idea i want to try and need to know how to create my own stencils. Thank you for sharing.
Hello there! I am interested in making a reusable stencil of a Persian rug. It’s for a bathroom with a Victorian bathtub floating I. The c NYE of the room. The floors are dark wood. Do yo know a source for oriental or Persian rug designs that I can duplicate. Or, do yo have an alternate suggestion?
Hi Nancy! I just tried googling “Persian rug designs” and “Persian rug patterns” and a few patterns that could be used as a stencil popped up. For a stencil, you may want to avoid the really intricate patterns though. You can adjust size in http://www.blockposters.com/. Also, I just checked out your website. Gorgeous food styling…WOW… I want to reach in a grab those donuts and stuff my face…lol. 😉
Just wondered if you have any suggestions on using a stencil on fabric. I’m making visors with mahjong symbols for prizes for a mahjong tournament. Do you think fabric paint will work or possibly glue with glitter.
Awesome tutorial which turned out amazing! I’m a crafty DIY & saver myself but just recently have had some spray paint projects on my to do list. I was wondering, because I didn’t see it in the post or comments, what material did you use to make your actual stencil? Ive read that depending on the project, anything from regular paper to metal works..I also don’t have a stencil cutter so starting projects on a whim could ne disastrous lol
I don’t want to choose the wrong material & it end up not working out. Again, your project is stunning and any advice or info would be very much appreciated. Thank you for your time & diligence I’m helping so many others DIY+ers with their questions, it’s so kind!
Hi SamLee! You can use Mylar or any Transparent Plastic Sheet to make the stencil. They come in different sizes and thickness depending on what you need for your project. They can be purchased online, in craft stores, art stores or any office supply store!
Thanks so much! I do have some plastic page protectors, though extremely thin it should do well enough for some practice 🙂
Thank you for this wonderful article! One quick tip: For a repeated pattern, place four reference marks to help line up your stencil with the part you just painted. The two marks made on the right (if going left to right) would then line up with the two left marks on the stencil itself. =) Happy painting!
Thanks for this wonderful tip Erin. Cheers!
Where do you get the plastic for the actual stencil? I’m having a hard time finding some. I need a bigger piece 1 foot by 2 freet approx….
Meredith, you can buy really inexpensive 1ftx2ft (or larger) mylar sheets online~ http://amzn.to/1JJsuTd (affiliate link) or try a local art store in your area. They often carry larger sheets too. 🙂
Hi, Denise. Thanks for the DIY. I’m wondering how thick the template material is that you used? I’ve seen quite a variety out there.
Thanks, Laura
Just the regular old mylar sheets Laura…they aren’t that thick. You can purchase them at any office supply store.
This is perfect. I’ve been looking for a geometric stencil and you’ve just provided a nice easy way to make it, and as it’s all straights and diagonals I don’t have to go freehand. Brilliant!
This is a great idea, but it could have been soooo much faster and easier with a simple stencil cutting tool. They sell them at almost any craft stores for under $20. (Even less with a coupon)
Like another commenter mentioned, they have a fine metal tip that gets hot and cuts right through the stencil in a breeze. Only light pressure is required, and you don’t have to worry about guiding your knife around curves.
I’d recommend getting one of you do any more stencils. There is definitely no need to shell out for a big fancy cutter, this simple tool will do. 🙂
(Check out this video for how they work http://youtu.be/p-Obkv2UtiM)
Thanks Aly! For larger stencils, this looks amazing!
absolutely love this! What color/brand paint did you use? I’m looking for a white or off white for kitchen cabinets and this looks like a nice one. Thanks!
Hi Sue. The paint I used was Sherwin Williams All Surface Enamel in “SW 7010 White Duck”.
I am a newbie, I want to stencil on wood with a brush not a spray paint, I am afraid the lines will not stay crisp or may bleed under with a brush, what do you think?
Jackie, when I use an appropriate size brush with firm bristles and then brush off any extra paint (so it’s almost like dry brushing), my paint does not bleed under the stencil and lines stay super crisp. They key is to apply a few VERY LIGHT coats of paint while making sure the stencil is firmly in place.
How can l copyright my stencil and sell them with out copy anyone else and how do see pictures and put my own idea witb out copyright need some help with this because like to print my design on my cushion cover and stamp
Interesting question Raj! I’ve never copyrighted anything so unfortunately I’m also unsure how to go about this. If anyone reading this comment has any info… please feel free to chime in!
There are a few websites you can check out that have images that do not require you cite the source. I use https://pixabay.com. There are others like http://www.copyright-free-photos.org.uk and https://unsplash.com/ but you just need to make sure you read any fine details – I use Pixabay for my business website. You can even reach out to the photographer should you need to just to be sure. Upsplash likes it when you credit the photographer so if you are selling a project on etsy, you may put in your notes that your image can from Blank – the website gives you the information to cite when you click “download”.
Hope this helps you! I found a cute silhouette dachshund from Pixabay and used this site to create some artwork today.
Hi Denise, I love your project and can’t wait to start on something of my own. I did recently purchase a stencil cutter that is like a pen and uses heat to cut.
My question is this: I see you duplicated your pattern multiple times to make a large stencil. Could you have just done one or two and moved it over the piece? I’m just thinking how to cut down on my labor if it won’t diminish the quality of my finished product. Thanks for sharing your knowledge and talent with us!
Hi Debi! Yes, you can make your stencil any size. When using a smaller stencil, it’s important to line it up properly and make sure the back doesn’t get/have any paint on it. You don’t want to smudge the fresh stenciled area. Great idea on your heated stencil cutter!
this is a shot it the dark… but hey networking is the way of the world. I need to make stencils for numbers that are painted on football fields. I know that they have to be 6′ by 3′. If you have any idea how to go about it Id appreciate it. Im thinking maybe there is a way to take a print out of the numbers and expand it to the right size.
A free online tool that may help you out is http://www.blockposters.com/.. At BlockPosters you can create any size image from uploading your numbers in 3 simple steps.
I love the tutorial. It would be helpful to know where to buy such a large mylar sheet?
Hi Nellie! You can purchase large mylar sheets at any art store. I bought mine from Currie’s (where you can also purchase online).
Thank you so much for your kind reply
Pleasure Nellie…. anytime. 🙂
I am so happy that I found your instructions on making a stencil. It is exactly what I needed to be reminded of before getting started. Your instructions are very clear and have outlined the important steps that I had forgotten. Thank you for sharing and I love your stencil!
Thank you Mel…and glad it was helpful! 🙂
Great job!!looks wonderful!!
Thank You… and just dropped by your blog. Love the blooming monograms!
May I promote this on my twitter?
Feel free Mandy Dee… hey, I just made a rhyme! 😉 Enjoy your day!
Wow, you sure are ambitious! I don’t know if I would have as steady a hand to do this. I have created one time use stencils on the Silhouette, but would love to see if I can do reusable ones. I’m not sure if mylar can be used in it…I’ll have to look into that. Thanks for the tips!
Debbie 🙂
Wow thank you so much. I love each tip
I’ve found manicure scissors come in handy for getting into the tight spots and curved edges of stencils with small details to cut.
Brilliant Gail! Thanks for sharing this tip! 🙂
LOVE this Denise!! Great job, it looks wonderful. I am definitely going to try this someday.
Thanks Lynda.. I was fun and rewarding doing it. 🙂
You outdid yourself!….Stunning and thanks for your details.
Thanks Judy!! 🙂
WoW!! This came out great!! And I actually love that it is NOT machine-cut perfect! And for 6 bucks?!!! It’s a WIN!!! 🙂
I think I’m going to give it a try!! Thanks for sharing your tutorial.
Thanks Sherri! While tracing and cutting out this stencil I realized it wasn’t going to be machine-cut perfect so I just went with the flow …I really like the end result too. A lot of fun. I felt like a kid in grade school again except this time I’m getting paid for my efforts! 😉
Denise! you must have been reading my mind (all the way over to Australia). For months now I have been trying to work out how to make my own stencil. I am not artistic at all and found it all too hard until I read your blog this morning. Thank you so much. I am sure with a little (read LOTS) of patience I can do it.
Best wishes, Suzanne.
Suzanne, You just gave me a morning smile….and all the way from Australia…lol! So happy you’ve found this tutorial helpful! 🙂
Madam I am from India West Bengal I want to start a business of wall artist but my problem is Mylar paper is not available at here If you kindly suggest any other material to crate a stencil like plastic tracing paper of anything else it very help full for me. (I would like to draw on the wall)
Suvom, if it’s possible to get your hands on an overhead projector, they are perfect for wall art!
I was able to use craft paper (about the same thickness and durability as stock paper) that I bought from Amazon. I replied to this post and explained how I was able to get around using Mylar paper and had great success, much to my surprise.
I stumbled across it (all the way from Australia too) as well – excellent tutorial. What “film” did you buy in Australia? Went of OfficeWorks and they gave me a stare…