A STEP BY STEP TUTORIAL – HOW TO STENCIL ON FURNITURE TO CREATE GORGEOUS DESIGNS! | VIDEO TUTORIAL
 Hi sweet SI family, I hope you’re doing well and staying safe. Today I’m sharing an easy step by step on How To Stencil On Furniture. When I first started painting furniture, it took me a few years to work up the courage to use stencils because I was afraid I was going to ruin my freshly painted pieces. But I’m SO glad I started using them in my makeovers. Stenciling is super easy and creates SUCH GORGEOUS designs!
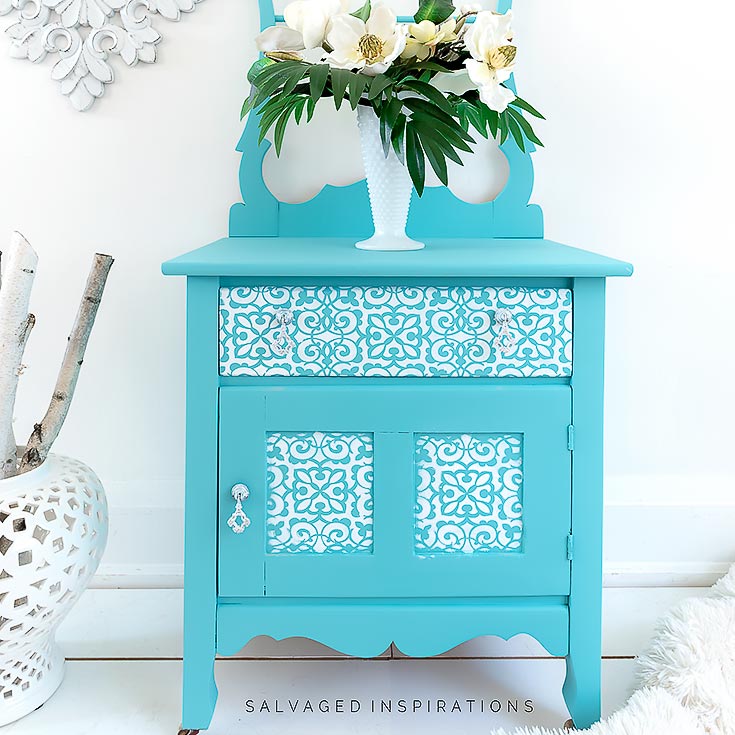
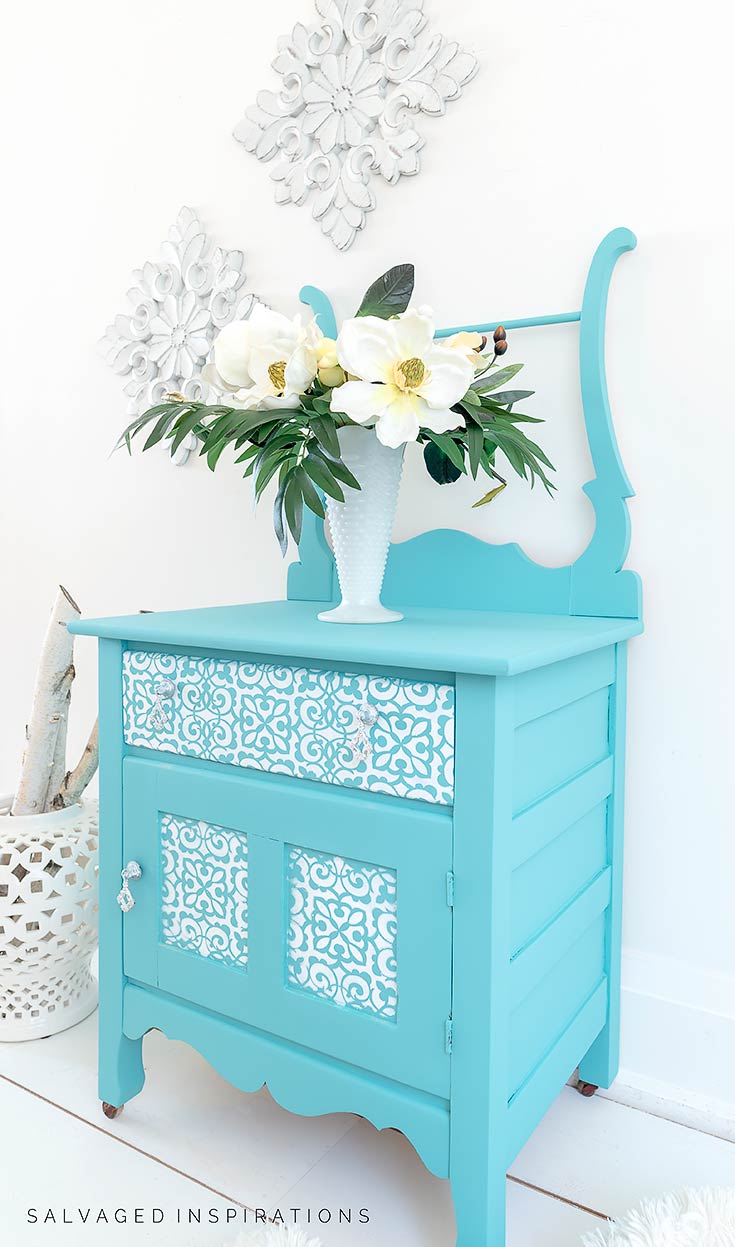
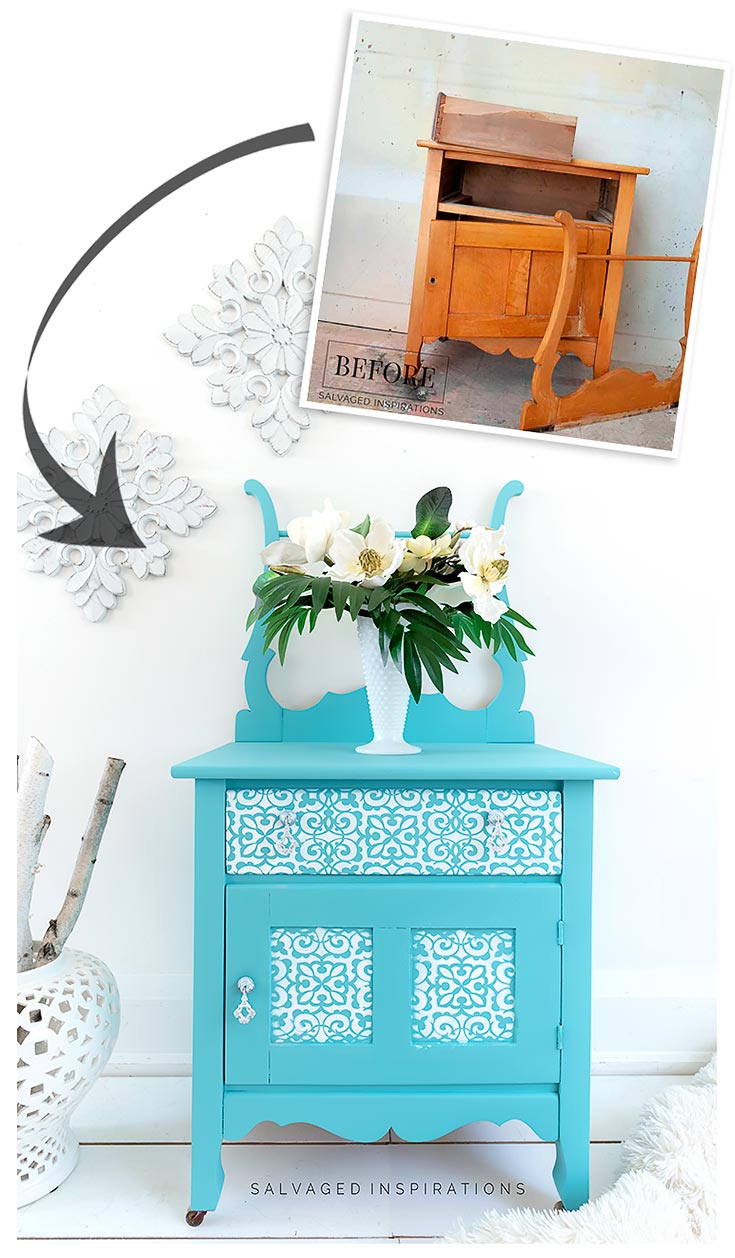
We’re also keeping a FUN furniture tradition three years strong! This trash bound washstand is getting its third (3rd!) December makeover for the holiday season! Woot woot! I’m so excited to share this stenciled version… very different but equally as beautiful!
As an added bonus for you (and me!) it’s also Trash To Treasure Day!! I’ll be sharing links to my talented T2T Crews’ before and after tutorials at the bottom of today’s post.
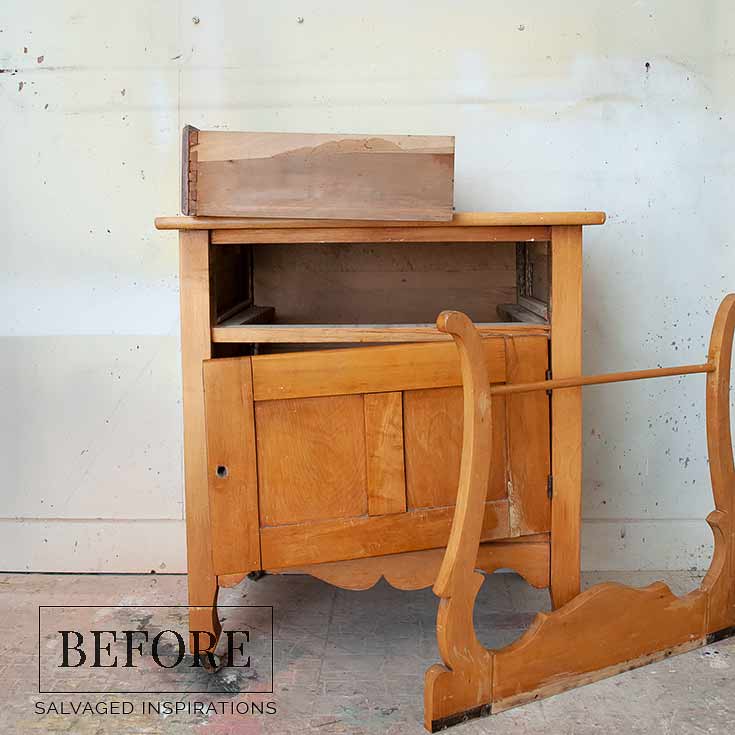
So, here’s the original curb-shopped before…
Here’s what it looks like now! This is the 3rd ‘new-holiday-makeover’ this washstand has had! I’m sharing the other two at the bottom of this post. I’d love for you to chime in and let me know which version is YOUR FAV. 🙂
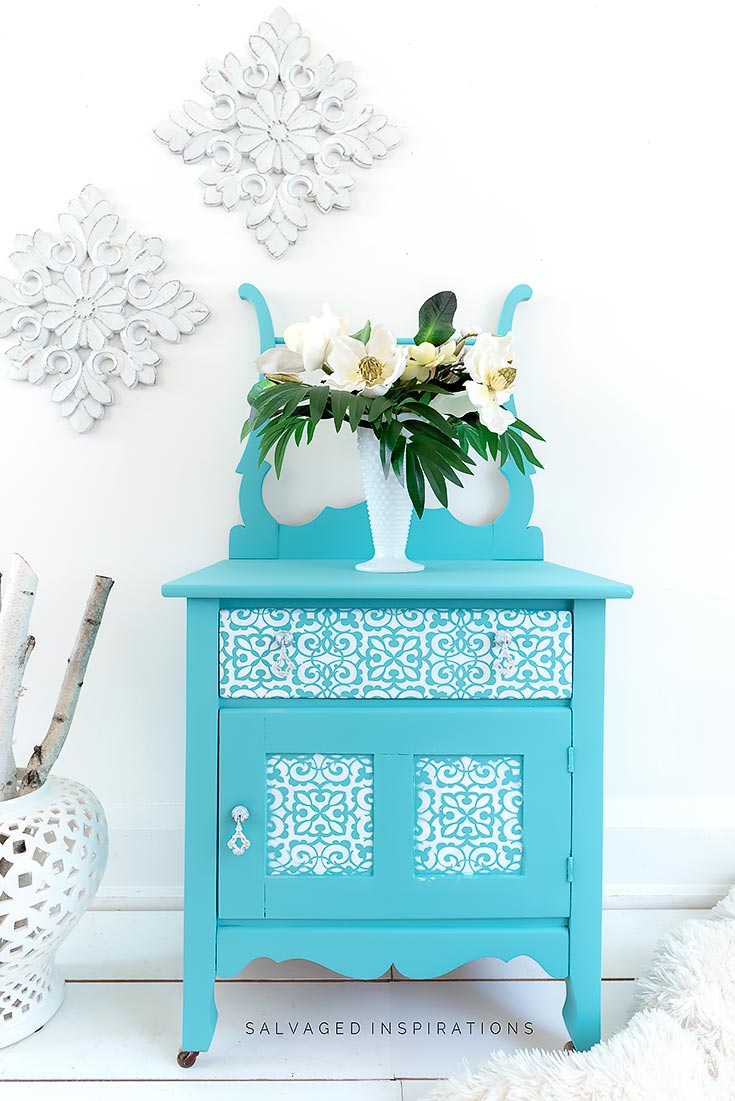
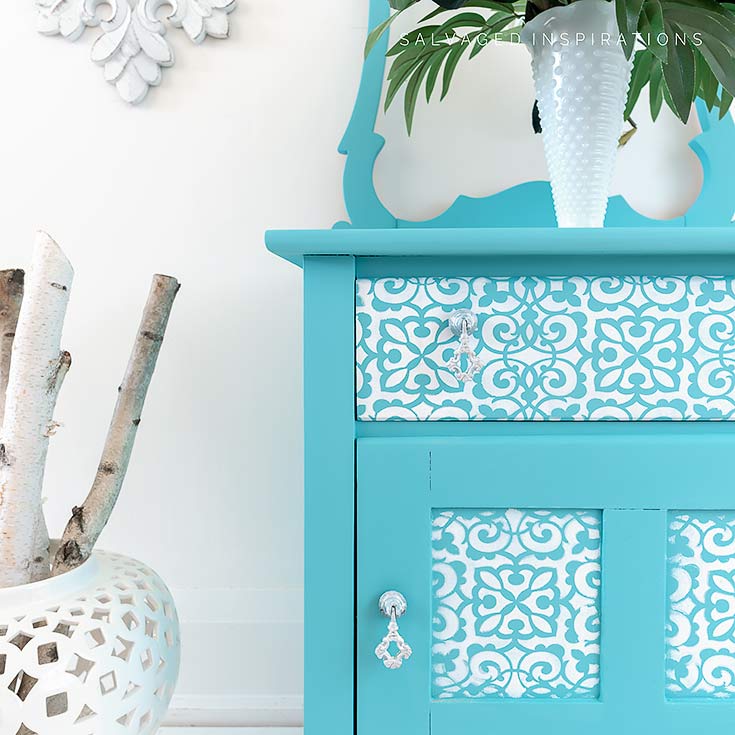
I’m loving this custom color and beautiful design from Dixie Belle’s brand new stencils!
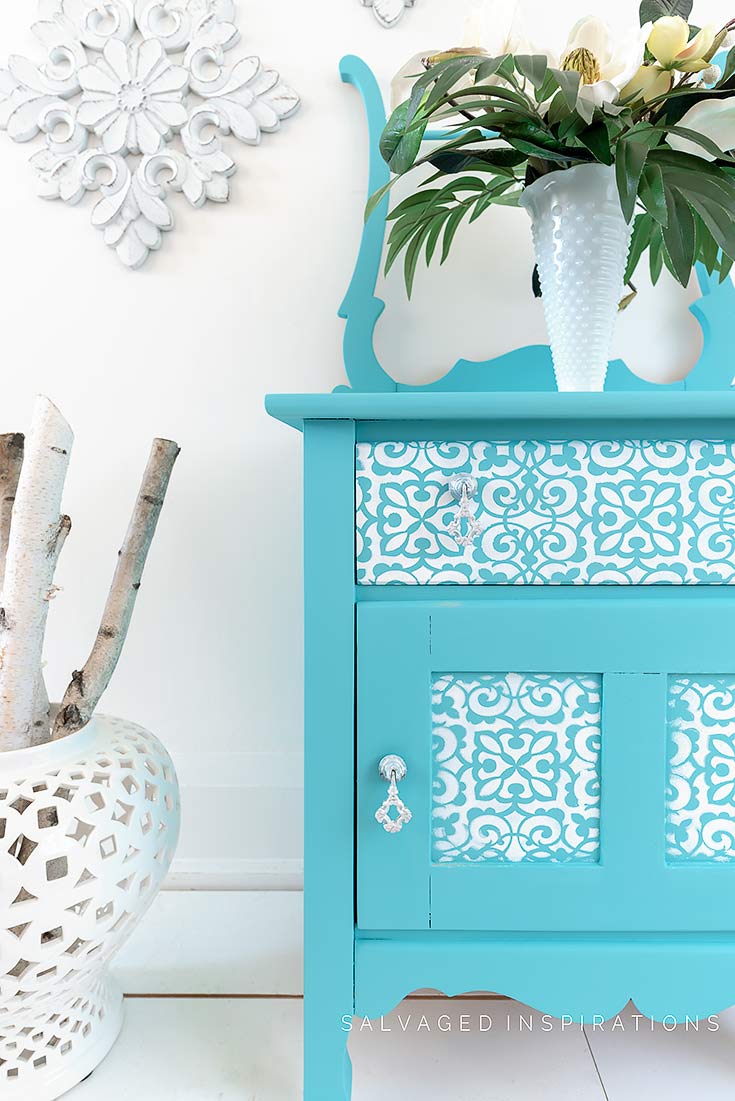
This stencil pattern painted in white reminds me of snowflakes. Isn’t it sweet?


THIS POST IS SPONSORED/CONTAINS AFFILIATE LINKS TO PRODUCTS I USE. YOU CAN SEE MY FULL DISCLOSURE HERE.
SOURCE LIST
-
- Curbshopped Washstand – SALVAGED
- Mini Angle Paint Brush
- Sandpaper | Shop Towels
- Stencil Brush
- Temp Adhesive Spray
- Painters Tape
- Water Misting Spray Bottle
- The Gulf (80%)
- Peacock (20%)
- Cotton White
- Dixie Belle Morroco Stencil
STENCIL ON FURNITURE
Although it took me a few years to get ‘into’ stenciling, I’ve done my fair share since then. So if you’re brand new to stenciling or even an old pro, I hope this gives you a few tips and ideas to help you out. 🙂
**Before I started stenciling, I clean this washstand and removed the applique from last year’s design, then gave it a light sanding.
Here’s the full video tutorial. If you have any trouble viewing it in your browser, feel free to click on my Youtube Channel here… and don’t forget to subscribe! 🙂
1. Plan Your Design
Before I do anything, I plan my design. Planning a design includes where you’d like your stencil design to appear on your furniture and what colors you will be using for your base and your stenciled design.
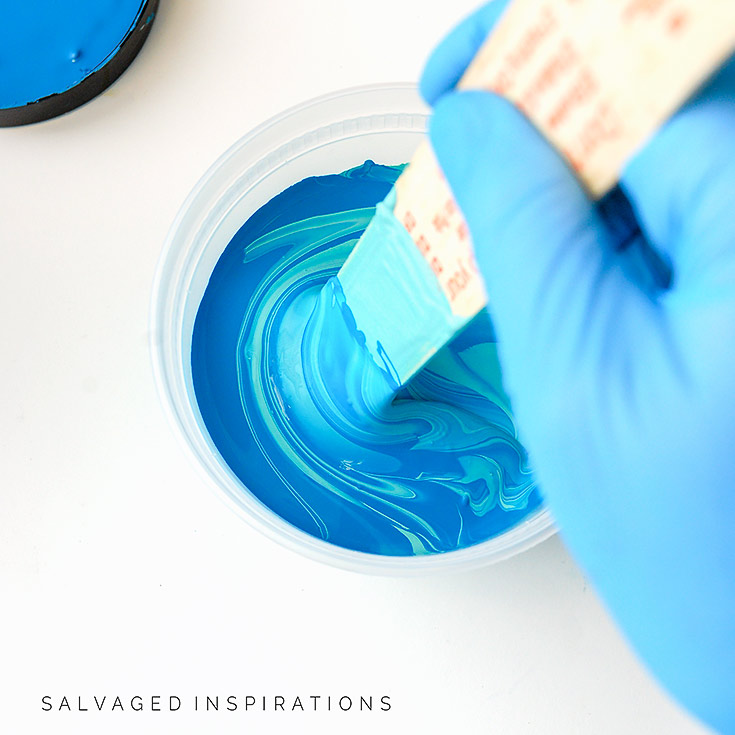
2. Paint the Basecoat
Once you have a plan for the placement and color scheme you can start painting your basecoat.
For this washstand, my basecoat was 80% The Gulf and 20% Peacock .
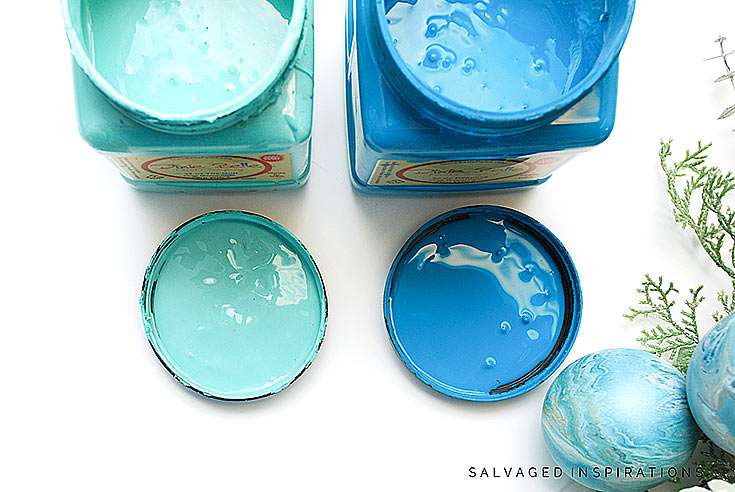
Mixing these two colors gave me a color similar to a Tiffany Blue!
Tip~ When mixing a custom color, always make sure to mix enough so you don’t run out halfway through. It’s always better to have a little more than not enough.
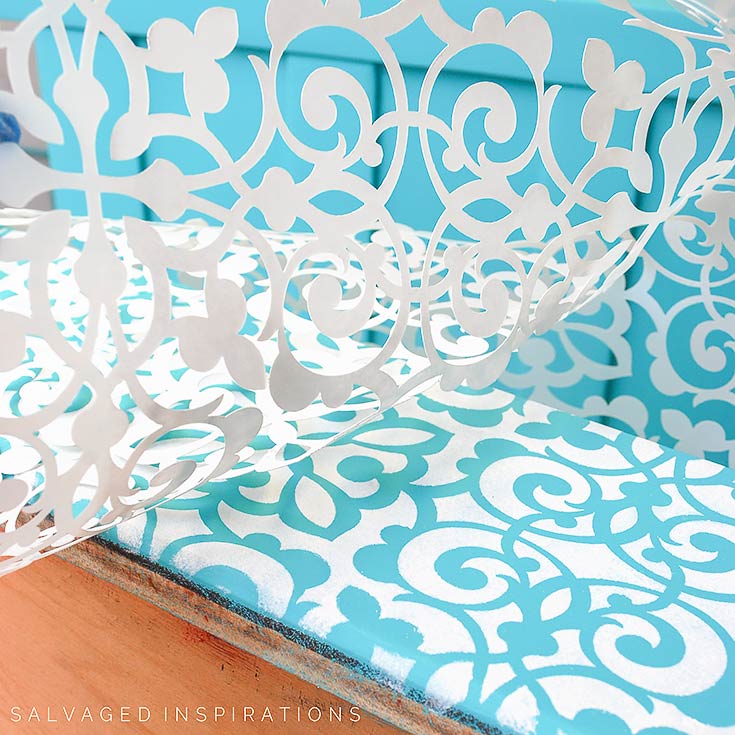
3. Secure Stencil
Once I painted two coats of my custom blue and it dried 100%, I was ready to stencil. For a clean design, it’s best to secure the stencil with a temporary spray adhesive (I like this one!) or some painter’s tape.

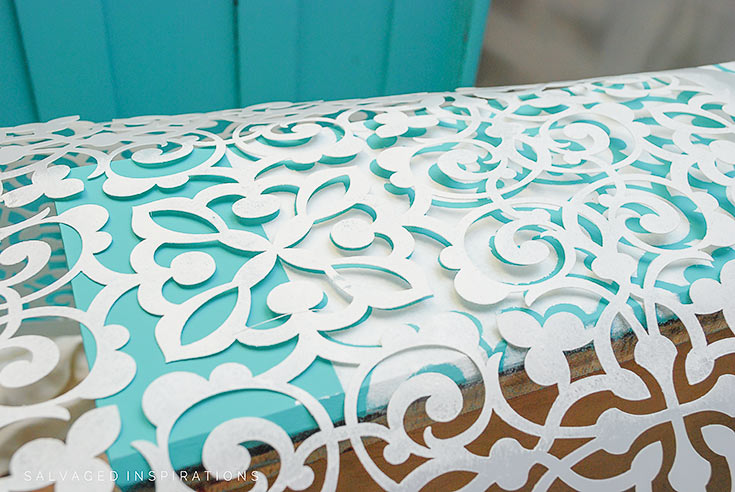
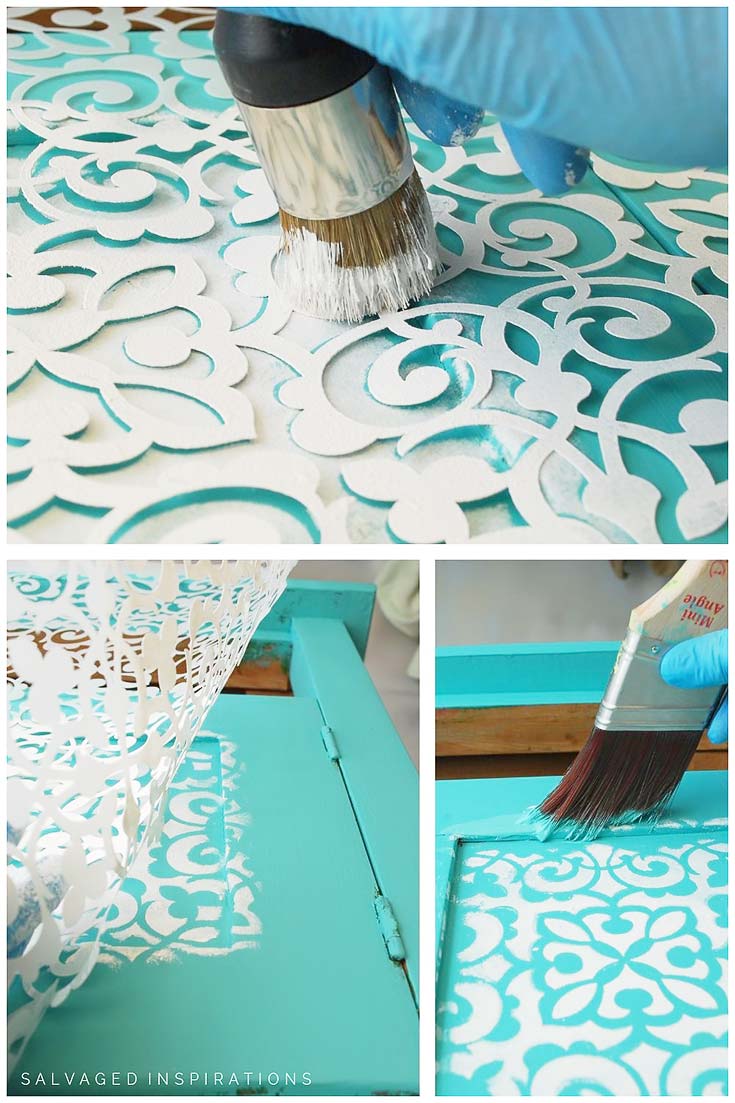
4. Paint the Design
To paint the stencil design, I like to use a stiff round stencil or wax brush and/or a foam roller for larger designs.
The key to painting a clean stencil design~
- Load your brush or roller with paint and then OFFLOAD the excess paint.
- Dabb your brush in an up and down motion, not side to side.
- Press the stencil firmly against your furniture while the other hand dabbs the paint.
- Two light coats are better than one heavy coat.
- Reposition your stencil perfectly when extending the design.
5. Remove Stencil & Reposition
Once you’ve added one or two coats of paint to your stencil design, depending on the size of your stencil, you may need to lift and reposition it to continue the design on your furniture like I had to with this drawer.
I prefer to reposition my stencil pattern once it’s dry to the touch. This way I know I’m not going to smudge or disrupt the work I’ve just finished. Once I had the stencil so the design matched up perfectly, I finished the end of the drawer.
TIP~ If you’re working with a piece of furniture like this washstand, a little finagling might be needed around edges and insets. For instance, to get around these door panels, I pressed the stencil into the grooves and held on tight to keep the stencil flat while I pounced the paint. I’m not worried if I paint outside the lines because that’s the best way I know how (other than cutting a stencil to size) to get the design closest to the edge. After, I use my base color and clean up and spillover of the design.
6. Protect and Seal
Once your stenciled furniture is finished, you want to protect all your hard work with a topcoat. ANY furniture paint topcoat like poly or wax is perfect.
Because this piece will be heading back into my inventory after the holidays, I’m not going to topcoat it.
If you take a close look you’ll see it’s not totally perfect but a stenciled design rarely is. In many cases, that’s what gives it a little character and interest! Overall, I’m really happy with how clean and crisp it turned out.
And what do you think of these snowflake hanging pulls? I bought them from Hobby Lobby and painted them white.
I’d love to hear which Christmas Makeover you like BEST in the comments below!
Makeover 2020
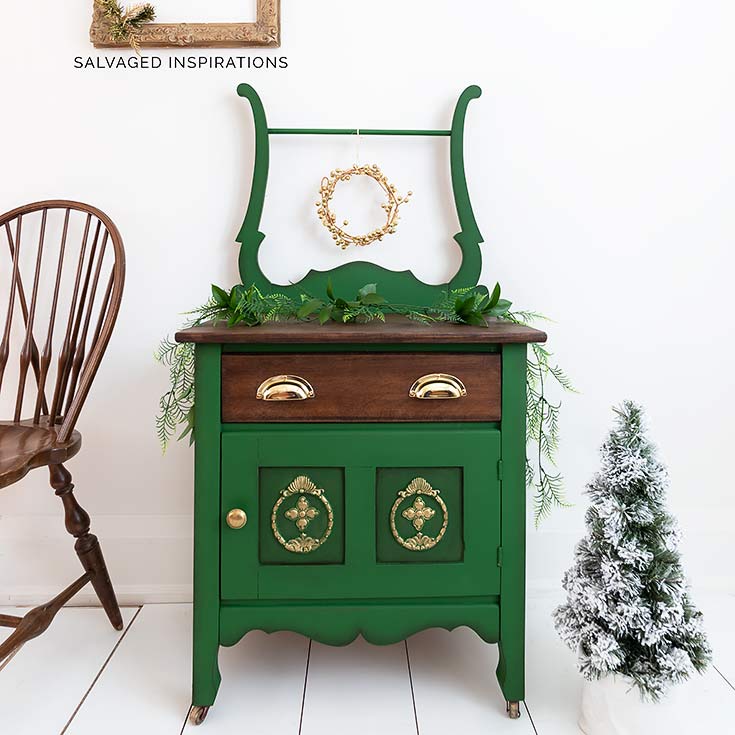
Makeover 2019
Makeover 2018
And now for some TRASH TO TREASURE FUN!
I know you’re going to LOVE what this talented team of ladies share. They never cease to surprise me with their creativity! Below are their BEFORE photos. Visit the links underneath to see the amazing AFTERS and to learn how they did it! I’m heading over to take a peek right now myself! x
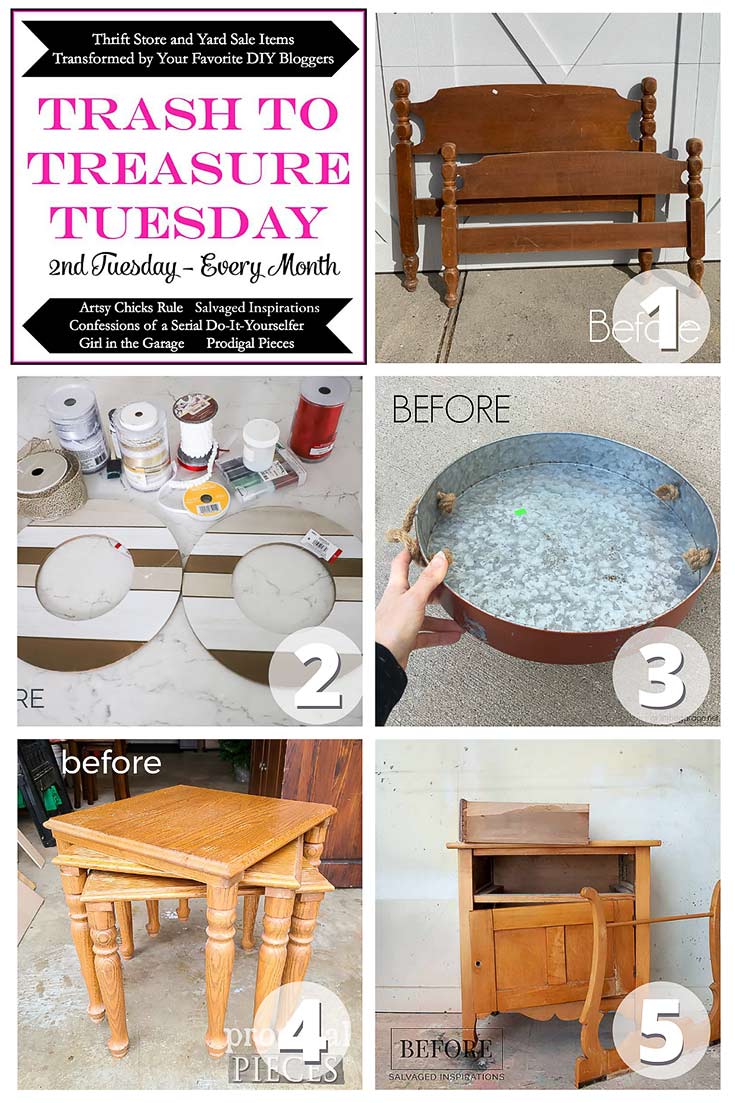
1. Confessions Of A Serial DIYer
2. Artsy Chicks Rule
3. Girl In The Garage
4. Prodigal Pieces
5. Salvaged Inspirations (I’m so happy you’re here!!)
Here’s another look at the before and after…
LET ME KNOW WHAT VERSION OF THIS CHRISTMAS WASHSTAND YOU LIKE BEST. AND WHAT YOU THINK OF THESE NEW DIXIE BELLE STENCIL DESIGN! I ALWAYS LOVE HEARING FROM YOU.
Thanks for reading. 🙂
Wishing you a beautiful day filled with inspiration and Happy Painting friends!
Denise XO
RELATED POSTS::
7 INSPIRING STENCIL IDEAS
MANDELA STENCILS – MCM MAKEOVER
HOW TO CREATE A RAISED STENCIL DESIGN
7 FURNITURE STENCILING TIPS | FRENCH TRELLIS MAKEOVER
HOW TO MAKE A STENCIL – NO COSTLY GADGETS REQUIRED!
2019 DIXIE BELLE EVERGREEN WASHSTAND
2018 HOW TO PAINT BUFFALO PLAID | WASHSTAND MAKEOVER
PIN AND SHARE!


Hi Denise!!
Another stunner! I just LOVE your work, you’re amazing! And the stencil looks Ah-mazing!!!
Hi Suzanne!!😊 Thanks so much! I’m loving the stencils and can’t wait to find my next project to use them on. I also heard there will be some silkscreens coming out as well. I’m a fan of those so that’s exciting. Stay safe and Happy Holidays to you and your family.
How stunning! Love the Tiffany Blue!!!
Hi Alanna!!! 🙂 It’s a great mix, right!? Thanks so much and happy holidays to you!
Hi Denise. Love them all but I think the red is my favorite. I love the detailed instructions you always give. Especially what not to do. It saves us so much time. Question…when using Hobby Lobby pulls, the mounting screws are so long. Do you replace the screws or cut them some how or just let them stick out? Stay warm up there.
Red vote it is! 🙂 Thanks! For these pulls I left them as-is because it’s not for sale, but I do usually trim the screws down with this tool. Super easy to do.
Thank you so much for the tips on customizing screws so they fit. Just what i needed to know. .You’re the best.
My pleasure Kathy… anytime! 🙂
Love Love Love this piece! You do beautiful work Denise!
Yay! So glad you like it and thank you, Deb! 🙂
Loving that color with that stencil . You always do such great work!! Thank you for making it look so simple!
Hi Mary Ann!!! 🙂 Thank you so much… I’m loving this stencil too! Happy holidays to you! xo
Gorgeous!!!! Love them all, green was my fav 😍
Thanks, Natasha! Thanks for chiming in and for all you do… much appreciated! 🙂
This is a fabulous piece and wonderfully written post.
I love the bright and fun pops of color!
Have a wonderful holiday.
Cortlyn… so nice to see you here!!! 🙂 Thank you! Wishing you a happy holiday as well!
The color really is awesome! I love it – a great color recipe. The stencil is so perfect, thank you for doing such beautiful work, Denise. I sure hope you have a wonderful Christmas.
Thank you so much… for ALL you do Teri! A wonderful Christmas to you and your family as well. XOXO
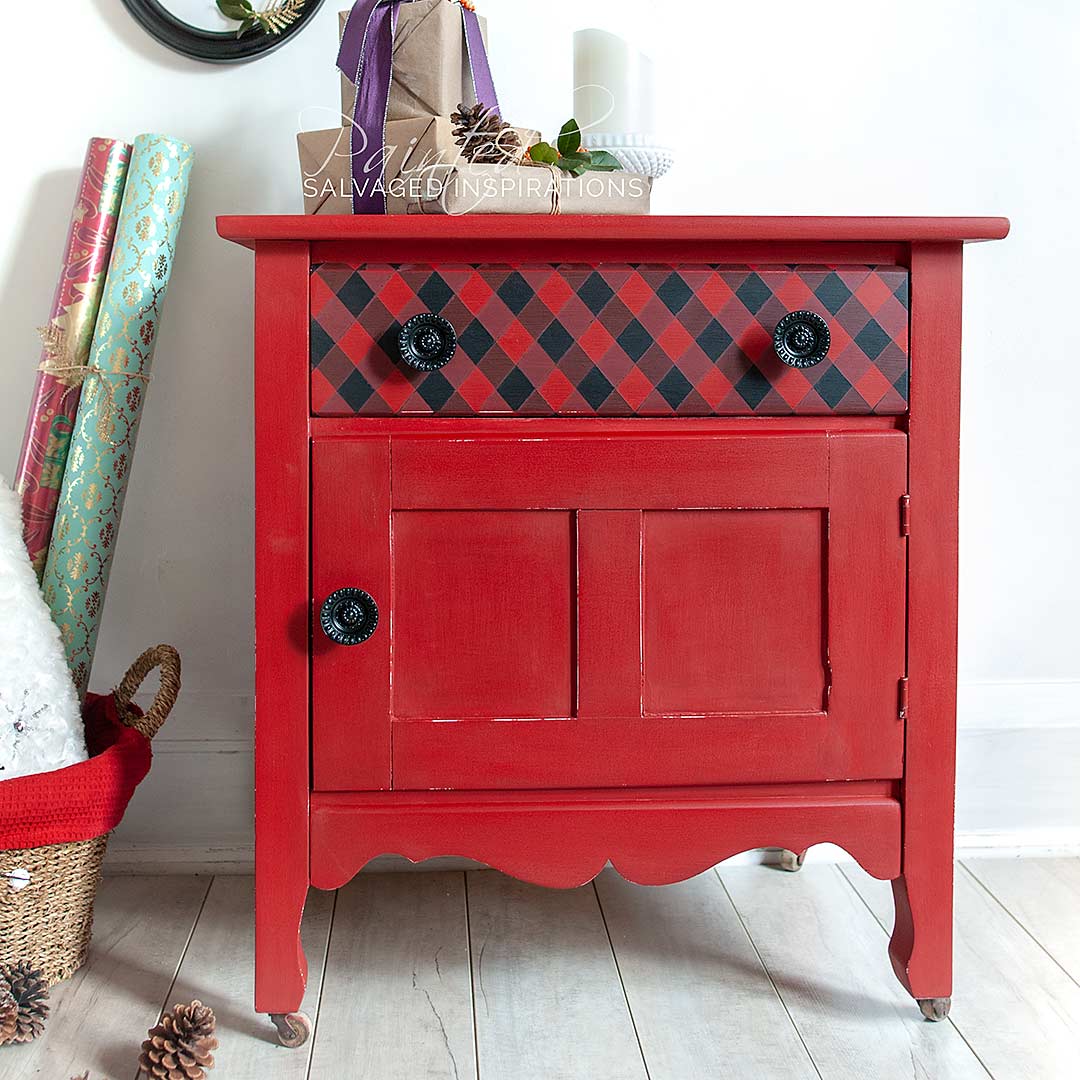
They’re all so pretty and unique in their own way! I have to choose red just because it’s my favorite color. 🙂
Thanks so much. Amazing what paint can do, right?! 😉 Another vote for red and thanks for chiming in my friend. XOXO
I like the chunky little red one. I love the pulls on the blue piece but I think they get lost on the stenciled drawer. I might paint over the drawer stencil enough so those cute pulls are featured a bit more. Or paint over the drawer stencil entirely. Just a thought. Love your work
Another vote for red. 🙂 Thanks Elizabeth!
Although I love them all, the deep green is the best. Thank you for sharing with us your excellent work. Love your projects.
Merry Christmas!
Marta
Thanks for chiming in and a Merry Christmas and happy holidays to you as well Marta! x
This turned out so pretty, Denise, love the stencil and color! xo
Thanks my friend! XOXO
Well, I’m a Tiffany gal wanna be so the blue is my favorite. I love aqua on anything and this is spectacular! The snowflakes on the wall are lovely too. I need to practice my stenciling skills; it looks much easier than it is!! I know y’all are chilly up there so stay warm and healthy!!
Thanks Cecilia and ya, we are bundling up here for sure. MMM went to see an outdoor Christmas light display at the RBG this past weekend and I felt I was 10lbs heavier with all the layers I had on..lol. Well worth it tho. It was beautiful. Hope you’re staying healthy and safe too. XOXO
All versions are beautiful but this year’s is the best. The turquoise is sassy and fun!
“Sassy and fun”… I love it, Anne! Thanks 🙂
It’s amazing how how you managed to re-imagine this piece into 3 very different & beautiful looks! I love what you did with the stenciling this go around but I think I’m partial to the deep rich green look. Looks stunning! Thank you for the consistently good inspiration!!
Merry Christmas
Neetu
Thanks so much, Neetu! And Merry Christmas and Happy Holidays to you too! XO
I love #2, (2019) the green really speaks to me.
Cynthia
Hi Cynthia!! Thanks for chiming in. The green counts might be taking over. 😉
Red!!!!
Another for red! Thanks for chiming in Doris! 🙂 🙂
They are all lovely pieces. You always do such lovely work. I have to go with the green one (I do like green!). The details on the aqua stand really make it pop, especially those knobs. Just not a turquoise fan.
Hi Barb! Thanks so much! xoxo By the comments, I can’t tell which piece is coming out ahead this year… they all seem to have about the same amount of ‘likes’ so far. Thanks for chiming in. 🙂
This colour is sooo pretty 💙
Thanks so much Annie! XOXO
I like them all. Great work. However my favorite is the gen
Thanks so much, Bev! So glad you like them! 🙂
Hello Denise! I always love your tutorials. My favorite is the buffalo check, for me the others are too busy! Thanks for started my Tuesday with some fun!
yaay, thanks Gwen! And thank YOU for joining me, my friend. XOXO
I like your 2020 makeover the best. Maybe it’s because blues and turquoise are my favorite colors. I always enjoy receiving your emails and watching your projects.
Thanks so much, Mary Jo! I have a video to go along with this stenciling tutorial that I’m working on right now! Unfortunately, I’m so slow at editing video I didn’t have it published along with the post. But if you prefer to watch, it should be up by this evening. 🙂
Denise I have to say that I love that green one . It could be for anytime of the year.
Thanks so much Micki! 🙂
It’s amazing how you make everything look so easy. This is a very hard choice but my favorite is this year’s 2020. The white stenciling against your custom blue is perfect. Thank you for sharing! ~ Nicki
Thanks so much Nicki! Hugs
Hi Denise. Wow! I love the Tiffany blue you created matched with the snowflake stencils and knobs. Stunningly beautiful. I can’t pick a favorite because all three versions are absolutely gorgeous. What I can say is that you are brilliant and creative. You’ve shown how completely different one piece of furniture can look with some paint and imagination. Well done:)
Awwww, thanks Monique… you’re too sweet! I have a hard time picking too but I think that’s because I’ve painted all of them.😂
My favourites are the blue and the green and brown
Thanks Darlene! XOXO
What a bright and beautiful color, and I love the stencil! I think my favorite might be the green one, but it was so fun to see three totally different looks from one piece! XOXO
Fun right?! It’s fun to see how one piece can have SO MANY looks. Now I want to do this for every season…lol
Hi Denise! What a.pretty color. I have been thinking about getting that new stencil. Now.i really want it. Your pie e turned out so pretty. All the makeovers are beautiful but I thi k I might like the red one the most. I’m a sucker for Harlequin patterns. It is a hard toss up.
Thanks, Cheryl! DB has a few gorgeous stencils out. When I link to their site it looks like they might already have sold out on this one. Hopefully, they will get more in soon. 🙂
Love that pop of color, Denise. And your stenciling is perfect.
Thanks my friend! XOXO