A STEP BY STEP TUTORIAL ON HOW TO ANTIQUE YOUR PAINTED FURNITURE WITH A GLAZE!
Hi sweet #sifamily! Some of you may have followed this fun makeover on my Insta and FB Stories. It’s a restyle from a broken vanity into a set of gorgeous glazed antiqued nightstands. This is a true Furniture Fixer Upper Project which is perfect for today’s FFU Day! I’ll be sharing my talented FFU Crews makeovers and tutorials at the bottom of today’s post!
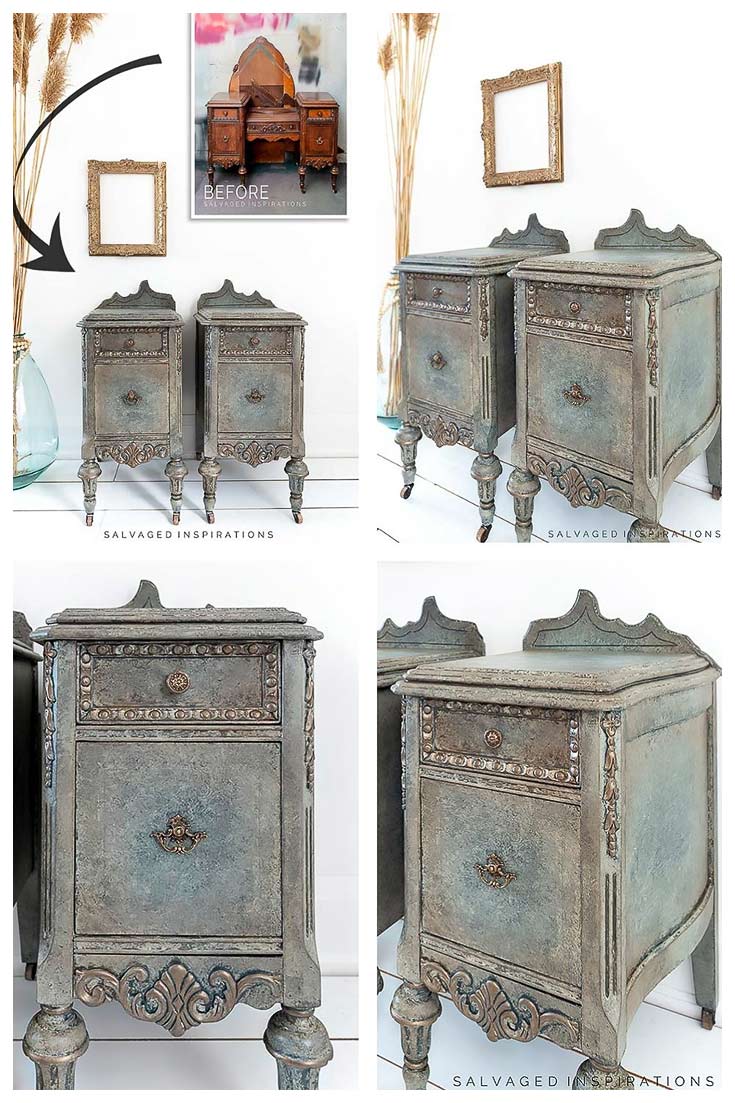
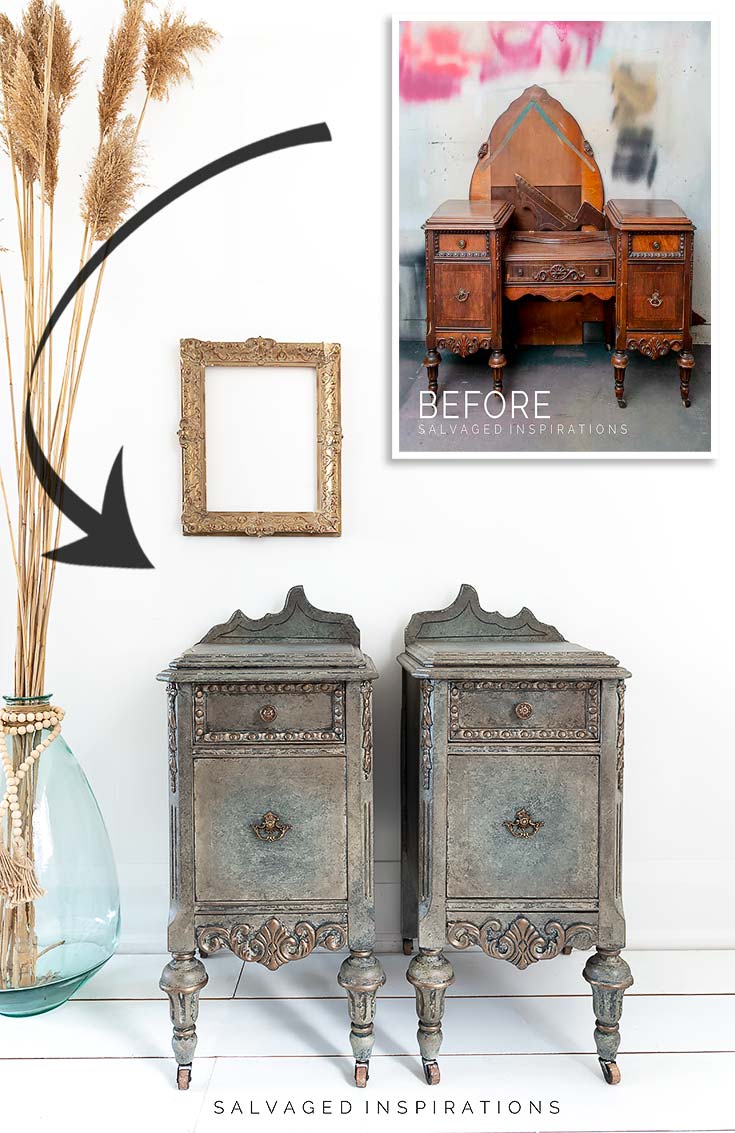
I found this vintage vanity on FB Marketplace and drove an hour each way to pick it up. I love the shape and style. It’s such a pleasure to work on these vintage pieces. I was waking up in the morning excited to get down to my studio.
The seller said the mirror had been broken and thrown away years ago and the backboard and wood appliques were falling off. But, I looked at the positive. The body was sturdy and the bones of the piece were still in fabulous shape. And look at those curves and details, right?!

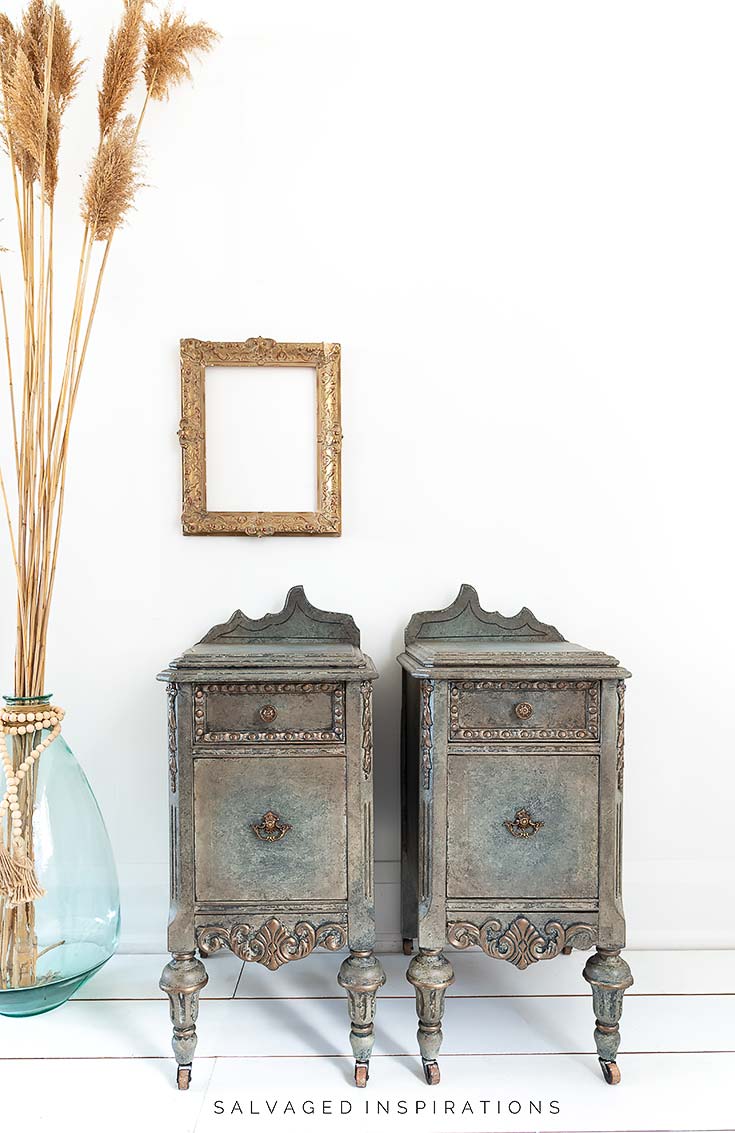
So, I decided to take it apart and create two one-of-a-kind-nightstands.
What do you think?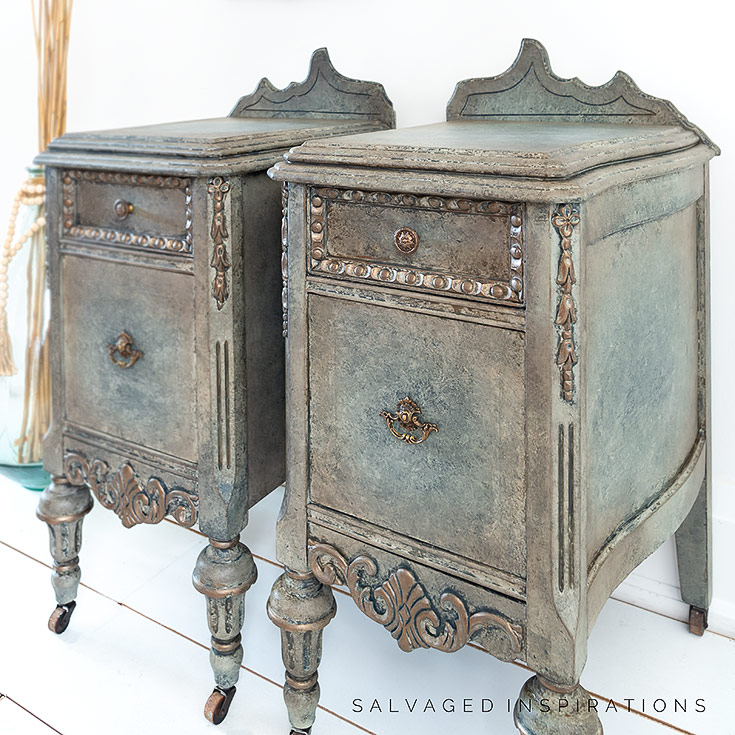
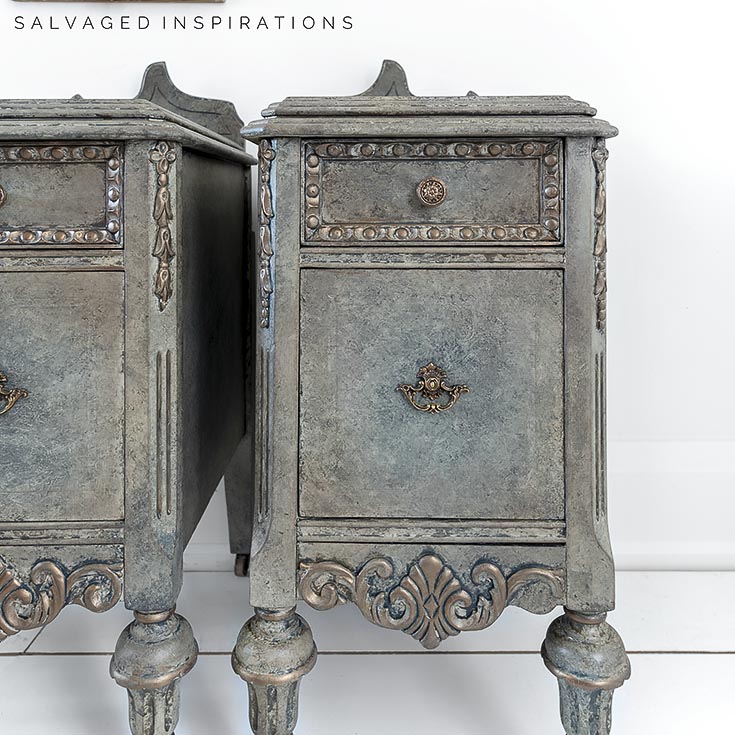
I did my best to keep an antique/vintage vibe while adding interest and character. Don’t laugh at me, but they remind me of little sister mermaids or old treasure chests under the sea.
THIS POST IS SPONSORED/CONTAINS AFFILIATE LINKS TO PRODUCTS I USE. YOU CAN SEE MY FULL DISCLOSURE HERE.
SOURCE LIST::
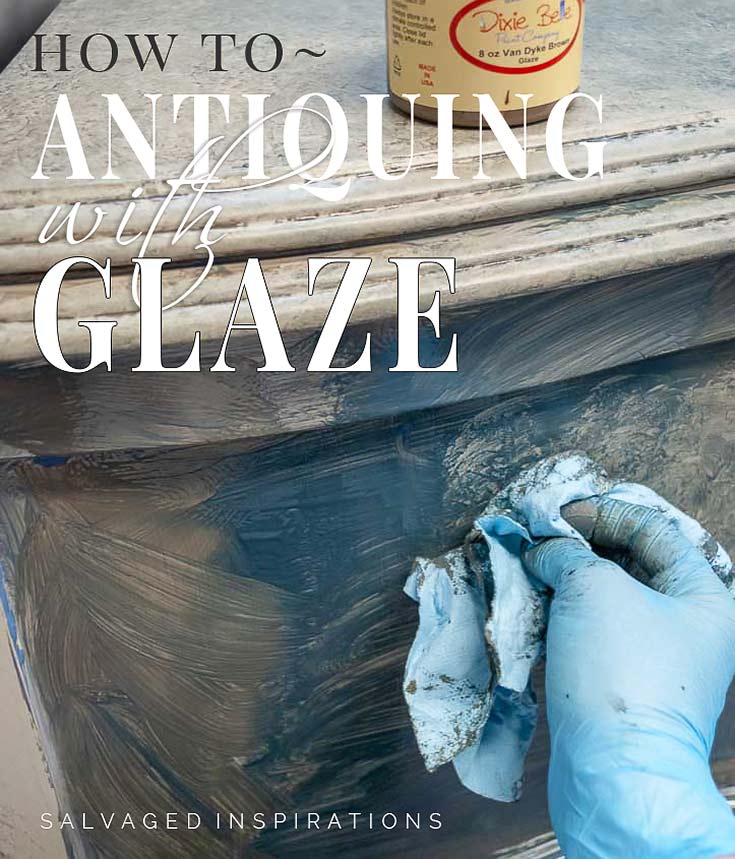
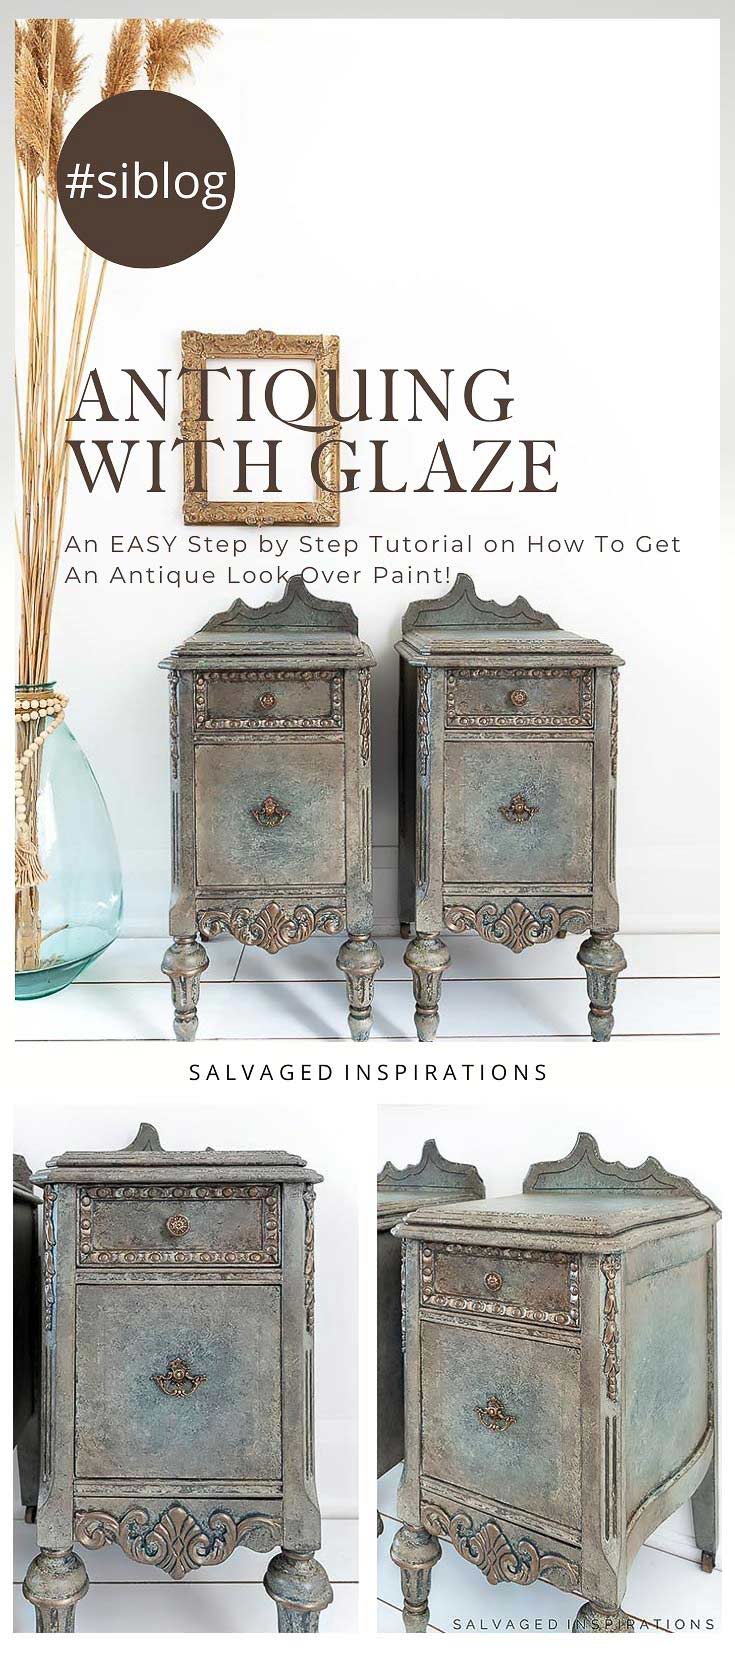
ANTIQUING WITH GLAZE::
For some reason, I don’t use glaze as often as I’d like but it can be a game-changer in transforming furniture. It’s easy to use. And if you apply a slip-coat (more on this below) before using tinted glaze, it’s also very forgiving. If you don’t like something, you can wipe it off and try again!
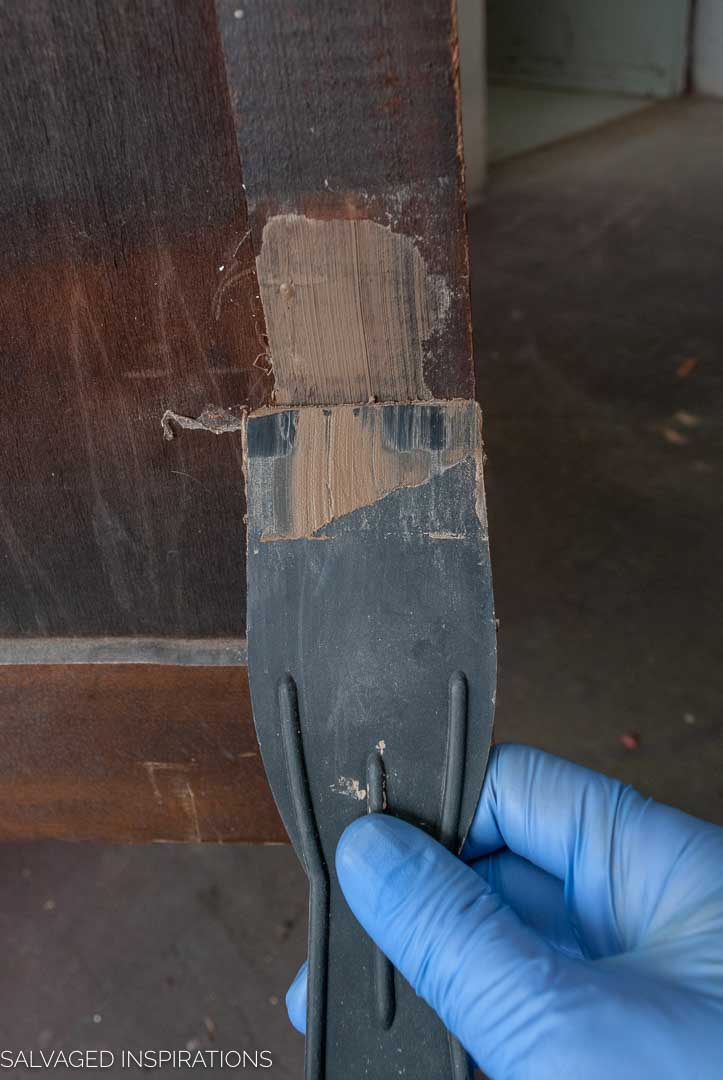
I started by dismantling the middle from the two sides and then patching the nail holes with Dixie Belle’s Mudd.
Once everything was cleaned, sanded, and primed, I painted two coats of this Dried Sage.
Tip~ To make sure I don’t miss any spots and give my furniture a professional look, whenever possible, I turn the piece over to get all angles and paint the underside.

Once the paint was 100% dry, I created a “slip-coat” for my glaze. A slip coat can be a temporary or permanent barrier before applying another product. For instance, I’ve used water (on a damp sponge) on wood before applying a water-based stain to give me an easy application and a more even finish. I’ve used mineral spirits before applying oil-based stains. Or in the case of glaze, I’ve used a clear glaze and/or a poly topcoat to give me a forgiving surface to work on. Another great example is using clear wax before applying dark wax. It helps ‘erase’ any mistakes you might make in the process instead of having the product sink in permanently right away.
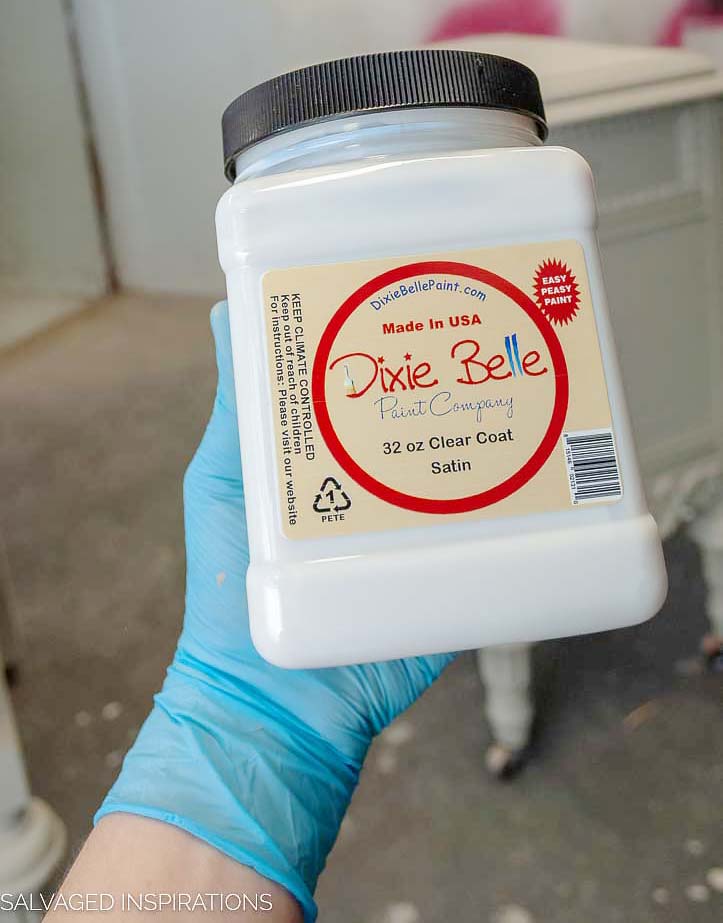
I wanted a little playtime for my glazes so I sprayed one coat of DB Satin Clear Coat.
Here’s the fun part. It looks intimidating but it’s really not because there’s no right or wrong. You just keep playing with the glazes until you like what you see.
- I applied DB Black Glaze (just get the product on…it doesn’t have to look good!)
- I added this Palmetto + In The Navy 50/50 mix that I had leftover from my Ikea project
- I added DB VanDyke Brown Glaze around the edges
- Then kind of smushed it around as you see in image #4 adding the color where I want it
- With a shop towel, I started dabbing off the product and mixing the glazes
- Taking a NEW shop towel, I removed any access until I had the antique look I was after
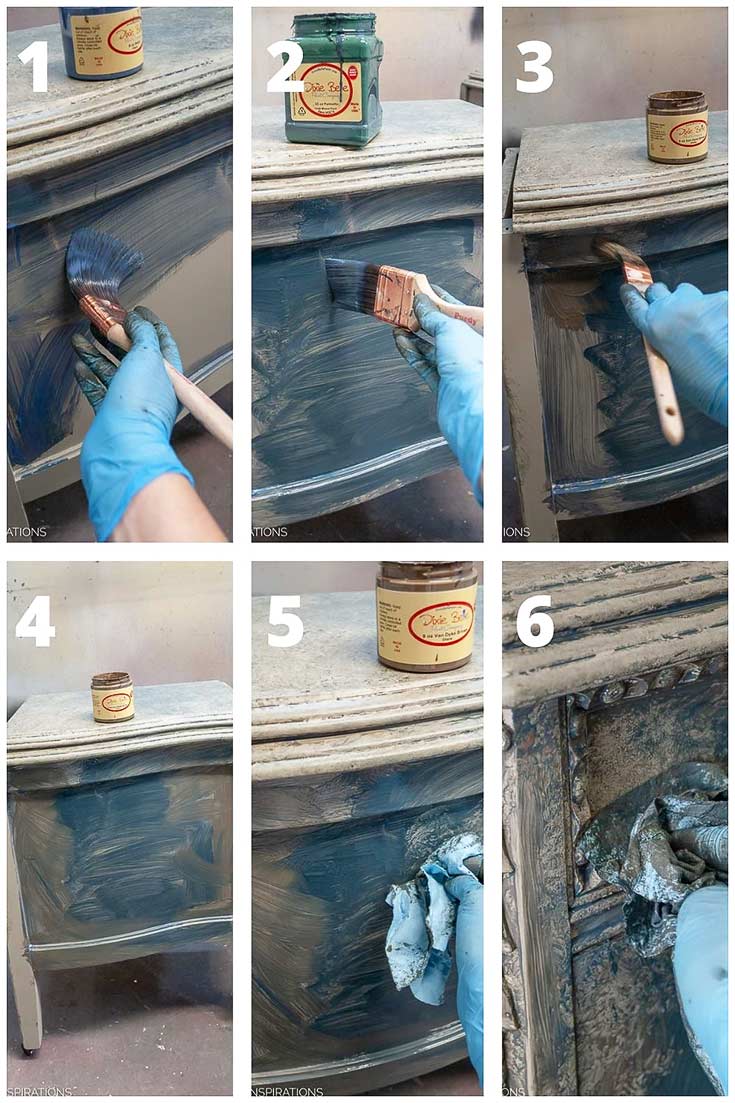
Here they are in progress. I used a blue/green paint-glaze along with VanDyke Brown but ANY color can be mixed with glazes. If you want a ‘true’ color of the paint you’re using, you would mix it with a clear glaze. If you want an antiqued version, mixing it with a black or brown can dull it down and give a subtle effect.
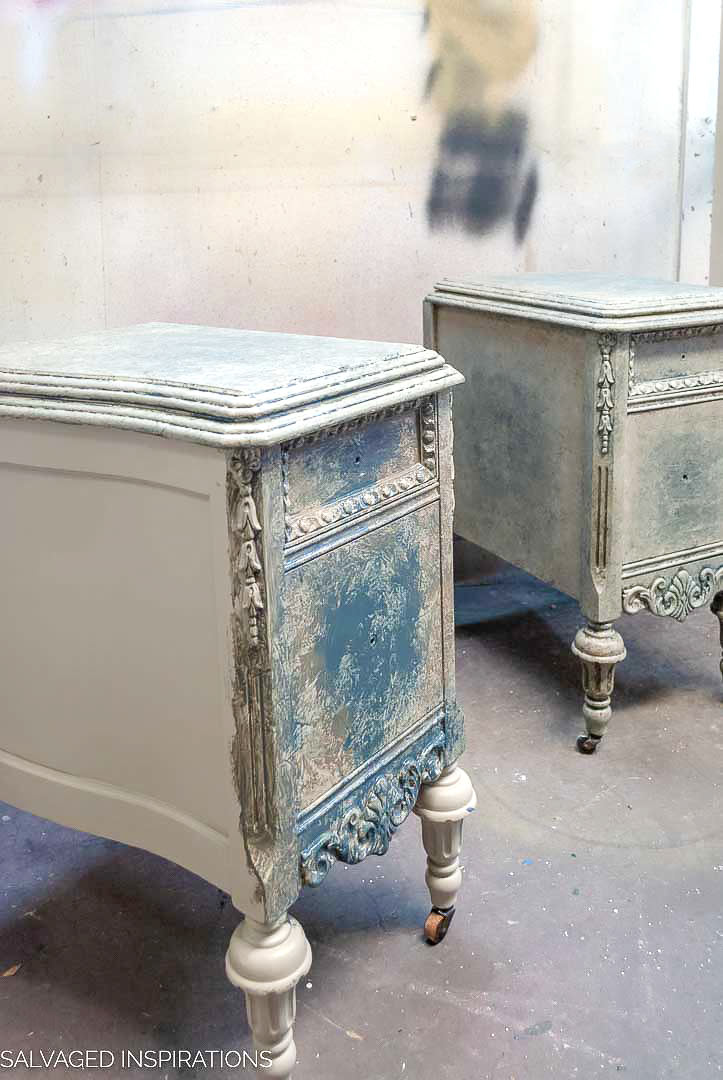
For the finishing touch, I added this *NEW Golden Gemstone Mousse to the hardware, details, and rims on the legs. And a little brown wax around the edges.

I debated about the backboard and decided to keep it. It adds extra character and hides the gap where the mirror once was.

I’m really happy with how they turned out!

And now for some FURNITURE FIXER UPPER FUN!
I know you’re going to LOVE what this creative team of girls do.
Below are their BEFORE photos – visit the links underneath to see the amazing AFTERS and to learn how they did it! I’m heading over to take a peek right now myself! x
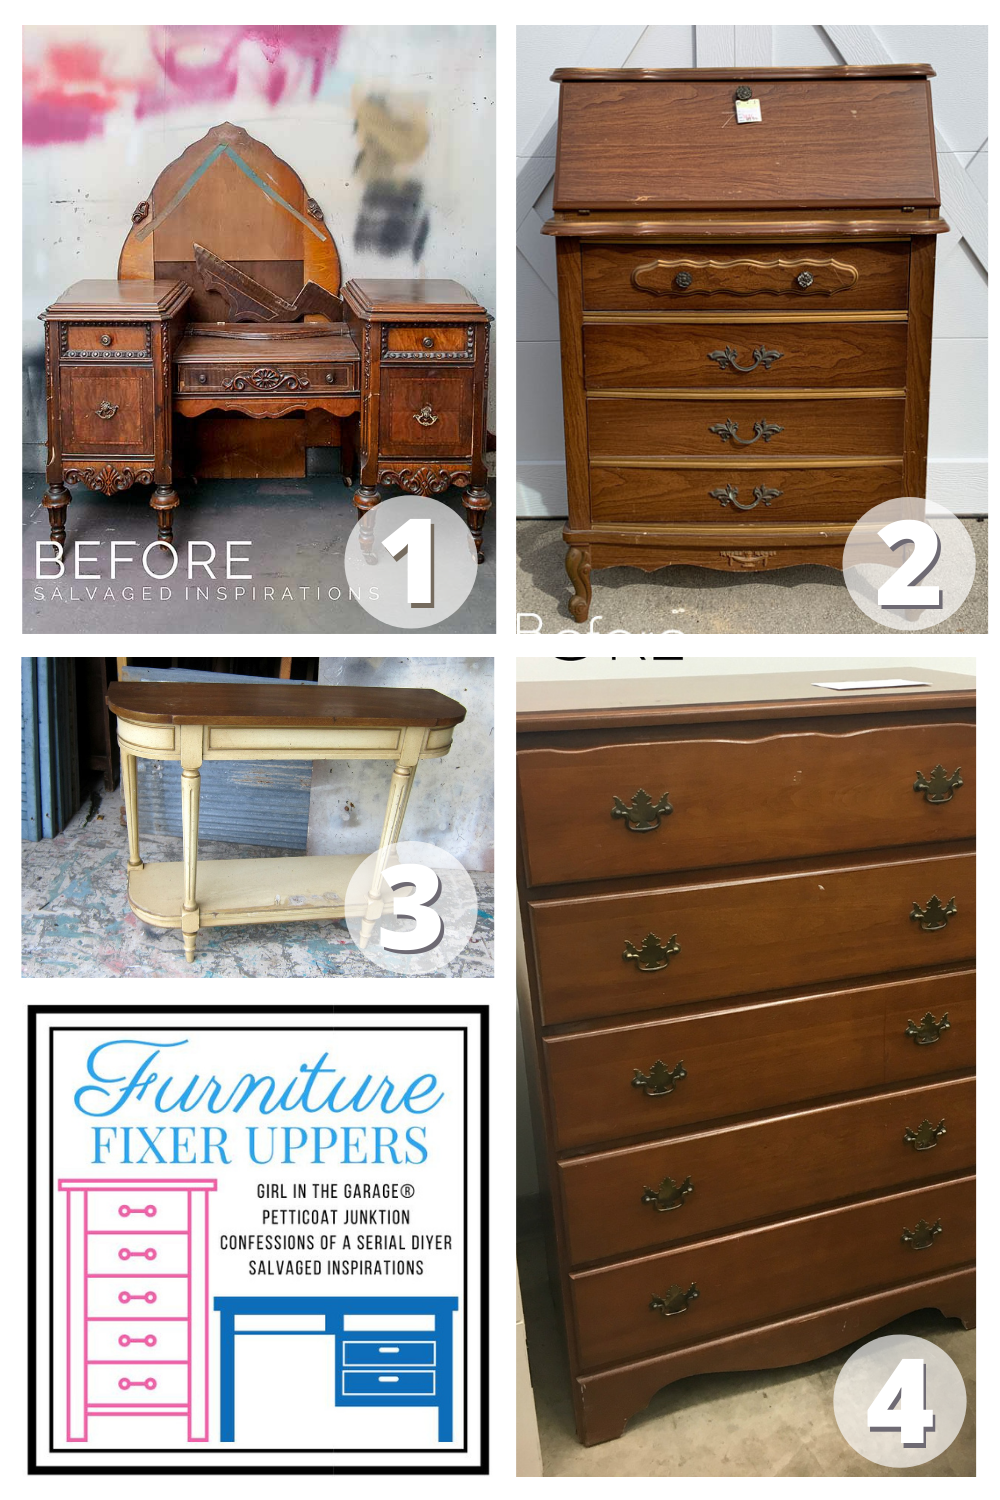
1. Antiquing With Glaze – Salvaged Inspirations
2. Vintage Secretary Desk Makeover – Confessions of a Serial DIY’er
3. Two-Color Furniture Paint Makeover – Petticoat Junktion
4. Paint Stripes Dresser – Girl In The Garage
Here’s one last look at this before and after…
LET ME KNOW WHAT YOU THINK OF THIS ANTIQUED GLAZED FINISH… OR FEEL FREE TO ASK ANY QUESTIONS YOU MAY HAVE… I ALWAYS LOVE HEARING FROM YOU. IT MAKES MY DAY! 🙂
Happy furniture painting my friends!
Denise x
RELATED POSTS::
Furniture Glaze – It’s ALL in the Details
How To Glaze Furniture | Console Table
DIY Furniture Glaze… SO Easy!
Stop Bleed Through When Painting
VanDyke Glazed Desk Makeover
PIN AND SHARE!
JOIN THE SALVAGED INSPIRATIONS FAMILY!

Absolutely gorgeous but as a newbie I wish there was a video. Beautiful work!
I am always blown away by your talent and your ability to see what can be made out of your piece! I am wondering what do you end up doing with the middle pieces?
Thanks so much, Wendy! The middle of this particular piece was turned into a large jewel box and the broken back mirror is still in my studio. I think I’ll remove the wood appliques for another project. 🙂
Love these beauties! You are so creative and thanks for sharing! Did you just layer all the glazes on top of each other while wet and start blending.
Thanks, Jane and yes, that’s exactly what I did. It’s a fun process!
Beautiful work as usual. You are amazingly talented.
Hi Charlotte!! 🙂 Thanks so much! x
I loved your comment
little sister mermaids or old treasure chests under the sea”. Such a perfect description. .I wish I could see them in person.
Thanks Val! I wish you could see them in person too.👯♀️
Gorgeous!
Thanks Kathy! 🙂
Absolutely STUNNING!!!
Thank you, Teri!!!💙😊
They turned out super-cool. I can imagine them in an old European castle. Definitely getting pinned!
Thanks Lizzy and thanks for the PIN!🤗
Beautiful work, Denise – and they DO remind me of mermaids!!! xo
Yes… right! Thank you Jen! XOXO
Unbelievably beautiful as always! So inspiring Denise! Truly!
Thank you Debbie!!!
I love these! Absolutly fabulous Denise; great job as always!
Thank you Barbara! 🙂
GORGEOUS , as always! French Rennaisance!
Thank you, Susan!!! 🙂
These are absolutely gorgeous. They are exactly what I’d love in my bedroom.
Thank you Toni!😊
Wow! I am speechless. Truly speechless. . .
Thank you Chris!
Absolutely Stunning. Amazing as always.. Thank you for your transparency, for your honesty,your love of giving back. You are an amazing artist.
Happy Thanksgiving!
Hi Roseann!! 🙂 Thank you so much and Happy Thanksgiving to you! XOXO
Gorgeous!!
This piece shows off your creativity.
This piece truly one of a kind
Thanks, Rosie! I’m hoping they sell to someone who really appreciates their one-of-a-kindness. 🙂
I wished you lived in Florida I would definitely want these. I love wha you have done and the pieces are spectacular.
Huge compliment, thanks Dorenda! Love your name btw! Very unique and beautiful!
You aren’t a furniture painter, you are a furniture artist! I love how you aren’t afraid to try new techniques and finishes! Simply stunning results, my friend! XOXO
Thank you, Christy… you’re super sweet my friend!💕
This set is stunning Denise! Simply gorgeous! -Nicki
Thanks Nicki! XOXO
Beautiful – I love them!!
Thank you Jackie!💕
LOVE these! Love the technique. Thanks so much for sharing.
My pleasure and thanks so much Marcia!😊
Beautiful!!
Thanks Susan!😊
This is a really great transformation. I love the mottled look of the two old gals! Thanks so much for sharing the technique and being such a lovely inspiration to so many!
Thanks, Trina! Glad you like them!💙
WOW
They are beautiful. What were the deminsions on them when finished? Can’t stop going back and looking at them😁.
How did you you like working with the mousse compared to other products?
Just a beautiful set
The mousse is fabulous. Super easy to use. I put it on my fingertip and rubbing it on the appliques and hardware. I tried rubbing the excess off the hardware and nothing came off. Impressive! The dimensions of these are 17″ Wide 20″ deep and 27″ tall + 5″ on backboard.😊
Great job Denise! This is a very creative application of paints and glazes, and I am curious to know whether you are able to picture the finished look in advance or whether you just choose interesting colour combinations and let the finished look develop as you work. Thanks. Robin
Both lol. I did have an idea of where I was going with these. As usual, they kind of do their own thing as I work on them. My original idea was this exact finish but with the blue/green darker on the bottom and fading up. As it turned out, I liked the color in the middle better. 🙂
Denise, i LOVE this look! I literally said, Woah! out loud when i saw what you created!!
awwww, thank my friend! Hugs XOXO
OH, DENISE!! These belong in a castle! They have such an old world look and the textures just make them fabulous. I haven’t used the mouse but need to try it. Love your work and your videos are very good. Thanks for sharing your secrets and tips!
You’re going to love the mousse, Cecilia! And thanks so much. I hope these nightstands find their perfect forever ‘castle’ home! hehe 😊
Hi Denise. I absolutely LOVE the antiqued effect and the asymmetrical backboards on these precious nightstands. Once you mentioned it, they do remind me of a subtle mermaid tail! Gorgeous makeover.
haha, mermaid tail right? 😉 Thanks so much and glad you like them my friend.💙
You truly are an artist. I could never have imagined this result in my wildest dreams! Stunningly beautiful!
Thanks so much Deb!💕