HERE’S AN EASY STEP-BY-STEP TUTORIAL ON HOW TO USE FURNITURE GLAZE TO MAKE ALL YOUR FURNITURE DETAILS POP!
Hi, creative #sifamily. Thanks for joining me today. I recently had septoplasty surgery to fix my deviated septum. I’m still on the mend and healing so it’s recommended I don’t lift or bend for another few days. So today I’m resharing a Furniture Glazing Tutorial and this gorgeous buffet makeover so I can join in on Furniture Fixer Upper Day!
I’ve included the before pics of my talented friends’ makeovers below so be sure to check them out before you leave.
Today is all about bringing out those gorgeous furniture details with an easy wipe-on wipe-off glazing technique. When I work on a piece of furniture like this, I always do my best to highlight the details. There are a ton of products and techniques to do this, gilding wax, chalk paste, colored wax, and dry brushing to name a few, but today I’m using GLAZE. It comes in a variety of colors, it’s easy to use, and the best part is you have TOTAL control over how bold or subtle the effect is.
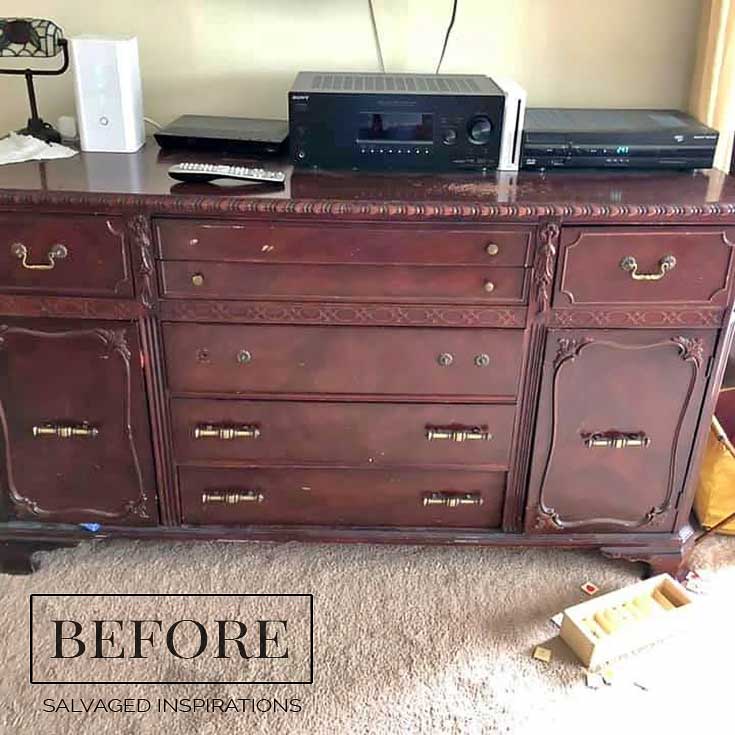
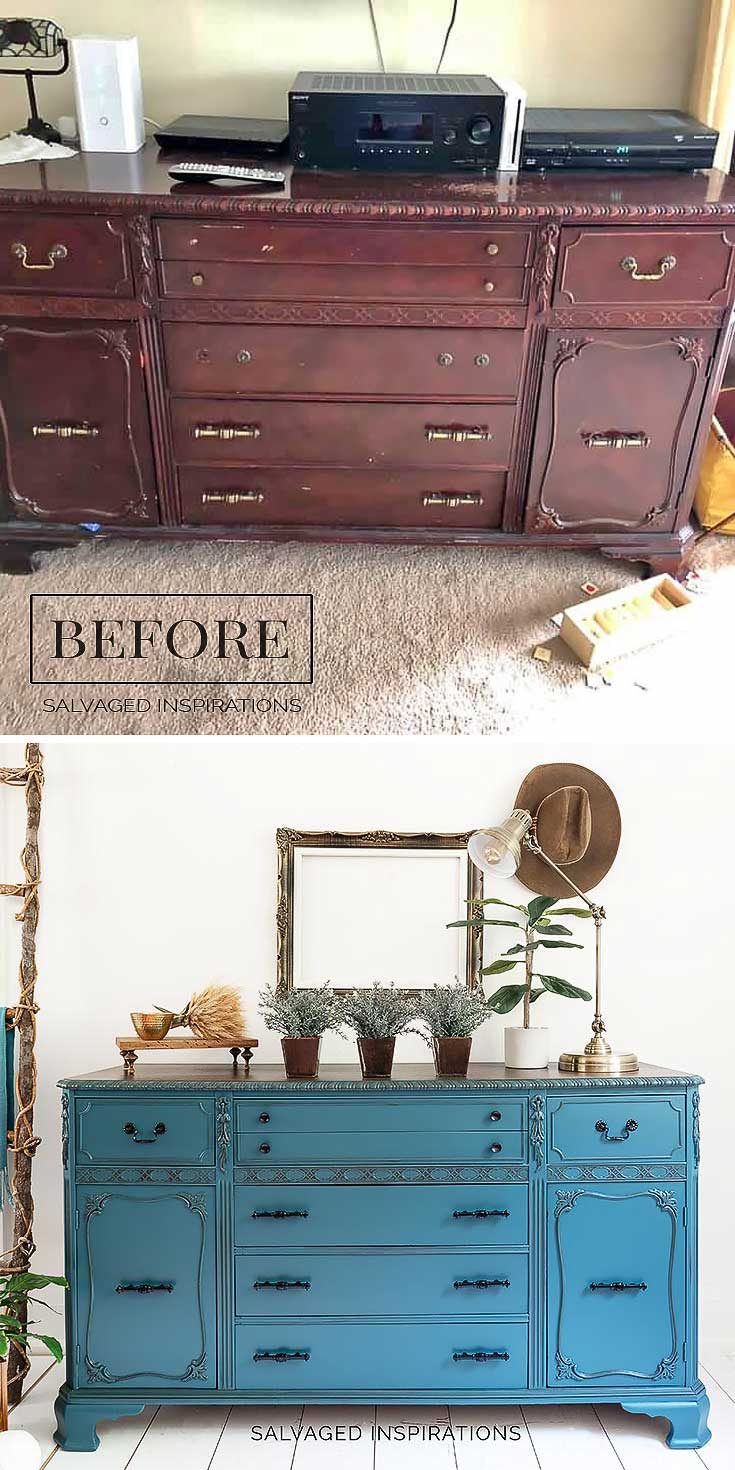
I started with this buffet I found on FB Marketplace. Below is the seller’s before pic which she agreed to me posting. She was forthcoming in saying this piece of furniture was ‘well-loved’ by her 3 kids.
The top required some extra attention as well.

Although it needed some cosmetic work, it’s still a beautiful buffet. I just love all these details!

THIS POST IS SPONSORED/CONTAINS AFFILIATE LINKS TO PRODUCTS I USE. YOU CAN SEE MY FULL DISCLOSURE HERE.
SOURCE LIST
BUFFET – SALVAGED
3″ Wooster Brush
Sandpaper | Shop Towels
DeWalt Orbital Sander
Water Misting Spray Bottle
Antebellum Blue Chalk Mineral Paint
GF VanDyke Brown Glaze
Espresso Gel Stain
Satin Clear Coat
HOW I GLAZE FURNITURE DETAILS
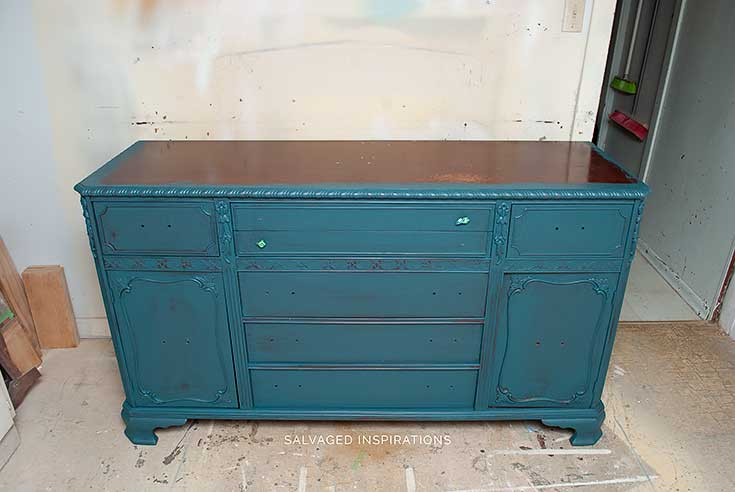
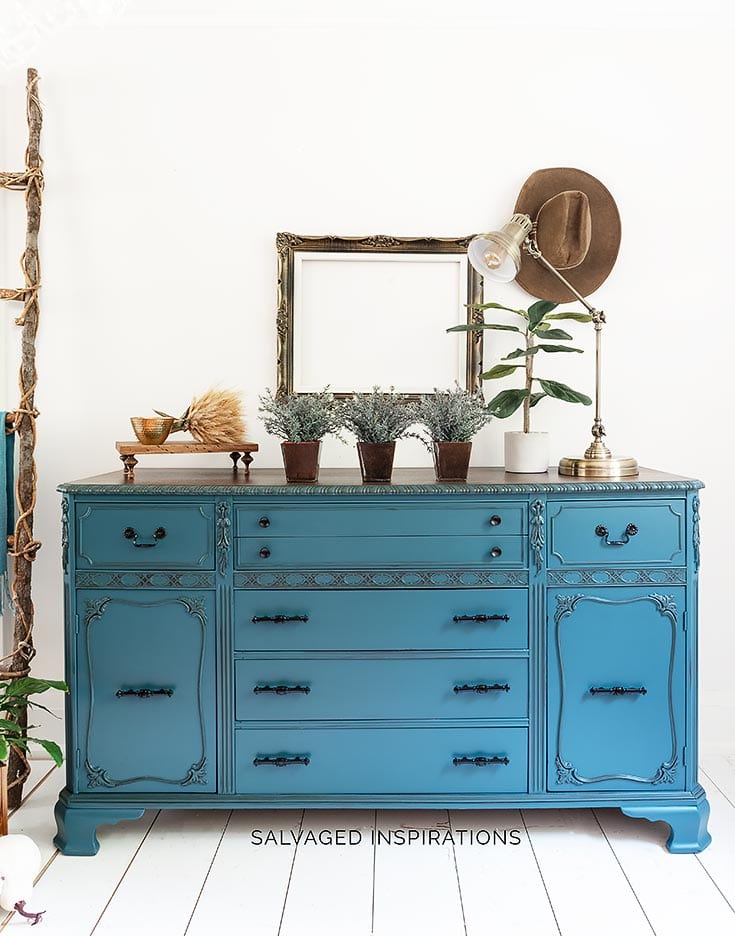
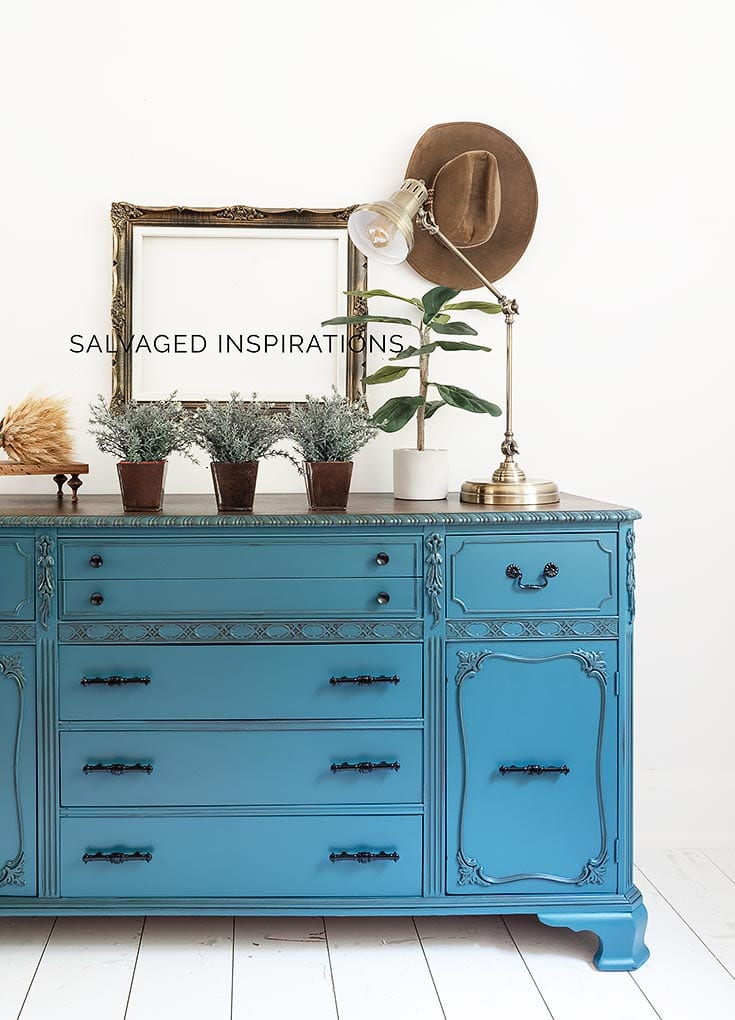
After this buffet was repaired and cleaned, I gave it two (2) coats of Antebellum Blue. What a gorgeous rich color! I would describe it as a mix of a peacock and teal. Here’s what it looked like after the first coat.
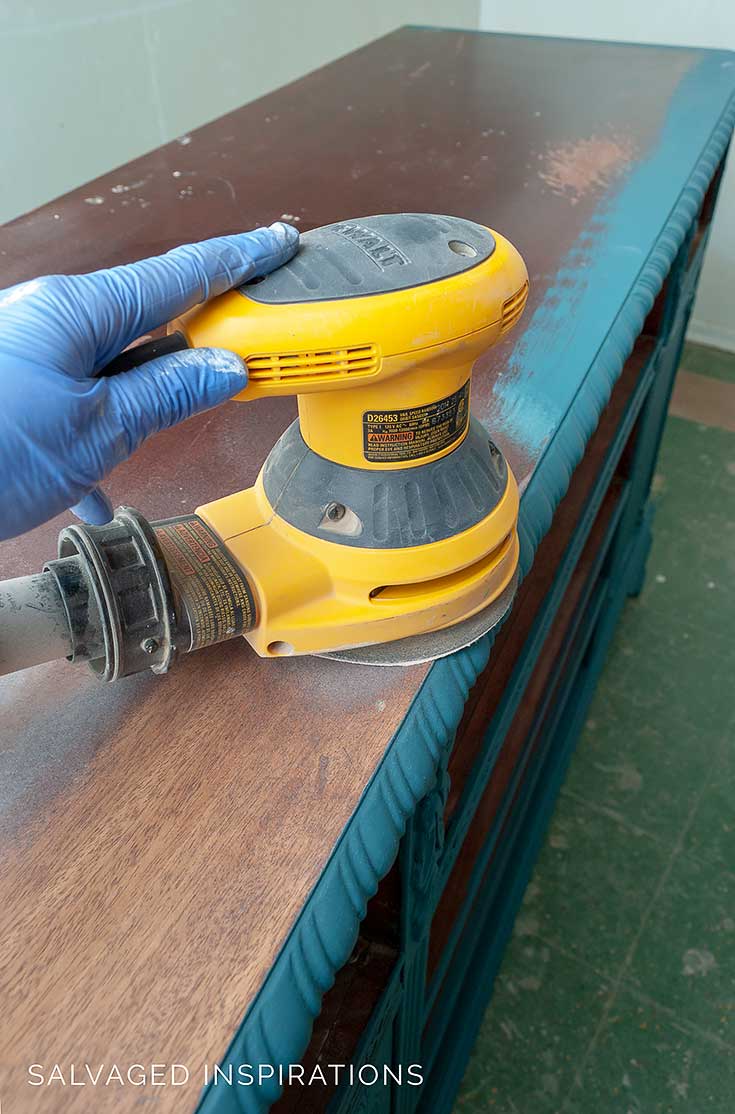
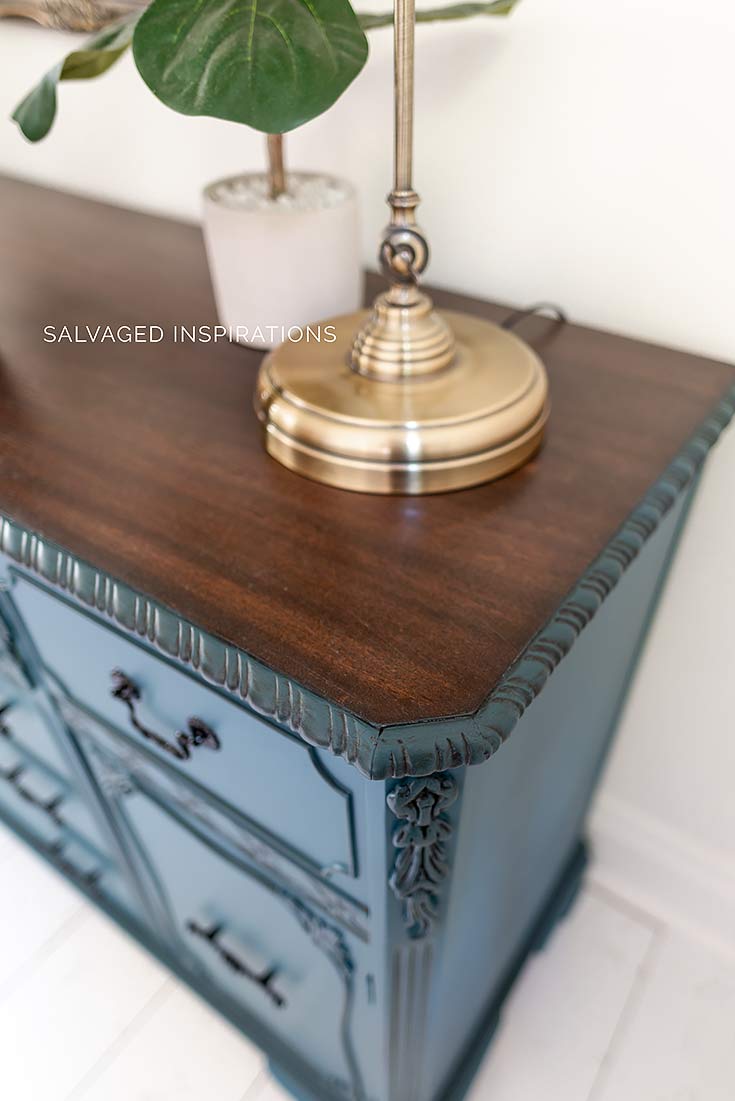
TIP:: A little trick I like to use when staining a top with a lip or border that’s going to be painted — I overlap and brush the top before sanding.
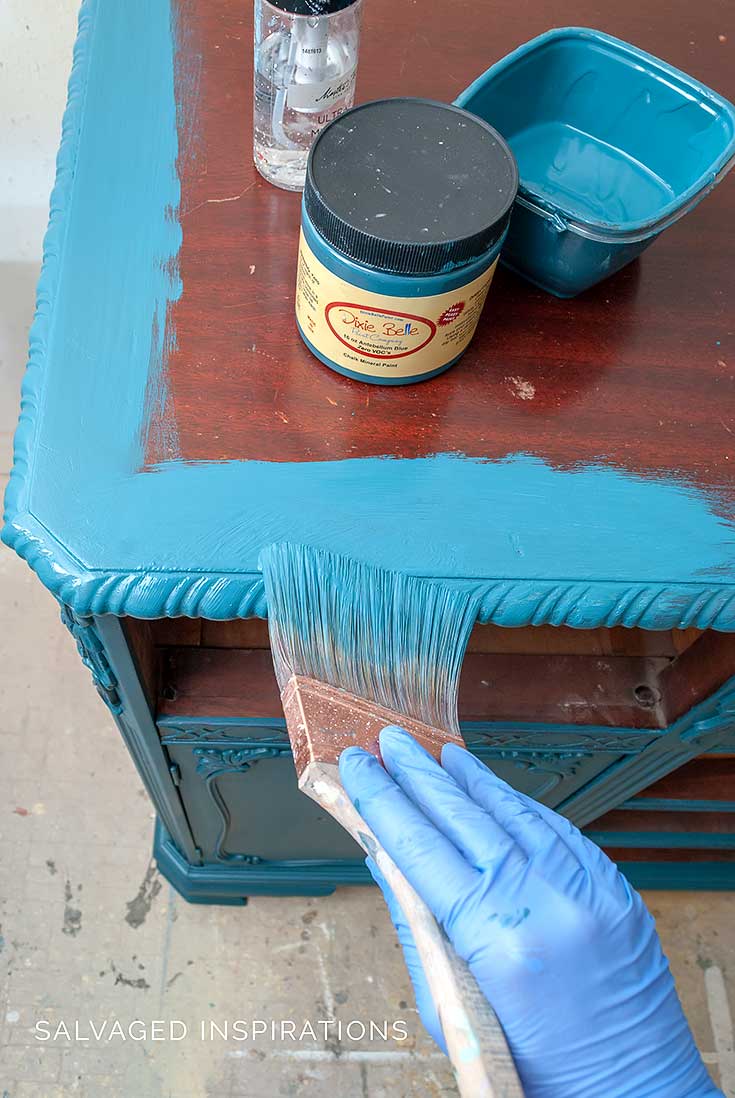
I used my 3″ Wooster Brush to paint the entire buffet and didn’t worry about getting paint on the top.
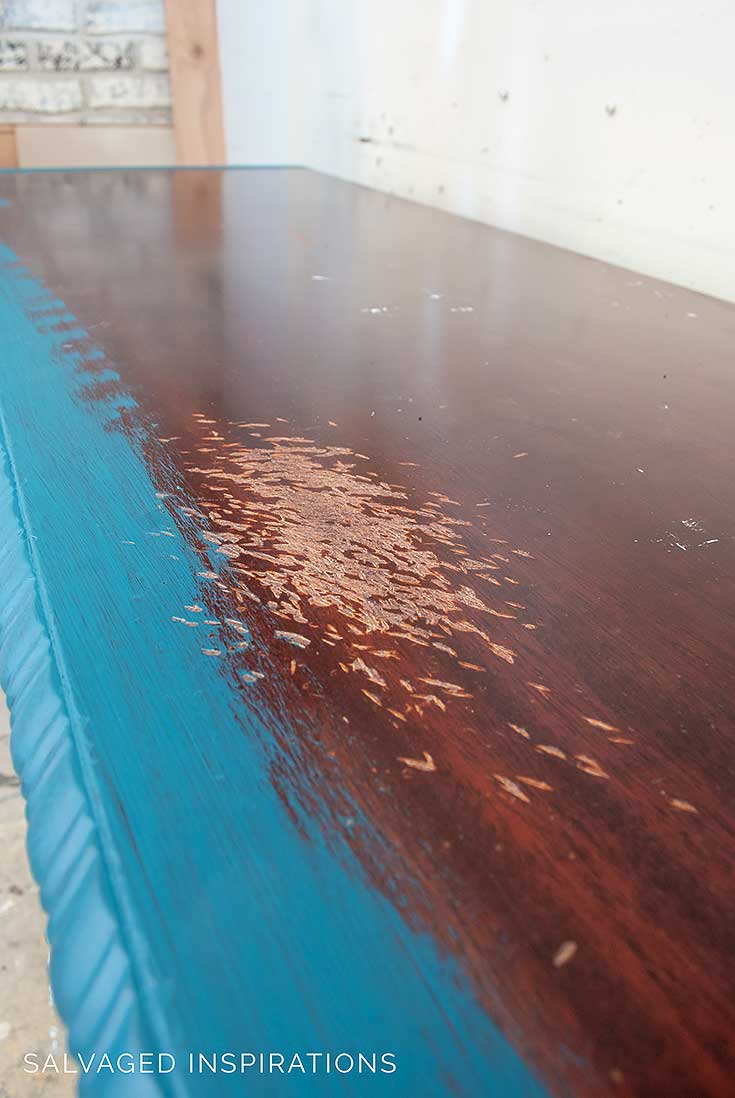
This way I don’t have to mask off anything with green tape and it gives me a PERFECT crisp edge. Once I use my orbital sander to remove the existing finish along with the overlapped paint, I end up with a crisp clean painted border and a stained top.
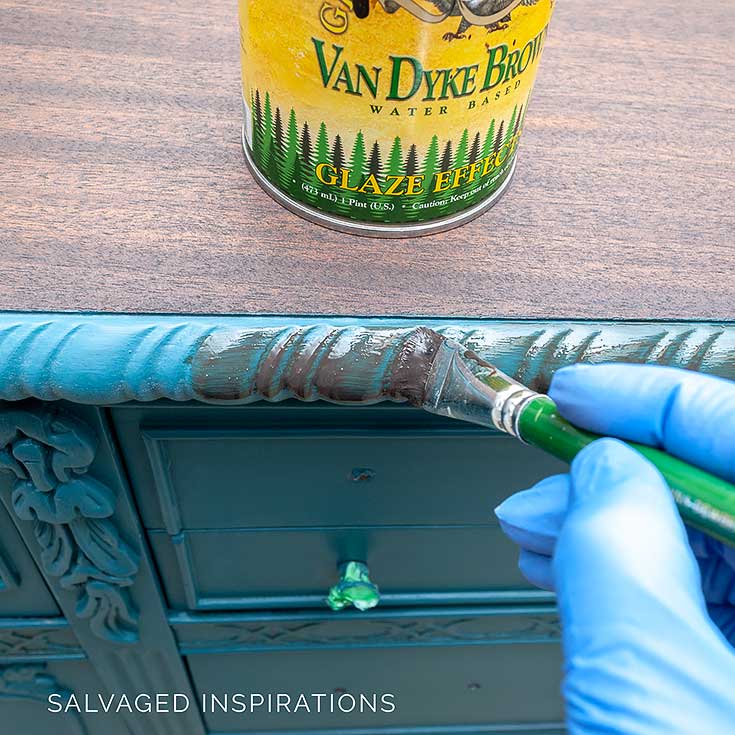
After the buffet had two coats of paint and the top was stained in Espresso, I used this GF VanDyke Brown Glaze Effect to highlight the details.
WHAT IS FURNITURE GLAZE?
Glaze is a translucent or semi-translucent liquid that can be applied to furniture, cabinets, and walls. It’s used to create various effects on the surface of wood, metal, or other materials commonly found on furniture. Glazing is typically applied after the furniture has been painted or stained, and it serves several purposes:
- Highlighting Details: Glaze is often applied to crevices, nooks and crannies, corners, and carved details and appliques on furniture. Once applied it settles into recessed areas, creating an aged or distressed look that highlights the piece’s texture.
- Antiquing and Aging: Furniture glaze can be used to give a piece an aged patina and antique look.
- Color Enhancement: Glazing can alter the color of the base coat. By choosing a glaze with a different color than the base, you can subtly change the overall hue of the piece. There are also metallic and pearl glazes that create glimmering looks.
- Depth and Dimension: Glaze can add depth and dimension to furniture surfaces. When applied with different tools or faux techniques, it can create the illusion of shadows and highlights, making the furniture seem more three-dimensional.
APPLYING GLAZE
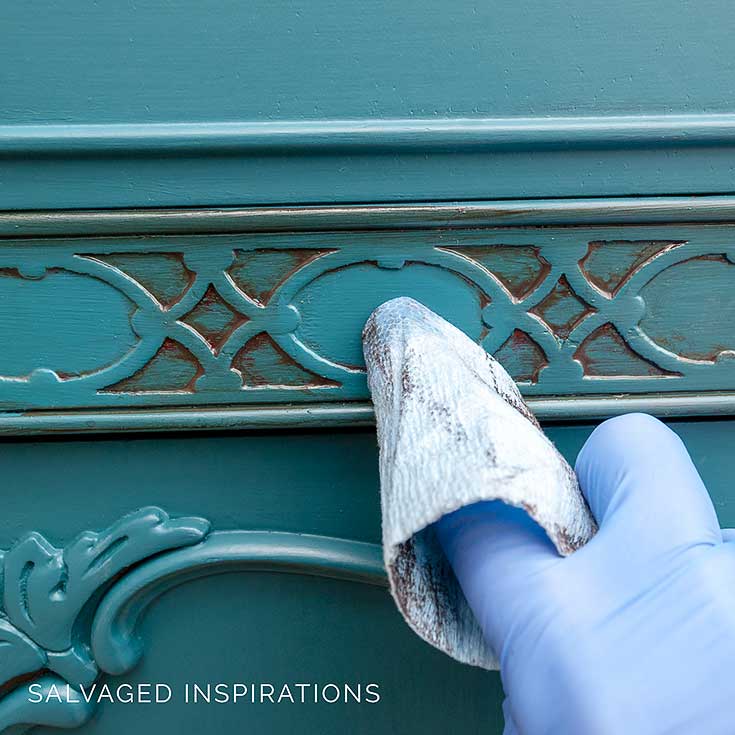
If you can paint, you can glaze! For detail work, I like to use an artist’s brush to get into all the nooks and crannies. Using an appropriately sized brush to apply the glaze ensures I don’t apply it to the surrounding areas that I want to stay ‘clean’.

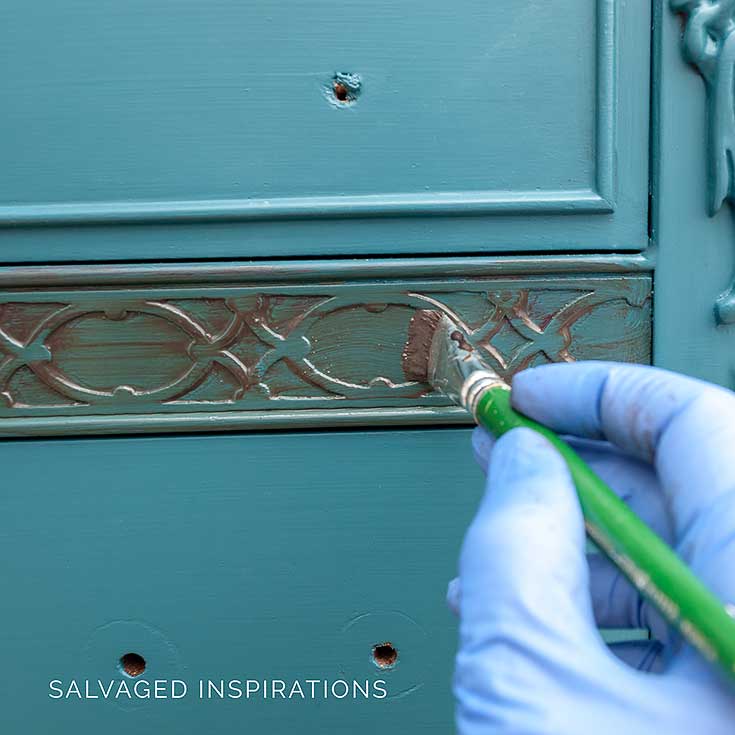
After I brush on the glaze, I use a shop towel to remove the excess. Here’s where the control part comes in.
For a subtle look, I wipe it right after I apply it and take off most of the glaze leaving a small amount in the detailed crevices. If I want a bolder look, I let the glaze set/dry for a few minutes and then wipe off a little leaving more product in the detailed crevices.
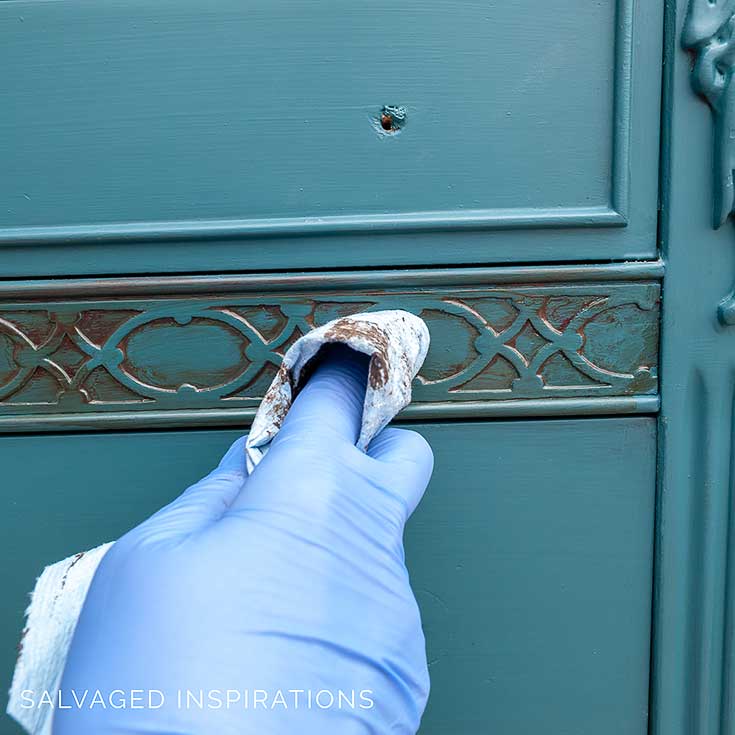
The best part is if I’m not happy with the look, I use a shop towel dipped in a little water to remove the glaze I don’t want. A damp cloth or wet shop towel will ERASE any glaze you might not want like in the pic below.
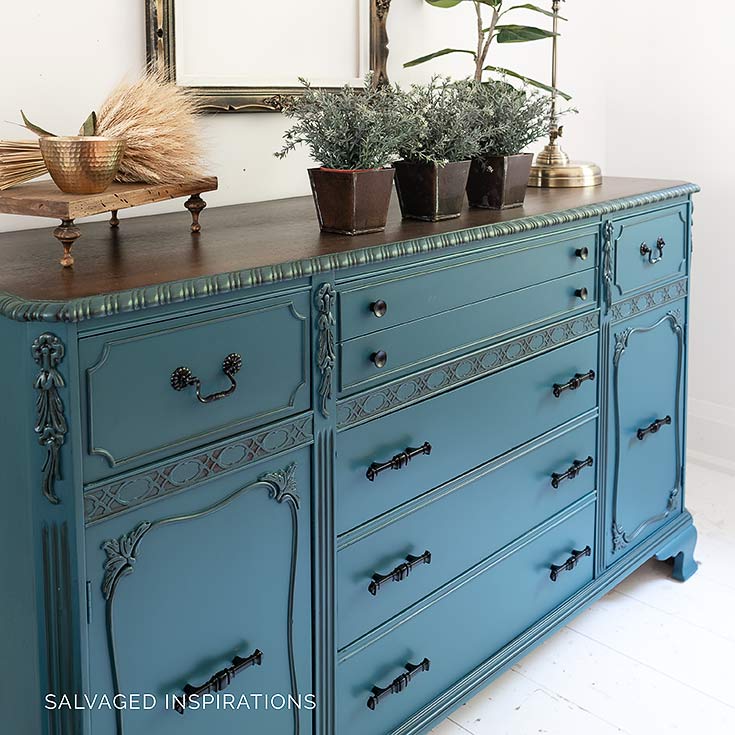
FINISHED LOOK
And here’s the finished look. What do you think … isn’t she stunning!?! Everything is original on this piece and the only products I used were paint, glaze, stain, and topcoat. Even the hardware is original.

The stained top against the Antebellum Blue is lovely.
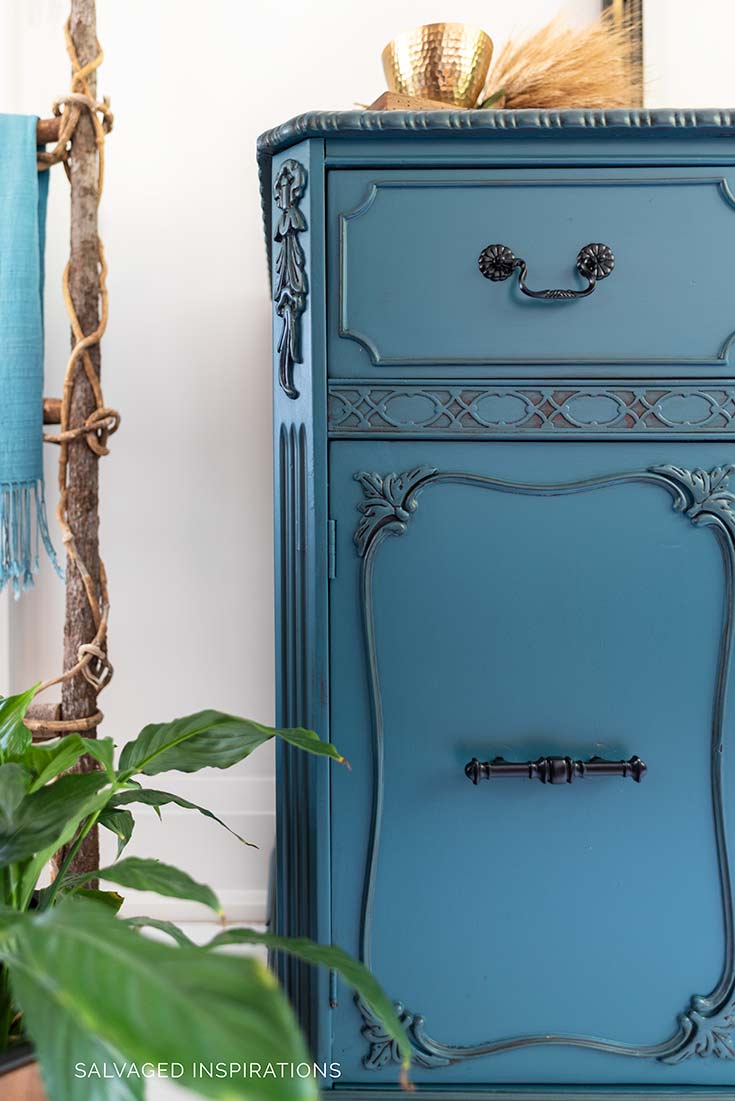
It’s such a rich looking piece with the glaze highlighting all those details!

7 GLAZING TIPS
- Mix the glazing product really well before using it.
- Use the right size brush for detail work. Larger brush for larger areas and smaller artists brush for smaller details areas.
- Test the glaze on a small area of your furniture before applying it. The same glaze can look VERY different over a variety of paint colors.
- Have a damp cloth or shop towel with water on hand to ‘erase’ any product you don’t want.
- Take control of the finished look by how long you leave the product on and how much you wipe off.
- Work in small managable areas so the glaze doesn’t have time to dry and remains ‘workable’.
- A glazed faux finish should be top-coated with wax or poly for additional protection.
I love this Antebellum Blue, stained top and glazed details. I can’t wait to hear what you think!
AND NOW FOR SOME FURNITURE FIXER-UPPER FUN!
You’re going to LOVE what my creative team of Furniture Fixer Upper ladies do. Visit the links underneath to see the amazing AFTERS and learn how they did it! I’m heading over to take a peek as well! x
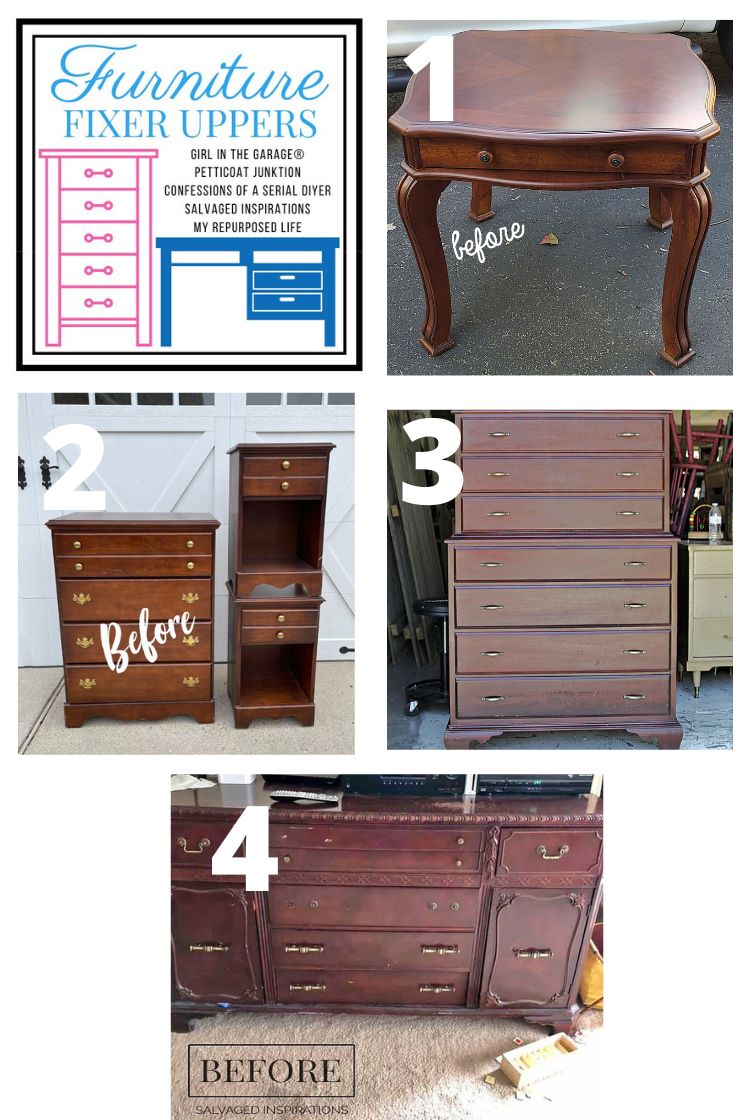
1. MY REPURPOSED LIFE
2. CONFESSIONS OF A SERIAL DIYER
3. PETTICOAT JUNKTION
4. SALVAGED INSPIRATIONS (HAPPY YOU’RE HERE!)
Here’s another look at this painted and glazed buffet before and after. I hope this makeover has inspired you and given you some new ideas on how to restyle your old furniture.
LET ME KNOW WHAT YOU THINK OF THIS GLAZED BUFFET … OR FEEL FREE TO ASK ANY QUESTIONS YOU MAY HAVE… I ALWAYS LOVE HEARING FROM YOU! 💕
Thanks for reading. 🙂
Wishing you a beautiful day filled with inspiration and Happy Painting friends!
Denise XO
RELATED POSTS
DIY Furniture Glaze – It’s So Easy!
How To Feather Glaze – French Country Bird Desk
The Glazed Deilcraft Occasional Table
Road Rescued Desk w GF Van Dyke Brown Glaze
How to Glaze Furniture – Console Table Makeover
PIN AND SHARE!


That’s a great solid piece of furniture, nice touch with the glaze. Wondering if you can add any paint color to a clear glaze to create custom glazes?
Yes! I used to LOVE making my own paint glazes. Unfortunately, I stopped because I was finding it more and more challenging to find clear glaze.🫤 If you know of a good brand or place to buy, I’d love to hear where you source yours Tracy! 🙂
I got my Valspar clear glaze at Lowe’s (USA) years ago, seems they still have it. Also, Saman clear glaze at Rona here in Qc, which I think is Lowe’s Canada, but they’re undergoing a corporate buy-out, so who knows if still available. You may wish to check your Lowe’s.
It’s still Rona here as well but I believe Lowes did buy them out. I’ll check Rona! thank YOU!!
What a beautiful piece of furniture. Highlighting those details took it over the top!
Thanks so much my friend! Enjoy your weekend! XOXO
Beautiful transformation!
Thanks so much my friend!🤗
This is really beautiful. You have done an excellent job, Lady!
Thank you so much Marietta!🤗
This buffet is beautiful Denise. It has inspired me to give glazing a try! TY
Oh I’m so glad and thank YOUUU!🤗
I hope your recovery is going well Denise, and that any symptoms that prompted the op will be alleviated, Stunning design and finish on this piece, and very inspirational. Thank you. I’m currently painting an Edwardian dresser in Peacock blue but want to tone it down with possibly a black glaze (as there are other bits which are silver/pewter). My question is, I already have a Polyvine scumble acrylic glazing medium – can I tint it with some Caviar to make my own? Or will the acrylic be a problem?
I used to mix my own glazes (with chalk/mineral paints) all the time so it shouldn’t be a problem at all. Your Edwardian dresser in Peacock Blue sounds gorgeous!! And thanks so much for the well wishes Laura!💕
Lovely! Hi do you have a section on how to make your own glazes? I have that paint, and I was wondering if you can mix a mineral paint with a chalk paint? What happens when you mix?
Hi Kyra. Yes, you can mix chalk+mineral paint as they are both waterbased paints. You can also create your own glaze. If you purchase a clear glaze, you can add in a little paint to tint it into a custom color.
This piece is stunning, Denise! I must have missed it on the first go. I love the tip about painting over the top edge before sanding! Heal quickly, my friend! XOXO
Thank you!💜 I’m feeling better and better every day! XOXO
This is so very lovely. I really appreciate you sharing tips on the glazing and waiting to sand top until after painting.
I’m thinking glazing might be a better fit for me than waxing or dry brushing the embellishments on furniture. I just started this as a hobby last August so always grateful for tips on how to improve my work. I enjoy this so much and really appreciate you and the others who share with us on Tuesdays and Thursdays.
I’m so happy you’ve found the tips helpful and like the buffet! And thanks for leaving a comment(s). I hope you know how much my furniture painting friends and I appreciate the feedback and input!💕🤗
Denise
I sure hope I can remember my 2 favorite takeaways from you stunning furniture project.
1) Sanding the top after painting, brilliant!
2) Using an artist’brush for glazing details. Why haven’t I done that?
Beautiful makeover, Pinned!
gail
Yay!! Thanks so much for the PIN Gail!💕
Hi Denise! I hope your recovery goes well I just recovered from a hip replacement and now I need the other one done. I learn so much from your blog. First of all I have never seen this piece so it’s new to me. I love the finished look. It’s beautiful. I am so excited that I have now learned to paint a little it the top before sanding it to get a crisp edge. Thank you!! I don’t find many pieces that have detail to glaze but if I ever do now I know how to glaze. Thank you!!
Oh wow, a hip replacement!… I’m so happy to hear you’ve recovered Cheryl!!! I’m feeling better each day and can’t wait to start lifting and painting again as well.🤗
That is absolutely gorgeous, Denise! Truly stunning! And that sanding the top tip is so good to know! Thank you for sharing! xo
thanks so much Karen! 🙂
Hi just found you website, I love it! Quick question, what do you use for a clear coat after you paint and glaze? I know some turn an amber color I’ve been told. I want to do a dresser and a buffet but also want a decent protective layer since an aquarium will be on one and the other is used in the kitchen. Thanks!
Hi Rachel and WELCOME! Oil-based topcoats amber quite a bit. Water-based is better but can still darken slightly over the years. Here’s what I’ve been using for super high traffic pieces. I recently salvaged a bathroom vanity and used the Gator Hide for that as well. It’s not only water-resistant, its water repellent! And I haven’t noticed any yellowing and I’ve used it on numerous pieces.
Thank you! I was looking at the gator hide, I think I will try it.
If you give it a try, let me know what you think and how it all turns out for you. 🙂
I have a dresser that I need to paint and I think Antellum Blue is the color I want to go with. Only my dresser is not ornate like yours. I’m wondering if I can Glaze around the edges ?
Thanks, Maggie
Hi Maggie! For sure! Glaze can be used on flat surfaces and manipulated with a brush, rag, sea sponge etc. You can get some really nice effects.
Just found your site and so glad I did! This piece is beautiful and I am looking forward to viewing the rest.
Hi Susan and WELCOME! So glad you found the #siblog and thanks so much! 🙂
I love that blue! I have a hutch I would like to do for my kitchen! My walls are light green! Any suggestions on a color I could use for the hutch. ?
Awesome idea over painting the edge! I’m going to have to try that one 👍 Thanks Denise 🙂
It works like a charm! 😉
Oh so beautiful! I love this technique! I have never tried it before but you have inspired me! I have an old dining hutch dying to be renewed. I’m thinking in a sage green to pop some color into my grey and white farmhouse decor.. Thank you for making it look easy enough for me to try it!
I love sage green! Have fun with your dining hutch. Sounds amazing. 🙂
Thank you so much for sharing your project and knowledge! I absolutely love this piece and I plan to try it soon. Two questions, the color seems so much brighter in some pictures is that because it had not dried.? I know you said you did not stain or glaze the entire piece. Second, I always brush the poly on and would love to see how you sprayed the finish on. Thanks so much!
Hi Faye! The color in the pics is two-fold. Some were taken in my studio while the paint was drying and others were taken upstairs in my ‘staging room’ aka dining room. I shoot with all-natural light so when the clouds stroll through and cover my sunlight, it creates some variances in my pics. So glad you like it and this has inspired you to try it on a piece of your own! I’d love to hear how it works out for you. 🙂
Thanks so much!
Beautifully done! Love the color and the details of the piece. Thank you for the excellent tips and how to’s. You took an ordinary piece of furniture and gave it a major upgrade with pizzaz! DIY people rule!!!
Aw, thanks, Gail! And so glad you find the tips helpful. XO
Wow! Gorgeous!!!
Thanks Norma! 🙂
Such a beautiful paint color and your glaze application is perfection, Denise! if only she could see her media cabinet now. LOL
Ya, I would love for her to see it now! Reloved and ready for another 3 kids…lol. 😉
You are so generous to share such a detailed description of your work so all of us newbies out here csan learn from you! This is just stunning! It is so wonderful to give new life instead of discarding!
Aw, thanks, Susan. I’m so happy you’re enjoying the tutorials! XO
What a BEAUTIFUL transformation as always. I just adore your work. I am so grateful that you share such amazing pieces with such detailed ho-to informative posts. !!!
Great tip about overlapping. 😃. Two questions… how do you determine whether to use brown or black glaze ? I Did you not 1st topcoat the areas you glazed first because they were small areas ?
Thanks again for sharing your incredible talent !!!
Thanks, Maria!! 🙂 I tested black on this piece but it looked a little harsh so I went with the brown. Testing in an inconspicuous area (on this piece it was the left backside of the rope detailing) before applying is what I do if I’m stumped. And no, I didn’t topcoat first but you definitely can! Top coating gives more slide and control when applying the glaze. You can get an even more subtle look with the extra step. Both ways work really well imo. 🙂
Was the satin poly coat the dixie bell? You sprayed it on? and do you typically put a top coat over the dixie bell paint on all pieces or does it depend on the piece?
Hi Melissa! Yes, the satin poly is from Dixie Belle. DB paints don’t require a topcoat. But because I sell all my furniture (and I don’t know how high traffic they may be) I ALWAYS topcoat. I usually do the tops in a poly and then the body in poly or wax…depending on the piece. There have been a few pieces I’ve painted for my own home that haven’t top coated and they are still holding up perfectly. Hope this helps. 🙂
You are so talented your furniture pieces amaze me. I’m getting closer to giving this a try.
Thanks and I hope you do give it a try Sher… it’s so much fun. And if you have any questions, feel free to reach out. 🙂
i absolutely LOVE this piece and recently purchased two pieces that i can definitely use your technique of glazing on! THANKS!
Thank you Gwen! And have fun with your two pieces. I’d love to hear how they turn out with the glazing!
Hi Denise, i’m still in the dreaming stage. With temps in the negatives i can’t seem to get going on much other than the necessities! I know i could just pin your post but I’m keeping the tab up on my computer because I enjoy looking at it so much!
Hi Gwen and thanks so much! It’s getting a lot cooler with the Fall temps here too. Today’s a rain day today… not pretty out there.
Gorgeous piece as all of your work is. Do you use cloth or paper shop towels>
Hi Mary… and thanks! 🙂 I’m kind of addicted to my blue shop towels. I used to use cloths (old rags) but then I goofed up with non-lint-free ones one too many times and have just stuck with my shop towels. So much easier and I never have to think or worry about it. lol
Wow Denise! What a wonderful transformation. Great tips on using glaze and I never would have known to paint over the edge before sanding the top. Brilliant. I’m in love with this dresser and the rich blue paired with the stained top. Simply gorgeous:)
Thanks so much, Monique! And I’m glad the edge painting is helpful too! XOXO
This is a beautiful makeover and I LOVE this blue! ~ Nicki
Thank you Nicki! XOXO
Thanks Denise! I especially liked your tip about how to finish the sides and top and getting a crisp line. Ah, the struggles I’ve had!
Hi Kathleen! I had my fair share of struggles too and the painters tape wasn’t doing the best job. I’m SO GLAD you find this helpful!
Denise, she is beautiful.
Thanks my friend. xo
Absolutely Beautiful!!!! Denise- you do SUCH great work! Thank you for the indepth instructions, too.
My pleasure Tess and you always put a big smile on my face… thank you!
Thank you for this. I love the tips listed 1-5 towards the end of your post. Helps recap in into my head!
Hi Liz!! The recap helps me too. 😉
Love DB’s new blue. It is so rich and timeless. Wonderful! Love your detailing with the glaze, too. You have such amazing vision for furniture. It’s always such a treat to read a post. Pinning….of course. XO
Thanks, my friend. And thanks so much for the share! XOXO
This cabinet is just beautiful. Blue always is a star as far as I am concerned. Keep up the inspiring work.
Blue is always a winner, isn’t it?! Thanks so much, Barabra. 🙂
In addition to seeing the techniques you use to make well loved furniture new again, I love how you use accessories to add even more personality to your final display.
Thank you for the inspiration to try something new.
Rita
Aw, thanks Rita! The ‘vision’ for the furniture comes waaaay easier to me than the accessories part. It took me a good 2 hours to figure out how to style this piece. But I guess I can’t complain because it used to take me a full day or two. So this means a lot Rita.. thank you!
Wow Denise what a beautiful transformation. I love the ip on the top! Genius!!
It looks like no glaze was added to the fronts of the drawers. Would you use a larger brush to shade some glaze onto the Drawer fronts.
Just a stunning piece,
Thanks.
Hi Nancy!! 🙂 I only added glaze to the rim/framing details on the drawers, but you’re right, no shading was added. That would have looked amazing too tho!
Hi! This color is gorgeous and love the glaze look on the details! Beautiful,as always🥰
Thanks so much, Madelyn! XO
This looks amazing. I just purchased some Antebellum Blue last week and can’t wait to use it on my project. Seeing your finished piece, the color is prettier than I thought. Did you topcoat after applying the glaze?
I really enjoyed your tutorials. Thanks for sharing your knowledge.
thanks Nadine… and you’re going to love working with the Antebellum. It’s so pretty! And yes. I did topcoat with a satin poly. Three coats were sprayed on the entire buffet. 🙂
What a beautiful color and the glazing is perfect! Stunning as always. 🙂
Thanks Do! And I can’t see what BIG changes are in the making! 🙂
Absolutely love it! What an amazing transformation! I wonder what people would think if they saw their worn, dated and dark furniture completely made over into something gorgeous like that. I bet they would think – oh I wish I could have it back now!! Rachele x
Thanks Rachele! There have been times where the people I’ve purchased from have asked me to email them a finished pic. I even had one lady BUY BACK this re-finished desk which was such a HUGE compliment.
Love glazing & how it brings out any details. Great tip about painting over lip of top then sanding it off but how do you prevent top stain from getting on painted part around the edges when you’re staining? Does the water based stain just wipe off the paint? I always do any oil based staining on top first to avoid getting any on the already painted parts, as that doesn’t wipe off. Beautiful piece.
On this piece, the top is slightly raised over the rope braided border so it was easy to apply the gel stain with a shop towel and have it stay put where it should be. If I were using a more fluid stain, I would probably mask off because yes, if you get it on the paint, it won’t wipe off 100%. I think water-based stains wipe off better than oil-based, but if you don’t catch it right away it will leave a trace for sure.
Oh my goodness that is beautiful! I especially liked the tip about not masking off the top, because let’s face it, I am too lazy to use tape! Sanding off worked great. Love this piece!
Thanks, Patrica! XOXO And I’m too lazy also. And quite honestly, I always ended up with some bleedthrough and it never looked pristine anyway. I find this waaaay faster and waaaay more precise.
I really like this dresser and how you detailed it. Thank you for taking the time to outline your steps, it helps me greatly!
Oh, I’m so glad you find the steps helpful Kira! Thank YOU.