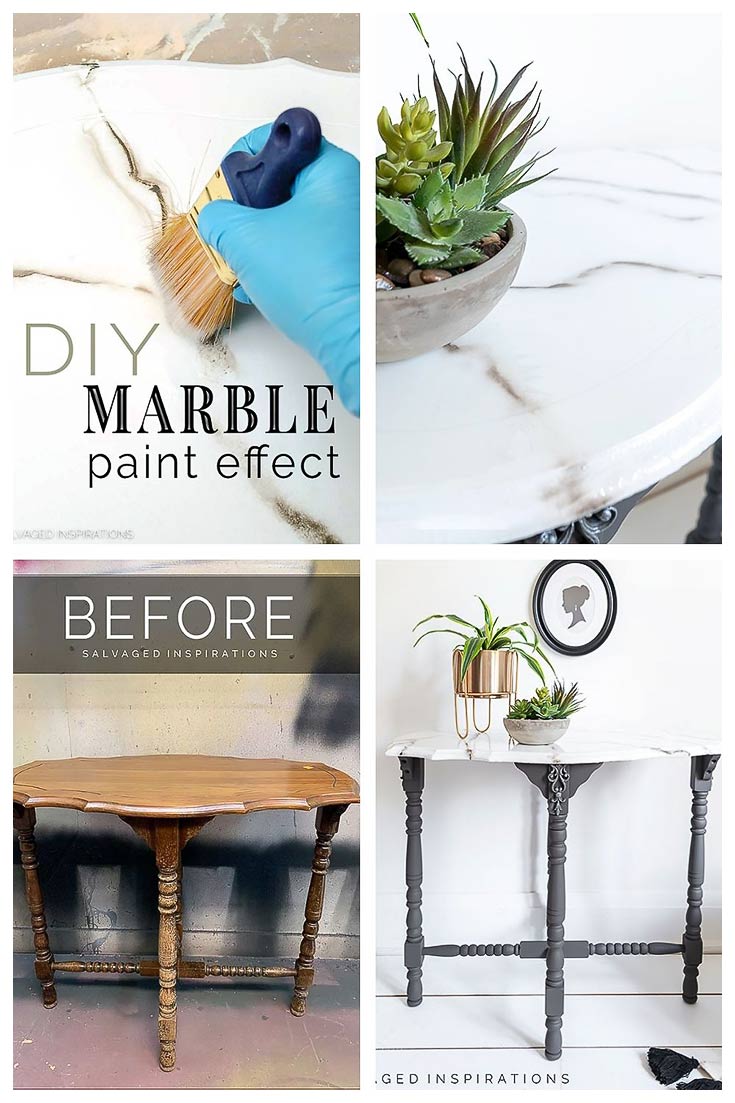
MAKE ANY PIECE OF FURNITURE LOOK HIGH END WITH A DIY MARBLE PAINT EFFECT | RESTORE TABLE MAKEOVER
 Hi sweet SI family! I’m excited to be sharing this DIY Marble Paint Effect even though this entryway table didn’t turn out as I would have liked. On the upside, sometimes with a ‘project-gone-wrong’, I learn the very most. And I have to admit, I’m still REALLY impressed with this painting technique and finish so I can’t wait to hear what you think!
Today is also one of my favorite days of the month. I’m joining my Trash To Treasure Crew! I’ll be sharing links to their before and after tutorials at the bottom of today’s post.
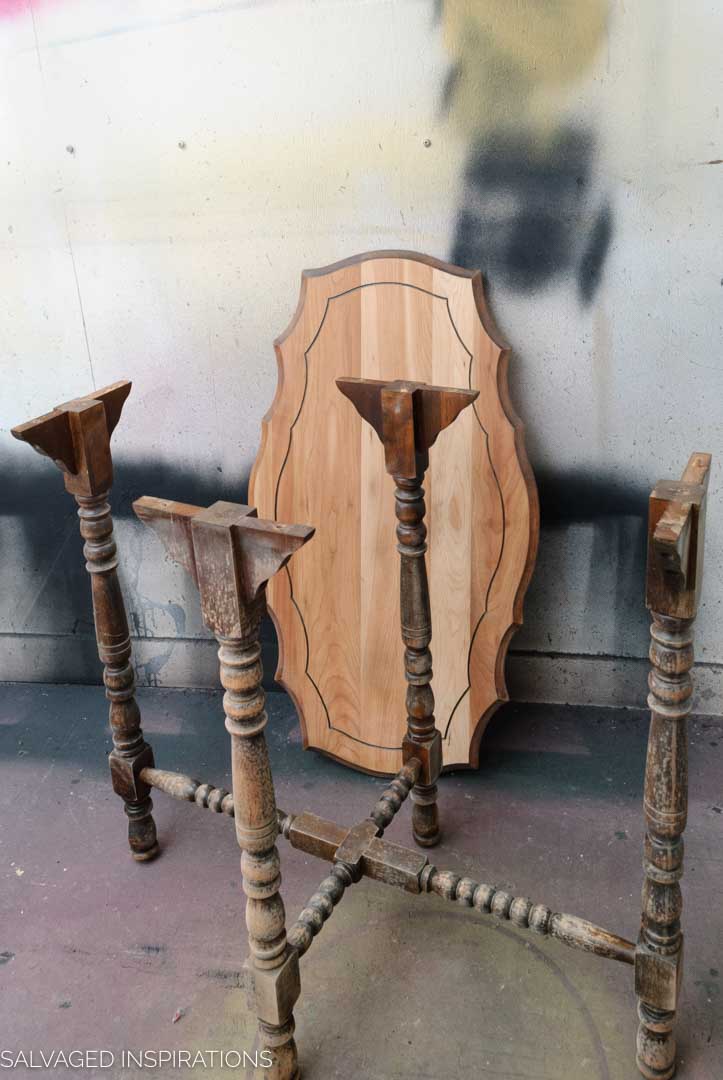
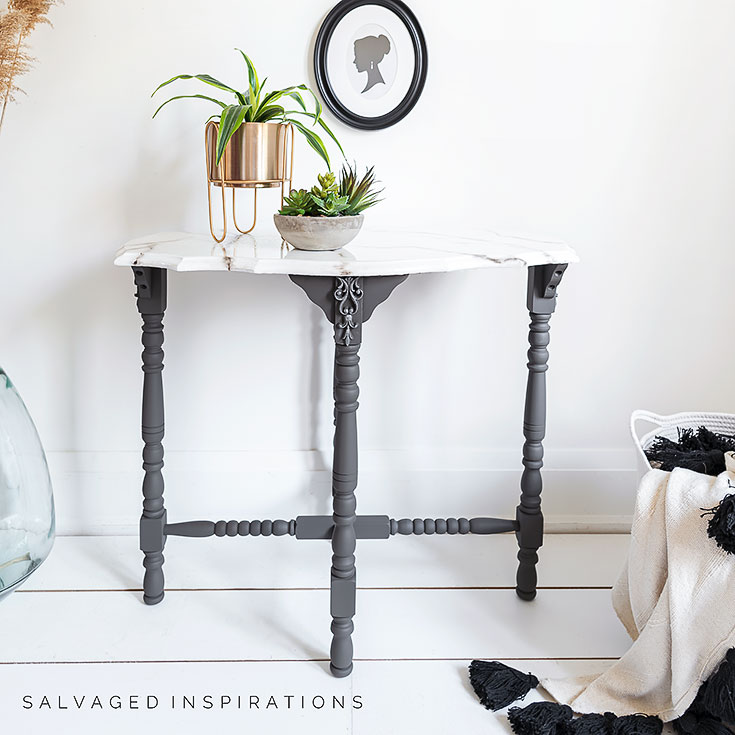
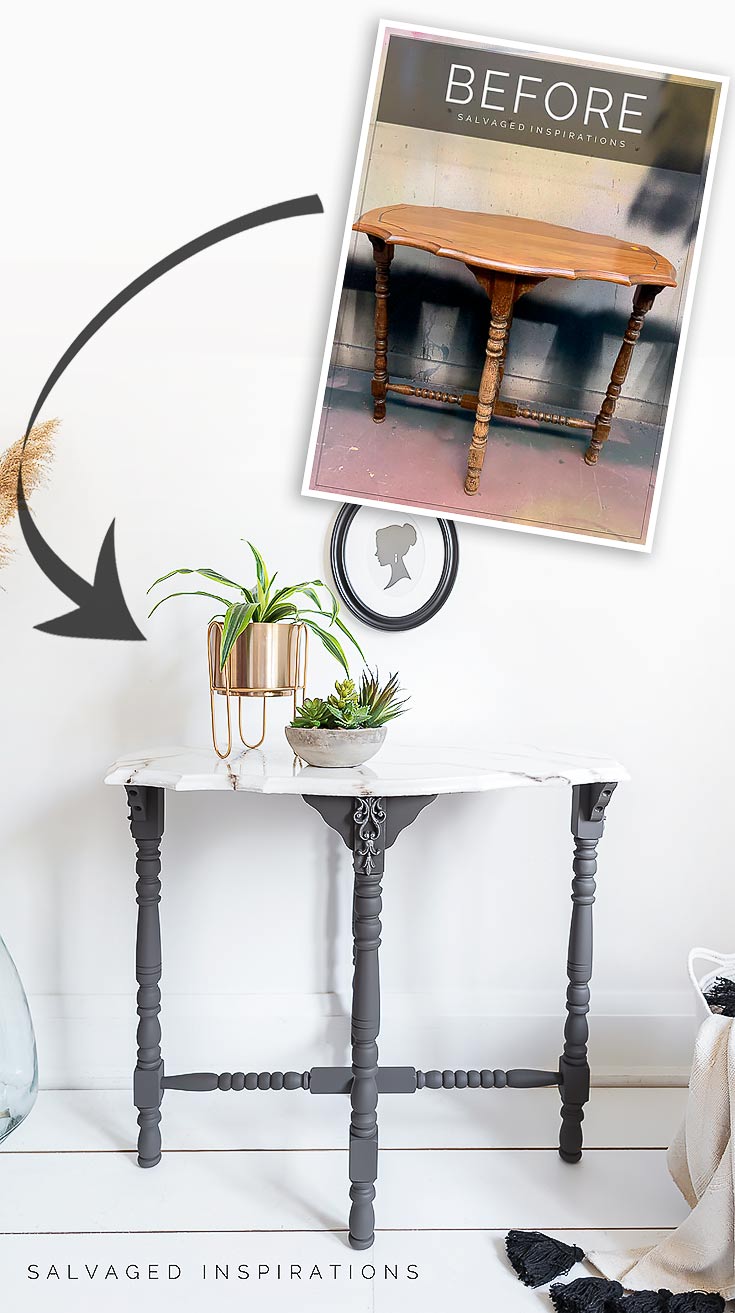
So here’s the before. I bought this entryway table at the ReStore for $45. It’s not the best price that I’ve ever come across but I really liked the shape.

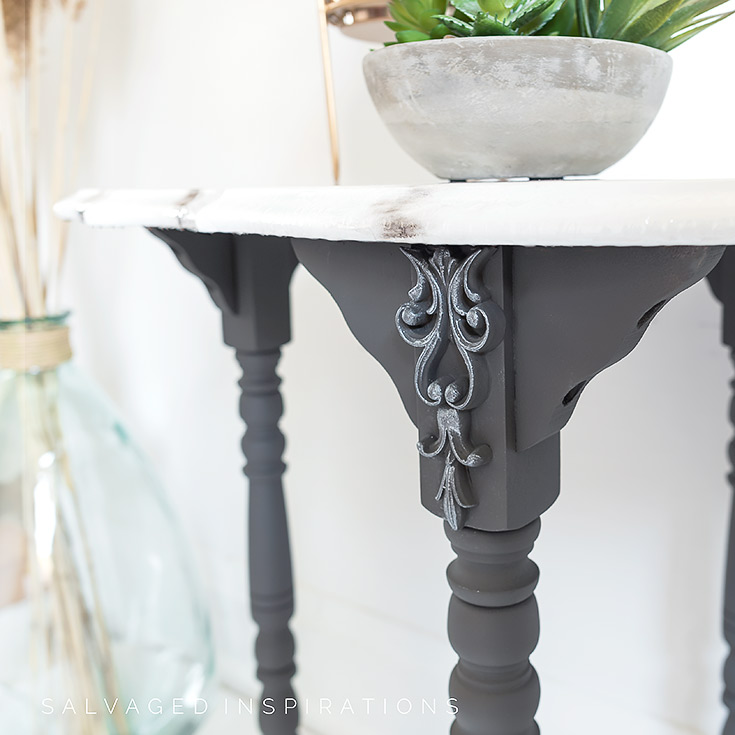
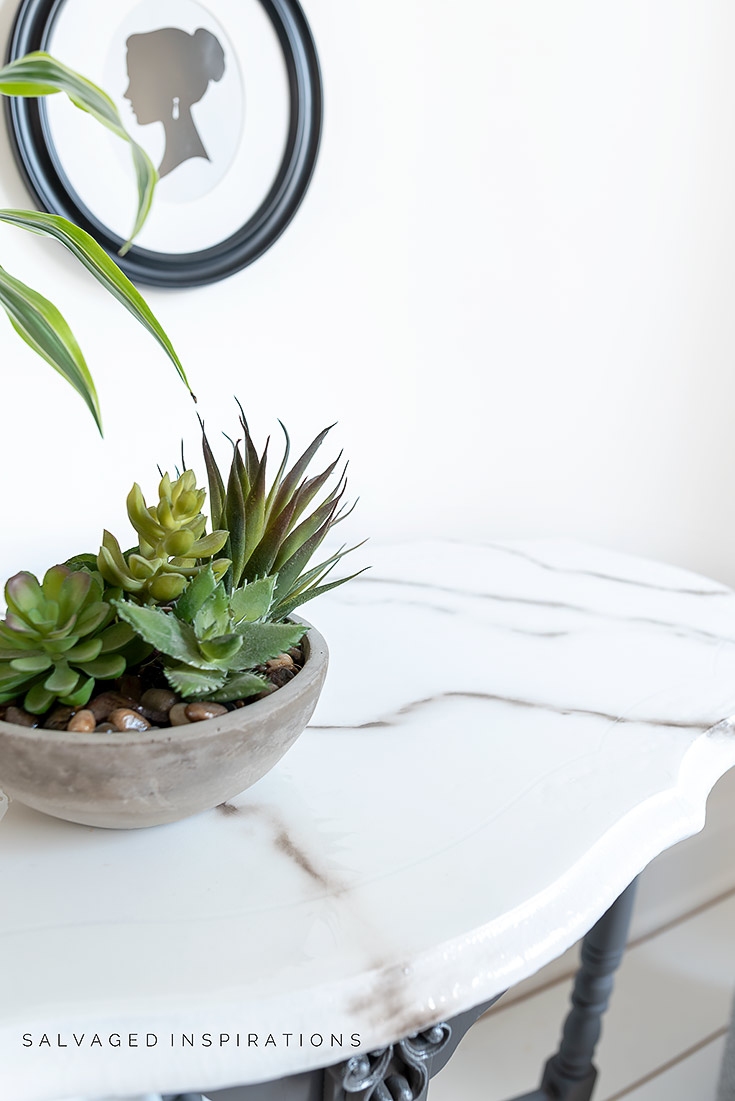
Here’s the after with the DIY Marble Top. What do you think?
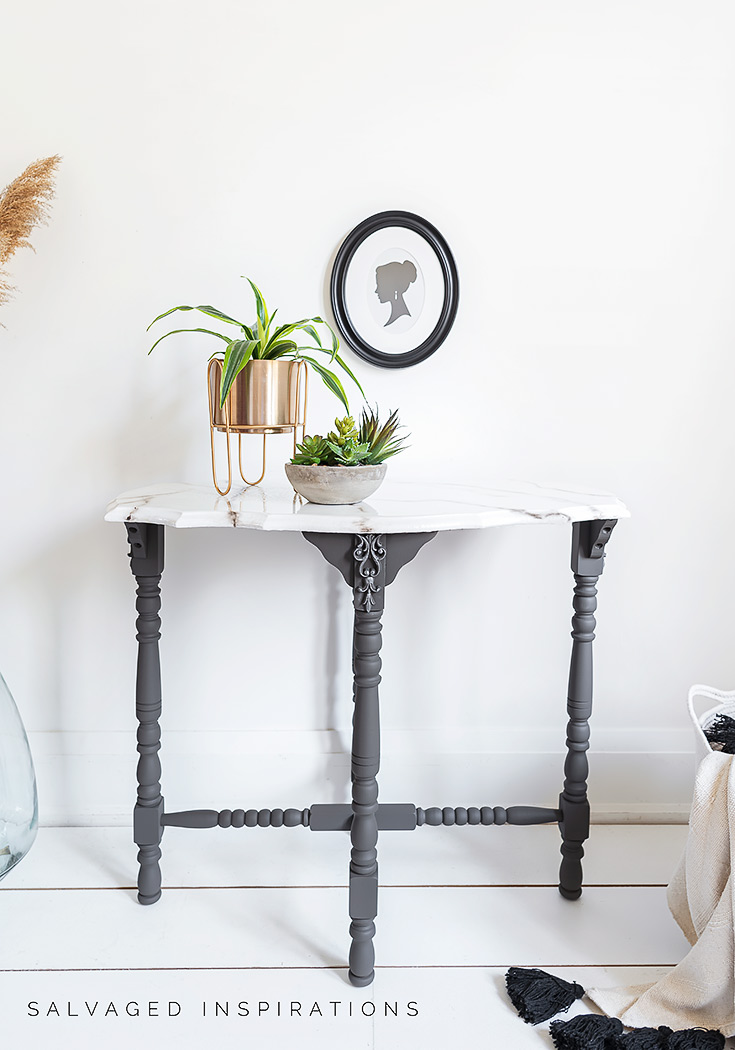
It looks pretty realistic, doesn’t it!? Unfortunately, I can’t sell it though. Stay with me and you’ll see why. 🙁
THIS POST IS SPONSORED/CONTAINS AFFILIATE LINKS TO PRODUCTS I USE. YOU CAN SEE MY FULL DISCLOSURE HERE.
SOURCE LIST
-
- Entryway Table – SALVAGED
- Mini Angle Paint Brush
- Artists Brushes
- Casting Resin | Epoxy Resin
- Sandpaper | Shop Towels
- Titebond Glue
- BIN Shellac Primer
- Water Misting Spray Bottle
- Pearl White Texture Paste
- Gravel Road
- Cotton White
- WoodUbend Applique
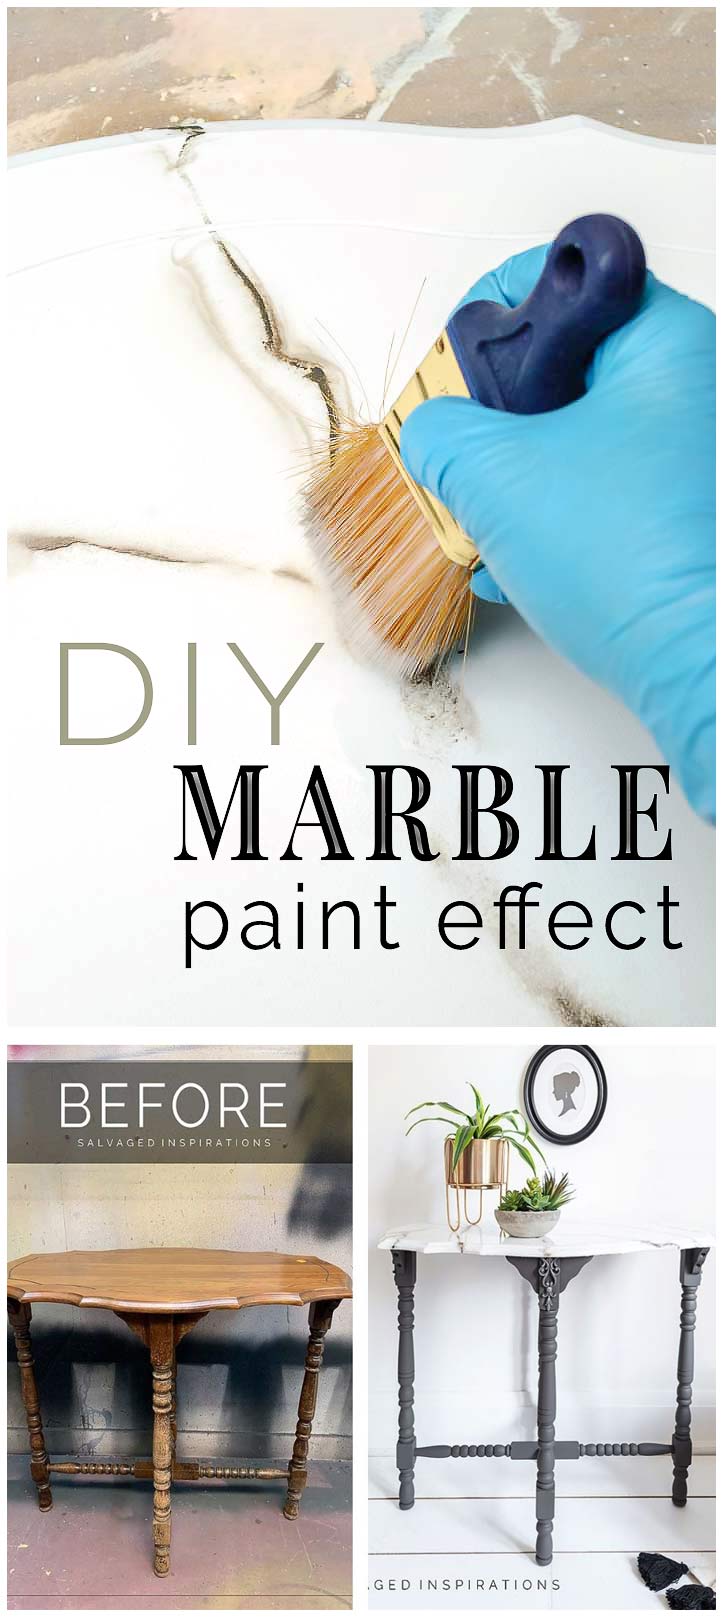
HOW TO PAINT FAUX MARBLE
I started by giving this table a good cleaning with this White Lightning. After the table was cleaned and dry, the top was sanded with my orbital sander using an 80 grit and the legs and lip with a medium grit sanding sponge.

To make it easier to work on the legs and marble top separately, I unscrewed the legs from the top.
To add extra detail, these Wood Appliques were glued on. I choose WoodUbend because these appliques are super versatile. They can be heated and molded onto ANY shape or surface. I also like cutting them into smaller appliques to fit my projects. I applied the WoodUbend and used this Pearl White Textured Paste to add a little shimmer.

It really adds a nice detail to the piece.
After the WoodUbend dried, I primed with two coats of BIN Shellac Based Primer and Sealer using a roller to apply. If you’re looking a primer to stop bleedthrough, I have a full tutorial here.
The base/legs were sprayed in two coats of this Gravel Road.
Now for some fun… the marble paint effect!
I rolled two coats of my favorite crisp Cotton White with a foam roller.
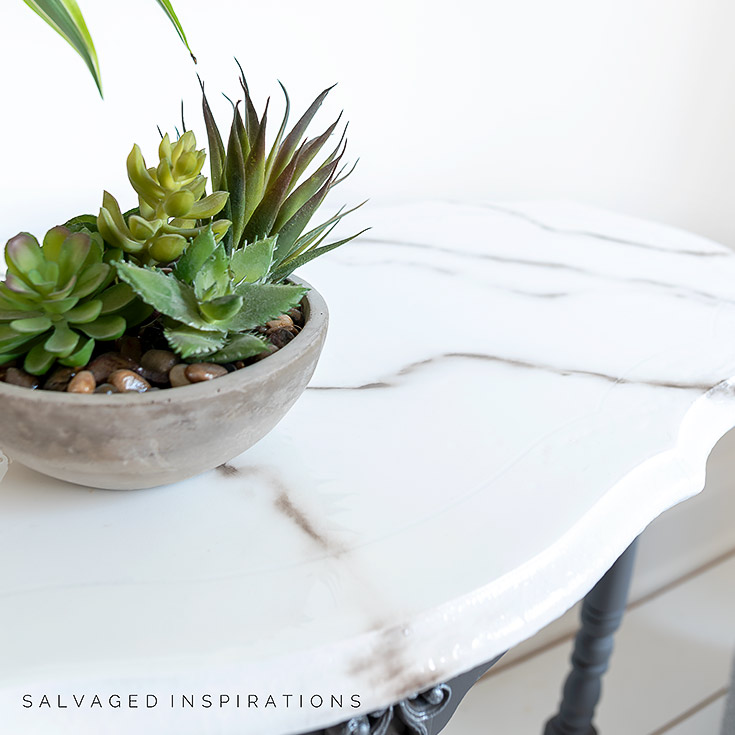
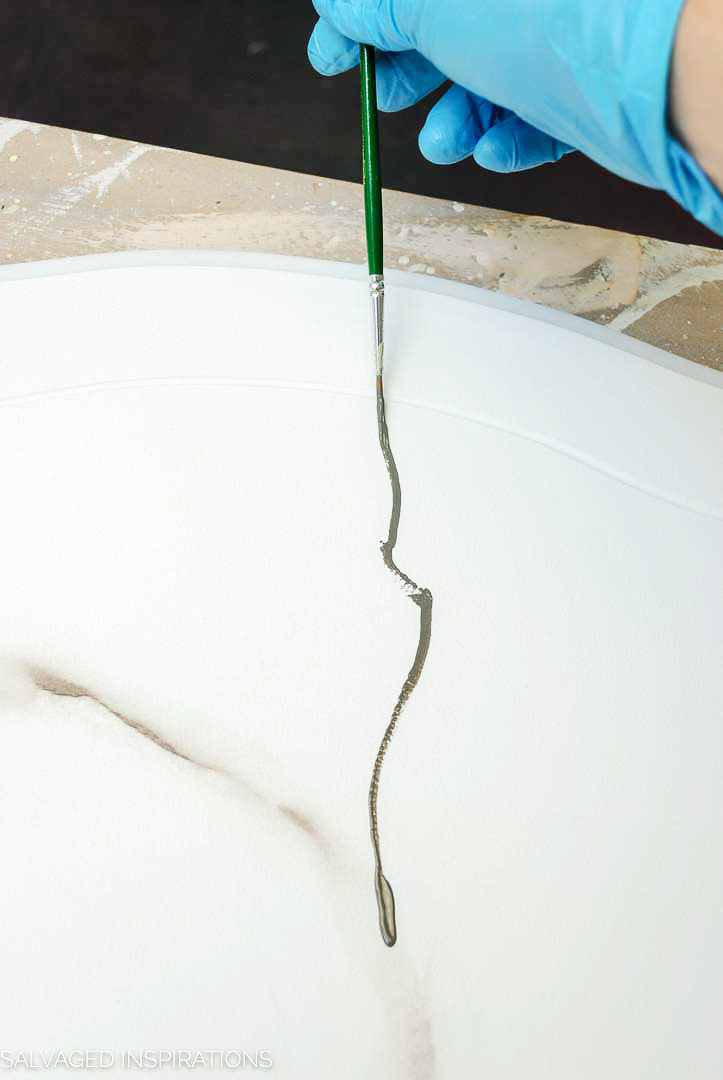
To create the marble veins, I was a little nervous because I’ve never tried this before — but it was surprisingly easy! It’s also a forgiving technique because the few times I didn’t like what I did, I just wiped off the paint with water and a shop towel.
I dipped an artist’s brush into the Gravel Road, and on the diagonal, I created jagged random lines like the one below.
Then with my water mister, I misted the freshly painted vein letting the water spread the paint a little.
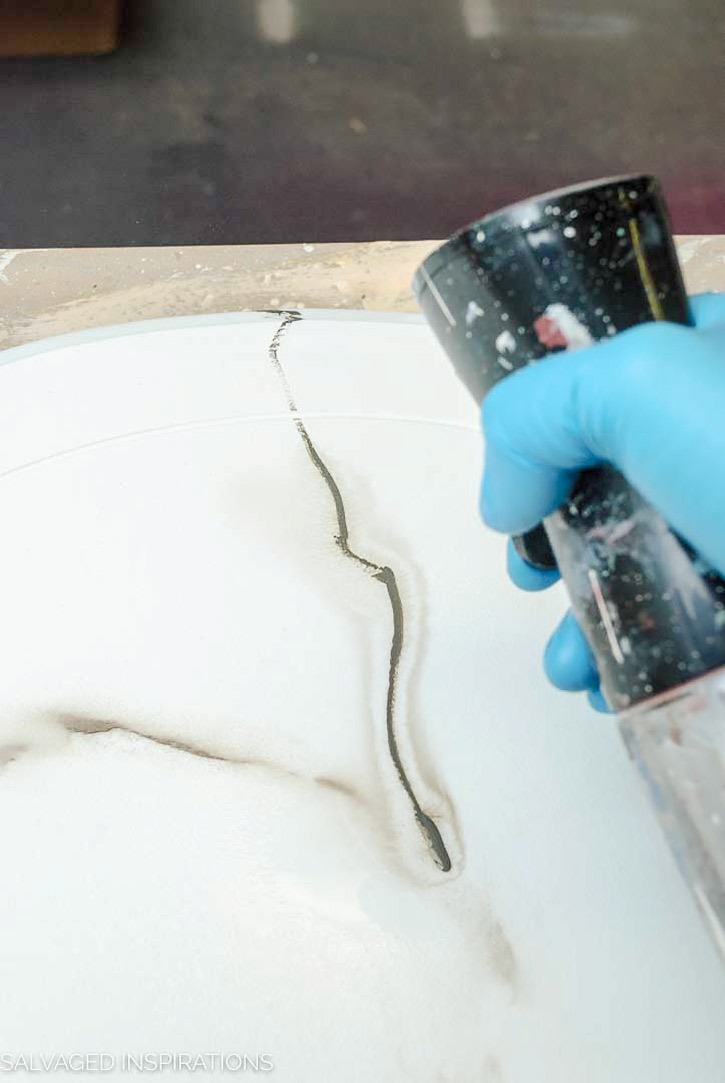
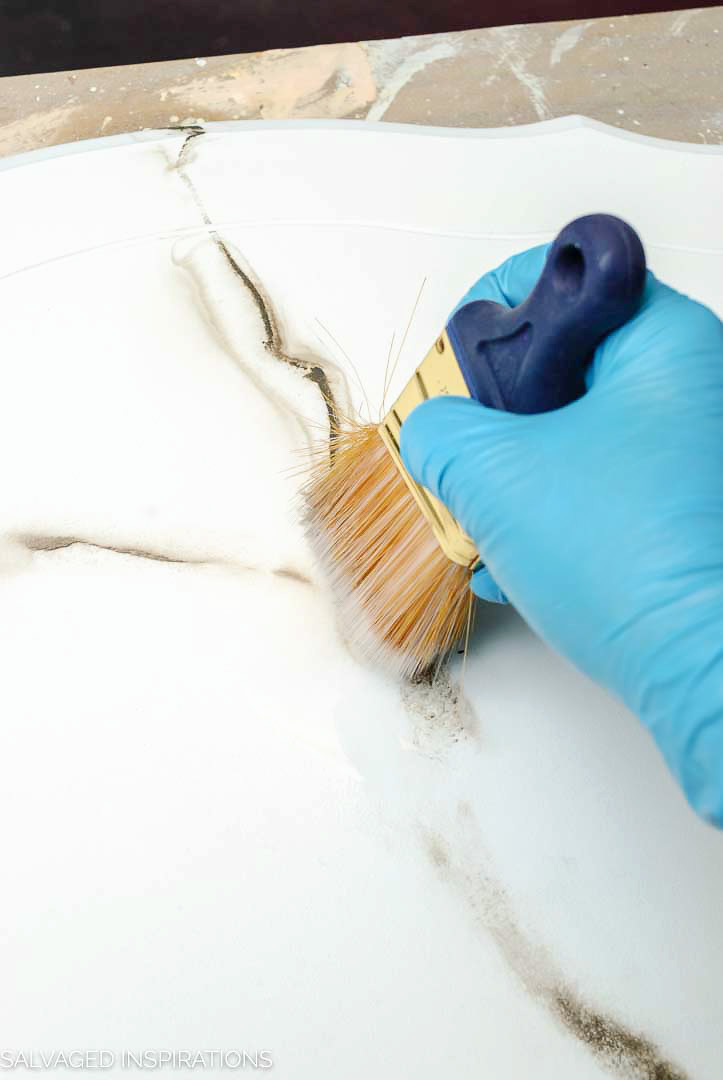
Once the water did its thing, I came back in with my brush and gently dabbed and stippled with the tips of my brush. I also soften the look in some areas by blending the paint out a little.
Tip ~ If you’re unsure of where to paint your faux marble lines, I found it helpful to look online at different marble patterns. Then I had a template on what sort of pattern to use.
Up until this point, I couldn’t have been more pleased. My marble effect was looking really good and coming along nicely. But it all went wrong when I tried top coating with a casting resin.
I mixed equal parts of the resin in a plastic container. Mixed well for about 2-3 minutes and then poured.

It was looking great but then for some unknown reason (and if any of you have some insight or experience working with this stuff – I’d LOVE some advice please!), it looked like it was being repelled in some areas.
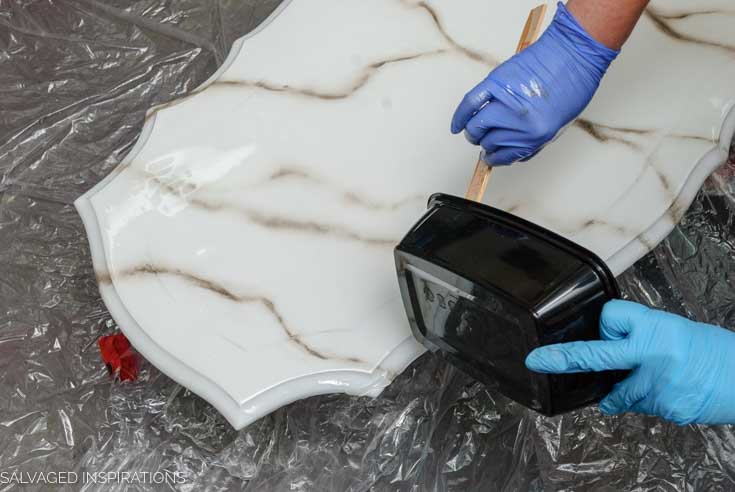
I worked at smoothing out the resing pour with a large paint stick. I used a heat gun to get out the bubbles and move the product around but nothing helped.
My studio doesn’t always have the best lighting for images when I’m working at night but hopefully, you can see where it’s starting to resist? And then it spread …like a fungus.
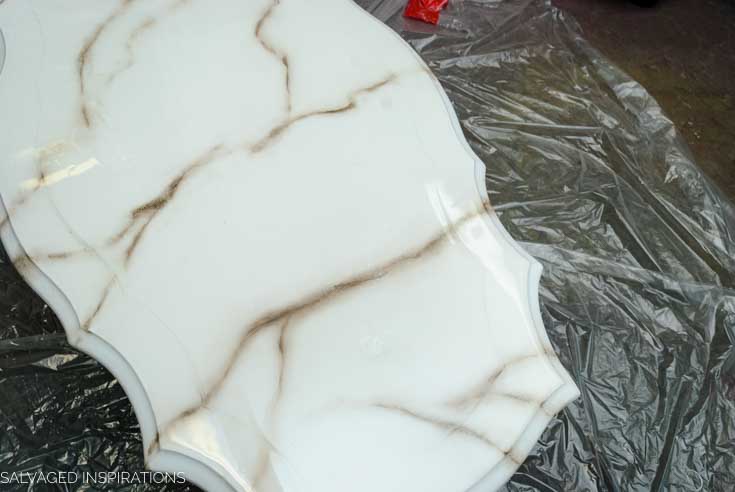
You can see it on the finished piece. Half of this table is smooth as glass, the other half is all rippled and weird.

It’s a real shame because it would have been gorgeous. But on a positive note, I learned a lot and will be trying this marble finish again!
And now for some TRASH TO TREASURE FUN!
I know you’re going to LOVE what this talented team of ladies share. They never cease to surprise me with their creativity! Below are their BEFORE photos. Visit the links underneath to see the amazing AFTERS and to learn how they did it. I’m heading over to take a peek right now myself! x

1. Painted Holiday Crates – Girl In The Garage
2. Painted Pine Hutch – Prodigal Pieces
3. BarStool Makeover – Artsy Chicks Rule
4. RePurposed Wall Cabinet – Confessions Of A Serial DIYer
5. DIY Marble Paint Effect – Salvaged Inspirations (So happy you’re here!!)

LET ME KNOW WHAT YOU THINK OF THIS MARBLE PAINT EFFECT OR IF YOU HAVE ANY SUGGESTIONS ON THE RESIN POUR. AND IF YOU HAVE ANY QUESTIONS, ASK AWAY! I ALWAYS LOVE HEARING FROM YOU!
Thanks for reading. 🙂
Wishing you a beautiful day filled with inspiration and Happy Painting friends!
Denise XO
RELATED POSTS::
DIY Resin Furniture Appliques & Onlays
How to ~ Marble Pour Painting
Marble Pour Painting Ornaments
DIY Marble Table $5 Makeover
How To Apply Bendable Wood Appliques – Video
PIN AND SHARE!

I have enjoyed and appreciated so many of your transformations. Shortly before Christmas I found a table very similar to this sitting outside Goodwill in the rain! I wiped a bit of the top and the legs to get a better idea of the true condition. Not bad and only $20.00 so it came home with me. I sanded and sanded to get the dirt and stain off, I was very happy with the results, but it needed to be painted. Because I wanted it for my entry hall, I needed a bottom shelf. I cut a triangle of wood, trimmed it around with WooduBend and put it into place. I am very happy with the way it turned out. I am so sorry about the problem with the resin, but I hope you will try again. I have gotten many ideas from you over the past and I hope you will keeping them coming.
$20 and some tlc + creativity for a one-of-a-kind entry table is amazing! And what a fabulous idea to incorporate the wood shelf with Woodubend trim!!! Thanks for being here and for sharing Kay! XOXO
Wow! The marble effect looks real. And you really did great with this project.
I know it’s been a while since you did this, but just in case you didn’t figure it out …. it’s usually due to some type of oil. Could he lotion, r even on your hands.
It will do exactly like yours did! Looks great anyway!Im doing my bathroom countertops so was looking around.
Thanks for this Kim and have fun with the bathroom countertops… that would look amazing!
Great Job!! That little table
Looks amazing! I too wanted to try a marble effect on a bathroom vanity, but I’m also considering a little table that I haven’t been able to figure out what to do with it. Thanks for the inspiration!!
Hi Tracey! It would look amazing on a bathroom vanity! 🙂
Your marble effect looks gorgeous! I am interested in using this technique for a bathroom vanity. I found this article which had some really good tips. This article described a process for preserving objects under the resin, but still had great pointers (like how to deal with bubbles and creating a barrier around the edges with masking tape for the initial pour). Hope it helps – you should definitely try this again! It looks so beautiful!
https://homeguides.sfgate.com/pour-resin-table-tops-30322.html
Thanks so much for this Tracy! This finish would look amazing on a bathroom vanity! Or kitchen counters which is what I was thinking but I’d have to practice a whole lot before attempting that. Thanks for the article. I’ll give it a read! Have a super day.
Dang, that is too bad about the resin finish because the marble effect looks amazingly real! Can it be removed so you can try again but with a different glossy top coat? It’s such a stunning makeover it would be a shame not to be able to redeem the table.
I know right? I have to admit I was bummed out because the part that turned out looks SOOOOO good. I’ll have to do a little research and give it another go.
This looks fabulous!!! You did a great job making it look like marble. One of the best I’ve seen. Just love it.
Thanks so much, Barbara!😊
The whole table makeover is wonderful! I would love to see the marble in person; I know it is lovely. I admire your bravery to try something new for T2T! All of you gals are so fun and talented. I appreciate you sharing all your techniques and even those that don’t turn out as planned. Maybe you can show us how you fixed it in an update!
Thanks, Cecilia! I’m going to Google on how to fix this up. 🙂
Beautiful work, Denise! Bummer that the resin didn’t work as planned… hope you find a simple fix for it. Love the faux marble though! xo
Thanks, my friend! 🙂
Hi Denise
Your very very best bet is to get ahold of the manufacturer! They know everything, including how to get it fixed safely! You have so much experience and you have a ton of photo’s to show them……call call call!
A good idea… I hope they don’t put me on hold. I have no patience…🤣
Denise,
I think it’s beautiful. Love the faux marble. Consider it a “happy accident”. You ended up with a beautiful little table.
Blessings,
Gayle
Thank you, Gayle!🤗
Hi Denise,
Your table is gorgeous! Thank you for sharing your trials. I would buy that in a minute, just put a pretty plant on the bubbles. You are so talented.
Marian
Pretty plants cover anything…lol. Thanks so much Marian! XOXO
I thought the same thing. Just cover it up with a plant or something. Looks amazing.
Thanks, Julie!
I think it’s beautiful and amazingly realistic. You do wonderful makeovers!
Thanks so much Toni! xo
The marble technique is beautiful. My daughter is a resin artist. As her momager, I have picked up on a few things. It looks as if there wasn’t enough resin. As someone else suggested, it’s better to have too much than not enough. You can pour another layer over the entire table. The second layer will cover the messed up section. One tip…make sure that the table top is completely level. Good luck!
Momager… love it! 🙂 Jen, does it have to be the exact same brand or can I use any brand of resin?
I certainly have no idea what you did that made part of it ripple but even with that it is gorgeous. It looks so realistic so please don’t lick your wounds too long and try this again! Beautiful little gem!
LOL. Good advice Gail… thank you!
That is amazing and looks so realistic!! Good job!! 🙂
Thank you, Nancy! XOXO
I once ruined an entire project — cut-out map pieces glued to tiles to make coasters– with the resin at the end, so I truly feel for ya! Looks gorgeous, though! My one question — what do you or your followers suggest as a topcoat? I love this look and want to try it on a side table. Thanks!
You get it, Diane! I’m guessing if a resin/epoxy isn’t used, a high gloss poly would work nicely. I’m not sure it would provide quite the same authentic looking finish (because the depth of clear coat won’t be there) but it would probably look pretty darn good.
Stunning! I am amazed. You are very talented.
Thanks Lizzy!! 🙂
Well, from what I can see, it looks absolutely amazing! I love that you went for it and aren’t afraid to consistently try new things! XOXO
Aw thanks, Christy! It was fun. I’m just happy it dried in time to be part of the T2T this month. hehe😉
Wow it’s gorgeous! Even with the slight flaw…… thanks for sharing! I have an ugly gate leg table that I would like to try that out on. Could I use a shiny poly finish instead of the resin?
Thx!
Thanks Stephanie and for sure! A glossy poly would be much easier imo! LOL
It’s just gorgeous and so realistic – what a bummer that the resin misbehaved! I hope you will try it again soon, using some of the tips you are getting…
Thanks Marcia! I’m not sure it will be anytime “real” soon as I need some time to lick my wounds 😂
Love the shape and lines of the table. And the marbling looks so good!!!!! Too bad it went wonky on you. I’m guessing because it is resin it would be near impossible to remove and retry?
Thanks Audra and to be honest, I have NO idea how to remove or fix resin. Maybe sand and repour as suggested below or find a product to remove it and retry as you’re suggesting. I think it’s too bad it went wonky too.😕
Why not try vinegar or acetone to remove epoxy
Sounds like you may have got a product that was to old.
It’s still very pretty.
Yes, I didn’t even THINK to look at the expiry. And it has been sitting in my studio for a while. Thanks for this Bev. 🙂
This table makeover is stunning but what I most appreciate is you sharing what didn’t go quite right! Thanks for being you Denise. This is why I follow. ~ Nicki
Ahh, thanks so much Nicki! I appreciate YOU!💕
THIS my friend is an amazing makeover. Great post! xo 😘
Thanks so much, Do! It’s a redo but at least I learned a lot. 😊 Have a super day! xo
I’ve done a few resin pours now And one thing that seems crucial is mixing. I mix for 3 to 4 minutes in one container and then pour into a second container and continue another 3 minutes at least. Another thing I’ve learned the hard way – don’t try to use just enough resin. Too much is better. When I’ve resined over wood or paint, it absorbs a lot and doesn’t spread as easily. Especially chalk paint. All paint must be water based. Surface must be sanded smooth and absolutely dust free.
Thanks for this Christine. Maybe that’s where I went wrong. I mixed for a good 2-3 minutes but maybe it wasn’t enough. The product was also thicker than I imagined it would be so even though quantity-wise there was plenty because it was so thick I found it challenging to get solid/even coverage.
That looks really beautiful–I’m sorry about the mishap, but it still looks great!
Thanks so much, Susan. I’m pretty pleased with the results myself even with the mishap. Hopefully, take #2 will be better. 🙂
That is the most realistic faux marble I have ever seen anyone create! You are a master! Love the grey base too. Wonderful!
This just put a smile on my face… thanks, Patricia!😀
I do like the marble finish. I have never tried using resin. While the resin did not adhere properly, it is still a very pretty tabletop makeover. It goes very nicely with the grey legs and added wood transfers .Thank you for sharing.
Thanks so much, Sue! XOXO
Love the project! Regarding the resin, perhaps the mixing ratio was off just a bit. Did you measure or eyeball? Or even though you mixed 2-3 minutes, maybe it wasn’t long enough?
Resin also has a shelf life; is there an expiry date on the packaging?. Was it opened previously? Or have you had it over a year?
If not expired, I would try it again on a sample and see what happens.
Hmmm, I never even thought to check for an expiry date! It wasn’t previously opened and I mixed the full bottle of each so it was an exact 1:1 but maybe I didn’t mix it for long enough. Thanks for this Sara!
You did a wonderful job on the marblei effect. I just googled it and water and resin won’t mix. epecially if it’s a poly. Who would have thought that? I suppose because it’s like “plastic”…..I’m no chemist but that’s probably why. What other type of sealer do you think would work? Anyway, just like you say….you can always paint over it! It’s really pretty. It’s my “me” Tuesday so I’m going to see what the other girls are up to today. I’m especially curious to see what Nancy did with the bar stools. Have a great week.
They have marble counter Epoxy/Resin kits where they provide acrylic/water-based paints and to create a marble effect and then you pour the resin/epoxy over that but I think you’re right, there can’t be any water droplets. Everything has to be bone dry. I’m heading over to see what the ladies have done too. 🙂 Enjoy your “ME” day Kathy! XOXO
With resin pours you can sand the surface and do another pour over the top. – save save!
Interesting!! Does it show the sand marks or divot areas when you repour? And I wonder if it has to be the exact same product? In all likelyhood it was my error (not the brand/product) but I have to admit I’m leary about buying the same brand. 😐
Will not show sanded areas but you have to sand the entire piece and no you do not have to use the same brand. follow times for overpouring)A few others mentioned outdated issues…..I used 20 year old kit on a kitchen counter top and it was just fine so I do not think outdated product is an issue (proper storage) Sometimes the mixing time might make an area set up more quickly so mixing is my most important detail.
Thanks, Ruth I appreciate all this info. And I love the idea of using this technique on kitchen counters. I’ll bet that looks amazing!💕
You can definitely re-pour over. Lightly sand with an ultra-fine sandpaper, just to scuff the gloss. Wipe clean of any snading dust. Mix, stir the FULL TIME SPECIIED, make sure to scrape sides and bottom of container as you stir. Then re-pour. it will not show sanding marks, and should level itself out over the ripples of previous pour. (I know this is a year past…I’m sure you’ve figured something out)
This tabletop is propped up against by d/r wall and the bottom is in my workshop because I’m still intimidated by the fix. So I’m super grateful for this Kim – thank you!
Hi Denise. I’m so glad you shared this beautiful marble effect table. It really looks like high end marble. I can’t believe it was achieved with paint! I’m also very impressed that you shared how it didn’t turn out perfectly. Too often things on the internet are photoshopped and manipulated. I really appreciate your honesty. Makes me feel better about the times my projects have taken an unexpected turn. I’m looking forward to seeing the next time you try the resin/epoxy:)
Thanks, Monique! And ya, we ALL have projects that take unexpected turns. It’s part of the creative process and trying new things, isn’t it?! 😊 Have a super week my friend. XOXO
Wow! 😍 First, kudos to you for trying and sharing your experience. It looks amazing, Denise!
Thanks my friend! I wasn’t even sure if it was going to dry properly to bring it upstairs and assemble for our T2T party, but thank goodness it did…lol