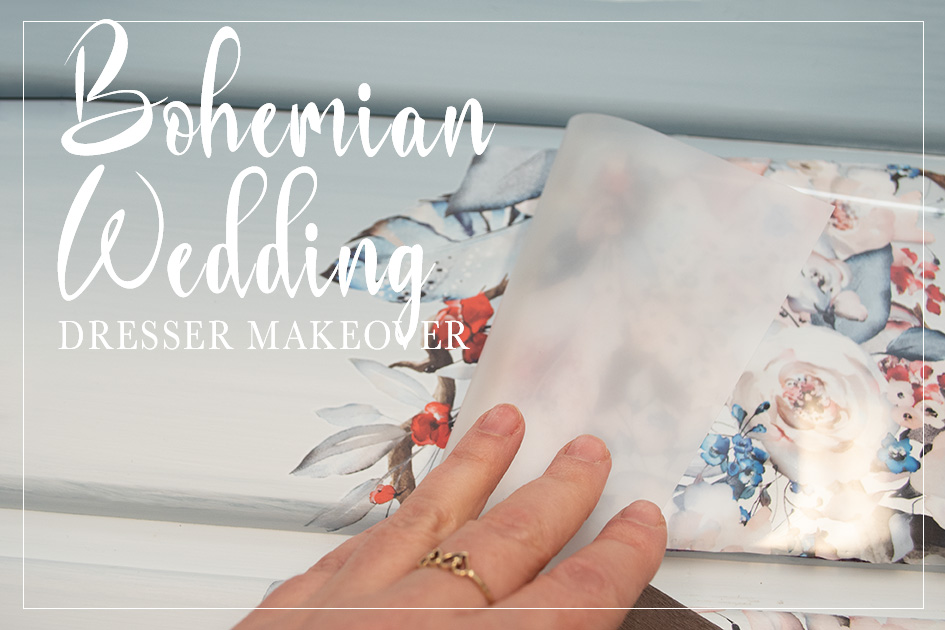
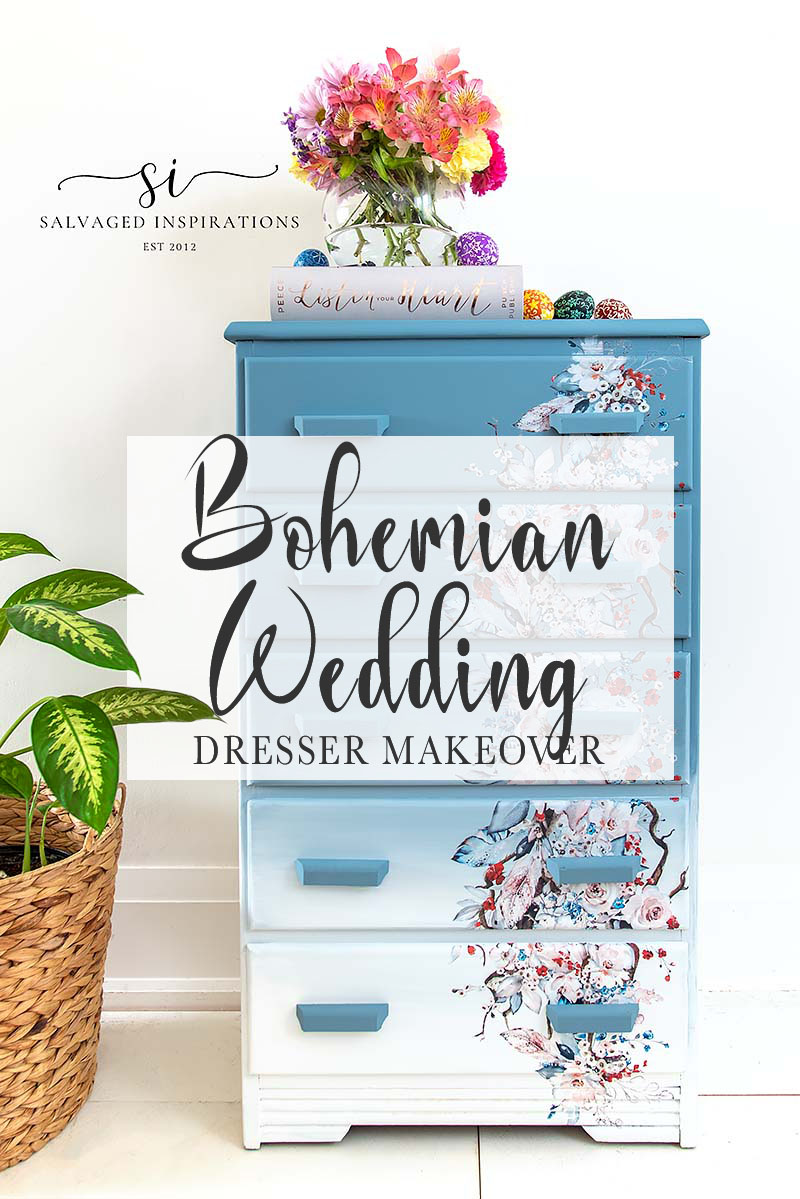
THIS THRIFT STORE BABY DRESSER GETS A FRESH NEW LOOK WITH A FLORAL BOHEMIAN WEDDING TRANSFER AND A BLENDED PAINT FINISH!
Hello sweet SI family! Spring is in the air and Easter is around the corner and this inspired today’s new furniture makeover. I’m sharing a thrifted baby dresser turned Bohemian Wedding Blended Dresser! Whether you’re just starting out on your furniture painting journey OR you’ve been painting furniture for some time, this tutorial will guide you through blending paint and transfer design.
I’m also sharing ~
- How to EASILY remove contact paper
- Why to Prime and THEN Fill
- How To Blend Paint Colors
- How To Rub On Furniture Transfers
- And more!
Let’s get started. Here’s the thrift store baby dresser I started with. Solid wood. Good bones. But pretty beat up.
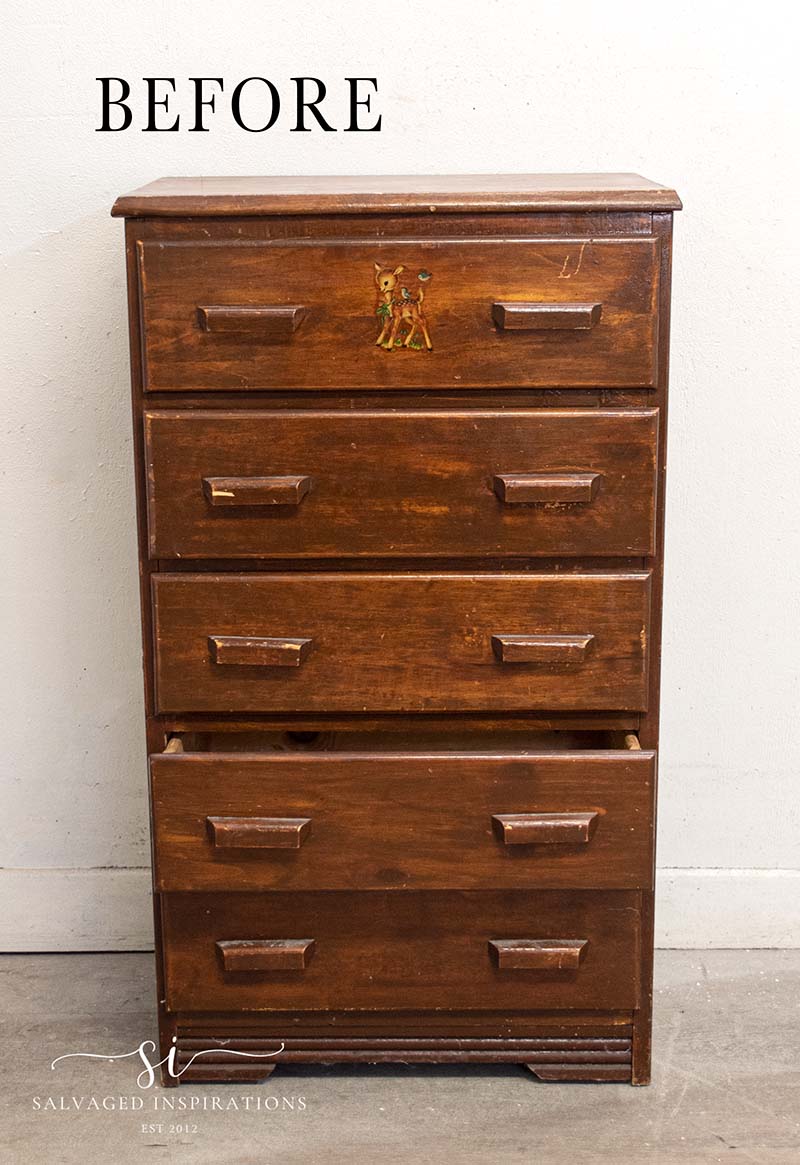
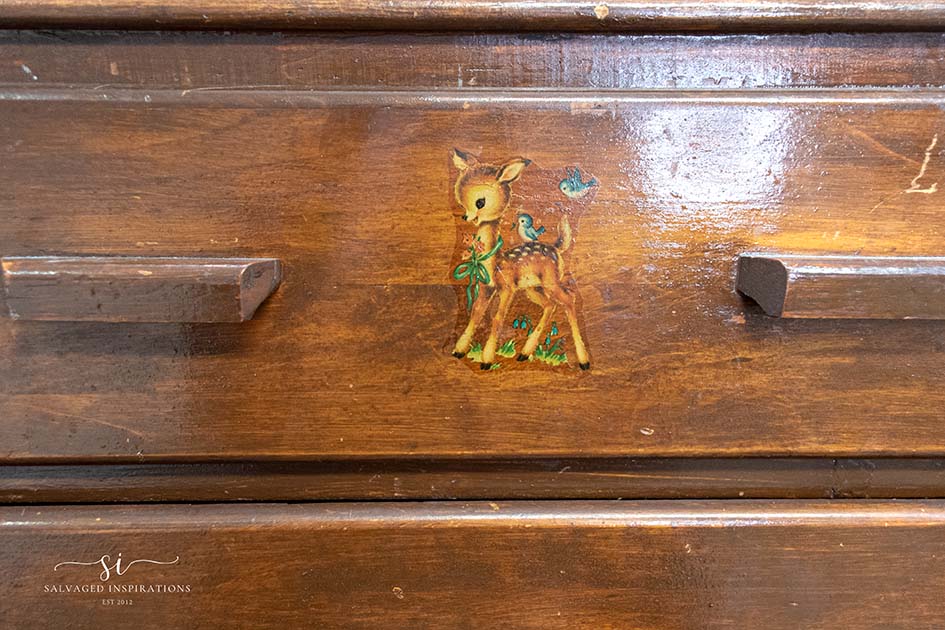
Does anyone else remember the image on this baby dresser? Super cute, right? I remember this Bambi and Bluebird pic from one of my childhood books from the 70’s!
Someone really loved this dresser. The drawers were lined with contact paper and were REALLY stuck on from the years of use! Even though removing contact paper takes a little effort (I’m sharing the easiest way I know down below!) it always touches my heart when I see someone has used liners. It means they cared. They valued the piece enough to want to keep it in good shape.

THIS POST IS SPONSORED AND/OR CONTAINS AFFILIATE LINKS TO PRODUCTS I LOVE AND USE. YOU CAN SEE MY FULL DISCLOSURE HERE.
SOURCE LIST
Baby Dresser – SALVAGED
White Lightning Cleaner
BIN Shellac-Based Primer
DB White Mud Filler
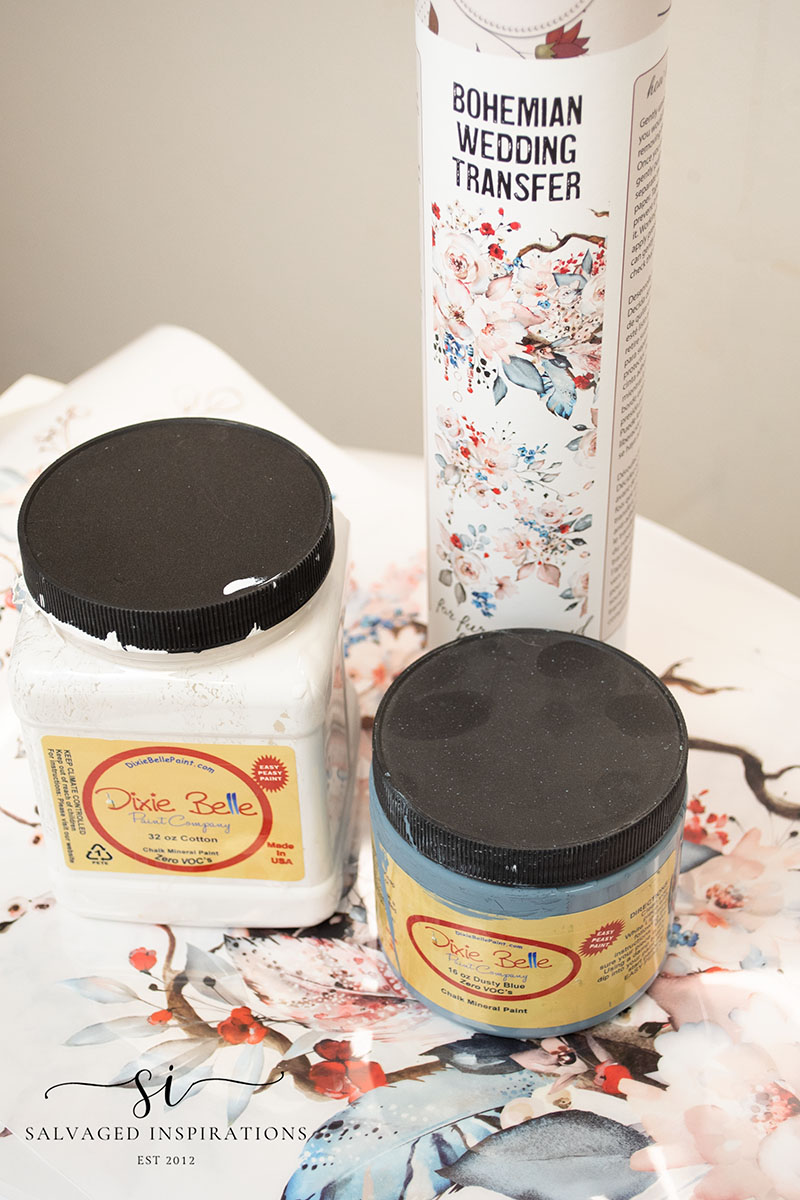
Cotton Chalk Mineral Paint
Dusty Blue Chalk Mineral Paint
Oval Paint Brush
2″ Mini Brush
Bohemian Wedding Transfer
Large Wax Brush
Clear Wax
TOOL LIST
4″ Paint Roller
Heat Gun
Dewalt Cordless Drill Set
Orbital Sander
Fine Spray Water Mister
Sand Paper | Tack Cloth
Shop Towels
BABY DRESSER MAKEOVER
Here’s how I salvaged this baby dresser into a Bohemian Wedding Blended beauty!
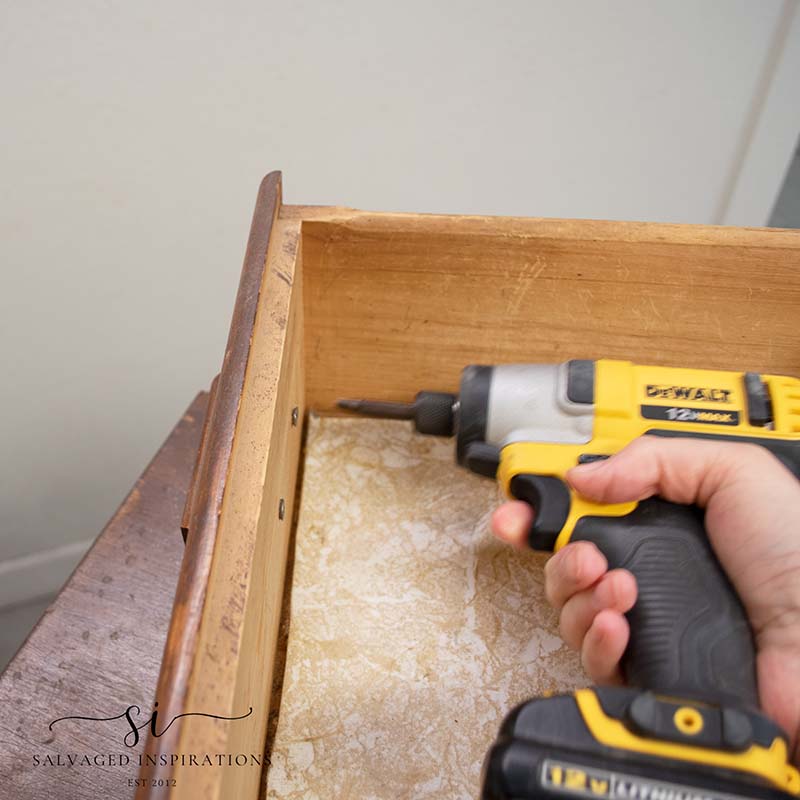
HARDWARE & DRAWER LINER
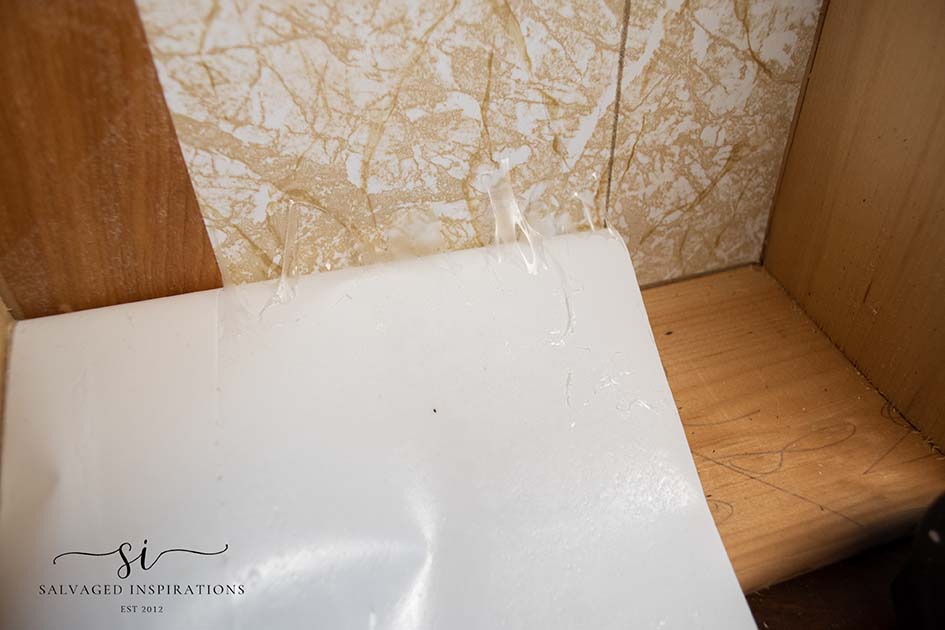
Before I cleaned this piece I removed the old wood hardware and drawer liners. The reason I started this way was that I saw there was a bunch of crud under the drawer liners and there was no point in cleaning the piece twice.
The easiest way I know of removing contact paper or ANY type of adhesive stickers is with HEAT! Applying heat reactivates the glue and softens it up enough to easily pull up or scrape off. A heat gun is super handy to have for so many reasons ( eg removing veneer, paint, contact paper, etc!) but if you don’t have one, try using a hair dryer!
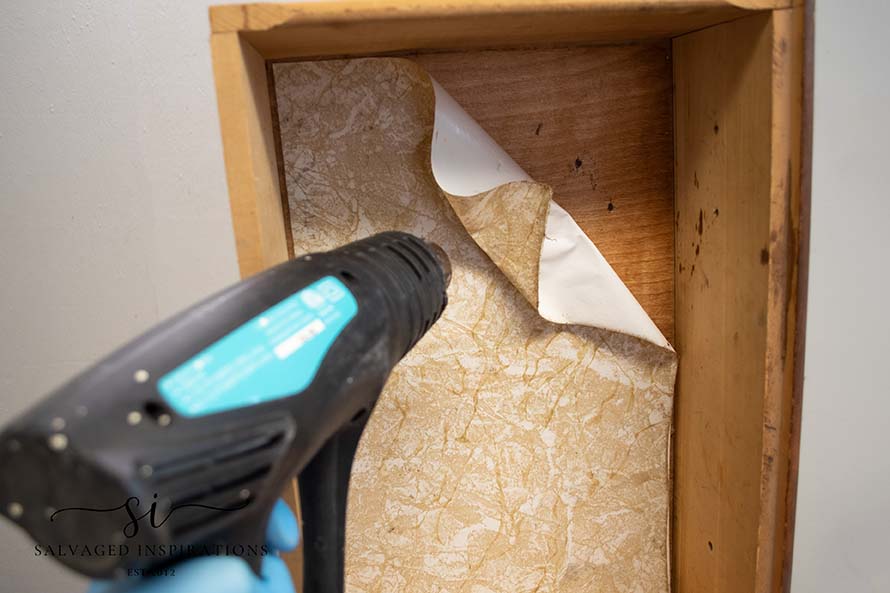
See how amazing it softens up the glue!
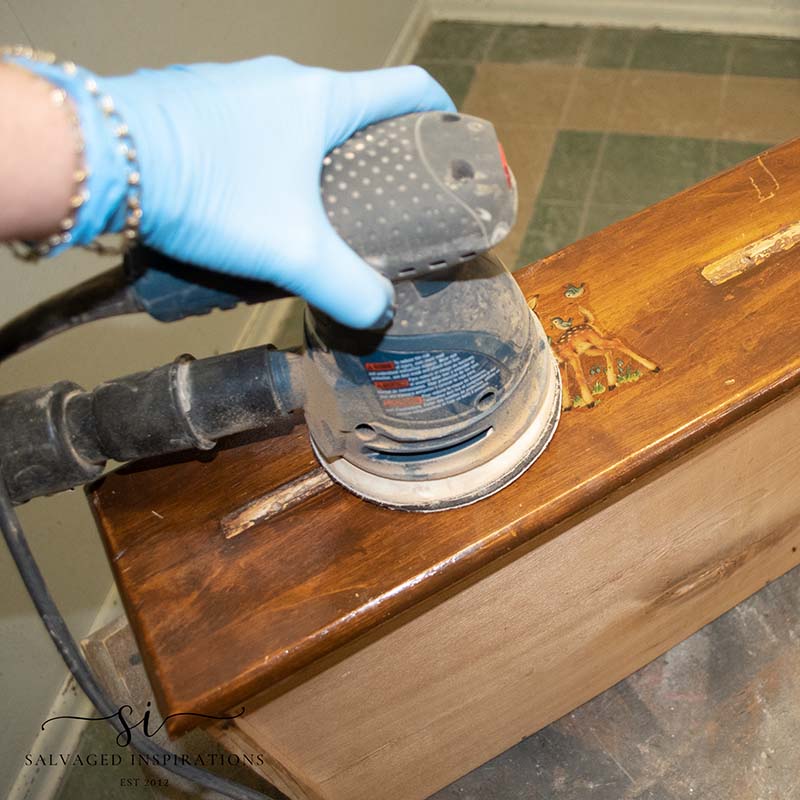
SANDING
Once the hardware and liners were removed I went ahead and sanded the drawers on the inside and out. Bye-bye, Bambi!
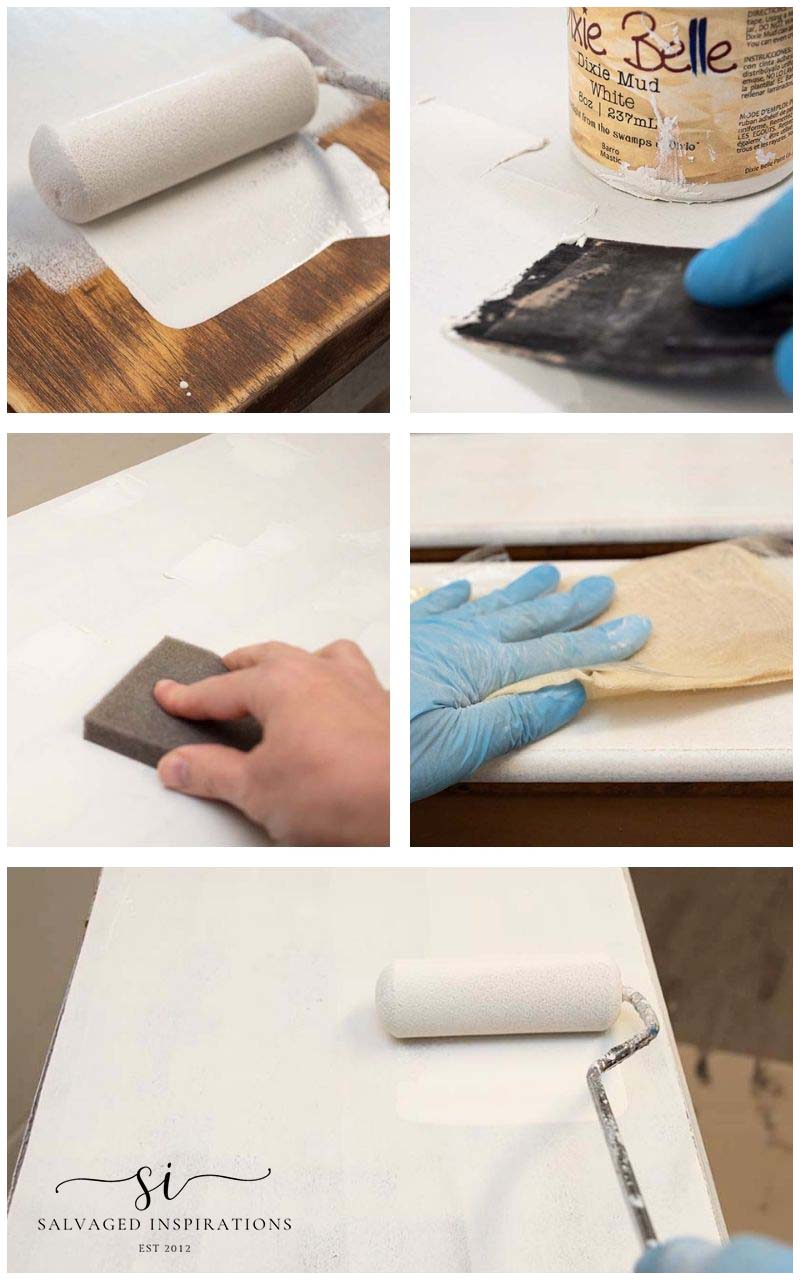
PRIMER & FILLER
Now it was time to prime and fill and because there were so many little divots and dings in this dresser, to see them properly, I went ahead and added a coat of BIN Shellac Based Primer BEFORE I used filler. Once it was primed, I saw every little area that needed attention with the wood filler. I filled all the flaws with this easy-to-sand DB Mud in White and once dry, sanded it all smooth. I used a tack cloth to remove all the dust and then added my last coat of primer.
Here’s the breakdown ~
- Prime
- Fill
- Sand
- Remove Dust
- Re-Prime
DESIGN
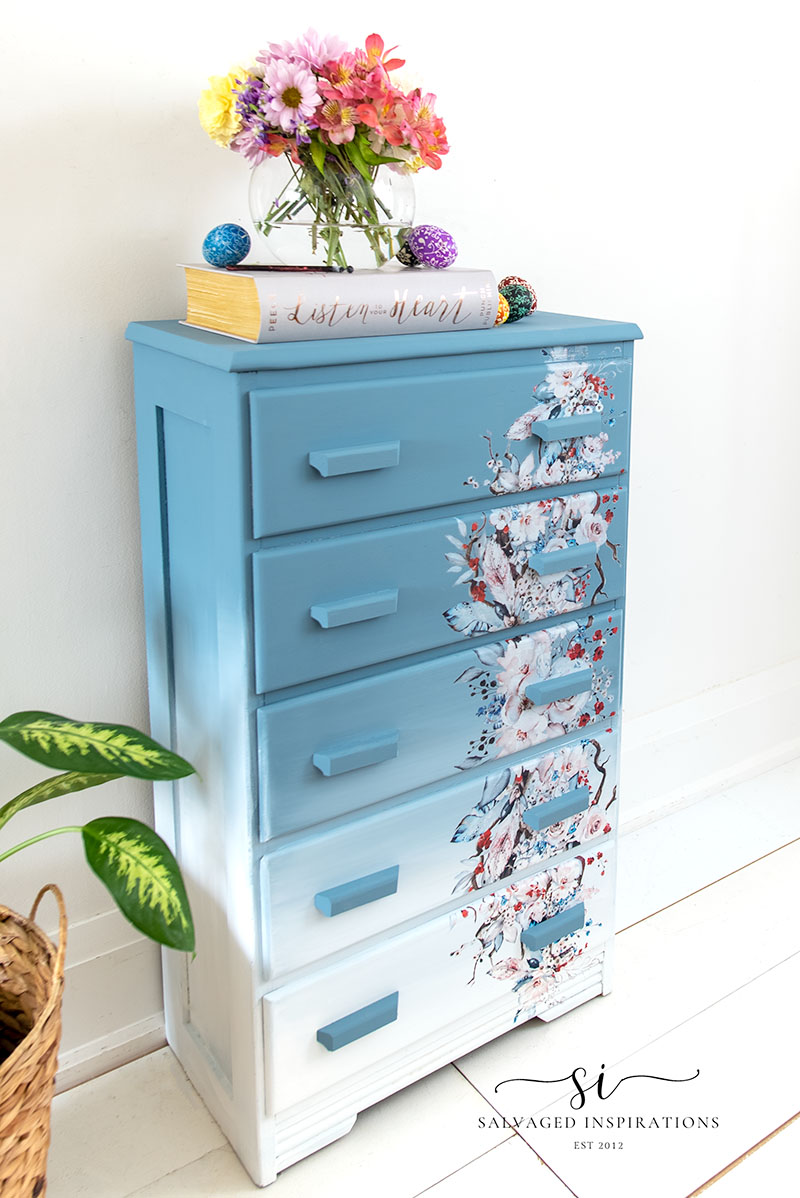
Now for the fun part – deciding my design! I decided to use this Bohemian Wedding Transfer because it has such an airy spring feel, and hey, these florals are gorgeous! When picking colors to ‘go with’ my transfers, I like to lay the transfer flat and hold up different paint jars to it. Using one or more colors that are IN the transfer design is a great way to make it look cohesive. For this transfer, I could have used red, peach, or pink, but I opted for this Dusty Blue and Cotton White.
BLENDING PAINT
I chose to paint Dusty Blue on the top half of the dresser.
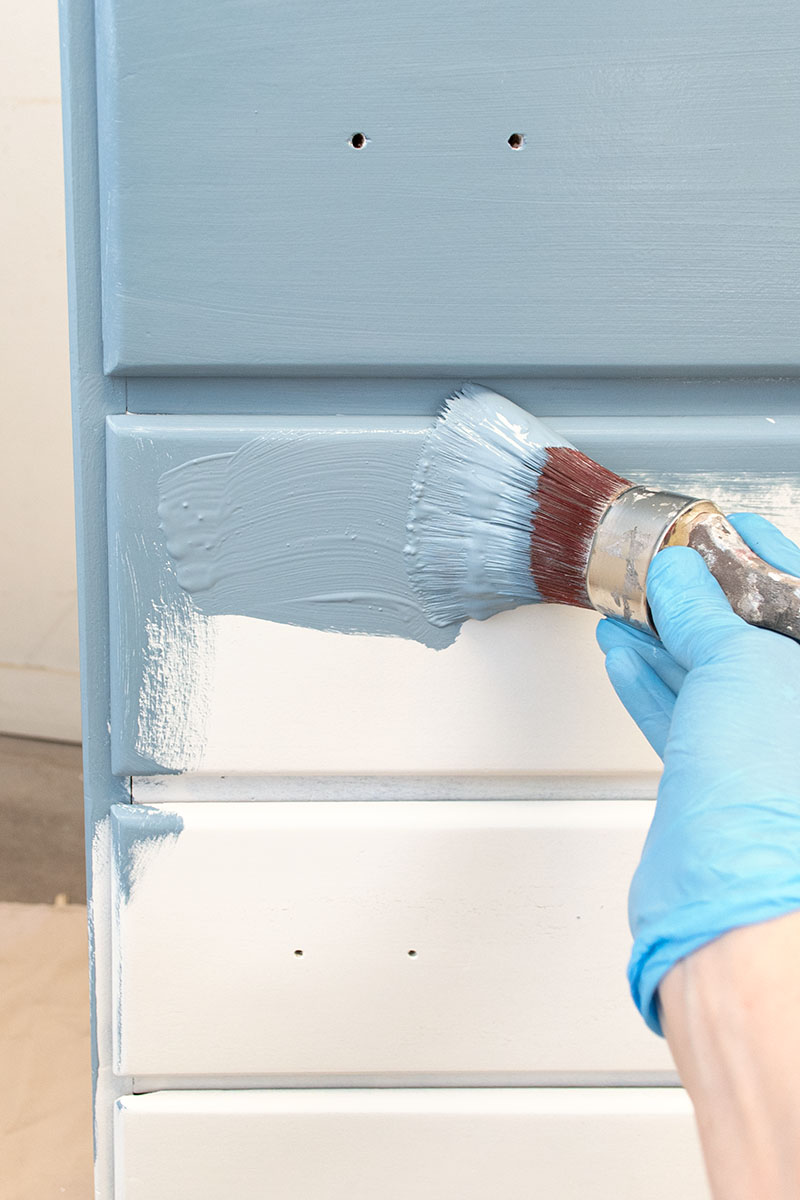
And Cotton White on the bottom half blending the two as I go up the dresser.
Blending two colors of paint onto furniture is a great way to create a unique and custom look.
Here’s a step-by-step guide to help you achieve a paint blend ~
- Start by prepping the furniture with cleaning, sanding priming, filling, etc.
- Choose two colors of paint that you want to blend.
- Apply the first color of paint to the area you want with a brush or roller.
- Apply the second color of paint to the area you want in the same way as the first.
- While the two coats of paint are still wet, use a dry brush to blend the two colors together. Start by lightly brushing over the area where the two colors meet, using a back-and-forth motion. Gradually increase the pressure to blend the colors more thoroughly.
- If necessary, use a water mister to keep the paint wet and blendable.
- Let the furniture dry completely before applying any additional coats of paint or finishing products.
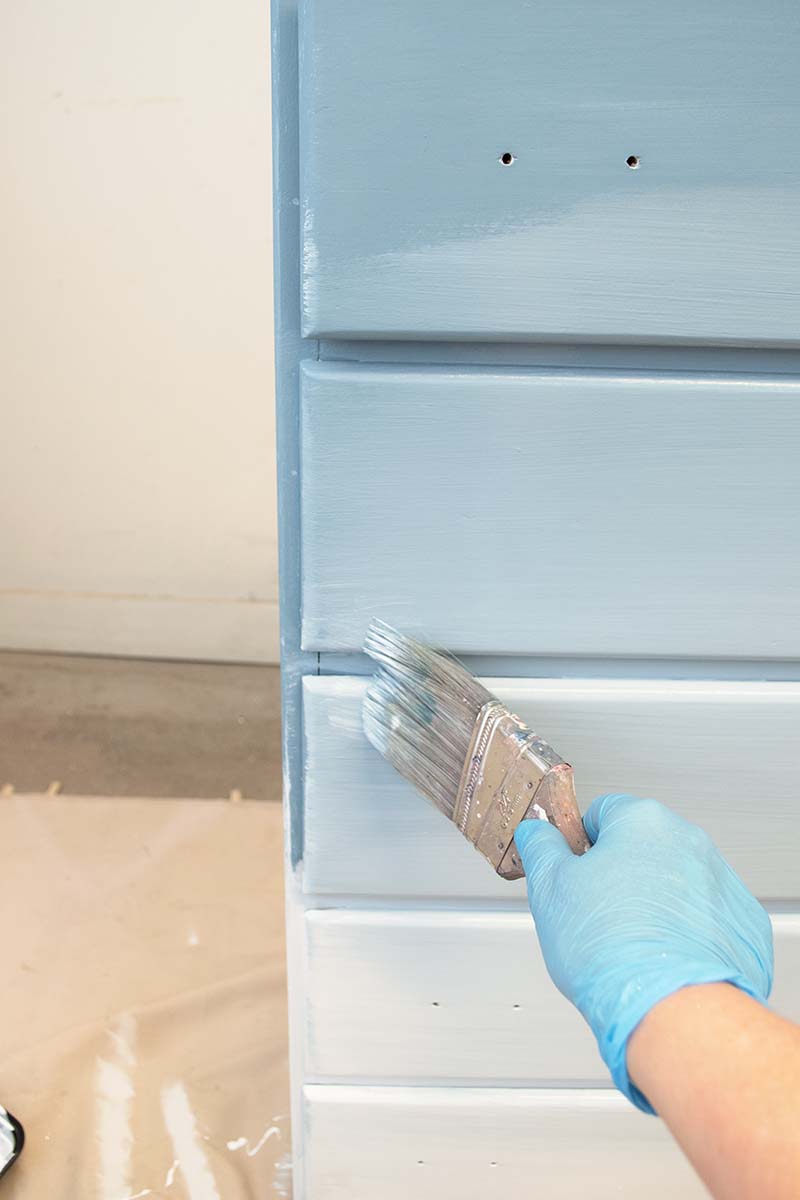
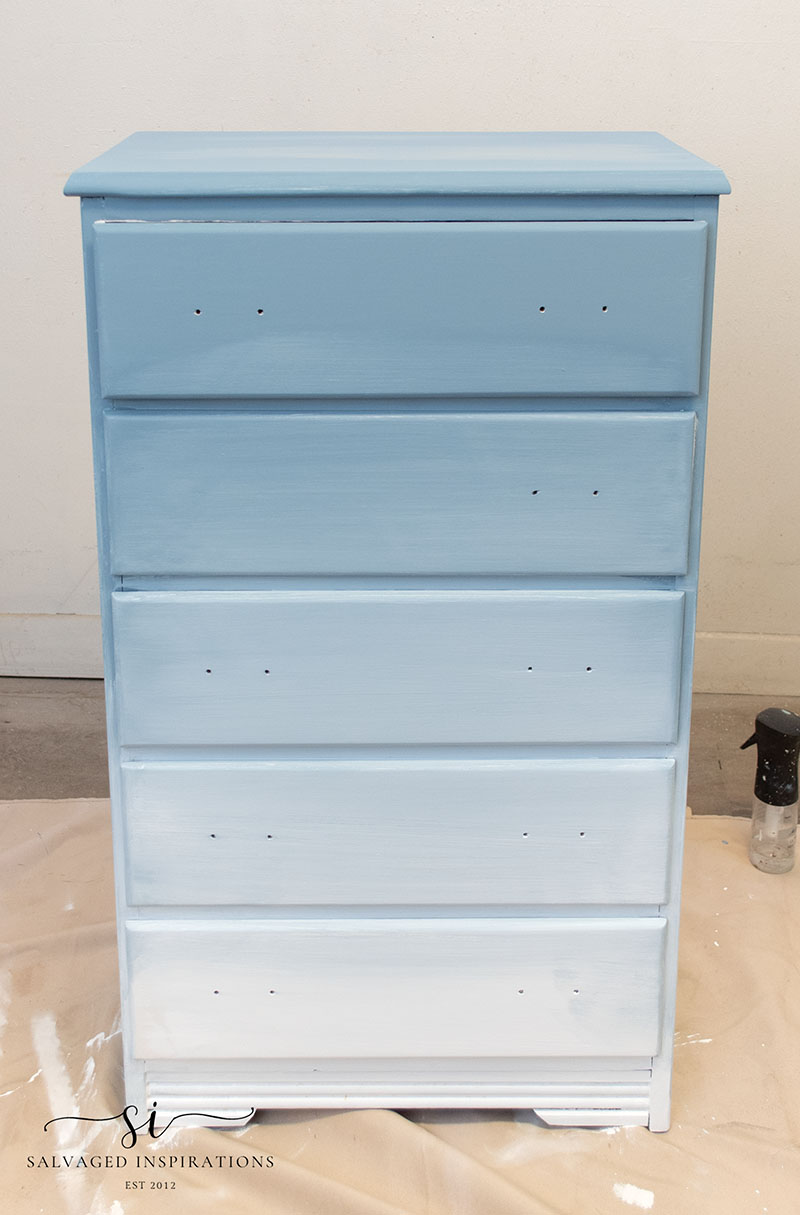
Remember, blending paint takes practice, so don’t be discouraged if it doesn’t turn out perfectly the first time. As you can see below, my first coat of blending was NOT perfect. I get the base coat down and then on the second coat I do the finessing.
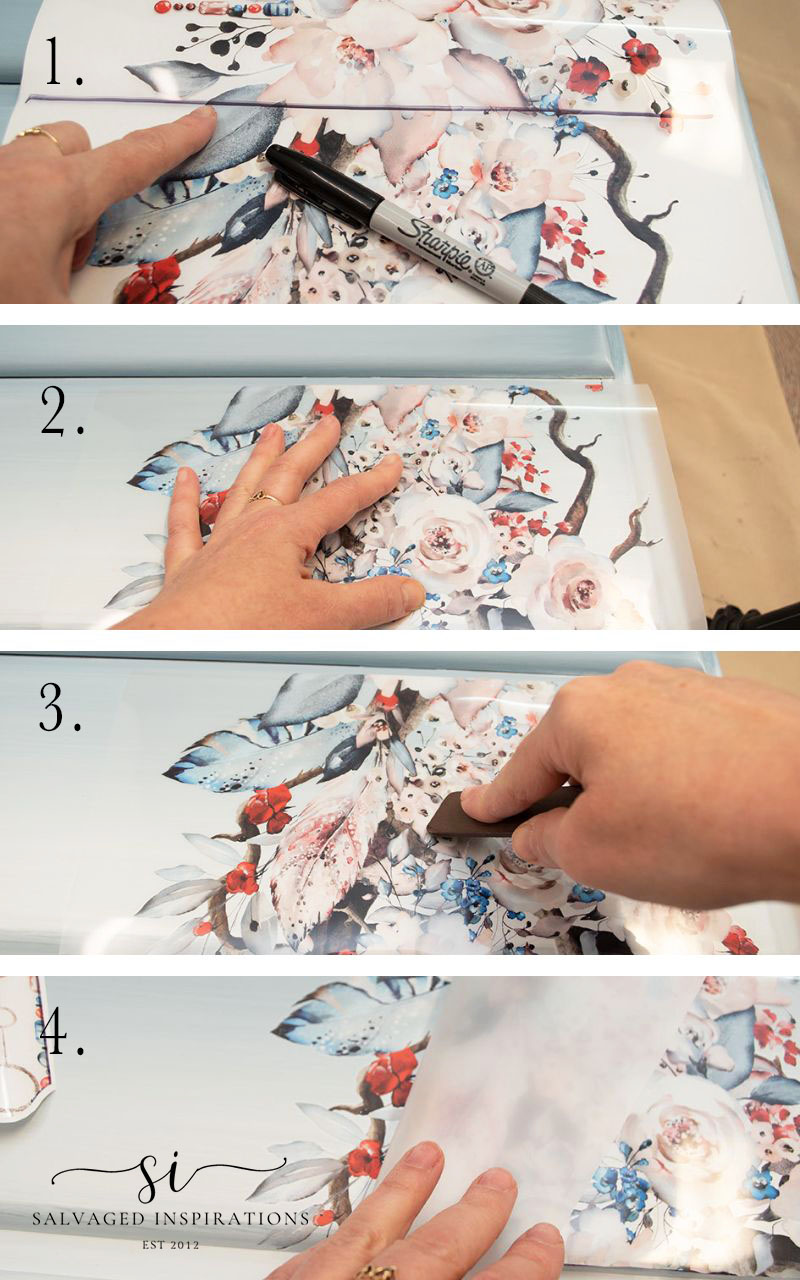
ADDING THE TRANSFER
To adhere the transfer, I removed the design from the sheet, placed it exactly where I wanted it, and then rubbed it on with the tool provided. I have a full tutorial on How To Rub On Transfers here.
Here’s the breakdown ~
- Draw a line and Cut transfer to size
- Place the transfer design where you want it
- Rub on the transfer
- Lift off the plastic sheet once adhered
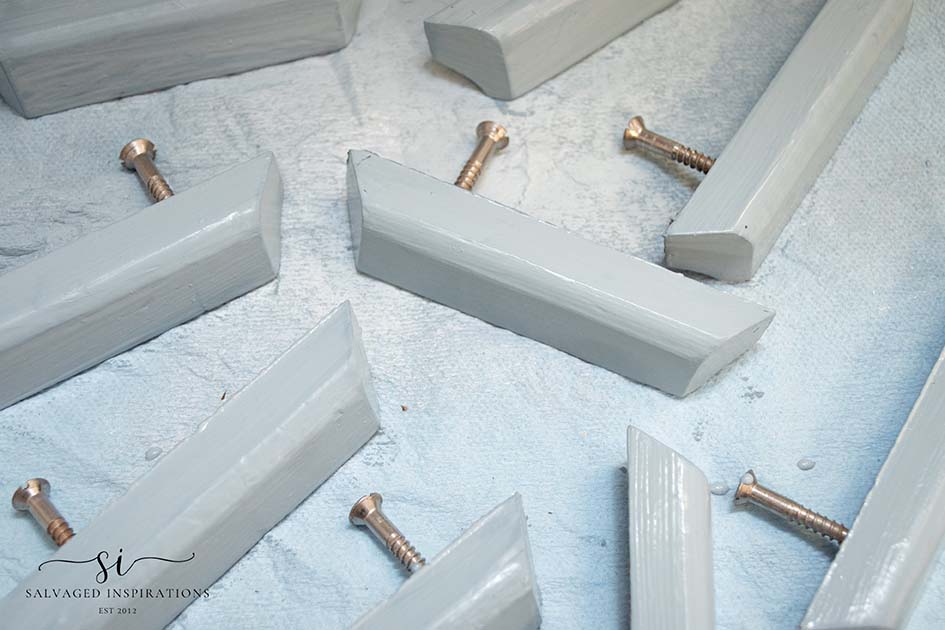
PAINTED HANDLES
To finish this piece off I painted the original wood handles in Dusty Blue and then top-coated the entire dresser with this clear wax.
And here’s how this thrifted baby dresser all came together.
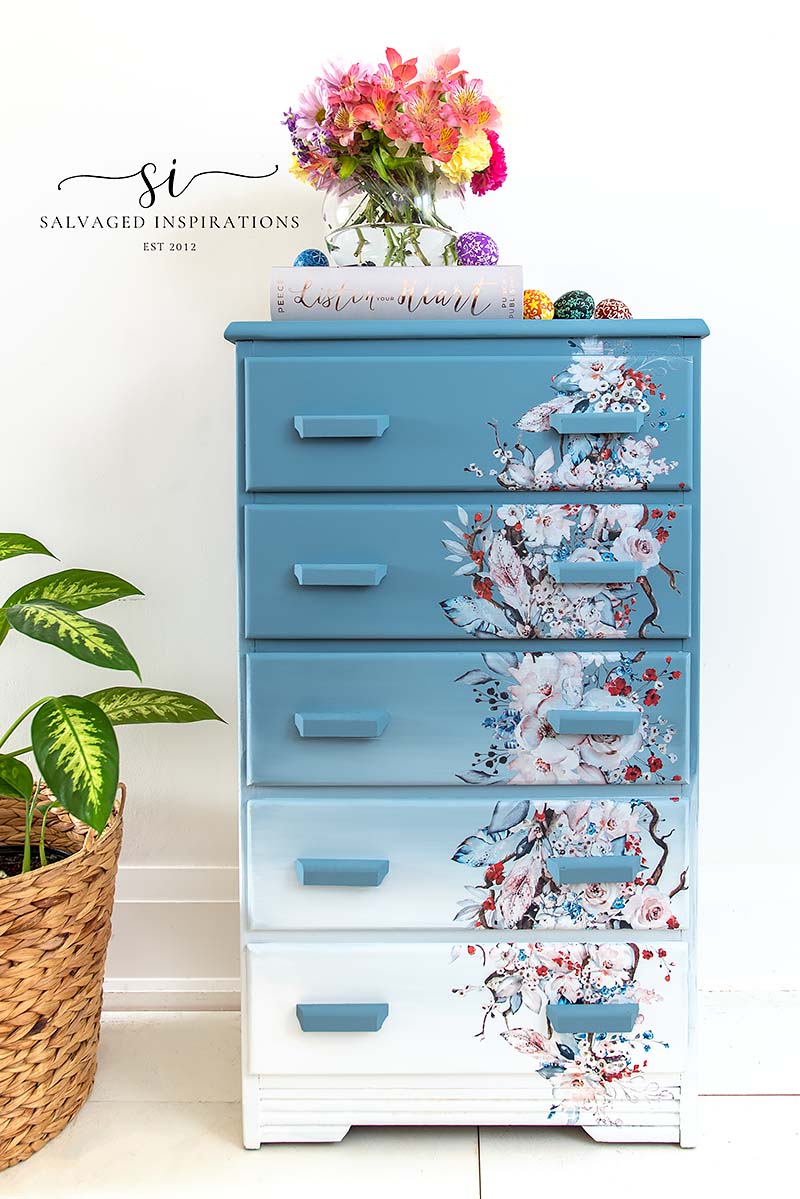
What do you think? Spring-eee right?!
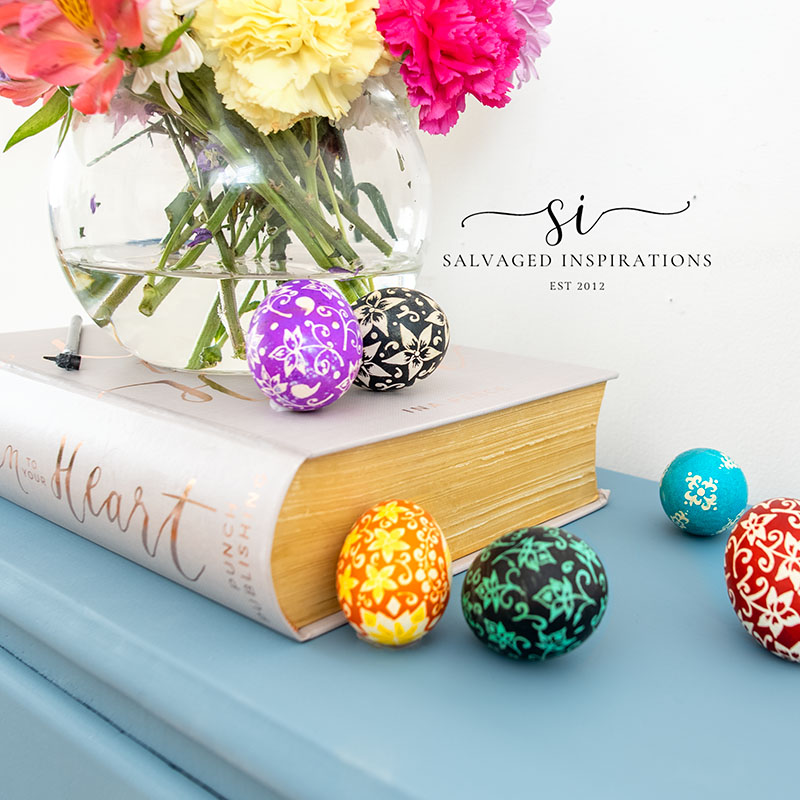
And on my last post I mentioned the Ukrainian Pysanky Easter Eggs I used to do years ago… well I found a few and decided to stage with them!
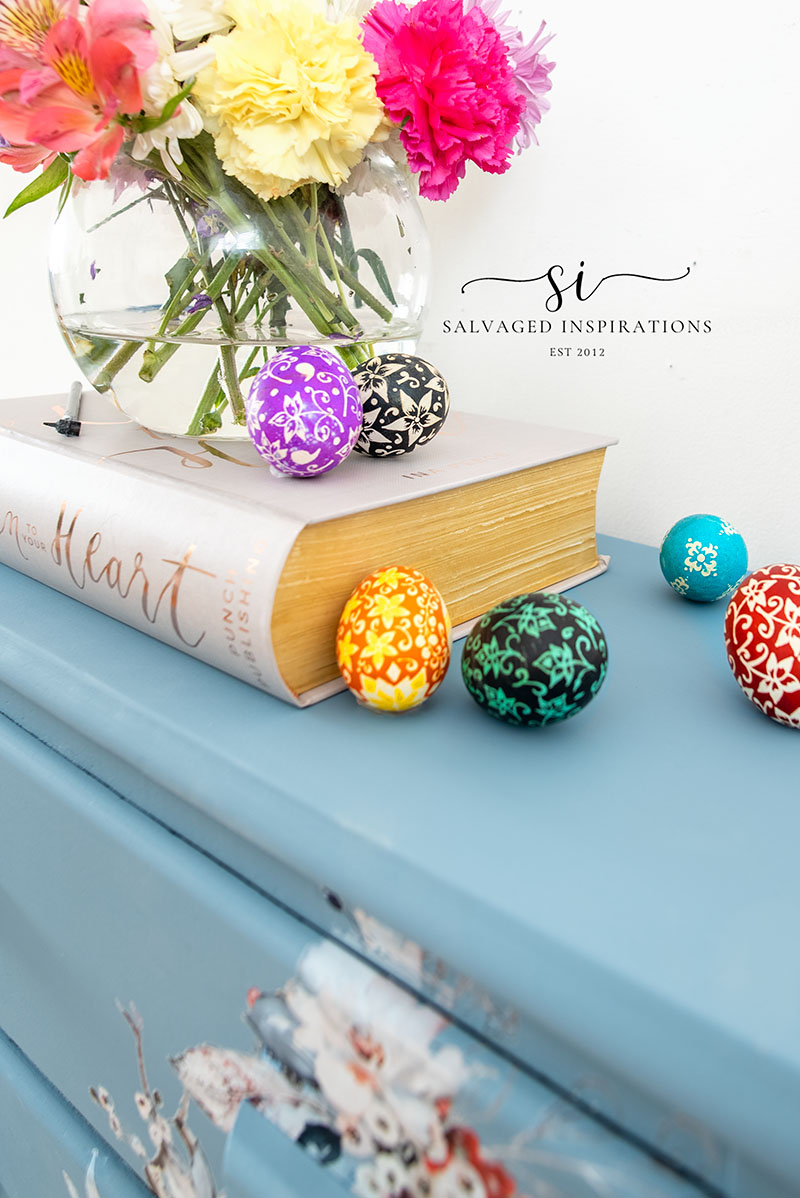
Don’t judge me too harshly… I know these are VERY basic in comparison to what the real artists do but hey, they are colorful and cute – perfect for a spring Easter dresser! 😉
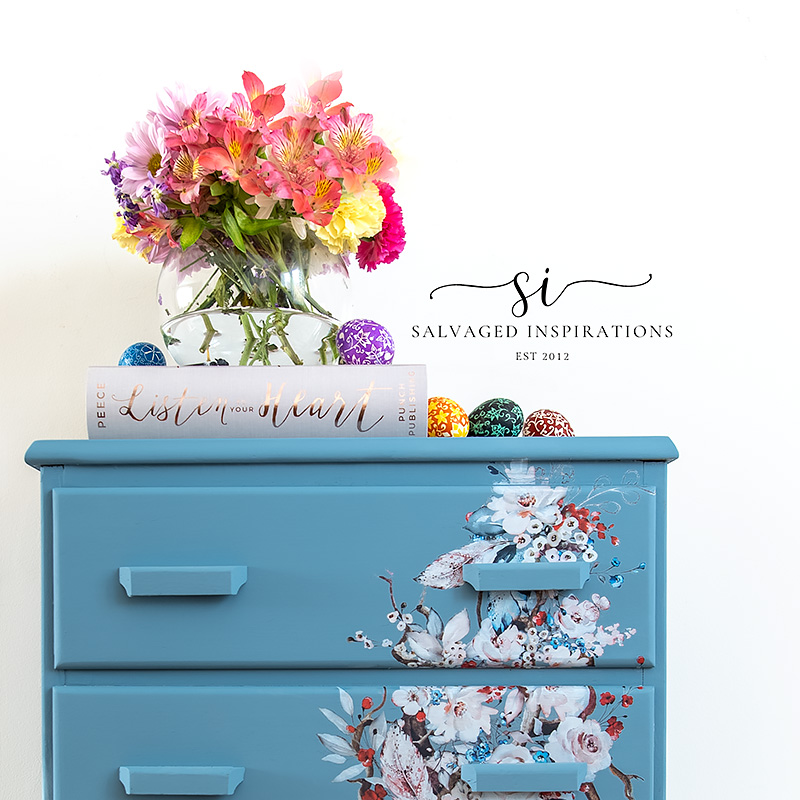
Here’s a view of the blended side. I can’t wait to hear what you think!
Here’s another look at this Bohemian Wedding Blended Dresser before and after. I hope this fun makeover has inspired you and given you some new ideas for your projects.

LET ME KNOW WHAT YOU THINK OF THIS DRESSER MAKEOVER. FEEL FREE TO ASK ANY QUESTIONS YOU MAY HAVE… I ALWAYS LOVE HEARING FROM YOU. IT MAKES MY DAY! 🙂
Happy furniture painting friends!
Denise x
RELATED POSTS::
ROYAL DAMASK PAINTED DESK
REPURPOSED DESK TO NIGHTSTANDS
HOW TO REVAMP YOUR OLD DESKS
PAINTED LACE SECRETARY DESK
SALVAGED SEWING DESK MAKEOVER
PIN AND SHARE!

Great save again, the uniform color of the handles really makes the blending stand out. I’ve added paper (prints, napkins etc) to drawer bottoms using varnish & an iron so I imagine an iron would also be another way to heat up old glue for removal, in case a heat gun is unavailable. This bureau sure came a long way!
I need to start looking for a thrifted/second hand iron I can use for furniture makeovers. There have been a few times (actually more than a few times!) it really would have come in handy to make things easier. Thanks for your tips Tracy… always appreciated! XOXO
I love the fresh look of this dresser! I remember the old Bambi and Bluebird transfer from my childhood. I really like the look of the handles against the floral transfer and the white and blue paint. It is still a wooden piece of furniture and I like the color contrast!
Thanks Janine! I remember the old Bambi and Bluebird motif as well! I had a toy box that had it front and center and for some reason I’m thinking my sister had something similar on her crib.
This one is really special. I love the colors and the fade and I think the handles go great with this look. The applique on the side. Well done, really lovely.
Aw, thank you Ginger! I’m so happy you like it.🤗
While I’m not usually a “fan” of painting over wood,
i can’t tell you enough how beautiful you made this simple piece look! I LOVE everything about it and especially love how you repainted the wooden handles light blue and how they look even over the transfer and the overall ombre look of the dresser!!
I’m so glad you like it Annette! Thank you!😃
Hey Denise! Like all the rest, this dresser is beautiful! Personally though the clunky pulls would have to go. But this is what makes art so unique, with soo many choices! 💖
Thanks so much Patricia! 🙂
I like the handles. I actually get tired of seeing Hobby Lobby handles that are replaced only to be different from original, and not an actual improvement.
It could also be fun to Ombre them in revers of the dresser’s Ombre.
I like using original hardware/handles whenever possible as well. And I never thought of using an ombre effect on them… fun idea!
I think it turned out just lovely, Denise! I love the paint job and the transfer. The piece is perfect.
Thanks for a great tutorial.
Thanks Susan, so happy you love it!
Gorgeous 😍!!
Thank you Lily! 🙂
Hello Denise,
Love the delicate transfer and the blue/white fade. Not so much the clunky handles, I think they overwhelm transfer and are not quite sophisticated enough. What a save on the dresser, it’ll be good for another 20 or 30 years!
I think it will be around for at least another 20 – 30 years, thanks Mary!
So pretty. The blending goes beautifully with the transfer. Would love to see the room designed around that dresser.. lucky customer when that is sold.
I’d love to see this dresser in its new home as well! Thanks Joanne!
Just delectable, Denise! Something else I wouldn’t have thought of–and I have the same exact dresser just waiting for a new look. Many thanks, and Happy Easter!
Yay! Have fun with your dresser Caye and Happy Easter my friend. XOXO
If only the previous owner could see their dresser now. Stunning makeover and beautifully styled, as always!
Thanks so much my friend and Happy Easter to you! Hugs XOXO
Your Pysanky are charming! How wonderful that you took this ancient art and gave it your own special touch.
The chest of drawers is lovely, with a dreamy quality from both the color and the lovely transfer. What did you do to the insides of the drawers?
Thanks Gloria! For the insides of the drawers, I removed the contact paper – cleaned off the residue, and sanded the entire inside so they are nice and clean. 🙂
Absolutely stunning. It couldn’t have turned out any better I am in love with it. Great work.xx
Thanks so much Janette! So happy you love it! Happy Easter XOXO
What a wonderful transformation!! Just love the final look!!
Thanks Lee!
I loooove it!
Thanks Corinne!
Hi Denise. I love how this dresser turned out. You have such talent and a real eye for color. I remember that Bambi picture from when my children were small. In my day, we used to decoupage cute pictures of animals to cribs, dressers, a high chairs and such to decorate our children’s furniture. This post brought back memories and made me smile. On a side note, your Easter eggs are so pretty. Are you of Ukrainian heritage?
I remember that Bambi pic as well and when I saw it in the store it put a smile on my face as well! And thanks so much re the easter eggs. I’m Polish background but they have their own version of these eggs as well!😃 Happy Easter to you! XOXO
The transfer is beautiful and the blue is my favorite color. However the blue handles on the transfer portion is very distracting to me. I see them before I see the transfer, which is disappointing to me. Should the handles blend with the flowers instead of distracting from them. I usually love when you blend paint colors, a very special talent, and the transfers are beautiful, but on this piece, I think you might have made better choices. Just my opinion…
I really like the handles blue but YES, you could certainly blend them in with paint OR even add the transfer to them so they are matching!
Beautiful! I love how you keep coming up with new inspirational ideas!
Thanks so much Lisa!
To be honest, I didn’t think I was going to like the new dresser but it turned out fantastic! Thank you too for all the tutorials along the way. I find them very helpful. I recently bought a similar water decal to put on a doll bed for my granddaughter so those are still around it wanted!
I’m so glad you like it Kim!🤗 And I had no idea they were still around… super cute! I’m sure your granddaughter is going to LOVE her doll bed!!
The blending of those colors is pure perfection with that transfer. Beautiful, Denise! Also, I think I have egg envy. 🙂 xo 😘
Super cute! hehe Thanks my friend! XOXO
I wasn’t sure what to expect when I read the email but this is a beautiful surprise! The dresser and your easter eggs are gorgeous Denise! Happy Easter to you!
Aw, thanks so much Nicki! Happy Easter to you as well! XOXO
I love it! Very fresh and airy feeling. Beautiful work.
Thanks Reba! 🙂
Wow that is spectacular. You did a fabulous job and your eggs are so pretty!!
Aw, thank you! The dresser AND the eggs were a lot of fun!
Hi Denise! Another beautiful makeover!! I love Dusty blue and I need to try this blend. I also love this transfer. The little red flowers sure do make it pop. I just had to do the same thing to a dresser I painted. I primed it and saw all of the deep gouges so I filled them and primed again. You are so full of great information. Thank you!! Pinned
It’s so much easier to see everything, right!?😃 Thanks for the PIN my friend! XOXO
I bought this same transfer and wasn’t quite sure what color to use with it. Love the dusty blue and white combo.
Oh I’m glad it’s sparked some ideas. Have fun Julie! XOXO
Wow! You’re good. You sure know how to make something ugly into something truly beautiful <3
Thanks so much Cindy!💕
I LOVE this dresser and will attempt a transfer project!
The blended paint and gorgeous transfer brings eye-catching life to this much loved dresser.
It’s an inspiration!
I’m so glad you love it Barbara and I’m happy it’s inspired you to give transfers a try! XOXO