THIS THRIFT STORE SECRETARY DESK GETS A GORGEOUS NEW LOOK USING SILK ALL-IN-ONE MINERAL PAINT, A LACE TRANSFER, AND WOODUBEND APPLIQUES!
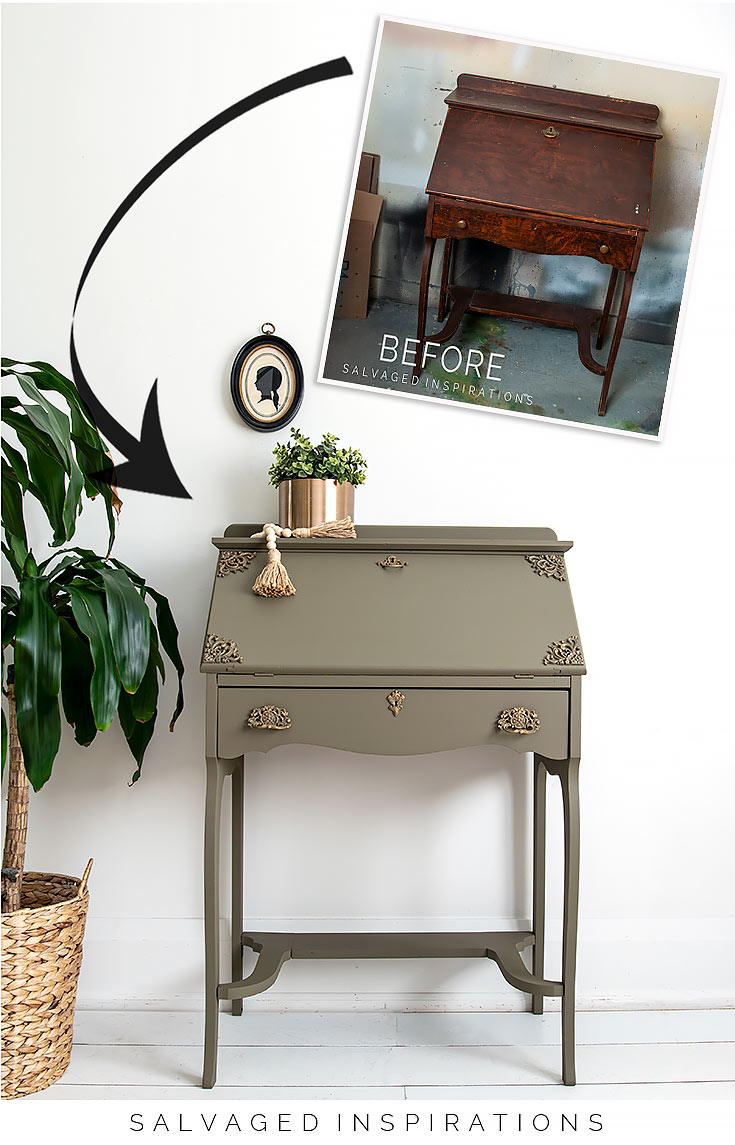
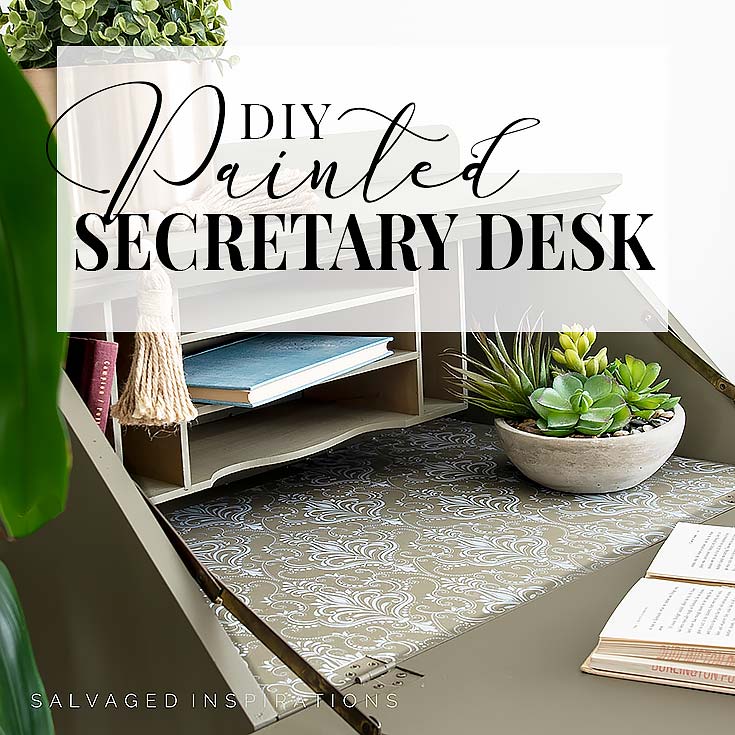 Hi creative friends! Today I’m sharing how I flipped this Thrift Store Secretary’s Desk into a gorgeous Hampton Olive beauty! This vintage secretary desk was selling for $19.99 which is a steal of a deal. As you’ll see there were a few issues but nothing a little paint couldn’t fix!
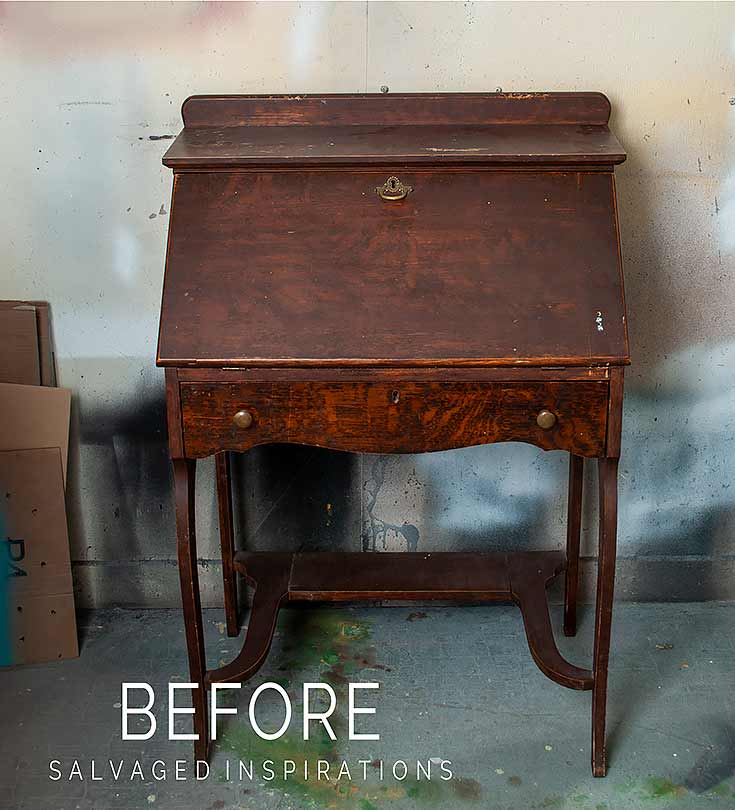
Here’s the before. A really old and gorgeous well-built piece that needed a little TLC.
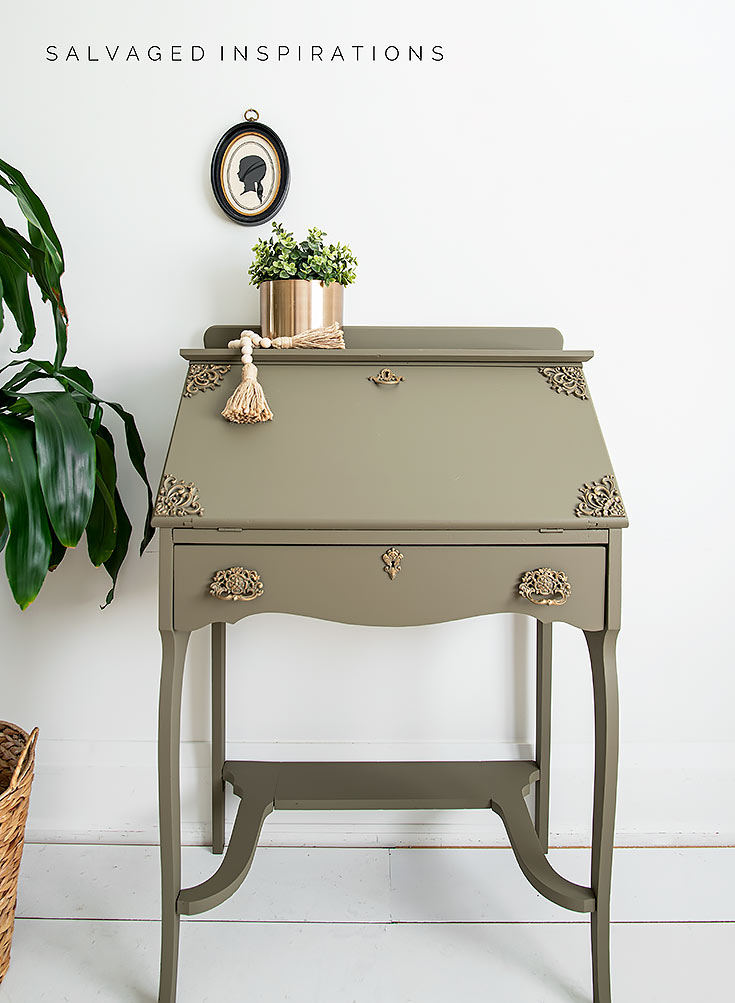
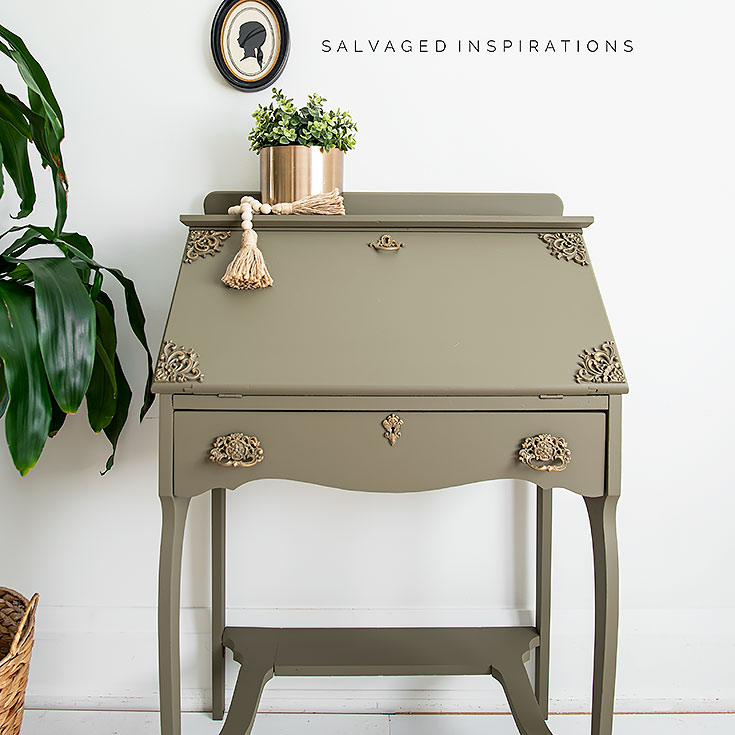
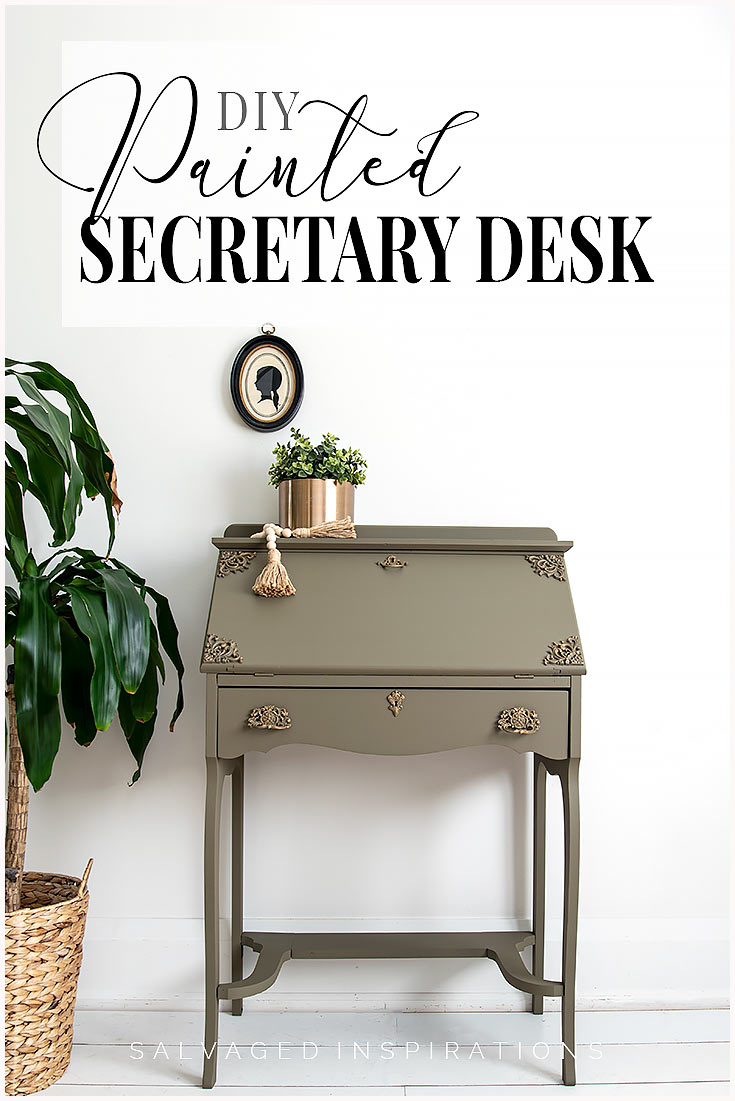
What do you think? I’m loving this monochrome vintage vibe!
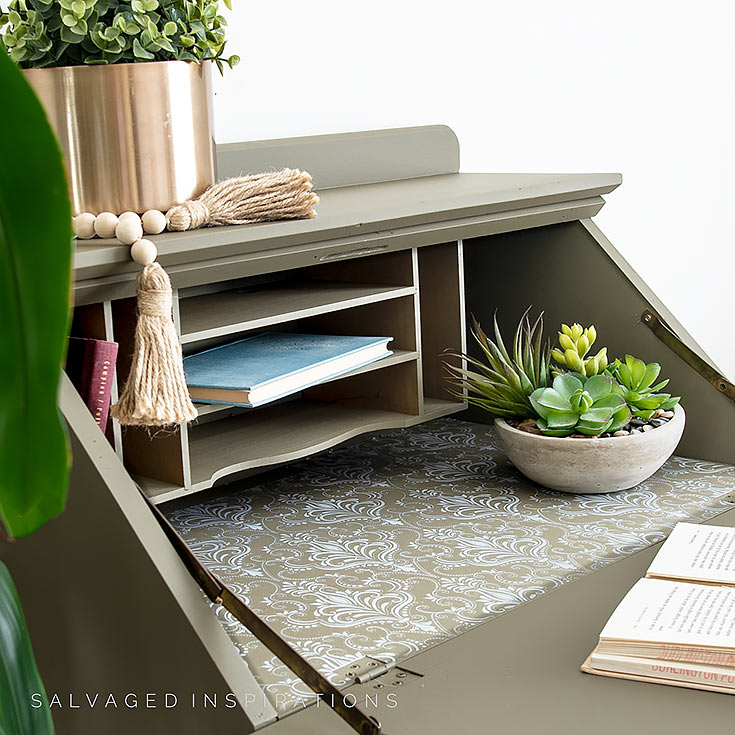
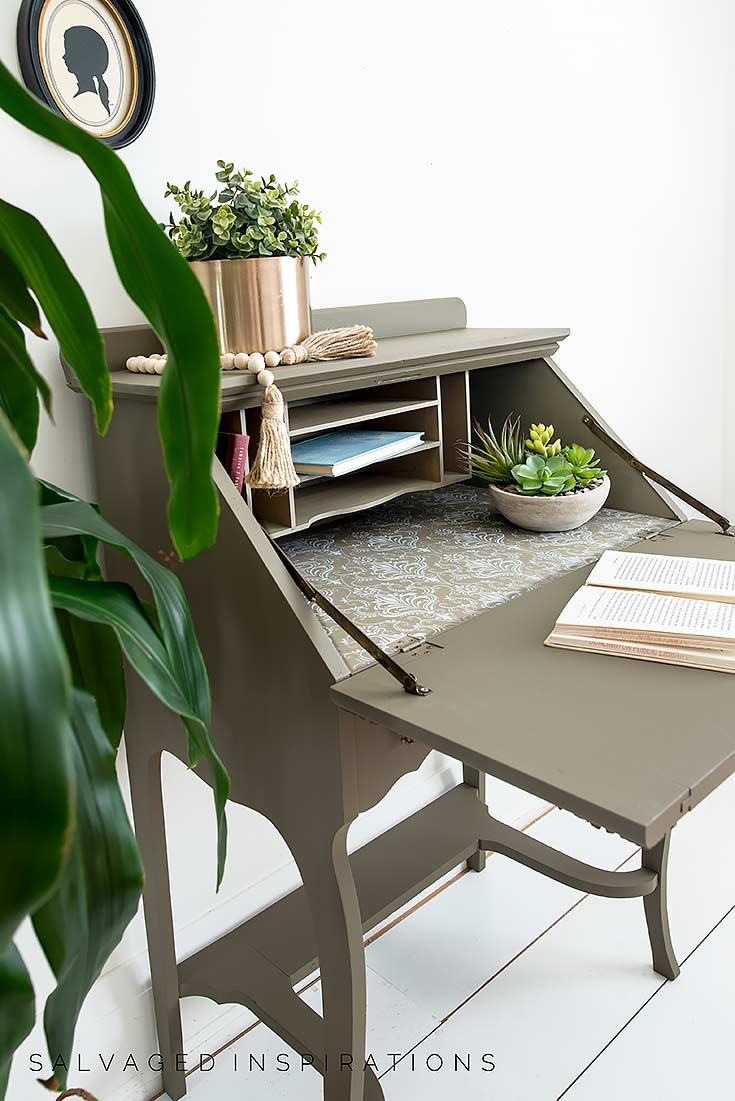
And check out these details!
THIS POST IS SPONSORED/CONTAINS AFFILIATE LINKS TO PRODUCTS I USE. YOU CAN SEE MY FULL DISCLOSURE HERE.
SOURCE LIST
Thrift Secretary Desk – SALVAGED
Husky Paint Sprayer
Orbital Sander
Sandpaper | Shop Towels | Auto Sponge
Titebond Wood Glue
Bondo
White Lightning Cleaner
Hampton Olive Silk Paint
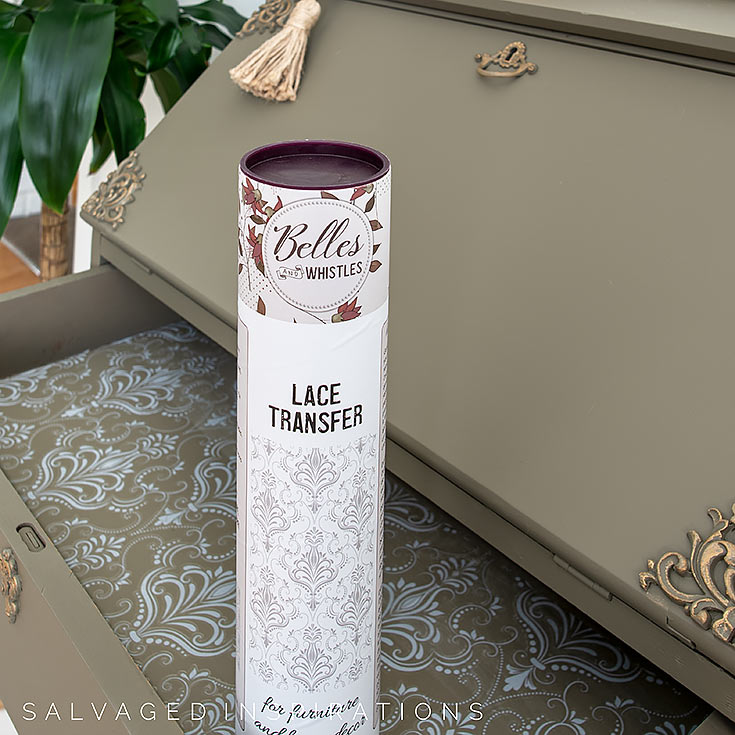
Lace Furniture Transfer
WoodUbend Appliques
WoodUbend Keyhole Cover (similar)
Pale Gold Patina
PAINTED SECRETARY DESK
This little desk was a joy to work on. I can so see this nestled in a little nook in someone’s bedroom!
Here’s the step-by-step on how to get this look.
STEP 1 – CLEAN
I started by giving this piece a super good cleaning with this White Lightning Cleaner. The fastest and simplest way I know how to do this is to use two spray bottles and a large auto sponge. I always have one bottle mixed with TSP+Water or my White Lightning (TSP substitute) and my second bottle filled with clean clear water. I spray the entire piece with the cleaning solution. Wipe it down with my auto sponge. These sponges are time savers! They are large and absorbent and cut down on my cleaning time. I pick them up from a dollar store or you can also find them online here. Then I spray with clean water and repeat the wipedown process until my sponge is 100% clean. Usually takes 2x. I realize not everyone has a designated workspace where they don’t have to worry about wet dirty floors and if that’s the case, doing this outdoors or laying a plastic sheet on your floor work to protect it.
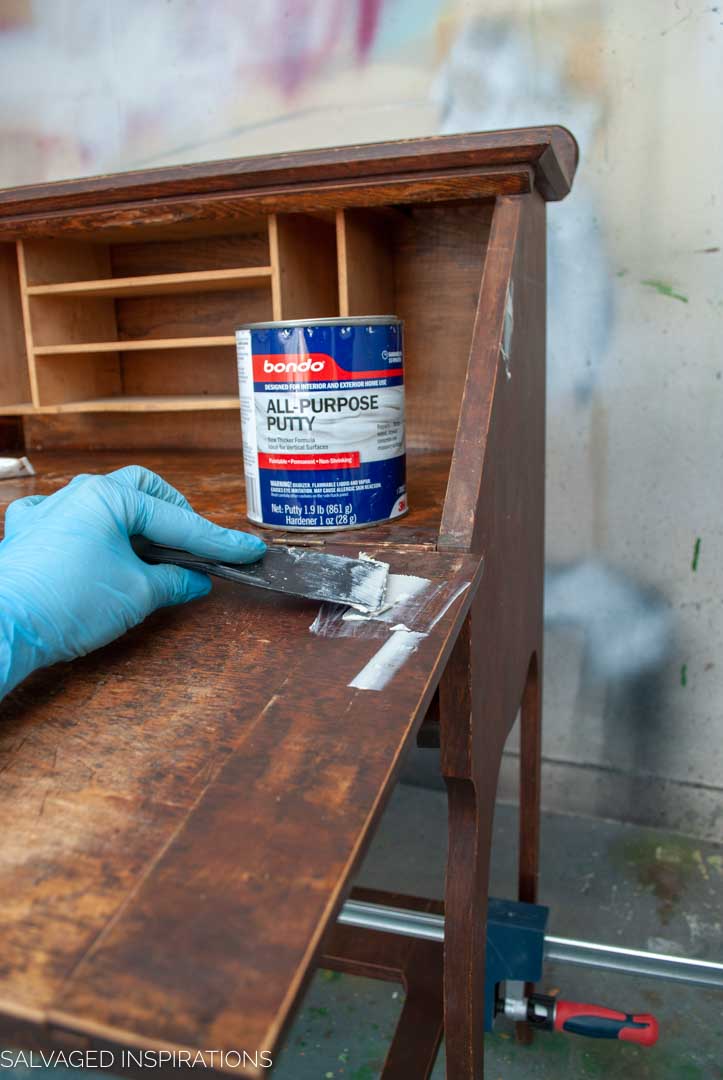
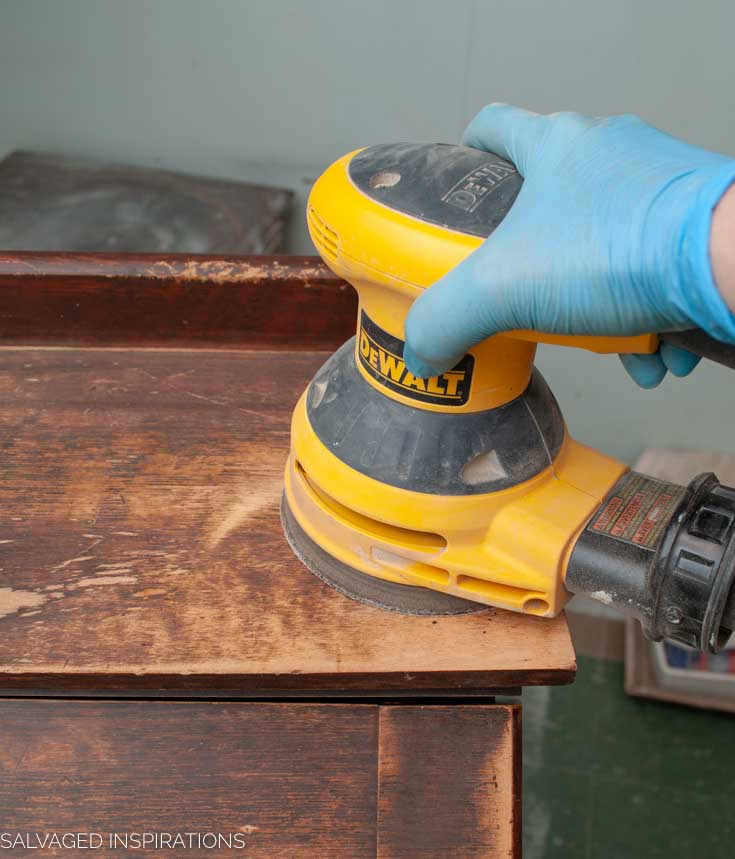
STEP 2 – REPAIR AND SAND
To repair this piece I unscrewed all the hardware that someone had drilled in from the outside.

Then to fill in all the holes I used Bondo. If you’ve never tried Bondo for repairs, I have a few Bondo Tutorials here and here. The benefit of using Bondo for these types of repairs is it dries hard and is durable and it’s SUPER FAST. You can have it filled, sanded, and start painting all within 15-20 minutes!
Once the Bondo was dry, I gave this piece an overall sanding with this orbital sander and 220 grit sandpaper.
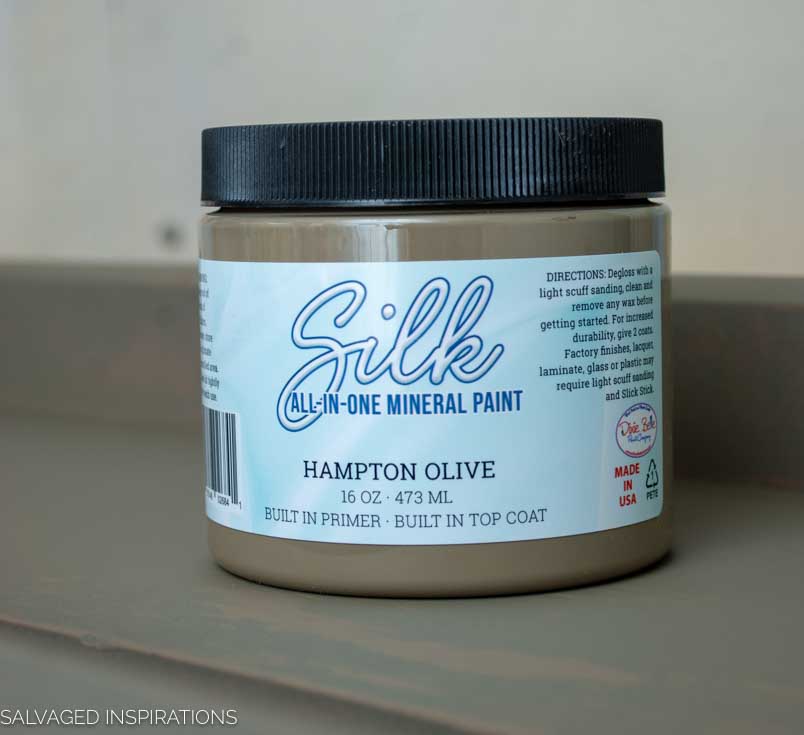
STEP 3 – PAINT
I thought I’d prime and paint all in one step using this ‘Hampton Olive’ Silk All In One Mineral Paint. I picked Hampton Olive because it’s such a stately gorgeous vintage green.
I decided to use my paint gun and spray the finish because if you’ve ever tried painting the inside of these secretary desks with all the cubby holes, it’s not fun and takes forever. To get a nice finish using a brush can be time-consuming and often frustrating if you’re impatient like me..hehe… so I find spraying much easier.
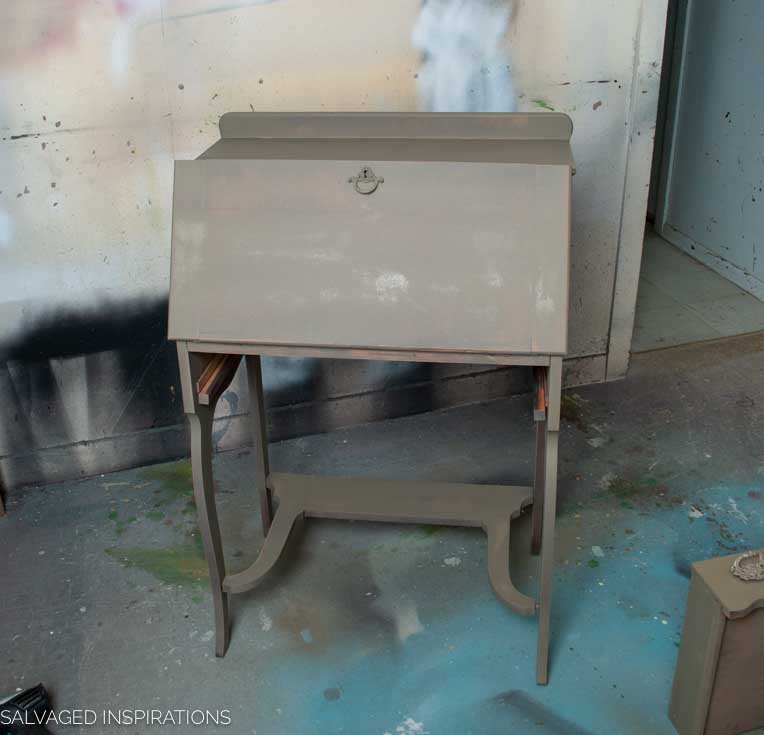
Here’s what it looked like after the first coat was sprayed. You can still see the bleedthrough and the blotchiness from the Bondo repairs. The stain blocker in Silk All-In-One Mineral Paint is really good. Just make sure you do a coat, wait 4+ hours and now that is your stain-blocking coat. Then do the 2nd coat, and wait overnight and then do the last coat. If you don’t have any bleed-through, often two coats are plenty. Of course, no topcoat is required because it’s also built-in!
STEP 4 – WOODUBEND
Before painting, I added some vintage hardware and covered the naked keyhole on the drawer with this WoodUbend Keyhole applique. These little keyhole molds are only a couple of dollars and have saved the day numerous times! I always keep some on hand in my inventory.
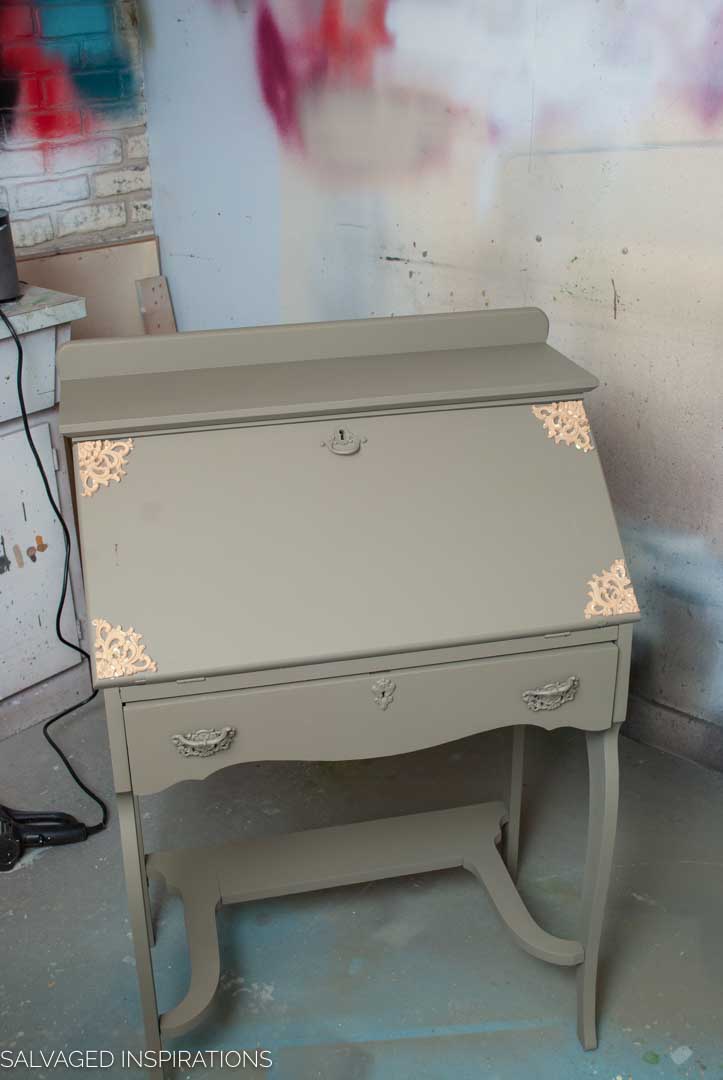
After I sprayed two coats, I thought the outside needed a little extra something. I tried a few of my WoodUbend Molds but nothing in the center was doing it for me BUT…
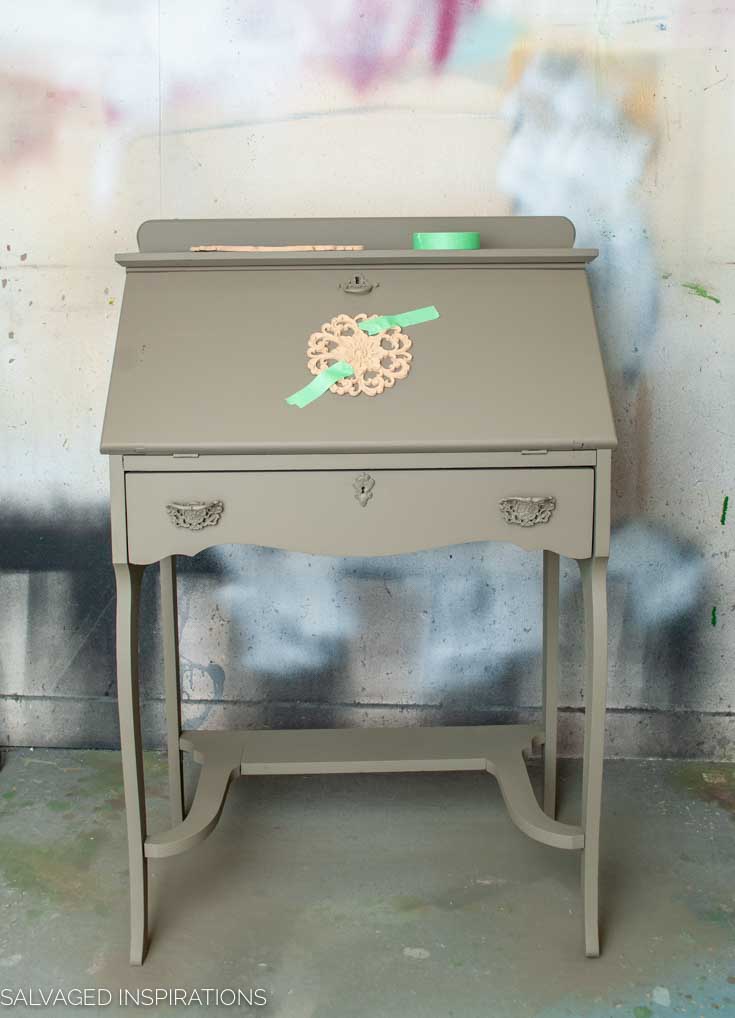
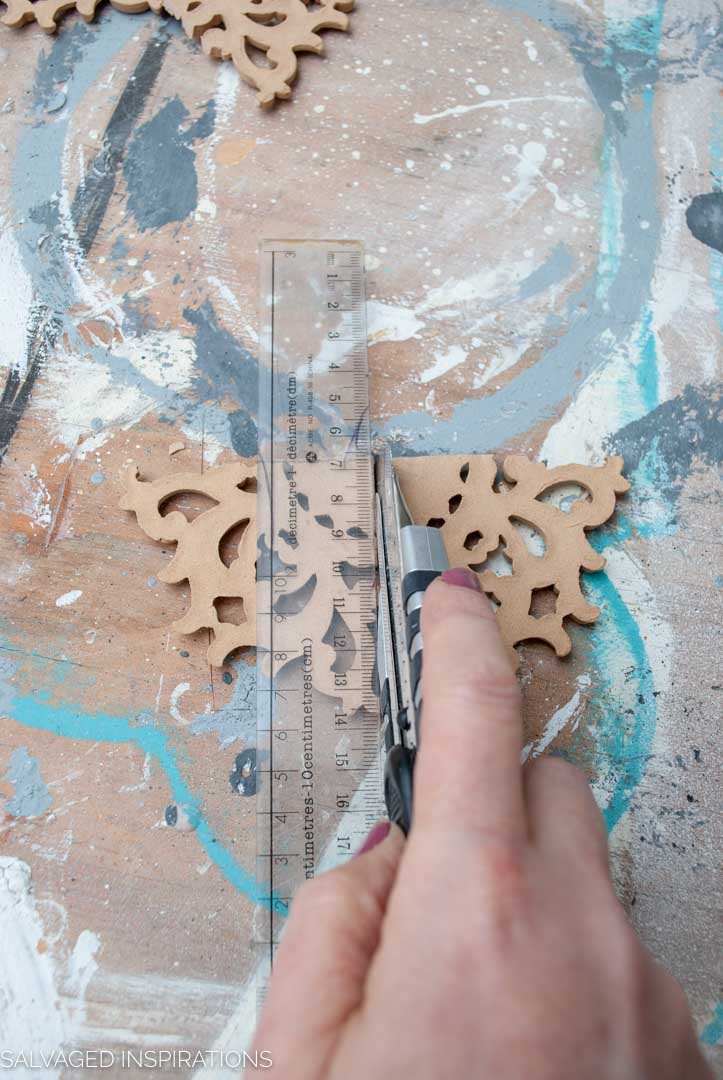
…I did like the idea of having a little detail on each corner! I took this round medallion mold and cut it into quarters. These WoodUbend Appliques are super versatile. Just heat them up with a blow dryer or heat gun and you can easily bend them or cut them. I have a full post including a video tutorial here.
Here’s what it looked like when it was glued on and before being painted. You may notice in the pic below there’s a little scratch on the left side. (The blotch is my camera lens.) I scratched the fresh paint with one of the corners of the applique. For this reason, applying WoodUbend after a piece is painted is not ideal. I much rather have them on before I start painting but it doesn’t mean you can’t do it this way. It’s just a little extra work and you have to be careful.
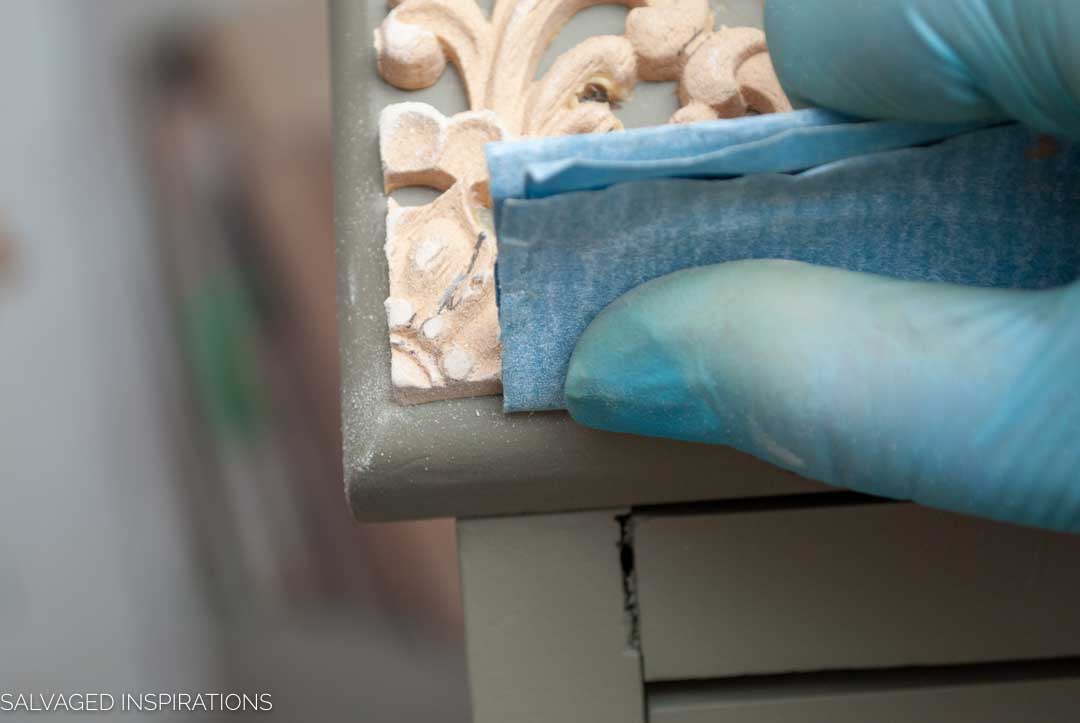
Once the corner appliques dried, I gave the edges a light sanding so there were no sharp corners.
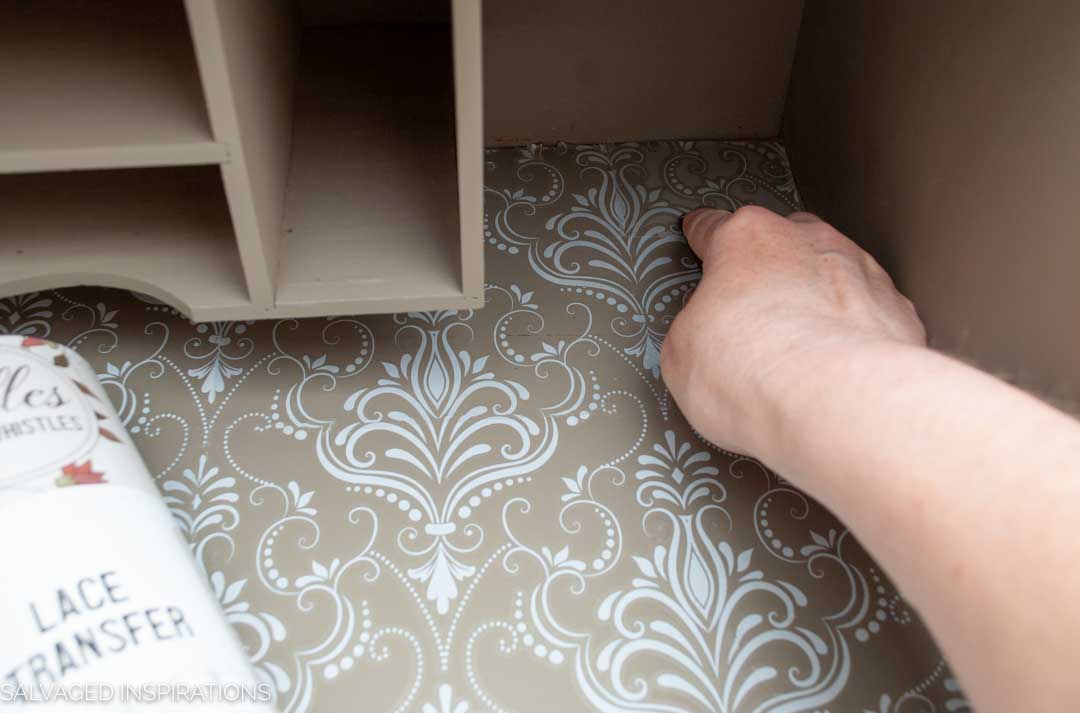
STEP 5 – LACE TRANSFER
To customize this piece even more, I added the NEW Belle’s and Whistles Lace Transfer from Dixie Belle. Their new transfers are gorgeous and this LACE didn’t disappoint! I started by adding it to the inside of the drawer but loved it so much, I decided to add it to the inside of the desk as well! If you’ve never tried furniture transfers, I have a full furniture transfer tutorial here.
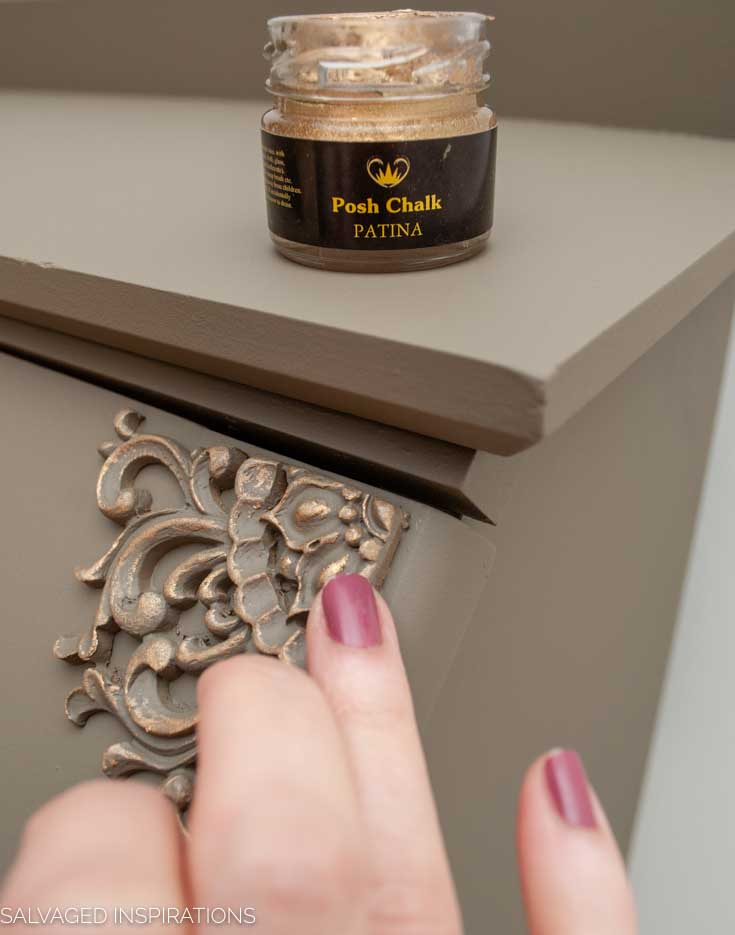
STEP 6 – ADDING GOLD HIGHLIGHTS
The last step was highlighting my hardware and appliques. I used this Posh Chalk Patina in Pale Gold which was the perfect ‘vintage gold’ to tie everything together without being too bold or brash. A tiny amount of this product goes a loooong way and it’s easy to apply. I added a little to my fingertip and rubbed it on the high spots of the appliques and hardware.
And here’s the finished look all pulled together…
What do you think of this new Lace transfer?
PAINTED SECRETARY DESK VIDEO
Here’s the step-by-step on Youtube. If you have any problems viewing below, feel free to watch it on my Youtube Channel here… and don’t forget to subscribe! 🙂
Here’s another look at the before and after.
I hope this piece has inspired you to try some of these techniques and flip a piece of your own!
I ALWAYS LOVE HEARING FROM YOU. 🙂
Happy furniture painting my friends!
Denise x
RELATED POSTS::
Singer Sewing Table Makeover
Painted Hall Console Table
Vintage Game Table Makeover
How To Paint Furniture Without Brush Marks
EASY Painted Kitchen Table Makeover
PIN AND SHARE!


I absolutely love the transformation of this painted secretary desk! The color choice is so fresh and inviting, and the details really pop. It’s amazing to see how salvaged pieces can be given new life. Can’t wait to try a similar project myself!
I have a secretary desk rescued from neighbours taking it to the tip. It is solid wood and very heavy. Every week I have a different thought on what I’d like to try and create – this will be my first attempt – so many possibilities and suppose I mess up …. Have you used wallpaper at all instead of the lace transfer which looks so great?
I have used wallpaper on furniture and it works and looks great! I have a full Pinterest Wallpaper board as well that you might get some ideas from. Have fun with your rescued secretary desk… they are fun pieces to work on!
Beautiful color & accents. On screen, it looks similar to french linen. I did a desk like this one & you’re right, brushing the cubby holes was slow.
Brushing the cubby holes is WORK…lol! Thanks Tracy and have a fabulous weekend. XOXO
Ahh I just love that Olive green color you went with on this piece! I also love what you did with that WoodUbend to dress up the corners! This is a beauty!
Thanks Natalie! Much appreciated! XOXO
I need to check out some of your videos. I’m proficient at painting with a brush but have never been successful at spray painting. And I’ve read and heard about the wonders of Bondo and Wood U Bend, but never tried them out. I’ve also gazed with admiration at some of your blended and shaded pieces of furniture but remember my long-ago fails when dabbing paints on various things with sponges, dry paint brushes, or wads of paper or cling wrap. Maybe if I see all these things in action, I’ll be emboldened to expand my repertoire.
Using a spray gun took me a few tries. There was a learning curve for sure. The Woodubend – is super easy and YOU’D LOVE IT Cyndel!
Hi Denise. Love the color and your transfer choice. So beautiful and as always you did a great job on this desk..
Thanks so much Cathy!💙
Hi Denise,
I love the secretary. I just finished a dresser using Spanish Moss which looks very similar to the color of the secretary. On the dresser, I planned to stain the top and paint the rest but I found out too late that I couldn’t stain it because I had used Bondo for the repairs on top. Bondo was a dream for big repairs but for planned staining projects not so much.
Thank you for all that you do to help with my projects.
It sounds amazing Shari! And ya, I haven’t found any filler that stains properly, Bondo included. If anyone (reading this comment) knows of one, please feel free to chime in because I’d love to try it as well!
Hey Denise! The Secretary turned out beautiful as always! Just curious, how long would you estimate it took you to complete this job start to finish? Including drying times? And on average, how many pieces can you complete in a week? I just LOVE all you do and am so appreciative of all your postings and tutorials. Thank you ever so much Denise!!
Hi Kristi! I don’t time myself unless I’m doing custom work and invoicing. I can complete 3+ pieces in a week – but I don’t. I pace myself (usually 1 project per week) because social media and blogging take up a considerable amount of time as well. Creating quality pieces I’m proud of while enjoying the process is most important to me. 🙂
Hi! First of all, I didn’t know you were a Canadian blogger (Yay!). I love it when I find one that is fabulous like you.! The secretary desk is gorgeous. After seeing this transformation, I need to find a secretary desk of my own to makeover 💕
Yes, I’m in Burlington ON, about 35 minutes SW of Toronto and thank YOU! Sending you good vibes in finding a secretary desk… they are a really fun makeover! 🙂
Love your desk as I typically LOVE all your work!! Question I have a Home Right Sprayer that I too am not thrilled with, so I looked up this spray gun and it says that Latex paint is not recommended for use with this gun? I know you usually do not use latex paint but wouldn’t most of the chalk/mineral paints fall into this category? I want a spare gun that works well and that I can count on I was impressed by the price but got nervous about latex stipulation. Would love to hear your thoughts.
Hi Kimberly! I’ve used latex, enamel, chalk paint, mineral paint and numerous water based topcoats with the Husky since 2013 and have never had any issues so long as the paint was thinned with a little water (if needed). The only thing I don’t use in this spray gun is oil based products and shellac primers. They work. But I can’t stand the cleanup for those products. Hope this helps. 🙂
This doesn’t look like the same piece of furniture! I was doubtful about the olive color but it’s beautiful! I have the lace transfers and just need the perfect piece to use them on. Thanks for your inspiration!
I’m glad you like it and thank you! Have fun using your Lace transfer… it’s gorgeous, isn’t it!
This is gorgeous!
Thank you Norma!!! XOXO
Thank you Denise for your beautiful inspirations, and especially for your recommendations and instructions. I have had a lot of difficulty using various top coats, streaking and uneven, and am going to give General Finishes a try hoping it looks like your work! You really are an amazing artist.
Thanks so much, Celia! GF is an amazing brand. I’ve used my fair share on various projects. I was featured as their “General Finishes Blogger Of The Month” back in 2016… if you’d like to check out a few! 🙂 Good luck with your GF topcoats, I hope you love it. XO
with the ripples in that wood grain I wish you would have considered using wood dye on parts of it and maybe paint the parts too damaged. go check out some of the wood dye projects on youtube and prepare to be astounded at the results.
Hi Susan! I’ve seen some of those wood dye projects and they are impressive. Definitely not the look I was after for this secretary desk tho.
Really pretty.
Sometimes when I paint ‘lids’ like the desk front that opens, the thickness of the paint causes the hatch to not close properly. Have you ever experienced that? If so, how do you handle it? Sand a bit more before applying paint to accomodate the thickness of the paint when it closes? Just wondering if you have a nifty trick.
Unfortunately, no nifty trick…I do the same as you, Liz.:) I sand to make sure everything is working perfectly before I paint. Then I sand between coats of paint making sure everything dries without touching each other.
I love this redo. I have my husband’s secretary desk he had growing up. I have been wanting to do something with it. I use it as my night table. My dread it to be able to sand the cubbies. I love that color and the transfer.Thank you.
Thanks, Janet and ya, I agree. Sanding or painting the cubbies is a bit of a chore and work out on the hands for these desks. I have small hands and it’s still hard to get them in there ..lol.
Hi Denise,
Love your work. I happen to have an antique secretary that was my mom’s. It’s in really bad shape. I have cleaned twice and sanded it, but there is a lot of discoloration in the wood. It’s also very dry. Should I /can I apply howdy doody oil first or just paint where needed. I wanted to restore it back to original walnut but it’s just not possible. Also, the cubbies are painted Kelly green! I can’t remove it so should I spray paint this area? Thanks so much for help. Sorry for the lengthy email. Gayle Judd
Hi Gayle! Howdy Doody Hemp Oil is usually used as a stand-alone oil on raw wood or it can also be used as a sealer over DB Chalk Mineral Paint but I wouldn’t apply it before painting. As for the cubbies, they can be a little work. I would give the Kelly Green a light sanding and then spray paint if you can. Hope this helps. 🙂
Love how it turned out! Always enjoy seeing your transformations. Curious as to where you found this piece for $19.99!! Wish I could come across these finds for those steal of a deal lol
Thanks Rosie! I bought it from a Value Village in the GTA. 🙂
You are so clever! I love your projects.
Thanks Kathleen!
Very elegant-glad you gave her a new look! Love the colour. One question-where do you purchase the bondo wood filler? Thanks
Thanks Laura! I buy mine at Canadian Tire, Home Depot or online here. I also don’t spend the extra money on Bondo Wood Filler… I just get this Bondo All-Purpose because I haven’t noticed any difference.
The desk is so pretty . Loved the green
Thanks Joan! x
Absolutely gorgeous, Denise, and what a steal for $20!! You never disappoint, my friend! XOXO
Thanks, Christy! Hugs XOXO
Love how this secretary turned out! The appliques and the lace transfer really make it special!
Thanks so much, Maryellen! XOXO
This green is so lovely, and I can’t wait to try it. Thanks for sharing another beautiful makeover. xo 🙂
I really like this vintage green as well! Can’t wait to see what you do with it my friend! XOXO
Drab to fab upcycle, Denise! The lace transfer is so pretty, especially against the dark color. Love the new pulls too, they compliment the appliques beautifully.
…”drab to fab”… love this!🤗 Thanks, Marie! XOXO
I love the desk. Great job and great color.
Thanks Charlotte… I really like the Hampton Olive as well!
This is one of the most gorgeous pieces you have done. And very straightforward and uncomplicated. Wow! I have a secretary desk that I found on the side of the road a number of years ago and I used AS Louis Blue paint and a floral wallpaper. A transfer would have been much easier, methinks! Now that I have seen your piece, I am debating repainting it in olive… Thanks for the inspiration!
Lucky you for curb-shopping one…woohoo! So happy you like it and it’s sparked some ideas, Gabi! If you give this paint/color a try I’d love to hear what you think! 🙂
Hi Denise. What a beautiful secretary desk. I love it in the gorgeous vintage olive green. The details you added (woodubend, gold highlights, and lace transfers) are stunning. I’ve always wanted an old secretary desk but have never been lucky enough to find one in my local secondhand shops.
I hope you find one!!… and thank you!💕
One word GORGEOUS. !!!
Thank you Lisa! 🙂
i have NOT painted a secretary desk, but i have one ready to do, it’s been sitting in my living room for well over a year! thanks for the inspiration Denise – i love the look of the lace transfer. i haven’t purchased that one yet, but i think now it’ll be one of the next ones i do buy! (Maybe i’ll win Christy’s latest Giveaway!)
Thanks… I love this transfer too! And I’ll keep my fingers crossed that you’re one of the lucky winners Gwen!🤞
Hi Denise! What a great transformation. The before picture was sad and the after picture is amazing. I’m impressed by the stain blocker because you can tell this was going to be a heavy bleeder. Great job!
It was kind of sad…lol. Thanks so much Cheryl! XO