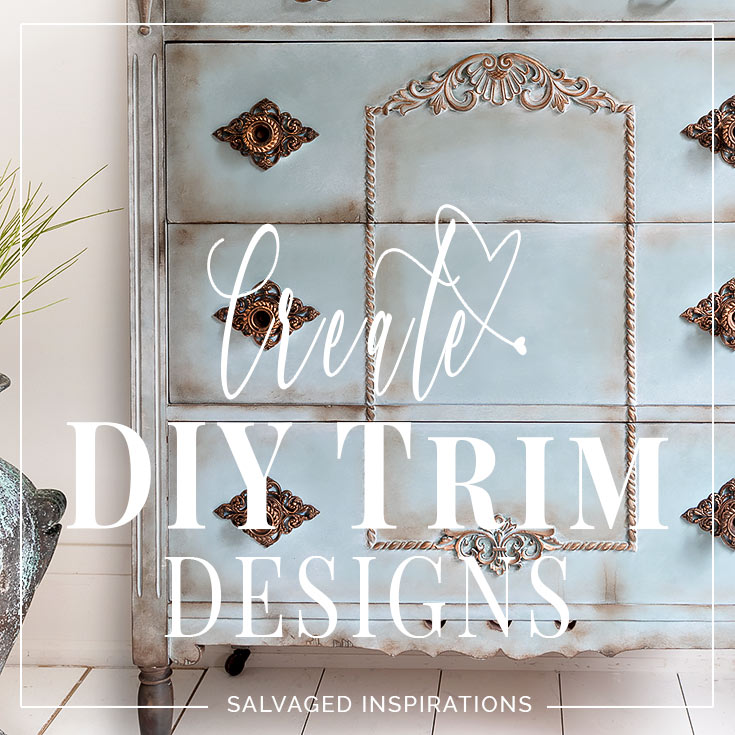
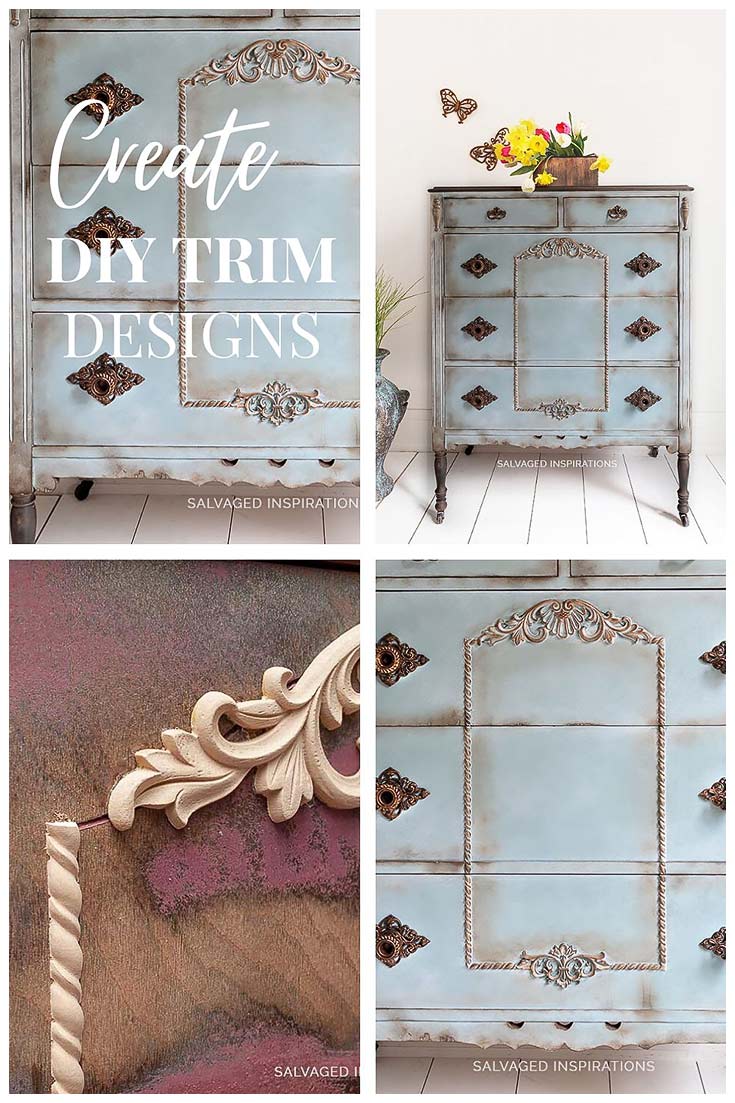
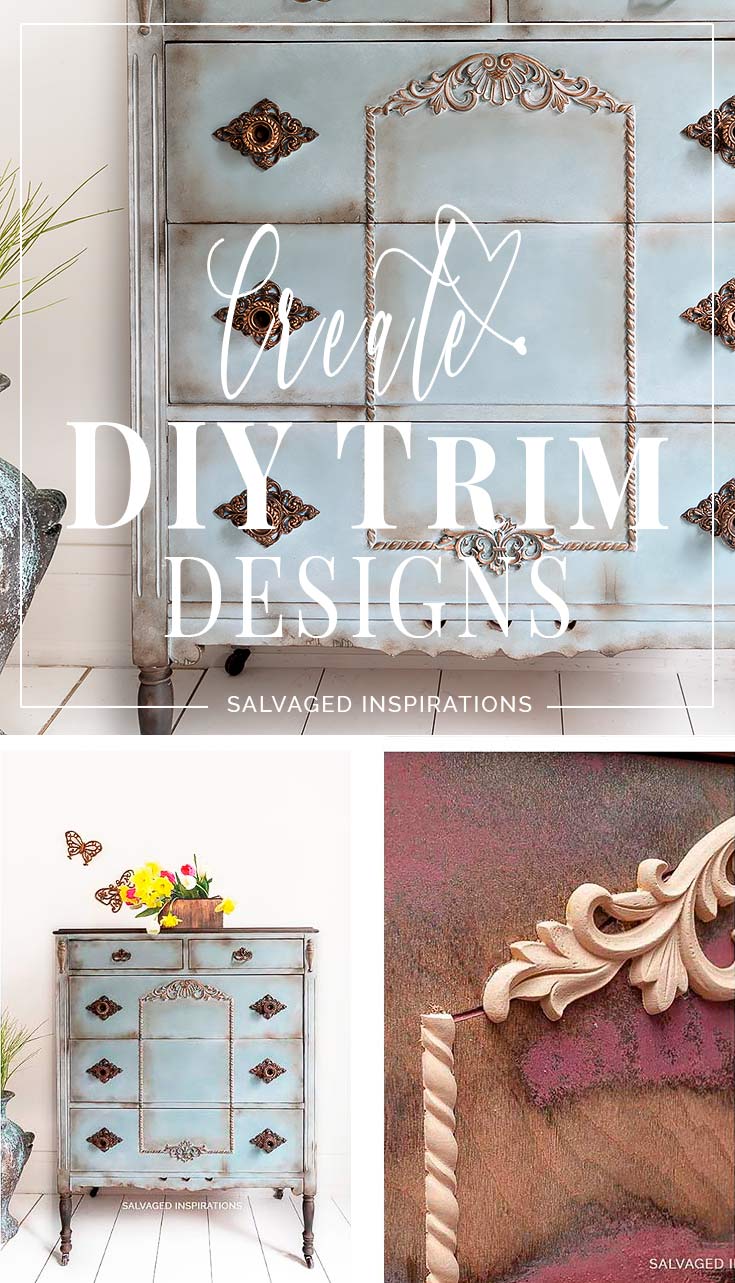
MAKE YOUR PAINTED FURNITURE STAND OUT WITH A ONE OF A KIND FURNITURE APPLIQUE/TRIM DESIGN!
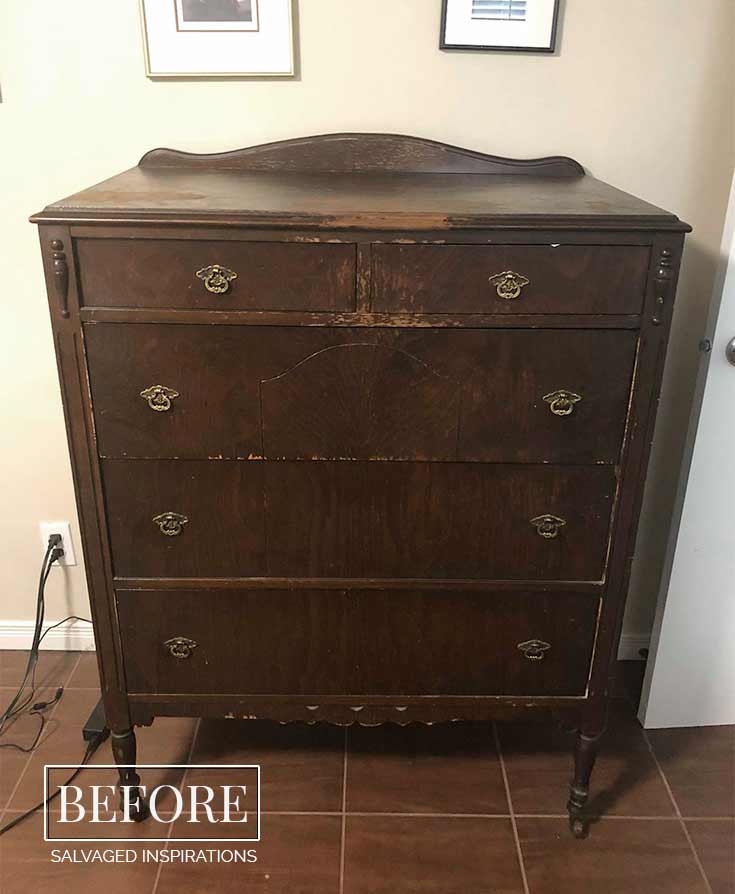
Hi sweet SI family, I hope you’re doing well and staying safe. Last week I took some time to go through my finished furniture inventory. It’s been on my to-do-list for some time but I kept putting it off. Like most of us, I’d rather start a new piece than touch-up an old one. I put aside a few dressers that haven’t sold and a few more that have imperfect finishes from all the shuffling around we do here. A few of them are great candidates for a FRESH makeover – like today’s vintage tallboy!
It’s also one of my favorite days of the month. I’m joining my Trash To Treasure Crew!! I’ll be sharing links to their before and after tutorials at the bottom of today’s post.
So, this is the before-before. I found this vintage dresser on Facebook Market Place last summer.
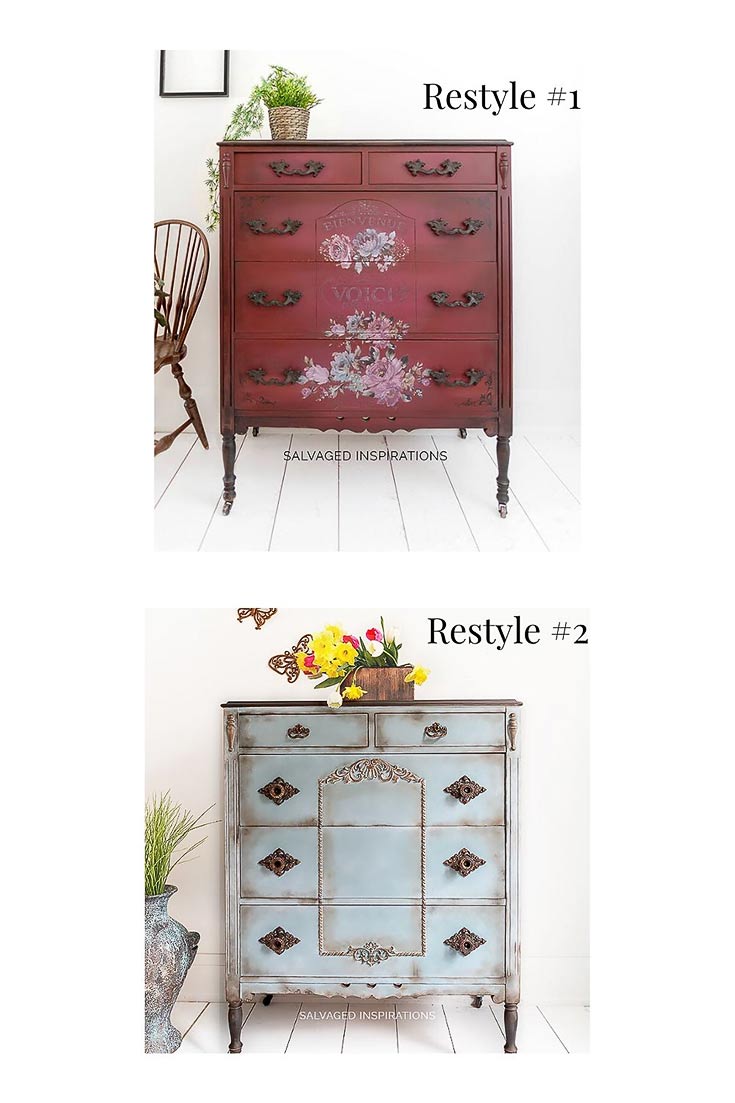
Below is REstyle #1. You may recall it was my Fuchsia Sunset makeover. This dresser has been moved up and down the stairs so many times, the finish on the stain and side needed touching up. But instead…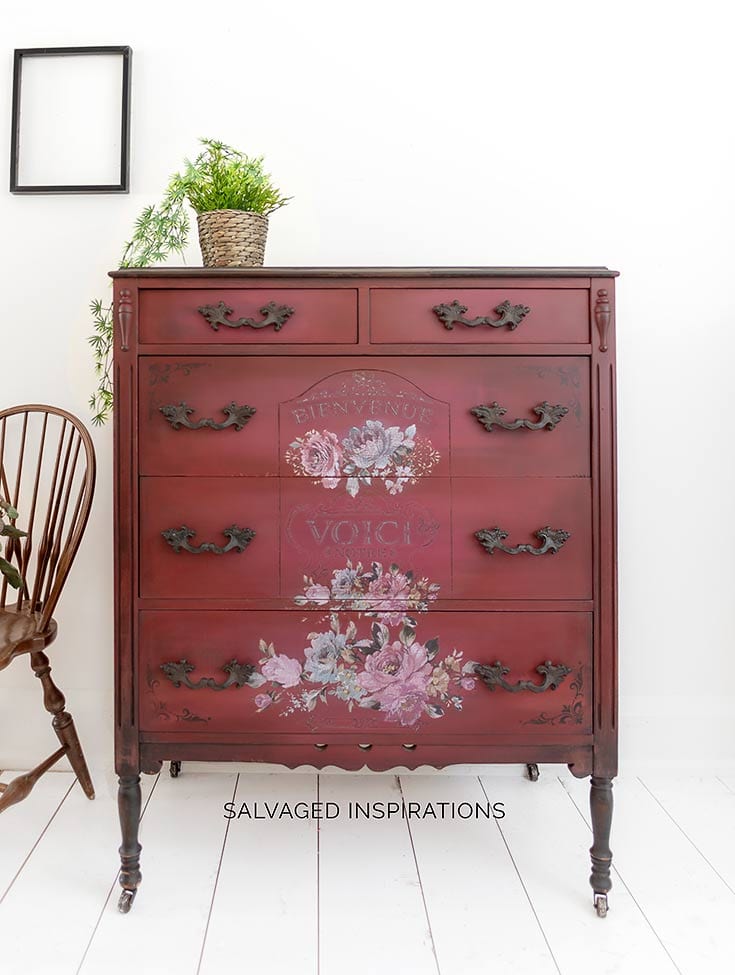
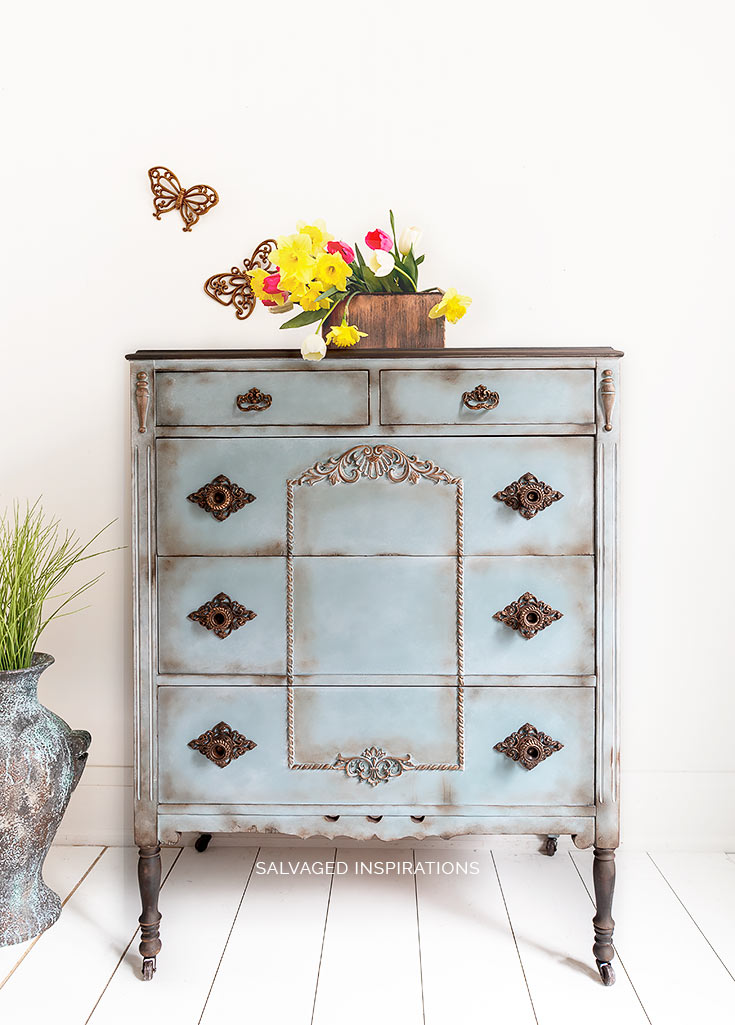
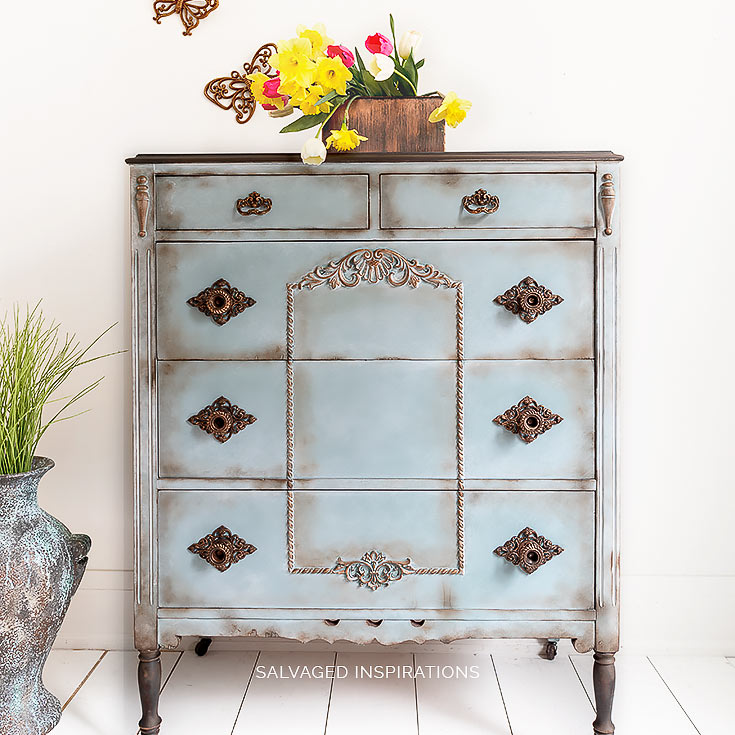
…I had fun giving her a NEW look. Below is REstyle #2. What do you think?
THIS POST IS SPONSORED/CONTAINS AFFILIATE LINKS TO PRODUCTS I USE. YOU CAN SEE MY FULL DISCLOSURE HERE.
SOURCE LIST
DIY TRIM DESIGN
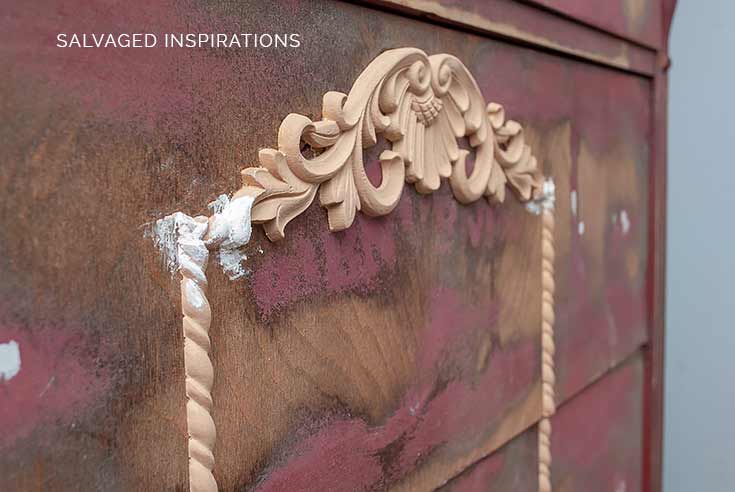
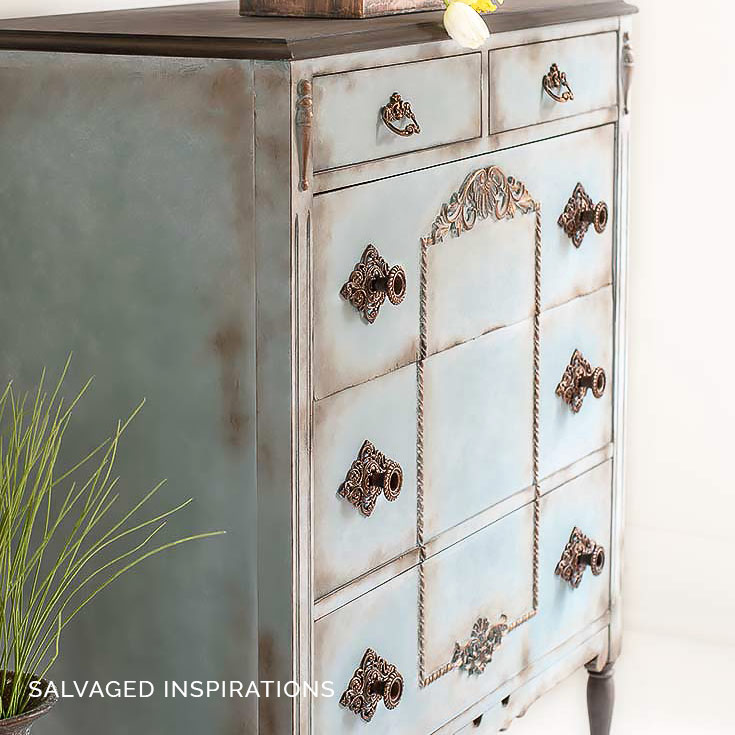
To give this dresser a brand new look, I created my own DIY applique/trim design using a few appliques and trim I had on hand. All the products I used were from WoodUBend but you can mix and match brands or even create your own furniture mouldings.
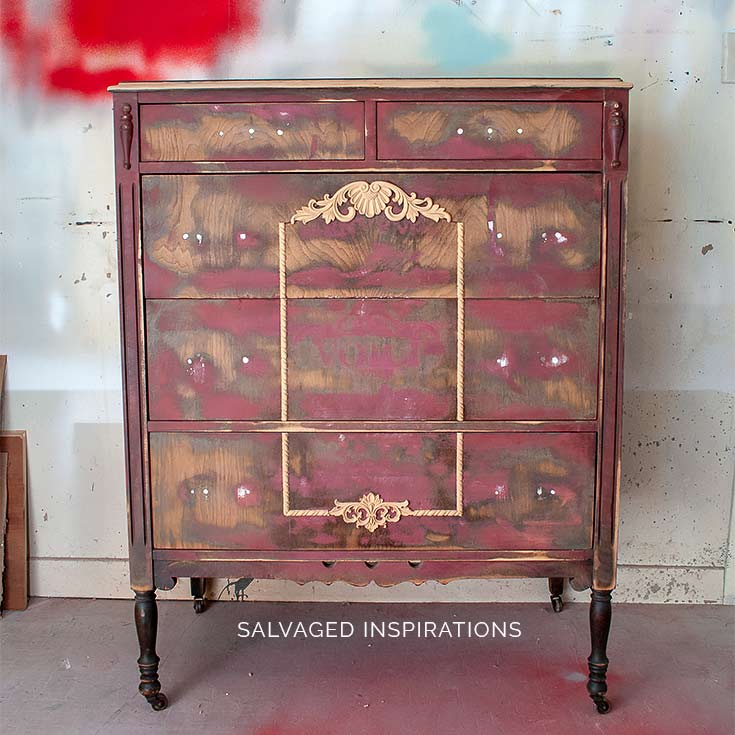
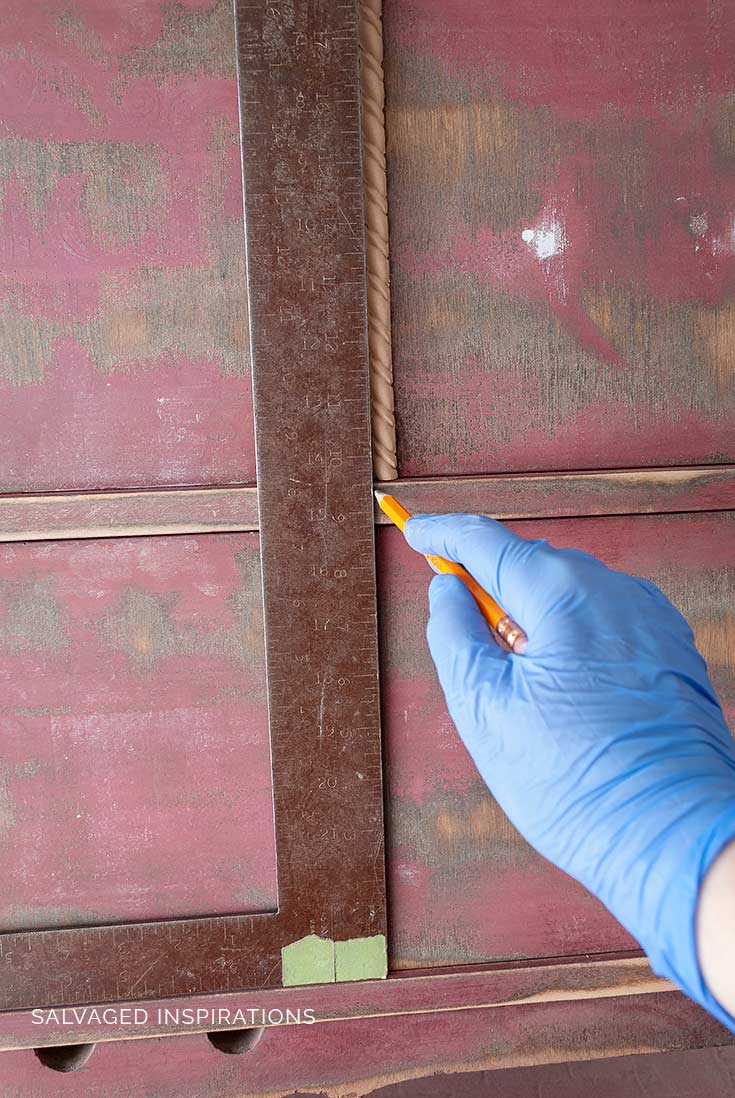
I started by sanding the Fuchsia Sunset finish off and removing all the dust. I played around with the pieces of trim until I came up with a design I really liked.
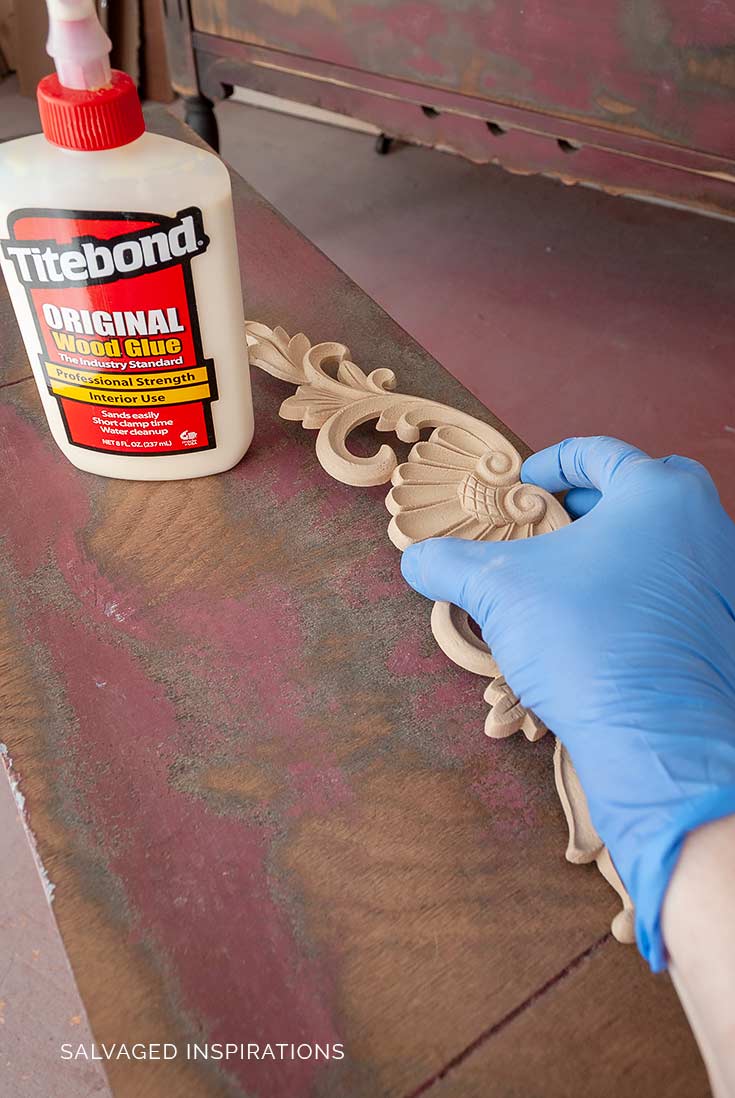
Once I knew where I was going to place everything I started gluing. I didn’t need to measure the top two drawers because I used the already existing lines in the dresser as my guide.
Mixing, matching, and joining appliques can create a totally unique look. There’s no right or wrong. I would encourage you to play around until you like what you see.
A few tips to keep your trim looking neat and professional…
Use A Straight Edge
For the top two drawers, I followed the design original to the dresser. The bottom drawer was blank so I used a square straight edge to make sure my trim was installed perfectly straight.
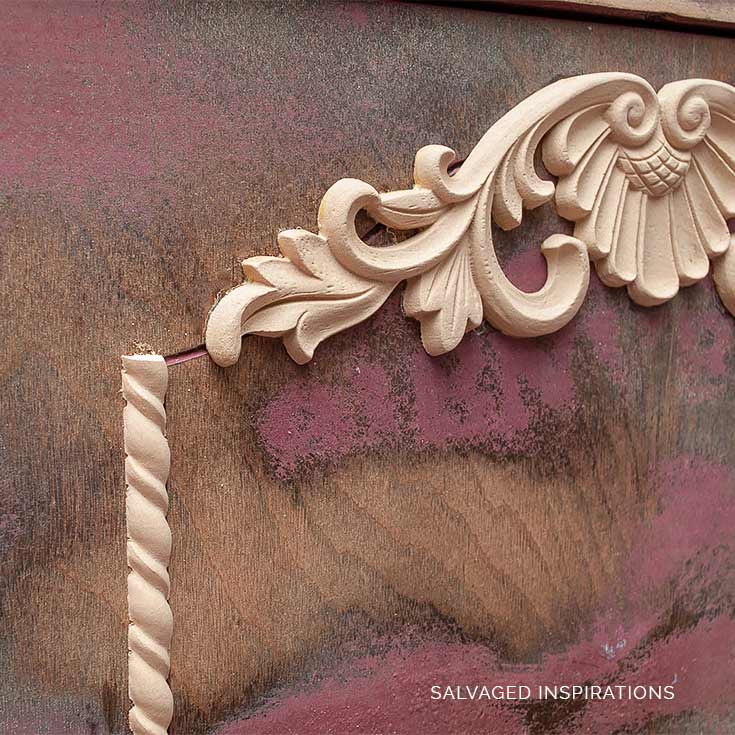
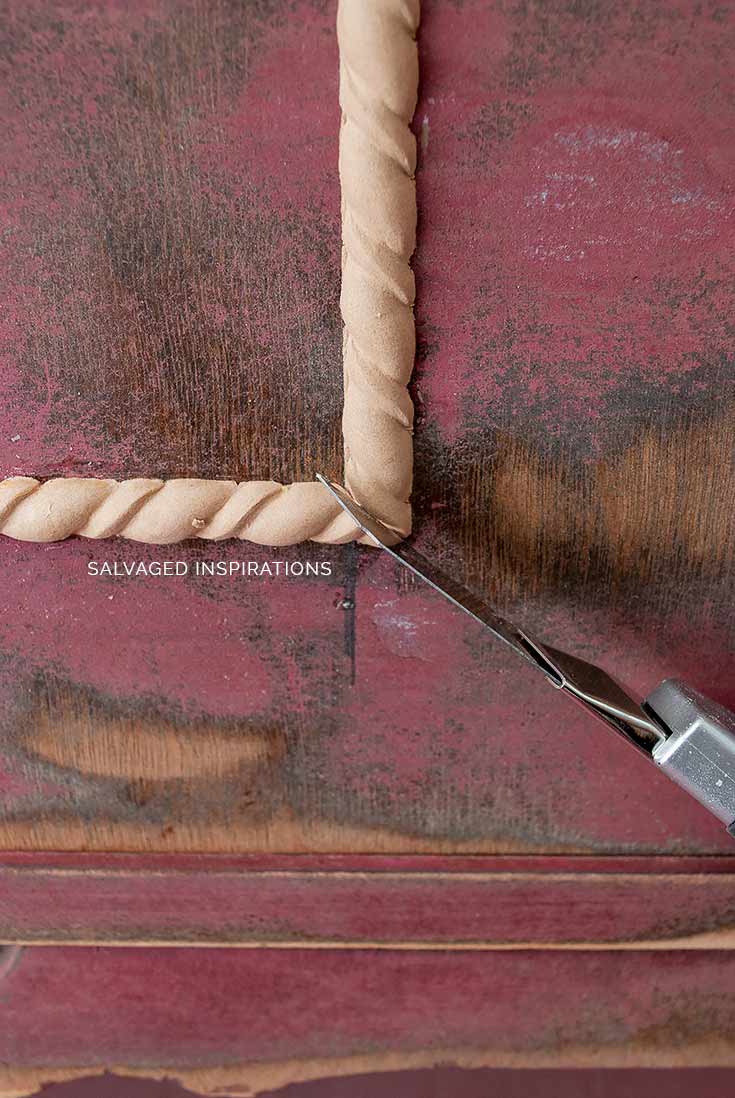
Miter The Corners
A mitered corner is what you see on a picture frame for example. It’s two pieces cut at a 45-degree angle so they fit nice and snug. When joining your trim design, nice fit corners will give a professional look.
With WoodUBend, it’s easy to heat and cut with a utility knife. Depending on what type of trim you use will depend on what tool you need to cut your piece.
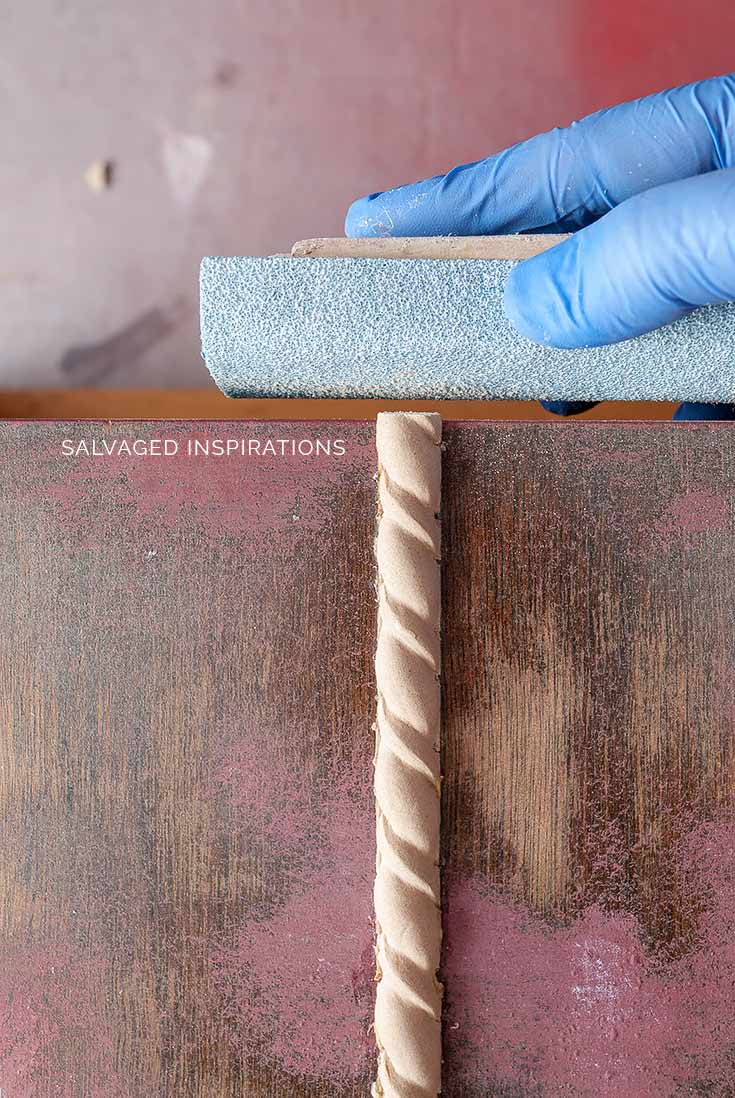
Sand Rough Edges
To keep all the drawer tops smooth, I made sure I sanded any overhand flush with the drawers.
Fill Gaps With Wood Filler
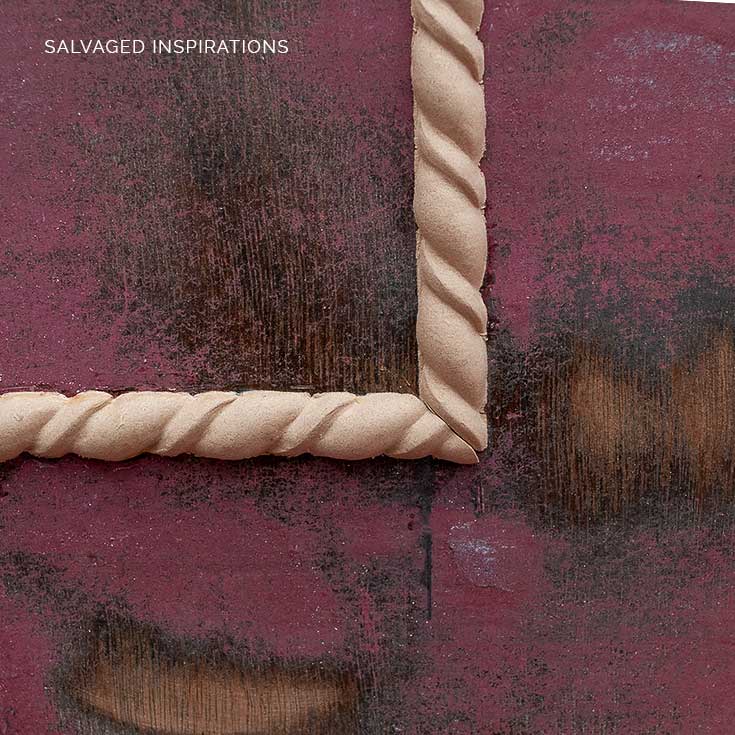
For any joints that didn’t perfectly cut at a 45-degree angle, I used this wood filler to create a seamless look. Once it’s sanded and primed, you’d never know!
Here’s what it looked like all put together before priming.
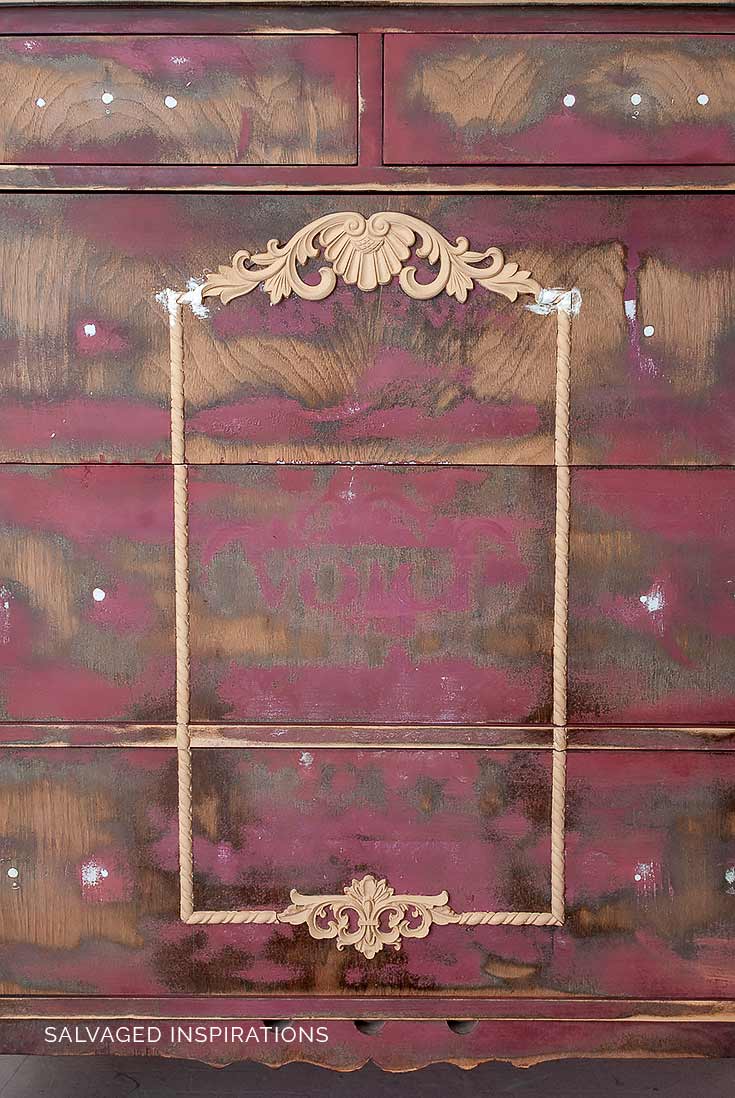
After designing and gluing on the trim, I primed the dresser with BIN Shellac Primer. If you missed the post on how to stop bleedthrough using this primer, you can view the BIN Shellac Primer post and video here.
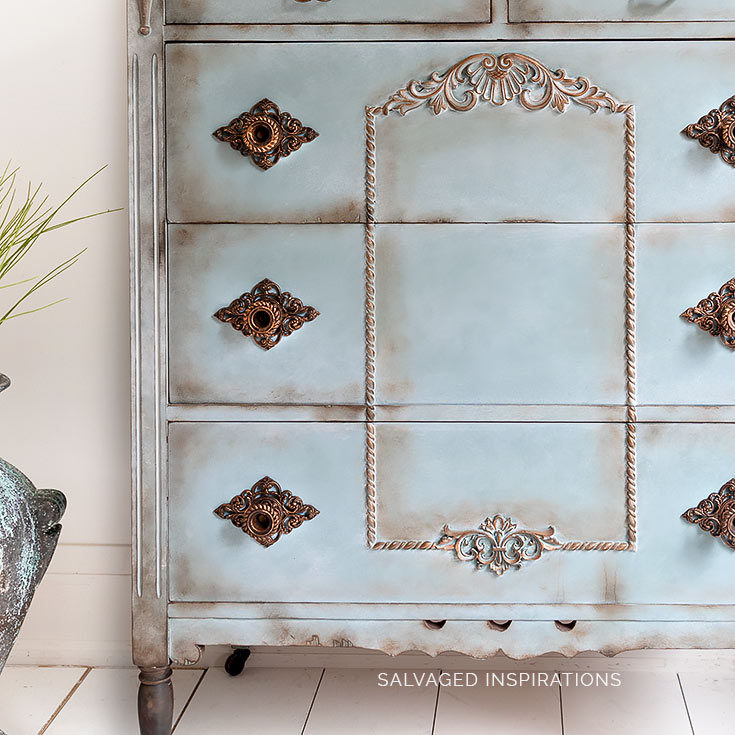
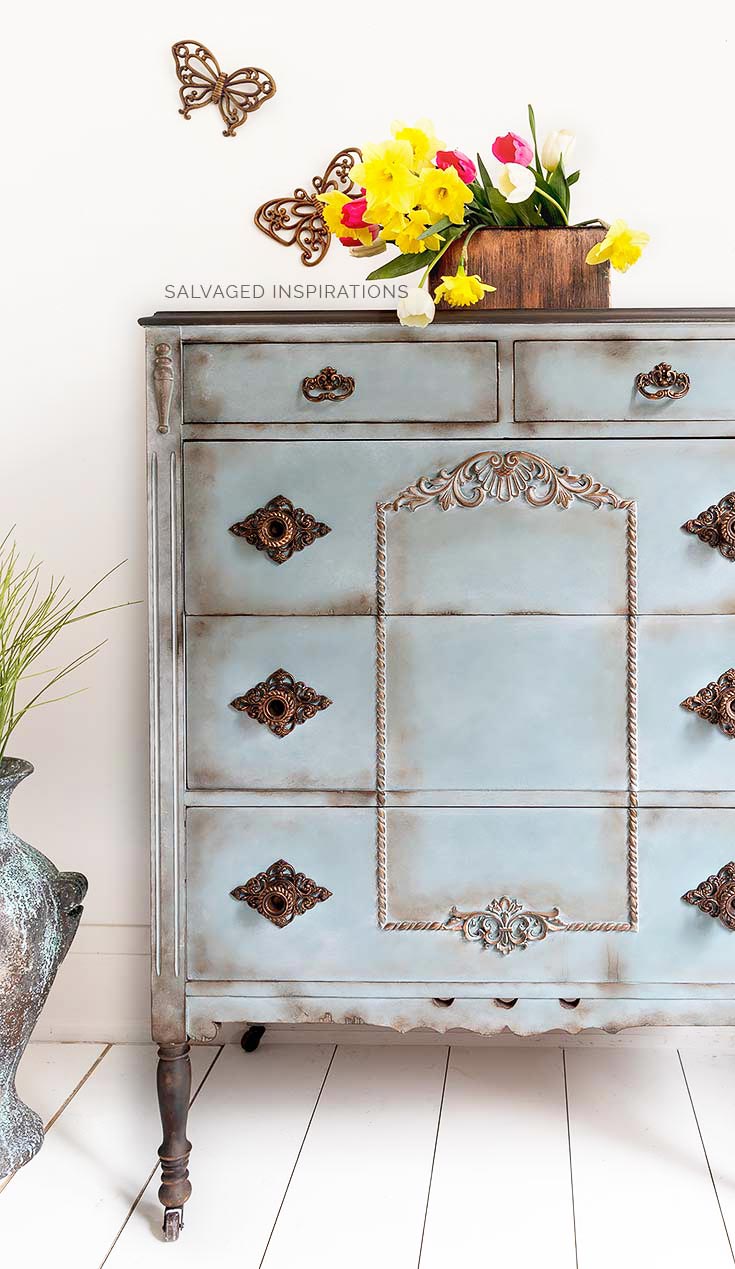
Here’s the finished look…
I’d love to hear which look you like best down in the comments!
Makeover #1 or Makeover #2?
And now for some TRASH TO TREASURE FUN!
I know you’re going to LOVE what this talented team of ladies share. They never cease to surprise me with their creativity! Below are their BEFORE photos. Visit the links underneath to see the amazing AFTERS and to learn how they did it!
I’m heading over to take a peek right now myself! x
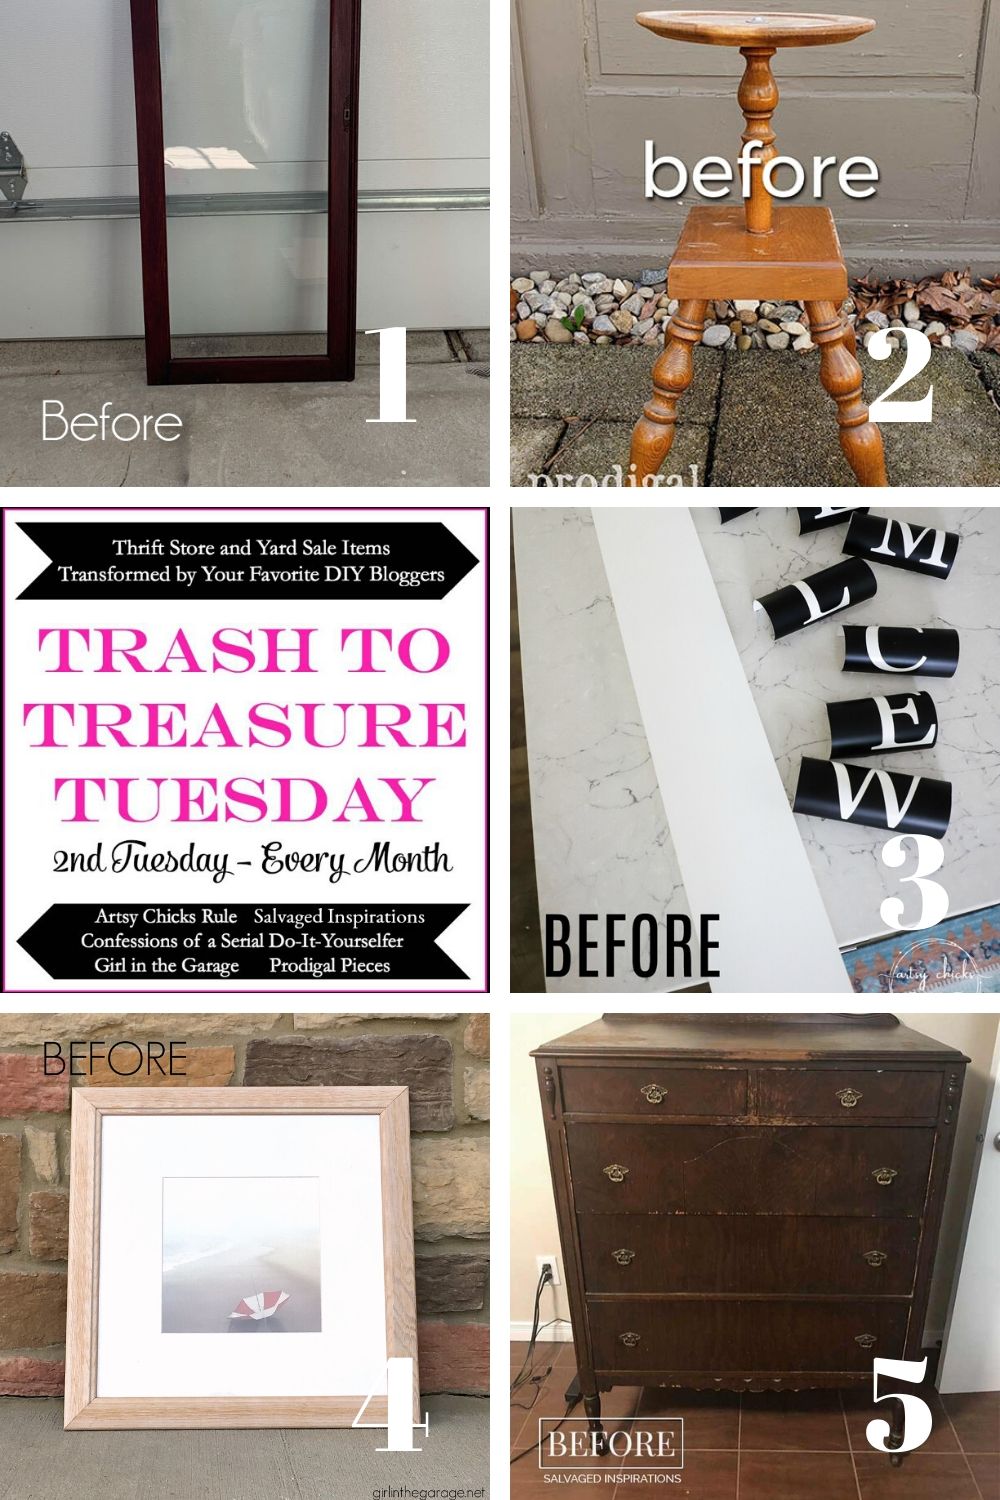
1. Confessions Of A Serial DIYer
5. Salvaged Inspirations (I’m so happy you’re here!!)
**UPDATE – I had requests asking how this Vintage Duck Egg paint finish was achieved. I’m sharing the exact same finish in the exact same colors here. I’ve also linked to the video in the related posts below. 🙂
LET ME KNOW WHAT VERSION OF THIS DRESSER YOU LIKE BEST. AND WHAT YOU THINK OF THIS DIY WOOD APPLIQUE DESIGN? I ALWAYS LOVE HEARING FROM YOU.
Thanks for reading. 🙂
Wishing you a beautiful day filled with inspiration and Happy Painting friends!
Denise XO
RELATED POSTS::
DIY Resin Furniture Appliques & Onlays
DIY Furniture Appliques | Iron Orchid Molds
Easy To Glue On Appliques
How To Use WoodUBend on Painted Furniture
How To Apply Bendable Wood Appliques – Video
Vintage Duck Egg Paint Finish – Video
PIN AND SHARE!

So gorgeous! I love this, and your use of the WoodUBend is spot on!
Thank you Rebecca! XOXO
I use sponge brushes and fusion mineral paint. Works great !
Your trim is gorgeous!
No,no,no. Real wood is so rare now, especially solid wood but even thick veneer is worth preserving. If you have to add color do it subtly, not decoupage the intended look away. Its like do you want to hear “Boogie Wonderland” as performed originally by Earth, Wind and Fire or by the only alternative on you tube, The Hindley Street Country Club. Original always lasts. So work it up from there.
Try different color stains with just a bit of blue added. Make it look like it was blue somewhere when it was made you just can’t tell where now. See the blue thru the beautiful wood. It’s much classier and you won’t want to include it in your next garage sale where someone will buy it just to strip it back to the way it was.
Believe me, I know, I do it all the time.
I love love love the blue❤ can I ask where you got the knobs from?
So stunning!!!!
Thanks Tricia! And the knobs came from Hobby Lobby and then I added some Hammered Copper Gilding Wax to have them tie in with the piece. 🙂
I love the natural top with the natural legs and some of the wood showing where you sanded. The trim seals the deal for the blue. When I put wood filler on molding it is so difficult to sand out and smooth out the tiny curls and cracks. Maybe I’m not using the best wood filler. Stay safe and healthy. XOXO
Thanks… and I hear you about the sanding. I find the DB Mudd really ‘soft’ to sand – perfect for these types of fills. I don’t use it for hardware holes or larger repairs though… just because it is so easy to knock down. I hope you’re staying safe and healthy too and enjoy your weekend Cecilia.
Love the before and after. Both have a place. It must have been hard to sand off that beautiful transfer. The mouldings add a great detail, Looks original to the piece. Just the right amount of simplicity and design. Beautiful work!
Thanks so much Susan… and ya, I wish the transfer was re-usable! 🙂
The Sunset was pretty but I think would appeal to a smaller group of people due to the color. The blue is lovely and the application of Wood U. Bend to add detail. The color would go with so many decor styles. and always be a standout.
Thanks so much for chiming in. Have a super weekend. 🙂
OMG! You knocked the blue one out of the water. It is so beautiful. Love that look. The first one was beautiful but the blue one is breathtaking. I agree with Christie, I would love for you to do a video on how you did the blue piece. I know you told us the colors and what you did but would love a video. Thank you so much for sharing
Thanks, Jane! I think the blue one is taking the lead again. And yes, once I find a piece to do this technique on, I’ll make a video for you. Thanks for the suggestion! 🙂
Both are equally beautiful, Denise! I love the u-bend trim that you added, so pretty. You know my love of all things red sooooo you can guess which camp I’m in. 😉
You didn’t even have to tell me…lol.;) Thanks my friend! Hugs
Ohhhhh, super pretty Denise!! Love what you did.
Thanks so much, Teri! 🙂
I love them both, they are beautiful! But, the blue is just unique! Did you use the cocoa instead of dark wax? it looks great. Also, did you paint the blue in a circular motion? I really like the variations of color. Thanks for sharing your passion with us! Meg
Thanks Meg! Yes, the chocolate paint was swirled on in the replacement of a dark wax. The blue was painted on solid. Then the cotton white was used as a wash and dabbed off with paper towel as I did in the video here. 🙂
I like #1
Team RED! Thanks Margaret! x
Both versions are gorgeous, Denise!! xo
Thanks Jen! XOXO
Gosh, I have a broken heart….I loved the fuschia color/transfer. The new dresser is also gorgeous and has wonderful hardware. Sure wish you could have sold the fuschia! Keep up the good work!
Thank Mary! I wish I had sold the fuchsia too… it was beautiful. My fault though. When I did the makeover and stained the top, it wasn’t as perfect as I would have liked — so I set it aside to redo. Then it got more dinged up by moved here-there-and-everywhere to stay out of the way of all the other makeovers coming and going and well…now it’s blue. Thanks for chiming in Mary! XO
Definitely for number 2!
Yay, Thanks Susan! 🙂
Both dressers are beautiful but if I lived closer I’d buy the blue one in a heartbeat! I vote for blue. ~ Nicki
Thanks Nicki! Thanks for chiming in. 🙂
I like them both but when I saw the fuschia one I said “wow, that’s a beauty, I wish that it was in my house”!
Judy for team #1! Thanks so much! 🙂
I love them both, but am a blue girl so no.2 is great for me. Well done and beautiful!
Thanks, Darlene! And it’s pretty neck and neck but I think the blue one has a few more votes. Thanks for chiming in! 🙂
I like anything BLUE! #1 is also beautiful, but my heart says vote blue!!! I’d love to have it in my bedroom.
Thanks, Maggie! And it would look amazing in a bathroom! Some nice perfume bottles and white fluffy towels is what I’m envisioning. 😉
OMG I’m in love with Version 2. Both are gorgeous I couldn’t stop looking at the blue version. I think it’s the most beautiful piece of furniture I’ve ever seen. You are so talented. Can’t wait to see more. I would also love to see your paint technique.
Thanks Barbara! You just put big a smile on my face!😁
It’s a difficult choice., Denise. I like 💕 both paint color choices and .the appliques and hardware one the blue one is nice I totally love the Appliques.. But ….I keep going back to look at the fuchsia sunset chest.. It is gorgeous.
Thanks Shirley…If the fuchsia sunset keeps drawing you back I’ll put you down for team #1 then!🤗 Thanks for chiming in! XOXO
Oh,my! Both are spectacular! I fell instantly in love with the fuchsia and have kept it in my personal folder of favorite inspiration pieces. When I first saw the new version, I had no idea it was over the fuchsia and my eyes popped out. Now I’m in love with both. I’m very sad to see the first version go – it should be saved for posterity. But, the new version is an entirely different type of amazing. There’s no way i can choose a favorite. I guess I’d have to go with the newest version since the first no longer exists. I would like more details on how you created the new paint finish. How you can take the same piece of furniture and come out with 2 completely different but beautiful pieces awes me. You have a true talent. Thank you for sharing it with us all.
Thanks so much, Christie! And when I find a piece of furniture that screams for this type of antique finish, I’ll be sure to create a post and video demonstrating how I do it. Hope you’re staying safe and well. 🙂
As usual, both are beautiful!! Hope you are staying well!
Thanks, and I hope you and yours are staying well and healthy too my friend. XOXO
This combo of VDE and Chocolate is fantastic. It would fit a clients project so well.
Probably 6 months ago one of your guest/girl tribe members did a sheep cutout with yarn. I have looked all over and cannot seem to find it. Do you know who did this. She had a whole tutorial.
Why can’t I find it😔😋
Thanks Mollie! I really like the color combo as well. 🙂 As for the sheep cutout with yarn, I believe you’re referring to Larissa’s Clothespin Sheep Ornaments. Super-cute… enjoy!
I LOVE the drawerbpulls!!
Thanks Angela… I love them too. 🙂 I bought them from Hobby Lobby at 50% off and then highlighted them with the same gilding wax I used for the trim! 🙂
They are both so beautiful! I love red and blue but it was so beautiful in the red I would never have been able to redo it, but it came out gorgeous.
Thanks Robin! 🙂
So beautiful, Denise!! I love the added wood trim, what a difference it makes! xo
Thanks my friend! XOXO
Love, love, love look #2!
Thanks Karen… I think #2 is taking the lead!
Denise, I like both designs but I love, love Style Number 2. You have inspired me. Where do you buy the wood bend?
Thanks so much for sharing. This is so beautiful.
Hi Lori! We’re getting a lot of votes for #2. Thanks for chiming in. 🙂 I’ve been getting my WoodUBend here… hope this helps. 🙂
So pretty! It looks like it has always been there!
Thanks Audra! I think so too! 🙂
I love the second version!! I also love the wood pieces you added. Thank you so much for sharing your work.
Another #2 vote… thanks for chiming in. And thank you Ionara! 🙂
I loved #1 when it first was published, but now I’m in camp #2. It looks beautiful!
Hi Carla, thanks! Another vote for camp #2. Thanks for chiming in. 🙂
Hi Denise! I love them both, please don’t make me choose! It would break my heart to have to redo the first makeover, but the second one is spectacular too! I love learning from you! and like your name says, you are an INSPIRATION! thanks!
LOL, you don’t have to choose Gwen. 😉 And ya, maybe I’m odd… hehe. I’d much rather strip a piece down and start from scratch than do touch-ups.😐
Hi Denise, I like #2 version the best. But I did like the Floral design on #1,
Thanks for chiming in Liz! XO
Amazing looks. Love them both, but for me, sunset without the floral would have been spectacular! Then I see the blue and I’m totally confused… who could pick a favorite? They are both dynamite!
Aw thanks Diane… much appreciated! XOXO
The first makeover is lovely but the second one is breath-taking. Oh to have the talent and know-how! I was hoping you would share how you painted and antiqued the piece. It is gorgeous!
Thanks, Bonnie! And I can share this painting/antiquing technique for you in a future post and video… I’ll just need to find the right piece of furniture to use it on. 🙂
I totally love the new aqua color! You are so talented, love your work! Hope you are staying healthy.
Thanks Brenda! I hope you’re staying well too. 🙂
The original transformation was lovely but this is over the top gorgeous! Thank you.
Thanks so much, Phyllis! XOXO
I love #2. What color blue is that? I have a 1930’s waterfall vanity that I want to redo in that color.
Thanks
Hi Tawnya! 🙂 I used Vintage Duck Egg Blue along with Cotton and Chocolate which I listed under the source list. 🙂 I think it would look amazing on a 1930’s waterfall vanity!
Hi! I absolutely love the 2nd restyle. The shading and the blending are beautifully done! The colors are so soothing. I’m sure it’ll take wing and fly out the door!
Thanks so much, Sue! 🙂
oh my word, I loved loved the original makeover. I’m such a red gal. that said this second makeover is too die for, I must go back and read every detail. keep it coming Denise! Stay well my Friend.
Thanks Roseann! And I hope you’re staying well too my friend. XO
I absolutely love the wood applique design that you added! It really dresses up the front of this dresser. I love both versions, but I think I’m leaning towards the blue…just beautiful!! XOXO
Thanks Christy… and isn’t it amazing what a little trim can do!? Another vote for makeover #2 it is! 🙂
Hi Denise. I absolutely LOVED the fuchsia sunset dresser and didn’t think you could top it, but I have to say “0H…MY…GOSH”, your blue makeover #2 is PHENOMENAL. The elegant and timeless Tiffany blue you chose is stunning (Blue is my favorite color). I’m always in awe of how you can transform furniture into completely different looks. Both are gorgeous. Thanks for sharing<3
Aw, thanks, Monique! And I think you’ve mentioned blue is your favorite color so we’ll add you to team #2… hehe. Thanks for chiming in and I hope you’re staying well. XOXO
That is gorgeous!!! The blue is definitely my favorite, (although, the fuscia sunset was very pretty as well).
Wow! Absolutely lovely!! 🙂
Thanks, Stacey and thanks for chiming in! 🙂
What a fantastic new look, Denise. I’m always a sucker for blues, so this one totally suits me. Beautiful!
Thanks so much, Larissa! Camp #2 for you! XOXO