HOW TO MAKE A DIY ROPE MIRROR LOOK LIKE A $529 INSPO MIRROR FOR UNDER $20! | YOUTUBE VIDEO
 Hi creative friends! I’m excited to share this EASY DIY with you! Here’s how to create a $529 DIY Rope Mirror Look-A-Like for under $20! This is a project I did for my sister and to be honest, I wasn’t sure how I was going to like the end result… but I LOVE it!
I’m also sharing…
- How To EASILY Remove Paint Off A Mirror
- How NOT Burn Your Fingers When Using A Glue Gun
- How Staging Props TOTALLY Change the Look of Your Furniture (or home!)
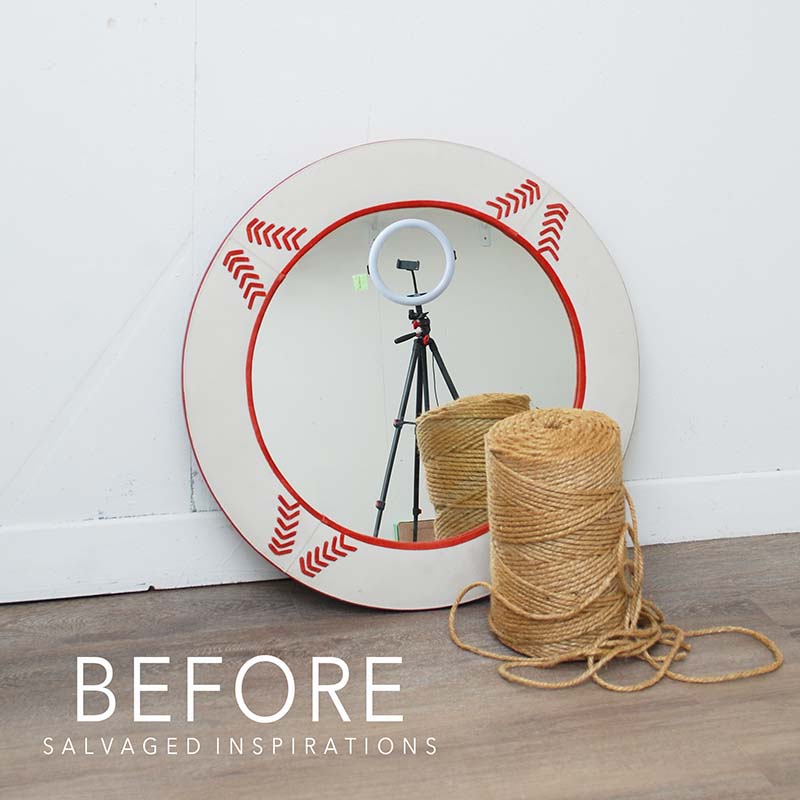
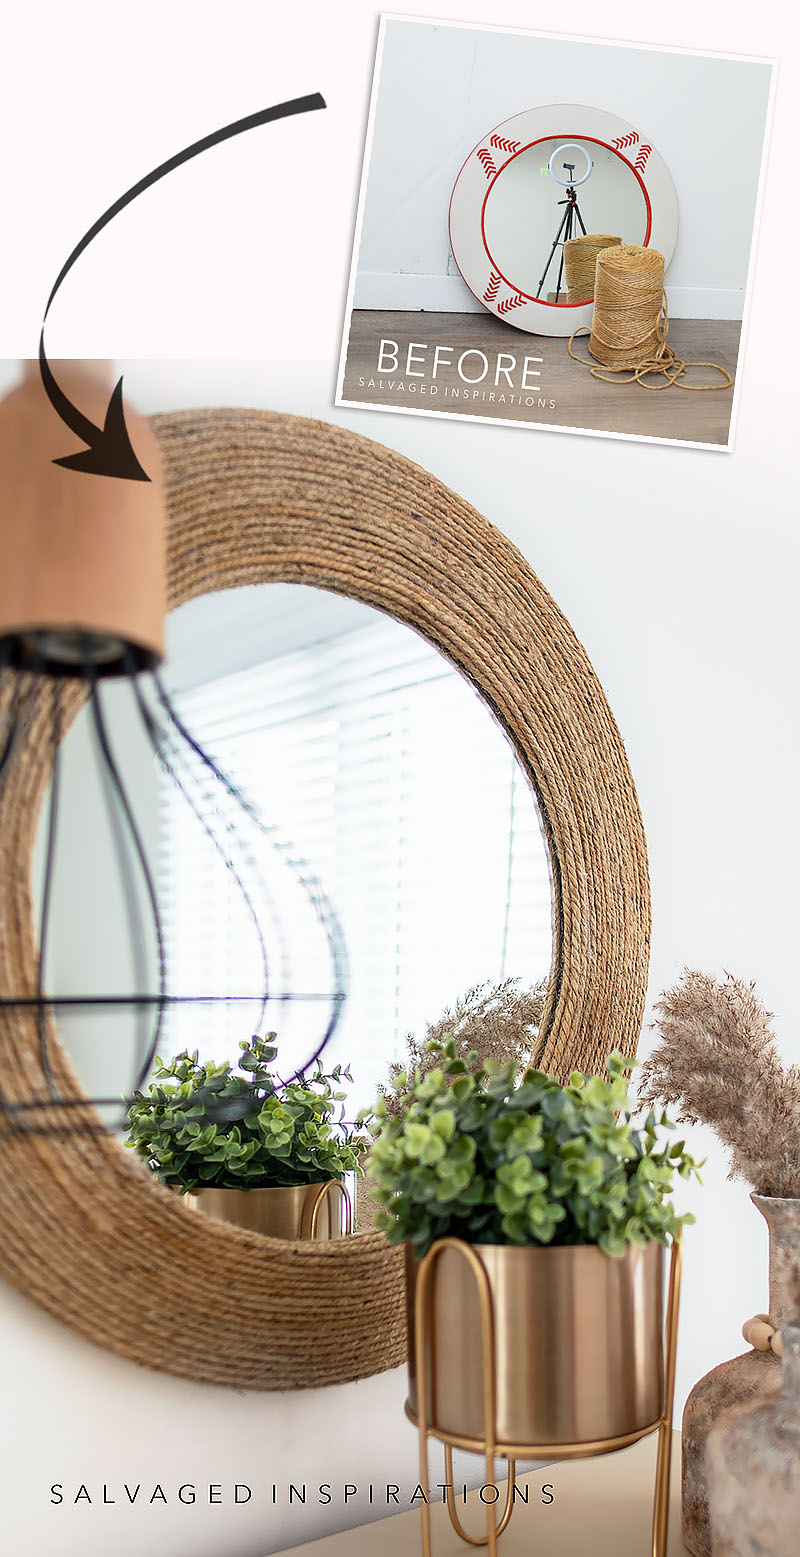
Here’s the thrift mirror I started with. It’s a Bombay Baseball Mirror. Solid and well built… just not my sister’s style. 😉 She found it at a Restore selling for $11. The spool of sisal rope was selling for $4 at a garage sale in Rochester NY! I’ve used it for styling furniture which you can see here.
After about 1.5 hours of work and a few hot fingertips hehe, here’s the NEW look!
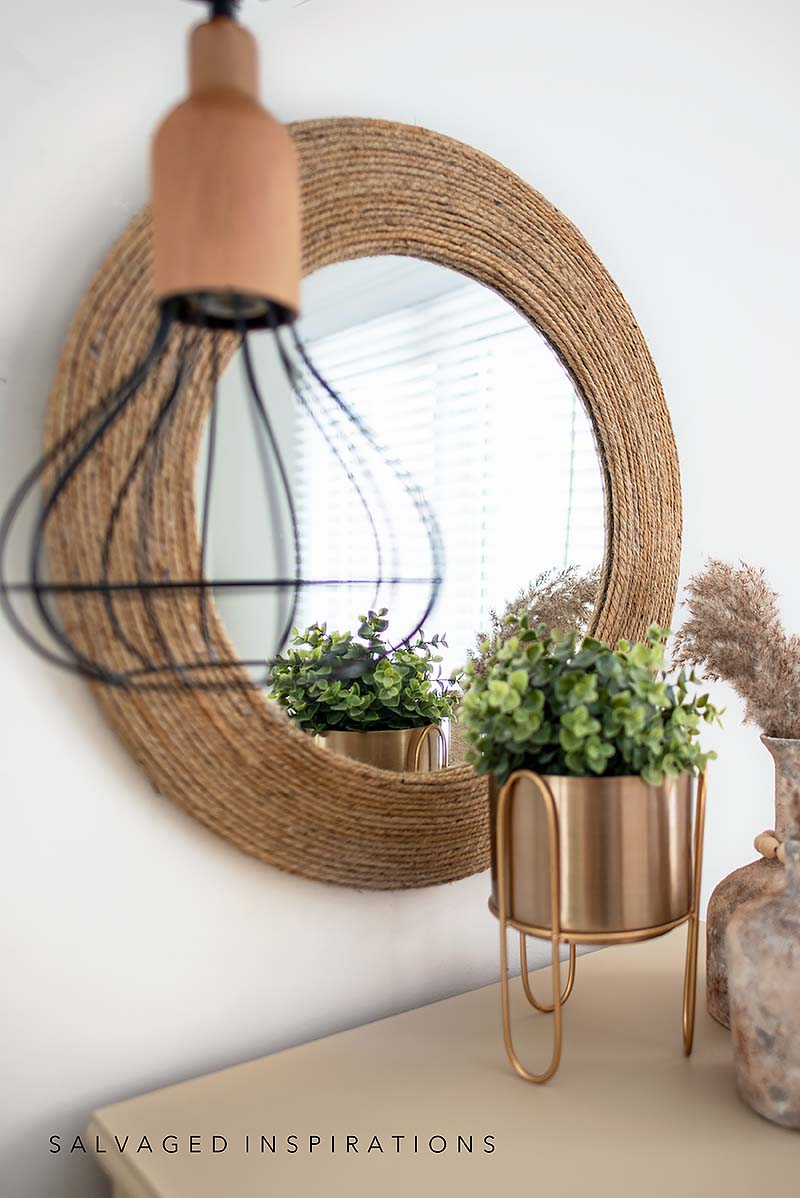
I’m so happy my sister encouraged me to try this! What do you think?
THIS POST IS SPONSORED/CONTAINS AFFILIATE LINKS TO PRODUCTS I USE. YOU CAN SEE MY FULL DISCLOSURE HERE.
SOURCE LIST
Round Mirror – SALVAGED
Sisal Rope
Scissors | Craft Knife
Glue Gun & Glue
Blade Scraper Tool
Paint Brush
Chocolate Chalk Mineral Paint
DIY ROPE MIRROR
My sister Andrea found this 36″ round Basset Mirror Company Palimar Wall Mirror with Sisal Rope selling at Bed Bath And Beyond for $529.00 and wanted US to try a DIY version. This really means… Denise, can you do this for me? 🙂
Here’s how it all came together…
PREP MIRROR FRAME
I started by removing the baseball stitching off this mirror so there would be no additional bulk underneath the sisal rope. It was easy to remove. I cut it with my utility knife and pulled it out like a shoelace.

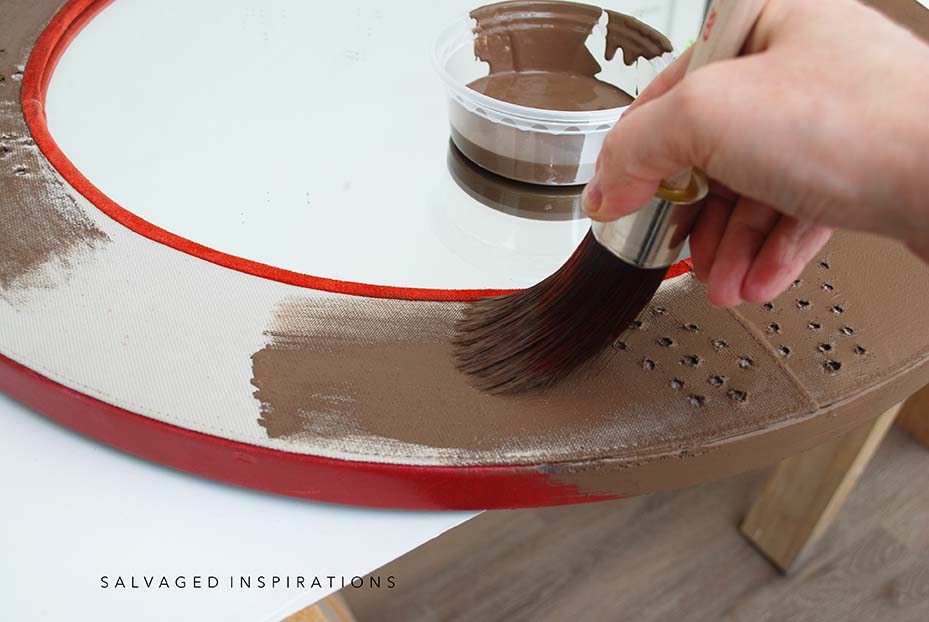
PAINT MIRROR FRAME
The base color I picked for the frame was this Chocolate Chalk Mineral Paint. It adheres to fabric, plastic, and metal so it was a perfect choice. It’s a good idea to paint a base color before gluing the sisal rope just in case there are any tiny gaps. This makes it look all organic and natural.
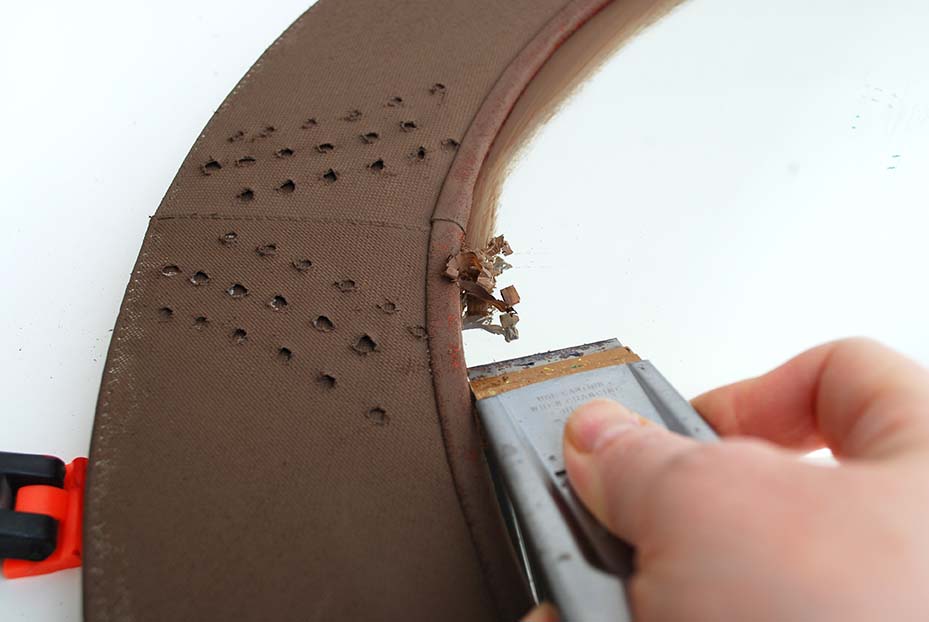
REMOVING PAINT FROM MIRRORS…EASILY!
In the past, I removed mirrors before painting. But as you can see I didn’t worry about getting some paint on the mirror while I was painting the frame. Why? Because I found this mirror scraper tool that takes the paint off mirrors effortlessly!! It’s a real-time saver and SO EASY to use. Holding the blade at a 15-20 degree angle, it scrapes the paint off without scratching the mirror.
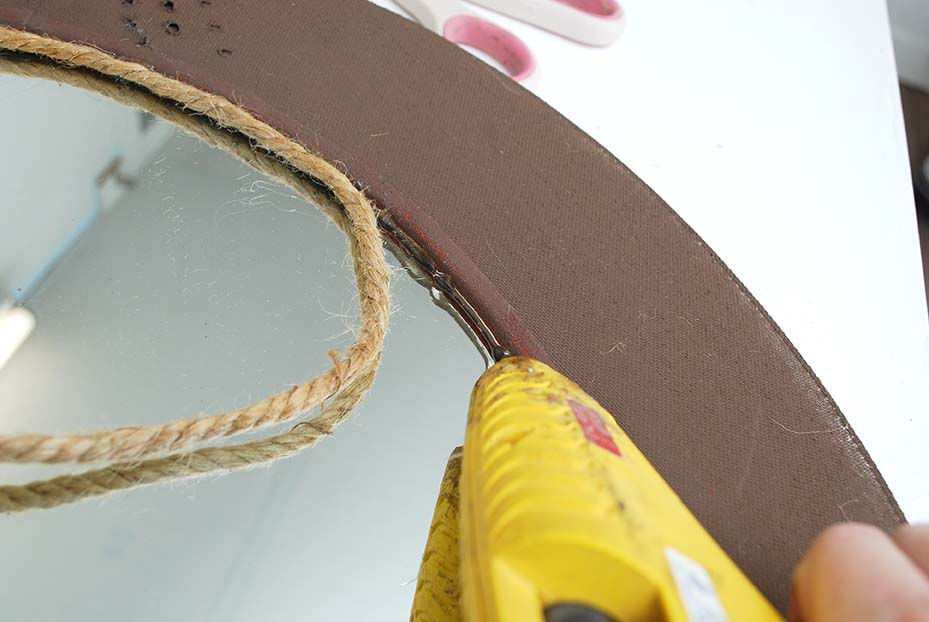
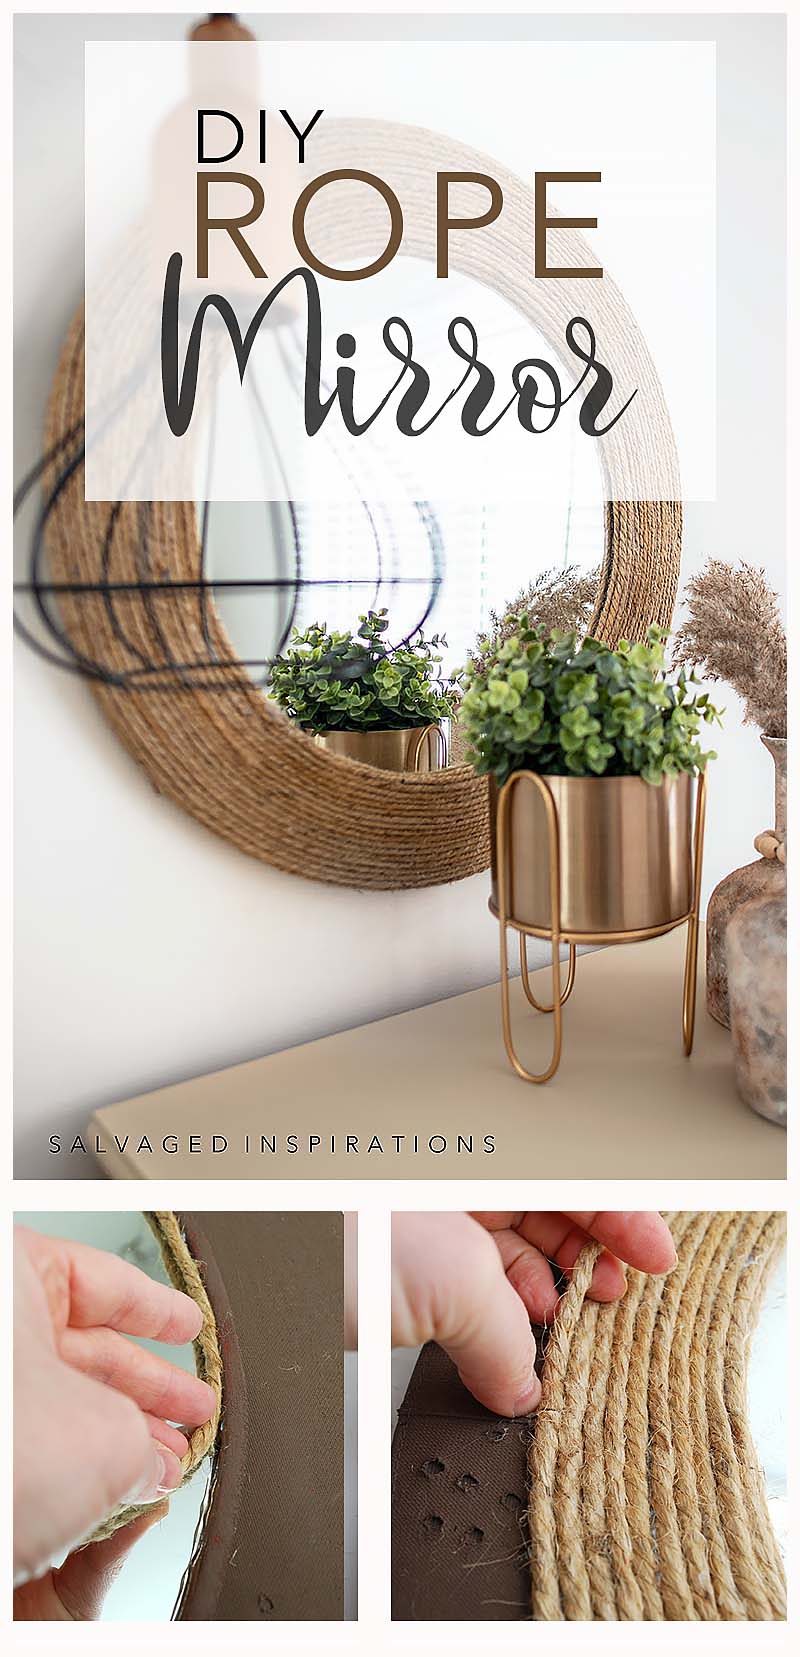
GLUING ON THE ROPE
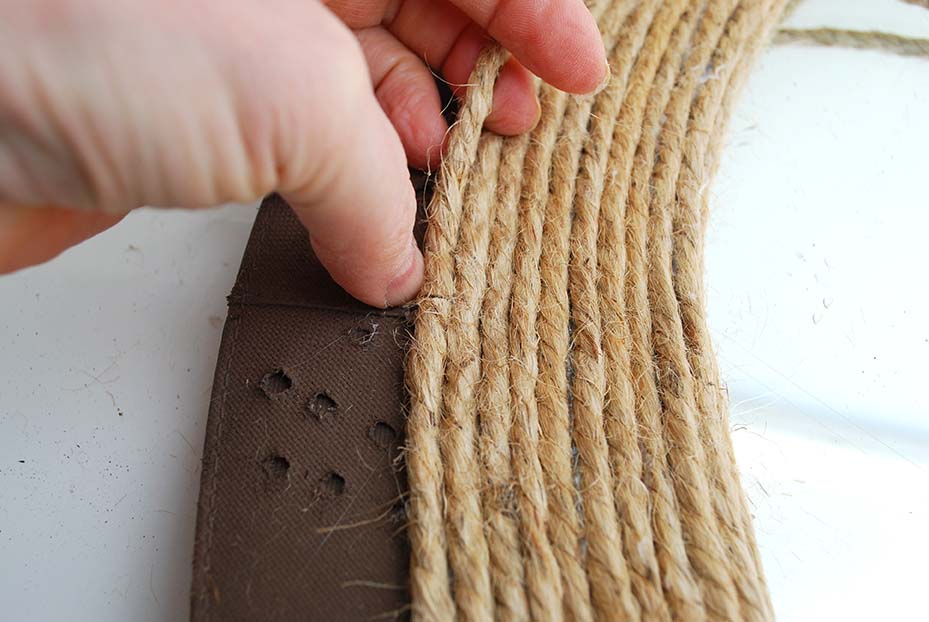
I started gluing on the sisal rope from the inside of the frame and working my way out. I used a hot glue gun to run a bead of glue and then pressed the rope onto the hot glue working in sections. The glue sticks in hot glue guns have about a 10-15 second open time before they start to dry. Working section by section is best.
And as always, safety first! Be sure to work safely with your tools. I ended up with a few ‘ouches’ pressing the rope into the hot glue until I figured out an amazing tool to press it down with — a craft stick! I didn’t take any pics but I’ll be publishing a Youtube video this Saturday and you can see how convenient and fast it worked!

To join the ends, I cut them straight and butted them right up against each other with a bead of glue. I just kept working my way around the frame gluing each piece of rope right up against the last until the entire mirror was covered.
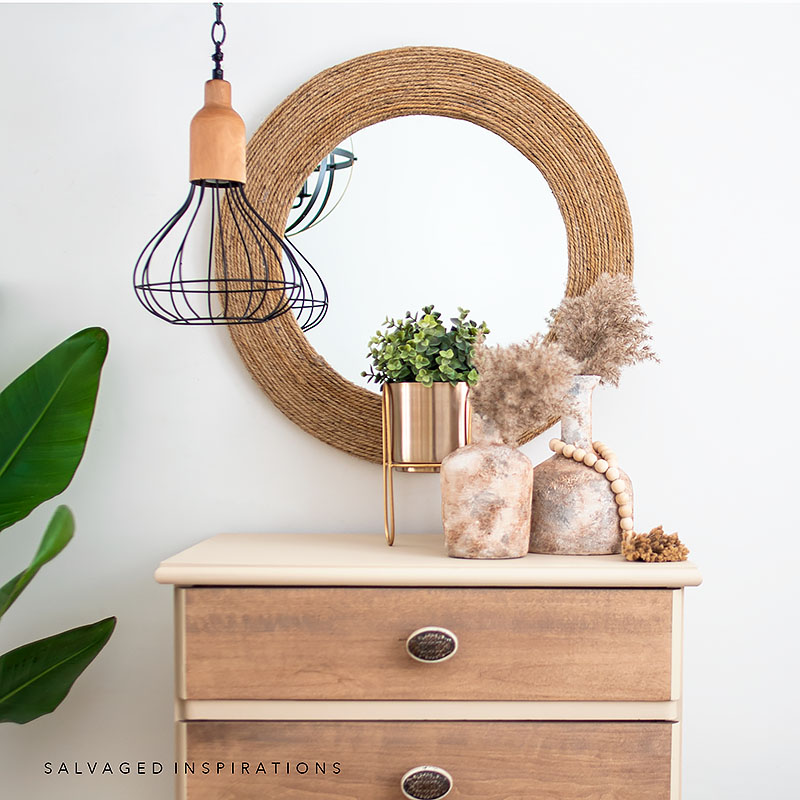
THE FINISHED LOOK
And here’s the finished DIY Rope Mirror! I have to admit, I like it more than I thought I would… I kinda want to keep it…lol
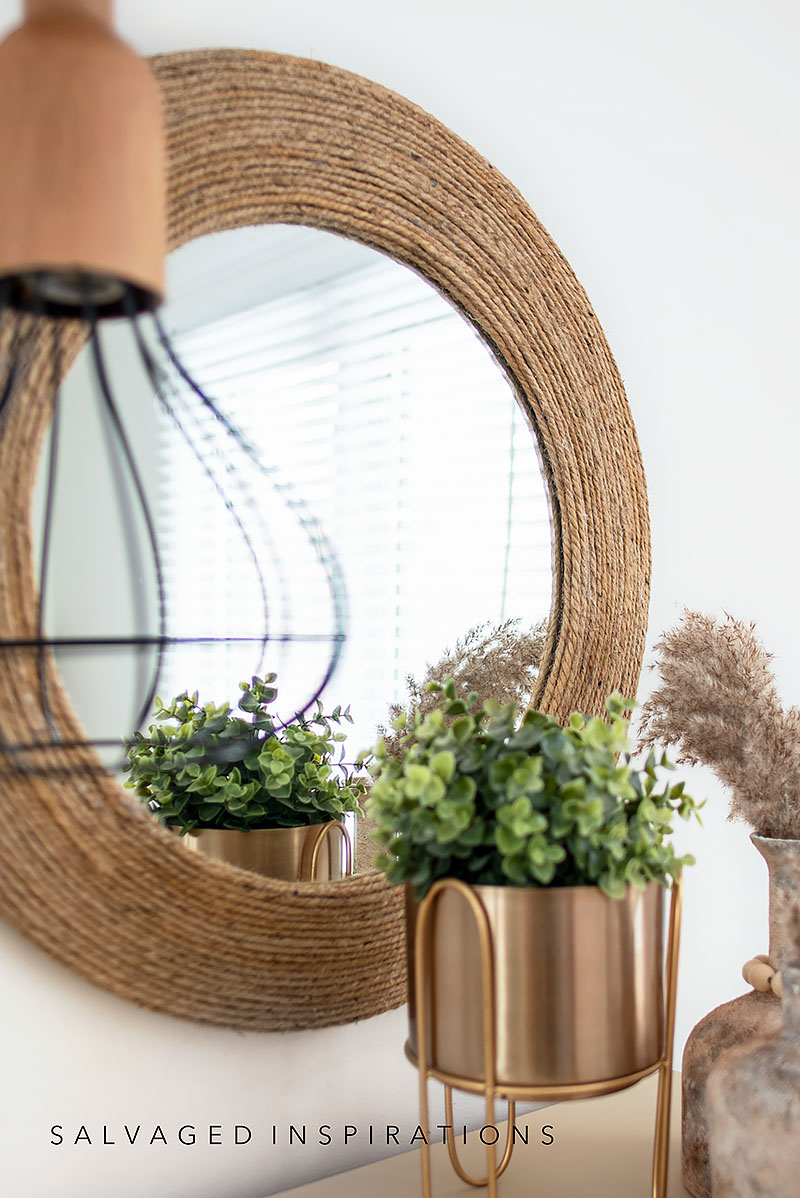
The nice thing is if I ever want to use it for staging or styling my furniture, I’m sure Andrea won’t mind if it goes missing off her wall for an hour or two.
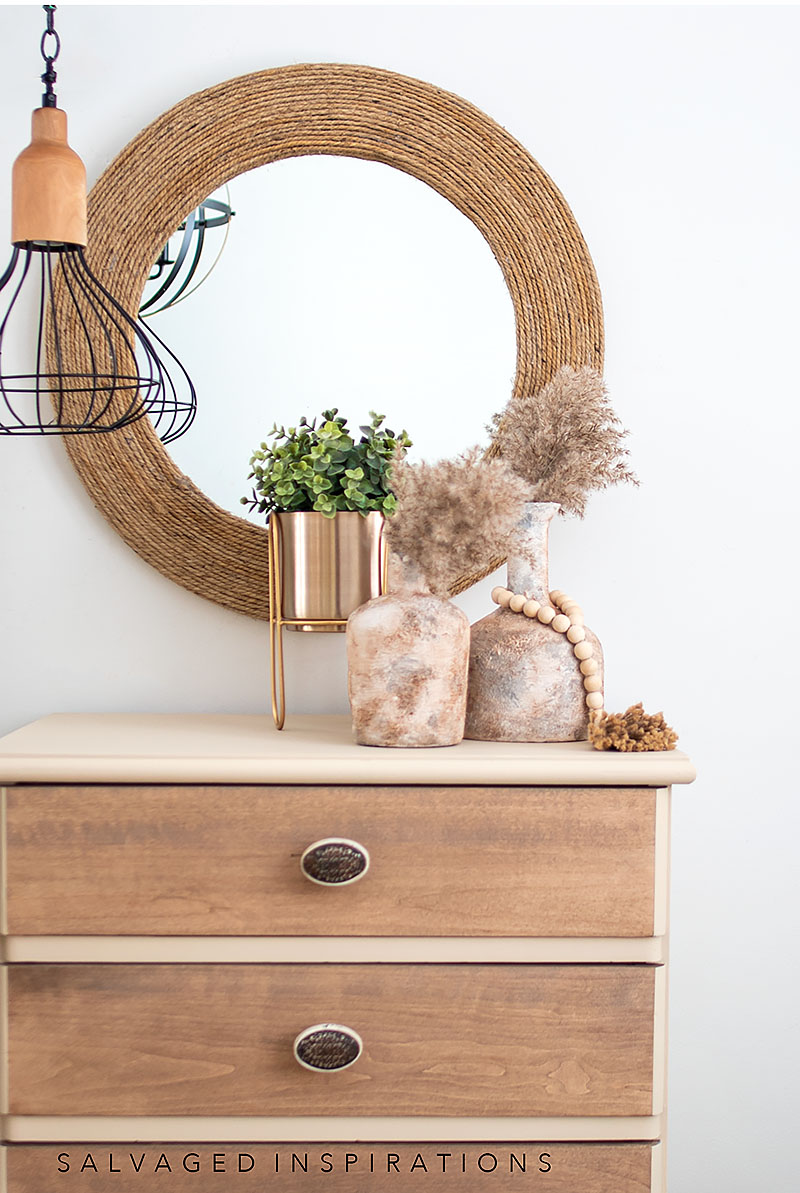

And speaking of staging and styling, I thought it would be fun to see which mirror you liked better with last week’s dresser. I know last week’s image the focus was on the dresser and this week the focus is on the DIY Rope Mirror — but I’m curious which styling you like better? Isn’t it amazing what a HUGE difference styling can do for your painted furniture… or home!? Are you team A or team B?

YOUTUBE TUTORIAL
Here’s a step-by-step in action on Youtube. If you have any problems viewing below, feel free to watch it on my Youtube Channel here… and don’t forget to subscribe! I can’t believe I hit 12K Subs! Woot woot, thank YOU! 🙂
THE COST BREAKDOWN
Maureen H. left a comment last week here on the #siblog suggesting I include a cost breakdown of my projects. I always LOVE your ideas and input so if there is ever anything you’d like to see, feel free to let me know in the comments. 🙂
- Restore Mirror – $11
- Paint & Glue $5
- Sisal Rope $4
Here’s another look at this before and after. I hope it’s inspired you and given you some new ideas for your projects.
LET ME KNOW WHAT YOU THINK OF THIS DIY ROPE MIRROR PROJECT. WOULD YOU GIVE THIS A TRY? FEEL FREE TO ASK ANY QUESTIONS YOU MAY HAVE… I ALWAYS LOVE HEARING FROM YOU. IT MAKES MY DAY! 🙂
Happy furniture painting friends!
Denise x

I’m a Team A as well. It just sets off the whole thing nicely. Not usually a sisal rope mirror fan but this has it’s place here!
Thanks Barb!! 🙂
I’m a Team A fan. In the B photo the poor mirror gets lost among the chunky decor on top of the chest. Maybe that mirror would look better hung a little higher with more sleek and modern decor on top.
Cheers for Team A, thanks Robin. And you want to hear something funny? I hung mirror “B” over the dresser pretty high when I first staged the piece… and then I got down really LOW to take some pics.😂 The angle a photo is taken at can totally change the proportions, so I totally see what you’re saying!
AWESOME re-do on the rope mirror. It gets my vote and looks AWESOME.
Yay, thanks for chiming in Michele! XOXO
Definitely depends on the look you’re going for. I do like A and as soon as I find a mirror I can do this with, it’s happening! BUT, B gives off the feeling of soft and gentle. It’s more of a boho look to me and I really like that too! Love your posts. Thank you for sharing and have a great weekend!
I agree! A seems more of a farmhouse look to me whereas B looks more Boho. Wishing you a super weekend as well! 🙂
Picture A, not doubt and ty for sharing! It is soooo pretty!!!
Aw, thanks Susan! Appreciate you chiming in!😊
Hi Denise!! I am definitely Team A. I am headed to watch the video. This is an awesome upcycle/dupe.
Thanks my friend! I hope you enjoy the video!💜
Team A for me. Love this idea and will do it on a table lamp. Love the look and really, really love the dresser too. You’re so talented!
ooohhhh, a table lamp! What a great idea!
I’m definitely a Team A fan. I don’t think the sisal mirror takes focus away from the dresser. In fact no time more than this post has the dresser really shone. The mirror seems to enhance the dresser. Love the entire staging.
Thanks Joanne! Staging can make such a difference, right!? A little paint. A little staging and styling and WOW! You sometimes can’t even recognize the original pieces.
I love this look, and really simplicity at its best! Thank you for sharing the how-tos. Hugs!
I love this look too… my sister has some pretty good ideas!😁 Big hugs back Tracy! XOXO
This turned out gorgeous, Denise! Thanks for sharing your DIY home decor project. I need to add this to my list. 🙂 You’re so creative.
My sister gets the credit on this one my friend! 🤗 Thanks so much Do! XOXO
I love the Rope Mirror ! Do you have any thoughts on using a rectangular mirror for the four corners ? I am wondering how to deal with the rope when I get to them ! 😳
Also, do you think the sisal rope would cover a raised pattern on an old mirror or would you sand it off ?
Thanks for any advice ! I love your creativity and skill!
Hi Dee! If the rope is soft enough, I would round it around the square corners OR create a neat seam at each corner. Hope that makes sense. Here are some examples I found for you to demonstrate on a square mirror.
Great up-cycling! I’m definitely going to try this even on a smaller mirror it would be cool! I prefer A; The scale of the mirror is better in the staging!
Thanks for chiming in and yes, it would look great on a smaller mirror! 🙂
Love this!!! i’m going to cover an old clock with this idea. I prefer B.
An old clock! I love this idea Tiffany! And thanks for chiming in for Team B!🙌
I LOVE it! I will certainly try it. Thanks for all your good information on this and so many other projects! I always know that when I see SI there’s a treat waiting for WOW me!
Aw, I love this… “a treat”… what a lovely compliment, thanks Caye!🤗
I don’t blame you for wanting to keep this pretty mirror, what a difference! You always do such an amazing job of styling your makeovers. I’m loving Option A along with the stunning job you did on the dresser!
I’m loving option A as well Marie! I didn’t even think I’d really like this mirror but I love it…lol.
Hi Denise. Wow, I absolutely love this sisal mirror makeover. And all for $20! I’ve seen similar mirrors in my local HomeSense and they are NOT cheap. Your sister is incredibly lucky to have you do projects for her. I like both A and B. I think it depends on if you want the dresser to be the star of the show (B) or if you want a more integrated look (A). As always, gorgeous.
Now that I know how expensive these rope mirrors are — I’m thrilled it was only $20! And I totally agree about the dresser styling. I have to admit if I were to pick I’m team A. My sister is going to have an “I told you soooo” moment..lol. XOXO
Love it! Such a great idea that I will be stealing in the future 😉 I think the rope mirror compliments the dresser the best (which I also love!!) Thank you for sharing, I look forward to everything you post! Carol
Doesn’t it look great with the dresser!? And if you give it a go, have fun… watch your fingertips while gluing tho! 🙂
I was shopping for rope mirrors last year and I couldn’t find one under $200. And they were they small! Great job and lucky Andrea. 😃
Ya, I didn’t realize these rope mirrors were so costly! Thanks Nicki! XOXO
Definitely Team A. Now I have to find a round mirror.
Yay for team A! And good luck Debra… I see a lot of them at thrift stores!😊
Team A for me! I love the dresser; it is so stylish. Andrea has such good ideas! And, you get material for your posts! Win-win! The mirror turned out nicely and is much more affordable! OH, did you paint the vases or buy them with that awesome finish?
Team A for me as well! And she DOES have amazing ideas. The funny thing is, she bombards me with them because she knows I’ll do them and share with my #sifamily!😂 The vases were a DIY I did with textured paint and cinnamon!
The rope mirror is definitely better with the dresser. Your sister is a wise woman 🙂
She is isn’t she…lol. And I love the rope mirror with the dresser as well. I think it looks great!
As always, a stellar job! And I like the rope mirror better in the styling. I think the mirror and dresser really complement each other and the dimensions are better.
Thanks and I think so too! Kinda wish I had it for last week’s original styling!😊
I’m team (A). Team (B) seems to get lost in the dresser. Great job and Sis is a lucky girl. I notice in a lot of your staging different items. Are they things around your house or do you purchase for these staging. Love the combo shown here. In love with that dresser. So calming.
Thanks Bev and she is lucky. I think I’ll be ‘stealing’ it off her wall for staging and styling every now and then. 😉 For staging my furniture I use things from around my house and use items I’ve made in recent posts… like these glass vases. So glad you love the dresser! XOXO
Team B: I love the rope mirror, but think that it’s too “heavy” and a little out of proportion for the dresser. The lighter weight mirror mounted a bit higher would look great 🙂
The lighter round mirror definitely keeps more of the focus on the dresser, doesn’t it? I think the camera angle and the lens which is used make a big difference as well.🤗 Thanks for chiming in! XOXO
Team A! Did you cut each piece of rope every time you circled the mirror or just continued gluing around? It turned out great
Great question! I started by measuring and cutting each piece until I got into the groove. Then I thought… what am I doing? I can just continue gluing around because I have all this sisal to work with! I’ll be sharing the Youtube video this Saturday so you can see the BIG difference it made in timing and ease.
love it!
Thank you Cheryl! xo
Oh, I’m Team A. Love how well the mirror goes so well with the dresser
Thanks Colleen… me too! XOXO
Absolutely stunning!!!❤️
Thank you Jamie!🤗
Love, love, love this! I’m on Team A but like Team B, too!
Thanks so much Rose!💜
It turned out really cute! Hobby Lobby and sometimes the Dollar Tree carry little silicone fingertips so that you can still use your fingers without burning yourself! When the glue dries, it just peels right off!
Thanks Jen! And I saw those fingertip silicone protectors on Amazon for the very first time ever! Good to know the sell at the Dollar Tree as well!
That is awesome. Lucky sister😁. It really is beautiful. Thank you for always sharing such beautiful yet somewhat simple transformations.
Thanks so much Teresa… so glad you like it and the tutorials. Thanks for being here to share! xo
I’m definitely Team A. That mirror is a better balance in size and color. I didn’t notice the ceramic vases on the dresser before and now I want to learn a technique to reproduce that look! Did you do them yourself? If so, would love your input on how to achieve the look. Great job!
I’m a big yes for Team A as well and I totally agree. Amazing what a difference styling can do, right!? YESSSS, I did paint those glass vases… and used some cinnamon too! 😉
Both look great but I definitely like A better, it compliments the bureau perfectly.
Thanks so much Elinor!😊