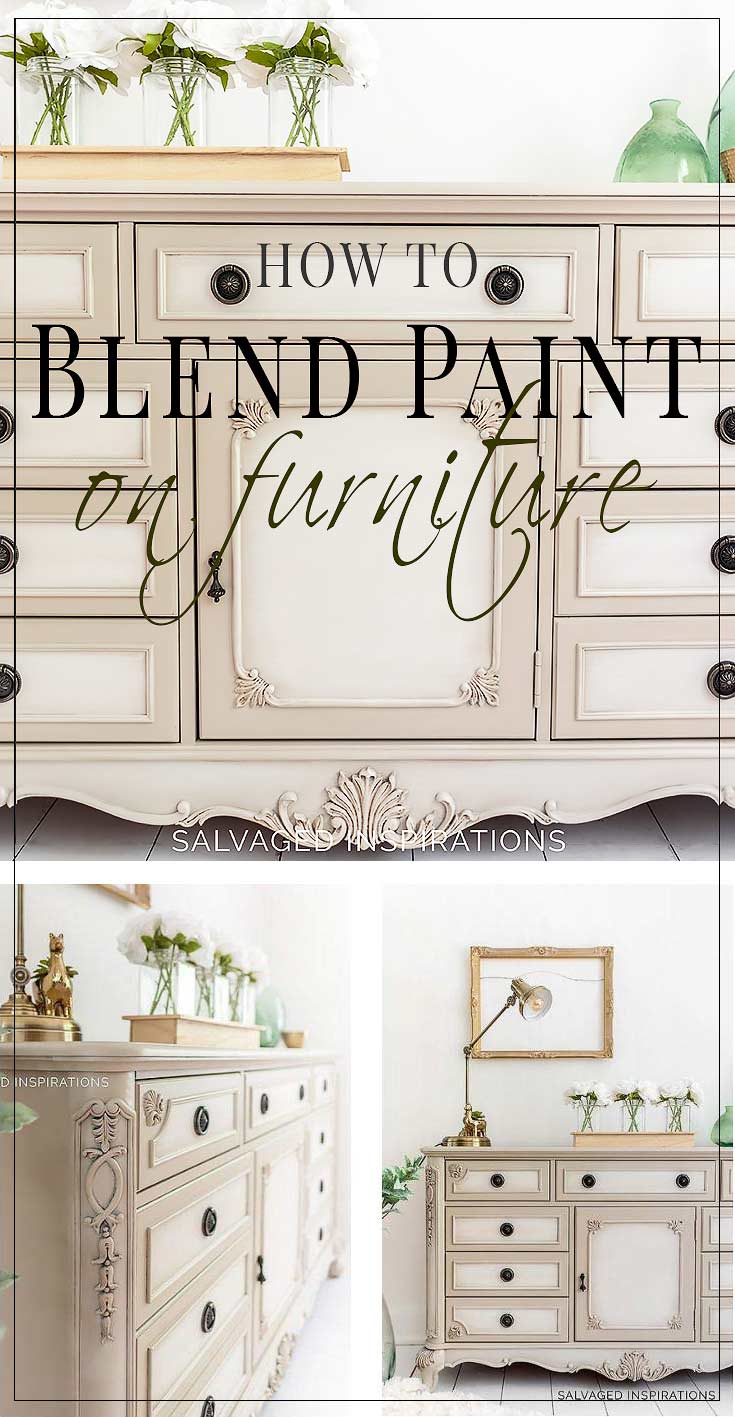
Want to know how to get that gorgeous blended look on your furniture? Here’s a step by step with tips, tricks, brushes AND the $10 tool that makes a dreamy blend easy to do…

Hi SI family! First, let me say – I LOVE hearing from all of you! I’m honored and privileged that you reach out to me and share your creative ideas and questions. It makes me feel warm inside to think that maybe, just maybe I play a small part in your creative journey, so THANK YOU.
I received a beautiful email from Melissa (Byron Bay AU) asking …” what’s your technique for blending paint on furniture?”
I’m guessing if one person asks, there are probably a few more of you who may be curious or interested — so it was a perfect opportunity to restyle this dark beast of a dresser and turn it into a soft feminine beauty — all while practicing my Youtube skills to boot – lol. I appreciate all your video encouragement btw!
I kind of blundered my the first drawer in the video, but left it in as a what not to do when blending! As a bonus, I’ve also included how I paint the lip of drawers perfectly without taking the drawers out or without using green tape to mask anything off. I hope you find the tutorial helpful.
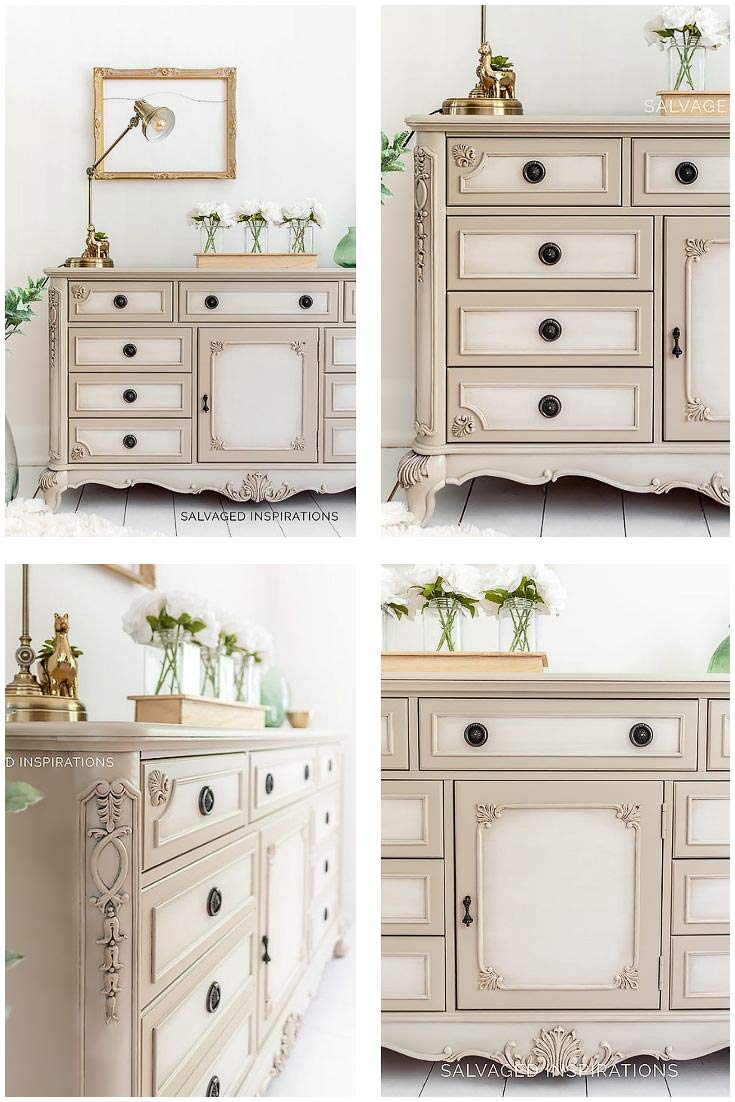
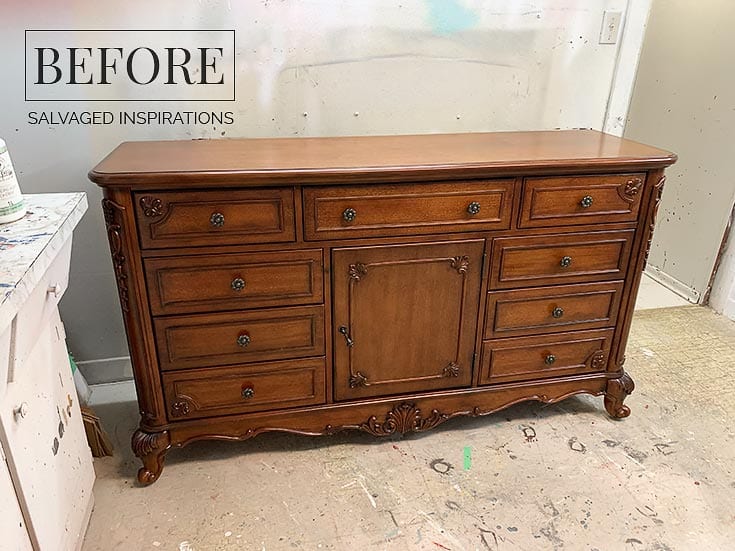
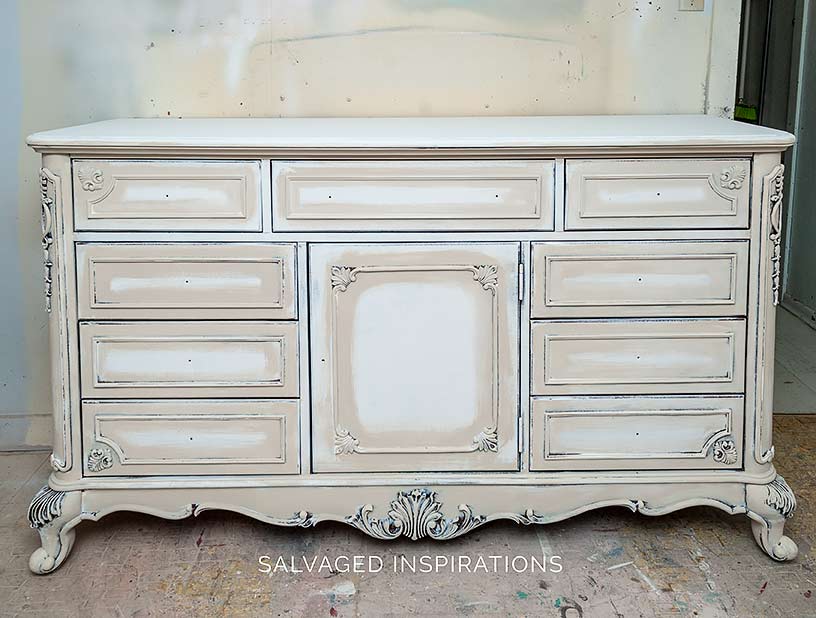
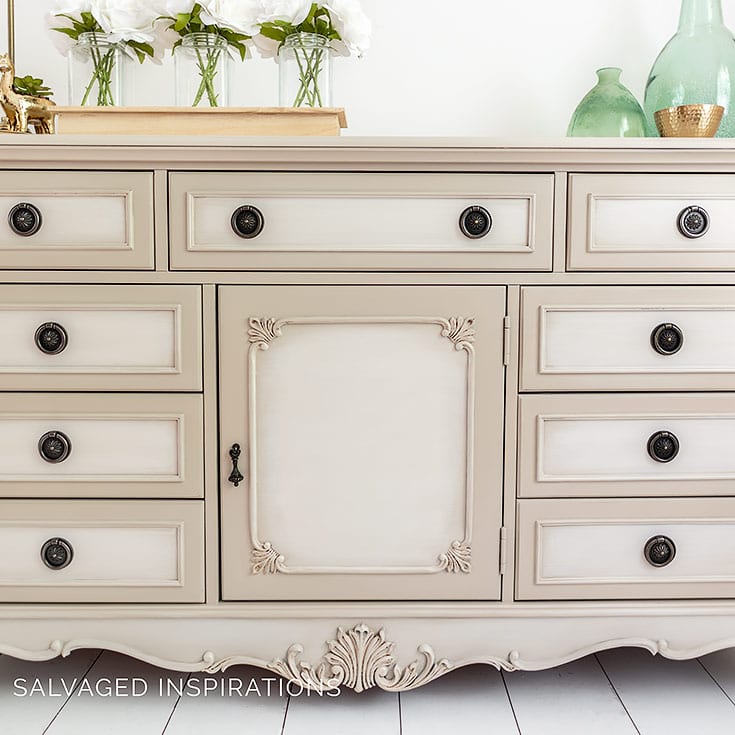
Here’s the before and after… what do you think?

THIS POST IS SPONSORED/CONTAINS AFFILIATE LINKS TO PRODUCTS I USE. YOU CAN SEE MY FULL DISCLOSURE HERE.
SOURCE LIST::
-
- Large Dresser – SALVAGED
- Paint Brushes
- Slick Stick
- Fluff Chalk Mineral Paint
- Sand Bar Chalk Mineral Paint
- Water Mister
- Satin Clear Coat
MY CHEAP BLENDING TOOL::
I have a full post on How to Paint Furniture WITHOUT Brush Marks and this is where I first introduced this cheap blending tool.
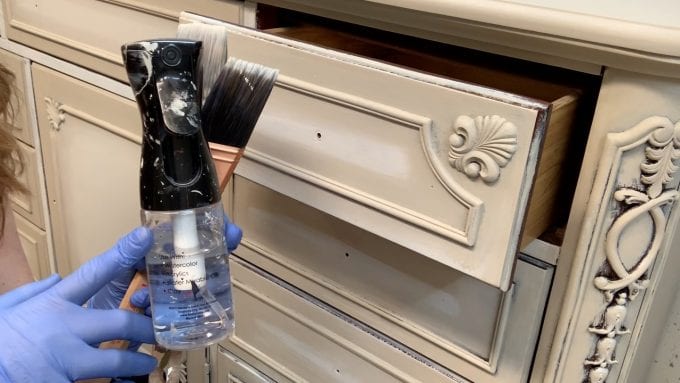
I LOVE this little mister and it can be purchased at any craft store or online for around $10.
These misters don’t spray or shoot water out… they mist the water softly and beautifully! It makes a huge difference in the gliding of the brush, the smoothness of the finish, and really helps control the blending of two or more paint colors.
A FEW BLENDING TIPS::
- Pick complementary colors that look great together
- The more contrast in colors, the bolder the look
- Use a separate paintbrush for each color for a cleaner look
- Keep your brush moving and watch for drips or watermarks
- Paint 2+ coats for a solid blended finish
Here’s the Youtube Video On Blending Paint
If you have any issues with the playback, feel free to watch it on my Youtube Channel here.
Here’s a short breakdown of the process.
I applied this Slick Stick to ensure the paint would adhere 100%. I didn’t want to sand (even a light sanding) because I knew that would cause a lot of bleedthrough with this finish.
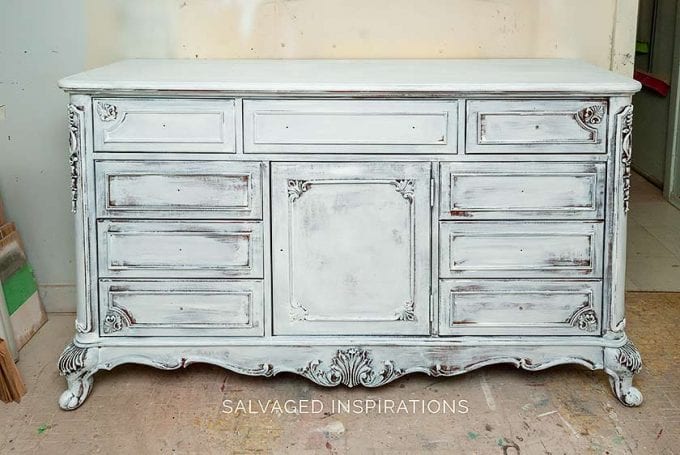
Then a base coat of Fluff was applied and the perimeter of the drawers was base coated in Sand Bar.
Then I applied 2 coats of blending which you can watch here.

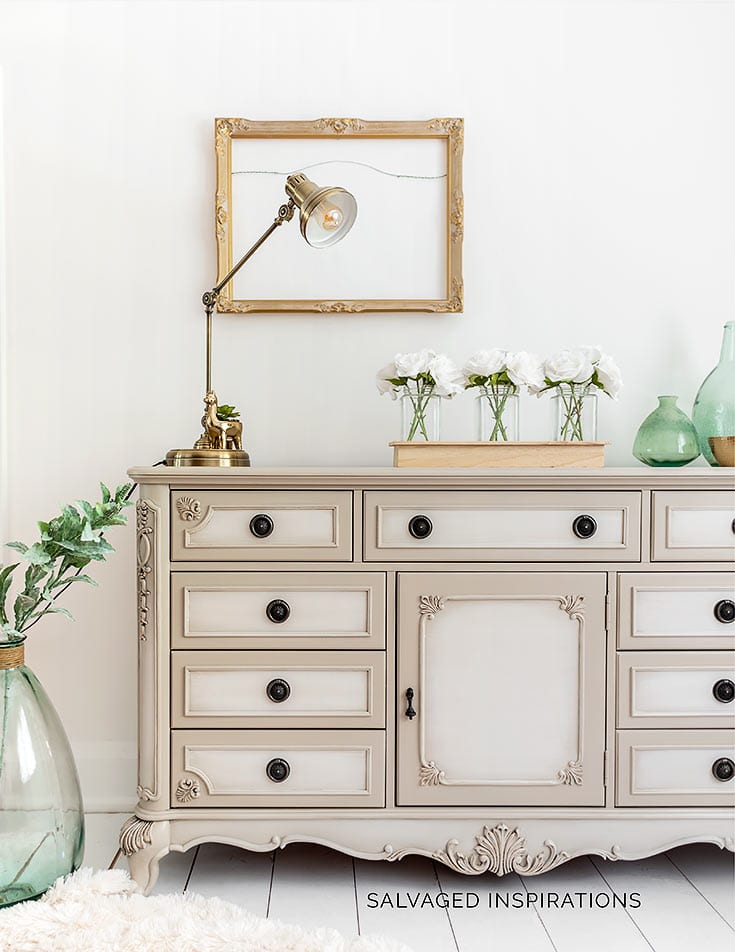
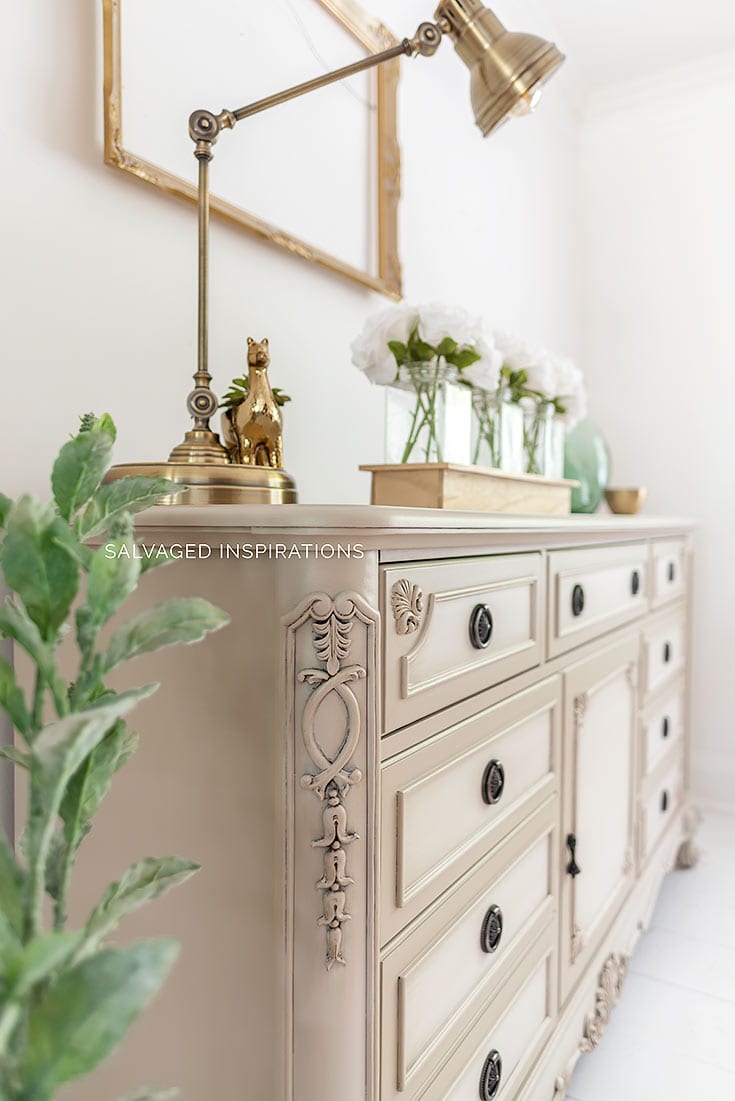
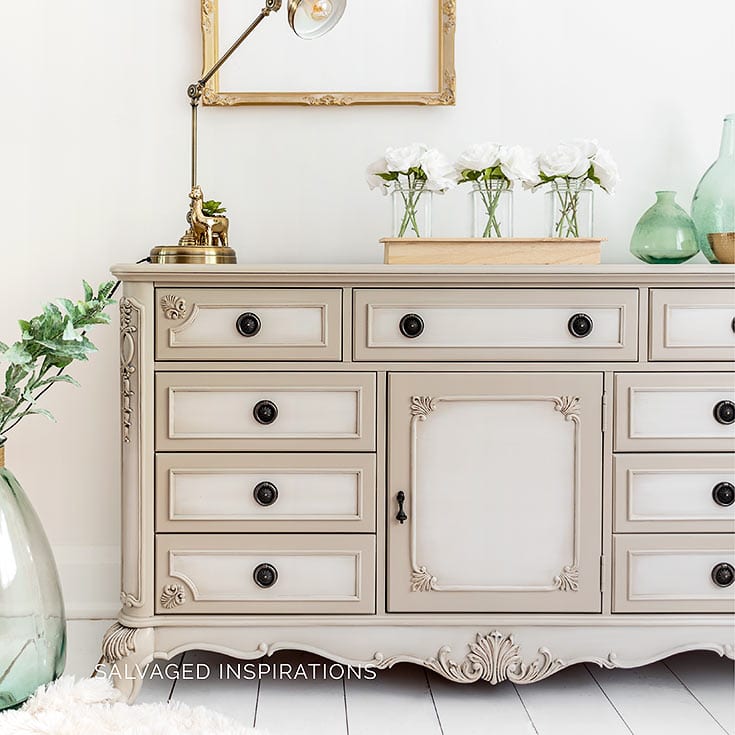
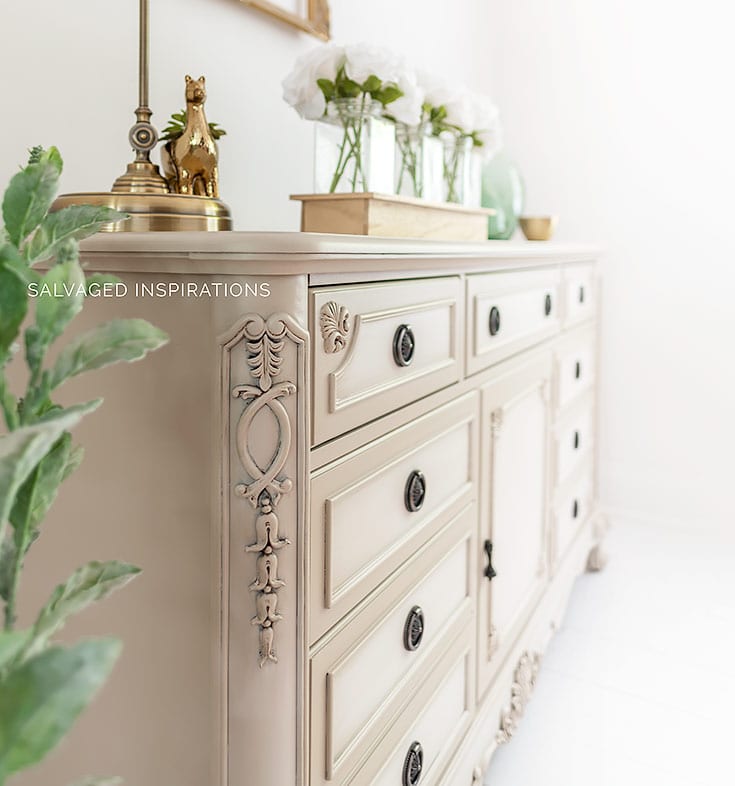
Here’s the finished look. She’s so feminine and timeless. I love how these two neutrals play off each other.


LET ME KNOW WHAT YOU THINK OF THIS SOFT BLENDED DRESSER … OR FEEL FREE TO ASK ANY QUESTIONS YOU MAY HAVE… I ALWAYS LOVE HEARING FROM YOU.
Thanks for reading. 🙂
Wishing you a beautiful day filled with inspiration and Happy Painting friends!
Denise XO
THE OTHER PIECES FROM THIS BEDROOM SET!
How To Create A Blackwash Finish | Painted Nightstands
Spring Inspired NO SAND Tallboy Dresser
RELATED POSTS::
Blueberry Blended French Provincial
Blending And Layering Painting Technique
Rebel Yellow Blended Curb-Shopped Dresser
PIN AND SHARE!

I just ran across this while googling how a blend paint. I’m familiar somewhat with you since I always check it out when I see you gals collaborate on #TheSerialDIYer.
This may be the most beautiful piece I have ever seen of yours. While they all look lovely. This one is magnificent. Now I’m headed to watch your video.
Hi Jackie! First thanks for dropping by and I’m so happy you love the piece. I hope the video is helpful as well.😊 PS – thanks for joining the monthly collabs as well. All the ladies are so talented and work super hard to share amazing projects. We appreciate you. 🙂
I love this piece. It looks like the filigree is aged and darker in the crevasses. Do you accomplish this by using a dark wax?
Thank you Lee! And no dark wax. I just blended the two paint colors together. 🙂
I thought it was just the original dark stain coming through on the more crevicey parts. I have a bedroom set I am going to try this on. I don’t care for chalk paint though. I purchased Behr Cabinet & Trim paint. Will this still work to blend with a mister?
I’ve never tried doing this technique with Behr Cabinet and Trim so I’m unsure. If you give it a go, I would LOVE to hear your results. It could help so many people because I’m sure others are wondering the same thing. 🙂
Why do you not paint 2 coats of the white then 1 coat of the beige and blend at the end?
There are many ways to get a blended look and what you’re suggesting would work as well. It’s whatever you feel comfortable with. I prefer working with the two colors wet on wet.😊
Perfection made manifest, Denise! I LOVE your videos so PLEASE DON’T stop making them!
How many pairs of paint pants have you had to toss out?
I just ordered two misters (I usually misplace things so I order two so I don’t have to drive myself crazy looking for the item I need). Can’t wait to try it out!
This piece is just stunning—AS USUAL! You are truly amazing because I don’t think there has ever been even one of your creations that I didn’t like! You have a real gift!
I always have a good few water misters on hand as well! And so happy you’re liking the video tutorials!🤗 As for the paint pants, uggghhh, I couldn’t tell you.🤣
When we first see the dresser it has been painted with both colours and just wondering which one you did first. I love how this dresser turned out and I have an old 1970’s dark wood triple dresser, high boy and two night tables that I want to paint. Our bedroom is basically blue and white with a fireplace mantle headboard in white and I want to lighten the furniture to a blended white similar to the one you did but maybe a little more white than the sand beige. Any suggestions about colour choices to achieve the same look only more white.
Need to know if I can add white to create a lighter version of the base color for blending?
You sure can.
I’ve referred to your video several times over the past year and still haven’t gotten the nerve to try blending! Maybe one day!
You’ll give it a go when you’re ready to give it a go… a piece will yell “blend me”…lol 😉
What color did you use on the hardware? This piece is beautiful.
Hi Lori, and thank you! The hardware was purchased from Hobby Lobby and used as-is. 🙂
Hi ,
Is there a Hobby Lobby in Canada now? If not what is the Closest one?
Beautiful Dresser!
Hi Cilla and thank you! No, I wish we had a Hobby Lobby here! I go cross the border to the one in Niagara Falls or Buffalo NY.
Thank you, I have never thought of Hobby Lobby for hardware.
They have GREAT deals. It seems like monthly they have 50% off deals!
Your piece is absolutely stunning! You are so talented! Can you use the blending technique if your piece is smooth . My piece doesn’t have any trim to know where to stop and start the blending. Should I not use the blending technique on a smooth front?
Hi Cindy and thank you. Yes. You can blend paint on flat surfaces. Just use less water and eyeball where you would like your blending to start and stop. Here’s an example of blending on a smooth surface.
Thank you for sharing. Your step by step video is great! Question: which color did you paint the top and the sides of the dresser? I’m painting an antique deck and want to make sure that it doesn’t look too patchworky. Thanks!
The top and side were painted in the Sandbar. 🙂
Absolutely beautiful. Your video was wonderful and has inspired me to try this technique. Thank you so much for sharing
So happy the vid has inspired you to give it a try Lynda! Have fun and I’d love to hear how it all turns out for you. 🙂
Thanks for the awesome video, very informative and helpful!!! My favorite part is when you wipe the excess paint on your pants!!!!! I have been using my shirt or pants to do this since I started painting!! Much easier then trying to keep up with a cloth!!!! I plan to try this technique this week!!!
Hi Jeannie! So glad you found the video helpful. And paint pants are a MUST… 😉
I’m new to blending (doing “research” now!) so sorry if this sounds so basic. Watching the video it appears that when you are painting the lighter color on the drawers you are completely covering the buff color but then doesn’t appear that way in the final product. Are you not going all the way to the edges with the lighter color? What am I missing? Thank you and love your videos. Very professional !
Hi Caroline! Video is ALL NEW to me so thanks for the vid encouragement. And yes, you’re absolutely correct. When I’m brushing the lighter color on, the brush isn’t completely covering the darker tone around the edges. If it does, it’s easy enough to add a little more dark and blend the two so long as both paints are still wet. You just kind of have to play with the 2 until you’re happy with the blended finish. Hope this helps. 🙂
Hi Denise! This is a beautiful piece. I am about to try and copy your Blue Jean piece. Have you ever been scared you will fail? I think i put too much pressure on myself and I need to think about it as having fun. Fear has kept me back long enough. I will send you a picture when i’m done.
I’m ALWAYS afraid I’ll fail…lol! Totally normal to feel insecure when taking on new things but I always try to remind myself that courage isn’t the lack of fear, it’s acting in spite of fear. I believe its a Mark Twain quote. Another one I like is “You miss 100% of the shots you don’t take” by Wayne Gretzky. Just DO IT Cheryl!!! Im cheering you on from my end. XO
Hi Denise! I can’t wait to try this with the dresser I have. I just wanted to make sure after the second blending dries, then you put Satin Clear coat all over? Do you use your mister with clear coat and the slick stick as well? Thanks!
Hi Taylor! Yes, you apply the Satin Clear Coat all over after you’re happy with your blended paint job. Depending on the piece – that could be 2 or 3 coats. I do NOT use the mister with the clear coat or the slick stick. Use those at full strength. Hope this helps and have fun with your dresser Taylor. 🙂
Your work is awe-inspiring and I’m so grateful to have found you!! This blending technique is so beautiful and can’t thank you enough for sharing your expertise! One question: Did you finish the piece by coating it in a natural wax? I’ve often wondered what stops chalk paint from being washed off furniture or what protects it from marks or water rings or droplets?
Thank you and God Bless you!
Please keep teaching. videos coming!
Aw, thanks so much Marie – I REALLY appreciate the kind words and vid encouragement. 🙂 This piece was top-coated with a water-based satin poly from top to bottom. But you’re absolutely right. You can protect chalk paints with wax too. I’ll often wax the body and then use a waterproof durable poly for the top (on high traffic pieces). I really like the combo and it provides great protection and a really nice sheen. 🙂
Thank you for the tutorial on blending paints. When you apply the second coat, are you adding a 2nd coat of Sandbar around the perimeter or just a second coat of Bluff?
Hi Cara! I do the EXACT same process with the Sandbar and Fluff on the second coat as well. 🙂
You are truly an inspiration to me. I followed the link for the mister and am thrilled this will make my life easier in so many ways, But I didn’t see a link for the base coat you used on the dresser and the paints. I have a small table I’d like to try this on.
Hi Bonnie! Here’s a direct link to the Slick Stick I use. This stuff is AMAZING if you don’t want to sand and need 100% adhesion on a more slick/slippery surface! And I’m SO HAPPY you’re going to try the mister. I’d LOVE to hear how it works out for you. 🙂
Beyond beautiful. Thanks for the technique info, too. This dresser is epic.
…”this dresser is epic”… I LOVE this…lol…. thanks Susie! XO
Denise, you are bringing a ton of joy to us all! I will totally copy these colors on a piece, ASAP. Now, you make it look very easy, but I will give it my best! Can’t tell you how much I look forward to seeing your work. You didn’t use dark wax on the embellishments, right? Just allowed the old stain to show through? Don’t know how you make that work and look so great, but awesome job! Way-To-Go! You make me feel like I can do anything!!!!
Thanks, Peggy and YES, good eye!!! I DID use a very small amount of VanDyke Glaze on the embellishments/details. I don’t think I remembered to add that into this post so THANK YOU!!
That is truly an elegant look. Beautiful work that gives a dramatically more expensive look to the piece. I’ve always used a fine sprayer when painting…even doing walls. I’ll have to look for a mister and try that technique. Do you happen to have a piece done in more contrasting shades? I find that more difficult than similar shades so I suspect my technique is lacking. Thanks for sharing your talent.
Hi Tricia and thank you! I did do this blended piece in Blueberry which has a lot more contrast. 🙂
Elegant, gorgeous and impressive piece Denise. Your work is impeccable. I enjoyed seeing you in action too! Keep them coming.
Aw, thanks so much Nicki! XO
I absolutely love this dresser – the style, colour everything about it is beautiful. Great tip with the ‘mister’. I paint furniture but have not yet tried blending – I’ve just been so busy with our Summer Guests, but hopefully in the next couple of months or so I am hoping to create something. Thanks also for the video 🙂
Hi Denise and thank you! And thanks for chiming in about the video. 🙂 Enjoy your summer guests! 🙂
Denise,
Thanks so much for all your beautiful inspiration and helpful tips!
Love your videos!
Thank you Lori! xo
Another masterpiece! I would love to do this on my lane chest! Your amazing!
Maryann!!! You always put a smile on my face – thank you! 🙂
Hi Denise. This is a simply stunning, elegant dresser. I love it!!! Thank you for your how-to video. I myself have a pair of painting pants:)
So glad you like the dresser and thank YOU! And everyone should have a pair of painting paints in my books… 😉 hehe
I’m new to furniture painting and I would love to paint my back splash in the kitchen behind all of my counters. I’m writing from Boise/Nampa Idaho. I love the look of the painted buffet, Thank you for all your painting tips and encouragement. Linda
Thanks so much Linda and have fun with your backsplash. I’ve seen some gorgeous stencil paint “faux” tiles done with paint. It looks amazing!
Oh my! What a breathtaking difference! The new paint job makes this piece so fresh and clean looking, and also not as heavy looking as the “before.” Fantastic job as usual!
Thanks Patricia! I think so too. 🙂 It was calling it a dark beast (this sucker is HUGE) before it got paintified. 😉
I finally purchased a mist bottle from my hairdresser a few months ago and it’s been a game changer! Glad to see I’m not the only one who wipes paint on their pants. LOL Beautiful blending as always and the dresser makeover is absolutely stunning (along with your photo styling)!
Glad I’m not the only one either! I sometimes see furniture painters looking all neat and spiffy in their videos and I think – how do they do that?? 😉
First I want to tell.you that I have loved your blog since the first time I saw it. You are inspirational and that is what you want to achieve. You are successful a that.
I can get very lost on all the social media tools a available. I thought I remembered you had instructions on how to make a. ID watermark for pictures. I was also.intrested in making a reverse image for printing a picture fro transferring.
Did you have these on your blog. If I have already asked this I apologize. I am.not sure where you would answer. My current email is [email protected].
Thank.you for the joy your blog brings.
Mollie
Hi Mollie! I don’t have a tutorial on an ID watermark but I do have one on how to apply image transfers. 🙂
Denise, I discovered the misting bottle awhile ago and I have to tell you; it’s a game changer! Watched your video and you make blending look sooo easy, but it helped to watch how you do it.. I’ll have something to guide me next time. Thanks for always taking the time to make these videos; I’m a visual person and they help me tremendously!
It really is a game changer, isn’t it! And thanks for chiming in and being encouraging about the vid tutorials. I’m hoping they get a little better in time but so long as you’re finding them helpful I’m super happy! 🙂
Thank you for sharing this technique! I have seen other videos on blending😮, but absolutely love the look you achieve.👩🎨 And the pants technique… it’s like old paint brushes- so many colors that they are works of art themselves!
Thanks Toia! You can go as subtle or bold as you like with this blending technique depending on the colors you pick and how gradual they get blended with the brush. And ya, my paint pants…lol.. well what can I say. It’s all part of the fun. 😉
LOVE the video! It is very helpful and I love the way the dresser turned out. The only thing that stood out for me was the center panel. It seems to be begging to have a subtle transfer stencil added. Your blog is my favorite “go to” every morning during my quiet time while I’m having my first cup of coffee.
Aw, thanks Jane… joining me with your morning coffee, that’s a huge compliment! 🙂
Of course, it’s beautiful! Fun to watch you demonstrate your technique too. 😊
Thanks Rosemary! 🙂 And glad you like the video. 🙂
Wow that is stunning and you make it look so painless!
Hi Laura! It’s painless and FUN. 🙂
FABULOUS!! Looks very french. Love it.
Thanks Cindy! x
Absolutely love this! It looks so much better than the original plain wood. It really brings out the detail on the piece.Particularly like the glove and pant technique. Definitely my kind of thing 😀
…”the glove and pant technique”…. love this…lol.
Love this subtle blending. Great video too.
Thanks, my friend! Hope you’re enjoying your day. 🙂