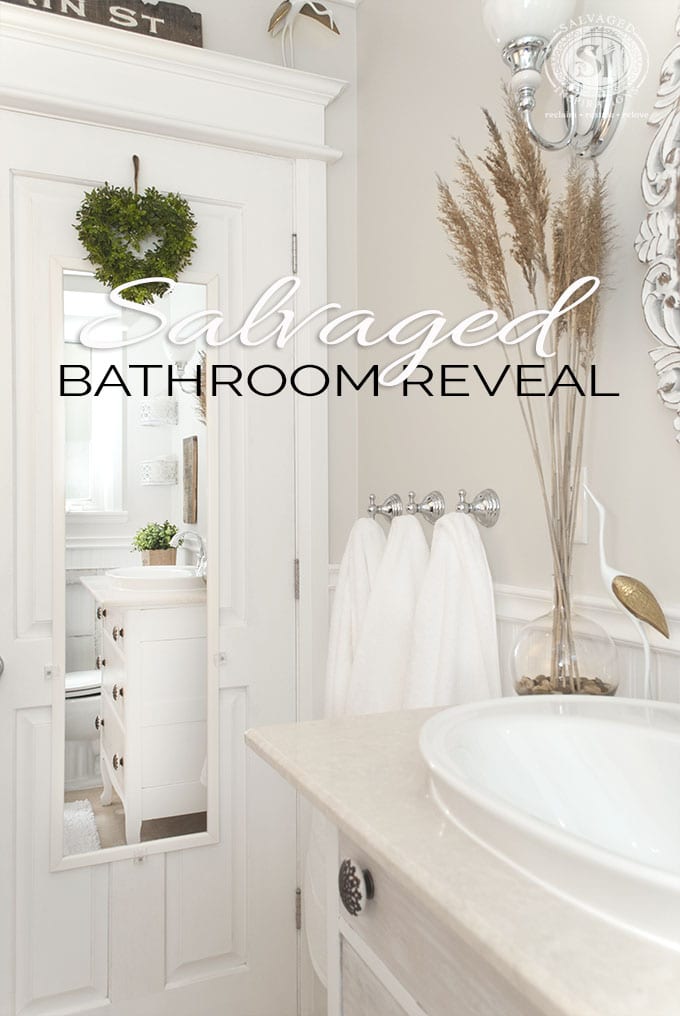
I’m thrilled to share my Salvaged Bathroom Reveal with you today! I’m so excited, it’s taken me almost an hour to decide on the title of this post! This re-style could be Modern Farmhouse, Cottage Style, or maybe even New Shabby Chic because there’s a mishmash of all these decor elements included – but I’d rather not label the style. The one constant and common thread in this re-do is Salvaged and Thrift finds… so lets call it that!
Just a little background on my home, it’s a 1 1/2 story brick – built in the early 50’s. By today’s standards – quaint and small measuring 1400 sq feet. This main bathroom is located on the main floor (which I thought was pretty weird when I first viewed this house!), and it’s only 6×8 feet – no space to waste!
I’m a little embarrassed to show you what the bathroom originally looked like when I first moved in. I lived with this for 5 years before it was updated/renovated in 2008.
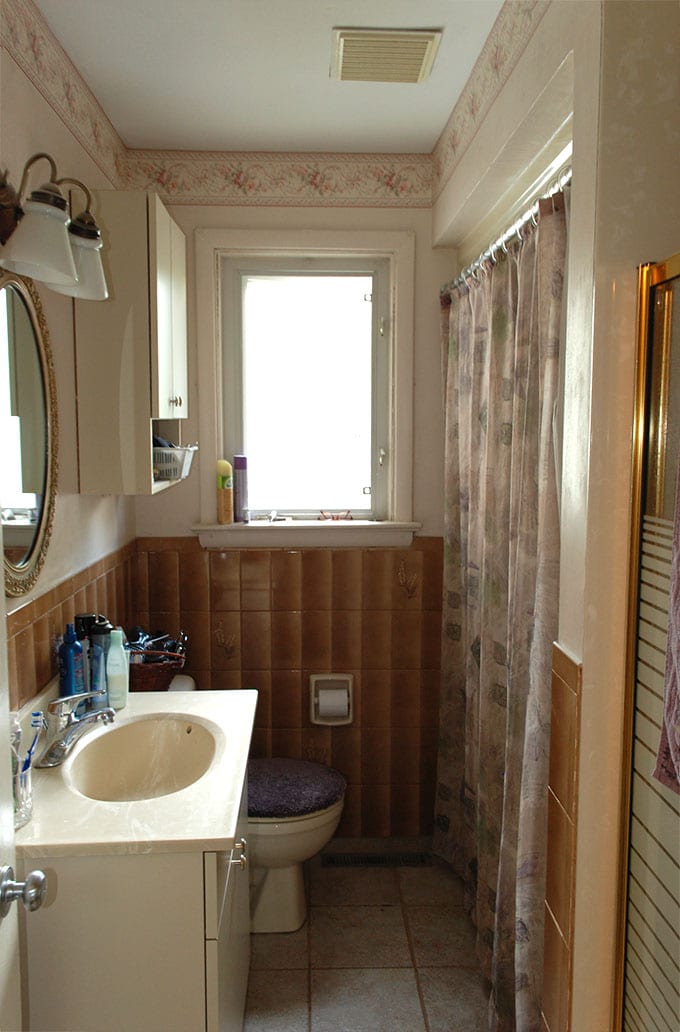
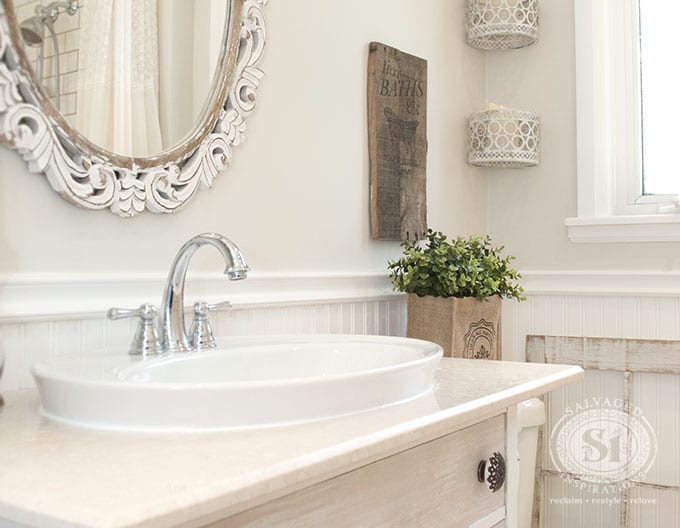
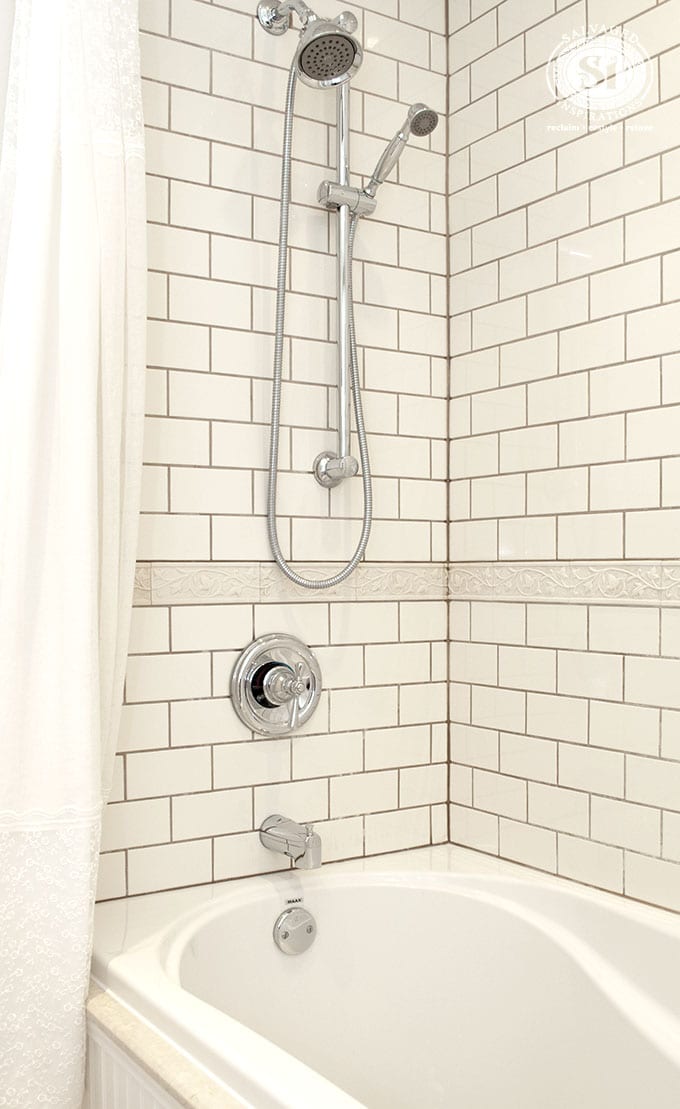
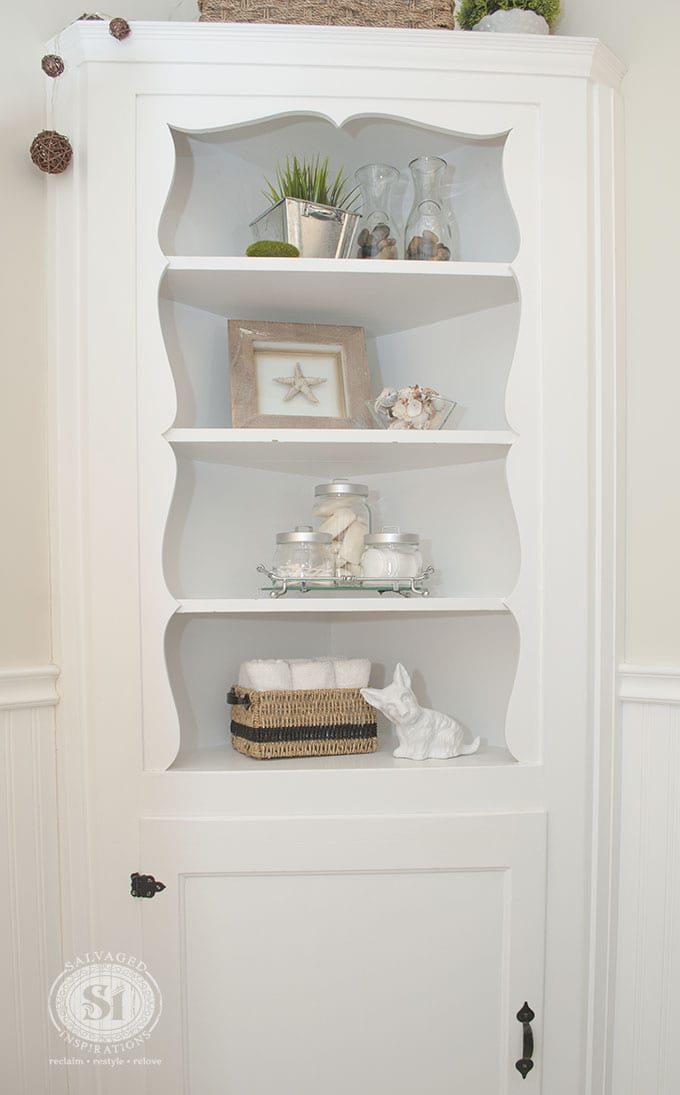
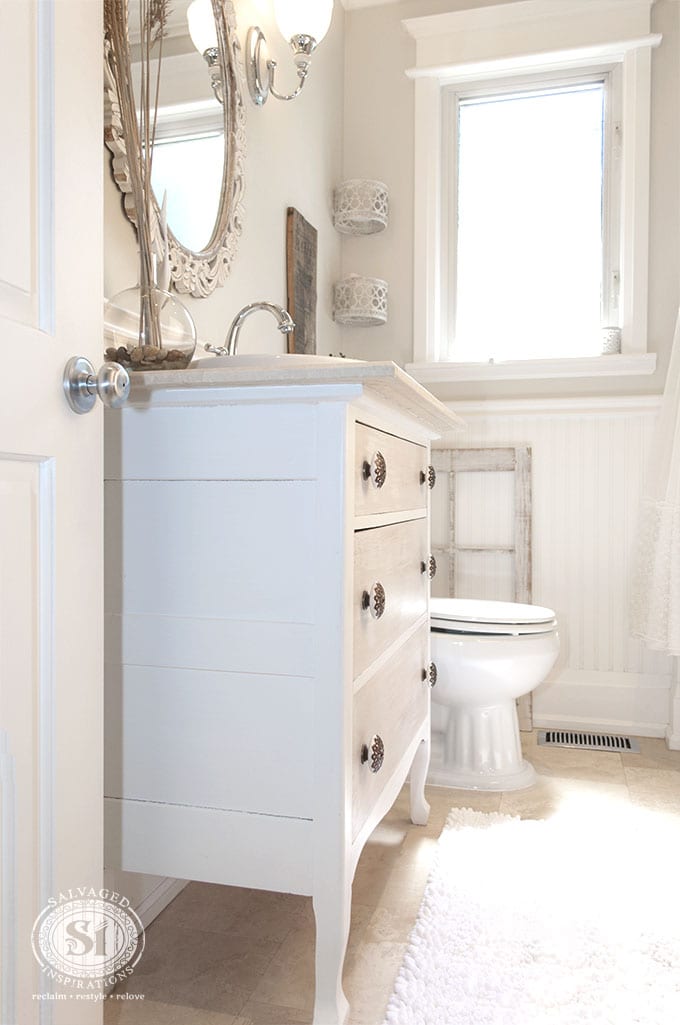
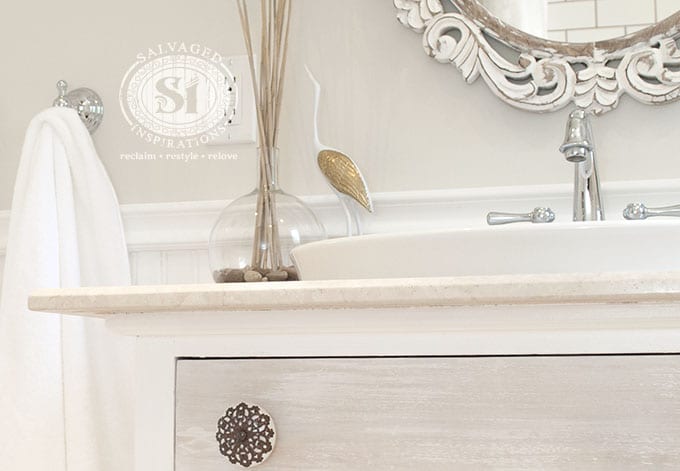
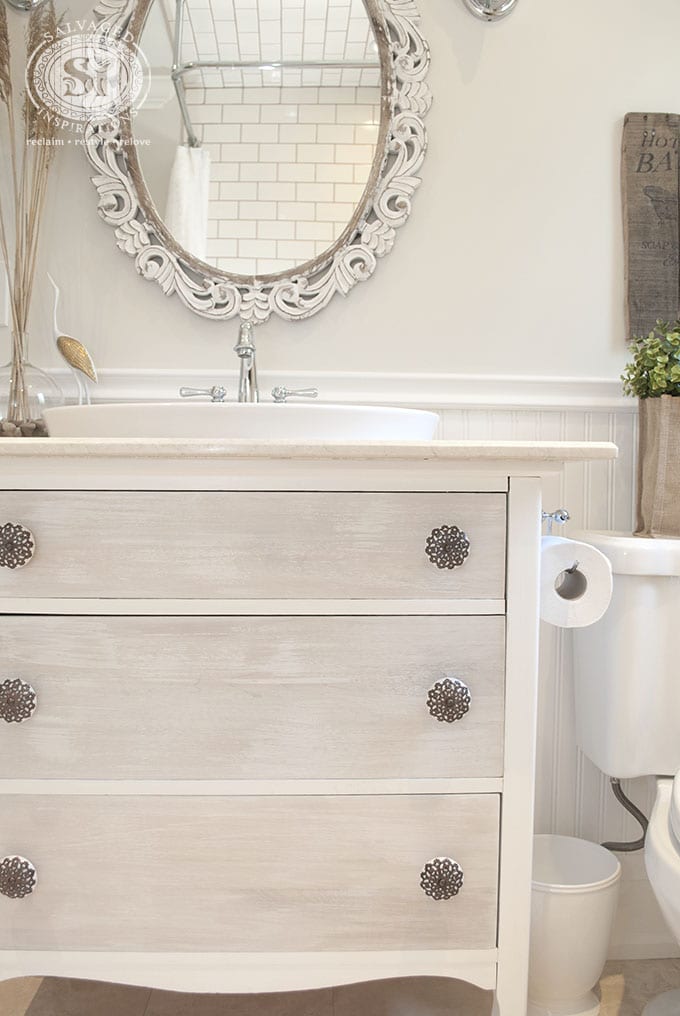
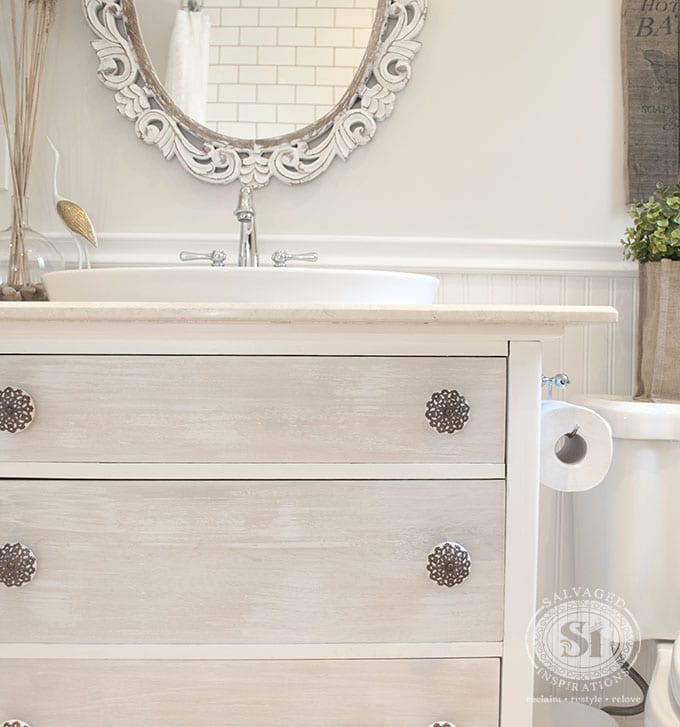
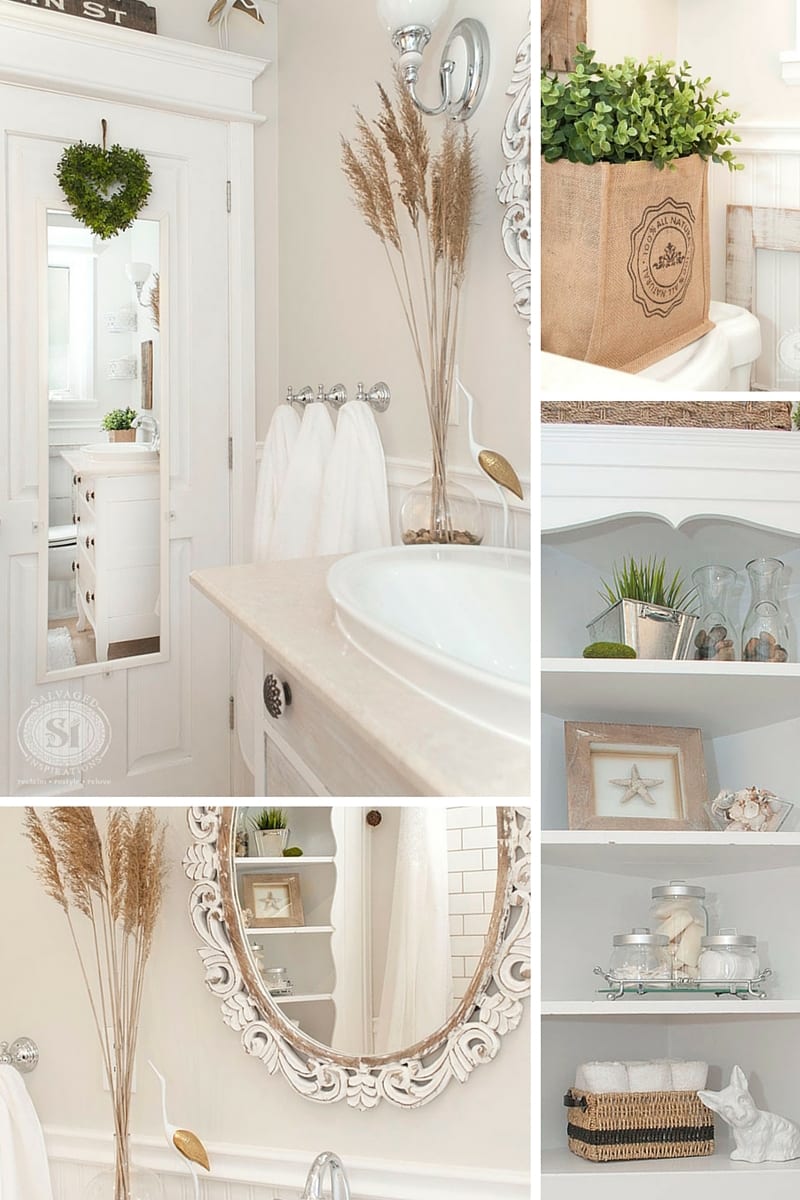
M-M-M gutted the bathroom and installed new marble floor, new bathtub/subway tile, bead board and crown molding. We also transformed a $40 Restore Dresser into a vanity/sink and turned a curb find into a built in corner unit. Since 2008, this bathroom hasn’t been touched – until now. My priorities fell elsewhere but I have to admit, it’s not a great feeling living in a home that doesn’t reflect your style. This is why I’m so happy with this update… it’s a baby step in the right direction. {big smile}
My Design Strategy
I’m not sure I have one… lol. A lot of bloggers put together these gorgeous vision boards. They reference where they’re going to buy and how they’re going to put it all together. I guess if I had to describe my design method – it’s to salvage, collect, and find things I love. I try not to worry about what-goes-where or be a slave to a particular decorating trend or style.
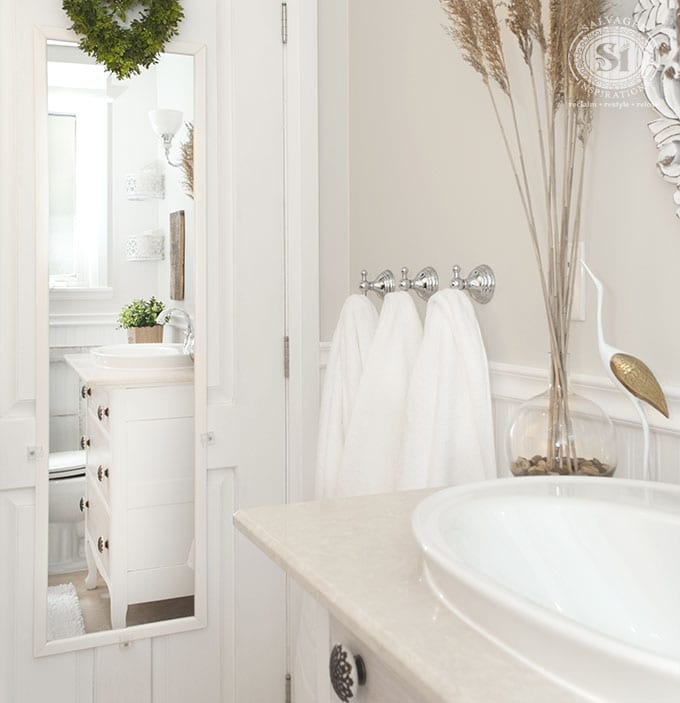
If you’re a regular reader of the SI Blog, you already know these cylinders are a perfect example. I bought them at a thrift store and didn’t know what they were or what they were going to be. All I knew was I like them and wanted to use them in my bathroom. With a little fishing wire, my sister and I repurposed them into decorative floating wall candles!

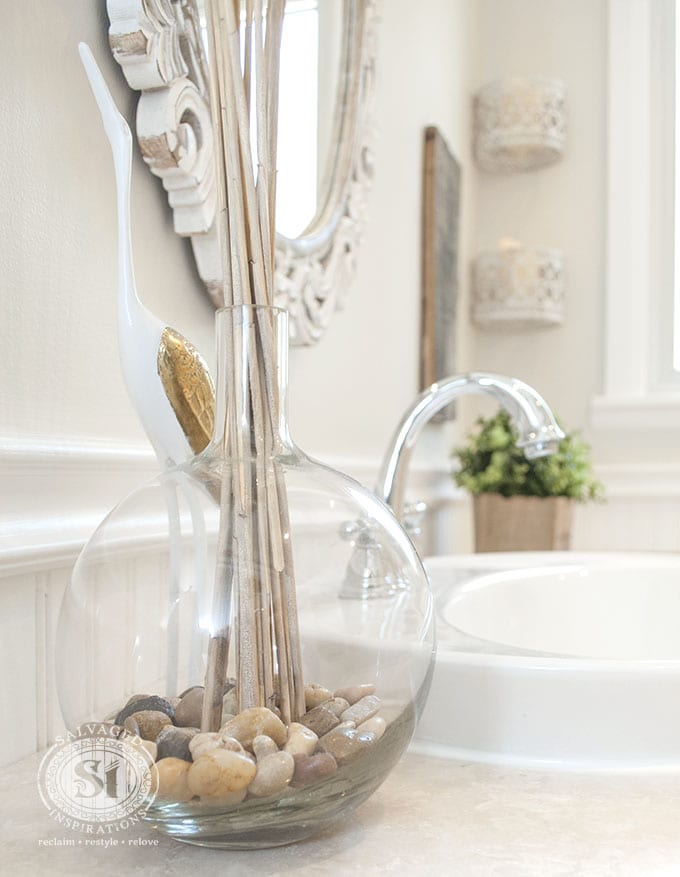
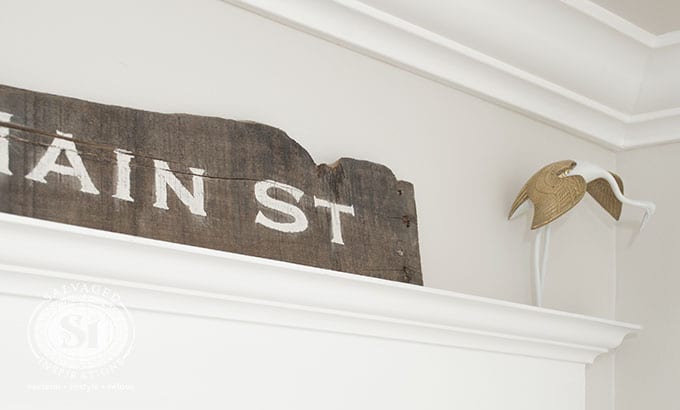
I also like to include things that have sentimental value. For this bathroom makeover, I’ve repainted 2 decorative crane birds that were my Mums. She bought these cranes back in the 90’s when she collected everything brass! In Asia, cranes symbolize eternal youth and happiness… which I know she would want for me. And how perfect to have them hanging out by the natural grass I collected roadside!
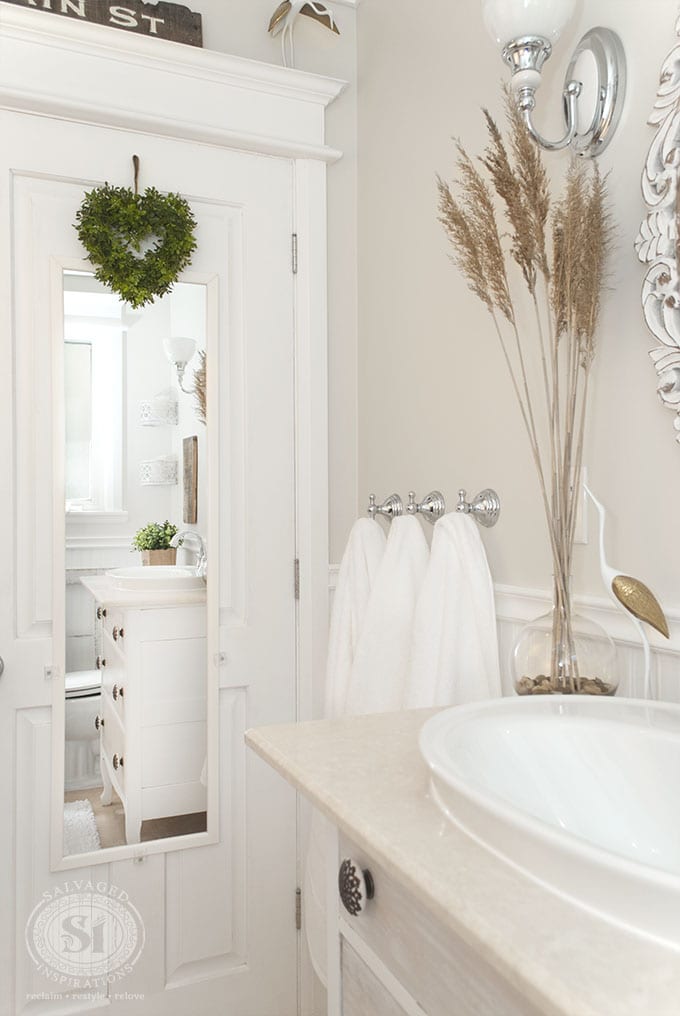

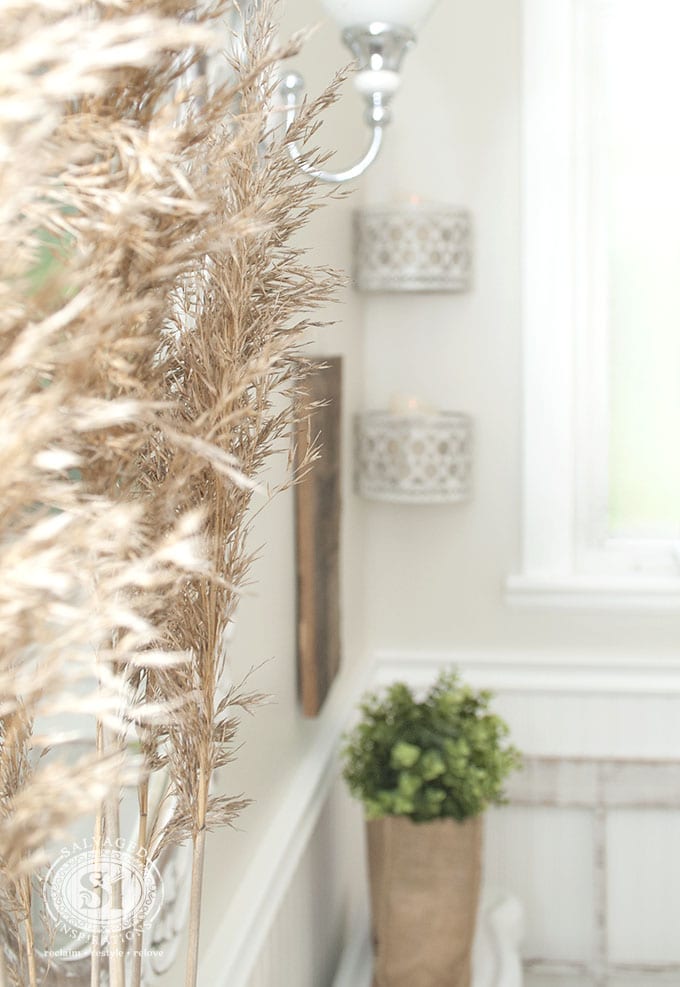
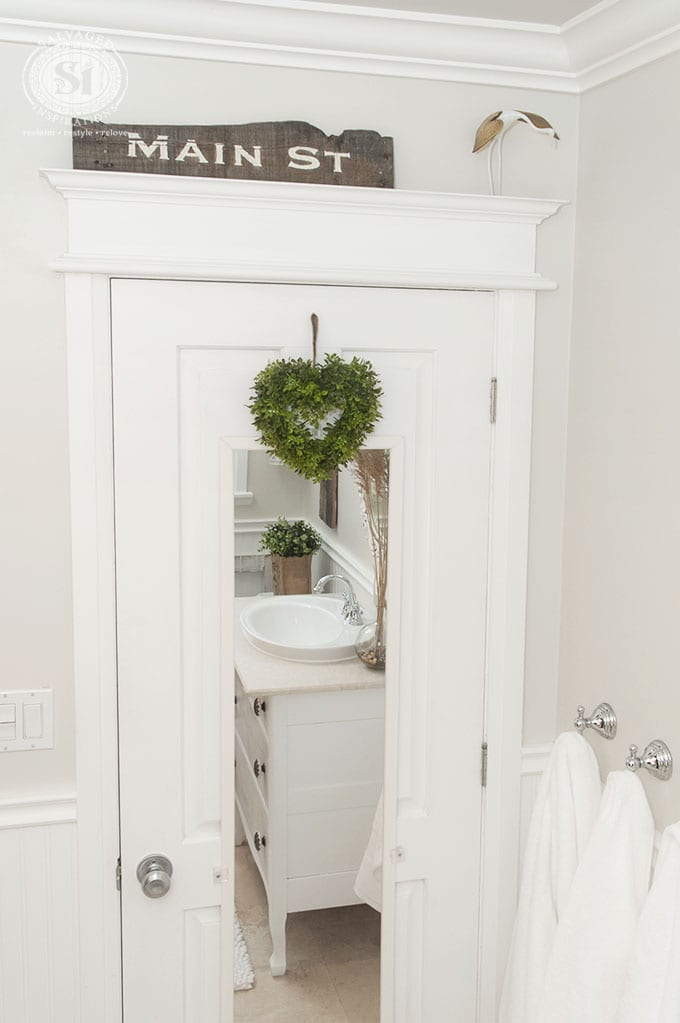
Salvaged pallet boards were used to create the two signs for my bathroom. I really like the warm rustic feel they add!


Still on My To-Do List
The bathroom is 90% complete, but there are still a few things on my to-do list. I’d like to make a bath caddy from pallet boards. And maybe sew some burlap or linen onto the top of these shower curtains to lengthen them so they reach the floor. What do you think?
For the salvaged built in corner cabinet, I may paint the back or add a stencil design to the front door? I’m open to suggestions!

Resource List
I’m posting this more for fun than to encourage shopping! I hope this list inspires you to re-purpose, re-use and re-love items you already may have. And maybe keep your eyes peeled for unique salvaged finds along the way. 🙂
- Dresser turned Vanity – Restore
- Wall Paint & Trim – Sherwin Williams
- Pallet Board Signs – Free/Salvaged
- Baskets, Glass Vases and Knick Knacks – Thrift Store
- Mirror – Reduced at HomeSense
- Floating Candles – Thrift Store
- Built in Corner Cabinet – Free/Salvaged
- Decorative Cranes – My Mums’ Decor
- Faux Greenery/Plants – Ikea
- Decorative Grass – Free/Roadside
- Rocks and Shells – Free/Beach
- Distressed Window Frame – Free/Salvaged
- Towels – HomeSense
- Knobs on Vanity – Hobby Lobby
- Burlap Bag – Free
I’d love to hear what you think! And if you have any suggestions for the shower curtains or corner cabinet, chime in!
Have an amazing day!
Denise x
Related Posts
The Perfect White DIY Floating Wall Candles Furniture Stripping Vanity Restyle
_____________________________
LIKE WHAT YOU SEE? SUBSCRIBE TO SALVAGED INSPIRATIONS SO YOU’LL NEVER MISS A POST!
FOLLOW ALONG ON PINTEREST, GOOGLE+, AND FACEBOOK FOR MORE INSPIRATION!

When I viewed your bath redo I immediately felt a sense of luxury! The towel hooks &white towels, the dresser, the gleaming chrome fixtures and sink, the door and trim make a beautiful impression. Yet it is not high-end thus losing a sense of comfort. To me you accomplished all I could ever want plus the cherished importance that the graceful cranes add. I really love the shower curtain it adds a feminine, elegant touch. Maybe the corner cabinet needs something on the door yet I really like it’s uncluttered simplicity! Truly a lovely & well-designed bathroom redo that I wouldn’t change!
Awww, thanks so much Cindy! It’s been a good few years since I did this redo and I am thinking it may need a little re-fresh, but over all, I’m still super happy with it as well! 🙂
I saw the before picture of your bathroom, and I thought “not so bad, kinda gloomy is all”. Then I saw the light and airy finished product and I said “Wow, Denise has done it again!” Love the way you did the cranes, but a few more pictures of them would be nice. My suggestion on the built in cabinet is to both paint the backs of the shelves and stencil the doors. I like the way you stencil things, I am going to be renovating my bathroom in the future and you gave me some really good ideas. Thank you much!
I’m so glad it’s sparked some ideas for you and I love your idea of stenciling the cabinet door! Thank you 🙂
Love the idea of adding the color to the bottom of the shower curtain,however, since the bathroom is on the small side, I would leave the cabinet as is because it will just clutter up the nice open space you have created. After seeing those, what I thought were shelves, hanging in the corner that you turned into candleholders, I had to read on to see what they were. In the meantime, I came across your lovely bathroom. No it’s not the designer look of today but it is gorgeous!
I forgot to ask about the burlap bag. Did you make that or buy it? I love the way you arranged that!
I don’t remember what I bought but the burlap bag was what it came in. I thought it was cute so I used it as a planter.
Thanks Shirley!
Denise, where did you find that gorgeous toilet? Never saw one with a fluted base like that one ~ please share 😉 thanks!
Hi Suzy! I know! I loved that toilet but it’s since been replaced with another Kohler. It lasted 8 years but then wasn’t flushing properly. I look high and low for the same one but couldn’t find it. 😐
It’s just beautiful. Love the clean white with the rustic accents. I’m planning a bathroom remodel myself. I can’t wait!
Thanks, Angela and have fun with your bathroom remodel! x
Hey Denise, very cool redo! I have a very small secondary bathroom which I redid about 18 months ago ~ tore out the old bathtub (I never take baths!) and put in one of those corner shower units which opened up a TON of room for movement and storage — and I used shiplap on two of the walls; this bathroom is now my fave room in my tiny little house lol! Regarding your redo I have a few questions: (1) you didn’t say what kind of rod you used for the shower curtain and I couldn’t tell enough from the photos; (2) what did you install over the doorframe so you could stand your little crane friend up there? and (3) what’s the function for the window frame that appears to be on the floor next to the toilet? Thanks, as always, for being so generous with your creativity and encouraging to all the DIYers out there (like me) who look forward to your weekly posts (you are the only one I subscribe to!) Blessings!
Hi Suzy! Thanks so much… what a HUGE compliment! 😀 1. I used an ‘L’ shaped shower rod similar to this one. 2. MMM installed a door header/moulding… I think the fancy work is an architrave. It’s a horizontal trim piece over the top of the door and my little crane friend loves it. 😉 3. No function what so ever…lol. Since this original post I’ve taken it away because it got on the way of the extra toilet paper roles I store there now. Blessings to you Suzy. Thanks for being part of my #sifamily.💕
Also love the casing ledge over the door, and your signs are fab. Have to try some of those as well.
Thanks so much Mary!
Stunning reno of a small bathroom, so chic & classy, Was the scrolled antique mirror over the vanity one of your finds? Did you antique it? It’s lovely and perfect for the bathroom. I’m a newbie and reading over your past tutorials and blogs. Have’n fun, love all the great comments, questions and suggestions.
Hi Mary and WELCOME! 🙂 The mirror over the vanity was a HomeSense find. It had a tiny crack in it so I got it on discount but it still looks phenomenal imo. 🙂
Great job on the bathroom, I love the faucet conversion to towel hooks and have searched your blog but cannot find how you accomplished the transformation Can you advise regarding how you manged to affix them to the wall? Great job on the remodel, its awesome!
Hi Mary! I love the idea of turning faucets into towel hooks (that’s an AMAZING salvaging idea) but these are just store bought towel hooks that match my Moen faucets. So they affixed to the wall with the given screws provided. I like your creative idea better tho…lol
This is my dream bathroom! I love everything in it!! You could have a piece of glass cut to fit the shape of the top and it would be waterproof and still show the dresser top. love all the details & beautiful DIYs. perfect bathroom.Thanks for the sharing this.
I live in a 50s house and have almost the exact same bathroom. We did a partial upgrade but are itching to redo it completely as we were able to create 2 extra feet for the width during our kitchen remodel. Your post was so inspiring!
Hi Valerie Lynn! This house was built in the 50’s too! Brilliant adding on the extra 2 feet and have fun with your redo..fun. 🙂
I just came across your blog and wondered about the stencil for your pallet sign. I couldn’t find any questions addressing this. This would be perfect for my new bathroom. I would love to try and make this…any other helpful hints regarding it?
Hi Dee…welcome! I did a tutorial on an Easy DIY Wood Sign and Free Printables if you’d like to take a peek. 🙂 Have fun with your new bathroom! https://salvagedinspirations.com/easy-diy-wood-signs-free-printables/
Hi Denise, I think the door of your built in would look great with a pattern of some kind that you could just paint over in the same colour. I used a stencil design I liked, pushed spac filler (that’s what we call it in Australia) – the stuff you use to fill up nail holes etc. through it and then when it dried, painted over it. Just adds a bit of texture to the finished piece. Love your blog. Regards, Sonja xx
I really like that idea! I have wracked my brain on what to do with the door or the backing of this piece but I’m still undecided! 🙂
you really did a beautiful job! I love how bright & fresh everything looks. you are amazing and very inspiring. thanks
This bathroom looks amazing. Very jealous right now. Great job!
Denise, Love your bathroom reno! I haven’t seen anything like the brass cranes before- beautiful! What size mirror did you use over the sink and what did you use for the flooring?
Thanks Andi! And those brass cranes are old-school. They must be at least 30yrs old. Oddly enough, I saw a similar pair in a Thrift Store not long ago! The mirror measures 32″ x 24″ and was purchased at HomeSense. The floor is an all natural/neutral granite tile. Because it’s porous, it does require sealing.
I’m new to your blog, and was reading your bath makeover. I love the cranes you painted that were your mothers. Great idea for an updated look. I was wondering what the towels were hanging on, they look like water faucet knobs. I did not see an explanation about what they were.
Love all your work. Gorgeous!!!
Hi there Maggie – welcome… and thanks for the kind words! The towels are hanging on Moen bathrobe/towel hooks in a chrome finish.
Denise, I’m inspired by your bathroom. You have accomplished a clean, fresh look. I have been living through a remodel for almost three years! Everything that could go wrong has. Now I wish I had done more of the work myself. I believe I would have been enjoying my own re-inspired bath much sooner!
Hi Pam! Sorry to hear about your remodel. Reno’s often take longer than we except don’t they. Hopefully when all said and done, you end up with the exact clean fresh look you dreamed of. Best x
This is a lovely remodel. Would you mind sharing the name of the color of Sherwin Williams paint you used on the wall?
Thanks Gwen! I used SW Natural Choice 7011… love it!
Beautiful. Thank you!!
Your bathroon reno is darling-light and airy and classic I love it. Did you paint the vanity yourself? If so I would so appreciate the paint names
.How about Oznaburg* fabric for your shower curtain? Its rather similar in look to burlap but much lighter and sewn onto white it’s a lovely farmhouse look.
*The name of fabric might be unfamiliar but you’ll recognize ot when you see it.
Thank you Diane! I ‘googled’ Oznaburg but I should know what Oznaburg fabric is because I use to buy it for my cross-stitch patterns. That’s a really good idea! 🙂
Just absolutely gorgeous! Light and bright and beautiful decor! Pinning for sure 🙂
Thanks for sharing/pinning Kristen… and for being a new contributor to the Painted Furniture – IDEAS & DIY Board! 🙂
It looks like a lovely marriage between beachy & French Country. And I like both. I’m drawn to neutrals anyway and you did a fantastic job putting it all together. Burlap on the top or bottom, either way, would be neat.
Thanks Christine… and because there is such a mix of decor styles, I really wasn’t sure what to label it! There’s definitely cottage beach and French Country! If I add the burlap, I think that will bring out more of the farmhouse style. What a mishmash eh…lol 🙂
It’s a gem Denise.
You have combined some very different elements, once again proving a love of something, makes the style. Not the other way around. A style does not need to prohibit creativity.
The clean open flow of the small space is brilliant.
Congratulations.
SK on Elderberry
Thanks so much SK…big compliment coming from such a creative! 🙂
Stunning. But I knew it would be 🙂
I popped a note about a shower curtain idea on Facebook because I could add a pic there.
Love this. Great job Hon !!
Thanks you Chez 🙂 … and love how you lengthened Mark’s shower curtain. Very professional and custom! I want to make a trip to FabricLand now! 🙂
Denise,
Love the transformation! The light, airy color scheme practically makes the room look twice as large! Leave the corner cabinet as is! It’s a small room and you already have so many interesting things to look at – leave it simple! Well done!
The light color scheme really does open it up! And thanks for chiming in on the corner cabinet Rosanne. I was thinking something subtle, but maybe it’s not needed. I can always play with the knick-knacks on the shelf to switch up the look.
Gorgeous! I love the mirror and vanity!
Thanks Tammy…the mirror was a ‘reduced’ find at HomeSense because there’s a tiny crack in it but it was the perfect fit for what I wanted so I nabbed it up. 🙂
I never write comments, but love reading them. I absolutely love your blog. It is always a pleasure to open up the emails and see a Salvaged Inspirations email. This bathroom though…wow. WHAT a transformation! It’s just beautiful. Not only is it beautiful, but to see how it changed, in every little detail, is just remarkable. So pretty. Congratulations on a gorgeous room transformation!! And thank you to all bloggers who share their amazing transformations!
Lisa, I’m SUPER happy you left a comment – you put a big smile on my face! I’ve been hesitant to share my home on the blog but I have to admit, you’re all making this really fun. Thanks again for chiming in! 🙂
Love it! Opens up and brightens the whole room
Thank you Marie 🙂
Your bathroom looks so lovely! I especially like how you incorporated both the old and the new items into your design. It looks fresh and clean, but still has a vintage charm.
Thanks Patricia – I always have to include the vintage for sure! 🙂
My husband & I are remodeling a 1960’s A-Frame with salvaged & new material. We are working on the bathroom now and it includes a cast iron 1950’s garden style tub that we bought at an architectural salvage store. Your beautiful bathroom re-do is great inspiration to help me complete our project. Love your style!
Thanks… and that sounds amazing Cherrie! I bet it’s going to look stunning!
Hi Denise: I also wanted to add a comment on the 2 cranes in your bathroom. I was amazed that you painted the cranes. I recall all the brass décor items my mother collected. Some of them were quite nice but very dated. What a great idea to paint the items and make them current. I personally will be painting a few in the near future. Any tips on the best way to paint brass?
haha…everyone collected brass it seems and I guess it’s made a comeback! The Kiltz spray primer is a great way to paint over brass and then just pick whatever spray paint color you like – and spray over. Super easy!
Hi Denise:
Love all the aspects of your renovated bathroom not to mention I love to have the corner cabinet/unit in my house.
Regarding your question about altering the length of your shower curtain – first off – its really hard to see your shower curtain in the pictures but it looks like it is sort-of shear in the middle with a sort-of lacey border on the top and bottom of the shower curtain. I would suggest you find a fabric that is of similar in weight to the fabric of your shower curtain, as well as, the fabric you add matches the theme of your bathroom. Personally, I would suggest you cut your shower curtain where the plain area of your shower curtain changes into the lacey border areas -(at both the top and bottom) of the curtain. Then I would add/insert a piece of fabric at both points where you cut the curtain (divide the amount your need to lengthen the shower curtain in half and add seam allowances to both pieces). Personally, the fabric I would select to use for the insert would match other features in your bathroom such as the paint colour or the grout colour. In addition, you might consider using the same fabric you use to add the length to your shower curtain in another area of your bathroom such as a curtain etc. to unified the shower curtain inserts.
Thanks Nancy and yes that’s exactly how the shower curtains look. The burlap may be to heavy so I probably will start searching fabric stores for something more suitable. I don’t know if I’m up to cutting up the panels though…lol. With my basic sewing skills – the easier it is – the safer! LOL I’d probably end up with some sort of Frankenstein looking curtain…lol.
I think this an amazing re-do. The grout is a perfect color and the painted vanity drawer color blends so well with it. Hoping you post how you did it!
I would love to purchase that same sink. Could you let me know the make and model and perhaps where you purchased it? It wasn’t on your list.
Looking forward to your next post!
Thanks Peggy…it’s a heck of a lot better than it was right…lol. The sink is a Kohler Drop In and I purchased it at Home Depot. I really like it because I didn’t want a sink flush with the marble top – but I didn’t want a bowl sitting high on top either. This one’s perfect for me! 🙂
WOW that is simple GORGEOUS. I love that you share you talent and information,I wish I had just a touch of your vision. Thank you so much for sharing, I’ll be referring back to this when I do my bathroom.
Love your site
Thanks so much Melody! 🙂
Nice job! I, too, love the salvaged boards!
Thanks and me too Christina! It’s funny how the ‘freebies’ can really add interest and character to a space.
Hi Denise, You’re bathroom revamp turned out beautifully! I agree with one of your other readers, don’t be embarrassed by the before pictures they only help to highlight what a transformation you and your MMM have achieved. I like your idea of adding a bit of burlap to lengthen your shower curtain to take them to the floor. I don’t think you need to do anything with the corner cabinet unless you really want to…maybe a subtle pop of colour? All the best 🙂
Thanks for saying this Annie! As Josie mentioned, I guess everything takes place in it’s own time right. 🙂 As for the shower curtains, I think adding some length is a really good idea too… I’m just not sure if I want to do burlap (which would really add to the farmhouse style) or maybe something a bit softer. I’ll experiment and if I come up with something I’ll be sure to share. Corner cabinet I’m really on the fence but I also agree – I’d like to keep it subtle.
Love, love, love!!! The pallet signs, the candles, the burlap, the mirror – everything! I’m intrigued by your idea of adding burlap on top of your curtain to give it some added length. I’m picturing white tabs with cool buttons to attach it to the rod?
Thanks for sharing your beautiful transformation – I LOVE seeing the before – you and MMM did seriously stunning work!!
thanks so much Laurie! And tabs! That would lengthen and keep it airy looking for sure! On pinterest, I also saw one bathroom design use a light chain and the other use twine as tabs/hooks. Sounds weird but it looked amazing!
Simply lovely!!! You did a fantastic job. Congrats! I am in the middle of re-doing a bathroom right now and this has inspired me to carry on as well as giving me some ideas to pursue.
Great pics and great job!!!!
Thanks Selena… and I’m so happy it’s sparked some ideas for your bathroom redo! Happy decorating!
You wouldn’t know it was the same space. Really refreshing country look. Great job!
It’s like night and day isn’t it Tracy! I give most of the credit to the amazing work M-M-M did! He did a beautiful job!
Denise,
Your bathroom is utterly gorgeous.
Bravo to you and triple M 🙂 Don’t be embarrassed about the “before”. Who knows…if you would have completed this earlier, it may not have turned out so lovely.
Thanks so much Josie! And triple M will appreciate the compliment too! 🙂 He did a phenomenal job all on his own…he didn’t call in any trades. I’m super lucky to have such a talented man. 🙂
GORGEOUS…as always Denise! You have such an eye for making things beautiful 🙂
Thanks Lynda! Huge compliment coming from you because I’ve seen how utterly gorgeous your home is decorated! Hope all is well and you’re enjoying the beautiful weather we’re having. 🙂
There is NOTHING that I don’t LOVE about this transformation. I knew you would make something special out of it, but this exceeds everything I could have imagined. It’s beautiful Denise and screams YOU! Classy, fresh, happy, inviting… I could go on and on…. GREAT JOB!!!!!
Carole
Carole gotta luv ya!!!….can I make a duplicate mini you and carry you around in my pocket everywhere I go? LOL I can’t take the original because Sally would have my head on a platter! 😉
LOL.. nah, she’d give me away to the nearest bidder sometimes, I’m sure 😉 HA!
Nope…not happening…LOL… you two are two-peas-in-a-pod just like Andrea and I are! 😉
I’d watch out with some pallet boards, because depending on where they’re from, they can be coated in some pretty toxic stuff. Especially in a place like a shower, I’d be careful. I’m sure if you thoroughly sanded it and sealed it, it’d be fine, though! =)
You did such an amazing job!! It all looks so beautiful. I especially like the signs, so cute! I was hoping we’d get to see a big picture of the candles soon, they really do look like they’re just floating. I think the room look perfect as it is, but I’m sure anything else you add to it will just keep astounding us! 😉
Thanks Zovesta… and I appreciate the pallet board tip! When creating/building with pallets, caution should be taken. I think you just gave me a brilliant idea for a future blog post my friend!:) The pallet I used was picked up from a local spice business so I’m not worried in this specific case. I’m really loving the rustic look they add!